1
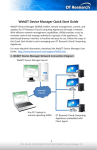
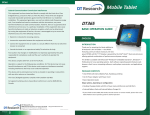
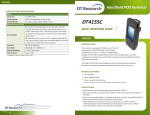
www.dtresearch.cn
www.webdtsignage.cn
User Manual
Ver. 6.2
6.1 Ver/ Updated: Jun, 2014
Table of Contents
Introduction
2
1. Playlist
4
2. Playlist Editor
7
3. Schedule
12
4. Media
16
5. Player
21
6. Settings
24
7. Preview Wizard
33
8. Urgent Cast
34
FAQ
35
01
Introduction
Introduction
Thank you for acquiring WebDT Content Manager 6 Pro (WCM 6 Pro), a server-based digital
signage management software tool. Bundled with rich functions in a graphical and user-friendly
interface with high extendibility and scalability, WCM 6 Pro helps simplify and streamline
content management to remotely manage digital signage hardware and publish digital content
to networked players.
Through an Internet/ Intranet connection, authorized users can access the WCM 6 Pro server
to manage media content, publish schedules and control system settings from a browser
at a remote site anytime and anywhere. The published schedule and content will then be
transmitted to players within the designated groups for playback over an Internet/ Intranet
connection.
02
WCM 6 Pro provides a more streamlined process with straightforward operations to quickly
create a playlist from uploaded media files and then publish to selected players.
Upload media files to the WCM server
Create a playlist with media files
Publish to selected players
Tips for best results with WCM 6 Pro:
1. We recommend monitor resolution larger than 1280 x 800, so the complete system interface
can be totally shown.
2. To access the WCM 6 Pro Server, launch a browser and key in your WCM server info:
http://(server IP address):(port number)/index.jsp
Then, you can login to operate with its default login information:
ID
Manager
Password
Organization
123456
My Site
NOTE: For security reason, you are suggested to change the login password. Click ,
and fill up each column to apply new password.
3. In WCM 6 Pro user interface, you can mouse over to view the tool tip of each icon.
NOTE: While using this software the Hot Key commands (e.g., Ctrl + R or Ctrl + F) will not work.
Besides, to click the forward on the browse may not move to the previous page correctly,
please click on the Navigation Buttons for Home, Forward, Backward and
Refresh.
03
1. Playlist
1. Playlist
In WCM 6 Pro, a playlist may contain one or multiple scenes. Each scene indicates a type of
layout with media files uploaded and arranged to each media zone. With multiple scenes added
to one playlist, users can schedule a playlist with different layout easily. In playlist page, users
can select a default playlist template as a base to replace media files then publish directly in few
steps. Or users can choose to new a playlist from scratch, and then add media files, then publish
in playlist page or arrange more detailed schedule in Schedule page later on. Create and publish the playlist in three steps
This section demonstrates how to quickly create and publish a playlist. This is for users not
requiring advanced functions who want to publish a playlist quickly using this 3-step process:
Step 1: Download & Edit Playlist →
Step 2: Insert Media Files →
Step 3: Publish
Step 1: Download and Edit a Playlist
Under the tab, click , Select Download Online Template to choose and download
the suitable playlist templates.
04
Step 2: Edit Zones and Media Files
Adjust playlist layout here
You can add multiple scenes with
different layouts here
Add/ Replace/ Edit/ Delete
media files for each zone here
Click each tab or click each
zone on the template to select
Double click the playlist template you downloaded or select one and then click to open and
launch the Playlist Editor. There are already zones and media files in the layout.
1.
You can add, delete, move and adjust the zones. Double click a zone to adjust the attributes.
2.
After adjusting the zones, click a Zone tab in the media list to edit the media files in the zone.
3.
The media files shown in the Zone are just samples. You can add or replace them.
05
1. Playlist
Step 3: Publish the Playlist
After editing the playlist, users can easily schedule the playback time and publish to the targeted
players or groups. 1.
Click to publish the playlist.
2.
Select the group in Add Groups column you want to publish to. You can select multiple
groups at once.
3.
Adjust the Date Range for the start date and end date.
4.
Adjust the Play Range to set up the start time and end time. (or click button to set 24 hrs as play time range. )
5.
Click Publish to publish this playlist.
NOTE:
If you are logging into an account without Publish/Approve privilege, click "Request" to send
your publish request and wait for manager's approval.
06
2. Playlist Editor
Playlist Editor is a key tool in WCM 6 Pro for you to add/edit and publish a playlist with single or
multiple scenes. In this chapter, you will learn how to complete a digital signage presentation by using the Playlist Editor functions – defining a layout resolution, creating normal and ticker
zones, and inserting media files to the zones.
Create Playlists with the Playlist Editor
Select the Playlist tag and click to new a playlist and the Playlist Editor will launch with a basic
layout as shown below. You need to adjust the layout attributes to fit your signage screen.
Defining Layout Attributes and Creating Zones
To begin, you will need to define the layout to match the resolution and orientation of your
signage screen.
1.
Click
, a dialogue window opens to adjust the value of the screen.
2.
If setting up multiple screens, adjust the quantities of the Horizontal Screens and Vertical
Screens to fit your real screen array. For the multi-screen application setting, please refer to
Multi Screen Application section.
07
2. Playlist Editor
While clicking button, there is already a default zone in the layout. You can select the zone
corner and drag it to a desired proportion; click the zone and drag/ drop it to the preferred
position.
1.
Double click the zone, a dialogue window pops up for you to set up the zone privilege and
other default settings. You can manually set up the zone location and size by entering the
preferred values.
2.
Click ICON and ICON, ICON to add normal zones and ticker text zones. Click ICON to delete
the zone. If you set up more than one screen, you can clone the zones to other screens by
clicking ICON. ICON is to adjust the up and down zone order.
Insert Media Files into a Zone
For showing the content, you need to insert media files to each zone. The media files inserted
can have different durations and file formats.
1. If there is more than one zone in your layout, click the target zone first. Then, click the
ICON, a dialogue windows opens to view and select the media files. You can select the
media files already located in the WCM server or upload new media files from local drives.
The thumbnails are available to verify each file.
2. Click the media file or select multiple files, and then click OK button in the dialogue
window to insert into the zone. Repeat the action to
Playback duration
add more media, and then you can adjust the media
file order by drag and drop.
3. To change the playback duration, transition effect type, and duration of a media file, adjust the attributes on
each media thumbnail.
4. To replace the file, click ICON and select a new file.
08
Transition
effect
Transition
effect
duration
Creating Tickers
In WCM 6 Pro, the ticker function provides the ability to display a scrolling or static line of text
or online RSS feeds to remote players. There can be multiple ticker zones co-existing on a layout
and each ticker zone may contain multiple tickers.
1.
Click ICON, ICON to add a ticker zone, you can choose to add horizontal or vertical ticker.
2.
One ticker can be either a text message or from a RSS feed. Click Text, a drop down menu
appears for you to choose. For text content, you can directly key in the messages in the
Content column; to show RSS content, input the RSS feed URL address. Click Enter or the
Add Ticker icon to add a new ticker item. Double click each ticker item to edit.
3.
You can select the ticker zone and drag it into the desired shape; click on the zone and
drag/ drop it to the preferred position.
When a layout design is completed, click , to save all the changes. To add a new scene, click icon to add to the playlist and repeat the actions to create different scene for a playlist.
NOTE:
If you need one ticker shown on multiple scenes in a playlist, please refer Chapter 3 for the
Global Ticker operation.
09
2. Playlist Editor
Multi-Screen Application
If you are using DT Research’s Multi Screen Appliance connected with a signage screen array,
this section will help you create a layout for multiple screens.
Change proportion to zoom in
each screen
Duplicate zones in one
screen to other screens
1. Click
, in the playlist setting
dialog to import the multi-screen layout
directly from the Multi Screen Appliance
registered to your WCM server. Click to select a MS Appliance and its screen
layout.
2. You may also manually adjust screen attributes and the quantities of the Horizontal
Screens and Vertical Screens to fit your real
screen array. For example, if your signage
array is 1 x 4 vertical screens, select Vertical
for the screen mode, and input 4 for the
Horizontal Screens and 1 for the Vertical
Screens.
3. Repeat the actions of Creating Zones,
Inserting Media Files, Adding Tickers, then save the playlist.
The actions above are about the content layout design. For the screen layout design and screen
detection, please refer the Multiple Screen Layout Designer Quick Start Guide. The document
and application can be downloaded from http://www.signage.dtri.com/support/download.
html
10
Publishing a Playlist
A Playlist should contain at least one scene.
1.
Once a Playlist is completed and saved, Click
2.
Select the group in Add Groups column to publish to. You can select multiple groups to
publish the playlist
3.
The Playlist type drop down menu is to choose from Publish Schedule, Publish Spot List or
publish the playlist as a Default Playlist.
4.
Adjust the Date Range for the start date and end date, and adjust Play Range to set up the
start time and end time.
5.
Click Publish to publish this playlist.
NOTE: to publish the playlist.
If the account being used doesn't have the privilege to publish schedule to groups, click "Request" button instead.
11
3. Schedule
3. Schedule
The Schedule function has an Outlook-style interface to review, manage the scheduled playlists,
add new playlists, and request/approve publishing playlists.
Select a Player Group
To set up start and end hours, whole
week or work days, to display the
playlists default duration
Set or clear default playlist
Request or approve to publish playlists. User
can request to publish playlists; Manager
can approve or reject the request
The time table shows the scheduled playlists,
or for you to insert new playlists. You can
switch it to Day, Month, Agenda or Spot List
view (Default : Week view)
Scroll to see and select among 12 months
Add and Adjust Playlists
To add a playlist, click on a start time and drag to its end time, a dialogue window will pop up for
selecting a playlist. You can adjust the start/end time and duration on the right panel.
12
After adding a playlist, click to publish as a scheduled playlist or a Spot List.
NOTE: A Spot List has the highest display priority; it overlaps the scheduled playlists at the same time slot.
NOTE: Global Ticker is the ticker zone with scrolling texts or RSS feed content which can be applied on
multiple scenes in a playlist. If you are going to add that ticker zone, select Enable, and then add
texts/RSS feed as well as adjust its attribute .
13
3. Schedule
Publishing Schedule Status
After publishing playlists, the schedule with different colors indicating current status:
Status
New
Request
Published
Expired/ Reject
Editable
Color
Blue
Yellow
Green
Red
Brown
On the left calendar, a date with dot indicates a spotlist within.
14
Manage a Playlist on the Time Table
On the time table, you can easily perform many functions to manage playlists:
• Drag and Drop a Playlist:
You can modify the date and duration by drag and drop.
• Edit a Playlist:
Click a playlist, a side tool bar opens to edit, cut, copy, paste and delete.
Click the , a window opens for editing play range and recurrence.
• Copy and Paste a Playlist:
When you copy a playlist, you can select another
blank time slot to paste into the playlist. The
attributes of the playlist won’t be changed.
• Click the Playlist Name:
Click the Playlist Name: Go to the interface under the Playlist tab
with the scheduled playlist selected.
• Click the Date:
While viewing the schedule with Week or Month view, click the
Date hyperlink and to switch to the Date view.
• Click the Blank Area Beside the Date:
Cut, copy, paste, or delete the whole day schedule.
Agenda View
The Agenda View is a daily-based interface showing the
scheduled playlists, the empty time slots for inserting
playlists. To insert playlist with agenda view, click Agenda
tag and all of the scheduled playlists on the day will be
connected together and the icon shows if there
is an empty timeslot. Click or to insert a playlist in
that time slot.
15
4. Media
4. Media
In the Media tab, you can manage media files with the thumbnail view, Import or Export media
files from a local drive or remote sites, or New Special Media - Real-time video, TV Tuner Media,
Executable Application (EXE file format) and Remote. Copy
Paste
Cut
Delete folder/media file
Home
Back
Forward
Refresh
New Media
Add Special Media
Export Media
This Media Attribute Panel allows you to
replace file, change media duration, privilege
settings...etc. These attributions are different
for each type of media
New Folder
Media Upload Status
While importing media files to the server, the status will be shown on the top menu. The
number indicates the remaining files to be uploaded. Click the to view the upload progress
of each media files. You can still put the media in a playlist before its full uploading.
NOTE: If you import image files to media library, the default duration will be 15 seconds.
16
Adding Special Media Files
In addition to the general multimedia file formats mentioned in the previous section, the WCM
6.1 also supports special media types including Real Time Video (a real-time data feed), TV Tuner
signal, Executable Application (.exe) and Remote (media URL) .
1.
Click
, a dropdown menu will open to select the media type to add.
2.
After adding a special media file, a thumbnail is displayed and the media attributes will be
shown in the right panel.
To Add a TV Tuner Signal
The TV Tuner/Real Time Video media supports both TV tuner and real time video signals.
TV Tuner:
From the Video Port drop down menu, select the TV Digital or TV Analog input. When selecting
TV Digital or TV Analog, you may select the Format, Signal Type and adjust the Volume.
NOTE:
The TV Tuner support is not applicable for all regions/ brands/ models. Please contact your DT
Research Tech Support team or your local resellers to confirm the availability.
Real Time:
1. Input source from a hardware device with video connector: To create a new real time video
from a connector, select the video connector from the Video Port drop-down menu and
then select the source type.
2.
Input source from a Remote URL: If the media file is located on a remote server, select
Stream and then enter the complete URL address beginning with http://, https://, mms://
(Microsoft Media Streaming is supported), or rtsp://.
NOTE:
If the media file added is streaming video, the supported URL address must begin with
mms:// or rtsp://.
17
4. Media
Widget Editor
The WebDT Widget Editor is a utility designed to help users edit the widget files. Under the
Media tab, click and select Download Online Widgets to import the suitable widget files.
Double click a downloaded widget file, the Widget Editor will be launched.
Flash Widget Files
1. Clock Widget
Double click the Clock Widget thumbnail to launch the Editor with the clock module. On the
right panel, users can modify the clock size, style and the clock name texts.
18
2. Date and Clock Widget
After opening the Number Date Clock Widget, users can change the style, calendar language
and text font, size and transparency.
3. Weather Widget
While editing the weather widget, the right panel can be used to adjust the attributes of widget
size, weather information, font and size, etc. Drag-and-drop can also be used to move the text
position. Click and enter the city name, the Widget will switch to the targeted city, and
show its weather information.
NOTE:
The signage players should be connected to the Internet for retrieving the latest weather data.
19
4. Media
4. Combo Widget
Double click the Combo Widget thumbnail and then the editor will present a plan canvas for
users to add on the objects. Users can use the drag-and-drop feature to adjust the object size
and move the objects on the canvas.
Add texts
Add widgets
Users can change the text style,
font, size and transparency
User can add widgets on the
canvas. After adding the widget
on the canvas, user can only
adjust its size and position.
Add media files
It is allowed to add images and
videos on the combo widget
canvas
Remove
objects on the canvas
There are several buttons on the tool bar for adding and removing the media files; use the right
panel to adjust the attributes of each object.
20
5. Player
A signage player is in charge of receiving and playing those playlists published via the Internet/
Intranet. Before performing as a media player in the signage network, please refer to the
Signage Appliance Basic Operation Guide or OEM Player Quick Start Guide to register to your
WCM 6 Pro server.
Folders, Groups and Players Management
Whenever a signage player is registered to the WCM 6 Pro server, the player will be shown
under the Player page. You can create folders
and Player Groups
to categorize the
players registered to the server. To move Players and Player Groups among different folders or
move players to other Groups, please use cut and paste function .
New Group
New Folder
Cut
WOL
Power Off
Paste
Restart
Delete
Power Management
Preload
Preload –
Click
, a dialogue window opens to select media files to preload to a desired player. You
can preload files to players before publishing playlists; this saves time and bandwidth when
transmitting the playlists.
Power Management –
Select a group or multiple groups to set Startup and Shut Down time for players in the groups.
Please note that if the settings are made when players are abnormal, the Startup action won’t
be executed because the abnormal players never receive the commands when they are idle/
running.
Restart –
Restart all Edge Servers and Players assigned in the folder or group.
21
5. Player
Power Off –
Shutdown all Players assigned in the folder or group.
WOL –
Remotely turn on all Players assigned in the folder or group.
NOTE:
1.
When a player is registered to your WCM 6 Pro server without any specific group, it will be
assigned to the Not Assigned group. You can move the player to a desired group manually.
2.
The number icon appears on top right corner of each group/folder indicating the number of
active players and total players.
3.
When you select a player/ group/ folder, the corresponding attributes will display at right side.
Player
When you select a player, an icon appears on the thumbnail screens indicating the player status:
Running , Idle , Power off , or Abnormal . You can check or modify the player
attributes on the right panel. Click each item, like HW/SW info, Publish Status, Preload Status
and Wallpaper/Default Playlist, on the bottom-right panel to see more player details.
Refresh Snapshot –
To control the snapshots from the players and refresh the snapshot images on the WCM browser side.
LCD Settings –
This function is only applicable for specific LCD screens. Select your LCD brand/model from the
supported list when registering the player and make sure your player and screen have been
connected with RS232; you can manage the LCD screen power on/off, contrast, brightness,
IrDA touch…etc. from the dialog. If your LCD screens are not supported, you will not be able to
manage your screens remotely. Please contact your local reseller or DT Research tech support
team if necessary.
22
Additional control functions on the player attribute tool bar:
Restart
Click to restart the player from remote site by software restart. This function will only work when the player is in idle/running status.
Power Off
Click to power off the player from remote site by software power off function.
Wake On LAN
Click to send Wake On LAN command to the player.
LCD Status
Click to see the LCD (Monitor) status if the related parameters of the LCD
monitor are supported and specified. If you are not sure if this function is
supported, contact your local reseller or DT Research tech support team.
Refresh
Click to refresh the player status
Group
When you select a Group, the group attributes will be displayed on the right panel. You can
define the Default Playlist and Wallpaper for the whole group here.
NOTE:
1.
Turn off Screen - This function is used to control the on/off settings for the display screens.
Select Never if the screens should not be turned off anytime. Select other options from the
drop down menu to turn off the screen after a certain period to extend monitor usage life.
2.
Send LCD Status Alert to – Input an email address here so if any abnormal status of the LCDs
(Monitors) in the group, the system will send email alert to the specified email address.
3.
Each player can be assigned to one group only. Each folder can contain multiple groups. You
can also set multiple layers of folders for management. The schedule of players in the same group will be the same. If you want to set different
schedules to multiple players, you will have to put them in different groups.
23
6. Settings
6. Settings
The System Setting section allows the account with related privileges to perform system controls
for account/role/site management, settings, and system upgrades. Click , the settings page
will be shown. You can also click the on settings tab to quit the page.
Account Management
Within Account Management, user with the Account and Role Management privilege is able
to create additional accounts. The user can view and modify the existing user accounts and
information stored within the account information. You can also select a Preview Player in order
to preview the content of media files, ticker, playlist and urgent cast before the schedule is
published.
While creating an account, under the Privilege Setting tab, there are already privileges inherited
from the Role, but you may assign new privileges to that account.
24
NOTE:
When you install WCM 6 Pro for the first time, a Manager and an Administrator account will
be created by default. Use the Manager account to login to set up new accounts or use the
Administrator account to login to modify/view site information.
WCM 6 Pro Default Accounts:
Administrator:
Manager:
Manager
Administrator
123456
Admin
My Site
administration
To create a new user account, click and the Account Information screen displays as below:
To add the account to one or
several roles
To show the privilege settings for
the account in a dialog, it is readonly
Enter the email address
designated to receive notifications
and warning alerts
Select the desired language for
SMS and email messages to the
mobile phone (Default: English)
Select single or multiple players to
preview
Enable or disable Email/SMS
alerting
To receive SMS notification
messages
Note: This feature is only available for U.S.
mobile phone users
25
6. Settings
Role Management
In WCM 6 Pro, a role means an account group, an account must be a member of a role, every
role has its own privilege settings, and the account will inherit the privilege settings from its role.
You can create many roles, and manage the privileges for each role in Privilege tab. The account
can be a member of more than one role, if so, the account’s privilege is the combination of all
the groups he/she is a member of.
Within Role Management, there are two tabs:
To manage general privilege of the role
To edit/ view accounts belonging to
this role
By default, there are three built-in roles – the Site Manager, Designer and Publish Manager;
each role with exclusive privileges. To manage the roles, an account with Account and Role
Management privilege can create/ delete roles, change the general privilege settings, and
manage accounts in roles.
NOTE:
Except for the Site Manager role, other ones can be deleted and edited. Change Role privilege
may influence the Accounts under the Role.
Privileges for Roles and Accounts
For default privileges of each role, please see the reference table below.
Site Manager
Designer
Publish Manager
Edge Server Management
Yes
No
Yes
Change System Settings
Yes
No
No
Account and Role Management
Yes
No
No
26
Accounts under the Roles have the default Content privileges in Media/ Ticker/ Playlist/
Template/ Data Source /Software Upgrades/ Urgent Cast, for each folder and file:
Site Manager Account
Designer Account
Publish Manager Account
Media
Full Control/ Modify/Read
Modify/Read
Full Control/ Modify/Read
Ticker
Full Control/ Modify/Read
Modify/Read
Full Control/ Modify/Read
Playlist
Full Control/ Modify/Read
Modify/Read
Full Control/ Modify/Read
Template
Full Control/ Modify/Read
Modify/Read
Full Control/ Modify/Read
Data Source
Full Control/ Modify/Read
Modify/Read
Full Control/ Modify/Read
Software Upgrades
Full Control/ Modify/Read
Read
Read
Urgent Cast
Full Control/ Modify/Read
Read
Full Control/ Modify/Read
Full Control: Perform all functions with the file/ folder and change the privilege settings with full control.
Modify: Create new file/folder under the folder, edit/delete the file.
Read: See the file/folder in Content Manager.
Accounts under the Roles have the default Group privileges in Player/Group, have the
privileges on the groups and group folders:
Site Manager Account Designer Account Publish Manager Account
Full Control
Yes
Manage Group
No
No
Yes
No
Yes
Read
Yes
Yes
Yes
Publish Schedule/Spot List
Yes
No
Yes
Edit Schedule/Spot List
Yes
Yes
Yes
Publish Urgent Cast
Yes
No
Yes
Preload Media
Yes
No
Yes
Software Upgrades
Yes
No
Yes
Full Control: Do all the actions within the player group.
Manage Group: Add/ remove players, create/remove groups in the child level, modify
the group/ folder’s information, and assign players (need both source and
target group’s privileges), set power management, etc.
Read: See this group in Content Manager.
Publish Schedule/Spot List: Publish or preview Schedule/Spot List to current player group.
Edit Schedule/Spot List: Edit schedule/Spot List for current player group.
Publish Urgent Cast: Publish or preview Urgent Cast to current player group.
Preload Media: Preload media to the players in current player group.
Software Upgrades: Update software for the players in current player group.
27
6. Settings
Settings
Within Settings menu, an account with System Setting privilege is able to edit the system settings
as below. Also this account can set up information pertaining to SMTP server, Player Access
Password, default playlist, wallpaper, and so on. The Settings window shown below:
Select and set the default playlist
for the whole site
Select the on-screen display
frequency of the Player Progress
Bar: Never, When Idle or Always.
If downloading restrictions are
required, check the box and enter
the time within a 24 hour period
when downloading is permissible
Define the SMTP email settings
and email address of the Manager
to allow for automatic email
notifications within the system
The number of PC Clients
registered to the WCM 6 Pro
server/ active (This field should
only be active if you have
purchased the WebDT SimulCAST
module)
NOTE:
The default playlist is the playlist shown on the screen while there is no scheduled playlist
displayed. Group default playlists have priority over site default playlists.
Report
Within the Report menu, you can generate raw/ summarized data of playback result for selected
media file and group within a specific time range. You can either generate a list of playback
information directly or download a .csv file for advanced data analysis or billing.
28
Software Upgrades
Software Upgrades menu allows you to update patches to edge servers or players remotely.
Patch update can be applied to one or multiple players (edge servers) simultaneously. The
built-in Player Patches and Edge Server patches folders cannot be deleted in the tree view.
Upload a New Patch:
You can upload a new patch (in ZIP format) by clicking New Patch to an assigned folder. Then,
you can see the Information for the patch displayed as below:
Check Compatible OS version for WCM Patch file:
You can check the OS compatible models by clicking See Detail button.
29
6. Settings
View Dispatch Status for Players or Edge Servers :
Select from the drop-down menu on right side to specify a dispatch status to players in the list.
Then, the searched status will show as below marked in red:
NOTE:
You can select from the following: Show All, Show Not Issued, Show Downloading, Show
Partially Downloaded, Show Downloaded, Show Installed, Show Canceling, Show Cancelled or
Show Failed.
Log Collection
Within Log Collection, the user can collect both server, edge server and player logs within a
certain time ranged defined here. If there is no player or edge server specified, only server logs
will be collected.
Trace Players/Edge Servers: Add players and Edge Servers to collect log information.
Date Range: select a date range to collect log information on Content Server and Publish Server.
NOTE:
1. If you installed multiple Content Servers and Publish Servers, log data on all servers will be
collected.
2. You should add at least one condition between Trace Players/Edge Servers and Date scope
of server log. Otherwise, you cannot click Collect
Now button to start collecting.
23
30
Login by Administrator
If you login by the Administrator account, you are allowed to establish the Site Management and
License Control.
Site Management
Through the Site Management function, Administrators can create, delete, search and manage a
site. click to create a new site.
Specify the name of your
organization. It is required for
player registration and user login.
Data of different organizations is
not shared.
To select WebDT Content Manager
Account System or Windows
Active Directory Account System
(see the Active Directory section).
The Manager user can login to the
WebDT Content Manager with
this ID to manage system settings
and accounts.
Enter the email address
designated to receive notifications
and warning alerts
NOTE:
If a site is deleted, all the content files under the site will be deleted and cannot be recovered!
31
6. Settings
Active Directory:
WCM 6 Pro can be used with Windows Active Directory. This function is for the company using
Active Directory to manage their employee accounts. Click the drop menu of Account System
Type, select the Windows Active Directory Account System option.
Assign the Active Directory domain name so
Content Manager can find it for access.
The port of the Active Directory
domain.
The Domain Account should be an account with permission
to access the information in Active Directory, allowing
Content Manager to access necessary data.
Click the Browse button to select
a group from Active Directory.
License Control
In the License control panel, you can review the player registration status. Click ,
it is allowed to upgrade old version player or add new version player.
The DT Research Signage Appliance with player software version lower than V4.1 needs an
upgrade key to activate while registered into WCM 6 Pro server. Key in your upgrade license in
the column and click Install License, the appliances license will be upgraded.
NOTE:
DT Research Signage Appliances with player software lower than V4.1 cannot download and
play content while registered into WCM 6 Pro servers.
32
7. Preview Wizard
The Preview Wizard is a quick tool for you to preview the playlists before publishing to a real
player group. Click the , a dialogue window open with two options – Preview on current PC
and Preview on selected player or PC simulator.
Preview on current PC:
While there is Preview Player software installed in your PC, choose Preview on Current PC to
play the playlist.
NOTE:
The WebDT Preview Player is designed for content only without any schedule function. It can
be installed on your PC/ laptop to preview your media, playlist or urgent cast content on any
computer.
If you have ever installed a Preview Player, your Preview Player will be launched automatically
to play the preview content. If you have not installed any Preview Player on current PC yet, a
dialog will be displayed to show you the download link. Download the preview player and follow the steps to complete installation so you can preview content on current PC immediately
(the Preview Player installation package is around 140MB).
Preview on selected player or PC simulator:
If there is/are a player(s) registered to the WCM 6 Pro server, you may assign them as a preview
player(s). You may add new preview players by clicking
to add the player(s) or to select as
preview player for this time. Click to remove players from the list.
NOTE:
Please be aware that the preview result is for your reference for content layout display. The
actual performance on your signage player will be different due to different display resolution
and hardware specs.
33
8. Urgent Cast
8. Urgent Cast
The Urgent Cast allows immediate broadcast of important content or messages to the players
and takes precedence over all normally published playlist schedules. The Urgent Cast message
can be a widget, a media file or a playlist.
New Urgent Cast by Widget
An Urgent Cast message can be created by clicking to launch the Urgent Cast Widget Editor.
An Urgent Cast widget thumbnail will come with a on top left corner. Double click to enter
the Widget Editor and modify the content if necessary.
Import an Urgent Cast from Playlist or Media Files
You may click and select to import a playlist or a media file as an Urgent Cast. An imported
playlist will display scene number on top right corner.
Urgent Cast Settings:
Click to launch the Urgent Cast Settings dialog, so you can rename the file, adjust its
duration, set the privilege, and lock the screen while playing the content
Preload Groups/Players:
You can also preload a media file to players or groups. Select an Urgent Cast and then click to assign preloaded players or groups to the urgent cast, so you will not need to download it to
players when an emergency happens.
Preset Urgent Cast for Immediate Publishing
For quickly publishing a group of urgent messages to multiple players, there are three preset
buttons for you to assign in advance. Select a Preset button and click , a
Preset dialog opens for adding the Urgent Cast files, setting the duration and enable/disable (on/
off) this preset button. With this Preset button, you can click ONE button and multiple urgent
cast messages will be published to different player groups if an emergency happens.
NOTE:
Before adding an Urgent Cast file to the Preset Button, make sure there are preloaded players or
groups assigned to the urgent cast file already. Otherwise, the Publish action will fail.
34
FAQ
Q
What are the differences between Scene and Playlist?
A One Playlist may contain multiple scenes and each scene may have its specific layout and
zone arrangement. In one Playlist, each scene should be with the same resolution but the
zone arrangement, media content and duration of the scene can be different.
Q What are the supported media files for WCM 6 Pro?
A Please refer the supported video/audio files on the WCM 6 Pro Support Media Guide
document online:
http://www.signage.dtri.com/download/wcm6/Supported_Video_Audio_Codec_Guideline.pdf
Q How should I adjust the settings in advance to ensure the PPT file will be played
correctly ?
A To play your PowerPoint file properly by WCM 6 Pro, please follow the steps below:
1. Open the PowerPoint file and select File | Page Setup.
2. Adjust the width/height of the slide to match the resolution of your signage screen.
And then click OK to save the settings.
NOTE:
To ensure that all fonts are properly embedded into the PowerPoint File:
1. Select File | Save As | Tools and choose Save Options.
2. Check the Embed fonts and select Embeds only the font information for the characters in
your presentation.
Click OK and then save the file.
Q Can I add a ticker with translucent/ transparent background?
A The translucent/ transparent background is not available for the ticker zone. You can use
Widget Editor to create a ticker widget with translucent/ transparent background. Please
refer to Widget Editor section for instructions.
35
FAQ
Q Why does the preview image in the playlist editor look blurry when a high
resolution media is applied?
A It takes much time to apply the real resolution preview image in a scene zone, so a
thumbnail image will be used if the original media has resolution higher than 1920 x 1080.
However, if to use 100% zoom to view an image larger than 1920 × 1080, it won't be blurry.
Q Can I add more scenes in a playlist?
A Yes, when a scene is complete and saved, you can click
to add the second scene
with a new layout to decorate. You can also click
to copy the first scene to edit.
However, scenes within a playlist should be with the same resolution and orientation. If
you are going to play content with different resolution, you should create multiple playlists
and publish.
Q Can I adjust the schedule after publishing the playlist?
A Yes, after publishing, you can still manage the schedule under the Schedule function.
Please refer to Chapter 3 for the instructions.
Q How do I know the status of each playlist?
A The icon shows a playlist is published and running. Click on the icon, the playlist
details will be shown:
The icon means the playlist is published or requested to publish but not running.
Click on the icon, it also shows the playlist details:
36
Q Can I preview the playlist in a Mac?
A Currently, the Preview Player can be installed in Windows operating systems only.
Q Can I import/ export/ copy/ cut/ paste multiple media files at the same time?
A Yes, while selecting the media files to import/export, copy/cut/paste or to delete media
files, you can press Ctrl key and select files one by one, or drag the cursor to select
mulitiple files to manage. When importing multiple files to the media library, the status will be shown on the top menu. The number indicates the remaining files to be uploaded.
Q Is there any file size limitation while uploading?
A There is no size limitation to Chrome. To Internet Explorer the max. size is 2GB, and 4GB to
FireFox.
Q How to show the thumbnails for those PowerPoint media files?
A Please install Microsoft Office in your WCM 6 Pro server for showing the PowerPoint file
thumbnails.
Q How to move Players to another Group?
A Select a player and click . Select the target group and click to move into.
Q What is the content of each privilege?
A Edge Server management: allow or deny managing the Edge Server functions in Edge
Server module.
Change system settings: allow or deny changing the system settings in Settings module.
Account and role management: allow or deny managing the accounts and roles in Account
Management and Role Management modules.
Q What can I do when my player operating system gets corrupted and cannot
boot into Windows?
A If your player storage is >32GB, it comes with a backup OS. Reboot the system and pick PE.
After booting into PE, the GUI has an option to restore the corrupted OS. After restoring
the OS, please register player again.
If your player storage is <32GB, please contact your sales agent to get a recovery image.
37
DT Research, Inc. headquarters
2000 Concourse Drive, San Jose, CA 95131
Copyright © 2015, DT Research, Inc. All Rights Reserved. DT Research is registered trademark of DT Research, Inc.
042715 WCM USM ENG