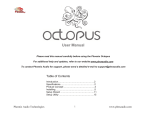
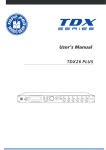
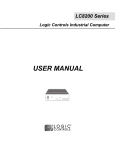
1
User Manual
Please read the instructions in these manual before using the Quattro
Please refer to our website www.phnxaudio.com for more information, specifically to our Q&A
section in our Support page
.
For additional help please send a detailed e-mail to [email protected]
-1–
Phoenix Audio Technologies
www.phnxaudio.com
Table of Contents
1. Introduction………………………………………………………………………….3
2. Key Elements………………………………………………………………………..4
3. Key Features………………………………………………………………………...6
4. Control and Panels…………………………………………………………………8
Primary (USB - Computer) Interface Panel
Control Panel
Secondary Panel
5. Using the Quattro with Your Computer - Connection and Operation…..12
6. PSTN Interface - Connection and Operation…………………………………14
7. VCA Interface - Connection and Operation…………………………………..17
8. Daisy Chain Interface - Connection and Operation…………………………20
-2–
Phoenix Audio Technologies
www.phnxaudio.com
1. Introduction
The Quattro is a high quality speakerphone for use in medium to large conference rooms. It has
an exceptionally large pickup and broadcasting range yet it is small in size. The Quattro utilizes
multiple microphones, multiple speakers and a powerful DSP to obtain its performance.
In its basic configuration the Quattro is designed for PC VoIP communication. In addition the
Quattro may include an interface module that will communicate directly with your telephone line
or other communication devices, per your choice. The Interface module can be replaced by the
factory or by an approved dealer. Please send an e-mail to [email protected] or call your
dealer for details.
This manual covers instruction for the installation and usage of the Quattro in its basic
configuration and with several selected interface modules. Specific instructions for other interface
modules will be provided separately when you purchase a unit with that specific interface.
Interface modules that are detailed in this manual include:
- PSTN interface (POTS telephones)
- VCA (video codec and analog) interface
- Daisy Chain interface
-3–
Phoenix Audio Technologies
www.phnxaudio.com
2. Key Elements
The Quattro utilizes:
-
Four microphones
-
Four loudspeakers
-
A powerful Digital Signal Processor that
performs the Quattro’s sophisticated audio
processing. This processing includes:
-4–
o
Detecting a person speaking
o
Finding the direction of the person
speaking relative to the Quattro
o
Aiming a directional audio beam towards the person speaking (note: the Quattro
can manage multiple people speaking simultaneously)
o
Eliminate the surrounding noise
Phoenix Audio Technologies
www.phnxaudio.com
o
Eliminate the Acoustic Echo
o
Eliminate the Line Echo (when used with PSTN interface)
o
Eliminate the room reverberation
o
Balance the input pickup level of the different speakers.
o
Balance the output signal level and adjusting it to the type of signal being
broadcasted.
The Result: Extended pickup and broadcasting range that can provide high quality
communication in a large conference room setup.
-5–
Phoenix Audio Technologies
www.phnxaudio.com
3. Key Features
-
Extended and powerful broadcasting capability: As a result of its unique design
the Quattro drives up to 25 Watts peak power through its loudspeakers, delivering a
strong and clear output signal. This feature is critical in large room coverage.
-
Ganging capability: The user can gang unlimited number of units for extended size
room coverage. Each ganged unit will perform independent audio pickup processing and
deliver it to the unit in front of it in the chaining hierarchy. The higher hierarchy unit will
select the best available audio signal to pass on. Each of the ganged units will also
transmit the output signal (more details in the Daisy Chain Interface chapter).
-
Battery operation: Each of the interface modules includes a built-in rechargeable
battery. The unit does not have to be connected to the power supply for power. The user
will be notified when the battery power is low. The unit can be recharged through the
USB or with AC/DC wall mount power supply (supplied with the interface module).
-
-6–
Three-Way communication: When using the Quattro with both the computer
(through the USB interface) and an additional communication device (through the
additional interface module - like the PSTN line) the Quattro mixes the incoming and
outgoing signals so that the three partners (the Quattro user, the telephone
communication and the computer communication) are full participants in the conference.
Phoenix Audio Technologies
www.phnxaudio.com
In addition to being convenient in many instances, this feature allows to record the
telephone conferencing and also playback audio files into the telephone lines.
-7–
Phoenix Audio Technologies
www.phnxaudio.com
4. Control and Panels
The Quattro has:
A Primary (USB) interface panel
A Simple control panel and
A secondary interface panel (optional)
Primary (USB - Computer) Interface Panel
The Quattro has a primary (USB) panel that includes three jacks:
- USB (on the right) for computer communication
-8–
Phoenix Audio Technologies
www.phnxaudio.com
-
Cascading (DIN6 - in the middle) for chaining
additional Quattro units. This connector can also
be used to connect an external microphone. The
chained Quattro unit must have a Daisy Chain
interface. Please refer to the Daisy Chain
Interface chapter for more details.
-
3.5mm for external speakers or headphones (using this jack will disable the Quattro’s
internal speakers).
Control Panel
The Quattro’s control panel has five buttons:
-
Power On/Off and Mute button (in the middle)
– see details of operation below.
-
Volume Up and Volume Down (to the right)
-
Interface control buttons (noted as L1 and L2 – to the left). These two buttons serve
different functions depending on the interface module you are using. In some cases (for
-9–
Phoenix Audio Technologies
www.phnxaudio.com
example in the computer only configuration) these buttons have no role and are not
functional.
Operating the L1 and L2 controls: please refer to the specific interface module you have on
your unit.
Light Indications
Power/ Mute button light off - the unit is off
Steady Power/ Mute light – unit is on
Blinking Power/Mute light – the unit is on and the microphones are muted.
L1 or L2 light is on – the button is active. For example – when using the PSTN interface L1 light
on indicates that Line 1 in connected.
Power On / Power Off / Mute operation:
-
To turn on: push the Power/Mute button. The light will turn on.
-
To turn off: push the Power/Mute button and hold for a few seconds. The units will
beep four times and turn off in the fifth. The light will turn off.
- 10 –
Phoenix Audio Technologies
www.phnxaudio.com
-
To mute: push the Power / Mute button (for less than 3 seconds). The light will start
blinking.
-
To un-mute: push the Power / Mute button (for less than 3 seconds). The light will stop
blinking and become steady.
Notes:
(1) The unit can be turned off from both On position or Mute. In both cases turning off
requires pushing and holding the button for about 4 seconds.
(2) After turning the unit off – you should wait a couple of seconds before turning it
On again. Otherwise the unit may fail to turn On.
Secondary Interface Panel
If your Quattro is equipped with an additional interface module it may have a secondary panel –
depending on your specific interface. Details and description are provided within the instructions
of your specific interface module.
- 11 –
Phoenix Audio Technologies
www.phnxaudio.com
5. Using the Quattro with Your Computer - Connection and
Operation
1) Plug the USB cable (supplied) into the Quattro on one end, and to your computer on the
other end.
2) Push the Power Button – the unit will turn on
(blue light is on as an indication). The unit will
identify itself as Phnx MT301. In most cases
the Quattro will become your system’s default
audio device. In some cases (depending on the application you are using and on the
operating system you are running) you’ll have to select the Quattro as your Audio Input
and Output device.
Note: if your unit does not have a battery (if it’s not equipped with an interface module), or
when the unit’s battery power level is low, the unit will turn on as soon as you plug it into the
USB port and you will not have to push the Power button to turn On. You will still be able to
turn the unit Off and On again as you wish.
3) You can control the unit’s pickup level (microphone) using your computer’s audio
controls. You can control the unit’s playback (speaker) level using either the computer’s
audio controls or the unit’s Volume Up / Volume Down controls.
- 12 –
Phoenix Audio Technologies
www.phnxaudio.com
Note: when working with both a VoIP application and an additional communication interface,
it is recommended that you set the speakers level using your computer’s volume controls
first. Then you can use the unit’s volume controls to set the output level of both interfaces to a
comfortable level. The reason is that your computer controls only the level of signal coming
out of your computer and not of the other interface while the unit’s volume controls affect
both.
4) Push the power button with a short push to toggle between Microphone On and Mute.
When muted – the light will blink.
5) Push and hold for 4 seconds to turn the unit off (the unit will beep four times and turn off
on the fifth).
- 13 –
Phoenix Audio Technologies
www.phnxaudio.com
6. PSTN Interface - Connection and Operation
1) The PSTN interface panel has two RJ jacks –
one narrower than the other. A unique telephone
cable is supplied with the unit. This cable has a
narrow RJ connector on one end, and a wider
one on the other.
2) The Quattro utilizes your telephone for the dialing and ringing functions. It is connected
directly to your PSTN line (through the RJ jack in the wall) using a standard telephone
cable (provided with your phone). The telephone is connected to the Quattro using the
unique cable supplied with the Quattro.
Note: the unit is supplied with a 6’ cable. A 20’ cable is also available and can be purchase
separately.
3) If your telephone is currently connected to your telephone line – unplug the cable from
your telephone (leave the “wall side” connected) and plug the loose end to the Quattro
(the wider jack on the right). If your telephone is not connected to the telephone line, use
a standard telephone cable, plug one end to the Quattro (wider jack on the right) and the
other end to your telephone’s line wall jack.
- 14 –
Phoenix Audio Technologies
www.phnxaudio.com
4) Plug the narrow connector of the unique
cable to the Quattro (left side) and the
other side to your telephone (same jack
that you unplugged before and is
typically used to connect your telephone
to the line).
5) You can now use your telephone as
before to dial out and get calls in.
6) L1’s (or L2) position determines whether
your telephone is connected to the line
or the Quattro (refer to the functional
drawing on the next page). When L1 is
active (light is on) the Quattro is
connected, when it is inactive (light is
off) your telephone is connected.
7) Please follow these steps to conduct a
conference call:
PSTN Connection Diagram
a. Dial out: pick-up your telephone’s
handset and dial the number you want to
call. At any time after dialing push L1 (or L2 if you dialed using line 2) to transfer
the call to your Quattro. The Quattro is now connected to the line and your
- 15 –
Phoenix Audio Technologies
www.phnxaudio.com
telephone is disconnected. As such the telephone is currently not functional and
you cannot utilize its dial-pad, unless you switch the call back to your telephone
(see C below).
b. Accepting a call: when your telephone rings you can push L1 (or L2 if the call is
coming from line 2) to accept the call on the Quattro. No need to pickup the
handset.
c.
Switching back to your telephone: Pickup the telephone’s handset and push L1 (or
L2 if the call is on line 2). The Quattro will be disconnected form the line and you
can use your telephone ordinarily.
L1
PSTN Functional Diagram
- 16 –
Telephone
Line
Phoenix Audio Technologies
www.phnxaudio.com
7. VCA Interface - Connection and Operation
The VCA interface is an Analog In / Analog out interface. It can
be utilized to connect the Quattro to a Video Set-top Codec, a
computer’s sound card or a digital phone headset jack.
The black RCA jack on the right should be connected to your VC
system’s (or sound card’s) output (the signal that goes to the
loudspeakers. The red RCA jack on the left is the Quattro’s
output and it should be connected to your VC system’s (or sound card’s) Input.
The VCA interface has a sensitivity control switch which offers 8 different settings of output signal
level. This allows the user to tune the Quattro’s output level and optimize it to the specific VC (or
sound card) input level specifications. The output levels for the different switch settings are
detailed in the following table (note: the orientation of the switches in the diagram represents the
way these switches appear when the Quattro is sitting on the table):
- 17 –
Phoenix Audio Technologies
www.phnxaudio.com
Switch
Position
Output level
peak-to-peak
Switch
Position
Output level
peak-to-peak
Line
level
3.0v
Mic
level
0.5v
Line
level
1.5v
Mic
level
0.25v
Line
level
0.75v
Mic
level
0.125v
Line
level
0.375v
Mic
level
0.0675v
In order to use the VCA interface with a digital phone’s headset jack you need the proper cable
(two RCA to RJ11). There are two types of wiring depending on the type of telephone you are
using. These cables are available for purchase separately.
Using external speakers
If you wish to use your VC’s speakers you can either:
1) Connect the VC out to the right RCA jack, and connect your speakers to the 3.5mm
“external speakers” jack on the Quattro’s primary panel.
Or
- 18 –
Phoenix Audio Technologies
www.phnxaudio.com
2) Using a RCA Y cable, split the VC out, connect one end to the Quattro (right RCA jack)
and the other end to your speakers. This way requires less cables running back and forth
from your VC to the Quattro. Note that in this configuration the Quattro’s internal speaker
will work in addition to the external speakers. If you wish to disable the internal
loudspeakers you can plug a Dummy 3.5mm plug into the 3.5mm jack (in the primary
interface panel). Such dummy plug can be purchased separately (you can use any
3.5mm plug for this purpose).
Video Codec
Quattro Out
Dummy Plug
(Optional)
VC Speakers Out
Splitting Connection
- 19 –
Phoenix Audio Technologies
www.phnxaudio.com
8. Daisy Chain Interface - Connection and Operation
Several Quattro units can be chained to provide larger room coverage. One of the Quattro’s
need to be connected to the communication line (or computer for that matter). Another
Quattro will be connected to Quattro number one; a third Quattro can be connected to
Quattro number two; and so on. There is practically no limit to the number of Quattro’s
that can be chained.
In this chain, we refer to the Quattro higher in hierarchy as a Master and the lower in
hierarchy as a Slave unit. Any Quattro can be a Master, since the Master connection is
provided with the basic unit and is included on all Quattro’s via the primary interface panel. In
order for a Quattro to become a Slave unit it needs to have a Daisy Chain interface.
Connecting a Slave unit to a Master is done using a unique cable supplied with the Daisy
Chain
interface.
Unique Cable
- 20 –
Phoenix Audio Technologies
PSTN or Other
Network
Connection
www.phnxaudio.com
Powering the Slave unit: the Slave unit has a battery and it does not need any extra
power supply. If the battery on the Slave unit runs low, the unit will turn Off its loudspeakers.
The unit’s microphone and audio processing will still run, powered by the Master through the
connecting cable.
Remember: if the Slave unit’s battery is low it is still powered and operational; it will just shut
off its loudspeakers to preserve power. The Master unit can supply enough power to operate
the Slave unit’s microphones and processor but not its loudspeakers. You can connect the
Slave unit to an external power supply using an AC/DC converter which is supplied with the
Daisy Chain unit.
Microphone Pickup Performance: the Slave unit is not just a simple satellite
microphone. The unit runs the same audio processes as a stand alone unit, including the
person speaking detection, direction finding, and tracking. The Slave unit will transfer its
processed audio to the Master unit which will weigh its quality against its own pickup quality.
If the talker was closer to the Slave and was picked up better by the Slave the Master will
select the Slave’s signal as the preferred one. With two units connected you have in actuality
eight microphones searching and tracking the best possible audio signal.
The diagram below illustrates the process:
- 21 –
Phoenix Audio Technologies
www.phnxaudio.com
PSTN Line
Thank you for purchasing the Quattro. For more information please refer to our Website
www.phnxaudio.com or call (516) 829-2920
- 22 –
Phoenix Audio Technologies
www.phnxaudio.com