1
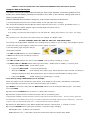
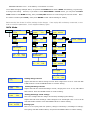
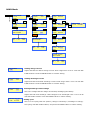
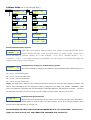
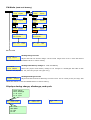
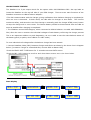
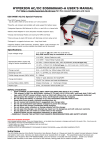
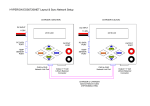
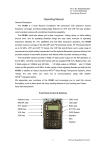
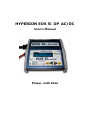
HYPERION EOS 5i DP AC/DC
User’s Manual
Power, with Ease
HYPERION EOS 5i DP AC/DC - User’s Manual
Please read the following instructions carefully, to insure safety and convenience
EOS 5i DP AC/DC Special Features
*Two INPUT power choices: Use AC 100~240V at home, or DC 11~15V anywhere
*Powerful, yet compact and portable with Wide support for various battery types
*Clear and easily readable LCD Screen with Warning messages for common setup errors
*Packaged in a rugged aluminum case - Output harness included - Long Input leads
*Specially designed to be 100% Compatible with Li-Po PCM Guard and Balancer Adapters
*DataPort Interface for EOS LBA 10 Balancers (see last page of manual for details)
Specifications
Input voltage range
100~240V AC OR 11.0-15.0V DC
(only one source may be connected at a time!)
1-14 Nickel-Cadmium cells
Appropriate battery types and
1-14 Nickel-Metal Hydride cells
range of series-connected cells
1-5 Lithium cells, 100~5000mAh (3.7V/cell type)
1-6 Lead-Acid cells (2V per cell nominal)
Charge current
0.1A ~ 5A MAX, by 100mA steps
Discharge current
0.1A ~ 1A MAX, by 10mA steps
Trickle charge current (NiCd, NiMH)
0 ~ 200mA
Charge termination
"zero delta V" peak detection for NiCd/NiMH
"CV/CC" for Lithium and Lead-Acid Batteries
Cycling Modes (NiCd, NiMH)
Charge>Discharge and Discharge>Charge
Display type
2-line, 16 backlit character LCD
Safety precautions
•
KEEP CHARGER AWAY FROM CHILDREN AND PETS AT ALL TIMES!
•
This charger is designed ONLY for NiCd, NiMH, Lithium (3.7V/cell), Lead-Acid (2.0V/cell) type cells.
DO NOT attempt to charge other types, such as 3.6V/cell Lithium, or non-rechargeable batteries!
•
Always place the charger on a firm, level, and fireproof surface for charging.
•
Do not place the battery or charger on or near flammable materials while in use.
Keep away from carpets, cluttered workbenches, etc.
•
Do not exceed cell manufacturer’s suggested max charge rates
•
Do not use automotive type battery chargers to power the charger.
•
Do not leave the charger unattended while charging.
•
Disconnect the battery and remove input power from charger immediately if the charger becomes hot.
Allow the charger or battery to cool down before reconnecting.
•
Do not allow water, moisture or foreign objects into the charger.
•
Do not open the charger, nor attempt any repair. It is dangerous, and will void your warranty.
•
Do not obstruct the air intake holes on the charger.
•
ALWAYS follow correct connection sequence, as given below
CAREFULLY FOLLOW THE BATTERY PACK MAKER’S RECOMMENDATIONS AND SAFETY ADVICE!
Using the EOS 5i DP AC/DC
The EOS 5i includes an Output Harness with two 4mm male “banana” connectors attached. First,
solder your chosen battery connector to the bare wire ends of the harness, taking great care to
observe proper polarity.
ALWAYS FOLLOW this connection sequence, and reverse sequence to disconnect:
1) Connect OUTPUT harness to the sockets located on the right side of the charger.
Take care that the Output Harness RED wire bullet connector goes to the (+) socket, and BLACK wire to (-) .
2a) Connect Charger INPUT alligator clips to an appropriate DC power source:
a) A 12V automobile battery
b) A quality, low-noise DC power supply of 12~15V with 5A+ rating (large batteries may require 10A supply)
OR
2b) Connect to AC wall power 100~240V using the supplied AC adapter cable
DO NOT CONNECT BOTH AC AND DC INPUT AT THE SAME TIME!!
The Charger will display INPUT VOLTAGE error message if input voltage is out of range. If this happens, please
recheck the input power supply to make sure correct voltage is present.
3) Set the battery type using the charger
configuration buttons.
*The INC and DEC buttons are used to Increase
or Decrease values, such as Charge Current or
LiPo Cell Count
*The INC and DEC buttons are used to select MODE, such as Charge, Discharge, or Cycle
*The BATT TYPE and ENTER buttons both have two modes: SHORT press or LONG (~1 second) press
•
Short press BATT TYPE:
Scroll battery types
•
Long press BATT TYPE:
View input/output Data
•
Short press ENTER:
Scroll settings for a battery type. Values will blink when selected. If nothing is
changed, blinking will stop. Short press Enter until re-selected, then INC/DEC to change values.
•
Long press ENTER:
START charging (or discharging, or cycling)
Let’s start by using a NiMh battery as an example:
When the charger is first connected to input power, it will display the previously used battery configuration.
This is especially convenient if you often charge the same type of battery.
1) If NIMH is not shown, short push the BATT TYPE button to scroll through all battery types.
Stop when
you reach NIMH.
2) Short press the ENTER button to select “C”, charge rate in Ampere
3) Press INC or DEC buttons to choose the proper rate for your battery pack.
Charging NiCd and NiMH is mostly automatic, and the setup routines are the same for both.
You only need to consult the
documentation for your battery pack (or ask your dealer) to determine the proper charge current in Ampere (A).
is given in mA, note that 100mA equals 0.1A:
so 900mA would be 0.9A, for example.
4) Attach your NiMH battery to the EOS 5i Output side harness, checking that +/- polarity is correct.
5) Long press ENTER button (hold down for about 1 second) to begin charging
NO BATTERY error - if battery not connected
OPEN CIRCUIT error - if the battery becomes disconnected from the charger after START
If the rate
REVERSE POLARITY error - if the battery is connected in reverse
In our NiMH charging example above, we pressed the ENTER button when “NiMH” was blinking, to go directly
to charge rate setting.
However, if you want to enter DISCHARGE or CYCLE modes, you can press the BATT
TYPE button to start NiMH blinking, then press INC/DEC buttons to scroll through the various modes.
Once
the mode is settled (like CYCLE), short press ENTER to start values blinking for editing.
Below are the flow charts for all the settings in the charger.
Have a play with no battery connected, to see
how to set all the parameters, for all supported battery types.
NiCd Mode
BATT TYPE
INC
NiCd CHARGE
C=3.0A
DEC
ENTER
NiCd DISCHARGE
D=0.50A
4.8 V
INC
DEC
ENTER
INC
DEC
NiCd CYCLE D->C 5
C=3.0A D=0.50A
ENTER
INC
DEC
INC
DEC
NiCd CHARGE
C=3.0A
NiCd DISCHARGE
D=0.50A
4.8 V
NiCd CYCLE D->C 5
C=3.0A D=0.50A
START
ENTER
ENTER
INC
BATTERY CHECK
WAIT PLEASE. . . .
DEC
INC
00000
1.200
INC
NiCd CYCLE C->D 5
C=3.0A D=0.50A
DEC
NiCd DISCHARGE
D=0.50A
4.8 V
NiCd CYCLE D->C 5
C=3.0A D=0.50A
START
ENTER
BATTERY CHECK
WAIT PLEASE. . . .
NiCd CYCLE D->C 5
C=3.0A D=0.50A
INC
CHG
0:00
NC + 3.0
DEC
DEC
ENTER
INC
DCH
0:00
NC - 3.0
00000
1.200
DEC
NiCd CYCLE D->C 5
C=3.0A D=0.50A
START
BATTERY CHECK
WAIT PLEASE. . . .
DCH
0:00
NC + 3.0
NiCd CHARGE
C=3.0A
00000
1.200
Setting charge current
Adjust and find the desired charge current which ranges from 0.1A to 5.0A with INC
& DEC buttons. Press the ENTER button to confirm setting.
NiCd DISCHARGE
D=0.50A
4.8 V
Setting discharge current
Adjust and find the desired discharge current, ranging from 0.1A to 1A, with INC &
DEC buttons. Press the ENTER button to confirm setting.
NiCd DISCHARGE
D=0.50A
4.8 V
Setting discharge cutoff voltage
This is the voltage that the charger should stop discharging the battery.
Adjust and find total discharge cutoff voltages to be discharged from 0.1V to 16.8V
NiCd CYCLE C->D 5
C=3.0A D=0.50A
with INC & DEC buttons. Press the ENTER button to confirm setting.
Setting cycle
This is to set cycling with two options ( Charge to Discharge / Discharge to Charge).
Set cycling with INC & DEC buttons, and press the ENTER button to confirm setting.
NiMH Mode
BATT TYPE
INC
NiMH CHARGE
C=3.0A
DEC
ENTER
NiMH DISCHARGE
D=0.50A
4.8 V
INC
DEC
NiMH CYCLE D->C 5
C=3.0A D=0.50A
SETUP
ENTER
INC
DEC
INC
DEC
INC
DEC
NiMH CHARGE
C=3.0A
NiMH DISCHARGE
D=0.50A
4.8 V
NiMH CYCLE D->C 5
C=3.0A D=0.50A
START
ENTER
SETUP
INC
BATTERY CHECK
WAIT PLEASE. . . .
DEC
INC
00000
1.200
INC
NiMH CYCLE C->D 5
C=3.0A D=0.50A
DEC
NiMH DISCHARGE
D=0.50A
4.8 V
NiMH CYCLE D->C 5
C=3.0A D=0.50A
START
SETUP
BATTERY CHECK
WAIT PLEASE. . . .
NiMH CYCLE D->C 5
C=3.0A D=0.50A
INC
CHG
0:00
NH + 3.0
DEC
DEC
SETUP
DCH
0:00
NH - 3.0
00000
1.200
NiMH CYCLE D->C 5
C=3.0A D=0.50A
START
BATTERY CHECK
WAIT PLEASE. . . .
DCH
0:00
NH + 3.0
NiMH CHARGE
C=3.0A
00000
1.200
Setting charge current
Adjust and find the desired charge current which ranges from 0.1A to 5.0A with INC
& DEC buttons. Press the ENTER button to confirm setting.
NiMH DISCHARGE
D=0.50A
4.8 V
Setting discharge current
Adjust and find the desired discharge current which ranges from 0.1A to 1A with INC
& DEC buttons. Press the ENTER button to confirm setting.
NiMH DISCHARGE
D=0.50A
4.8 V
Setting discharge cutoff voltage
This is the voltage that the charger should stop discharging the battery.
Adjust and find total discharge cutoff voltages to be discharged from 0.1V to 16.8V
with INC & DEC buttons. Press the ENTER button to confirm setting.
NiMH CYCLE C->D 5
C=3.0A D=0.50A
Setting cycle
This is to set cycling with two options ( Charge to Discharge / Discharge to Charge).
Set cycling with INC & DEC buttons, and press the ENTER button to confirm setting.
Lithium Mode (for 3.7V/cell types only!)
BATT TYPE
INC
LiPo CHARGE
C=3000mAh
3S
DEC
ENTER
LiPo DISCHARGE
D=0.50 A
3S
ENTER
INC
DEC
LiPo CHARGE
C=3300mAh
3S
ENTER
INC
DEC
LiPo DISCHARGE
D=0.20A
3S
ENTER
INC
DEC
LiPo CHARGE
C=3000mAh
2S
INC
DEC
LiPo DISCHARGE
D=0.20A
4S
START
START
BATTERY CHECK
WAIT PLEASE. . . .
BATTERY CHECK
WAIT PLEASE. . . .
CHG
0:00
LP + 3.0
DCH
0:00
LP + 3.0
00000
1.200
00000
1.200
Setting Lithium battery capacity
LiPo CHARGE
C=3000mAh
Adjust and set the desired battery capacity from 100mAh to 5000mAh with INC & DEC
2S
buttons (50mAh per step). Press the ENTER button to confirm setting. Charge rate is
set on the basis of selected capacity, at 1C rate. Example : Li-Po cell of 1500mAh capacity : 1C =
1500mAh ( = 1.5A ).
If your battery is larger than 5000mAh, you can charge it at the 5000mAh setting, but
it will just take longer to finish charging.
LiPo CHARGE
C=3000mAh
Setting battery voltages for Lithium battery packs
3S
Select the total battery voltage to be charged or discharged with INC & DEC buttons: 1S=
1S = 3.7V - single cell
2S = 7.4V - two-cell series pack
3S = 11.1V - three-cell series pack
4S = 14.8V - four-cell series pack
5S = 18.5V- five-cell series pack
NOTE: The EOS Series chargers have intelligent detection routines to help you avoid making mistakes, and
LOW or HIGH VOLTAGE errors are displayed if battery voltage does not match your setting.
HOWEVER, under
some circumstances, especially with over-discharged or damaged batteries, the safeguard could fail. Therefore,
be absolutely sure that you have correctly set pack voltage correctly before charging, every time!
LiPo DISCHARGE
D=0.50 A 3S
Setting discharge parameters
Adjust to the desired discharge current from 0.10A to 1.00A (0.01A per step) with INC &
DEC button. Press the ENTER button to confirm setting. Set pack voltage, 1S~5S as in charging example above.
Autocut occurs automatically at 3.0V per cell.
LITHIUM MODE IS ONLY FOR LITHIUM BATTERIES WITH 3.7V/cell RATING! Some Li-Ion
types are rated at 3.6V/cell, and CANNOT BE CHARGED with the EOS 5i!
Pb Mode (lead-acid battery)
BATT TYPE
INC
PB CHARGE
C=3.0A 12Vpack
DEC
ENTER
PB DISCHARGE
D=0.50A
12Vpack
ENTER
INC
DEC
INC
DEC
PB CHARGE
C=3.0A 12Vpack
PB DISCHARGE
D=0.50A
12Vpack
ENTER
ENTER
INC
DEC
INC
DEC
PB CHARGE
C=3.0A 12Vpack
PB DISCHARGE
D=0.50A
12Vpack
START
START
BATTERY CHECK
WAIT PLEASE. . . .
BATTERY CHECK
WAIT PLEASE. . . .
CHG
0:00
Pb + 3.0
CHG
Pb -
00000
1.200
0:00
3.0
00000
1.200
Back to NiCd
PB CHARGE
C=3.0A 12Vpack
Setting charge current
Adjust and find the desired charge current which ranges from 0.1A to 5.0A with INC &
DEC buttons. Press the ENTER button to confirm setting
PB CHARGE
C=3.0A 12Vpack
Setting total battery voltage for Lead-Acid Battery
Select the proper total battery voltage to be charged or discharged with INC & DEC
buttons – 2V, 4V, 6V, 8V, 10V, and 12V [2V per cell types only]
PB DISCHARGE
D=0.50A
12Vpack
Setting discharge current
Adjust and find the desired discharge current from 0.10A to 1.00A (0.01A per step) with
INC & DEC button. Press the ENTER button to confirm setting.
Displays during charge, discharge, and cycle
CHG: charge
DCH: discharge
C→D: cycle
D→C: cycle
CHG 030:25 00000
NC + 3.00A 10 .75V
NC: NiCd
NM: NiMH
LP: LiPo
Pb: Pb
DCH 030:25 00000
NC - 3.00A 10 .75V
DELAY TIME
5 : 00
Completion display
If the Enter button is pressed , charge or discharge will be stopped.
END 030:00 00000
NC 100mA 10.75V
In order to move back to the main display, press the Enter button.
Data display
INC
INPUT = 12.00V
OUTPUT = 13.18V
INC
ChgCAPA=00000mAh
DchCAPA=00000mAh
DEC
CHG PEAK = 12.00V
DCHG AVR = 13.18V
DEC
If the Battery type button is pressed for over 3 seconds, Data view will be displayed as above. Data displays
can be scrolled left and right by INC & DEC buttons. If nothing pressed for 3 seconds, this display disappears.
Error messages
INPUT BATTERY
VOLTAGE ERROR
When input voltage is below 11.0V or exceeds 15V.
NO BATTERY
Battery is not connected to the charger’s output
OUTPUT BATTERY
REVERSE POLARITY
OUTPUT CIRCUIT
PROBLEM
CHECK THE BATT.
OPEN CIRCUIT
CHECK THE BATT.
OVER VOLTAGE
CHECK THE BATT.
LOW VOLTAGE
Battery is connected to the output in reverse
When the output connection has some other problem
When a battery becomes disconnected during an operation
If incorrect voltages are set while charging lithium or Pb batteries.
If incorrect voltages are set or batteries are over discharged while charging Lithium or Pb
batteries.
LBA DATAPORT FEATURE
The DataPort is a 3-pin output which fits the option cable #HP-EOSLBA10-DPC. See top label to
locate the DataPort on the top left side of your EOS charger.
There are two main functions of the
DataPort connection to LBA10 balance adapter:
*The LBA communicates with the charger, giving notification when balance charging is completed,or
when an error is detected.
In both cases, the LBA tells the charger to shut down.
This insures
maximum safety, and saves the user from having to manually push the charger STOP (enter) button
to stop the charge-end or error tones. The lithium battery should be disconnected from the LBA as
soon as possible after charging is completed.
* The DataPort version EOS chargers, when connected to LBA10 balancer via cable #HP-EOSLBA10DPC, allow the user to monitor the individual voltages of each battery cell during the charge process.
This is an important addition to pack diagnostics, as one is able to see the exact balance status of
the battery pack (or packs, when LBA10 is in NET mode).
To view individual cell voltages after the balance charge has been started:
* Connect DataPort Cable (DPC) between Charger and LBA10 as shown by the Green line in diagram
below. [no matter if single or networked LBA, connect DPC to Master LBA]
*Push the EOS5i BATT TYPE Button for 3 seconds to access DATA screen.
*Push the INC, DEC buttons to scroll up and down data screens as in the chart below.
Data Display
INPUT = 12.00V
OUTPUT = 13.18V
INC
DEC
ChgCAPA=00000mAh
DchCAPA=00000mAh
INC
DEC
CHG PEAK = 12.00V
DCHG AVR = 13.18V
INC
DEC
Li-CELLS VOLTAGE
1 - CELL = 0.000V
INC
DEC
INC
DEC
LCB-V
0.00
0.00
0.00
0.00V
0.00V
INC
DEC
4 - CELL =
5 - CELL =
0.000V
0.000V
INC
DEC
2 - CELL =
3 - CELL =
0.000V
0.000V