1
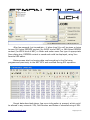
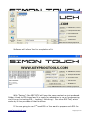
User Manual
NEC ESL Tool PSB Version
Overview
This software and accompanied drivers are intended for educational
purposes only and it's use is sole liability of user. All further consequences of
www.keyprogtools.com
[email protected]
any other possible device use is subject of user's choice and responsibility.
The drivers, provided are original Cypress® inf-file and original Cypress®
library files, which compatibility to Your current operating system is subject of
Cypress® technical notes and bulletins. Any further questions of misbehaved
CyUSB-library to be forwarded to Cypress® Support Desk.
Hardware serial number is visible in Windows in “My Computer” /
“Properties” / “Hardware” / “Device Manager” - selecting the device “Properties” / “Details” / “Device Instance id” and Serial Number (8 digits and/or
characters) is shown after VID and PID of the interface hardware. The method,
described above may vary, depending on exact operation system You are using,
but in general is the same. This unique serial number eases identification of Your
hardware in manufacturer database, providing You corresponding initial software
and further updates.
Hardware contains Lithium battery for backing up the critical data for
supporting it's functionality. Do not use / store the device in extreme
temperatures or inappropriate humidity or another operational conditions, as this
could lead to big leakage currents, shortening battery life. Consult Lithiumbattery specifications for proper storage and usage. In any case it is good idea to
have device connected and powered by USB port or another external compatible
+5V DC source for prolonging battery lifespan.
How to use
At start of the software, if hardware is properly connected, You will see the
following (button/labels if not active, this means You did something wrong):
www.keyprogtools.com
[email protected]
Always mind the exact order of connecting and disconnecting the
NEC/interface/PC – not following might seriously harm any/all components:
1. Solder NEC MCU to adapter board
2. Plug NEC adapter board to NEC ESL Tool hardware in proper direction. See
below photo – DO NOT reverse adapter board !!! When connecting adapter board,
NEC ESL Tool should be disconnected from USB – always mind that !!!
3. Connect hardware to available USB port of PC.
Upon completion of Your work with NEC ESL Tool disconnect in the reverse order:
1. Unplug NEC ESL Tool hardware from USB port of PC.
2. Disconnect NEC adapter board NEC ESL Tool hardware.
3. Unsolder NEC MCU from adapter board.
After that step, You could plug again NEC ESL Tool to USB, even if not used.
It's important for it's battery maintenance to be powered most of the time.
Disconnect it from USB when PC has being switched off to avoid transient power
peaks on USB connector power supply when computer has been powered on.
Here is shown proper connection of adapter board to NEC ESL Tool:
www.keyprogtools.com
[email protected]
As visible from photo, the orientation of adapter board should be facing up
to the label of NEC ESL Tool. Also photo shows, that NEC MCU soldered to adapter
board should be free of dirt, soldering paste and any other flux, which might
interfere with electrical signals. Have the adapter well cleared after soldering,
using Isopropyl alcohol or another suitable cleaning solution.
Press “Read” button to check if You did required and above described connection.
The data shown is:
“Key # Hash” - Key hashes. Any MB has eight keys and this information
helps to identify current one from the others in the set. Four Hashes are stored in
NEC EEPROM. Software displays two hashes parts for W203 NEC and full first
hash for W204 NEC. There are more hashes for each Key #, which are not
www.keyprogtools.com
[email protected]
displayed, but could be seen if full EEPROM is read.
“Service Hash” - also called “Dealer Password” or different, depending on
people's habit to name it. Used for resetting the ESL module to Initialized state.
Same function here could be performed without knowing that “Dealer Password”
if You press “Initialize” button.
“TP OFF Key” - Transport Protection removal Hash.
“Serial SN#” - unique serial number of ESL.
If You scroll up the screen also are visible:
“Version ROM” - version of NEC firmware.
“ESL State” - mechanical position of ESL. Shows if in “Locked” / “Unlocked”
/ “Moving” / “Fault” state, as seen from NEC pins. It doesn't corresponds to
!mechanical position of ESL locking pin, but to actual NEC pins state! Note, that
NEC MCU is soldered to adapter board here, so this is not relative information!!!
You could also read part of internal EEPROM data by clicking “EEPROM”:
www.keyprogtools.com
[email protected]
After few seconds (not immediate – it takes time) You will be given a choice
to save 160-bytes EEPROM content (for W203 kind of NEC) or 288-bytes EEPROM
content (for W204 kind of NEC) in folder and under name You type in appropriate
Save dialog box. EEPROM content is saved and could be displayed, using Your
favorite HEX-editor.
Below screen-shot is showing data read according to the file being
programmed previously to the NEC MCU and modified during ESL operation.
Except data described above, few more information is present, which could
be altered in any moment: VIN, Part Number and Dates of manufacturing of ESL.
www.keyprogtools.com
[email protected]
Simply, enter desired values and press “Change” button. It will be shaded until
operation is completed. In the example below VIN is changed from value of
“12345678901234” to “20400112345678”, Part Number is changed from
“2045455372” to “2045459132” and also dates are changed:
You could write any desirable values in these fields – just for compatibility it
is advisable to use values, understandable for DAS diagnostics software.
Note: For programming of new or used ESL, “Write” button will be
enabled only if ESL is not in “Activated” state.
If You use “Write” button for writing data to NEC EEPROM it happens with
data, prepared from files read from EIS via IR channel and is explained further.
Information, being read from EIS by our IR Tool is saved in two of the most
popular formats for bin-files, related to MB. File, sized of 512 bytes is for SKC®
software and another file, sized 87 bytes is for server calculations.
Have in mind, that You could use only 512-bytes file after it has been
processed by our ESL Server or by our software support department. You could
not use plain IR Tool files – they are not suitable for ESL programming.
The other option You have is to program to NEC EEPROM factory content,
provided by us with files “W203_Factory.bin” and “W204_Factory.bin”.
www.keyprogtools.com
[email protected]
Software will inform You for completion of it:
With “Factory” files NEC MCU will have the same content as just produced.
Solder it back to ESL board and it is ready for adaptation in car or programming
via K-line or for testing ESL – Locking / Unlocking... Our other ESL Tool, which
works by K-line provides all that functions.
If You are going to use 2nd hand ESL or You want to prepare such ESL for
www.keyprogtools.com
[email protected]
further use in car, then it's state should be returned to “Initialized” to allow
reprogramming it to another car. With our ESL Tool, working by K-line that is
possible if “Dealer Password” is present.
But!!! There is one limitation!!! Dealer Password is useless in cases, when
used W204 ESL becomes disabled. That is the most common issue with these
units – they stop to respond EIS commands, they stop to switch relays for motor,
ESL becomes completely unusable... Trying to renew such ESL with “Dealer
Password” in that case returns error and is just money in vain... and here comes
the “Enable Blocked ESL” and “Initialize” buttons of this software.
If You want only to change the state of NEC from “Activated” to “Initialized”
the use “Initialize” button and wait for completion of the process:
You could interrupt that operation by clicking the same button again – it
changes caption to “Stop” as visible from above screenshot. When NEC is
returned to “Initialized” state, you will be informed:
www.keyprogtools.com
[email protected]
“Read” buttons confirms that:
In similar manner work also the other two possible buttons - “Virgin” and
“Enable Blocked ESL”. While “Initialize” button does the job almost instantly,
those two requires more time, which depends on ESL internal data. You could
start and stop their operation when You decide, without worrying for interruption
of the process.
“Virgin” buttons returns NEC to it's very original state, prior to initialization
state. When it is done all check-boxes at the right side of software should be
blank if button “Read” is pressed. While working, software informs You for
progress and gives You opportunity to interrupt the process:
www.keyprogtools.com
[email protected]
When stopped, it informs You and You are able to continue with same
activity or any other operation of software:
Same applies to “Enable Blocked ESL” button – it also changes caption while
working and gives progress message:
www.keyprogtools.com
[email protected]
If You just want to write new EEPROM content to ESL NEC MCU, then is
enough to use “Initialize” button to change it's state from “Activated”.
“Personalized” state is not an obstacle for reprogramming if checked.
But if NEC MCU is in “Disabled” state, then re-writing it's EEPROM content
or turning it's state to “Initialized” will not make NEC MCU working. “Disabled”
flag is not related to other ESL state flags. To fix that “Enable Blocked ESL” button
should be used. After it's completion, ESL will be both in “Initialized” state and
“Enabled”. All You need to do is to program with “Write” button either ESL file for
specific car or the best practice is to program “Factory” file to NEC MCU.
Note, that while soldered on adapter board W204 NEC MCU couldn't have it's
state changed to “Activated”. This is possible only if NEC is soldered to original
PCB and mounted into ESL. To activate W204 ESL Locking / Unlocking procedure
should be performed, which happens only if ESL is completely assembled.
So, keep proper practice to write “Factory” files to any NEC before You remove it
from adapter board of NEC ESL Tool hardware!
Sometimes faulty W204 ESL units do not only get to “Disabled” state, but
also get corrupted EEPROM data. Software could check some of the data as it
does for TP Key and informs if correct or not, but there are more internal EEPROM
flags, that couldn't be checked. Their reflection is when You try to program NEC
EEPROM it fails with some error. In such situations You should use “Virgin” button
to completely erase NEC flags and turn it to pre-initialized state. That will allow
restoring TP Key correctness and other values initialization. All the necessary
routines are implemented in “Write” button functionality and are automatically
performed according to ESL state.
www.keyprogtools.com
[email protected]
All You should remember are those simple steps for working with 2nd hand /
used / disabled / blocked NEC MCUs:
1. “Initialize” and “Write” with “Factory.bin”
check after and if needed go to
2. “Enable Blocked ESL” and “Write” with “Factory.bin”
if errors persists then
3. “Virgin” and “Write” with “Factory.bin”
Enjoy it !!!
www.keyprogtools.com
[email protected]