1
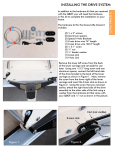
Errors and Troubleshooting
In the event of an error, your QBOT will display an error message on the screen and the warning
light will blink. If QBOT gives directions on the screen, follow them. Here is a list of error messages and their causes.
Error Message
Cause and Repair
No SD card detected
No QBOT files found
Motors not following
Insert SD card. If SD card is not found after reinsertion, replace card.
Unable to Save File
Failed to scale
File is corrupted
Cannot save file - SD card is full or damaged
During Upgrade
Not Supported
No Memory
Cannot Unprotect
Erase Error
There are no QBOT files on SD card, reload SD card with QBOT designs
The carriages did not move properly. Check all connections and verify there
is nothing in the way of moving the carriages.
Mistake in 4QB file or SD card read error
Mistake in 4QB file or SD card read error
no external RAM or external RAM is damaged
out of memory, cycle power and try again
cannot remove flash write protection
cannot erase flash memory
1
Errors and Troubleshooting
Installation Errors and Remedies
Error
Next Generation Quilt Frame
Remedy
Rear lip of upper carriage bumps lower carriage
Install washer and wheel per instructions on page 3
of User Manual. If washer is placed on wrong side of
wheel, the upper carriage will be too close to the rear
frame of the lower carriage.
Wheels come off of track
Double check wheel installation. Some Next Generation frames have duplicate brass washers on the front
and rear wheel sets on the lower carriage. Typically,
only one set is needed at most. This is a carry over
from when the plastic wheels were used. The track
should ride in the center of the ‘V’ grooved wheels.
Y-Axis wire tight or binding
Double check tension in the drive wire. • Ensure that
the drive wire is not overlapped on the drive wheel.
• Check the alignment of the Y-Axis wire holders and
set to 5 o’clock and 7 o’clock positions as shown in
the User Manual on page 4. The drive wire should be
parallel to the rails, not shaped like a ‘V’.
X-Axis wire tight or binding
Double check tension in the drive wire. • Ensure that
the drive wire is not overlapped on the drive wheel.
• Check the alignment of the X-Axis wire holders as
shown in the User Manual on pages 6-7. The drive
wire should be parallel to the rails, not shaped like a
‘V’.
Carriage moves backwards
Verify drive bracket is installed on the proper side of
the carriage. Look at picture on Page 8 of the user
manual. • Verify drive wires are wrapped properly
around drive wheels. • Check X and Y direction
parameters in QBOT and make sure they match the
default parameters as outlined in the parameters
list. For Next Generation frames, X and Y direction
parameters = -1.
INSPIRA Quilt Frame
Error
Remedy
Y-Axis wire tight or binding
Double check tension in the drive wire. • Ensure that
the drive wire is not overlapped on the drive wheel.
• The drive wire should be parallel to the rails, not
shaped like a ‘V’.
X-Axis wire tight or binding
Double check tension in the drive wire. • Ensure that
the drive wire is not overlapped on the drive wheel.
• Check the alignment of the X-Axis wire holders as
shown in the User Manual on page 13. The drive
wire should be parallel to the rails, not shaped like a
‘V’.
2
Errors and Troubleshooting
Installation Errors and Remedies
Error
INSPIRA Quilt Frame (cont.)
Remedy
Carriage moves backwards
Verify drive brackets are installed on the correct sides.
See pictures on page 10 and 12 of the User Manual
to verify installation. Verify drive wires are wrapped
properly around the drive wheels. Check X and Y
direction parameters in QBOT. For Inspira frames, X
direction parameter = 1, Y direction parameter = -1.
Errors when Trying to Sew
Error
Remedy
Sewing machine does not start after pressing ‘GO’
Verify sewing machine is turned on and the presser
foot is down. • Check power to Quilter’s Cruise Control. • Check connection between QCC brain remote
port and the port labeled ‘QCC Remote Port’ on
QBOT. • Check connection between sewing machine
and QCC. • Check position of sewing machine selector switch on QBOT, see page 21 of User Manual
Sewing machine starts, but carriages don’t move
Check connections from QBOT to drive bracket assemblies. • Ensure connectors are snapped into
place.
Patterns are not sewing precisely
Replace plastic carriage wheels with metal wheels.
• Check tension in drive wires. Loose wires will slip
and cause sloppy results. • Ensure that there is slight
clearance between the sewing machine bed and the
fabric. If the take up pole is clamping the carriage,
QBOT will not move the carriage precisely.
Pattern does not sew completely, but QBOT shows the SD card error. Contact LiTen Up Technologies, Inc.
Repeat|Exit menu
for replacement card. • Reformat card, place contents
from DVD on SD card and retry.
Sewing machine starts, but does not change speed
when carriages move
Check connection from QBOT ‘QCC Encoder Port’ to
the encoder port on the QCC.
3