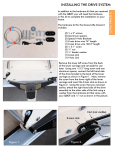
1
Thank You
Thank you for purchasing a QBOT® - you have made an excellent choice. The QBOT will provide hours of troublefree
automated quilting. Whether you are new to quilting or an experienced quilter, we are sure that you will enjoy the
features and benefits of the QBOT automated quilting system.
Trademarks
QBOT® and Quilter’s Cruise Control® are trademarks of LiTen Up Technologies, Inc.
Manual Version
Version 2.01. LiTen Up Technologies, Inc. reserves the right to update this manual. A current electronic version of this
manual can be found at:
www.myqbot.com/support
We have attempted to make this User Manual as comprehensive as possible. You can get additional information,
designs, and tips and tricks at our YouTube QBOT Quilting Channel, www.myQBOT.com, www.quilterscruisecontrol.com,
and monthly webinars.
Copyright
©2009 LiTen Up Technologies, Inc. No portion of this manual may be reproduced without the written consent of
LiTen Up Technologies, Inc. Electronic versions of this manual found on the website and on the companion DVD
may be distributed in their entirety, including this copyright statement.
Package Contents
Making the Connections
ii
1-2
Wiring Harness-to-QBOT Connections
1
Wiring Harness-to-Drive Assemblies Connections
1
Wiring Harness-to-Quilter’s Cruise Control Connections
2
Brother /Babylock /Janome 6500, 6600/ELNA 7200 Owners
2
®
®
®
®
Verifying the Installation
3
Quilting with your QBOT
4-15
Learning the ICONS
4
2-Point Proportional Scaling
5-6
2-Point Non-Proportional Scaling
7
4-Point Proportional Scaling
8
Set Rotation Degree
8
Trace Boundary
9
Examples of 4-Point Scaling
9-10
4-Point Non-Proportional Scaling
11
On-Board Rotation
11
‘Overlay’ and ‘Another’ Functions
12
Echo Quilting Made Easy
12
Using QBOT Template Pages
13
Free-Motion Quilting and Recording Your Own Quilting
14
Quilting Interruptions
15
Maintenance and Care
16-18
Updating the QBOT Firmware
16-17
Transferring Designs
18
Troubleshooting
19-23
Parameters
24-25
Tensioning Template
26
Warranty
27
Once your frame is set up according to the manufacturer’s instructions, you are ready to install your
QBOT. Contact your dealer if you have questions or concerns regarding set up on your specific frame.
i
Package Contents
The hardware provided with your QBOT is specific to your machine/frame set-up. Below are various parts that you may
need and may differ from the kit provided.
I
A.
B.
C.
D.
E.
(1) QBOT ‘Head’
(2) Drive Assemblies
(1) Power supply and cord
(1) Wiring harness
Hardware Pack
F. Drive wire set
G. SD memory card
H. Tensioning template
I. Instructional DVD
Y-axis brackets
X-Axis brackets
Washers
Screws
Drive wire tensioners
Hex key
Adhesive pad
Wire ties
Because of the various sewing machine and quilting frame combinations, some
of the components you received with your QBOT may appear different from
those shown in this manual.
ii
Please follow the drive assembly and wire installation instructions that came
with your QBOT before using this manual. Then continue on to page 1.
At this stage, you should have the drive assemblies,
drive wires, and QBOT main unit, or “head,”
installed.
Wiring Harness-to-QBOT Connections
One end of the wiring harness has long wires. The other end
has shorter wires.
MAKING THE
CONNECTIONS
MAKING THE CONNECTIONS
Step 1: Using the shorter end, plug the cable marked with an ‘X’ into
the corresponding port on the QBOT. Plug the cable marked with a ‘Y’ into its
corresponding port.
TIP-Push these connectors in until you hear a click.
Your particular sewing machine may not require the connections shown in Steps 2 and 3. If your sewing machine
uses a Quilter’s Cruise Control® brand stitch length regulator, then Steps 2 and 3 apply.
Step 2: The smaller flat cable, which looks similar to a phone cable, is the
connection between the QBOT and the Quilter’s
Cruise Control. Plug this cable into the
connection labeled ‘QCC Encoder Port’ on the
QBOT.
Step 3: The last cable is the one that plugs into
the port labeled ‘QCC Remote Port’ on the QBOT.
Step 4: Remove the power supply from
its box and plug it into the port labeled
“Power.” Next, ensure that the QBOT power
switch is in the ‘OFF’ position, designated
by ‘0’ on the label under the switch on
the left side of the QBOT. Finally, plug the
power cord into the QBOT transformer,
with the opposite end plugged into a surge
protector.
TIP-There should be plenty of slack
in the power cord when you move
the carriages across the frame.
Wiring Harness-to-Drive Assemblies Connections
To keep your QBOT wires tidy, secure the wiring harness and power supply cord
as shown using the included wire ties.
Plug in the Y-axis cable from the wiring harness to the upper drive assembly (the
assembly on the side of the carriage) and the X-axis cable to the lower drive
assembly (the assembly on the back of the carriage).
TIP-Push these connectors in until you hear a click.
1
MAKING THE CONNECTIONS
NOTE: these connection instructions are for connecting the Quilter’s Cruise Control to the QBOT. In the plastic style, there
are red, purple, dark blue, and light gray “brains.” In the compact metal style, there are red and black “brains.” If you
have a dark blue or gray QCC brain, the connector cord to the sewing machine will look like a double-ended audio cable
rather than the 3-pin cable that is shown.
Wiring Harness-to-Quilter’s Cruise Control Connections
Step 1: Plug the smaller flat cable that looks like a phone connector
into the port on the Quilter’s Cruise Control labeled ‘Encoders.’
NOTE: If you have a metal Quilter’s Cruise Control that has the
encoder wires ‘hard-wired’ to the brain, you do not need to make
this connection.
Step 2: Plug one end of the sewing
machine connector cord into the port on
the QCC labeled ‘To Sewing Machine,’
the other into the foot pedal port of the sewing machine. Your metal QCC brain will connect
directly into the machine. NOTE: If your sewing machine differs in appearance, use the
appropriate connector cord that came with the QCC.
Step 3: Connect the cable from the
QBOT wiring harness to the port labeled
‘Remote Switch’ on the QCC.
Step 4: The last connection to the QCC unit is the power supply
connection. Plug the QCC power transformer into a surge protector.
WARNING: Use only the power supply that came with
your QCC, not with the QBOT. Using the wrong power
supply will permanently damage your QCC.
Step 5: You may adhere the adhesive pad to the back of the
plastic brain and then mount it to the side of your sewing
machine as shown. If you have a metal QCC brain, plug it
directly into the back of your sewing machine.
You’re almost there. Ensure your QBOT power switch is
toggled up, to the OFF (0) position.
Brother®/Babylock®/Janome® 6500, 6600/ELNA® 7200 Owners
Using a blunt tip of a paper-clip, slide the small switch on the right side of the QBOT to the right or up. The defaut position
for this switch is the left or down position.
2
Verify the correct parameters for your quilting frame in the drive assembly installation instructions and make
adjustments as necessary. You may need to change a setup parameter in the QBOT prior to moving on. See the
‘QBOT Parameters List’ found at the back of this User Manual.
VERify the Drive System
Step 1: Insert the SD card that came with your QBOT into the slot in the right side of the QBOT. Turn on the QBOT.
The welcome screen will display briefly, then you will see the Quilt|Record|Options menu. If you get an error
message, ‘No SD card detected, Please insert card,’ re-insert the SD card making sure you here a ‘click’. You will
now see the Quilt|Record|Options menu with the cursor
blinking under the ‘Q.’
MAKING THE
CONNECTIONS
VERIFYING THE INSTALLATION
Step 2: On the menu navigation touchpad, press the ‘GO’
button. The QBOT will then display the design selection menu.
Using the down arrow, if needed, scroll through the design
files until you see the ‘TEST.4QB.’
Navigate the cursor to the right, under the ‘S’ in ‘Start’. Press the ‘GO’ button. The QBOT displays ‘Place on right
upper.’ Place the carriage toward the take up roller, but not
touching. Press ‘GO.’ From the ‘Scaling Type?’ menu, select 2
points. Press ‘GO.’
Step 3: Next, the QBOT displays ‘Place on left lower.’ Relative
to the first position, move the carriage to the left and down.
Press ‘GO.’
The QBOT displays ‘Keep Proportion?’
Select ‘Yes,’ then pess ‘GO.’
After completing the scaling for your test block, QBOT displays
‘GO = Move to Start.’ Press ‘GO’ and the carriage moves to
the start point. Fine Tune if necessary.
Turn on the sewing machine, unthread the needle, and lower
the presser foot. Make sure that the bobbin winder lever is in
the sewing position (not the bobbin winding position). Long
Arm users may perform this test without engaging the sewing
machine.
Press ‘GO.’ The sewing machine
will start, QBOT will move the
sewing machine in a square from
the lower left corner to the upper
left corner to the upper right corner to the lower right corner, then back to the lower left
corner, and the QCC will control the speed of the sewing machine. If your results are
different, please consult the troubleshooting section of this manual.
At the end of the test design, you will be asked ‘Another|Overlay|Exit.’ Select ‘Exit’ and touch GO. You are ready to
start quilting.
Your QBOT is now installed and you are ready to begin quilting with your QBOT. Following the loading instructions
that came with your quilting frame, load some fabric onto your quilting frame. You may now skip to the ‘Quilting with
QBOT’ section of this manual.
To see more details of this procedure, please view the quilting section of the DVD that is included with your QBOT.
You may also find helpful videos on the QBOT Quilting Channel on YouTube.
3
QUILTING WITH YOUR QBOT
Let’s learn the icons...
SD Card Access
Warning Indicator
Button Press
Verification
Lights:
SD Card Access -
(orange)
Whenever information is taken from or written to
the SD card, the access light will blink.
Warning Indicator- If the QBOT encounters an error, the warning
(red)
light will flash and an error message will show
in the main display screen.
Button Press Verif.- This light will blink when any of the buttons
(green)
are pressed on the touchpad.
Buttons:
STOP-ESC-NO - This button stops action or returns you to the previous menu.
GO-YES - Use this button to start quilting or confirm selections.
4
Navigation Arrows - use these to step through the QBOT menus.
QUILTING WITH YOUR QBOT
introduction
QBOT comes with a collection of over 40 quilt designs. It is a good idea to print out the design manual found on
either your DVD or your SD card. When printing, do not use page scaling to enlarge or shrink the printout.
QBOT Design Collection Icon
When you are ready
to quilt a design,
select ‘Quilt’ from the
‘Quilt|Record|Options’
menu and press ‘GO.’
UP/DOWN arrow icon
The display will show a
filename and have the navigation menu under it as
shown. With the blinking cursor under the UP/DOWN
arrows on the left of the display, use the down arrow on
the keypad to scroll to the file named GTBL0050.4QB.
Next, use the right arrow on the keypad to place the
cursor over the ‘S’ in ‘Start.’ Press ‘GO.’
QUILTING WITH
QBOT
Simply navigate to the Version2designs.pdf file and
double click the icon. Most of today’s computers have a
reader application that can
open a document with the
.pdf file extension.
2-Point proportional scaling
From the ‘Scaling Type?’ menu, navigate to ‘2 points’ and press ‘GO.’ Your QBOT
prompts you to ‘Place on right-upper.’ This will define the right upper corner of the
quilting area. If you are using the QBOT technique quilt (pattern on DVD), use the first
5-inch square. Here, we are using a plain piece of fabric and selecting a spot near the
take-up rail on the quilting frame as our upper right corner. Touch ‘GO.’ You have just told your QBOT that this is
the upper right corner of your quilt block.
Your QBOT now asks you to ‘Place on left-lower.’ This will define the left lower corner of the quilting area. If you are
using the QBOT technique quilt select the lower left corner of the first 5-inch square. Here, you will move to a point
that is to the left and below the first point that we defined as the right-upper. Press ‘GO.’
Your QBOT now prompts whether to ‘Keep Proportion?’ If you choose ‘Yes,’ the QBOT will keep the relative height
and width of the design the same even if the design was made larger or smaller than the original. For this exercise,
we want to keep proportion, so we highlight ‘Yes’ and Press
‘GO.’
Your QBOT now adjusts the size of the quilt design to the size
you just defined. You will see the ‘Scaling File’ message, and
the dots will cycle back and forth along the bottom of the
display. Depending on the size of the file, scaling may take a
couple of seconds to a minute or two.
5
QUILTING WITH YOUR QBOT
After scaling, QBOT will display the scale relative to the stored design size. In this case,
the design is scaled to 88% of the stored design. Your scaling factor may be different.
Pressing ‘GO’ will move the carriages and the sewing machine to the start point of the
design.
This is the last menu you will see before the QBOT takes control and starts to sew your
design. This is called the ‘Fine Tune’ menu. You can fine tune the start point by using the
navigation arrows on the QBOT. You may need to do this if you are aligning two designs
in a complex fashion. Here, you have nothing to align to, so you are ready to press
‘GO’... BUT WAIT
There are three very important things that you should
remember before pressing the ‘GO’ button. First, pull
up your bobbin thread to eliminate a thread nest at
the beginning of your stitching. Second, make sure the
sewing machine is ON. Third, be sure that your presser
foot is down to ensure proper stitch formation. Hold
on to the thread tails, move your hand away from the
needle, press ‘GO.’
Notes for Longarm Owners:
®
If you are using a long arm machine that does not have a Quilter’s Cruise Control brand stitch
length regulator, you must ®
®
start the sewing machine before pressing the ‘GO’ button. Owners of the Pfaff GrandQuilter 18.8 and Husqvarna Viking
Mega Quilter 18x8 must press the “auto stitch” button on the left handle before pressing ‘GO’ on the QBOT. Similarly,
owners of the Tin Lizzie 18LS and Tin Lizzie Ansley 26 must press the “Lizzie Stitch” button before pressing ‘GO.’
Owners of the Tin Lizzie 18LS and Tin Lizzie Ansley 26 must also ensure that your sewing machine is in the proper operating
mode prior to using QBOT. When you first turn on your sewing machine you must hold down the “auto stitch” or “Lizzie
stitch” button while turning on the power to the machine. Hold the “auto stitch” or “Lizzie stitch” button until you hear 2 short
beeps and one continuous, high-pitched tone. After you hear the long tone, you may let go of the “auto stitch” or “Lizzie
stitch” button. This places the sewing machine in ‘cruise mode’ which allows the needle to idle in place for a short period
of time when the carriages come to a stop. This is very important to ensure that designs with sharp corners or changes in
direction do not lose stitches at those locations.
Here is pattern GTBL0050.4QB quilted out. Your heart may be a slightly different size,
but the proportion should be the same. You have just completed the quilting process with
the QBOT. About 80% of your QBOT quilting will be similar to the process that you just
performed.
You selected a design, sized the design by choosing the upper-right and lower-left points of
the block, chose to keep it proportional, and pressed ‘GO.’
Your QBOT now asks you whether you want to Overlay|Another|Exit. We are going to explore more features of the QBOT.
Use the right navigation button to move the cursor to ‘Exit.’ Press ‘GO.’
6
QUILTING WITH YOUR QBOT
2-Point Non-Proportional scaling
Now, position the needle on the left-lower corner of the block. Choose a point that is about 3 inches to the left, and
about 5 inches down from the right-upper corner. A rectangle of this proportion will highlight the difference between
QUILTING WITH
QBOT
The same design file (GTBL0050) appears in the display. This time we are going to
make the same heart fill up a rectangle. With the cursor over ‘Start,’ press ‘GO.’
You are shown the ‘Place on right-upper’ menu again. Place the needle in the
upper right corner of a vertical rectangle. Press ‘GO.’
proportional and non-proportional scaling. Press ‘GO.’
Here at the ‘Keep Proportion?’ menu, select ‘No.’ Press ‘GO.’ The QBOT will scale
the file to fill up the area of the rectangle. When finished, the design will look
stretched in the vertical direction.
The QBOT will scale the file. Press ‘GO’ when you see the menu ‘GO = Move to
Start’. Remember to pull up the bobbin thread and lower the presser foot before
pressing ‘GO’ the final time.
Here is pattern GTBL0050.4QB during quilting and fully finished. Note the nonproportional scaling because you chose ‘No’ when asked to keep proportion.
7
QUILTING WITH YOUR QBOT
4-POINT PROPORTIONAL SCALING
Let’s look at placing a quilt design in the odd-shaped block shown below (Figure 1). With 2-Point scaling, this would be a
little difficult, but with 4-Point scaling it’s a breeze. After the design (Figure 2) and 4-Point Scaling (Figure 3) are chosen,
simply follow the prompts to denote the quilting area (Figures 4-7).
Figure 1. Odd-Shaped Block
Figure 4. Right-Upper
Figure 2. Choosing the Design
Figure 5. Right-Lower
Figure 3. NEW FEATURE (Scaling Type)
Figure 6. Left-Upper
Set Rotation Degree
Figure 7. Left-Lower
As you go through the menu prompts you will see, ‘Set Rotation Degree.’ If you would like to rotate your design INSIDE
THE SELECTED AREA, then you can select the amount of rotation by using the UP/DOWN navigation arrows. Enter a
POSITIVE angle and the design will be rotated CLOCKWISE. Enter a NEGATIVE angle and the design will be rotated
COUNTER-CLOCKWISE.
To return to the default 0° rotation, navigate using the
UP/DOWN arrows or cycle the power OFF/ON.
8
QUILTING WITH YOUR QBOT
Trace Boundary
Another feature is the ‘Trace Boundary’ option. You can use this option to
verify that the quilted design will be placed in the chosen area. Similar to
home embroidery machines, the needle will trace the boundary without
sewing. This tracing will be of the shape of a box that fully encloses the
design, not the outline of the design itself. This can be a useful tool to
verify placement of a design in quilt blocks that are of ‘non-standard’
shapes.
QUILTING WITH
QBOT
Shown below is a heart design and the boundary (in red) that will be
traced during the ‘Trace Boundary’ function.
Heart Design (black) and Boundary (red)
Examples of 4-Point SCALING
Here is the completed design inside the NonStandard block shape. This design was not
rotated.
4-Point Proportional
9
QUILTING WITH YOUR QBOT
QBOT automatically fits designs into TRIANGULAR boundaries as well. The triangle boundary is treated as a special case of
a four-sided boundary by selecting a set of adjacent corners at ALMOST THE SAME POINT. Note how the right-lower point
is slightly lower than the right-upper point. Here’s an example of quilting a design inside a triangular boundary.
Choosing Quilting Design
‘Right-Upper’
‘Right-Lower’
Choosing 4-Point Scaling
‘Left-Upper’
‘Left-Lower’
Below is the resulting quilting if you choose ‘Proportional Yes’ (left) vs. ‘Proportional No’ (right).
Proportional
10
Non-Proportional
QUILTING WITH YOUR QBOT
4-POINT NON-PROPORTIONAL SCALING
Non-Proportional scaling is perhaps the most powerful feature in Version 2.0 of the QBOT. Used in conjunction with
the QBOT software, the new scaling method leads to the most professional results yet!
We have all run into a quilt top where the piecing isn’t perfectly aligned when it is installed on the quilt frame. Even
our best efforts to align the top fall short in the middle and end of the quilt once we have advanced the quilt a couple
of times.
QUILTING WITH
QBOT
We can minimize the effect of this skewing and slight rotation of the top by using the 4-Point Non-Proportional scaling
method. Here is the work-flow for using this powerful new tool:
1. Measure the dimensions of the quilt block or the border that you want to quilt.
2. Size your design to these measurements in the QBOT software and save the designs to the SD card.
3. Select the design in QBOT, choose 4-Point Scaling, choose the boundary points, choose ‘NO’ to the ‘Keep
Proportion?’ prompt, and choose 0° for the rotation.
4. QBOT will move to the start point and begin quilting.
QBOT AUTOMATICALLY rotates and skews the design to
compensate for the slight rotation and skewing of the quilt
blocks.
Note the quilt block shown at right. The outermost
line is an outline of the ‘quilt block.’ It is both rotated
and slightly skewed on the right-hand edge. The quilt
design was placed with the 4-Point, Non-Proportional
method. Note how perfectly the design has been
rotated and skewed to fit the block - AUTOMATICALLY.
You can now quilt difficult designs with highlighting
borders ‘in the vicinity’ of the block seam lines, with
this method. The results look more professional and
natural, not skewed and mechanical!
Automatic Rotation and Skew
On-board rotation
In Version 2.0 you have the ability to rotate a design at the
QBOT before quilting it out. As a result, you need only one
version of each quilting design and you can choose the
rotation angle at the QBOT.
C
Rotation works with 4-Point scaling only. In the example
shown here, the corners (A,B,C,D) were chosen, ‘YES’ was
chosen at the ‘Keep Proportion?’ prompt, and +30° was
chosen at the ‘Set rotation degree’ prompt.
A
30°
The design is automatically scaled and rotated to fit inside
the original chosen block (A,B,C,D.)
D
B
Rotated Design Inside Block
11
QUILTING WITH YOUR QBOT
‘OVERLAY’ AND ‘ANOTHER’ FUNCTIONS
When QBOT has finished quilting a design, the
‘Another|Overlay|Exit’ menu is displayed on the screen.
Choosing ‘Exit’ will exit this particular quilting process.
Choosing ‘Overlay’ and following the on-screen prompts
will quilt the same pattern on top of itself. This can
provide a desired effect to highlight designs on wearable
art, garments, and home-dec items.
Finishing of One Element
An exciting feature in Version 2.0 is the ‘Another’
function. This is especially useful when quilting edgeto-edge designs on wide quilts when the design you
have is less than the width of the quilt. If the design
has beginning and end points that are at the same level
(i.e, the same Y-axis coordinate), then you can use the
‘Another’ function to link successive stitch-outs together to
form a long chain.
1st pass
Another
Another is Added to the First
ECHO QUILTING MADE EASY
Echo quilting in blocks can add depth and drama to your quilt. With Version 2.0, echo quilting is a snap! The figures
below show the steps to successful echo quilting. Here are the steps:
1. Choose the Test.4QB file (a simple square)
2. Choose 4-Point scaling
3. Follow the prompts to choose the corners of the block (A,B,C,D shown below)
4. Choose ‘NO’ when asked to ‘Keep Proportion?’
5. When the ‘GO=Move to Start’ menu appears, use the UP and DOWN arrows on the touchpad to
change the scale. In this example of a 5” block, choosing 90% will yield a 1/4” echo of the
block. Once the scale is changed to the desired amount, press ‘GO’ to move to the start
point. Press ‘GO’ again to begin quilting.
6. The first echo is complete.
7. Choose ‘Overlay’ from the ‘Another|Overlay|Exit’ menu
8. At the ‘GO=Move to start’ menu, use the up down arrows to change the scale. In this example,
80% is chosen to continue with a 1/4” echo.
9. You can repeat these steps to create as many echos as you would like.
C
D
A
B
Choose the Corners
12
Adjust the Scale
Use Overlay to Echo More
QUILTING WITH YOUR QBOT
Using QBOT Template Pages
QUILTING WITH
QBOT
Your QBOT comes with a set of design templates in PDF format. This file may be found on the SD card or instructional
DVD that came with your QBOT. The filename is version2designs.pdf. First, let’s look at what is on a design
template.
Sewing Design
Stitching Start and
End Points
Designer and Source Information
Typical Design Template Page (Block)
There are two basic ways to place a block design on your quilt using the QBOT. The first and easiest method is to
follow the menus on the QBOT and select the upper-right and lower-left corners of the area where you would like the
quilt block placed, using 2-point scaling. The second is to use 4-point scaling.
You have the choice of keeping the quilt design proportional or non-proportional. If you choose the ‘proportional’
method, the proportions of the design will remain the same, but the scale may be changed to fit the design into
the selected area. If you choose nonproportional, then the design will
be stretched to fill the area that you
selected.
Using GTBL0050.4QB as the example,
proportional and non-proportional
scaling is shown to the right. Details of
quilting this are provided earlier in this
User Manual.
Proportional Scaling
Non-Proportional Scaling
13
QUILTING WITH YOUR QBOT
Free-Motion Quilting & recording your own quilting
Free-motion quilting and the ability to record a quilting pattern are two of the features that come standard with your
QBOT. Both are easy tasks.
From the Quilt|Record|Options menu, use the navigation arrows to highlight ‘Record.’ Press ‘GO.’
The display shows ‘Record:quilt001.PLT’ on the first line of the display. ‘quilt001.
PLT’ is the filename of your free-motion design and recording. The filename
always begins with ‘quilt’, but the numbers will increase from 001 -> 002 -> etc.
as you record more designs. You can record a total of 999 designs before you
need to either transfer the files to a computer or switch to a new SD card.
Press ‘GO.’ The sewing machine starts and the QBOT records the path that
you make. Whenever you free-motion quilt with the QBOT, it will record your
movements.
You may need to pause while you are quilting. Press the ‘STOP’ button. The
‘Recording Paused’ menu will appear with the choices ‘Cont|Save|Discard.’ Choose
the ‘Cont’ option if you wish to continue the recording process. Choose ‘Save’ if you
are satisfied with the result and wish to save your work. Choose ‘Discard’ if you do
not want to save your work.
The ‘Recording Paused’ menu will also appear if
QBOT detects no carriage movement for a period
of ten seconds.
When the ‘Save’ option is selected, QBOT displays a confirmation message. Press
‘GO’ and QBOT displays the ‘Quilt|Record|Options’ menu.
Once you have recorded your design, it is considered just like any other design by
the QBOT. You can scale it to fit a block, stretch it to fill an area, and open it in the
optional QBOT software to change it.
Select your recorded file from the ‘Quilt’ menu choice, navigate to ‘Start,’ and Press
‘GO.’ QBOT treats your recorded design like any other pattern.
QBOT stitches out the exact pattern that was recorded. As you play back the design,
you will have the option to adjust the outcome using 2-Point or 4-Point scaling.
You can also record patterns without actually stitching the designs. Perhaps you
would like to record a favorite pantograph design. Simply turn off your sewing
machine and trace the pattern using the stylus on your carriage while in record mode.
When you come to the end of the pantograph, press ‘STOP’ and then choose ‘Save.’
ORIGINAL
14
PLAY BACK
QUILTING WITH YOUR QBOT
Quilting Interruptions
QBOT displays the ‘Quilting Stopped’ menu. The
choices are ‘Cont|%Restart|End.’ If you choose
‘End,’ you will end quilting the current design. You
would choose this option if you accidentally chose
the wrong design or placed it in the wrong place
on your quilt. If you choose ‘Cont,’ your QBOT will
continue quilting from the place where it stopped.
To make adjustments to your sewing machine,
choose ‘% Restart.’ Press ‘GO.’
The carriages are now free to move. The QBOT knows and remembers the position of the carriages so you can move
to either side of the quilt to re-thread the sewing machine or replace the bobbin. When you are finished, move the
carriages back to the general area of where you stopped your QBOT.
QUILTING WITH
QBOT
During quilting, you may break or run out of upper or bobbin thread. Your QBOT
can handle these events with ease. When you notice that the thread is broken or
you have run out of bobbin thread during the quilting process, press the ‘STOP’
button.
The display on the QBOT shows ‘Set restarting point’ and ‘Start at: ___ %’. The
percentage that is displayed is the percentage of the quilting path that has been
quilted out. Change this percentage by pressing the DOWN navigation arrow. This
will lower the percentage. Choose a percentage that you think best represents a
couple of inches before the stitching stopped. This is a guess. If you were watching
the sewing machine and stopped the QBOT immediately, choose a percentage that
is 2 or 3% lower. If you were not watching the sewing machine, then make your
best guess at the percentage. Press ‘GO.’
QBOT now displays the message ‘Raise Needle and Press GO to Hover.’ When you press ‘GO,’ QBOT will move the
carriages directly to the point in the design that represents the percentage that you
chose. QBOT will then follow the quilting path in hover mode. The sewing machine
will not stitch. When the sewing machine needle is about 3/4” away from where the
stitching ended press ‘STOP.’ There is a short time lag before QBOT stops.
QBOT now displays the message ‘Hovering Stopped’ and your menu choices are
‘Quilt|%Restart|End.’ If you picked the wrong percentage earlier, you can choose
‘%Restart’ and repeat the process. Otherwise choose ‘Quilt.’ Press ‘GO.’
The display now shows the ‘Fine Tune’ menu. Lower the needle slightly by turning
the handwheel on the sewing machine. This will help you see better where to tune
to the exact location quilting stopped. You can use the navigation arrows to fine
tune the position if necessary. Once you are satisfied with the positioning, pull up
your bobbin thread, lower your presser foot, and press ‘GO.’ Your sewing machine
and QBOT will finish quilting the design.
That’s it for the basics of quilting with the QBOT. Please watch the DVD and our QBOT Quilting Channel on YouTube
for more in-depth instructions on joining designs, recording, and pausing the quilting process. The instructions for
these QBOT features are best shown by video so you
can see the complete process rather than try to gain an
understanding through still photos.
Please
visit www.myQBOT.com where you can:
- Join the BOT Squad
- Watch short technique videos
- Share questions with the QBOT support team
- Read the list of FAQ’s
- Download an electronic version of this manual
15
Maintenance and Care
Updating the QBOT Firmware
When you turn on your QBOT, it starts running its operating system. This operating system is called ‘firmware.’
Updates to the firmware may be available from time to time. These firmware updates may include additional
features, or changes to the existing features. We recommend running the latest version of the firmware. At the time
of printing, the current firmware version is 2.07. DO NOT update your firmware with a version with a lower number.
This will eliminate features that are only available with version 2.
After downloading the firmware from www.myqbot.com,
extract the firmware file from the .zip archive. This may
also be called ‘un-zipping’ the file.
After extracting, or un-zipping, you will see three
additional files appear.
Copy the firmware file to your SD card. If your
computer does not have an SD card reader, you
may purchase on at electronics stores or through
myQBOT.com or quilterscruisecontrol.com under
ACCESSORIES.
* Your SD Card may look different from the illustration
16
Maintenance and Care
Insert the SD card into the QBOT ‘head.’
From the ‘Quilt|Record|Options’ menu, navigate to ‘Options’ and press ‘GO.’
‘DO NOT SWITCH OFF’ is shown on the first line of the display. ‘Erasing Flash’
message appears briefly on the second line of the display, then the number of bytes
written is shown. Do not switch off the power during the update process. If the
QBOT is turned off during this process, it must be returned to the factory for service.
MAINTENANCE
AND CARE
From the ‘Setup|Credits|Update’ menu, navigate to ‘Update’ and press ‘GO’. The
display will show ‘Load new firmware?’. Navigate to ‘Yes’ by pressing the left
navigation arrow once and press ‘GO.’
When the new firmware is written, ‘Upgrade complete!’ and ‘Please Cycle power’
is shown in the display. Turn the QBOT off, wait 2 seconds, then turn the QBOT on.
You will see the Welcome screen, then the ‘Quilt|Record|Options’ menu with the
current version of the firmware shown in the second line of the display.
It is a good practice to annotate the current version on the serial number sticker, located on the back of QBOT.
17
maintenance and care
Transferring Designs from CD/DVD to SD Card
Place the CD-ROM or DVD with the QBOT designs into your
computer’s CD/DVD-ROM drive. Once the computer recognizes
the CD/DVD, open My Computer (Windows XP) or Computer
(Windows Vista) and double click on the icon for the CD/DVD.
Insert the SD card into the SD card slot in your computer, if so
equipped, or into an SD card reader that is attached to your
computer. SD card readers are available at myqbot.com,
quilterscruisecontrol.com, and most electronics stores. Open My
Computer (Windows) or Computer (Windows Vista). You will see
the icon for the SD card change, indicating that there is an SD
card inserted.
In the CD/DVD window (shown at left), select the
designs that you would like to transfer from the CD/
DVD and drag them to the icon for the SD card (shown
in the initial window still on your desktop.) The file
transfer process will start and you will see a progress bar
indicating that the files are being transferred.
When all the files you have selected are transferred, the
progress window will disappear. You may now remove the
SD card from the computer or the SD card reader and insert
it into the QBOT.
Note: The design files will appear on the QBOT in the order
you transfer them from the CD/DVD to the SD card - not
necessarily in alphabetical order.
Your SD card provided with your QBOT purchase is used a lot - inserting into/removing from the QBOT,
adding designs, editing designs, etc. The contacts can become misaligned and may cause problems as
a result. It is a good idea to have a back up SD card. You should purchase SD cards that are 2GB or
less.
18
Troubleshooting
The following pages outline some of the possible
issues that may occur while using your QBOT.
TROUBLESHOOTING
For additional assistance, check the Support area
of the www.myqbot.com website.
19
Troubleshooting
The following troubleshooting list covers some basic errors that may happen during installation of the QBOT. This list
is not an all inclusive list of errors that may happen during installation, but represents the most frequently occurring
incidents during installation. If you have a support question that is not covered in this section, please visit online at
www.myqbot.com for more options.
Error
Remedy
Carriages move the wrong way when
running TEST.4QB
1.) Check wiring harness installation. ‘X’ wire connects to the ‘X’ port on the
QBOT, ‘Y’ connects to the ‘Y port.
2.) Check wiring harness connection to the drive assemblies. ‘X’ connects to
the rear drive assembly. ‘Y’ connects to the upper drive assembly.
3.) Make sure you hear a click-sound when you install the connections at
both the QBOT head and the drive assemblies.
4.) Check drive wire installation. Drive wires come off the top of the drive
pulley, not the bottom. Drive wires should be horizontal and straight, not
shaped like a ‘V.’
5.) Check the setup parameters in the QBOT. The default parameters
are set for the Next Generation frame. The QBOT parameters may need
to be adjusted for different frames. For instance, the ‘X Axis Direction’
parameter may need to be changed from ‘-1’ to ‘1.’ Please check the QBOT
instructions for your specific frame.
6.) Ensure the upper carriage drive assembly is installed on the correct side
of the carriage. Check the installation instructions for your frame.
QBOT displays ‘No SD Card Detected
Please insert card’
1.) Be sure that SD card is inserted. You will hear a click when it is inserted
properly.
2.) SD card has become corrupted. Reformat the SD card and replace the
original contents of the card by transferring the files from your installation
DVD to the card.
3.) SD card is damaged and requires replacement. SD cards may be
purchased at any electronics store and at many independent retailers.
Stitching path is ‘sloppy.’
1.) Check carriage movement. It should be smooth. All the carriage wheels
should be on their tracks.
2.) Check the assembly of the carriage and the frame to ensure all fittings
are tight and the frame and carriage are sitting square and not skewed.
3.) Check drive wire tension. If the wires are too loose, the carriages will not
track properly.
4.) Check the quilt take up roller height. The take-up roller should be 1/8”
to 1/4” above the sewing machine arm.
5.) Check to ensure the feed-dogs are lowered or feed-dog cover plate is in
place.
On start-up, the SD card access light is
Try a different SD card. If the new SD card solves the problem, try
illuminated and the first row of the display reformatting problem card using your PC Computer and re-install the
is solid blocks, QBOT is ‘locked up.’
designs.
All three lights stay on during start-up,
QBOT display is blank.
1.) Try a different SD card. If the new SD card solves the problem, try
reformatting problem card using your PC computer and re-install the
designs.
2.) Ensure you are using the factory-supplied power supply.
Drive assemblies make noise.
Most noise in the drive assembly is amplified by the tension in the drive
wire. As the drive assembly rotates it may generate a ‘whining’ noise that
is undesireable. If this occurs, adjust the drive wire tension to eliminate
the resonance. Increase the tension slightly and note the effects. If the
resonance is more bothersome, reduce the drive wire tension.
NOTE: Decreasing the tension too much may result in a decrease in stitch
quality.
20
Troubleshooting
Error
Remedy
Stitches are too long.
If you are using the Quilter’s Cruise Control , you can check the
operation of the internal optical encoders by moving the carriage back
and forth while looking at the lights on the QCC brain. Move the
carriage side-to-side at a relatively quick speed. You should see the
red light on the QCC flicker on and off. Similarly, move the carriage
back and forth relatively quickly. Again, you should see the red light
flicker. If you see the red light flicker, then adjust the stitch length on
the QCC by turning the dial to make the stitch length smaller.
If you do not see the red light flicker, ensure that the Quilter’s Cruise
Control is getting power. The green light on the front of the QCC
should be illuminated. If it is not, check to ensure the power cord to
the QCC is completely inserted. If the red light still does not flicker
when moving the carriages, then there may be a problem with the
internal optical encoder inside the drive assembly. Contact your dealer
or LiTen Up Technologies, Inc. for further troubleshooting.
Machine only hovers and will not stitch.
If you are using the Pfaff GrandQuilter 18.8, the Husqvarna Viking
Mega Quilter 18x8, or Tin Lizzie, be sure that you have started your
machine in ‘cruise’ mode. To do this, hold down the ‘auto stitch’ or
‘Lizzie Stitch’ button on the left hand control while turning on the main
power to the sewing machine. You will here a series of two ‘beeps’
followed by a long tone. Once you hear the long tone, you may
release the auto stitch button. When ready to quilt, start the sewing
machine first, then press the ‘GO’ button on the QBOT. With this
set-up, the QBOT does not turn the sewing machine on and off. Also,
keep in mind that the QBOT does not stitch, your sewing machine
does.
If you have the Queen Quilter Eighteen, check the switch on the lower
left corner of the speed/stitch length pod. Ensure the switch is flipped
left or right, not in the center.
The machine hovers through the pattern,
then turns on after the pattern is done.
Check the position of the small switch on the right-hand side of the
QBOT as shown on page 2 in this manual. The default position for this
switch is down or toward the SD card.
TROUBLESHOOTING
®
21
Troubleshooting
Errors and Troubleshooting
In the event of an error, your QBOT will display an error message on the screen and the warning light will blink. If
QBOT gives directions on the screen, follow them. Here is a list of error messages and their causes.
Error Message
Cause and Repair
No SD card detected
No QBOT files found
Motors not following
Insert SD card. If SD card is not found after reinsertion, replace card.
Unable to Save File
Failed to scale
File is corrupted
Cannot save file - SD card is full or damaged. Replace SD card.
During Update
Not Supported
No Memory
Cannot Unprotect
Erase Error
There are no QBOT files on SD card. Reload SD card with QBOT designs
The carriages did not move properly. Check all connections and verify there
is nothing in the way of moving the carriages.
Mistake in 4QB file, SD card read error, SD card faulty. Replace SD card.
Mistake in 4QB file, SD card read error, SD card faulty. Replace SD card.
No external RAM or external RAM is damaged.
Out of memory. Cycle power and try again.
Cannot remove flash write protection.
Cannot erase flash memory.
Errors when Trying to Sew
Error
Remedy
Sewing machine does not start after pressing ‘GO.’
®
(machines with the Quilter’s Cruise Control )
Verify sewing machine is turned on and the presser foot is down.
• Check power to Quilter’s Cruise Control. • Check connection between QCC brain remote port and the port labeled ‘QCC
Remote Port’ on QBOT. • Check connection between sewing
machine and QCC. • Check position of sewing machine selector
switch on QBOT, see page 2 of User Manual
Sewing machine starts, but carriages don’t move.
Check connections from QBOT to drive bracket assemblies.
• Ensure connectors click when inserted. • Ensure the drive wire is
not wrapped over itself on the drive spool.
Patterns are not sewing precisely.
Replace plastic carriage wheels with metal wheels (for Next Generation frame only). • Check tension in drive wires. Loose wires
will slip and cause sloppy results. • Ensure that there is slight
clearance between the sewing machine bed and the fabric. If the
take up pole is clamping the carriage, QBOT will not move the
carriage precisely.
Pattern does not sew completely, but QBOT shows the SD card error. • Reformat card, place contents from DVD on SD
Repeat|Exit menu.
card and retry.
Sewing machine starts, but does not change speed
when carriages move.
22
Check connection from QBOT ‘QCC Encoder Port’ to the encoder
port on the QCC.
Troubleshooting
Installation Errors and Remedies
Error
Next Generation Quilt Frame
Remedy
Rear lip of upper carriage bumps
lower carriage
Install washer and wheel per instructions in hardware installation manual.
If washer is placed on wrong side of wheel, the upper carriage will be too
close to the rear frame of the lower carriage.
Wheels come off of track
Ensure your quilting frame is level. Double check wheel installation.
Some Next Generation frames have duplicate brass washers on the front
and rear wheel sets on the lower carriage. Typically, only one set is needed at most. This is a carry over from when the plastic wheels were used.
The track should ride in the center of the ‘V’ grooved wheels.
Y-Axis wire tight or binding
Double check tension in the drive wire. • Ensure that the drive wire is not
overlapped on the drive wheel. • Check the alignment of the Y-Axis wire
holders and set to 5 o’clock and 7 o’clock positions as shown in the drive
assembly installation instructions for your frame. The drive wire should be
parallel to the rails, not shaped like a ‘V.’
X-Axis wire tight or binding
Double check tension in the drive wire. • Ensure that the drive wire is not
overlapped on the drive wheel. • Check the alignment of the X-Axis wire
holders as shown in the drive assembly installation instructions for your
frame. The drive wire should be parallel to the rails, not shaped like a ‘V’.
Carriage moves backwards
Verify drive assembly is installed on the proper side of the carriage. •
Verify drive wires are wrapped properly around drive wheels. • Check X
and Y direction parameters in QBOT and make sure they match the default
parameters as outlined in the parameters list. For Next Generation frames,
X and Y direction parameters = -1. If the drive assembly is installed on
the wrong side of the carriage, change the Y-axis direction parameter to 1.
Error
Remedy
Y-Axis wire tight or binding
Double check tension in the drive wire. • Ensure that the drive wire is not
overlapped on the drive wheel. • The drive wire should be parallel to the
rails, not shaped like a ‘V.’
X-Axis wire tight or binding
Double check tension in the drive wire. • Ensure that the drive wire is not
overlapped on the drive wheel. • Check the alignment of the X-Axis wire
holders as shown in this User Manual. The drive wire should be parallel to
the rails, not shaped like a ‘V.’
Carriage moves backwards
Verify drive brackets are installed on the correct sides. See pictures in the
drive assembly installation instruction for your frame to verify installation.
Verify drive wires are wrapped properly around the drive wheels. Check X
and Y direction parameters in QBOT. For Inspira frames, X direction parameter = 1, Y direction parameter = -1. If the drive assembly is installed
on the wrong side of the carriage, change the Y-axis direction parameter
to 1.
TROUBLESHOOTING
Original INSPIRA Quilt Frame
23
ParameterS: standard
Parameter List: default Parameters
The QBOT has a number of user adjustable parameters that change the way the QBOT operates. Below is a list of the
parameters, their descriptions, and the default values.
The parameters can be viewed from the ‘Setup’ menu. From the Quilt|Record|Options menu, select ‘Options.’ From the
Options menu, select ‘Setup’ and press ‘GO.’
To navigate through the parameters, use the up and down navigation arrows.
To change the value of a parameter, use the right and left navigation arrows.
To store the parameter, press ‘GO.’ When ‘GO’ is pressed, ‘Setting Saved’ is displayed and the user is
returned to the Options menu.
Parameter
Use Metric?
Use metric units (YES) or English (NO)
X Axis Direction
Direction multiplier that is frame dependent
Y Axis Direction
Direction multiplier that is frame dependent
Use Thread Cutter
Future capability for machines with external thread cutter control
Wheel Diameter (mm)
Drive wheel diameter (22.3mm)
Motor Current (%)
% of max motor current used to drive carriages
SpdCtrl On Delay (mSEC)
dwell time between turning on sewing machine and moving carriage
SpdCtrl Off Delay (mSEC)
dwell time between stopping carriages and turning off sewing machine
Motors Enable Delay (mSEC)
dwell time between pressing go and the drive motors beginning to move
Motors Disable Delay (mSEC)
dwell time between end of sewing and unlocking the drive motors
Acceleration Factor
ramp up speed control
Delta Factor
controls how QBOT slows down into a corner
Encoder Sample Time (mSEC)
recording time interval, lower number = more precise (larger file size)
Recorder Accuracy
determines accuracy of recording
Check Position Error
If YES, then QBOT will display error if carriages do not move
Hover Speed Override
Speed ratio of hover mode. Default is 3/5 speed (60%)
Thread Cutter Delay (mSEC)
Time delay between ending quilting and cutting the thread (future use)
Use Buzzer?
Turns beep on and off
Reset to Defaults?
Sets all parameters back to their factory default values
24
Default Value
NO
-1
-1
NO
22.3
50
2000
2000
200
1000
2200
0.7
50
0.1
YES
3
2000
YES
NO
Parameters: Long Arm sewing machines*
Parameter list
The QBOT has a number of user adjustable parameters that change the way the QBOT operates. Below is a list of the
parameters, their descriptions, and the values.
Change the parameters highlighted in the blue boxes to the values shown.
The parameters can be viewed from the ‘Setup’ menu. From the Quilt|Record|Options menu, select ‘Options’. From the
Options menu, select ‘Setup’ and press ‘GO.’
To navigate through the parameters, use the up and down navigation arrows.
To change the value of a parameter, use the right and left navigation arrows.
To store the parameter, press ‘GO.’ When ‘GO’ is pressed, ‘Setting Saved’ is displayed and the user is
returned to the Options menu.
Use Metric?
Use metric units (YES) or English (NO)
X Axis Direction
Direction multiplier that is frame dependent
Y Axis Direction
Direction multiplier that is frame dependent
Use Thread Cutter
Future capability for machines with external thread cutter control
Wheel Diameter (mm)
Drive wheel diameter (22.3mm)
Motor Current (%)
% of max motor current used to drive carriages
SpdCtrl On Delay (mSEC)
dwell time between turning on sewing machine and moving carriage
SpdCtrl Off Delay (mSEC)
dwell time between stopping carriages and turning off sewing machine
Motors Enable Delay (mSEC)
dwell time between pressing go and the drive motors beginning to move
Motors Disable Delay (mSEC)
dwell time between end of sewing and unlocking the drive motors
Acceleration Factor
ramp up speed control
Delta Factor
controls how QBOT slows down into a corner
Encoder Sample Time (mSEC)
recording time interval, lower number = more precise (larger file size)
Recorder Accuracy
determines accuracy of recording
Check Position Error
If YES, then QBOT will display error if carriages do not move
Hover Speed Override
Speed ratio of hover mode. Default is 3/5 speed (60%)
Thread Cutter Delay (mSEC)
Time delay between ending quilting and cutting the thread (future use)
Use Buzzer?
Turns beep on and off
Reset to Defaults?
Sets all parameters back to their factory default values
Value
NO
1
1
NO
22.3
70
200
2000
200
2000
2200
0.7
50
0.1
YES
3
2000
PARAMETERS
Parameter
YES
NO
*Long arm sewing machines referenced at time of printing: Tin Lizzie 18LS, Tin Lizzie Ansley 26, Pfaff Grand Quilter® 18x8,
Husqvarna Viking® MegaQuilter 18x8, Queen Quilter Eighteen, HQ 16, Voyager 17, Hinterberg Indigo
25
tensioning templates
It is a good idea to regularly check the
tension of the drive wires as problems
can occur if the tension isn’t right.
Using a photocopy of these tensioning
templates, make sure the wires aren’t
too tight or too loose.
26
Warranty
QBOT Warranty
LiTen Up Technologies, Inc. – Limited 5-Year Warranty
We thank you for purchasing this QBOT and hope you will enjoy it for years to come. In the event that your QBOT
needs service covered by this warranty, please contact the authorized QBOT dealer from whom you purchased it.
Please register your QBOT with us at www.myqbot.com. You will be asked to provide information such your
name, address, telephone number, email address, date of purchase, and location of purchase (dealer name, city, and
state). Additionally, we will need your QBOT serial number and firmware version, which is on the reverse side of the
QBOT “head” on the silver label.
LiTen Up Technologies, Inc. warrants the QBOT exclusive to the original purchaser and is provided for normal
household use. LiTen Up Technologies, Inc. warrants this QBOT for 5 years from the date of original purchase against
defective materials and/or workmanship, excluding (1) SD card, which is warranted for 90 days, (2) wire ropes, which
are covered for 60 days and only for a defect in workmanship but not against normal wear and tear and overtightening, (3) labor, which shall be provided for a period of 1 year from the date of original purchase.
As stated above, this warranty is in respect to normal household use of the QBOT. Machines used commercially are
warranted for a period of 1 year from the date of purchase in respect to parts and labor. No further warranty shall
apply to QBOT’s used for commercial purposes.
After the warranty period, your authorized QBOT dealer can provide parts and/or labor at an additional cost to you.
This warranty is void – that is, the QBOT was purchased without warranty – if you did not purchase it from an
authorized QBOT dealer. This warranty will be honored only when the original invoice or sales receipt indicating the
date of purchase, the QBOT serial number, and the dealer’s name are provided with the defective QBOT for warranty
repair.
This warranty does not cover periodic maintenance and repair or replacement of parts due to normal wear and
tear; damage resulting from misuse of the QBOT; repairs done by unauthorized dealers, service providers, or the
purchaser; damage resulting from the use of non-QBOT parts, supplies, or accessories; accidents, lightning, fires,
water, power surges, and any other cause beyond the reasonable control of LiTen Up Technologies, Inc.
This warranty will also apply to any replacement or substitute QBOT or QBOT part. For purposes of establishing the
warranty period described for any replacement or substitute QBOT or QBOT part, the original date of purchase of the
original QBOT will continue to apply.
IMPORTANT:
If you need replacement parts that are not covered by warranty, contact your dealer.
If you need service or warranty service, contact LiTen Up Technologies, Inc.
WARRANTY
This warranty will be governed by the laws of the state in which you purchased your QBOT. The extent of LiTen Up
Technologies, Inc.’s liability under this warranty is limited to the repair or replacement provided above and in no event
shall the company’s liability exceed the purchase price paid by the purchaser for this product.
To obtain repair under the terms of this warranty, you must send your QBOT in its
original packaging (QBOT box and fitted foam insert). Failure to do so will result in
a $25 re-packaging fee.
27
IMPORTANT
Keep all of your original packaging - DO NOT DISCARD
(see Warranty on reverse for further details).
Go to www.myqbot.com to register your QBOT.
LiTen Up Technologies, Inc.
27850 Irma Lee Circle, Suite 105
Lake Forest, IL 60045