1
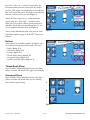
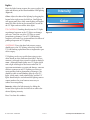
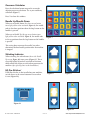
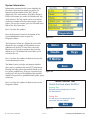
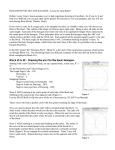
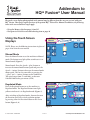
Addendum to HQ24 Fusion® User Manual The touch screen display photographed in the manual may be different from the one you received with your HQ24 Fusion. These pages replace portions of the printed HQ24 Fusion User Manual. In addition, the following items in the user manual no longer apply: • Using the Memory Card on pages 24 and 25 • Unresponsive Touch Screen troubleshooting item on page 26 Using the Touch Screen Displays NOTE: Please use the following instructions in place of pages 14 to 20 in the user manual. Manual Mode Press the Manual button to set the machine to Manual mode. The button turns light yellow to indicate it is in Manual mode (Figure 1). Manual mode: Press the Speed + (plus) button to increase the manual mode motor speed and press the Speed ― (minus) button to decrease the manual mode motor speed. This has the same effect as pressing the + (plus) and ― (minus) buttons on the handlebars. The speed ranges from 5% and 100%, or between 110 and 2200 stitches per minute (SPM). Figure 1 Regulated Mode Press the Regulated button to set the machine to Regulated mode. The Regulated button turns light yellow to indicate it is in Regulated mode (Figure 2). After switching to Regulated mode, alternate between the Precision and Cruise stitch regulation options by pressing either the Precision button or the Cruise button (Figure 2, A) A Figure 2 1 HQ24 Fusion - Addendum 05/10/13 Visit http://www.HandiQuilter.com Press the + (plus) or ― (minus) buttons above the Precision button to increase or decrease the stitches per inch (SPI) setting. The SPI displays in the indicator box at the stop of the screen. This value can be adjusted between 4 and 24 stitches per inch (Figure 3). Adjust the Cruise Speed (as a % of the maximum speed) using the + (plus) and ― (minus) buttons below the Cruise button. Choose speeds between 5% and 100%. If you adjust the speed lower than 5%, the Cruise regulation function turns off (Figure 4). There is more information about using the two Stitch Regulation modes on page 22 of the HQ24 Fusion user manual. Figure 3 Buttons Some buttons are available regardless of whether you are in Manual or Regulated stitch modes. These are: • Lights (Figure 5, A) • Calculator (Figure 5, B) • Settings (Figure 5, C) • Thread Break Alarm (Figure5, D) • Overspeed Alarm (Figure 5, E) • Needle Up/Needle Down (Figure 5, F) Thread Break Alarm Figure 4 Press to enable. When enabled the button turns light yellow. An alarm will sound if the upper thread breaks. Overspeed Alarm Press to enable. When enabled the button turns light yellow. An alarm will sound when you are stitching faster than the speed setting. A D F B E C Figure 5 2 HQ24 Fusion - Addendum 05/10/13 Visit http://www.HandiQuilter.com Lights Press the Lights button to open the screen to adjust the color and intensity of the front handlebar LED lighting (Figure 6). COOL Color: Adjust the color of the lighting by dragging the button left or right across the slide bar. Cool lighting will appear more blue, while warm lighting will appear more red. Slide the bar to the extreme left, to turn on the UV lights and turn off the white lights. UV: CAUTION!!! Looking directly into the UV lights or prolonged exposure to the UV lights can damage your eyes. Limit the use of the UV lights to avoid permanent eye damage. Use of UV A/B blocking sunglasses will reduce eye strain and limit the effects of prolonged exposure to UV lighting. DIM Intensity WARM Color BRIGHT Figure 6 CAUTION!!! Users who have had cataract surgery should not use the UV lighting unless they have had UV A/B blocking replacement lenses implanted as part of the surgery. UV lighting can be very useful when trying to view white thread or white chalk on white fabric. The best contrast is achieved when viewed in a dark or dimly lit room. Although Handi Quilter uses UV lights which emit a light wavelength at the lowest end of the UV spectrum to minimize eye strain and damage, constant or direct exposure to any UV lighting can cause eye strain and may lead to permanent eye damage. Care should be taken to avoid looking directly at the UV lights (which emit a violet colored light) and the UV lights should only be used when other lighting sources cannot produce the visual contrast necessary to achieve accurate quilting. Intensity: Adjust the light intensity by sliding the button left or right across the slide bar to achieve the desired lighting intensity. Press X to close this window. 3 HQ24 Fusion - Addendum 05/10/13 Visit http://www.HandiQuilter.com Onscreen Calculator Press the calculator button to open the screen for adjusting onscreen calculator. Use as you would any calculator (Figure 7). Press X to close this window. Needle Up/Needle Down When set to Needle Down (the down-arrow button turns light yellow when activated, Figure 8), the needle ends in the down position when the Stop button on the handles is pressed. When set to Needle Up (the up-arrow button turns light yellow when activated, Figure 9), the needle ends in the up position when the Stop button on the handles is pressed. Figure 7 This setting does not move the needle, but rather determines the final needle position after the machine is stopped. Stitching Indicator When stitching, the red indicator (above the Needle Up arrow, Figure 10) turns green (Figure 11). This is especially helpful if you have switched to Precision mode which only begins to stitch when you move the machine (after pressing Start on the handlebars). HQ Pro-Stitcher ® If HQ Pro-Stitcher is also installed on your machine, an icon shows at the center bottom of screen when it is on (Figure 12). Figure 9 Figure 8 Figure 12 Figure 10 4 HQ24 Fusion - Addendum 05/10/13 Figure 11 Visit http://www.HandiQuilter.com System Information Information contained on this screen identifies the electronics board revision number as well as the firmware revision number of the HQ24 Fusion (Figure 13). The serial number of the HQ24 Fusion is listed at the bottom, just under the Lifetime and Trip stitch counters. The Trip Count can be reset to keep track of the number of stitches taken during a given project. To reset this counter, press the X button to the right of the Trip Count box. Press X to close this window. Press the Diagnostics button at the bottom of the System Information screen to open the Diagnostics Menu. Figure 13 The Diagnostics Menu lists (Figure 14) each of the diagnostics tests available to help identify certain problems with the HQ24 Fusion. Press any of the diagnostics test buttons to perform that particular diagnostic test. Then follow the instructions on the screen for the test. Motor Y Motion XNeedle Motion Keys X Motion Press X to close this window or Back to return to the System Information screen. The Motor Sensor test helps to determine whether there may be a problem with the HQ24 Fusion motor. Rotating the front or back hand wheel should result in a pulsing audible beep. If you get a constant beep Figure 14 or no beep at all, the test has failed and the machine should be inspected by a qualified Handi Quilter repair technician. Back Motor Sensor Test Press X to close this window or Back to return to the Diagnostics Menu. Rotate the hand wheel SLOWLY. Passing Test: Regular pulsing beeps as you rotate the hand wheel. Failing Test: A solid tone or no beeping at all as you rotate the hand wheel. Back Figure 15 5 HQ24 Fusion - Addendum 05/10/13 Visit http://www.HandiQuilter.com The Needle Sensor test (Figure 16) will indicate whether the needle position sensor is functioning properly. Rotating the front or back hand wheel should result in a beep for half of a stitch cycle followed by no beep for the other half. If you hear a constant beep or no beep at all for a full 360° rotation of the hand wheel, this indicates the test has failed and the machine should be inspected by a qualified Handi Quilter repair technician. Use the X-Motion Sensor test (Figure 17) to verify functionality of the X-stitch regulator encoder (the encoder mounted at the rear of the carriage). As you move the carriage left and right you should hear a pulsing beep that pulses faster as you move faster. A solid beep, no beep, or periods of irregular beeping (with constant motion) indicate a problem with the X-stitch regulator encoder. This could be caused by an unplugged or damaged cable, a stitch regulator wheel that is not rotating, or possibly by an issue with the main control board. The machine may need to be inspected by a qualified Handi Quilter repair technician. Needle Sensor Test Rotate front or back hand wheel Passing Test: You should hear a beep for 1/2 of a stitch cycle and not beep for the remainder of the stitch cycle Failing Test: You will hear either no beep or a solid beep as you rotate the front or back hand wheel through a full stitch. Back Figure 16 X-Motion Sensor Test SLOWLY Push machine left and right. Passing Test: Pulsing beep which increases in frequency as you push the machine faster. Failing Test: No beep or a solid beep as you move the machine left and right. Press X to close this window or Back to return to the Diagnostics Menu. Back Use the Y-Motion Sensor test (Figure 18) to verify functionality of the Y-stitch regulator encoder (the encoder mounted to the rear power pod side machine wheel). As you move the carriage towards you and away from you, you should hear a pulsing beep that pulses faster as you move faster. A constant beep, no beep, or periods of irregular beeping (with constant motion) indicates a problem with the Y-stitch regulator encoder. This could be caused by an unplugged or damaged cable, a stitch regulator wheel that is not rotating, or possibly by an issue with the main control board. The machine may need to be inspected by a qualified Handi Quilter repair technician. Press X to close this window or Back to return to the Diagnostics Menu. 6 HQ24 Fusion - Addendum Figure 17 Y-Motion Sensor Test SLOWLY Push machine front and back. Passing Test: Pulsing beep which increases in frequency as you push the machine faster. Failing Test: No beep or a solid beep as you move the machine front and back. Back Figure 18 05/10/13 Visit http://www.HandiQuilter.com The Keypad test (Figure 19) verifies that the HQ24 Fusion is reading the front and rear handlebar buttons as they are pressed. When a key is pressed, a beep will be heard and the name of the key that is pressed will appear in the box on the screen. Keypad Test Press one of the handlebar keys. Passing Test: The name of the key is hown below. Failing Test: No name or the wrong name below. Press X to close this window or Back to return to the Diagnostics Menu. Keys Up Back Figure 19 7 HQ24 Fusion - Addendum 05/10/13 Visit http://www.HandiQuilter.com