1
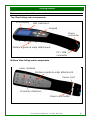
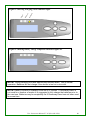
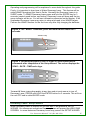
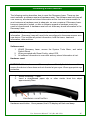
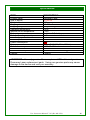
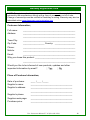
Dermaray® Intelligence in Phototherapy User Instruction Manual Dermaray ® 100mW Laser Comb Model DM-100 Version 1.01 (Rev 0.998) 2010 Please Read All Instructions Thoroughly Prior to activating the Device. Document version number: Date of publication: Copyright: Updates available from: Your Serial number: Software version number: Date of purchase: Place of purchase: Purchase invoice number: 0.998 24-Jan-11 Total Control Pty. Ltd. 2009 www.demaray.com ______________________ ______________________ ______________________ ______________________ ______________________ All rights Reserved www.dermaray.com Table of Contents Table of Contents ........................................................................ 2 Introduction .................................................................................. 4 Welcome and preface ............................................................... 4 Environmental notice ................................................................ 4 How to use these instructions.................................................... 5 Laser Comb -101 Guide ........................................................... 5 Safety Information ....................................................................... 6 Safety First ................................................................................ 6 Safety precautions .................................................................... 6 Safety precautions - continued ................................................. 7 Device compliance ...................................................................... 8 When not to use - Laser Therapy ............................................... 9 Hazards when using Dermaray - Laser .................................... 9 Proper usage ............................................................................ 9 Your Laser Pack inclusions. .....................................................10 Spare Parts .............................................................................10 Getting started ...........................................................................11 Main components of You Laser Comb ...................................11 Proximity Detector Explained .................................................12 Battery charging battery care ...................................................13 General Operations ...................................................................15 Setup and configuration ..........................................................15 Establishing a treatment program ...........................................16 Using the Laser Comb ............................................................16 Waking your Laser: The WAKE command .............................16 Dermaray Laser: Setup Wizard ..............................................17 Setup Wizard: Flow Chart .......................................................18 Setup Wizard: Date (year, month, day) ..................................19 Setup Wizard: Input Patient Name .........................................22 Setup Wizard: Skin Type ........................................................23 Setup Wizard: Disease Type ..................................................24 Setup Wizard: Treatment Area’s ............................................25 Setup Wizard: Completed .......................................................26 What to do if the Wizard is not presented ..............................26 Subsequent Activations: Welcome screen .............................26 User Instruction Manual V1.01 (Rev.998 2010) 2 Entering Manual Mode ........................................................... 27 Manual Activation – UP button ............................................... 28 Manual Activation - Down button ............................................ 29 Manual Activation next treatment – RIGHT button ................. 31 Accessing HELP system – LEFT button ................................ 32 Entering Programming Mode.................................................. 33 Main Menu and its five options; .............................................. 34 Main Menu: 1. Therapy Info.................................................... 34 Main Menu: 2. Start Therapy .................................................. 36 Main Menu: 3. Therapy Setup ................................................ 38 Main Menu: 4. System Tools .................................................. 39 System Tools - Menu functions .............................................. 40 General Use and Operation ...................................................... 41 Online Help ................................................................................. 42 Doctor and Specialist PC Connectivity .................................. 43 Battery pack replacement guide .............................................. 44 Performing a software upgrade ............................................... 46 Performing a Reset function .................................................... 47 Software reset ........................................................................ 47 Hardware reset ....................................................................... 47 Trouble Shooting Tips .............................................................. 48 “IR Disconnection" error during treatments. ........................... 48 Dermaray Laser turns on, but won't start. .............................. 48 Specifications ............................................................................ 49 Menu Structure Flow Chart ....................................................... 50 Warranty Information – Dermaray Laser ................................. 51 Warranty Registration Form ..................................................... 52 User Instruction Manual V1.01 (Rev.998 2010) 3 Introduction Welcome and preface Thank you for choosing the world’s most innovative Laser phototherapy device. The Dermaray® - Laser represents the most technological advanced, effective and more importantly, the safest hand held phototherapy system available today. Designed and Manufactured by Total control Pty. Ltd. Your Dermaray® Laser Comb is a premium quality medical device which will deliver optimum laser therapy up to a full 100mW of laser power, which maximizes the effectiveness of your treatment plan as advised by your medical consultant or Hair Specialist. Your Dermaray® Laser Comb has numerous other superior built-in features that includes; an on-board computer, which will create your individual treatment plan, then, Monitor, Regulate, control , Record and Log, your usage. The proximity detector/sensors assist the user by alerting you of incorrect operation, and will automatically turn the device off if it senses no activity. The re-chargeable batteries ensures long and safe treatment sessions, and the Universal Power Supply means that you can use your device anywhere in the world, (you will need only acquire the correct power cord for the country of destination) The ergonomics in design is another feature like no other, the head of the laser comb has been designed with a natural curvature so it molds-in with the natural pathways of the human scalp. Minimal amount of teeth placed on the head of the comb is to prevent further tearing, tangling, and eroding of your of your prized possession “Your Hair”, as we understand that you are trying to grow it, and not comb it, or pull it out”, - so fully teethed combs and brushes are unnecessary. Let the power of the 100mW Dermaray® Laser comb do the work. Remember if ever in doubt as to whether Phototherapy or Laser devices is for you, we highly recommend seeking the advice of a qualified medical consultant, Trichologist, or your preferred Hair Specialist. Thank you, and Congratulations on your purchase of the Dermaray Laser Comb, we wish you the greatest success with your treatment, and hope you achieve your goal. Environmental notice In the interest of taking care of our environment Dermaray will use recycled packaging and printing materials where possible. Appropriate environmental manufacture and waste disposal regulations are followed. Dermaray has been manufactured to all appropriate environmental standards. Including RoHS reduction of hazardous substances (including lead free) User Instruction Manual V1.01 (Rev.998 2010) 4 How to use these instructions Laser Comb -101 Guide This user’s guide should be read completely from start to finish PRIOR to following any specific instructions or attempting to use or charge the Dermaray Laser batteries for the first time. Once read fully, you should follow all instructions and then also refer to these instructions while configuring your Dermaray Laser for the first time. The suggested process is as follows; Read these instructions fully from front to back Charge batteries fully as described in these instructions Read Safety Instructions Configure Dermaray Laser for initial use Refer to this guide as required Contact your supplier for assistance if required Contact Dermaray technical support if required User Instruction Manual V1.01 (Rev.998 2010) 5 Safety Information Safety First Dermaray Laser is a powerful hand held Laser Device, it is a Class IIIb laser. It must only be used in accordance to this user’s guide titled “Dermaray Laser User’s Guide.” Incorrect usage of this device may be dangerous. User guides are replaced from time to time; please download the latest user guide from; www.dermaray.com/forms/dermaray-laser-manual.pdf Safety precautions Low Level Lasers produce no heat – any heat felt is generated by the actual electronic components. There is no evidence to suggest over exposure is possible or side effects exist. However, it is recommended to abide by the suggested exposure times. Longer exposure times may not produce better results from treatment. If symptoms persist, please see your health care professional. Eye and accidental eye over exposure should be avoided with laser therapy. Laser light may cause permanent damage to your eyes. Damage may be cumulative, so repetitive accidental exposure may cause long term problems. Phototherapy programs are a suggestion and should be used as a guide only. NOTE: Never repeat treatment more than once in a 24 hour period unless under direct medical supervision. Other precautions include; Please follow these instructions carefully to minimize health risks and damage to property. Dermaray - Laser emits intense Laser Radiation which is dangerous to the eye. Never operate without laser safety goggles. Your must wear the supplied safety goggles at all times. When possible, also keep your eyes closed, particularly if treating the scalp or face. Any person in the vicinity of the device must also wear safety goggles, particularly if assisting the patient. Never look directly into the light with your eyes open (even with goggles.) If treating your face, keep eyes closed and goggles on at all times. Perform irradiation only as described in the operating instructions or as recommended by a health care professional. Never use the appliance in the bath tub or other wet areas. Never use a damaged product or damaged power supply. Do not perform laser phototherapy after photosensitizing of the skin by cosmetics, foods or medicine etc. User Instruction Manual V1.01 (Rev.998 2010) 6 Safety precautions - continued Do not use laser phototherapy concurrently or within several months of radiation therapy unless instructed by your doctor. Eye lids and the male scrotum/testicles cannot receive laser phototherapy under any circumstances – the skin is too thin and damage may occur. Use only the approved safety goggles supplied – sunglasses or other generic goggles may not provide adequate protection or protection at the peak wavelengths. Home laser phototherapy should ideally be supervised by an appropriate medical practitioner. Use only in accordance with local government regulations and safety protocols. Only use the device in areas of temperature below 40c and in low humidity environments. Store in a cool, dry place away from heat and direct sunlight. Avoid charging Dermaray when it is warm or hot; allow the device to cool after use and prior to charging. Never use Dermaray Laser while connected to mains power, use only on battery operation. NOTE: To date there is no proven link between measured medical dose phototherapy and any adverse side effects. User Instruction Manual V1.01 (Rev.998 2010) 7 Device compliance Dermaray medical devices are manufactured to strict ISO quality control standards AS13485 and meet or exceed the following recognized standards; CE electronic device approval TGA Class 1 medical device approval ACMA electronic device approval FCC electronic device approval RoHS reduction of hazardous substances (including lead free) User Instruction Manual V1.01 (Rev.998 2010) 8 When not to use - Laser Therapy You should not use Dermaray Laser if you are undergoing any form of skin treatment, taking any medications or receiving or recently undergone radiation therapy, without first speaking with your health care professional. Dermaray Laser should not be used if you suffer from any of the following conditions; suffer from or have a history of skin cancers pregnancy, because there have been no trials conducted NOTE: If you have any previous or prevailing medical conditions which you think may compromise you’re your health, and you are uncertain of whether usage of laser therapy is suitable for you, Please seek professional medical advice from a recognized medical specialist prior to use of laser phototherapy. Hazards when using Dermaray - Laser Dermaray Laser has been built to international ISO quality control standards in compliance with recognized safety standards. The equipment can only be used; 1. 2. 3. for that purpose for which it was intended, when in perfect working order and In accordance with all applicable laws, rules and regulations. Improper use, or use contrary to these instructions, can cause serious damage to the operator’s health and/or third parties (including damage to the skin and eyes) as well as potentially damaging the equipment. Proper usage Dermaray Laser is a laser appliance for the treatment of skin diseases and hair loss. Any other use of the equipment going beyond this shall be deemed improper and may be hazardous. The operator may use the equipment only after reading this user guide in full and accepting any direct or indirect results. Failure to do so may render the manufacturer's warranty invalid. You must; a. b. c. Adhere to all the information contained in the operating instructions Adhere to the schedule for inspection and maintenance work Adhere to the general and specific safety information and safety regulations contained in these operating instructions as well as the prevailing accident-prevention regulations. User Instruction Manual V1.01 (Rev.998 2010) 9 Your Laser Pack inclusions. Your Dermaray Laser pack contains one (1) each of the following items:- Laser Comb 100mw Universal Mains power supply / battery charger Laser safety goggles compact (patient) Laser safety goggles large (patient / helper) Power cord Quick-Start user guide A Free copy of User Instruction Manual is reserved for you to download at www..dermaray.com.au Optional Extra’s include (price on application) printed copy of User Instruction Manual CDROM copy of User Instruction Manual Spare distance guide Spare scalp attachment Treatment Packs If any component is missing, please contact your place of purchase immediately prior to using your device. Spare Parts There is no regular maintenance required for Dermaray Laser, laser modules have an average life time over 15+ years and should not require replacement. The comb attachment can be cleaned with a soft damp cloth; no cleaning agents should be used. Batteries should only be replaced with original Dermaray spare parts and by qualified service personal if and when required. WARNING: Use only genuine Dermaray Laser supplied spare parts. Contact your Dermaray or your authorised distributor for all spares. User Instruction Manual V1.01 (Rev.998 2010) 10 Getting started Main components of You Laser Comb Top View listing main components LCD Display LED Indicators Keypad Power connector Distance guide & scalp attachment PC / USB connector Bottom View listing main components Laser modules Distance guide & scalp attachment Power cord Proximity detectors Power cord holder User Instruction Manual V1.01 (Rev.998 2010) 11 Proximity Detector Explained Dermaray Laser is the safest and most technologically advanced hand held phototherapy system available today. By using a unique and innovative proximity detection system, the brain or on board computer of the Dermaray Laser is able to activate the laser modules once it is held in close proximity against a surface (such as a treatment area) and also sound an alarm or deactivate the lasers if it is moved away from the surface. This technology protects against accidental exposure and provides a level of safety not found in any other phototherapy device. User Instruction Manual V1.01 (Rev.998 2010) 12 Battery charging battery care Dermaray Laser Combs contains a high quality Li-Ion rechargeable battery and is supplied with a universal (100-240v @ 50-60Hz) battery charger. The power cable with wall connector can be changed to suit different locations with different wall power sockets. The high quality Japanese Li-Ion battery used in the Dermaray Laser are reliable and not susceptible to the “chemical memory” problems of older NiCad batteries, and is the same type of battery used in mobile telephones. It is recommended to perform a full charge prior to initial use of your Dermaray® - Laser to ensure the best performance and extend the life of your batteries. Connect the Dermaray Laser to mains power for a minimum of 12 hours prior to initial use. The CHARGING indicator should glow yellow when charging. The CHARGING indicator will go out (not be lit) when fully charged. However, for the initial charge, leave connected for a total of 12 hours which will include time after the charge indicator stops. Future charging is completed once the yellow CHARGING indicator goes out (not be lit.) After the initial long charge, Dermaray Laser can be charged between each use and disconnected from charge once the battery charge indicator shows battery full, or it can be charged when the unit indicates low battery. Dermaray Laser can be connected to mains power when the battery low indicator sounds. The low battery indicator will sound and display a low battery message with approximately 1 hour of treatment time left and again every 60 seconds whilst in use (with 5 minutes left). Batteries will charge while the device is in use, however it is recommended that treatment be suspended while the batteries are charging. Fully charged batteries will give approximately 3~7 hours of treatment time depending on the laser configuration, this time may be reduced if the device has not been charged for some time. The battery charger that is built into the unit is intelligent and protects against overcharging and resulting battery damage by constantly measuring battery voltage and temperature. When connected to power and charging the LED indicator “charging” will glow yellow, see below for detailed view. User Instruction Manual V1.01 (Rev.998 2010) 13 gin g so n ch ar er las po we r Figure 1: Showing charging yellow indicator light. Figure 2: showing battery charge completed. Indicator lights off. NOTE: During charging the laser handle may become warm. This is normal operation. Batteries will not charge if the device is too hot or too cold. NOTE: Battery life while in standby is around 2~3 months. If Dermaray Laser is not used for a number of weeks it is suggested to fully charge the batteries prior to the next use. Batteries may be completely flat if Dermaray Laser has not been used for some time. User Instruction Manual V1.01 (Rev.998 2010) 14 General Operations Dermaray Laser can be configured in different ways for different treatment purposes, including both strength and wavelength of the laser modules. Red and Blue laser are visible laser light, where infrared lasers are invisible, but are still harmful to the eye. Particular distributors may have their own specialized configurations not detailed here. Typical Dermaray Laser configurations are as follows; 50mW RED – 5x 660nm Laser Modules at 10mW each 100mW RED – 5 x 660nm Laser Modules at 20mW each 400mW RED – 5 x 660nm Laser Modules at 80mW each Please ensure that you have received the appropriately configured system for your treatment. Setup and configuration Prior to commencing treatment, you should have fully charged the battery in the Dermaray Laser as detailed in section 5. Do not activate the Dermaray Laser unless you have firstly charged the battery and read these instructions in full. Dermaray Laser comes fitted with a distance guide comprising of a number of rubberized black plastic teeth. This guide establishes the correct distance between the lamp and exposure area, makes scalp treatment more convenient and effective and allows proper operation of the proximity detection system. Permanent removal of this distance guide is not recommended and may lead to accidental over exposure and failure of the proximity detection safe guards. Temporary removal is acceptable for cleaning or maintenance purposes only. The distance guide clips off and also clicks back into place. Common sense must be applied to any phototherapy treatment program, always err on the side of caution. If unsure of any facet of treatment or operation, contact the person who supplied your device or your supervising doctor. Dermaray Laser can store details for 10 patients, each with up to 32 treatment areas. If one patient has more than 32 treatment areas, configure the additional areas under another patient (e.g. Patient 1a and Patient 1b.) User Instruction Manual V1.01 (Rev.998 2010) 15 Establishing a treatment program Phototherapy treatment is different for each person. Any phototherapy program should be considered a guide and may need to be adjusted on an individual basis or in consultation with your health care professional. Dermaray Laser however, generally automates this process for you and uses proprietary methodology based on established best practices. There are many variables including but not limited to the following that are considered; Patient skin type Disease being treated Areas requiring treatment Once programmed, Dermaray Laser will intelligently suggest a starting exposure time for your individual condition (based on the information above) and create an entire treatment program specifically for you. This treatment program will be automatically managed and increase at a rate suitable for your skin type and condition, to a maximum exposure level, also appropriate for your situation. Once the suggest treatment program is completed and your maximum exposure reached, a less frequent maintenance program will then be suggested and used for all further treatments. WARNING: Dermaray Laser is incapable of determining your suitability for phototherapy, your medical background and assessing any adverse reactions to treatment that you may experience. Therefore, common sense must always prevail and you, or a doctor, must monitor your individual condition and results of each treatment session. Using the Laser Comb Dermaray Laser should be held against the treatment area and moved slowly around the surface for the allocated time. For stubborn areas Dermaray Laser can he held on one place for several minutes or for the duration of treatment if required. Moving Dermaray Laser too quickly may result in a warning alert and deactivation of the lasers. Waking your Laser: The WAKE command Operating and programming will be explained in more detail throughout this guide. Firstly, it is important to learn how to Wake Dermaray Laser. This feature will be called” WAKE” throughout this User’s Guide. NOTE: Do not perform this function until this document has been read in full. User Instruction Manual V1.01 (Rev.998 2010) 16 Operating and programming will be explained in more detail throughout this guide. Firstly, it is important to learn how to Wake Dermaray Laser. This feature will be called WAKE throughout this User’s Guide. Normally the Dermaray Laser is in SLEEP mode. To WAKE Dermaray Laser press and hold the ENTER key for 3 seconds (central round button, see below.) Dermaray Laser will beep and the top green indicator will be on. You will see information presented on the display. If left unattended Dermaray Laser may return to sleep and need to be WAKEN again. Perform the WAKE function for the first time only after fully charging the batteries. Figure 4: The "WAKE" command, press and hold ENTER button for 3 seconds. Enter key Figure 5: Screen is shown on the subsequent WAKE 3: Dermaray Welcome Setup Wizard is started when lamp is first commands activated. after completion of the Setup Wizard. The screen displays the YEAR – DATE – TIME and a logo. *2008-Year 2009-Year 2008 09-08 10:30 D erm aray To turn Off Laser (enter sleep mode) At any time and at most menus to turn off Dermaray Laser, PRESS and HOLD the ENTER button for 3 seconds. This will turn the unit OFF and is called SLEEP mode. Dermaray Laser: Setup Wizard When Dermaray Laser is WAKEN for the first time, it will present a SETUP WIZARD. On subsequent activations Dermaray Laser will present the WELCOME SCREEN. In some instances Dermaray Laser may present the SETUP WIZARD User Instruction Manual V1.01 (Rev.998 2010) 17 again, for example after a software upgrade, a full software reset or manual activation of the Setup Wizard. Please now follow the procedure below; 1. 2. 3. Fully charge Dermaray Laser WAKE Dermaray Laser Proceed through Setup Wizard as follows. The SETUP WIZARD is an automated setup procedure; it will prompt you for system information as well as patient treatment information. It is suggested to make some notes prior to starting the SETUP WIZARD. The Setup Wizard must be completed within 25 minutes otherwise Dermaray Laser will return to SLEEP. (If this happens, the information will need to be entered into Dermaray Laser manually via the SYSTEM CONFIG MENU and TREATMENT CONFIG MENU.) Information can easily be amended or deleted at a later stage. The SETUP WIZARD will ask the following questions; Date (year, month, day) Time (hour and minutes in 24:00 format) Patient name Patient skin type Disease Treatment areas (by area name e.g. scalp, chest, left leg etc) Setup Wizard: Flow Chart User Instruction Manual V1.01 (Rev.998 2010) 18 Setup Wizard: Date (year, month, day) User Instruction Manual V1.01 (Rev.998 2010) 19 - Laser for initial use, please WAKE the device by pressing and HOLDING the “ENTER” key for 3 seconds Enter key Select the current YEAR by pressing or holding the UP and DOWN keys and then press ENTER. The display will scroll up and down. *2008-Year 2009-Year Select the current MONTH by pressing or holding the UP or DOWN keys and then press ENTER. 1 = January, 2 = February, 3 = March etc. *1-January 2-February User Instruction Manual V1.01 (Rev.998 2010) 20 Setup Wizard: Continued Select the current DAY by pressing or holding the UP or DOWN keys and then press ENTER. 1 = 1st of the month, 2 = 2nd of the month, 3 = 3rd of the month etc. *1-D ay 2-D ay Select the current HOUR in 24 hour format (00:00) by pressing or holding the UP or DOWN keys and then press ENTER. 1 = 1:00am, 6 = 6am, 18 = 6pm, 0 = midnight etc. *0-Hour 1-Hour Select the current MINUTE in 24 hour format (00:00) by pressing or holding the UP or DOWN keys and then press ENTER. 1 = 1 minute past the hour, 15 = 15 minutes past the hour, 30 = 30 minutes past the hour, 45 = 45 minutes past the hour etc. *0-Minute 1-Minute User Instruction Manual V1.01 (Rev.998 2010) 21 Setup Wizard: Continued After entering the Date and Time either 1.Complete the setting or 2.Discard & Exit. 1*Com plete 2.D iscard & E xit Setup Wizard: Input Patient Name Enter the patient name by selecting letters from the alphabet. Press or hold the LEFT or RIGHT arrow to scroll through the alphabet, press ENTER to select the highlighted letter e.g. “A” and repeat scrolling for subsequent letters. “_” = space. To delete an incorrect letter select “Del” to delete the last letter(s). To finish entering the Patient Name press the ENTER button after selecting the last letter. Press either the ENTER button or select “Exit” to finish using the Setup Wizard. NOTE: UP and DOWN arrows can be used for advanced editing to swap between the input line and alphabet selection line. A maximum of 10 Patient Names can be stored. Input Nam e _ User Instruction Manual V1.01 (Rev.998 2010) 22 Setup Wizard: Skin Type Select the patient SKIN TYPE by pressing or holding the UP or DOWN keys and then press ENTER. Options that do not appear on the LCD are included in the picture above. The list will automatically scroll. A confirmation page will display to confirm your selection. Skin types can be further explained as; 1*Very W h ite 2.W h ite 3.O live 4.B row n B lack Skin Type / Description 1. VERY WHITE - Celtic type: Light skin, red or fair haired, blue or green eyes, freckles. quick to sunburn; little or no bronzing even after repeated sun exposure. 2. WHITE ANGLO SAXON - European type: Fair-haired, blue, grey or green eyes. Almost always sunburn; moderate bronzing after repeated sun exposure. 3. EUROPEAN OLIVE – Dark skinned European type: Light brown or brown hair, brown eyes. Sometimes sunburn; progressive bronzing after repeated sun exposure. 4. BROWN BLACK – African, or black coloured type: Dark brown or black hair, brown eyes. Rarely sunburn, rarely bronze or tan. 5. CHILD – Small children For very sensitive skin type such as children or the elderly This setting can be used for a very conservative treatment User Instruction Manual V1.01 (Rev.998 2010) 23 Selecting a skin type allows Dermaray Laser to adjust exposure programs to best suit your sensitivity to light. Lighter skin has shorter exposures than darker skin. Darker skin types will have longer exposures. Setup Wizard: Disease Type Select the patient DISEASE TYPE by pressing or holding the UP or DOWN keys and then press ENTER. Options that do not appear on the LCD are included in the picture above. The list will automatically scroll. A confirmation page will display to confirm your selection. Selecting a disease type allows Dermaray - Laser to calculate an appropriate treatment program for different conditions while considering your skin type. 1*Hair Loss 2.G en eral 3.B eau ty 4.Wou n d/B u rn User Instruction Manual V1.01 (Rev.998 2010) 24 Setup Wizard: Treatment Area’s Treatment Areas are locations on the body that require exposure such as Scalp, Face, Left Leg, Right Arm etc. Up to 32 locations can be entered and treatment times and exposures are individually recorded for each area. Individual areas can be treated separately or all areas can be treated in turn in one session. There may also be only one area, such as for treatment for Hair Loss. Enter the Treatment Areas by selecting letters from the alphabet. Press or hold the LEFT or RIGHT arrow to scroll through the alphabet, press ENTER to select the highlighted letter e.g. “A” and repeat scrolling for subsequent letters. “_” = space. To delete an incorrect letter select “Del”. To finish entering the Patient Name press the ENTER button. Press either the ENTER button or select “Exit” to finish using the Setup Wizard. A confirmation page will display to confirm your selection. After the first Treatment Area is added, Dermaray - Laser will present the “Treatment Area” menu. Input A rea Nam e _ NOTE: UP and DOWN arrows can be used for advanced editing to swap between the input line and alphabet selection line. A maximum of 32 Treatment Areas can be stored per Patient Name. To add additional treatment areas select 1. Add Treat Area, select 2. Area List to view already entered Treatment Areas or select 3. Complete when finished entering all Treatment Areas. 1*A dd A rea 2.A rea List 3.Com plete User Instruction Manual V1.01 (Rev.998 2010) 25 Setup Wizard: Completed Once Date & Time, Patient Information and Treatment Areas have been entered the Setup Wizard is now complete. Dermaray - Laser will return to the Welcome Screen. The current Date and Time should S etup Com plete What to do if the Wizard is not presented Under some circumstances, the Setup Wizard may not be presented or may need to be started manually. In order to resolve this issue for a brand new Dermaray Laser please follow the instructions titled "A Software Reset" "Performing a Reset Function Subsequent Activations: Welcome screen After initial completion of the SETUP WIZARD and AWAKE on subsequent occasions, the Dermaray Laser will present a WELCOME SCREEN. The WELCOME SCREEN displays the date, time, logo and battery voltage. At the WELCOME SCREEN - Laser behaves in a similar way to a traditional non-computer controlled laser comb, it may be activated or deactivated on a manual basis. Or at the WELCOME SCREEN pressing ENTER again will access treatment programs and other configuration and automated features. 2008 09-08 10:30 D erm aray WELCOME SCREEN MANUAL MODE AUTOMATED MODE User Instruction Manual V1.01 (Rev.998 2010) 26 Entering Manual Mode Dermaray Laser is a very sophisticated device, but it can also be used in a similar fashion to a manual phototherapy system by simply being turned on and off. This mode may be useful for people who are; unable to program the device successfully do not wish to use an automatically generated program are already familiar with manual phototherapy continuing a pre-existing treatment program other non-standard applications for laser therapy as prescribed by a doctor have already configured a DEFAULT USER and wish to proceed with their next pre-defined treatment session with no additional change, to programming Three manual modes and one short cut key are available at the WELCOME SCREEN as follows; UP manual activation. DOWN activation for set time. LEFT for HELP menu. RIGHT begin next programmed session ALL areas for default user. User Instruction Manual V1.01 (Rev.998 2010) 27 Manual Activation – UP button WAKE Dermaray - Laser, by pressing and holding the ENTER key for 3 seconds. Then at the WELCOME screen; 2008 09-08 10:30 D erm aray Press and hold the UP button for 3 seconds to manually activate the lamp. - Laser will start counting how long it is activated for. Once started a treatment surface must then be detected before the lamp will activate. This mode must be stopped manually. Hold for 3s to start counter Move the laser to the appropriate area requiring treatment. Move Laser To Therapy A rea... User Instruction Manual V1.01 (Rev.998 2010) 28 Once a surface is detected the laser will turn on and the treatment will be administered. The RED LED will also be activated to indicate the Laser system is active. Treating: X s NOTE: This is a timer that increases with no set limit. In this mode, the lamp will remain on until manually de-activated, or a de-activation is triggered or caused by another event such a low battery. WAKE Dermaray - Laser, by pressing and holding the ENTER key for 3 seconds. Then at the WELCOME screen; 2008 09-08 10:30 D erm aray Manual Activation - Down button WAKE Dermaray - Laser, by pressing and holding the ENTER key for 3 seconds. Then at the WELCOME screen 2008 09-08 10:30 D erm aray User Instruction Manual V1.01 (Rev.998 2010) 29 Press and hold the DOWN button for 3 seconds to manually activate the lasers, with proximity detection and with a user defined countdown timer (shut off will occur once timer has expired. Hold for 3s to activate tim er Enter the time in SECONDS to manually turn on the Laser. Press or hold the LEFT or RIGHT arrow to scroll through the numbers; press ENTER to select the highlighted number. E.g. 60 seconds = 1 minute, 180 seconds = 3 minutes. To delete an incorrect number select “Del”, to finish entering the number press the ENTER button or select “Exit Input Tim e _ Move the Laser to the appropriate area requiring treatment. M ove Lam p to Therapy A rea User Instruction Manual V1.01 (Rev.998 2010) 30 Once a surface is detected the Laser will turn on and the treatment will be administered. The RED LED will also be activated to indicate the Laser is active. Treating: X s NOTE: This is a timer that decreases from the specified time limit. In this mode, the lamp will remain on until automatically de-activated when the timer reaches zero or manually stopped by pressing ENTER and selecting STOP, or when proximity detection pauses the countdown. Manual Activation next treatment – RIGHT button Once the SETUP WIZARD has been completed, at the WELCOME SCREEN, pressing and holding the RIGHT button for 3 seconds will invoke the next treatment session for the last user for all areas. This is an extremely useful feature. It allows the laser user (usually the primary user) of Dermaray Laser to invoke their next treatment program quickly and easily without accessing extended programming menus. Dermaray Laser will know the next appropriate session duration - Laser, by pressing and holding the ENTER key for 3 seconds. Then at the WELCOME screen, press and hold the RIGHT key for 3 seconds. 2008 09-08 10:30 D erm aray User Instruction Manual V1.01 (Rev.998 2010) 31 A confirmation page will display the last Patient Name and advise All Areas Treatment has been automatically selected. Then move Dermaray - Laser to the first treatment area. If the last treatment was interrupted, Dermaray - Laser will resume from the point it was interrupted Loading Patient x Accessing HELP system – LEFT button WAKE Dermaray - Laser, by pressing and holding the ENTER key for 3 seconds. Then at the WELCOME screen, press and hold the LEFT key for 3 seconds to access the HELP MENU 2008 09-08 10:30 D erm aray Hold for 3s to display help User Instruction Manual V1.01 (Rev.998 2010) 32 Entering Programming Mode WAKE Dermaray Laser, by pressing and holding the ENTER key for 3 seconds. Then at the WELCOME SCREEN press ENTER again once to enter the MAIN MENU for programming. If a button is not pressed within 4 seconds the MAIN MENU will exit and the WELCOME SCREEN will be displayed again. Simply press ENTER again to access the MAIN MENU. If Dermaray Laser is left unattended for a short while, it will exit programming and return to the WELCOME SCREEN. If still left unattended it will also return to SLEEP to conserve batteries. If this happens, please WAKE the unit and begin programming again. 2008 09-08 10:30 D erm aray NOTE: During programming, to exit a menu press the RIGHT button to return to the previous menu or select EXIT. 1*Th erapy In fo 2.S tart Th erapy 3.Th erapy S etu p 4.System Tools 5.E xit User Instruction Manual V1.01 (Rev.998 2010) 33 Main Menu and its five options; Therapy Info: displays a list of Patients and statistics for each treatment area for each individual patient including skin type, disease, the last session time and total exposure time. Start Therapy: allows a user setup via the SETUP WIZARD or entered manually to start either all treatment areas or a selected individual treatment area. This menu also allows for manual activation or manual activation with a fixed time. Therapy Setup: allows existing patients to be modified or deleted, plus new patients to be added. System Tools: provides access to the Setup Wizard, System Information, Laser Configuration, LCD Back Light Control, Power Control, Time Setup, Software Synchronisation with a PC, Reset to Default Settings etc. Exit: Leave the main menu and return to the Welcome Screen. Main Menu: 1. Therapy Info 1*Th erapy In fo 2.S tart Th erapy 3.Th erapy S etu p 4.System Tools 5.E xit There may be any number of patients configured. Make a selection and press ENTER to view the treatment areas that are configured for that user. 1*U ser_O n e 2.U ser_Tw o User Instruction Manual V1.01 (Rev.998 2010) 34 From the TREATMENT AREA MENU, selecting a Treatment Area from the list will display detailed information about that area; there may be any number of Treatment Areas configured. Make a selection and press ENTER to view the additional information 1*A rea_O ne 2.A rea_Tw o Information contained for each treatment area includes the above details, examples included. To exit this menu presses the RIGHT button. To return to the MAIN MENU or WELCOME SCREEN continue pressing the RIGHT button. Note that the down arrow indicates more information on the next screen; press the DOWN arrow to scroll and view more details A rea:A RE A _O NE (S kin Type) (D isease) Last S es:0 Total E xp:0s User Instruction Manual V1.01 (Rev.998 2010) 35 Main Menu: 2. Start Therapy From the MAIN MENU, selecting 2.Start Therapy will display the START THERAPY MENU 1.Th erapy In fo 2.S tart Th erapy 3*Th erapy S etu p 4.System Tools 5.E xit From the START THERAPY MENU, selecting 1. Area Program will present a PATIENT LIST. Manual On/Off and Set Manual Ti (time) are the same function available via UP and DOWN arrows at the WELCOME SCREEN 1*A rea Program 2.M anual O n/O ff 3.S et M anual Ti 4.E xit After selecting a Patient from the PATIENT LIST a THERAPY AREA menu is displayed 1*U ser_O ne 2.U ser_Tw o User Instruction Manual V1.01 (Rev.998 2010) 36 At the THERAPY AREA menu select 1.All Areas to treat all pre-programmed areas or select an individual area to perform treatment on. 1*A ll A reas 2.A rea_O n e 3.A rea_Tw o 2.A rea_Th ree After making a selection at the THERAPY AREA MENU above, the AREA MENU will be presented at the start of each new area requiring treatment – only once if an individual area was selected. Each Treatment Area can either be 1.STARTED, 2. SKIPPED or 3.RESTARTED. The system will automatically move to the next area in succession 1*S tart 2.S kip 3.Restart 4.Can cel Move the laser to the appropriate area requiring treatment Move Laser To Therapy A rea... User Instruction Manual V1.01 (Rev.998 2010) 37 Once a surface is detected the lamp will turn on and the treatment will be administered. The RED LED will also be activated to indicate the Laser is active. The timer will display with the time REMAINING for this treatment session. A session can be STOPPED, PAUSED or SKIPPED by pressing ENTER during the session Treating: X s Main Menu: 3. Therapy Setup From the MAIN MENU, selecting 3.Therapy Setup will display the THERAPY CONFIG MENU 1.Th erapy In fo 2.S tart Th erapy 3*Th erapy S etu p 4.System Tools 5.E xit THERAPY SETUP MENU above. Option 1. Add Patient will create a new patient profile – a similar process as the SETUP WIZARD 2. Patient List will allow an existing patient to be edited or deleted. 1*A dd Patient 2.Patient List User Instruction Manual V1.01 (Rev.998 2010) 38 Main Menu: 4. System Tools The System Tools menu should be used with some caution. These options typically control vital components of Dermaray Laser and some functions, if selected, cannot be easily undone From the MAIN MENU, selecting 4.System Tools will display the SYSTEM TOOLS MENU. 1.Therapy Info 2.S tart Therapy 3.Therapy S etup 4*System Tools 5.Exit 1*S etu p W izard 2.System In fo 3.Proxim ity Cn tl 4.B ackligh t Cn tl 5.Pow er Cn tl 6.Pow er Level 7.Tim e S etu p 8.S ou n d Cn tl 9.Tim e S etu p 10.Reset A LL 11.S oftware U pd 12.E xit User Instruction Manual V1.01 (Rev.998 2010) 39 System Tools - Menu functions 1. 2. 3. 4. 5. 6. 7. 8. 9. 10. 11. 12. 13. 14. 15. 16. 17. Setup Wizard: This function allows for the easy addition of a new user, a similar process to the Patient Information entered during the original Setup Wizard, without modifying the current system Date and Time. System Info: Displays the current Software Version Number, the unique Serial Number of the device, the type of installed Laser Modules other fixed system information. Battery Info: Displays current battery voltage Proximity Cntl: Allows the proximity detection system and associated safe guards to be Disabled or Enabled (default is automatic.) Treat Notify: Beep during treatment at set intervals. Sound Cntl: Allows the sound and other warnings to be disabled or enabled, or just warnings to be activated. Default is all audible alerts are on. Backlight Cntl: Allows the continual activation of the LCD display back light, or automatic management. Continued activation will reduce battery life. Automatic management will turn off the LCD backlight when no new information is available, and turn on the LCD backlight when there is new information to present on the display (default is automatic.) Power Cntl: Allows the continual activation of the Dermaray Laser without automatic shut down to sleep (default is automatic.) IR Sensitivity: Adjust the effectiveness of the proximity detection. Sensitivity can be reduced if IR disconnects more regularly than required. Power Level: The installed Laser modules can be run at a percentage of maximum, e.g. to limit the laser power output for safety, legal requirement or particular types of treatment (default is 100%.) Laser Config: A method to indicate the installed laser module type including power and wavelength. Diode Config: Turn individual laser modules on or off, then applies to all treatments until changed or reset. Time Setup: Set new Date and Time information. Reset ALL: This function will delete all user entered information, historical data and patient information. This is useful if giving the device to a new patient or configuring. Hardware Test: Test all aspects of the system including LCD backlight, LCD text display, battery voltage, individual laser diodes, all laser diodes, laser diode power levels, proximity detection system and keypad. System requires a hardware reset after performing this function. Software Updt: A function to upgrade operating system software within Dermaray Laser. This function would only be performed with an original Dermaray Laser upgrade kit. Exit: Exit System Tools Menu and return to the Main Menu. User Instruction Manual V1.01 (Rev.998 2010) 40 General Use and Operation Once programming has been completed on your Dermaray Laser the duration of your treatment has been calculated automatically and is usually within 10~17 minutes depending on your condition and skin type. Laser therapy is recommended at least every two days, allowing your skin to rest between treatments. If more frequent treatment is required, it is suggested to do this after several weeks of successful treatment every two days. It is not recommended to begin with daily treatments. Dermaray Laser can be used by either continuously moved over the entire treatment area or held for several minutes on each area. Likewise it is acceptable to concentrate on problem treatment areas. There appears to be no "best" method for applying laser therapy, but the general consensus is to hold for several minutes on the main problem or treatment areas. If Dermaray Laser is moved too fast, an alert will sound and the display will issue an "IR disconnect" command-error. This is part of the normal operation. If you continually receive this error, please ensure you are holding the comb flat against the treatment area. Try moving Dermaray Laser either faster or more slowly until you find the best method of use for yourself. It is important to hold Dermaray Laser flat against your scalp or treatment area and move it in contact with your skin. Lifting Dermaray Laser to move between treatment areas will cause an IR Disconnection warning. This is part of the normal operation. If lifting and moving between treatment areas is required, setup additional treatment areas or disable proximity detection via the System Tools menu. NOTE: Do not press the Dermaray Laser hard against your skin. Pushing hard to flatten the comb attachment will eventually break the comb teeth. Hold Dermaray Laser lightly in place. User Instruction Manual V1.01 (Rev.998 2010) 41 Online Help In addition to this user guide, we are pleased to document the main features of the Laser via online videos. Click on the following links to view the videos. Charging the battery or http://www.youtube.com/watch?v=-Kmoz10sj2g Completing the Setup Wizard or http://www.youtube.com/watch?v=7w-xMKVVpdU How to Start and Use or http://www.youtube.com/watch?v=lEDHknYmxoI Proximity Detection Explained or http://www.youtube.com/watch?v=wOcqjIUUrCc Hardware Test & Feature Overview or http://www.youtube.com/watch?v=Vaertnzfhn0 User Instruction Manual V1.01 (Rev.998 2010) 42 Doctor and Specialist PC Connectivity The Dermaray Laser when supplied by your Medical or Hair Specialist, May have already been pre-configured with your treatment plan and your personal details. “Do not under any circumstance change or amend this”. Your therapist or consultant has already acquired the optional connectivity package which permits connection of your device with the Dermaray Specialist Software program, Your Laser comb will be connected to the specialists Personal Computer system using an optional USB connection cable for programming and input of your personal details and treatment(s). This feature allows the specialists to calibrate the laser to your individual program, and may include one of or all of the following options; 1. 2. 3. 4. 5. 6. Locking a Dermaray- Laser to a specific patient by name. Establishing a set customised treatment program for individual patients. The ability to LOCK or PRESCRIBE a predetermined program by either date and time or number of sessions to administer, e.g. after 3 months or 50 sessions, Dermaray Laser will need to be returned to the doctor to PRESCRIBE additional sessions or treatment and for a patient checkup by their doctor/Hair specialist. Allow a doctor or specialist to establish a customised treatment program for particular patients or conditions such as small children or patients hypersensitive to phototherapy. This feature allows for greater regulatory and safety control. To upgrade firmware for your unit. WARNING: Use only genuine Dermaray Laser supplied USB connector cable. Using a non Dermaray Laser supplied USB connector cable will damage your device and is not covered by any warranty. Damage of this nature is explicitly not covered by any warranty. Fire or explosion may result using a non genuine USB cable. User Instruction Manual V1.01 (Rev.998 2010) 43 Battery pack replacement guide The following section describes how to change a battery. Instructions here are a guide only, this procedure should be undertaken strictly by a person suitably qualified or experienced with electronic equipment and tools. WARNING: Battery replacement should only be performed by a qualified and approved service centre. WARNING: Use only genuine Dermaray Laser supplied replacement batteries. Using a non Dermaray Laser supplied replacement battery pack will damage your device and is not covered by any warranty. Damage of this nature is explicitly not covered by any warranty. Fire or explosion may result using a non genuine battery. NOTE: Ensure Dermaray Laser is NOT connected to mains power and is currently OFF or ASLEEP. Battery packs should be disposed of in accordance with local environmental laws. Detach the Distance Guide with a finger nail or flat screw driver Remove distance guide & Scalp attachment WARNING: Take care when removing screws that the lamp is not accidentally activated. It is suggested to hold the lamp rather than lay it on a flat surface while removing the screws. User Instruction Manual V1.01 (Rev.998 2010) 44 Remove 4 screws; the single crew at the base is located inside the power cord holder Locate the Battery Pack and Battery Connector Terminals. Disconnect the two connector plugs taking note of where they were connected. Replace the battery pack and reassemble the device. Battery terminal Battery Temperature sensor terminal User Instruction Manual V1.01 (Rev.998 2010) 45 Performing a software upgrade The following section describes how to upgrade onboard software or firmware. This section should only be followed on explicit instructions from Dermaray or your authorized distributor. The software upgrade feature requires a custom PC connection cable and Dermaray specific PC software. Attempting to access Dermaray features or firmware via non-standard connector cable and / or PC software may cause permanent damage to the Dermaray Laser. WARNING: Use only genuine Dermaray Laser supplied PC connector cable and PC software. Using a non Dermaray Laser supplied PC connector cable and / or PC software will damage your device and is not covered by any warranty. Damage of this nature is explicitly not covered by any warranty. Fire or explosion may result using a non genuine PC connector cable. WARNING: Performing a software upgrade will erase all entered and stored information. Dermaray Laser will need to be reconfigured in the same manner as a new device. This includes all patient information, laser module type, treatment information, date and time etc. WARNING: The Software Upgrade function must not be interrupted. Interruption of a software upgrade may render Dermaray Laser unusable and a factory repair will be required. Damage of this nature is not covered by any warranty. WARNING: After a hardware reset Dermaray Laser will briefly flash it’s laser modules, ensure the device is face down and not directed at your eyes. Wear appropriate eye protection. 1. 2. 3. 4. 5. 6. 7. 8. 9. Ensure that Dermaray Laser battery is fully charged. Connect Dermaray Laser to mains power. Stop all unnecessary programs on the PC, disable all virus scanners and firewall applications. Attach the supplied PC connector cable to a PC and to the Dermaray Laser USB connector. WAKE Dermaray Laser, access the System Tools Menu, and select Software Upgrade, then select YES. Using the supplied software, firstly ERASE the flash. Using the supplied software, upload the new flash. Perform a hardware reset (see next section.) Reconfigure Dermaray Laser. User Instruction Manual V1.01 (Rev.998 2010) 46 Performing a Reset function The following section describes how to reset the Dermaray Laser. There are two reset methods; a software reset and hardware reset. The software reset will clear all user memory; all entered and stored information will be lost and unrecoverable. In most instances a hardware reset is adequate, on rare occasions if Dermaray Laser becomes jammed or locked, or after a software upgrade a hardware reset may need to be performed. A hardware reset will not erase any stored information in the Dermaray Laser. WARNING: Performing a software reset will erase all entered and stored information. Dermaray Laser will need to be reconfigured in the same manner as a new device. This includes all patient information, bulb life timers, treatment information, date and time. Software reset 1. 2. 3. WAKE Dermaray Laser, access the System Tools Menu, and select Default Reset. When prompted with Reset Config, select YES. All software information is now reset and any stored information is lost. Hardware reset WARNING: After hardware reset Dermaray Laser will briefly flash its laser modules, ensure the device is face down and not directed at your eyes. Wear appropriate eye protection. 1. 2. WAKE Dermaray - Laser. Insert a straightened paper clip or other similar blunt thin object approximately 5mm. Hardware reset button Hardware reset button. Once pressed, the LCD display will flash and beep. User Instruction Manual V1.01 (Rev.998 2010) 47 Trouble Shooting Tips Dermaray Laser is a high quality precision device manufactured to the most exacting standards possible. However from time to time problems may be encountered. This section describes some common problem solving tips; “IR Disconnection" error during treatments. A beep followed by an "IR Disconnection" error on the display indicates a problem with a treatment surface area. Try adjusting how you are holding Dermaray Laser and ensure it is held flat against the treatment area. Also try adjusting how you move Dermaray Laser by experimenting with a faster or slower movement, circular movements can also work for some situations. If Dermaray Laser is used near strong fluorescent light or near a strong natural light source, then the IR Detection could be more sensitive than usual. Try moving to another room or adjusting your position away from another strong light source. The IR Sensitivity can be adjusted in the System Tools menu, in extreme cases it can also be disabled. Disabling IR Detection is NOT recommended. Dermaray Laser turns on, but won't start. If Dermaray Laser shows a Yellow power led, but has no display on the display, please firstly ensure that battery is fully charged. If the problem persists follow the instructions for a Hardware Reset. User Instruction Manual V1.01 (Rev.998 2010) 48 Specifications ITEM DESCRIPTION Product name: Size of device: Weight of device: Shipping size: Shipping weight: Operating temperature: Internal cut out temperature: Battery type: Battery operating capacity: Power supply: Power input: Power consumption: Microprocessor: Onboard memory: PC Interface: Laser Modules Options: Patents: Dermaray Laser HxW xD 190g 25 x 20 x 6cm 600g or 0.6kg 5-45c ~ 65c 1 x Li-Ion 3.7v battery 3~7 hours min continual use 100-240v 50-60Hz 5VDC – 2.0A TBA Philips PLC2138 (32bit, 60MHz) 512kb FLASH USB* 100mW: 5 x 20mW ~10% @ 660nm ~10%. Pending *WARNING: Use only genuine Dermaray Laser USB cable and genuine Dermaray Laser replacement parts. Using non-genuine parts may cause damage to the device and void your warranty. User Instruction Manual V1.01 (Rev.998 2010) 49 Menu Structure Flow Chart User Instruction Manual V1.01 (Rev.998 2010) 50 Warranty Information – Dermaray Laser Your Dermaray Laser is covered under the manufacturer’s warranty against all defects in materials and workmanship for a period of Two Years (2 years) from the date of the original purchase, subject to the following terms and conditions. This warranty is not limited to the original owner and is fully transferrable. This warranty does not apply if the serial number or housing of the product has been removed, or if the product has been subject to physical abuse, improper installation, or modification. This warranty is only valid when a bill of original sale and a completed warranty registration form is received by Dermaray. Change of ownership must be notified in writing to Dermaray for warranty transfer purposes. For products purchased from an authorised distributor, please contact that distributor to arrange warranty service, repair or replacement. Products not purchased directly may be returned, but return shipping must be paid by the customer and a service fee may apply. To obtain warranty service from products purchased directly from Dermaray.com, the product must be returned, insured and shipping prepaid to Total Control Pty. Ltd. at the address following, in its original packaging or suitable equivalent, along with a written description of the problem and the customer’s full name, return address, contact telephone numbers and email. Return Authorisation Numbers (RAN#) must be obtained and marked clearly on the outside of the package being returned. A service fee applies for items returned with no fault found. Items returned without your RAN # may not be accepted. Total Control Pty. Ltd. disclaims all other warranties, expressed or implied, including warranties of merchantability and fitness for any particular purpose whatsoever and no other remedy shall be available, including without limitation, incidental or consequential damaged. In no event shall Total Control Pty. Ltd. liability exceed the purchase price of the product in question. Total Control Pty. Ltd. wants you to be satisfied with its products. Should you have any difficulties with operation or performance with your Dermaray Laser, please contact us immediately. User Instruction Manual V1.01 (Rev.998 2010) 51 Warranty Registration Form NOTE: To register and activate your warranty, this form must be completed and returned to the manufacturer directly with a copy of your invoice or bill of sale. Change of ownership must be notified to Dermaray in writing. Warranty may also be submitted online www.dermaray.com/registration.htm Customer Information; Full name: ____________________________________________ Address: ____________________________________________ ____________________________________________ Town/City: ____________________________________________ Zip Code: __________________ Country: _________________ Phone: ____________________________________________ Mobile: ____________________________________________ Email: ____________________________________________ Why you chose this product: __________________________________ ____________________________________________ Would you like to be informed of new products, updates and other important information by email? Place of Purchase Information; Date of purchase: ____ /____ /_____ Supplier’s name: ___________________________________ Supplier’s address: ___________________________________ ___________________________________ Supplier’s phone: ___________________________________ Suppliers web page: ___________________________________ Purchase price: ___________________________________ User Instruction Manual V1.01 (Rev.998 2010) 52 This page is for your personal schedule of appointments and for general notes User Instruction Manual V1.01 (Rev.998 2010) 53 Total Control Group Pty Ltd Unit 3/ 6 Barnett Court Morley W.A. Australia Telephone: 61 (8) 9370 4038 Fax: 61 (8) 9271 4305 Web: www.dermaray.com All rights reserved. User Instruction Manual V1.01 (Rev.998 2010) 54