1
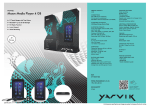
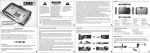
Portable/Personal
able/Personal
Media Player
PMP400
User Manual
(Ver 2.3)
Distributed World-Wide exclusively by Portable Electronics Ltd
http://www.hdmp4.com
http://www.portable.geek.nz
PMP400 USER MANUAL
Dear Customer,
Thank you for your purchase on this versatile All-In-One portable media player, PMP400. We hope you will find
this player useful and enjoy the convenience it brings to your life. The better you know how to use it, the more
enjoyment you will get from it. Remember, with the PMP400 you can…
• Play literally any video files directly without conversion - AVI(DivX, Xvid)、VOB(DVD)、DAT(VCD)、MPG、
MPEG on the built-in 4.3” LCD screen, television, video projector, etc
• Record video from television, DVD player, VCR or other video devices in mpeg4 format
• Listen to MP3, WMA, or OGG music files
• View JPEG digital photos as well as in slide shows
• Store your computer data – it’s a portable hard drive too!
• and many other features detailed inside this manual.
Please read this manual carefully to discover and maximize the benefit of owning and using this PMP before
operating and keep it for future reference. It will also be helpful if you encounter any problems.
About Portable Electronics Ltd,
Portable Electronics Limited is 100% New Zealand owned and operated. In 2006, we became aware of the
immerse market demand for MP3/MP4/PMP players in New Zealand and the apparent lack of suitable supply.
The quest to obtain one for ourselves for personal use from overseas eventuated the formation of Portable
Electronics Ltd to supply these hard to get gadgets. In other words, we exist only to provide end-users with
their long sought after dream gadgets and to improve their way of life.
We do not have retail shops or showrooms but have local representatives in both New Zealand and Australia to
serve your needs. We are an online based distribution company providing multi-purpose high quality portable
gadgets at low price to electronic and computer shops. We are extremely picky and we employ very rigorous
selection process when sourcing new products. We do not like cheap low quality products. Hence, we only sell
the best and only the very best products at some of the lowest price you can find in the market. We test all our
products comprehensively, pro-actively identify potential problems (as well as from customer feedback) and
negotiate fixes constantly with our supplier.
Today, we sell our products world-wide with focus on New Zealand and Australia. We strive to provide the best
products at the lowest prices and we offer excellent after-sales customer service. We are proud to say that
customers who purchased from us are 100% satisified with our friendly service and are very happy to return for
future purchase. We have put honesty as our priority when we communicate with customers and are highly
transparent in our communications (e.g. our public forum feedback/discussion system). Forget other online
shops/stores, especially Ebay stores that provide non-existent after-sales support or require expensive
overseas delivery in order to have your product fixed/repaired. We have a repair and distribution centre in both
New Zealand and Australia. In addition, we pledge to attend and respond to all your enquiries promptly
regardless of warranty status and will always discuss the best options for available to you.
Portable Electronics Limited is a registered company in New Zealand. Our New Zealand company number is
1805301 and our incorporation certificate can be viewed here. We are also a GST registered company. Our
New Zealand GST registration number is 93-820-061. We are registered in Australia as well and our ABN
number is 31997329955.
Portable Electronics Ltd © 2008
2/27
PMP400 USER MANUAL
Contents
1 Safety and storage guide............................................................................................... 4
2 Charging the battery ...................................................................................................... 4
3 Turning on/off the PMP400 ............................................................................................ 4
4 Hardware Reset ............................................................................................................ 4
5 Files/data ....................................................................................................................... 5
6 Optional Accessories ..................................................................................................... 5
7 Standard Accessories .................................................................................................... 6
8 Device schematics......................................................................................................... 7
9 Features ........................................................................................................................ 8
10
Technical Specifications .............................................................................................. 9
11 Video ............................................................................................................................10
11.1
PLAYING VIDEO FILES ......................................................................................10
11.1.1
Video control .................................................................................................10
11.1.2
Menu............................................................................................................. 11
12
Music .........................................................................................................................12
12.1
PLAYING MUSIC FILES .....................................................................................12
12.1.1
Music control ................................................................................................12
12.1.2
ID3/Lyric display ...........................................................................................13
12.1.3
Menu.............................................................................................................13
13
PHOTO ......................................................................................................................14
13.1
Viewing Photos....................................................................................................14
13.1.1
Photo Control ................................................................................................15
14
SOUND RECORDER ................................................................................................16
15
E-book .......................................................................................................................17
15.1.1
E-book control ..............................................................................................17
16
DIGITAL VIDEO RECORDER....................................................................................18
16.1
TV out..................................................................................................................20
17
MANAGE ...................................................................................................................21
18
SETUP .......................................................................................................................22
18.1
Audio Setting .......................................................................................................23
18.2
Video setting........................................................................................................23
18.3
Power Setting ......................................................................................................24
18.4
Timer setting........................................................................................................24
18.5
Language ............................................................................................................25
18.6
Other Setting .......................................................................................................25
19
OTG ...........................................................................................................................26
20
PC connection - USB hard disk .................................................................................26
20.1
To use as removable USB hard disk ...................................................................26
21
Using USB charger ....................................................................................................26
22
Frequently Asked Questions (FAQ) ...........................................................................27
Portable Electronics Ltd © 2008
3/27
PMP400 USER MANUAL
1 Safety and storage guide
Vibration, moisture, electro-magnetism, extreme low/high temperature and direct
sunlight exposure to the player and the remote controller must be avoided to prevent
damage.
Prolonged use of the device may cause permanent hearing loss and/or eye problems.
To protect your sight and hearing, please keep the volume low and do not use it
continuously for extended hours.
Do not attempt to take apart, open, service, or modify the product or power supply.
Doing so could present the risk of electric shock or other hazard. Any evidence of any
attempt to open and/or modify the device, including any peeling, puncturing, or removal
of any of the labels, will void the Limited Warranty.
Clean only with soft dry cloth while the player is turned off.
Do not charge the battery for extended hours to prevent potential fire hazard.
2 Charging the battery
Fully charge the battery (5 – 6 hours) before using it for the first time.
Use ONLY the designated charger for the PMP400. You can charge the internal battery
of PMP400 by plugging the included charger into the device or using a standard USB
port.
Using Non-designated charger may damage the PMP400
The red CHARGE indicator lights up to indicate that the external adapter is connected,
the battery will charge automatically when the AC adaptor is plugged in, the light will
disappear once the battery is fully charged.
Disconnect the charger when fully charged.
3 Turning on/off the PMP400
1. Hold the POWER
button for 5 seconds till you see the word PMP appears. After that,
you will see a splash screen that says “ALL-IN-ONE” and then the PMP is ready to use.
2. If the unit shuts off automatically after holding the POWER
button for several
seconds, the unit is out of power. Please plug in the charger to charge the battery.
3. There is a build-in screen saver function to save battery power. If the PMP400 is not
being used, the screen will shut off automatically in order to save battery life.
4. To turn off the unit, press and hold the POWER
button for 5 seconds till the PMP
says “Power off, please wait…”
4 Hardware Reset
In the unfortunate event that the PMP400 freezes or hangs and does not respond, you can
force the unit to shut down by inserting a needle to press the RESET hole at the bottom.
Portable Electronics Ltd © 2008
4/27
PMP400 USER MANUAL
5 Files/data
It is STRONGLY ADVISED that you keep a neat and orderly file structure. Otherwise, you
will spend a lot of time searching for files, i.e. wasting battery life while not listening or
watching them. When browsing the files/folders in the PMP, by default, the newest file/folder
will be found at the end of the list. This is because the files/folders are arranged by the time
they are copied to the PMP hard disk. You can also configure the PMP to arrange
files/folders by alphabetical order by doing the following, go to Setup -> Other setting ->
Rank file -> select Rank file by letter order (only available in firmware ver.4 or higher). Please
note that the PMP400 automatically creates these folders which are designated to the
respective type of files: Audio, Photo, System, Text, Update and Video.
To avoid loss of important data/information due to hard disk failure, accidental damage, lost
of the unit, etc, it is RECOMMENDED that you keep at least one BACKUP of all files loaded
onto this player. Portable Electronics is not responsible for any loss of information and will
not provide any data recovery service. In addition, we also recommend that you always use
the “Safely Remove Hardware” function in the operating system before removing or
disconnecting the USB cable from your computer as this will reduce the likelihood of data
corruption.
Avoid dropping or subjecting excessive shock to the device because this may result in
permanent hard disk damage, i.e. file corruption, especially when the unit is running.
6 Optional Accessories
The following optional accessories are available for purchase separately from us. Please
visit our web site for information (e.g. price) and use our online store or contact us if you
would like to purchase them.
PMP400 battery
OTG FM transmitter
PMP400 Leather pouch
4.3" LCD protector
PMP400 car charger
PMP400 wall charger
International Travel adapter
Portable Electronics Ltd © 2008
5/27
PMP400 USER MANUAL
7 Standard Accessories
After unpacking, please check that all the standard accessories listed below are included.
Note: User Manual (available online from http://www.hdmp4.com) and Service Certificate
may not be included in the package.
Portable Electronics Ltd © 2008
6/27
PMP400 USER MANUAL
8 Device schematics
Portable Electronics Ltd © 2008
7/27
PMP400 USER MANUAL
9 Features
Music Player
mp3, wma, ogg
Video Player
Supports All Format and subtitle
MPEG1/2/4,
4, DIVX3/4/5/6,
DIVX3/4/5 XVID, VOB, AVI, DAT
Multiple Language
English, Chinese, Portuguese, Spanish, French,
German, Italian
High capacity USB 2.0 Hard disk
Photo Album
High speed removable mass storage device
view photos (*.jpg, *.bmp) in slide show while
Replaceable 2.5" hard disk
listening to music
Sound Recorder
Upgradable firmware
via build-in mic into mp3
for new features
Lyrics
Long battery life
View lyrics while listening to music
Up to 8h music playback
Up to 4h video playback
Digital Video Recorder
TV OUT (NTSC/PAL)
Manual/Scheduled recording from TV, DVD,
Enjoy DVD quality Video on TV with Remote
VCR, Camera into DVD quality MPEG4 video
controller
via AV connector (NTSC/PAL)
USB OTG
Replaceable Battery
transfer photos and other files directly from
3100mAh Lithium-ion
ion battery
camera or other devices
4.3" 16:9 WideScreen LCD
E-book
480x272 pixel, 16.7 million colours
read text documents
Dual Powered
Loud speaker
Re-charge using wall charger or USB port
Build-in
in stereo speaker
3 month player warranty
(extended warranty option available)
3 year Hard Disk warranty
Portable Electronics Ltd © 2008
8/27
PMP400 USER MANUAL
10 Technical Specifications
Type
Dimensions
General
Display
141mm x 82mm x 25mm
1.
4.3" 16:9 LCD, 480x272 pixel, 16.7 million colours
2.
TV (NTSC/PAL) via RCA TV cable
Internal cache
32Mbit flash, 128Mbit SDRAM
Weight
300g
OS
Linux
Language
English, Chinese, Portuguese, Spanish, French, German, Italian
I/O
Sound output
Hard disk
USB 2.0 High Speed
2.
USB host(OTG)
1.
Build-in stereo speaker
2.
3.5 mm stereo earphone outlet
2.5" PATA (IDE)
Power supply
Playback time*
1.
1.
Wall charger - Input:100-240VAC 50/60HZ 0.5A; Output: DC 5V 2.4A
2.
USB charging - 5V 500mA
3.
3100mAh removable lithium battery, 4 hour charging.
Video: 4 hour
Music: 8 hour(LCD off, 128kbps MP3)
Remote Controller
range: 8m
Operating temperature
0-50°C
Supported format
MPEG1/2/4, DIVX3/4/5/6, XVID, VOB, AVI, DAT
FRAME
30 frame/second
Bitrate
8Mbps (720x480, 30 frame/s)
Subtitle
support SMI, SRT subtitle
Supported format
MP3, WMA, OGG, AC3
Frequency Response
20Hz-20KHz
Signal-to-noise ratio
>90dB
Balance/ Equalizer
1, 2, 3, 4, 5
Lyric display
*.lrc
Photo browsing
file format
JPEG, BMP
Sound Recording
file format
MP3
maximum recording time
unlimited, limited by hard disk capacity
bitrate
64Kbps
file format
Video:MPEG4 (divx); Sound:MP3
maximum recording time
unlimited, limited by hard disk capacity
resolution
720x576 pixels, 25fps
Input
via RCA TV cable (NTSC/PAL)
Computer Spec
CPU: 200Mhz and above
Operating System
Windows 98SE/ME/2000(SP3 or higher)/XP/Vista
Video
Music
Video Recording
Operating environment
Linux/Mac OS
Portable Electronics Ltd © 2008
9/27
PMP400 USER MANUAL
*Battery life depends heavily on the exact brand and model of hard disk used as well as how the PMP player is
operated.
11 Video
11.1 PLAYING VIDEO FILES
Scroll to the VIDEO icon in the main menu using the navigation key
(UP/DOWN/LEFT/RIGHT) and enter by pressing on the navigation key
or Play ►. Then,
using the navigation key , locate and highlight the desired video file, begin video playback
by pressing on the navigation key
or Play ►.
11.1.1 Video control
•
File Control/Navigation
Scroll up
UP
Page up Left
Right Page down
Down
Scroll down
•
Press on navigation key
•
During video playback
or Play ► button to play or pause the video
Video resize smaller
UP
Video Rewind (1x, 2x, 4x, 8x, 16x) Left
Right Video Forward (1x, 2x, 4x, 8x, 16x)
Down
Video resize larger
• Increase or decrease the VOLUME by pressing /
Portable Electronics Ltd © 2008
10/27
PMP400 USER MANUAL
•
Press STOP ■ button to stop video and exit
Note: from firmware ver. 6 onwards, exit will automatically set bookmark upon
exit, this allows video to resume from the position you exit the video
to resume, when browsing video, press M (menu) -> play from
11.1.2 Menu
While browsing through the files, press
Use the
and you will see this
navigation key to select the function you require.
Attribute: to display file information
Play: play the video
Play from: re-start the video playback from the labeled location
Clear label: delete the last label
During video playback, press
Use the
and you will see this
navigation key to select the function you require.
Set label: insert a time stamp label at this location
Time play: choose this function, and select the time you want to start playing the video from.
Increase time by 5 minutes steps
UP
Decrease time by 30s Left
Right Increase time by 30s
Down
Decrease time by 5 minutes steps
Zoom: Press Right on navigation key
and choose 4:3/16:9/Zoom
Setting: enter to adjust Screen brightness, contrast, saturation, subtitle, Language
• Brightness: increase or decrease LCD brightness using LEFT/RIGHT
navigation
key
• Contrast: increase or decrease LCD contrast using LEFT/RIGHT
navigation key
• Saturation: increase or decrease LCD colour saturation using LEFT/RIGHT
navigation key (0 = black and white screen)
• Subtitle: enable/disable video subtitle (*.SMI, *.SRT) or locate subtitle file
• Language: change language of PMP400 menu
Portable Electronics Ltd © 2008
11/27
PMP400 USER MANUAL
12 Music
12.1 PLAYING MUSIC FILES
When you click on the MUSIC icon in the main screen, you will enter into the music library
where you can browse your music collection using the navigation key
(UP/DOWN/LEFT/RIGHT).
12.1.1 Music control
•
File Control/Navigation
Scroll up
UP
Page up Left
Right Page down
Down
Scroll down
•
Press on navigation key
•
During music playback
•
•
or Play ► button to play or pause the music
Scroll to the music file above
UP
Fast rewind 30s Left
Right Fast forward 30s
Down
Scroll to the music file below
Increase or decrease the VOLUME by pressing /
Press Stop ■ button to stop music and press Stop ■ again to exit
Portable Electronics Ltd © 2008
12/27
PMP400 USER MANUAL
12.1.2 ID3/Lyric display
During music playback, the ID3 information (such as name of artist, album, etc) will be
shown at the bottom of the screen as indicated above.
If lyric (*lrc) is available, it will be displayed on the screen as well.
Note: the lyric file must have the same file name as the music file
12.1.3 Menu
To open up the menu, press
Use the
and you will see this
navigation key to select the function you require.
Attribute: to display file information
Open: Play the file
Add to: add music to the playlist
Play playlist: play the files on the playlist
Check: to display the playlist
Clear list: delete all the files in the play list
During music playback, press Function key
Use the
and you will see this
navigation key to select the function you require.
Normal: normal playback
Portable Electronics Ltd © 2008
13/27
PMP400 USER MANUAL
Random: random music playback
Repeat: repeat the current music
Balance/Equalizer: press right on the navigation key
sound modes (1/2/3/4/5)
During playlist music playback, press
to open and select 5 different
and you will see this
Play: play the music
Remove: remove the music from the playlist
13 PHOTO
13.1 Viewing Photos
The PMP400 supports the viewing of JPEG (.jpg) and Bitmap (.bmp) image files.
When you click on the Picture icon in the main screen, you will enter into the Photo library
where you can browse your photo collection using the navigation key
(UP/DOWN/LEFT/RIGHT).
Portable Electronics Ltd © 2008
14/27
PMP400 USER MANUAL
13.1.1 Photo Control
•
File Control/Navigation
Scroll up
UP
Page up Left
Right Page down
Down
Scroll down
•
Press on navigation key
•
During Photo viewing
•
Rotate 90º clockwise
UP
Right Scroll to the next photo
Scroll to the previous photo Left
Down
Rotate 90º anti-clockwise
Press Stop ■ button to exit
or Play ► button to look at the photo
While browsing through the files, press
and you will see this
Use the
navigation key to select the function you require.
Photo preview: preview photos by showing 8 photos per page, use the navigation key
(up/down/left/right) to select and browse the photos
Attribute: to display file information
Open: open the photo
When viewing photos, press
and you will see this
Use the
navigation key to select the function you require.
Full screen: look at the photo with full screen
Left rotate: rotate photo anticlockwise by 90°
Right rotate: rotate photo clockwise by 90°
Portable Electronics Ltd © 2008
15/27
PMP400 USER MANUAL
Zoom: zoom in and out of the photo using use left/right
navigation key
Move: move the picture around in order to see the desired magnified area using navigation
button
(UP/DOWN/LEFT/RIGHT)
Slide: start slide show
Music on: turn on background music
Music off: turn off background music
14 SOUND RECORDER
Scroll to the VoiceRecord icon in the main menu using the navigation key
(UP/DOWN/LEFT/RIGHT) and enter by pressing on the navigation key .
•
•
Time: The default recording time is 0, i.e. un-timed recording. You can also set the
maximum recording time and the recording will stop when time is up.
Style: choose between using the build-in mic or line in
Portable Electronics Ltd © 2008
16/27
PMP400 USER MANUAL
•
The recorded sound clips are automatically saved and can be found under the folder
audio/Record, i.e. you can listen to it by entering the Music menu -> Record folder
Start recording by press on the navigation button
or play ►.
Press STOP ■ to terminate the recording and press STOP ■ again to exit recording mode.
15 E-book
PMP400 can support TXT files, you can copy any TXT file into the TEXT folder in PMP400.
When you click on the Text icon in the main menu, you will enter into the E-book library
where you can browse your E-book collection using the navigation key
(UP/DOWN/LEFT/RIGHT).
15.1.1 E-book control
•
Navigation Control
Page up
UP
Left
Right
Down
Page down
When reading e-book, press
Portable Electronics Ltd © 2008
and you can open the function menu
17/27
PMP400 USER MANUAL
Use the
navigation key to select the function you require.
Set mark: insert a bookmark (up to 6)
Open mark: open the e-book at the previously marked location
Music on: play music from the playlist or Audio folder
Music off: stop the music playback
Goto: use the left/right navigation key to choose the pages you are after, press
the page
to enter
16 DIGITAL VIDEO RECORDER
It is simple to record Video Files using the PMP400 by connecting the AV cable to a TV,
cable box, satellite receiver, etc.
Portable Electronics Ltd © 2008
18/27
PMP400 USER MANUAL
In AVRecorder mode, pressing
Use the
in the main menu and you will see this.
navigation key to select the function you require.
Start: start recording
Setup: choose PAL/NTSC/Vidicon
Timing:
• Progression – un-timed recording
• Timing – adjust recording time
Time Select:
Configure timer to record at pre-defined time
• The player will turn on at the pre-set time to record if the unit is off and will
Portable Electronics Ltd © 2008
19/27
PMP400 USER MANUAL
•
•
automatically shut down when finished.
Ensure the correct Mode, i.e. PAL/NTSC is set according to your requirement.
It is recommended to leave the charger connected when using pre-set TV recording.
This ensures the unit has sufficient power and will not shut down half way during
recording.
16.1 TV out
With the AV cable properly connected to the TV,
Click on the Setup icon on the main menu and then choose Video Setting
Navigate to the Swap display using UP/DOWN Navigation button
Then Press LEFT/RIGHT to activate TV PAL or TV NTSC output. At same time, your
display will be switched over and displayed on the TV screen
Note: only one screen, i.e. either TV or LCD will be active at any time. Please remember to
go back to the settings and re-activate the LCD screen before you disconnect the AV cable
from your TV.
Portable Electronics Ltd © 2008
20/27
PMP400 USER MANUAL
17 MANAGE
Scroll to the MANAGE icon in the main menu using the navigation key
(UP/DOWN/LEFT/RIGHT) and enter by pressing on the navigation key
enter the file management system of the PMP400.
•
. Then, you will
File Control/Navigation
•
Scroll up
UP
Page up Left
Right Page down
Down
Scroll down
Press on the navigation key
or Play ► to enter a folder or play a file
In the browser, press
Use the
and it will display the menu below.
navigation key to select the function you require.
Attribute: to display file information
Copy: choose a file to copy, press the navigation key , go to the new location, press
and select the stick option
Delete: delete the file or folder
Cut: cut file or folder from one location to and stick it to another
Portable Electronics Ltd © 2008
21/27
PMP400 USER MANUAL
Note: Do not copy the file within the same location. There will be a prompt if attempting to
overwrite an existing file.
18 SETUP
From the main screen, select the Setup icon to reveal the menu items for various settings.
Portable Electronics Ltd © 2008
22/27
PMP400 USER MANUAL
18.1 Audio Setting
Headphone Volume: You can adjust the sound volume to suit your particular taste.
Balance: adjust balance of the left and right channel
18.2 Video setting
Brightness: increase or decrease the Brightness of the LCD screen. Adjust the bar to the
left or right to get the best image. Lower brightness value will give you a longer battery life.
Contrast: adjust contrast levels of the LCD screen
Saturation: adjust saturation level of the LCD screen
Swap display: swap between LCD screen and TV out
Portable Electronics Ltd © 2008
23/27
PMP400 USER MANUAL
18.3 Power Setting
Screen Saver: shut down the screen after a pre-set amount of time (3-10 seconds) to save
power, set to 0 to prevent screen shut down
Slide show: adjust the interval of the slide show (1-10 seconds)
Shut down time: adjust the length of idle time before shut down (1-5 minutes); set to 0 to
stop the player from shutting down at all
18.4 Timer setting
Current date and time: set up the current date and time in
YEAR/MONTH/DAY/HOURS/MINUTES/SECONDS
Wake up AVrecord time setting: pre-set timing to wake up for AV recording
Wake up: Enable or disable auto wake up for AV recording
Portable Electronics Ltd © 2008
24/27
PMP400 USER MANUAL
18.5 Language
The PMP400 can be set to English, Chinese, Portuguese, Spanish, French, German and
Italian.
18.6 Other Setting
Rank file: Rank file by time OR Rank file by letter order
Firmware Version: to check the current firmware version
Firmware update: to update the firmware
HD information: to check Total capacity, Used capacity and Free capacity
Disk partition: select the active partition - partition 1 (HD1), partition 2 (HD2), partition 3
(HD3) or partition 4 (HD4)
Note: When updating firmware, you MUST connect the AC charger to the unit to ensure
there is sufficient power for firmware update. If the update is interrupted, the firmware will be
damaged and the player will not work.
Portable Electronics Ltd © 2008
25/27
PMP400 USER MANUAL
19 OTG
Connect the OTG cable to the PMP400, then connect the device e.g. camera, card reader,
USB stick, etc you would like to copy the files from to the OTG cable using USB. Turn on the
PMP400 and the screen will display “The USB host port is connected, press
to continue.”
After
is pressed, the data will start to transfer, at same time, the hard disk indicator will
be blinking to show the data is transferring. The indicator will be off after the data had
finished copying/transferring.
20 PC connection - USB hard disk
The PMP’s hard disk will act as a removable hard disk upon connection to a computer via
USB.
20.1 To use as removable USB hard disk
•
•
•
•
•
Simply plug the USB cable to the PMP and computer
The computer will detect and automatically install the necessary drivers to
read/write to the hard disk
On the PMP screen, it will display a Logo – certified USB
Shortly after the logo is displayed, the backlight of the PMP will shut off to reduce
power drain under USB mode
To exit USB mode, use the “Safely Remove Hardware” function on the computer,
then either pull the USB cable or press STOP ■ button on the PMP and it will
return to the normal menu.
Note: It is recommended to connect the PMP to the wall charger when using USB mode on
the computer to prevent loss of data due to write errors if the battery suddenly goes flat,
especially during heavy read/write operations.
21 Using USB charger
As the PMP automatically defaults to USB mode as soon as PMP is connected to a USB
port, the following trick is needed to use USB’s power to “charge” and use the PMP at the
same time instead of using the standard wall charger.
•
•
•
After USB is plugged, press STOP ■
Leave the USB plugged and continue to use the PMP as usual
This allows user to take advantage of USB’s power to charge the PMP
For normal charging using USB port, i.e. while PMP is off, just plug the USB to the PMP and
wait till the red charging indicator light goes off.
Portable Electronics Ltd © 2008
26/27
PMP400 USER MANUAL
22 Frequently Asked Questions (FAQ)
We apologize that the list of FAQ is not included here because the list of FAQ is simply too
long.
Please visit http://www.hdmp4.com/PMP+FAQ for the latest, up-to-date FAQ.
If your question is not answered in the FAQ, you are welcomed to ask in our forum –
http://forum.hdmp4.com
Portable Electronics Ltd © 2008
27/27