1
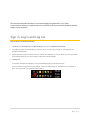
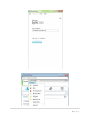
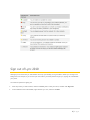
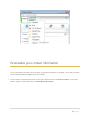
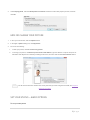
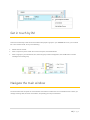
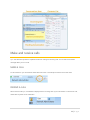
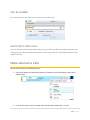
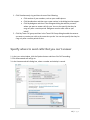
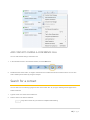
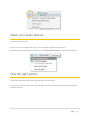
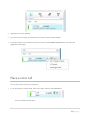
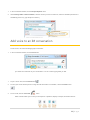
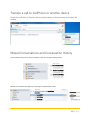
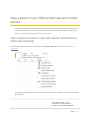
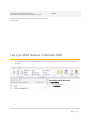
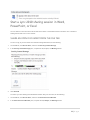
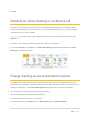
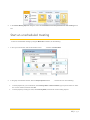
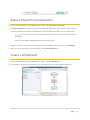
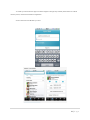
Lync Client 2010 User Manual 1. Sign in, Log in and Log out 2 2. Personalize your contact information 4 3. Change your picture settings 5 4. Build your contact list 8 5. Get in touch with IM 9 6. Navigate the main window 9 7. Make and receive calls 11 8. Make Extension Calls 12 9. Make International Calls 13 10.Set up call Forwarding 13 11.Set up Simultaneous Ring 15 12.Make a conference call 17 13.Add video to a call 24 14.Transfer a call to Cellphone or another device 25 15.Missed Conversation and Conversation History 25 16.Use Lync 2010 features in Outlook 2010 27 17.Schedule an online meeting or conference call 33 18.Share your desktop and programs with others 36 19.Lync 2010 App for Iphone, Ipod touch, Ipad, Android 39 1|Page This Quick Start describes the basics for communicating by using Microsoft® Lync™ 2010 communications software. It explains how to use Lync 2010 to easily interact and collaborate with the people at your workplace. Sign in, Log in and Log out You can open Lync 2010 in two ways: 1. Click Start, click All Programs, click Microsoft Lync, and then click Microsoft Lync 2010. 2. You might get signed in automatically by Lync 2010, but if you don’t, type your sign-in name (typically your business email address) 3. (Optional) Select a presence status to tell your contacts how available you are. By default, Lync sets your status automatically, based on your current activity or Microsoft Outlook Calendar. 4. Click Sign In. Or open My Computer and navigate to c:\Program files\Microsoft Lync\communicator.exe If Lync is started you will see the icon in taskbar. A gray icon means that Lync is started but not connected. A green icon means that Lync is started and connected. 2|Page 3|Page Sign out of Lync 2010 Although you can close the Lync main window to free up your desktop, it’s a good idea to leave Lync running in the background. For example, if you are set up to route calls to your desk phone through Lync, signing out could disable your phone. You have two options for signing out. At the top of the Lync main window, click the availability menu under your name, and then click Sign Out. In the notification area of the taskbar, right-click the Lync icon, and then click Exit. 4|Page Personalize your contact information You can personalize your location, phone numbers, and presence information. For example, you can add your mobile phone number and make it available only to close contacts. 1. To set a location to let people know where you are today, click the arrow next to Set Your Location or your current location, and then, in the location menu, click Show Others My Location. 5|Page 2. To add a phone number to your contact card, click the Options button , and then click Phones. 3. Click the button for the phone number that you want to add (such as Work Phone or Mobile Phone). 4. In the Edit Phone Number dialog box, type the number, and then click OK. 5. Select the Include in my contact card check box, and then click OK. 6. To change privacy relationships for the people you want to see your personal phone numbers, right-click the contact’s name in your Contacts list, click Change Privacy Relationship, and then click Friends and Family. Change your picture settings 1. In the Lync main window, click the Options button 2. In the Lync - Options dialog box, click Personal. . 6|Page 3. Under Display photo, clear the Show photos of contacts check box to hide other people’s pictures, and then click OK. HIDE OR CHANGE YOUR PICTURE 1. In the Lync main window, click the Options button 2. In the Lync - Options dialog box, click My Picture. 3. Do one of the following: . 1. To hide your picture, click Do not show my picture. 2. To change your picture, click Show a picture from a web address, type the address of a photo site (such as Windows Live® Skydrive or Facebook) including the file name, and then click the Connect to Picture button. NOTE The file must be less than 30 KB in size. If the photo that you want is larger than 30 KB, see Prepare a photo for Lync 2010. SET YOUR STATUS – AWAY OPTIONS To set your away status 7|Page 1. click the Options button 2. On the left of Lync – Options page click on Status button. CONFIGURE YOUR PERSONAL SETTINGS You can configure your personal settings by: 1. Click Options button 2. Click Status button on the left You can set your Sign-in address, Location, Display Photo, Activity Feed etc. 8|Page Build your Contacts list Add people to your Contacts list if you'll be contacting them often or if you just want to keep track of them. 1. In the Lync main window, type the person’s name or email address in the search field. 2. In the search results, right-click the person. 3. (Optional) If you’ll be contacting the person often, click Pin to Frequent Contacts. 4. Add them to a group by clicking Add to Contacts List, and then clicking the group name, or, if you haven’t created groups yet, click Add to New Group, and give the group a name. You can add more contacts to this group later. 9|Page Get in touch by IM There are several ways to start an IM conversation with people or groups in your Contacts list. From your Contacts list or from search results, do any of the following: Double-click the contact. Point to a person’s picture. When the contact card opens, click the IM button. Point to a group in your Contacts list, and, when the group contact card appears, click the IM button to send a message to the whole group. Navigate the main window The main window has two parts: the Cconversation area and the Contacts list. The Conversation area is where you manage incoming calls, the active conversation, and pending (on hold) conversations. 10 | P a g e Make and receive calls Lync 2010 Attendant provides a simplified interface for making and receiving calls. You can still receive instant messages while you’re on a call. MAKE A CALL To call someone in your Contacts list double-click their name or click the phone button next to their name. RECEIVE A CALL When someone calls you, a notification is displayed in the Incoming area of your main window. To answer the call, double-click anywhere on the notification. 11 | P a g e DIAL BY NUMBER Enter the number in the search box, and then double-click the search result. MULTI-PARTY VIDEO CALLS Yes, Lync does provide multi-party video calls, but no, Lync does not offer the "Hollywood Squares" view (viewing all users video at the same time) when in a multi-party video call. It will always show the active speaker view only. Make extensions Calls You can call extensions in the following ways : 1. Click on Call button and select the Extension. If Extension is not visible please contact the IT Support Team. 2. In the Find a contact or dial a number enter the extension number with + in front 12 | P a g e Make International Calls To make an international call dial +(country code)(phone number). Set up call forwarding When you set call forwarding settings in the Lync – Options dialog box to forward calls, all incoming calls are automatically forwarded to the destination you choose. Incoming calls do not ring or display a call alert on your computer. 1. Open Lync, click the Options button and then click Call Forwarding 13 | P a g e 2. Or, in the lower-left corner of the Lync main window, click the call forwarding menu and then click Call Forwarding Settings. 3. In the Call Forwarding dialog box, click Forward my calls to, select one of the following and then click OK. Click another of your numbers, such as your mobile phone Click New Number or Contact and then search for or click a contact in the dialog box that is displayed. You can also set your extension + and your extension number ( +22214 ) Click My delegates and then in the Delegates dialog box, add contacts whom you want to answer your calls. You can also specify that they be rung only after a certain period. Stop call forwarding When you return to your desk, remember to stop the call forwarding. 14 | P a g e 1. In the Lync main window, in the lower-left corner, click the call forwarding menu and then click Turn off call forwarding. Or, click the Options button, click Call Forwarding and then select Turn off call forwarding. Click OK. Set up simultaneous ring Unlike call forwarding where your phone doesn’t ring, you can set your incoming calls to simultaneously ring your phone and another number or contact in case you are busy or momentarily unavailable. This setting can help ensure that callers don’t get the busy signal and their calls don’t get missed. At the same time, they won’t know that their call was forwarded. 15 | P a g e 1. Click Simultaneously ring and then do one of the following: Click another of your numbers, such as your mobile phone Click New Number and then type a new number in the dialog box that appers Click My delegates and then in the Delegates dialog box add any contacts whom you want to answer calls for you. You can also specify that they be rung only after a certain period. Delegates can also make calls on your behalf. 2. Click My Team-Call group and then in the Team-Call Group dialog box add the contacts you want to receive your calls at the same time you do. You can also specify that they be rung only after a certain period of time. Specify where to send calls that you can’t answer 1. In the Lync main window, click the Options button and then click Call Forwarding. 2. Click Unanswered calls will go to. 3. In the Unanswered calls dialog box, select a number and a delay in secods. 16 | P a g e Take notes during a conversation You can take notes during a conversation to remember important items. When the conversation ends, you can save the notes by sending them in an email message. 1. If necessary, click the Note button. 2. Click anywhere in the note area, and type your note. 3. To send notes in an email message, click Send Notes. NOTE Your notes are automatically saved as part of the conversation history, if enabled under Options. Make a conference call You can make a conference call with multiple contacts in the conversation. 1. Select the contact(s) you want to invite from your Contacts list. Hold down the Ctrl key to select multiple contacts. 2. Right-click one of the selected contacts. 3. Click Start a Conference Call. 17 | P a g e ADD CONTACTS DURING A CONFERENCE CALL You can add contacts during a conference call. 1. In the Conference area or Conversation window, click the Add button. 2. Double-click the contact name, or drag the contact from the Contacts list into the Conference area. You can also enter a mobile phone number by using the dial pad. Search for a contact You can search for a contact by typing their name in the search box. As you type, matching names appear in the search results list. 1. Type the name of a contact in the search box. 2. Find the name in the search results list. NOTE It may take a minute for your search to complete initial indexing. 18 | P a g e Sort your contacts You can sort your contacts by different criteria, such as display name, availability, or company. Sorting your contacts makes it easier to organize, find, and connect with your teammates quickly. 1. At the top of the Contacts list, click the arrow next to Arranged By. The default sort order in Attendant is Display Name. 2. In the drop-down list, select a sort criterion (such as Availability). NOTE You cannot hide contacts who have a status of Offline or Presence unknown. Transfer a call You can transfer a call to another contact or number by doing the following: 1. Click the Transfer button. You can also place callers on hold before transferring the call, so they don’t hear everything during the transfer. 2. Double-click the name in the Contacts list to whom you want to transfer the call. The call just disappears from the Conversation window. An error message is displayed if the transfer is unsuccessful. Switch your audio device When you are in an audio conversation, you can switch your audio device without interrupting the conversation. 1. From the tool bar near the top, click the Current Device button. 2. From the drop-down list, select the appropriate device. 19 | P a g e Select your audio devices To select your audio devices: 1. Open Lync, and, in the lower-left corner of the Lync main window, click the audio device menu . 2. Either select the audio devices that you want to use, or click Audio Device Settings to set up a new audio device. Find the right person The search box is the first place to go to find the people you need to contact. 1. In the Lync main window, in your Contacts list, start typing a person’s name in the search box. Results will appear below the search bar. 20 | P a g e 2. (Optional) Do any of the following: If you see who you’re looking for, double-click the contact to send an instant message. To add the contact to your Contacts list, point to the contact, click the Add to Contacts button, then select the appropriate contact group. Place a voice call You can start a phone call with one simple click. 1. In your Contacts list or search results, point to the contact, and then click theCall button. A new conversation window opens. 21 | P a g e Start a conference call To call multiple contacts: 1. In your Contacts list, press and hold Ctrl, and then click the contacts you want to call. 2. Right-click any one of the selected contacts, and then click Start a Conference Call. Answer a call When you get a call, an incoming call notification is displayed in the lower-right corner of your computer screen. Do any of the following: 1. To answer the call, click anywhere in the incoming call notification. 2. To redirect it to a different number, click Redirect, and then select a number. 3. To send the call to voice mail, click Decline. Invite other people to the conversation To invite other people to a conversation already in progress, do the following: 22 | P a g e 1. In the conversation window, click the People Options menu. 2. Click Invite by Name or Phone Number, click the contact you want or search for, and then click OK. (If someone is available by phone only, type the phone number.) Add voice to an IM conversation To add voice to an instant-messaging (IM) conversation: 1. In the conversation window, click the Call button. Lync adds voice and audio to your conversation. You can continue typing while you talk. 1. To put a call on hold, click the Hold button . 2. To send your call to another phone or merge the call with another conversation, click the Transfer menu . 3. To end a call, click the Leave Call button. Other controls enable you to mute your microphone or speakers, display a dial pad, and switch devices. 23 | P a g e Plug in a webcam For the closest thing to a face-to-face conversation, connect a webcam to your computer. Lync automatically detects the webcam and uses it for your next video call. To see your webcam settings: 1. In the upper-right corner of the Lync main window, click the Options button 2. In the Lync - Options dialog box, click Video Device. . Add video to a conversation If you have a webcam set up, you can choose to allow your contact to see you as you speak. To set up a webcam, see the previous section, “Plug in a webcam.” 1. In the conversation window, click the Video button. The video call starts. You can continue to send instant messages to the call recipient and also other contacts. NOTE If you accept someone’s incoming video call, they won’t see you unless you add video from your side of the conversation. 24 | P a g e Transfer a call to CellPhone or another device During the call click on Transfer call to another person or device button and select the mobile. Missed Conversations and Conversation History Conversation history can be found in Outlook under Conversation History Folder. Missed conversations will appear as a message in Outlook Inbox Folder . 25 | P a g e View a person’s Lync 2010 contact card and contact options The contact card displays detailed information about people and provides one-click access to several ways of communicating with them. You can access a person’s contact card in Office 2010 programs anywhere you see the Lync 2010 presence indicator next to a person’s name. VIEW A PERSON’S CONTACT CARD AND CONTACT OPTIONS IN AN OFFICE 2010 PROGRAM Point to a person’s presence indicator, and then click the View More Options button. For details, see Use the contact card. The following table describes where you can find the Lync 2010 presence indicator and contact card in Office 2010 programs. OFFICE 2010 PROGRAM LOCATION Microsoft® Outlook® messaging and collaboration client Email From, To, and Cc boxes Find a Contact search results To-Do Bar, under Quick Contacts Meeting request Scheduling Assistant 26 | P a g e Microsoft® Word word-processing program Microsoft® Excel® spreadsheet software Microsoft® PowerPoint® presentation graphics program On the File tab, on the Info tab, under Related People Microsoft® SharePoint 2010 team services Microsoft® SharePoint Workspace 2010 (formerly Microsoft® Office Groove 2007) Next to a person’s name Use Lync 2010 features in Outlook 2010 In Outlook you can see the user status when you are reading an email or even when you compose a new message: 27 | P a g e In addition to viewing a person’s availability and contact card as described in the previous section, you can use the following additional Lync 2010 features when working in Outlook 2010: Respond to an email, contact, or task with an IM or call Search for a contact quickly View your contact list in the Outlook To-Do Bar Schedule an online meeting View a record of your Lync 2010 calls, voice mails, and conversations You can also control which features are shared between Lync 2010 and Outlook 2010. RESPOND WITH AN IM 1. In Outlook Mail, on the Home tab, in the Respond group, click IM. 2. Click Reply with IM, or Reply All with IM. You can also respond with an IM in other Outlook locations: In an open email message, on the Message tab, in the Respond group In Outlook Contacts, on the Home tab, in the Communicate group, on theMore menu In Outlook Tasks, on the Home tab, in the Respond group 28 | P a g e RESPOND WITH A CALL 1. In Outlook Mail, on the Home tab, in the Respond group, click More, and then click Call. 2. Do one of the following: Click the name or number of the person who sent the email message Click Call all to start a Lync 2010 audio conference with everyone who received the email message You can also respond with an IM in other Outlook locations: In an open email message, on the Message tab, in the Respond group, on the More menu In Outlook Contacts, on the Home tab, in the Communicate group, on theMore menu In Outlook Tasks, on the Home tab, in the Respond group, on the Moremenu SEARCH FOR A CONTACT QUICKLY In the Outlook Find a Contact box, begin typing the name of the contact you want to find. A list of search results appears as soon as you begin typing. VIEW YOUR CONTACT LIST IN THE OUTLOOK TO-DO BAR 1. Right-click in the To-Do Bar, click Options, and then select or clear Show Quick Contacts. 2. (Optional) Select or clear Show contact photo. 29 | P a g e SCHEDULE AN ONLINE MEETING In the Outlook Calendar ribbon, on the Home tab, in the Online Meeting group, click Online Meeting (in Microsoft Outlook 2007) or New Online Meeting (in Microsoft Outlook 2010). VIEW YOUR CONVERSATION HISTORY In the Outlook Navigation Pane, click the Conversation History folder. This folder contains a record of your Lync 2010 calls, voice mails, and conversations. SET OUTLOOK INTEGRATION OPTIONS IN LYNC 2010 1. In the Lync main window, click the Options button, and then click Personal. 2. Under Personal information manager, select either Microsoft Exchange or Microsoft Outlook or None from the drop-down list. 30 | P a g e When you select Microsoft Exchange or Microsoft Outlook, the Lync search feature uses the Microsoft Outlook Contact list as a source of contacts, in addition to the global address list. When you select None, the Lync search feature returns contacts only from the global address list. It does not use either the Windows Address Book or the Outlook Contact list. 3. If you select Microsoft Exchange or Microsoft Outlook, do any of the following: To make your presence automatically reflect when you are in a scheduled meeting, select the Update my presence based on my calendar information check box. Use the following settings to further specify who can see this information: To show this information to contacts in your Workgroup, select theShow meeting subject and location to contacts in my Workgroup privacy relationship check box. To show your Out of Office information to contacts, select theDisplay my Out of Office information to contacts in my Friends and Family, Workgroup, and Colleagues privacy relationshipscheck box. Clear the check box if you want to hide your Out of Office information from all your contacts. To save conversation history in Outlook, select the Save instant message conversations in my email Conversation History folder check box. Clearing this check box means that your instant message history is not kept. To save your phone call history in Outlook, select the Save call logs in my email Conversation History folder check box. Clearing this check box means that your phone call history is not kept. To save your contacts in Microsoft Exchange Server, select the Save my Lync contacts in my personal contacts folder on the Exchange server check box. Clearing this check box means that your Lync contacts are kept only in Lync. SET LYNC INTEGRATION OPTIONS IN OUTLOOK 2010 1. In Outlook, on the File tab, click Options, and then click Contacts. 2. Under Online status and photographs, select or clear Display online status next to name. 31 | P a g e Start a Lync 2010 sharing session in Word, PowerPoint, or Excel You can share an open document in Word 2010, Excel 2010, or PowerPoint 2010 by sending a copy or starting a sharing session with one or more contacts. SHARE AN OPEN DOCUMENT FROM THE FILE TAB To send a copy of your document as an instant message attachment, do the following: 1. On the File tab, click Send & Save, and then click Send by Instant Message. 2. In the Send by Instant Message pane, complete the To, Subject, and Message boxes. 3. Click Send IM. To start a Lync 2010 sharing and collaboration session with your document, do the following: 1. On the File tab, click Send & Save, and then click Share Document Window. 2. In the Share Document Window pane, complete the To, Subject, andMessage boxes. 32 | P a g e 3. Click Share Now. SHARE AN OPEN DOCUMENT FROM THE REVIEW TAB To send a copy of your document as an instant message attachment, do the following: 1. On the Review tab, in the Share group, click Send by IM. 2. In the Send File window, select one or more people from your Contact list, or look for additional contacts in the search box. 3. Click OK. To start a Lync 2010 sharing and collaboration session with your document, do the following: 1. On the Review tab, in the Share group, click Share Now. 2. In the Share Now window, select one or more people from your Contact list, or look for additional contacts in the search box. 33 | P a g e 3. Click OK Schedule an online meeting or conference call Schedule an online meeting or conference call in the Microsoft® Outlook® messaging and collaboration client by using the Online Meeting Add-in for Microsoft® Lync™ 2010. The Online Meeting Add-in for Lync 2010 is installed automatically when Lync 2010 is installed. IMPORTANT Lync supports both online meetings and conference calls. One meeting request is used for both purposes. To create an online meeting or conference call request in Outlook, do the following: In the Outlook Calendar, on the Home tab, click New Online Meeting (in Microsoft® Outlook® 2010) or Online Meeting (Microsoft® Outlook® 2007). Change meeting access and presenter options The default online meeting options are best for small conference calls or sharing and collaboration sessions with people inside your organization. If you are scheduling an online meeting with people outside your organization or your meeting is unusually large, use the Online Meeting Options dialog box to help you determine the following: Who should wait in the lobby before being admitted to the meeting? Who should have presenter privileges during the meeting? To set access and presenter options, do the following: 1. In the meeting request, on the Meeting tab, in the Online Meeting group, clickMeeting Options. 34 | P a g e 2. In the Online Meeting Options dialog box, select the Customize access and presenters for this meeting check box. Start an unscheduled meeting To start an unscheduled meeting by using the Meet Now command, do the following: 1. In the Lync main window, click the Show Menu arrow 2. In the group conversation window, click the People Options button , and then click Meet Now. , and then do one of the following: To invite people from your Contacts list, click Invite by Name or Phone Number, type a phone number or select one or more contacts, and then click OK. To invite people by sending an email, click Invite by Email, and then fill out the meeting request. 35 | P a g e Join a scheduled online meeting or conference call To join a scheduled meeting or conference call, do the following: 1. In the Outlook Calendar, open the meeting you want to join. 2. In the meeting request, click Join online meeting. Join an unscheduled meeting You may be invited to an unscheduled or Meet Now meeting or to a meeting that is already in progress. In the notification that appears in the notification area, at the far right of the taskbar, click Join. Set audio preferences You can set up Lync to connect to the meeting audio the same way every time, or to prompt you for a choice. 1. In the Lync main window, click the Options button . 2. In the Lync - Options dialog box, click Phones, and, under Joining conference calls, in the Join meting audio from box, do one of the following: To use integrated computer audio during meetings, click Lync. To have the Microsoft® Lync™ Server 2010 call you, choose a phone number from the list. NOTE If you don’t see the phone number you want, enter it under My phone numbers, at the top of the dialog box. 36 | P a g e 3. To use a phone to call into meetings, choose Do not join audio (Optional) Under Joining conference calls, select the Prompt me before joining to confirm or select another audio source check box. Choose this option if your audio preferences change frequently. Share your desktop with others To share your desktop with others: 1. Open Lync, and, in your Contacts list, double-click a contact’s name. 2. When the conversation window opens, click the Share menu. 3. If you only have one monitor, click Desktop. Otherwise, choose which monitor(s) to share. 37 | P a g e A bar that reads You are sharing appears at the top of your screen. 4. (Optional) To see how your screen looks to participants, click Preview. To close the preview, click Hide Stage. 5. When you want to stop sharing, on the sharing bar at the top of your screen, click the Stop Sharing button. Share a program 1. In the conversation window, click the Share menu, and then click Program. 2. In the Share Programs dialog box, double-click the program that you want to show. A bar that reads You are sharing appears at the top of your screen. 3. (Optional) To see how your screen looks to participants, click Preview. To close the preview, click Hide Stage. 4. When you want to stop sharing, on the sharing bar, click the Stop Sharingbutton. 38 | P a g e Share a PowerPoint presentation 1. In the conversation window, click the Share menu, and then click PowerPoint Presentation. 2. In the Share PowerPoint dialog box, double-click the PowerPoint presentation that you want to share. When the content is prepared for presentation and uploaded, the other participants will be able to see your presentation. NOTE You can make annotations on the presentation using the annotation tools at the lower left of the presentation. A bar that reads You are sharing appears at the top of your screen. 5. (Optional) To see how your screen looks to participants, click Preview. To close the preview, click Hide Stage. 6. When you want to stop sharing, on the sharing bar, click the Stop Sharingbutton. Create a whiteboard 1. In the conversation window, click the Share menu, and then click New Whiteboard. 2. To start writing or drawing on the whiteboard, use the annotation tools at the lower left of the whiteboard. 39 | P a g e Give control to others 1. While sharing your desktop, monitors, or a program, on the sharing bar, click the Give Control menu. 2. Click Automatically accept control requests, to give control to everybody, or click the name of an individual under Attendees. 3. In the Lync dialog box confirming that you want to give control, click OK. 4. When you want to take back control, press Ctrl+Alt+Spacebar. If Automatically accept control requests is selected, click it to clear it. Lync 2010 App for Iphone, Ipod touch, Ipad, Android YOU CANNOT MAKE AUDIO/VIDEO CALLS with Iphone App IN THIS MOMENT. AUDIO CALLS WILL BE AVAILABLE AFTER STEP 2 OF THE LYNC INSTALLATION LATER ON THIS YEAR. WILL WORK TELEPHONE NUMBER CALLS, NOT VOIP CALLS. CONNECTION TO LYNC CAN BE MADE FROM OUTSIDE THE OFFICE AND WITHOUT USING A VPN CONNECTION. JUST USE THE SIGN-IN ADDRESS WHICH TYPICALLY IS YOUR BUSINESS E-MAIL ADDRESS. Requirements: Compatible with iPhone, iPod touch, and iPad.Requires iOS 4.3 or later. It is also compatible with Android OS. To download and install Lync Microsoft Lync 2010 App for Iphone navigate to App Store from your device, search for Microsoft Lync2010 for iPhone application, download and then install. Once installed open the App, enter your sign-in address ( your email address ) and click Sign-In. You can also install the App from iTunes software. 40 | P a g e To install Lync Microsoft 2010 App for Android navigate to Google Play website (Online Store for Android devices) search, download and install the Application. Some screenshots from Mobile Lync 2010. 41 | P a g e