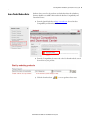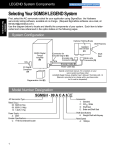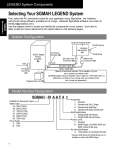
1
Release Notes
ControlLogix Enhanced Redundancy System, Revision
16.081_kit5
Redundancy Module Catalog Numbers
1756-RM, 1756-RMXT, 1756-RM2, 1756-RM2XT
Controller Catalog Numbers
1756-L61, 1756-L62, 1756-L63, 1756-L63XT, 1756-L64
Communication Module Catalog Numbers
1756-CN2/B, 1756-CN2R/B, 1756-CN2RXT/B, 1756-CN2/C, 1756-CN2R/C, 1756-CN2RXT/C, 1756-CN2RK/C,
1756-EN2T/C, 1756-EN2T/D, 1756-EN2TXT/C, 1756-EN2TXT/D
These release notes describe enhancements, corrected anomalies, and known
anomalies specific to redundancy system firmware revision 16.081_kit5 or earlier.
Topic
Page
Product Release Notes
2
About This Redundancy Firmware Bundle
2
Compatible Software Versions
5
About the Redundancy Module Configuration Tool
5
Enhancements
7
Corrected Anomalies
10
Known Anomalies
15
Restrictions
17
Application Notes
18
Using a Redundant System with a FactoryTalk Batch Server
22
Using a Redundant System and CIP Equipment Phases
23
Upgrade from an Enhanced Redundancy Revision
28
Update IP Address Set Via Software to Address Set Via Rotary Switches
47
Replace 1756-RM/B (or earlier) Modules with 1756-RM2 Modules
51
Replace the1756-EN2T Modules
52
Replace the 1756-CN2 Modules
63
Upgrade Ethernet Modules when Rotary Switches are Set between 2…254
67
Store a Project to Nonvolatile Memory while Your Process is Running
73
Access Product Release Notes
75
Additional Resources
76
2 ControlLogix Enhanced Redundancy System, Revision 16.081_kit5
IMPORTANT
Throughout this publication, the following applies:
ControlNet Communication Modules
– References to the 1756-CN2/B modules also apply to the 1756-CN2R/B, and 1756-CN2RXT/B
modules.
– References to the 1756-CN2/C modules also apply to the 1756-CN2R/C, 1756-CN2RXT/C, and
1756-CN2RK/C, modules.
– Catalog numbers 1756-RM, 1756-RM2 and 1756-RM2XT refer any series modules.
Product Release Notes
Product release notes for the individual products that are part of this
ControlLogix Enhanced Redundancy bundle are available online within the
Product Compatibility and Download Center.
For example, you can access release note information specific to the 1756-EN2T
ControlLogix EtherNet/IP bridge module.
For more information on product release notes, see page 75.
About This Redundancy
Firmware Bundle
This enhanced redundancy firmware bundle, identified as revision 16.081_kit5,
contains series and firmware revisions for each of the modules listed in Table 1,
Required Series and Firmware Revisions for Components Used in an Enhanced
Redundancy System, Revision 16.081_kit5 on page 3.
You can download the firmware bundle at the Product Compatibility and
Download Center:
http://www.rockwellautomation.com/rockwellautomation/support/pcdc.page?.
Information that has been added or changed since the last revision of this
publication is indicated by a change bar as shown next to this paragraph. In
addition to information specific to the most recent firmware revision, the
information from previous minor revisions is retained in these release notes.
Rockwell Automation Publication 1756-RN650I-EN-E - July 2015
ControlLogix Enhanced Redundancy System, Revision 16.081_kit5 3
We strongly recommend that you review the information provided regarding
previous firmware revisions. We recommend that you do so because if you are
upgrading your firmware through multiple previous revisions, all of the
information specific to all of the revisions is applicable.
IMPORTANT
When designing, installing, and operating the redundant chassis pair for this enhanced
redundancy system revision, you can use only the modules specified in Table 1,
Required Series and Firmware Revisions for Components Used in an Enhanced
Redundancy System, Revision 16.081_kit5 on page 3.
Also, keep in mind the series and firmware revision requirements listed apply only to
components used in the redundant chassis pair, not to components used with
the redundancy system outside the redundant chassis pair.
This enhanced redundancy system revision includes support using the
1756-CN2/C, 1756-CN2R/C, 1756-CN2RXT/C, 1756-CN2RK/C modules
with firmware revision 25.005
Table 1 - Required Series and Firmware Revisions for Components Used in an Enhanced
Redundancy System, Revision 16.081_kit5
Cat. No.
Module Description
Series
Firmware Revision
1756-CN2
ControlLogix® ControlNet bridge module
B
20.011
1756-CN2R
ControlLogix redundant ControlNet bridge
module
B
1756-CN2RXT
ControlLogix-XT™ redundant ControlNet
bridge module
B
1756-CN2(1)
ControlLogix® ControlNet bridge module
C
1756-CN2R(1)
ControlLogix redundant ControlNet bridge
module
C
1756-CN2RXT(1)
ControlLogix-XT™ redundant ControlNet
bridge module
C
1756-CN2RK(1)
ControlLogix redundant ControlNet bridge
(conformal coated) module
C
1756-EN2T
ControlLogix EtherNet/IP bridge module
D
10.007(2) (3)
C or earlier
2.007(4)
D
10.007(2) (3)
C or earlier
2.007(4)
1756-EN2TXT
ControlLogix-XT EtherNet/IP bridge
module
1756-EN2TK
ControlLogix EtherNet/IP conformal coated
communication bridge module
1756-L61
ControlLogix5561 controller
1756-L62
ControlLogix5562 controller
1756-L63
ControlLogix5563 controller
1756-L63XT
ControlLogix-XT controller
1756-L64
ControlLogix5564 controller
Rockwell Automation Publication 1756-RN650I-EN-E - July 2015
25.005
D
Any
10.007(2) (3)
16.081
4 ControlLogix Enhanced Redundancy System, Revision 16.081_kit5
Table 1 - Required Series and Firmware Revisions for Components Used in an Enhanced
Redundancy System, Revision 16.081_kit5
Cat. No.
Module Description
Series
Firmware Revision
1756-RM2
ControlLogix redundancy module
Any
20.005
1756-RM2XT
ControlLogix-XT redundancy module
1756-RM
ControlLogix redundancy module
Any
2.005
1756-RMXT
ControlLogix-XT redundancy module
(1) IMPORTANT: The 1756-CN2/C, 1756-CN2R/C, 1756-CN2RXT/C, 1756-CN2RK/C modules do not support firmware revisions previous
to revision 25.004. Do not attempt to flash the firmware to earlier revisions. The 1756-CN2/C, 1756-CN2R/C, 1756-CN2RXT/C, and
1756-CN2RK/C modules are digitally-signed.
(2) IMPORTANT: The 1756-EN2T/D modules do not support firmware revisions previous to revision 10.006. Do not attempt to flash the
firmware to earlier revisions.
(3) Firmware revision 10.006 and later is digitally-signed. For more information on digitally-signed firmware, see page 4.
(4) IMPORTANT: The 1756-EN2T/ C (or earlier) modules do not support firmware revision 10.006 or greater. Do not attempt to flash the
firmware to revision 10.006 or greater.
1756-EN2T Modules Digitally-signed Firmware
Digitally-signed firmware provides additional security over the unsigned
firmware. This firmware is different based on the EtherNet/IP modules you use.
• 1756-EN2T/D modules - Support only firmware revision 10.007 in this
enhanced redundancy system bundle. This firmware revision is
digitally-signed.
• 1756-EN2T/C (or earlier) modules - Support only firmware revision
2.007 in this enhanced redundancy system bundle. This firmware revision
is unsigned.
IMPORTANT
When you install the digitally-signed firmware, that is, firmware revision 5.028, into a
1756-EN2T/C (or earlier), the installation makes the module incompatible with some
firmware revisions.
For example, after upgrading firmware, the module supports use of only
digitally-signed firmware. Any unsigned firmware updates are rejected by the module.
You can download the enhanced redundancy system, revision 16.081_kit5
firmware bundle at the Product Compatibility and Download Center:
http://www.rockwellautomation.com/rockwellautomation/support/pcdc.page.
The firmware bundle is identified as V16.081_kit5.
Rockwell Automation Publication 1756-RN650I-EN-E - July 2015
ControlLogix Enhanced Redundancy System, Revision 16.081_kit5 5
Compatible Software Versions
Use these versions of software with this redundancy firmware bundle.
Table 2 - Required Software Versions for Enhanced Redundancy System, Revision 16.081_kit5
Software
Version
ControlFLASH™
12.00.01
FactoryTalk® Services Platform
2.10.01 (CPR 9, SR1)(1)
FactoryTalk Alarms and Events
2.10.00 (CPR 9)
FactoryTalk Batch
10.00.26
FactoryTalk View Site Edition
5.00.00 (CPR 9)
Redundancy Module Configuration Tool
8.02.01
RSLinx® Enterprise
5.17 (CPR 9, SR1)
RSLinx Classic
2.54(2)
RSLogix™ 5000
16.04
RSNetWorx™ for ControlNet
9.00
(1) Use the most recent FactoryTalk Services Platform Patch Roll-up with this redundancy firmware revision. For the most recent patch
roll-up, see Rockwell Automation Knowledgebase Answer ID 56184, accessible at:
http://www.rockwellautomation.com/knowledgebase/.
(2) If your redundant system is comprised of ControlLogix-XT modules placed in a 1756-A5XT chassis, RSLinx Classic software, version
2.55, or later, is required.
About the Redundancy Module
Configuration Tool
You can use 1756-RM redundancy modules to commission a redundant system.
These modules operate in a plug-and-play manner, that is, they can commission a
system without any additional programming. However, there is additional
functionality available if you use the modules with the Redundancy Module
Configuration Tool (RMCT).
This enhanced redundancy system revision requires the RMCT, version 8.02.01.
The About screen for the RMCT displays 8.2.1.0 but it’s the correct version.
You can use the RMCT with the redundancy modules to complete these tasks:
• View error diagnostics
• View partnered modules’ qualification and compatibility status
• Set Auto-Synchronization parameters
Rockwell Automation Publication 1756-RN650I-EN-E - July 2015
6 ControlLogix Enhanced Redundancy System, Revision 16.081_kit5
• View and set Chassis ID parameters (Chassis A, Chassis B)
• Identify noncompliant modules for removal
• Configure redundancy system parameters
IMPORTANT
This publication documents Corrected Anomalies and Known Anomalies associated
with the RMCT. We recommend that you read these anomaly descriptions before using
the RMCT, version 8.02.01.
Also, if you need to upgrade your RMCT separately from downloading this enhanced
redundancy system revision or by using RSLinx Classic software, version 2.59.00, see
Upgrade the Redundancy Module Configuration Tool (RMCT) on page 30.
RSLinx Classic software includes the RMCT, however, it is not likely to be the
version that is compatible with this firmware revision. Complete these steps to
obtain the compatible version of the RMCT.
1. Access Knowledgebase Answer ID 29511 (available at:
http://www.rockwellautomation.com/knowledgebase/).
2. Download the version listed for this redundancy firmware revision.
You can find this information at the Product Compatibility and
Download Center at
http://www.rockwellautomation.com/support/downloads.html.
3. Open the executable file and use the Installation Wizard to install the tool.
For information about checking the version of your RMCT, see Upgrade the
Redundancy Module Configuration Tool (RMCT) on page 30.
Rockwell Automation Publication 1756-RN650I-EN-E - July 2015
ControlLogix Enhanced Redundancy System, Revision 16.081_kit5 7
These enhancements are provided with enhanced redundancy system, revision
16.081_kit5.
Enhancements
Table 3 - Enhancements Provided with Enhanced Redundancy System, Revision 16.081_kit5
System Component
Enhancement
1756-CN2,
1756-CN2R,
1756-CN2RXT,
1756-CN2RK
The 1756-CN2, 1756-CN2R, 1756-CN2RXT, and 1756-CN2RK modules are available with firmware revision 25.005 in this enhanced redundancy bundle.
These enhancements have been made in previous firmware revisions.
Table 4 - Enhancements Provided with Enhanced Redundancy System, Revision 16.081_kit4 (or earlier)
System Component
Enhancement
1756-CN2/C support
The 1756-CN2, 1756-CN2R, 1756-CN2RXT, and 1756-CN2RK modules are available with firmware revision 25.004 in this enhanced redundancy bundle.
1756-RM2 firmware
Upgraded Firmware Revision
The 1756-RM2 and 1756-RM2XT modules use firmware to revision 20.005 in this enhanced redundancy bundle.
Redundancy Module
Configuration Tool
The RMCT has been revised to version 8.02.01.
ControlLogix
EtherNet/IP module,
1756-EN2T/D
Upgraded Firmware Revision
The 1756-EN2T/D module uses firmware revision 10.007 in this enhanced redundancy bundle.
ControlLogix
EtherNet/IP module,
1756-EN2T/D
Product Resiliency Improvement
This release includes enhancements intended to improve product resiliency to potentially disruptive activities. These enhancements have been verified to
not affect product safety, performance, expected life, configuration, or operation of the product. Rockwell Automation advises customers to follow good
Industrial Control System (ICS) security practices that include regular product updates. To ensure authenticity, obtain product updates and new releases
directly from Rockwell Automation.
The 1756-EN2T/D modules, firmware revision 10.006, are available.
IMPORTANT: The 1756-EN2T/D modules do not support firmware revisions previous to revision 10.006. Do not attempt to flash the firmware to
previous revisions.
With the 1756-EN2T/D module, firmware revision 10.006, message performance is improved over earlier revisions.
Redundancy Module
Configuration Tool
(RMCT),
1756-RM2,
1756-RM2XT
Automatic Export
The Export All button on the Event Log tab lets all of the event log records and internal diagnostic data from both redundancy modules in the chassis pair to
be collected automatically.
Major Fault Recovery
The redundancy module can now communicate on the backplane for most of its major fault conditions. When the redundancy module is in Major Fault
state but communicating on the backplane, the OK status indicator flashes red and the module display shows the 4-character error code.
The Clear Fault button on the Event Log tab automatically becomes active as soon as a major fault occurs on the redundancy module. The Module Info tab
shows the fault code and associated information. You can click the Clear Fault button to clear the fault without removing and reinserting the module. Once
the fault is cleared, the redundancy module automatically restarts and enters a primary or secondary state.
Redundant fiber ports for the 1756-RM2 module for crossloading; no single point of failure of a fiber cable.
Addition of the 1756-RM2 and 1756-RM2XT redundancy modules.
The 1756-RM2 module is interference-free with regard to safety functions and can be used in ControlLogix SIL2 applications.
During a switchover of the fiber channels on the 1756-RM2 module, the chassis remains synched at all times. (Scan time can encounter a delay of ~10 ms
or less during this fiber channel switchover.)
1756-L61, 1756-L62,
1756-L63, 1756-L63XT,
1756-L64
The false execution time of Add-On Instructions have been improved.
With previous revisions, the false execution time of an Add-On Instruction was dependent on the number of parameters (input, output, and inout)
configured for the instruction. The more parameters configured, the longer the false execution time of the Add-On Instruction.
With this revision, the false execution time of an Add-On Instruction is now constant if a scan false routine is not created. To determine the false execution
time of Add-On Instructions based on your controller, reference the values published in the Logix5000™ Controllers Execution Time and Memory Use
Reference Manual, publication 1756-RM087.
Lgx00106477
Rockwell Automation Publication 1756-RN650I-EN-E - July 2015
8 ControlLogix Enhanced Redundancy System, Revision 16.081_kit5
Table 4 - Enhancements Provided with Enhanced Redundancy System, Revision 16.081_kit4 (or earlier) (Continued)
System Component
Enhancement
1756-L61, 1756-L62,
1756-L63, 1756-L63XT,
1756-L64
Support for redundant controller use with alarm features of FactoryTalk Alarms and Events software.
This redundancy firmware revision provides support for alarms as supported by FactoryTalk Alarms and Events software. Alarms can now be embedded in
the controller with two new instructions, ALMD and ALMA, available in RSLogix 5000 software. These digital and analog alarm instructions are fully
self-contained.
Support for redundant controller use with equipment phases.
This redundancy firmware revision provides support for equipment phases that can be implemented by using FactoryTalk Batch software and the RSLogix
5000 PhaseManager™ feature. See the Application Notes on page 18 for more information about using a redundant system and equipment phases.
1756-RM,
1756-RMXT
Auto-qualification and synchronization processes of the 1756-RM module are stopped after a chassis pair first fails to synchronize.
In previous firmware revisions, if the Auto-Qualification parameter is set to Always and the controller in the secondary chassis faulted, or a communication
module was removed from the chassis, the 1756-RM module continuously attempted to qualify the redundant chassis. As a result of the continuous
attempts to qualify, the event logs became filled with synchronization failure events, thus making the originating fault more difficult to troubleshoot.
With this firmware enhancement, the 1756-RM module stops auto-qualification and synchronization attempts after the first fault occurs. This makes
troubleshooting the original fault easier.
Lgx00080574
Synchronization failure reports enhanced by adding `Partner Module not Found’ cause.
In previous revisions, if synchronization failed due to partner modules being at incompatible firmware revisions or a secondary module was not installed or
powered, then failure was indicated by the same cause statement in the synchronization log of the RMCT. For both types of failures, `’Module Pair
Incompatible’ was indicated as the cause.
With this firmware revision, the 1756-RM module can differentiate between partner incompatibilities and a missing secondary module. The RMCT
indicates a missing secondary module by stating `Partner Module not Found’ in the Cause column of the Recent Synchronization Attempts log.
Module is not installed or powered in chassis.
Modules are at different firmware revisions.
Lgx00083165
1756-RM, 1756-RMXT
The timestamps of Lock for Update and Initiate Locked Switchover commands are more precise.
In previous firmware revisions, when the redundant system was locked for an update or a locked switchover was initiated, the 1756-RM module indicated
the same time for the both the initiation and completion of those commands.
With this revision, the initiation and completion of each these commands is timestamped accordingly and the difference in time between initiation and
completion can be observed.
Lgx00083167
Rockwell Automation Publication 1756-RN650I-EN-E - July 2015
ControlLogix Enhanced Redundancy System, Revision 16.081_kit5 9
Table 4 - Enhancements Provided with Enhanced Redundancy System, Revision 16.081_kit4 (or earlier) (Continued)
System Component
Enhancement
1756-L61, 1756-L62,
1756-L63, 1756-L63XT,
1756-L64
Firmware revision 16.054 provides redundancy support for controller programming with Add-On Instructions.
Synchronization points for programs within the RSLogix 5000 project can be configured.
Redundancy firmware revision 16.054 provides the ability to limit the programs that are followed by synchronization and data crossloading. In many
applications, changing this can reduce the overall impact to the task scan time by reducing the number of times a data area is synchronized. Removing a
synchronization point results in 1 ms of overhead time saved.
However, reducing the number of synchronization points can delay the switchover time because more programs may need to be re-scanned by the new
primary controller as it starts at the last synchronization point.
Synchronization is performed at the end of the last program in the task's program list, regardless of the program’s Synchronize Data after Execution setting.
To change the synchronization setting of a program, access the program’s Program Properties dialog box and check or uncheck Synchronize Data after
Execution.
1756-L64
The ControlLogix5564 controller is supported for use in the redundant system with this firmware revision.
Redundancy Module
Configuration Tool
(RMCT)
System Event History accessible via the Redundancy Module Configuration Tool (RMCT).
A System Event History tab is available in the RMCT and is visible only when the session is launched while online with the 1756-RM module. This feature
automatically captures key events occurring in the redundant system that explain why a switchover occurred or why redundancy was lost.
Certain events also indicate what caused the chassis pair to become synchronized. There are 10 most recent entries available for viewing. Each entry has a
user comment attached to it that can be used to enter system maintenance information.
For more details, see the online help of the RMCT.
Lgx00073250
Event Log provides additional module information.
The 1756-RM module is able to report any changes in the application firmware revision and the backplane serial number via entries posted to the Event
Log. This information indicates that a firmware upgrade took place and whether the chassis location of the 1756-RM module was changed.
Lgx00073278
The Synchronization Status tab provides module type and firmware revision data.
Within the RMCT, the Synchronization Status tab displays the product-name string and firmware revision of redundancy-compliant modules in the chassis.
Lgx00073729
1756-RM,
1756-RMXT
User-identity parameters are retained through a power-cycle.
The user identity parameters are now 64 characters in length and are stored in nonvolatile memory of the 1756-RM modules. The parameters are saved to
nonvolatile memory whenever a change is made.
Lgx00073247
The qualification state of the redundant chassis pair is indicated on the module status display.
The 1756-RM module in the secondary chassis displays a ‘QFNG’ 4-character code when the redundant chassis pair is qualifying for synchronization.
Lgx00073276
The primary 1756-RM module is the Wall Clock Time (WCT) master for the secondary 1756-RM module.
The 1756-RM module in the primary chassis is the master of the currentTime attribute of the WCT object. When a secondary 1756-RM module is
connected, the currentTime attribute in the primary 1756-RM module is copied over to the secondary 1756-RM module to make them the same. The
currentTime attribute on the secondary 1756-RM module is synchronized every second.
Lgx00073248
The 1756-RM module can be accessed when in a major fault state.
In some applications, it is possible to communicate with the 1756-RM module even if it has already experienced a major nonrecoverable fault. This lets the
fault code to be read remotely and facilitates the retrieval of event logs while in the faulted state.
Lgx00073258
Rockwell Automation Publication 1756-RN650I-EN-E - July 2015
10 ControlLogix Enhanced Redundancy System, Revision 16.081_kit5
Corrected Anomalies
The following sections describe anomalies that are corrected in enhanced
redundancy system revisions.
Corrected Anomalies with Revision 16.081_kit5
These anomalies have been corrected in enhanced redundancy system, revision
16.081_kit5.
Table 5 - Corrected Anomalies in Enhanced Redundancy System, Revision 16.081_kit5
Cat. No./System
Component
Enhanced
Redundancy
System Revision
Description
1756-CN2/C
1756-CN2R/C
1756-CN2RXT/C
1756-CN2RK
16.081_kit5
CORRECTED: When the second power supply of a redundant power supply pair powers up, ControlNet interface modules that reside
in the same chassis experience an overvoltage condition. The 5V power rail on the interface module briefly exceeds the maximum
voltage setting in the Voltage Monitoring System (VMS).
Lgx00158735
CORRECTED: The Redundancy System Update feature takes several minutes to report that a secondary module with an earlier
firmware revision is paired with a primary module that has more recent firmware.
Lgx00155142
Corrected Anomalies with Revision 16.081_kit4 (or earlier)
These anomalies have been corrected with enhanced redundancy system,
revision 16.081_kit4 (or earlier).
Table 6 - Corrected Anomalies with Enhanced Redundancy System, Revision 16.081_kit4 (or earlier)
System
Component
Description
1756-L61, 1756-L62,
1756-L63,
1756-L63XT,
1756-L64
A Digital Alarm (ALMD) configured to trigger when the input condition of the alarm is false, does not trigger if the alarm condition is false when you conduct
a a download or return to run mode.
When the Condition parameter of the ALMD instruction is not set (that is, Input = 0) and either the program has recently been downloaded to the controller,
or the controller has been changed from Run to Program and back to Run mode, the alarm is not activated (that is, the InAlarm bit is not set).
These behaviors can result, depending on your application:
• Programming designed to respond to the activated alarm is not executed.
• Messages designed to be indicated at the operator station in response to the activated alarm are not indicated.
• The alarm’s history log does not indicate that the alarm was activated.
If you do not upgrade to this revision, you must toggle the Condition parameter from set (that is, Input = 1) to not set (that is, Input = 0) to activate the
alarm.
If your Condition parameter is set, then the alarm activates as expected after a download or change to the controller mode.
Lgx000103444
Rockwell Automation Publication 1756-RN650I-EN-E - July 2015
ControlLogix Enhanced Redundancy System, Revision 16.081_kit5 11
Table 6 - Corrected Anomalies with Enhanced Redundancy System, Revision 16.081_kit4 (or earlier) (Continued)
System
Component
Description
1756-L61, 1756-L62,
1756-L63,
1756-L63XT,
1756-L64
Fault handlers can be defined at the controller and program scope levels. These fault handlers are typically used to handle major recoverable faults that can
occur during runtime execution of an application due to programming errors. A typical example of this is handling indirect addressing that has gone out of
range; MyTag[index], where index is larger than the size of the array.
Faults can also be handled by the controller during pre-scan of the controller program on the transition to Run mode. Again, for example, the handling of
indirect addressing that has gone out of range.
There is an anomaly when these methods attempt to handle a fault.
These are the possible ways the anomaly can manifest itself:
• The controller experiences a major non-recoverable fault. I/O goes to their configured safe state, and the user application is cleared from memory. At this
point, a Code 1 Type 60 or 61 major recoverable fault is logged in the controller. This requires you to redownload the application.
• Tag data corruption.
• Online saving or uploading failures.
• Anomalous program execution.
For example, if a rung is being scanned false and there is an instruction that has false execution, the fault handler executes so the remainder of the rung
scans true. In the example below, the OTE instruction has an index out of range. After returning from the fault handler, the ADD instruction executes, even
though the rung input conditions are false.
Only on redundancy systems, when the fault handler or power-up handler contains an Add-On Instruction, the new primary controller can fault with a major
non-recoverable fault on the second switch-over. These fault conditions can leave the redundancy system without a running primary controller.
Lgx00106481, Lgx00107423, Lgx00100766, Lgx00106478
1756-CN2,
1756-CN2R,
1756-CN2RXT
The 1756-CN2/B module cannot use a ControlNet network address of 96, or greater, in a redundant chassis pair. If you set the switches on the 1756-CN2/B
module to 96 or greater, and place it in a secondary chassis, the module faults.
With this firmware revision, the node address switches of the ControlNet module in the secondary chassis can be set at an address of 98, or less.
Lgx00082110
A connection closing during phase two of redundant chassis qualification results in a synchronization failure.
With this firmware revision, a connection closing during qualification does not cause a synchronization failure.
Lgx00092857
Attempts to use the ControlNet bridge modules on an unconfigured ControlNet network results in a failure to qualify and synchronize the redundant chassis.
With this firmware revision, ControlNet modules in a redundant chassis can qualify and synchronize when the ControlNet network is not scheduled.
Lgx00091856
After an event on a 1756-CN2 or 1756-CN2R module causes disqualification of the redundant chassis pair, the secondary chassis continues to appear to be
synchronized for up to 30 seconds after the disqualifying event. Even though the redundant chassis pair does not indicate disqualification immediately, the
PartnerChassisRedundancyState attribute immediately indicates that no partner is present.
During the delayed disqualification, a switchover cannot successfully occur.
With this firmware revision, the secondary chassis disqualifies without delay.
Lgx00090120
1756-CN2,
1756-CN2R,
1756-CN2RXT
Upon powerup, the OK status indicator of the 1756-CN2 or 1756-CN2R modules can be red and the module status display indicates either:
• CmdConnOpen.cpp Line 630.
• RMEventLog.cpp Line 841.
This is a result of the ControlNet module inaccurately detecting the size of the redundant chassis.
With this firmware revision, the correct chassis size is accurately detected.
Lgx00082907
Rockwell Automation Publication 1756-RN650I-EN-E - July 2015
12 ControlLogix Enhanced Redundancy System, Revision 16.081_kit5
Table 6 - Corrected Anomalies with Enhanced Redundancy System, Revision 16.081_kit4 (or earlier) (Continued)
System
Component
Description
1756-EN2T
After a power cycle switchover and HMI loading, CIP Sync functions of the 1756-EN2T module fail when used in a redundancy system.
Rarely, the 1756-EN2T module can powerup and not synchronize CIP Sync time to the grandmaster or can synchronize with an incorrect time.
With this firmware revision, the CIP Synch time of the 1756-EN2T module synchronizes with the grandmaster on powerup.
Lgx00083465, Lgx00082870
As a result of a delayed 1756-EN2T module-response, the 1756-RM module failed and indicated communication error EAE8 after power to the redundant
chassis was cycled.
With this firmware revision, no delayed response of the 1756-EN2T module occurs.
Lgx00079052
The 1756-EN2T module refuses all outbound connections via the Ethernet port.
After cycling power on the Ethernet switch or router that the 1756-EN2T module is connected to, the 1756-EN2T module can become unresponsive. The
affected module does not respond to Ethernet network, backplane, or USB traffic, even though the status indicators remain green and the status display
shows no errors.
With this revision, the 1756-EN2T module maintains outbound connections.
Lgx00081018
After a switchover, the new primary 1756-EN2T module resets if the partnered 1756-EN2T module that was the primary is faulted. This can result in a slight
delay of the new primary chassis taking control.
With this firmware revision, if the primary 1756-EN2T module is faulted, the partnered 1756-EN2T module becomes the new primary without resetting and
the delay in the new primary chassis taking control cannot occur.
Lgx00082818
Rockwell Automation Publication 1756-RN650I-EN-E - July 2015
ControlLogix Enhanced Redundancy System, Revision 16.081_kit5 13
Table 6 - Corrected Anomalies with Enhanced Redundancy System, Revision 16.081_kit4 (or earlier) (Continued)
System
Component
Description
1756-L61, 1756-L62,
1756-L63,
1756-L63XT,
1756-L64
After a redundant system is synchronized, if the secondary controller is removed or is faulted, the primary 1756-RM module faults with an E054 error code.
Removing and reinserting the primary 1756-RM module re-initiates qualification and resolves the error.
Lgx00083316
When an Add-On Instruction is used in the Power-Up Handler or Controller Fault Handler routines, a major nonrecoverable fault (MNRF) occurs on the new
primary after two switchovers.
Lgx00088390
When redundant controllers are used to produce data communicated on a ControlNet network, at a switchover the produced data reverts to an earlier value
until the next requested-packet interval (RPI) after an output scan occurs.
Lgx00090100
Redundant chassis synchronization fails when ControlLogix controllers are used in a redundant system where the redundant controller is consuming data
produced by a GuardLogix controller.
Lgx00091317
After a switchover, an Add-On Instruction stack overflow error occurs on the new primary controller. This anomaly can occur when:
• Add-On Instructions are used in the continuous task.
• The `During unused System Overhead Time Slice’ parameter (specified in the Controller Properties dialog box, Advanced tab) is set to `Reserve for System
Tasks, eg Communications’.
Lgx00093699
If a redundant controller is producing data to a consuming controller in the same redundant chassis, when a switchover or a locked switchover occurs, the
produced data reverts to an earlier value until the next requested-packet interval (RPI) after an output scan occurs.
Lgx00090167, Lgx00091180
A block-transfer message error 16#301 occurs for an extended time period after a successful switchover. This anomaly occurs when the 1756-L6x controller is
programmed with a block transfer of data to analog I/O via a 1756-DHRIO module.
Lgx00092774
1756-RM,
1756-RMXT
At times, the 1756-RM module status display can go blank soon after power is applied to the chassis. In addition, the OK status indicator stays solid red.
Attempts to access the 1756-RM module via the backplane are unsuccessful and communication via the fiber-optic cable does not occur.
Other modules in the chassis powerup as though in a nonredundant chassis.
Lgx00082630
The 1756-RM module can log minor faults E8AC and E2WZ after the chassis pair is already synchronized. This minor fault codes occur rarely and are logged
solely for information purposes - they do not indicate noteworthy problems with the system.
Lgx00080482, Lgx00097734
While synchronized, 1756-RM module can fault with an error EA84 or EA28 on switchover.
If the Ethernet cable to a synchronized and primary 1756-EN2T module is broken or damaged, the 1756-RM module can fault with an error EA84 or EA28 fault
code. However, a switchover successfully executes.
Lgx00084385
Repeatedly disconnecting and connecting the fiber-optic cable while the redundant chassis pair is qualifying causes the 1756-RM modules to fault. Fault
codes that can be indicated are E0Ix fault codes.
Lgx00084595
Comments cannot be added to older events in the System Event History tab.
In the System Event History tab, commented entries already saved to nonvolatile memory cannot be edited. However, new events generated (after the last
attempt to save to nonvolatile memory) can be edited.
Lgx00084176
After completing a firmware upgrade to either the 1756-CN2 or 1756-EN2T modules, an error EK24 is indicated by the redundancy module and the redundant
chassis fails to qualify.
Lgx00076384
After a power cycle, the 1756-RM module occasionally remains in Test mode as indicated by the module status display continuously indicating THG1. In
addition to THG1 indicated on the module status display, the controller reports a `(Type 03) I/O Fault (Code 20) Unable to read ControlBus chassis’ error.
Also, if the 1756-RM module that remains in Test mode is in the secondary chassis, then the communication modules in both chassis indicate a duplicate
node.
Lgx00080649
Rockwell Automation Publication 1756-RN650I-EN-E - July 2015
14 ControlLogix Enhanced Redundancy System, Revision 16.081_kit5
Table 6 - Corrected Anomalies with Enhanced Redundancy System, Revision 16.081_kit4 (or earlier) (Continued)
System
Component
Description
1756-RM,
1756-RMXT
After applying power to the redundancy module, the OK indicator is steady red and the module status display does not provide any indication of the module
status (that is, the module status display is blank). Power-up processes of the redundancy module are not carried out and the module’s Event Log does not
indicate that power-up processes have been initiated.
Lgx00081559
Repeated attempts to automatically synchronize redundant chassis after certain qualification checkpoints can cause the primary 1756-RM module to fault as
indicated by the:
• Steadily red OK indicator.
• Blank module status display.
• Major faults EG1G and EG1a indicated in the Event Log.
Lgx00087889
The 1756-RM module indicates that the primary modules are not compatible with secondary modules and the redundant chassis fail to qualify. This occurs
after multiple modules within the primary chassis received firmware upgrades at the same time, or nearly the same time.
Lgx00083164
The 1756-RM module indicates error code E010 after attempts to complete online edits while synchronized.
This anomaly can occur when multiple programs are used and:
• Inhibited programs are uninhibited.
• Synchronization and crossloading is not carried out at the end of each of the inhibited programs.
Lgx00090176
Editing any parameters of the User-Defined Identity within a few seconds of disqualification or a switchover results in the synchronization status changing to
incompatible.
Lgx00091144
After running in the synchronized state for several days, a 1756-RM module of the pair can fault and indicate error code E8A0.
The system-response to the fault depends on the location of the 1756-RM module. If the faulted 1756-RM module is in the:
• Primary chassis, a switchover occurs
• Secondary chassis, disqualification occurs
To restore redundancy, remove and reinsert the faulted 1756-RM module. Then, synchronize the chassis.
Rockwell Automation Publication 1756-RN650I-EN-E - July 2015
ControlLogix Enhanced Redundancy System, Revision 16.081_kit5 15
Known Anomalies
This table lists the known anomalies applicable to the enhanced redundancy
system, revision 16.081_kit5 (or earlier).
Table 7 - Known Anomalies with Enhanced Redundancy System, Firmware Revision 16.081_kit5 (or earlier)
System Component
Description
1756-EN2T,
1756-EN2TR,
1756-EN2TXT
You cannot have kits with firmware revisions 10.006 and 10.007 installed on the same computer. If you have firmware revision 10.006 installed and you
attempt to install firmware revision10.007, 10.007 generates an error directing to an incorrect .nvs file. Reinstall the desired firmware revision and ignore
the error. We recommend using Firmware revision 10.007 because it has corrected anomalies from firmware revision 10.006.
Lgx00155450
1756-L61, 1756-L62,
Redundant chassis synchronization fails when a large number of controller connections are used.
1756-L63, 1756-L63XT, Chassis synchronization can fail if the controller is near its connection limits. To reduce the likelihood of this anomaly, verify that you use controller
1756-L64
connections within the limits of the controller and that at least eight controller connections are reserved for the redundant system. Try to limit the number
of controllers connections used to 243 connections, or less.
Alarms scanned during the continuous task can be published to the alarm server twice after a switchover.
If a switchover occurs and a continuous task that contains alarm instructions is scanned twice as a result, a duplicate `out of scope’ alarm entry can be
indicated in the alarm summary object. To clear `out of scope’ entries, click Refresh alarm list.
Alarm status messages can be duplicated in the Alarm History Log in the event of a switchover.
To make troubleshooting duplicate alarm states easier, consider programming alarms to indicate when a redundant system switchover occurs.
Alarms that are acknowledged just before or during a switchover can be indicated as active and unacknowledged after a switchover. If this occurs,
acknowledge the alarm a second time.
If an alarm is active, then inactive, and a switchover occurs before change in the alarm state is updated to the FactoryTalk server, the FactoryTalk alarm
history log may not indicate the change in alarm state.
The alarm parameters can be lost when a switchover occurs.
When a switchover occurs in a redundant system that uses alarms, certain alarm parameters may not be transferred to the new primary controller if the
parameters have changed since the last crossload of data. Alarm parameters that may not transfer include:
• DeliveryER
• DeliveryEN
• NoSubscriber
• NoConnection
• CommError
• AlarmBuffered
• SubscNotified
Once the alarm data is buffered, the parameters are updated.
Lgx00093529
Alarms can fail to be acknowledged when the attempt to acknowledge the alarm occurs during a switchover.
If you attempt to acknowledge an alarm while a switchover occurs, a failure to acknowledge the alarm is indicated. Attempting to acknowledge the alarm a
second time is successful.
Lgx00093826
1756-EN2T,
1756-EN2TXT
You cannot have firmware revisions 10.006 and 10.007 installed on the same computer. If you have firmware revision 10.006 installed and you attempt to
install firmware revision10.007, 10.007 generates an error directing to an incorrect .nvs file.
Uninstall firmware revision 10.006 before installing 10.007 or reinstall the desired firmware revision and ignore the error.
We recommend using Firmware revision 10.007 because it has corrected anomalies from firmware revision 10.006.
Lgx00155450
Rockwell Automation Publication 1756-RN650I-EN-E - July 2015
16 ControlLogix Enhanced Redundancy System, Revision 16.081_kit5
Table 7 - Known Anomalies with Enhanced Redundancy System, Firmware Revision 16.081_kit5 (or earlier)
System Component
Description
1756-RM, 1756-RMXT
The redundancy module fails to detect a controller in the chassis.
Rarely, after powering the redundant chassis, the 1756-RM module is unable to detect all of the controllers placed in the chassis. When the controller fails to
be detected, it goes into Run mode, even if it is in the secondary chassis. In addition, the Synchronization Status tab of the RMCT does not indicate that the
missing controller is present.
If the controller that fails to be detected is in the secondary chassis, the chassis pair fails to synchronize.
Lgx00079417
Repeated connection and disconnection of the 1756-RM modules’ fiber-optic cable results in various fault codes indicated on the module status display.
If the 1756-RM modules’ fiber-optic cable is disconnected and connected repeatedly within short periods of time, the redundancy module faults and
indicates error codes such as E0XX or EAXX.
To avoid experiencing these faults, wait 5…10 seconds between disconnecting and connecting the 1756-RM modules’ fiber-optic cable.
Lgx00084595, Lgx00091960
Cycling power to, or, updating the firmware of the 1756-RM module or other modules in the chassis can cause the 1756-RM module to fault and indicate
error code EAM3 on the module status display.
Rarely, after updating the firmware the 1756-RM module or any other modules in the chassis, the 1756-RM module begins logging E750 faults and
eventually an EAM3 fault occurs. To recover, uninstall both the 1756-RM modules from the chassis and re-install them in the same chassis slots. Uninstalling
and reinstalling only one of the modules can result in the fault appearing again.
Lgx00094986, Lgx00099560
Rockwell Automation Publication 1756-RN650I-EN-E - July 2015
ControlLogix Enhanced Redundancy System, Revision 16.081_kit5 17
This table lists the restrictions applicable to the enhanced redundancy system,
revision 16.081_kit5 (or earlier).
Restrictions
Table 8 - Restrictions with Enhanced Redundancy System, Firmware Revision 16.081_kit5 (or earlier)
System Component
Description
1756-CN2, 1756-CN2R,
1756-CN2RXT,
1756-CN2RK
1756-CN2/B and 1756-CN2R/B module firmware is not compatible with 1756-CN2/A and 1756-CN2R/A, hardware.
Do not attempt to upgrade an 1756-CN2/A or 1756-CN2R/A, module with 1756-CN2/B or 1756-CN2R/B firmware. Attempting to do so results in
ControlFlash software displaying a severe incompatibility warning. Series A modules are not supported in redundancy.
1756-CN2/C, 1756-CN2R/C, 1756-CN2RXT/C, 1756-CN2RK/C module firmware is not compatible with series A and B hardware. You cannot flash series A or B
firmware on series C hardware or vice versa.
The 1756-CN2x communication modules provide a maximum of 128 CIP connections for standard (non redundancy) application use.
The 1756-CN2x communication modules provide 131 total CIP connections. However, three of the 131 CIP connections are always reserved for redundant
control. These 3 redundant-system CIP connections always appear to be in use, even when no connections are open.
Because 3 of the 131 CIP connections are reserved for redundancy, 128 CIP connections are available for nonredundant use.
1756-CN2/B and 1756-CN2R/B module firmware is not compatible with 1756-CN2/A and 1756-CN2R/A, hardware. You cannot flash series A or B firmware
on series C hardware or vice versa.
1756-CN2/C, 1756-CN2R/C, 1756-CN2RXT/C, 1756-CN2RK/C module firmware is not compatible with series A and B hardware. The 1756-CN2/B and
1756-CN2R/B module firmware is not compatible with the 1756-CN2/A or 1756-CN2R/A hardware. Do not attempt to upgrade an 1756-CN2/A or
1756-CN2R/A, module with 1756-CN2/B or 1756-CN2R/B firmware. Attempting to do so results in ControlFlash software displaying a severe incompatibility
warning. Series A modules are not supported in redundancy.
1756-CN2
The 1756-CN2/A, module cannot be used in any redundant chassis. The 1756-CN2/A module is not redundancy compliant in either a standard or enhanced
redundancy system.
1756-CN2, 1756-CN2R,
1756-CN2RXT,
1756-CN2RK,
1756-EN2T
System Event Entry contains a module failure event when an enhanced communication module is inserted.
The System Event History displays a `Module Failure’ entry when you insert a 1756-CN2/B, or 1756-CN2/C module, or a 1756-EN2T module in the chassis
while the redundant chassis pair is synchronized. This is not indicative of any module failure, instead it only indicates that an enhanced communication
module was inserted in the chassis.
Lgx00078874
1756-EN2T
Do not use 1756-EN2T modules at firmware revision 1.004, or lower, in redundant chassis.
1756-EN2T module firmware revision 1.004 is not redundancy-compliant either in standard or enhanced redundancy systems. 1756-EN2T modules at
firmware revision 1.004 must be upgraded to revision 2.003, or later. Once upgraded, the 1756-EN2T module is redundant-system compliant.
The 1756-EN2T module provides a maximum of 256 CIP connections for standard (non redundant) application use.
The 1756-EN2T module provides 259 total CIP connections, however, 3 of the 259 CIP connections are always reserved for redundant control. These 3
redundant-system CIP connections always appear to be in use, even when no connections are open.
Because 3 of the 259 CIP connections are reserved for redundancy, 256 CIP connections are available for non redundancy use.
The 1756-EN2T module used in the enhanced system does not provide features such as socket services, web services, or the Simple Time Network Protocol
(SNTP) client.
1756-L61, 1756-L62,
Inhibiting or removing an inhibition from a redundant controller program can cause the secondary chassis to disqualify, then to qualify again.
1756-L63, 1756-L63XT, When changing the Inhibit Program setting, plan for secondary chassis disqualification according to potential implications that are specific to your
1756-L64
application. Or, unschedule the program rather than inhibiting it.
Lgx00090432
Do not use Match Project to Controller property with redundant controllers.
If you use the Match Project to Controller property available in the Advanced tab of the Controller Properties dialog box, you cannot go online with,
download to, or upload from the new primary controller after a switchover. This is because the serial number of the new primary controller is not the same
as the serial number of the old primary controller and the project cannot be matched to the newly-switched-to controller.
Lgx00063573
Deleting I/O modules from a project while online with the controller can cause a major nonrecoverable fault (MNRF) on the secondary controller.
If your application requires that you delete I/O modules from the project while online with the controller, disqualify the secondary chassis before deleting
the I/O modules.
Lgx00095282
Disqualify redundant chassis before running the Data Preserved Download Tool.
If you attempt to run the Data Preserved Download Tool with a ControlLogix redundancy-enabled controller while the controllers are synchronized, the Data
Preserved Download Tool begins to run, but then becomes inoperable and must be terminated.
Lgx00099382
Rockwell Automation Publication 1756-RN650I-EN-E - July 2015
18 ControlLogix Enhanced Redundancy System, Revision 16.081_kit5
Table 8 - Restrictions with Enhanced Redundancy System, Firmware Revision 16.081_kit5 (or earlier)
System Component
Description
1756-L61, 1756-L62,
If you have either a:
1756-L63, 1756-L63XT, • 1756-L64 controller at firmware revision 1.10 (boot firmware)
1756-L64
• 1756-L61, 1756-L62, 1756-L63 at firmware revision 1.7 (boot firmware)
then you need to update the controller firmware with the controller placed in a nonredundant chassis.
If you install the controller in a redundant chassis, a major nonrecoverable fault (MNRF) can occur, or, it can remain in a faulted state. The controller indicates
this fault by the OK status indicator being solid red.
The label on the side of the controller indicates the series controller and the boot firmware revision as shown in the following example.
1.7
B
F/W REV.
LOGIX 5563
PROCESSOR UNIT
CATALOG / SERIES
CATALOG REV.
1.7
PART NO.
1756-L63 B
Complete these steps to upgrade from the boot firmware revision.
1. Put the controller in a nonredundant chassis.
2. Update the controller.
3. Put the controller in the redundant chassis.
After you have updated the controller from the boot firmware revision, any further updates can be made while the controller is in the redundant chassis.
Exception
If your controller is already running in a redundant system and you want to update it to a later revision, you can leave it in the existing redundancy system
during the firmware update.
Application Notes
Consider these application notes when configuring, programming, and using
your ControlLogix enhanced redundancy system revision 16.081_kit5.
Gateway Address Setting When Using Switches
When you use rotary switches to set an IP address, modules with firmware
revision 2.007 default to gateway address 0.0.0.0. When you use the
1756-EN2T/D module, firmware revision 10.006 or later, the default gateway
address is 192.168.1.1. This change impacts the upgrading of EtherNet/IP
modules in enhanced redundancy systems.
For more information, refer to ControlLogix Enhanced Redundancy System
User Manual, publication 1756-UM535.
Rockwell Automation Publication 1756-RN650I-EN-E - July 2015
ControlLogix Enhanced Redundancy System, Revision 16.081_kit5 19
Out-of-box Switch (888) Behavior Change
With the 1756-EN2T/D modules, firmware 10.006 or later, when the switches
are set to 888 to perform an out-of-box reset and the module is installed in a
chassis, remember the following:
1 The module does not become active on the backplane.
2 Other modules do not recognize the module.
3 RSLinx Classic software does not recognize the module.
4 If the module is installed in the primary chassis of a qualified redundant
chassis pair, a switchover does not occur. This item does not apply to
1756-EN2T/A/B/C.
IMPORTANT
The behavior that is described in 1…3 applies to all 1756-EN2T modules. The
forth does not apply to 1756-EN2T/A/B/C.
EtherNet/IP Networks and Redundant Systems
In Enhanced Redundancy systems, revision 16.081_kit5 (or earlier), use only an
EtherNet/IP network for HMI/workstation communication and messaging.
Some connections to an enhanced redundancy chassis pair can briefly drop if the
connection path between the device and the redundant chassis pair is made
exclusively over an EtherNet/IP network.
Do not use an EtherNet/IP network for:
• Communication with I/O modules.
IMPORTANT
The 1756-EN2T/D modules can control remote I/O modules over an
EtherNet/IP network. This functionality is not tested in Enhanced Redundancy
systems, revision 16.081_kit5 (or earlier).
We recommend that you do not use the 1756-EN2T modules/D modules to
control remote I/O modules over an EtherNet/IP network.
• Communication between devices via produced/consumed tags.
Produced/Consumed Tags between Primary Controllers and Nonredundant Controllers
If controllers in the redundant chassis pair produce tags over an EtherNet/IP
network that controllers in remote chassis consume, the connection from the
remote controller to the redundant controller can briefly drop during a
switchover if the remote chassis’ EtherNet/IP communication modules do not
use specific firmware revisions.
Rockwell Automation Publication 1756-RN650I-EN-E - July 2015
20 ControlLogix Enhanced Redundancy System, Revision 16.081_kit5
Use these firmware revisions for EtherNet/IP communication modules in the
remote chassis to maintain connections during a switchover.
Table 9 - Minimum Firmware Revision for Communication Modules
EtherNet/IP Communication Module in Remote Chassis
Minimum Firmware Revision
1756-EN2F
4.003
1756-EN2T
4.002
1756-ENBT
6.001
1768-ENBT
4.001
1769-L2x
19.011
1769-L3xE
1788-ENBT
IMPORTANT
3.001
The minimum firmware revisions listed above apply only to EtherNet/IP
communication modules in the remote chassis.
In a redundant chassis pair, you can use only the ControlLogix modules listed in Table 1.
Minimum Value for the Watchdog Time
Use this table to determine the equation to use to calculate the watchdog time for
each task in your program.
If
Then use this equation
Switchover time is critical to system performance
(2 * maximum_scan_time) + 150 ms
Module firmware is updated in the field
(maximum_scan_time) + 245 ms
You need to safeguard against the removal of a
intermodule fiber-optic cable
(maximum_scan_time) + 390 ms
The maximum_scan_time is the maximum scan time for the entire task
when the secondary controller is synchronized.
Synchronizing after Disqualification
If your secondary chassis becomes disqualified, or you manually disqualify it, take
these actions before you try to synchronize the chassis:
• Verify that the synchronization status of the primary module is full
compatibility.
• Wait at least 15 seconds after the redundant chassis are disqualified before
you try to synchronize them.
Rockwell Automation Publication 1756-RN650I-EN-E - July 2015
ControlLogix Enhanced Redundancy System, Revision 16.081_kit5 21
Using Different 1756-RM2, 1756-RM2XT, 1756-RM, or 1756-RMXT
Redundancy Module Firmware Revisions
The firmware bundle available for enhanced redundancy system, revision
16.081_kit1, includes a new electronic data sheet (EDS) file for the 1756-RM2
and 1756-RM2XT redundancy modules.
You must install the EDS files available with the enhanced redundancy system,
revision 16.081_kit1 firmware bundle or you cannot launch or, consequently, use
the RMCT, version 8.01.05 in an enhanced redundancy system, revision
16.081_kit1 application.
When using the 1756-RM or 1756-RMXT, and you continue to use the EDS file
made available with enhanced redundancy system, revision 16.081 and earlier,
series B redundancy modules, used in revision 16.081_kit1 appear as series A
redundancy modules in the Device Type column of an RSWho browse screen.
In this case, that is, using the EDS file made available with enhanced redundancy
system, revision 16.081 or earlier, use the information in the Online Name
column to identify your redundancy modules’ series level. The information in the
Online Name column is accurate.
We recommend that you use the EDS file for redundancy modules that is
included with the enhanced redundancy system, revision 16.081_kit1 firmware
bundle. With the new EDS file, the RSWho software Device Type column shows
a generic 1756-RM device type, as shown in this graphic.
Failure to install the new EDS files available in enhanced redundancy system,
revisions 16.081_kit1 (or later), firmware bundles prevents the use of RMCT,
version 8.02.01.
Generic 1756-RM Redundancy
Module Device Type
Rockwell Automation Publication 1756-RN650I-EN-E - July 2015
1756-RM/B Redundancy
Module Indication
22 ControlLogix Enhanced Redundancy System, Revision 16.081_kit5
Using a Redundant System with
a FactoryTalk Batch Server
To connect a ControlLogix redundancy system to a FactoryTalk Batch Server,
you must bridge from the ControlNet network of the redundant system to the
EtherNet/IP network, and then connect to the FactoryTalk Batch Server.
You cannot connect to the FactoryTalk Batch Server directly from an
EtherNet/IP module placed in the redundant chassis.
This illustration demonstrates one method of bridging the ControlNet network
of the redundant system to the EtherNet/IP network that the FactoryTalk Batch
Server is running on.
FactoryTalk Batch Server
Workstation or HMI
EtherNet/IP Network
Primary ControlLogix Chassis
Logix 556x
E
N
2
T
L
6
3
Secondary ControlLogix Chassis
Logix 556x
L
6
3
R
M
C
N
2
R
E
N
2
T
Logix 556x
Logix 556x
L
6
3
L
6
3
Fiber-optic Cable
E
N
2
T
C
N
2
R
ControlNet Redundant Media
EtherNet/IP Network
To Remote I/O
Rockwell Automation Publication 1756-RN650I-EN-E - July 2015
R
M
C
N
2
R
ControlLogix Enhanced Redundancy System, Revision 16.081_kit5 23
Using a Redundant System and
CIP Equipment Phases
When implementing a redundant system that uses Common Industrial Protocol
(CIP) equipment phases, we recommend certain programming considerations to
help avoid potential issues with your redundant system.
Using the EquipmentPhase.StepIndex Tag
Each CIP equipment phase that you have in your project has a status tag of a
PHASE data type. One of the members of the PHASE data type is
EquipmentPhase.StepIndex. The .StepIndex tag stores data that
indicates the step currently in progress. This tag can also be used to advance
through steps if the next step value is moved into the .StepIndex tag on
completion of a step.
PHASE Data
Type
.StepIndex Member
Rockwell Automation Publication 1756-RN650I-EN-E - July 2015
24 ControlLogix Enhanced Redundancy System, Revision 16.081_kit5
Verify that the current EquipmentPhase.StepIndex tag value is
crossloaded to the secondary controller by:
• Using a buffer to hold the target step value (that is, the value of the next
step) and update that value when a step transition occurs.
• Creating logic to move the target step value into the
EquipmentPhase.StepIndex tag once the current step is
completed.
If those programming considerations are made, after a switchover, the new
primary controller begins executing according to the
EquipmentPhase.StepIndex tag value, where if:
• The switchover occurs just after the tag value is updated, the step
newly-transitioned to executes as expected without duplication.
• The switchover occurs just before the tag value is updated, the current step
executes again before transitionally to the next step.
Because of the small possibility of steps being executed twice upon a switchover,
we recommend that you organize steps and phase logic into groups that is not
affected if a step is executed twice as a result of a switchover.
For more information about programming for step execution after a switchover,
see Knowledgebase Answer ID 62193 available at:
http://rockwellautomation.com/support
For more information about the PHASE data type, see the PhaseManager User
Manual, publication LOGIX-UM001.
Rockwell Automation Publication 1756-RN650I-EN-E - July 2015
ControlLogix Enhanced Redundancy System, Revision 16.081_kit5 25
Using Unit Tags
Batch Projects containing CIP equipment phases that require the use of Unit
Tags also require that a non-CIP data server be used to service the Unit Tags.
Either of these data servers can be used:
• OPC data server, available with RSLinx Classic software
• LiveData data server, available with RSLinx Enterprise software
However, when a redundant system is used, communication through an OPC or
LiveData data server can be interrupted when a switchover or qualification
occurs.
We recommend that, if possible, you use the LiveData data server to service Unit
Tags. This is because communication interruptions that can result from a
switchover or qualification are less likely to occur when the LiveData data server
is used.
For more information about communication interruptions with both the OPC
and LiveData servers, see Knowledgebase Answer ID 62192 available at:
http://www.rockwellautomation.com/support.
Multiple CIP Data Servers with One FactoryTalk Batch Server
If you take a controller offline and download its project while the same
FactoryTalk Batch Server is communicating with other ControlLogix controllers
in the system that are running CIP equipment phases, you can experience a range
of conversation statuses on the CIP data servers associated with the other
controllers. If the other CIP data servers encounter the status changes, the
FactoryTalk Batch Server can issue a hold command (HOLD) to any recipes that
are currently running.
You can experience this if your redundant or nonredundant ControlLogix system
is configured and running with these components:
• A single FactoryTalk Batch Server that is running CIP equipment phases
• The CIP equipment phases are running in more than one ControlLogix
controller
• The FactoryTalk Batch Server is configured with a separate CIP data server
for each ControlLogix controller
• The FactoryTalk Batch system is patched with patch 10.00.00.26 or later.
(Patch 10.00.00.26 is required for use with redundancy firmware revision
16.080.)
Rockwell Automation Publication 1756-RN650I-EN-E - July 2015
26 ControlLogix Enhanced Redundancy System, Revision 16.081_kit5
If your system is configured as described above, and you take one of the
ControlLogix controllers offline and download the project, these changes in
conversation statuses can occur.
a. The other CIP data servers that the FactoryTalk Batch Server is
communicating with can temporarily indicate a SUSPECT or LOST
conversation status.
b. As a result of the LOST state on the CIP data servers, the FactoryTalk
Batch Server issues a HOLD command and phases or recipes that are
running go to a held state.
c. The conversation statuses of the CIP data servers eventually transition
back to GOOD after a few minutes.
d. When the CIP data servers return to the GOOD conversation status,
you can manually click Clear Failures and Restart from the Batch View
to resume recipe execution.
The potential for you to experience this issue with your CIP data servers depends
upon:
• The size of the project being downloaded from the offline controller.
• The configuration of Timeout and Retry settings for the CIP data servers
in the Area Model. These settings are used by the Batch server to
determine how long to wait before changing the CIP data server
conversation status to SUSPECT or LOST.
For more information about using multiple CIP data servers with one
FactoryTalk Batch Server, see Knowledgebase Answer ID 62369 available at:
http://rockwellautomation.com/support
Rockwell Automation Publication 1756-RN650I-EN-E - July 2015
ControlLogix Enhanced Redundancy System, Revision 16.081_kit5 27
Replace a Module in the
Secondary Chassis that has the
Same Catalog Number and
Firmware Revision
These steps only apply when the primary chassis is at revision 16.081_kit4 and
16.081_kit5. These steps are used when performing a direct communication
module replacement, for example, when replacing a communication module in
the secondary chassis with a module that has the same:
• Catalog number
• Series
• Firmware (after updating the firmware, if necessary)
When you replace communication modules, make sure that the node address (for
ControlNet modules), rotary switches, and Port Configuration (for Ethernet
modules) match the existing modules.
1. Using the Redundancy Module Configuration Tool (RMCT):
a. Set Auto-qualification to Never.
b. Disqualify the redundant chassis pair (if not already disqualified).
2. Remove the module from the secondary chassis and replace it with the
new module.
3. If applicable, update the module firmware by using ControlFLASH
software.
4. In the RMCT, from the Auto-Synchronization pull-down menu, choose
your preferred method.
5. Manually synchronize the chassis, if needed.
Rockwell Automation Publication 1756-RN650I-EN-E - July 2015
28 ControlLogix Enhanced Redundancy System, Revision 16.081_kit5
Upgrade from an Enhanced
Redundancy Revision
Complete the tasks listed in this table to upgrade your redundancy system from
one enhanced redundancy system revision to another enhanced redundancy
system revision while your process continues to run.
IMPORTANT
These steps also apply to the 1756-RM2 modules.
Task
Page
Before You Begin
28
Upgrade Workstation Software
29
Upgrade the Redundancy Module Configuration Tool (RMCT)
30
Download and Install Redundancy Firmware Bundle
31
Update EDS Files
31
Prepare the Redundant Chassis for the Firmware Upgrade
32
Update Primary 1756-RM Redundancy Module Firmware
33
Update the Secondary 1756-RM2 Redundancy Module Firmware and All Other
Module Firmware in the Secondary Chassis
35
Prepare the RSLogix 5000 Project for the Upgrade
39
Lock and Switchover the System for Update
41
Update the New Secondary Chassis Firmware
43
Synchronize the Redundant Chassis
45
Before You Begin
IMPORTANT
• During the upgrade procedures, you are not able to use RSLogix 5000 software
to change the mode of the controller. Instead, use the keyswitch on the front of
the controller.
• Leave RSNetWorx for ControlNet software closed or offline throughout this
procedure. Otherwise, you see errors in the RSNetWorx software during the
update process.
• While completing these tasks to upgrade your redundancy firmware,
remember the following:
– Do not make any changes to the RSLogix 5000 project other than those
identified in these tasks.
– Verify that no one will be, or, is making, changes to the project.
Rockwell Automation Publication 1756-RN650I-EN-E - July 2015
ControlLogix Enhanced Redundancy System, Revision 16.081_kit5 29
Upgrade Workstation Software
Before you download and upgrade software for use with your redundant system,
use one of these methods to fully shutdown RSLinx Classic software.
• Right-click the RSLinx Classic icon in the notification area of the screen
and choose Shutdown RSLinx Classic.
• With RSLinx Classic software open, from the File menu choose Exit and
Shutdown.
Obtain and install the software required for your enhanced redundancy system
configuration.
The 1756-EN2T/C (or earlier) modules must use firmware revision 2.007 with
enhanced redundancy systems, revision 16.081_kit3 (or earlier). Firmware
revision 2.007 is unsigned firmware.
You cannot use digitally-signed firmware on 1756-EN2T/C (or earlier) modules.
For more information on, see 1756-EN2T Modules Digitally-signed Firmware
on page 4.
Use the installation instructions or release notes provided with each software
version for installation procedures and requirements.
Rockwell Automation Publication 1756-RN650I-EN-E - July 2015
30 ControlLogix Enhanced Redundancy System, Revision 16.081_kit5
Upgrade the Redundancy Module Configuration Tool (RMCT)
Obtain and install the compatible version of the RMCT. For more information,
see About the Redundancy Module Configuration Tool on page 5.
Verify Your RMCT Version
Complete these steps to check or verify the version of the Redundancy Module
Configuration Tool (RMCT) you have installed.
TIP
The RMCT launches at the version that is compatible with the 1756-RM module
firmware that is currently installed.
If you have not upgraded your 1756-RM module firmware after upgrading your
RMCT version, the RMCT version that is indicated may not reflect the version you
upgraded to.
1. In the RSLinx Classic software, start the RMCT for the 1756-RM module
in the primary chassis
The Module Configuration dialog box opens.
2. Right-click the title bar and choose About.
Rockwell Automation Publication 1756-RN650I-EN-E - July 2015
ControlLogix Enhanced Redundancy System, Revision 16.081_kit5 31
This enhanced redundancy system revision requires the RMCT, version
8.02.01 that is packaged with this enhanced redundancy system revision
bundle. The About screen for the RMCT displays 8.2.1.0 but it’s the
correct version.
Download and Install Redundancy Firmware Bundle
Download and install the redundancy firmware revision bundle from the
Rockwell Automation Support website at:
http://rockwellautomation.com/support
The redundancy firmware bundles are posted in the Downloads section and are
classified in the Control Hardware category.
Update EDS Files
EDS files for the 1756-EN2T/D modules, firmware version 10.007 or later, and
1756-CN2/C firmware revision 25.005 may not be available when you install
RSLinx software. You can use RSLinx software to upload EDS files from the
module or download EDS files from the Product Compatibility and Download
Center web site.
If needed, obtain EDS files for modules in your system from the
Rockwell Automation Support website at:
http://www.rockwellautomation.com/resources/eds/.
Once you have downloaded the required EDS file, launch the EDS Hardware
Configuration Tool by choosing Start > Programs > Rockwell Software >
RSLinx Tools > EDS Hardware Installation Tool.
The tool prompts you to Add or Remove EDS files.
Rockwell Automation Publication 1756-RN650I-EN-E - July 2015
32 ControlLogix Enhanced Redundancy System, Revision 16.081_kit5
Prepare the Redundant Chassis for the Firmware Upgrade
Complete these steps to prepare both the primary and secondary redundant
chassis for redundancy firmware upgrades.
1. Set the mode switch of the primary and secondary controllers to REM.
If the redundant controllers in both chassis of the redundant chassis pair
are not in Remote Program (REM) mode, the redundancy firmware
upgrade cannot be completed.
2. In RSLinx Classic software, start the RMCT for the 1756-RM module in
the primary chassis
3. Click the Configuration tab in RMCT.
4. From the Auto-Synchronization pull-down menu, choose Never.
5. Click Apply, then click Yes.
Rockwell Automation Publication 1756-RN650I-EN-E - July 2015
ControlLogix Enhanced Redundancy System, Revision 16.081_kit5 33
6. On the Synchronization tab, click Disqualify Secondary, then click Yes.
The secondary chassis is disqualified as indicated by the RMCT at the
bottom-left of the RMCT and on the redundancy module’s status display.
Status in RMCT
7. Click OK and close the RMCT.
Closing the RMCT helps prevent a timeout from occurring when the
redundancy module’s firmware is upgraded.
Update Primary 1756-RM Redundancy Module Firmware
Wait 45 seconds before you begin updating the 1756-RM firmware. During this
time, the redundancy module conducts internal operations to prepare for an
upgrade.
Complete these steps to upgrade the firmware of modules in the primary chassis.
1. Launch ControlFlash software and click Next.
2. Select the redundancy module catalog number and click Next.
Rockwell Automation Publication 1756-RN650I-EN-E - July 2015
34 ControlLogix Enhanced Redundancy System, Revision 16.081_kit5
3. Browse to the redundancy module and select it.
Primary Chassis
Secondary Chassis
4. Click OK.
5. Select the firmware revision to upgrade to and click Next.
6. Click Finish.
The firmware begins to update. When the upgrade is complete, the Update
status dialog box indicates completion.
Rockwell Automation Publication 1756-RN650I-EN-E - July 2015
ControlLogix Enhanced Redundancy System, Revision 16.081_kit5 35
Update the Secondary 1756-RM2 Redundancy Module Firmware and All
Other Module Firmware in the Secondary Chassis
Apply power to the secondary chassis. Wait 45 seconds before you begin
updating the secondary chassis firmware. During this time, the redundancy
module conducts internal operations to prepare for an upgrade.
Complete these steps to upgrade the firmware in the secondary chassis.
1. Launch ControlFlash software and click Next.
2. Select the redundancy module catalog number and click Next.
3. Browse to the redundancy module and select it.
Primary Chassis
Secondary Chassis
4. Click OK.
Rockwell Automation Publication 1756-RN650I-EN-E - July 2015
36 ControlLogix Enhanced Redundancy System, Revision 16.081_kit5
5. Select the firmware revision to upgrade to and click Next.
6. Click Finish.
The firmware begins to update. When the upgrade is complete, the Update
status dialog box indicates completion.
7. If you are replacing and upgrading your module hardware, remove the
module from the secondary chassis and replace it with the new module.
IMPORTANT
If you are replacing and upgrading your redundant controllers, verify that the planned
secondary controller provides the same, or greater, memory as the primary controller.
IMPORTANT
This is applicable only to the controllers. If replacing communications modules or the
Redundancy modules, refer to those specific sections.
When replacing communications modules, make sure that the node address (for
Controlnet modules), rotary switches, and Port Configuration (for Ethernet modules)
match the existing modules.
Use this table to determine if your planned primary and secondary
controllers can be used together in the redundant chassis.
Table 10 - Controller Compatibility
Primary Controller
Compatible Secondary Controller
1756-L61
1756-L61, 1756-L62, 1756-L63, 1756-L64
1756-L62
1756-L62, 1756-L63, 1756-L64
1756-L63
1756-L63, 1756-L64
1756-L64
1756-L64
8. Complete steps 2…7 for each module in the secondary chassis, including
the new controller, if applicable.
IMPORTANT
Continue with following steps, if the system upgrade is from any of the revisions
16.054 or 16.080, 16.081 to revision 16.081_kit5 and is replacing 1756-EN2T/C (or
earlier) modules with 1756-EN2T/D modules, and the modules being replaced have
rotary switches set to 2...254.
9. Make a note of the primary Ethernet module’s Port Configuration
including the following:
• IP Address
• Network Mask
Rockwell Automation Publication 1756-RN650I-EN-E - July 2015
ControlLogix Enhanced Redundancy System, Revision 16.081_kit5 37
• Gateway Address
10. Disconnect the Ethernet cables from the secondary Ethernet module.
11. In the 1756-EN2T/D replacement module, set the 1756-EN2T/D
module switches to 888 and insert it in the secondary chassis.
12. After the reset is complete, remove the module from the secondary chassis.
13. If a 1756-EN2T/C module is being updated, remove the 1756-EN2T/C
from the secondary chassis.
14. Set the switches to 999 and reinsert the module into the secondary chassis.
Rockwell Automation Publication 1756-RN650I-EN-E - July 2015
38 ControlLogix Enhanced Redundancy System, Revision 16.081_kit5
15. Bridging across the backplane (or via the Ethernet module’s USB port),
configure the newly added 1756-EN2T/D module’s Port Configuration
to match the primary Ethernet module’s Port Configuration from step 9.
16. Confirm the secondary 1756-EN2T/D module is at firmware
revision 10.007 or that the EN2T/C (or earlier) module is at firmware
version 2.007 or that the EN2T/C (or earlier) module is at firmware
version 2.007.
a. Launch ControlFLASH software and click Next.
b. Select the Ethernet module catalog number and click Next.
c. Browse to the module and select it.
Secondary
Chassis
d. Click OK.
e. Select the firmware revision to upgrade to and click Next.
f. Click Finish.
The firmware begins to update. When the update is complete, the Update
status dialog box indicates completion.
Wait for the update to complete.
Rockwell Automation Publication 1756-RN650I-EN-E - July 2015
ControlLogix Enhanced Redundancy System, Revision 16.081_kit5 39
17. After the update completes, connect the Ethernet cable to the secondary
Ethernet module, cycle power on the secondary chassis, and wait for
communication to resume on the network.
18. Check the Synchronization tab in the RMCT to verify that compatibility
is Full for all communication modules in the chassis.
19. Repeat step 9…step 18 for all Ethernet modules that have their rotary
switches set between 2…254.
Once you have either replaced or upgraded the firmware for each module in the
secondary chassis, prepare the RSLogix 5000 project for the upgrade.
Prepare the RSLogix 5000 Project for the Upgrade
Complete these steps to prepare the RSLogix 5000 program and controllers for
the upgrade.
1. Launch RSLogix 5000 programming software and go online with the
controller.
2. Verify that the watchdog time is set to a value that corresponds with the
requirements of the redundancy firmware revision and your application.
See the section Minimum Value for the Watchdog Time on page 20 for
information about calculating the minimum watchdog time.
3. Cancel or assemble any pending test edits.
4. Remove all SFC forces from the project.
5. Verify that no changes need to be made to the following:
• I/O forces
• I/O configuration
After this step, changes to I/O cannot be made until after the redundancy
firmware upgrade is complete and both chassis are synchronized.
6. Save the project.
Rockwell Automation Publication 1756-RN650I-EN-E - July 2015
40 ControlLogix Enhanced Redundancy System, Revision 16.081_kit5
7. Go offline.
Controller Properties
8. Click Controller Properties.
9. Click Change Controller.
10. Specify the controller revision you are updating to.
11. If you installed a new controller while upgrading the primary chassis
firmware, specify the new controller catalog number.
12. Click OK.
13. Access the Module Properties for each communication module in the
chassis and specify the module firmware revision you are upgrading to.
TIP
If you are unable to specify the new revision, you may need to change the
Electronic Keying parameter to Compatible Keying (recommended) or
Disable Keying.
Rockwell Automation Publication 1756-RN650I-EN-E - July 2015
ControlLogix Enhanced Redundancy System, Revision 16.081_kit5 41
14. Save the project.
15. Download the project to the secondary controller.
The secondary controller is at the higher network address of the two
available for the redundant chassis.
16. After the download is complete, go offline.
You are now ready to lock the system and initiate a locked switchover to update
the primary chassis. Continue with Lock and Switchover the System for Update.
Lock and Switchover the System for Update
Once you have downloaded the RSLogix 5000 project you prepared, complete
these steps to lock your system and initiate a switchover.
IMPORTANT
• Remain offline while completing these steps.
• Once you have locked the system, do not abort the system lock. Aborting the
system lock during this procedure clears the project from the secondary
controller.
• Do not disconnect any communication cables while completing these steps.
• Completing a locked switchover causes SFC instructions to be reset to their
initial state. This can result in SFC instructions executing twice.
1. In the RSLinx Classic software, start the RMCT for the 1756-RM module
in the primary chassis.
Rockwell Automation Publication 1756-RN650I-EN-E - July 2015
42 ControlLogix Enhanced Redundancy System, Revision 16.081_kit5
2. Click the System Update tab.
3. Click Lock for Update, then click Yes.
4. Wait for the system to lock.
The System Update Lock Attempts log indicates when the system lock is
complete.
5. Click Initiate Locked Switchover, then click Yes.
This step results in your secondary chassis assuming control and becoming
the primary chassis. When the switchover is complete, the Locked
Switchover Attempts log indicates success.
Rockwell Automation Publication 1756-RN650I-EN-E - July 2015
ControlLogix Enhanced Redundancy System, Revision 16.081_kit5 43
In addition to the log, the chassis status indicated in the bottom of the
RMCT updates to reflect the switchover.
Once your locked switchover is complete, continue by updating the firmware of
the modules in the new secondary chassis.
Update the New Secondary Chassis Firmware
IMPORTANT
Using RSLinx, update the Gateway address of the primary chassis ethernet module to
192.168.1.1, if the system upgrade is from revision 16.054 or 16.080, 16.081 to
revision 16.081_kit5 and replacing 1756-EN2T/C (or earlier) modules with EN2T/D
modules, and the modules being replaced have rotary switches set to 2...254.
Verify that your chassis have been locked for update and that the locked
switchover has completed successfully.
Then complete these steps to upgrade the firmware of all of the modules the new
secondary chassis, except for the 1756-RM module that has already been
updated.
See section Update Primary 1756-RM Redundancy Module Firmware on
page 33).
1. If you are replacing and upgrading your module hardware, remove the
module from the secondary chassis and replace it with the new module.
TIP
When replacing communications modules, make sure that the node address
(for Control net modules), rotary switches, and Port Configuration (for
Ethernet modules) match the existing modules.
2. If it is an Ethernet module:
a. Make a note of the rotary switch setting on the modules that you are
replacing.
b. Set rotary switches on the replacement module to 888 and insert the
module into the chassis.
c. After reset completed, remove the module.
d. Set the rotary switches to original values that you noted in step a.
e. Insert the module.
f. Go into the module properties and restore the values that you noted in
step 9 on page 36.
3. Launch ControlFlash software and click Next.
Rockwell Automation Publication 1756-RN650I-EN-E - July 2015
44 ControlLogix Enhanced Redundancy System, Revision 16.081_kit5
4. Select the module catalog number and click Next.
5. Browse to the module and select it.
Primary Chassis
Secondary Chassis
6. Click OK.
7. Select the firmware revision to upgrade to and click Next.
8. Click Finish.
The firmware begins to update. When the upgrade is complete, the Update
status dialog box indicates completion.
9. If you are replacing and upgrading your modules, remove the module from
the secondary chassis and replace it with the new module.
IMPORTANT
If you are replacing and upgrading your redundant controllers, verify that the planned
secondary controller provides the same, or greater, memory as the primary controller.
Rockwell Automation Publication 1756-RN650I-EN-E - July 2015
ControlLogix Enhanced Redundancy System, Revision 16.081_kit5 45
10. Complete steps 2…9 for each module in the new secondary chassis,
including the new controller, if applicable.
IMPORTANT
If you are replacing 1756-EN2T/C (or earlier) modules with 1756-EN2T/D modules,
make sure the configuration for the new modules in the new secondary chassis match
that of the partners in the new primary chassis.
Once you have upgraded the firmware for each of the modules in the new
secondary chassis, continue by synchronizing the redundant chassis.
Synchronize the Redundant Chassis
Complete these steps to synchronize the redundant chassis after firmware in both
chassis have been upgraded to the same revision.
1. In the RSLinx Classic software, start the RMCT for the 1756-RM module
in the primary chassis
IMPORTANT
You only have to do steps 3…7 if the system upgrade is from revision 16.054 or
16.080, 16.081 to revision 16.081_kit5 and replacing 1756-EN2T/C (or earlier)
modules with EN2T/D modules, and the modules being replaced have rotary switches
set to 2...254.
2. Click the Configuration tab.
Rockwell Automation Publication 1756-RN650I-EN-E - July 2015
46 ControlLogix Enhanced Redundancy System, Revision 16.081_kit5
3. Initiate a switchover.
4. In the new secondary, set the rotary switches back to the original
configuration.
5. Repeat this for all Ethernet modules that need the rotary switches set back
to 2...254.
6. From the Auto-Synchronization pull-down menu, choose the frequency
that suits your application.
7. Manually synchronize the chassis, if needed.
8. Set the redundancy module date and time according to your preference.
9. Click OK.
10. Close the RMCT.
Your redundant system firmware upgrade is now complete.
Rockwell Automation Publication 1756-RN650I-EN-E - July 2015
ControlLogix Enhanced Redundancy System, Revision 16.081_kit5 47
Update IP Address Set Via
Software to Address Set Via
Rotary Switches
This section describes how to change Ethernet IP address settings set by software
to IP addresses set by rotary switches when your system must continue to operate
during the update.
One reason to change IP address settings to the rotary switch option is if you
system is experiencing a Duplicate IP address condition and IP address swapping
is disabled.
IMPORTANT
Remember the following before using this section:
• If you are replacing 1756-EN2T/D modules, ignore this section.
• You must execute this procedure before the Redundancy System Update
procedure.
• You must physically be present at the location of the redundant chassis to do
this upgrade.
• The term 1756-RM is synonymous with 1756-RM2 in the text and graphics
throughout this section.
Complete the following steps.
1. Open RSLinx Classic software and browse to the redundancy module.
2. Right-click the redundancy module in the primary chassis and choose
Module Configuration.
Rockwell Automation Publication 1756-RN650I-EN-E - July 2015
48 ControlLogix Enhanced Redundancy System, Revision 16.081_kit5
3. Verify that the chassis are synchronized.
4. On the Configuration, choose Never from the Auto-Synchronization
pull-down menu.
5. Click Apply, and then click Yes.
6. Remove the secondary 1756-EN2T module from its chassis and
disconnect the Ethernet cables from the module.
7. Configure the IP address on the primary 1756-EN2T module.
The following steps use RSLinx Classic software.
a. Right-click the module icon and choose Module Configuration.
Rockwell Automation Publication 1756-RN650I-EN-E - July 2015
ControlLogix Enhanced Redundancy System, Revision 16.081_kit5 49
b. On the Port Configuration tab, enter the desired IP address, Network
Mask (if not entered automatically), and click OK.
This example uses the values in the following screen capture.
8. Set the rotary switches on the removed secondary module to 888.
9. Reinstall the module into the secondary chassis.
IMPORTANT
Make sure the module is not physically connected to the network before
reinstalling it.
10. After the module resets, remove it again.
11. Set the rotary switches on the secondary module to the desired IP address.
12. Reinstall the module in the chassis and reconnect it to the network.
Any Duplicate IP address errors that existed previously are no longer
present.
13. On the Synchronization tab in the RMCT, click Synchronize Secondary
to synchronize the chassis.
Rockwell Automation Publication 1756-RN650I-EN-E - July 2015
50 ControlLogix Enhanced Redundancy System, Revision 16.081_kit5
14. On the same tab, click Initiate Switchover to switch the primary and
secondary chassis in the system.
15. Remove the new secondary 1756-EN2T module from its chassis and
disconnect the Ethernet cables from the module.
16. Set the rotary switches on the removed secondary module to 888.
17. Reinstall the module into the secondary chassis.
IMPORTANT
Make sure the module is not physically connected to the network before
reinstalling it.
18. After the module resets, remove it again.
19. Set the rotary switches on the secondary module to the desired IP address.
20. Reinstall the module in the chassis and reconnect it to the network.
Any Duplicate IP address errors that existed previously are no longer
present.
21. On the Configuration, choose Always from the Auto-Synchronization
pull-down menu.
22. Verify that the chassis are synchronized.
23. Click Apply, and then click Yes.
Rockwell Automation Publication 1756-RN650I-EN-E - July 2015
ControlLogix Enhanced Redundancy System, Revision 16.081_kit5 51
Replace 1756-RM/B (or earlier)
Modules with
1756-RM2 Modules
You can replace your current redundancy modules with 1756-RM2 modules
without initiating a switchover.
TIP
For the following steps, `redundancy modules’ refers to 1756-RM or 1756-RM/B
modules.
Before executing these steps, review Table 1and Table 2.
• Required Series and Firmware Revisions for Components Used in an
Enhanced Redundancy System, Revision 16.081_kit5 on page 3
• Required Software Versions for Enhanced Redundancy System, Revision
16.081_kit5 on page 5.
1. Install the compatible version of the RMCT software.
You must shut down RSLinx Classic software to perform the installation,
and then restart RSLinx Classic software after the installation is complete.
2. On the RMCT Configuration tab, from the Auto-Synchronization
pull-down menu, choose Never.
3. Disqualify the redundant chassis pair (if not already disqualified) by using
the RMCT.
4. Unplug the fiber cable on both of the redundancy modules.
5. Close any open RMCT sessions connected to the current redundancy
modules that are being replaced.
6. Remove the redundancy module pair (in any order) from the redundant
chassis.
7. Insert the 1756-RM2 redundancy module pair (in any order) in the
redundant chassis into the same slots as the redundancy modules.
8. If not already installed, use RSLinx Classic software to upload the EDS file
for the 1756-RM2 module.
If needed, obtain the EDS file for the 1756-RM2 module. Right-click the
module in RSWho and choose ‘Upload EDS file from device’.
9. Update the primary and secondary 1756-RM2 modules to the to the
appropriate firmware revision.
10. Reconnect the fiber cable on either CH1 or CH2 of the 1756-RM2
redundancy module.
11. Optional: Connect a second fiber cable on the remaining channel for fiber
redundancy.
12. Wait for at least 45 seconds after connecting the fiber cables.
13. Launch the RMCT again for the newly-installed 1756-RM2 modules.
14. On the RMCT Configuration tab, from the Auto Synchronization
pull-down menu, choose your original value.
15. Synchronize the system again (if it is not already qualified) by using the
RMCT.
Rockwell Automation Publication 1756-RN650I-EN-E - July 2015
52 ControlLogix Enhanced Redundancy System, Revision 16.081_kit5
Replace the1756-EN2T Modules
This section describes how to replace ControlLogix EtherNet/IP
communication modules in a ControlLogix enhanced redundancy system.
You can replace EtherNet/IP communication modules in this enhanced
redundancy system as follows:
• Replace 1756-EN2T/C (or earlier) modules with
1756-EN2T/D modules.
IMPORTANT
The following section describes the requirements and tasks used to replace 1756-EN2T
modules with 1756-EN2T/D modules.
For example, before replacing 1756-EN2T modules, make sure you have installed the
correct firmware on all 1756-EN2T/D modules.
You can replace 1756-EN2T modules with 1756-EN2T/D using the
following methods:
• Synchronization and Switchover - Method 1 - Use this method if either of
the following conditions exist:
– The module being replaced is a 1756-EN2T/D module in the primary
chassis of a system using revision 16.081_kit2 (10.006 firmware).
– The module being replaced is a 1756-EN2T/C (or earlier) module in
the primary chassis of a system using revision 16.081 or later and its IP
address is not set via rotary switches and Electronic keying is set to
Disabled or Compatible keying.
For more information on this method, see page 53.
• Synchronization and Switchover - Method 2 - Use this method if the
following conditions exist:
– The enhanced redundancy system is revision 16.081, 16.081_kit1,
16.081_kit2, 16.081_kit3, 16.081_kit4, or16.081_kit5.
– The 1756-EN2T/C (or earlier) module is installed in a primary chassis.
– The 1756-EN2T/C (or earlier) module’s IP address was set via the
rotary switches.
– Electronic keying is set to Disabled or Compatible keying only.
– For more information on this method, see page 56.
• Upgrade from an Enhanced Redundancy Revision You must use this
method if either of the following condition occurs:
– If you are upgrading for an enhanced redundancy system, revisions
16.054Enh or 16.80.
– If you are upgrading an enhanced redundancy system, revisions 16.081
to 16.081_kit5 with Electronic keying is set to Exact Match.
Rockwell Automation Publication 1756-RN650I-EN-E - July 2015
ControlLogix Enhanced Redundancy System, Revision 16.081_kit5 53
For more information on this method, see page 28.
IMPORTANT
Consider the following:
• Before replacing 1756-EN2T/C (or earlier) modules, make sure you have installed
the correct firmware on all 1756-EN2T/D modules.
• When you upgrade 1756-EN2T/C (or earlier) modules to 1756-EN2T/D modules,
you must do so in pairs. If not the system cannot synchronize after a switchover.
Synchronization and Switchover - Method 1
You can replace 1756-EN2T/C (or earlier) modules with 1756-EN2T/D
modules, or you can upgrade or replace 1756-EN2T/D modules which have
10.006 firmware using synchronization and switchover if the following
conditions exist:
• The RSLogix 5000 software project allows 1756-EN2T modules
Electronic Keying = Compatible Module or Disable Keying.
• The 1756-EN2T/D modules in the primary chassis that have IP addresses
that was set via any method.
• The 1756-EN2T/C (or earlier) modules in the primary chassis of an
enhanced redundancy system prior to revision 16.081_kit3 have IP
addresses that were set via software, that is, RSLogix 5000 or RSLinx
Classic software. For example, IP addresses set via rotary switches.
Complete these steps to replace 1756-EN2T/C (or earlier, or 1756-EN2T/D
modules with 10.006 firmware) modules with 1756-EN2T/D modules.
1. Make sure the existing and replacement modules use the same IP address,
Network Mask, and Gateway addresses.
2. If necessary, upgrade the recent Redundancy Module Configuration tool
(RMCT) version 8.02.01.
See Upgrade the Redundancy Module Configuration Tool (RMCT) on
page 30 for instructions,
3. In the RSLogix 5000 software, go online with the primary controller.
Rockwell Automation Publication 1756-RN650I-EN-E - July 2015
54 ControlLogix Enhanced Redundancy System, Revision 16.081_kit5
4. Verify Electronic Keying is set to Compatible Module or Disable Keying.
In the RSLinx Classic software, start the RMCT for the 1756-RM module
in the primary chassis
5. On the Configuration tab, from the Auto-Synchronization pull-down
menu, choose Never.
6. Click Apply.
7. On the Synchronization tab, click Disqualify Secondary.
8. Turn off power to the secondary chassis.
9. Remove the 1756-EN2T module from the secondary chassis.
10. If necessary, configure the 1756-EN2T/D module with the correct IP
address before inserting it into the disqualified secondary chassis.
11. Insert the 1756-EN2T/D module into the secondary chassis and turn on
power to the chassis.
Rockwell Automation Publication 1756-RN650I-EN-E - July 2015
ControlLogix Enhanced Redundancy System, Revision 16.081_kit5 55
12. Verify that the Synchronization Status tab indicates the modules are
fully compatible.
13. On the Synchronization tab, synchronize the secondary chassis.
Wait for synchronization to complete.
14. Initiate a switchover.
15. Turn off power to the secondary chassis.
16. Remove the 1756-EN2T module from the secondary chassis.
17. If necessary, configure the 1756-EN2T/D module with the correct IP
address before inserting it into the secondary chassis.
18. Insert the 1756-EN2T/D module into the secondary chassis and turn on
power to the chassis.
19. On the Configuration tab, from the Auto-Synchronization pull-down
menu, choose Always.
20. Click Apply, Yes, and OK.
21. Verify that the secondary chassis has qualified.
Rockwell Automation Publication 1756-RN650I-EN-E - July 2015
56 ControlLogix Enhanced Redundancy System, Revision 16.081_kit5
Synchronization and Switchover - Method 2
Complete the tasks listed in the following table to replace an existing
1756-EN2T module with a 1756-EN2T/D module.
Task
Page
Before You Begin
57
Upgrade Workstation Software
57
Upgrade the Redundancy Module Configuration Tool (RMCT)
57
Verify Your RMCT Version
57
Download and Install Redundancy Firmware Bundle
58
Update EDS Files
59
Prepare the Redundant Chassis for the Firmware Upgrade
59
Update the RSLogix 5000 Software Project
59
Replace the 1756-EN2T Module in Secondary Chassis
59
Use this method if the following conditions exist:
• The enhanced redundancy system is revision 16.081, 16.081_kit1,
16.081_kit2, 16.081_kit3, 16.081_kit4, or 16.081_kit5
• The 1756-EN2T/C (or earlier) module is installed in a primary chassis.
• The 1756-EN2T/C (or earlier) module’s IP address was set via the rotary
switches.
IMPORTANT
If the enhanced redundancy system is revision 16.054 Enhanced or 16.080, you must
use the procedures described in Upgrade from an Enhanced Redundancy Revision on
page 28 to upgrade to enhanced redundancy system, revision 16.081_kit2 or later.
Rockwell Automation Publication 1756-RN650I-EN-E - July 2015
ControlLogix Enhanced Redundancy System, Revision 16.081_kit5 57
Before You Begin
Complete the tasks described on page 28 before proceeding.
Upgrade Workstation Software
IMPORTANT
Skip this step if you are replacing 1756-EN2T modules in a system of revision 16.081,
16.081_kit1, 16.081_kit2, or 16.081_kit3.
Complete the tasks described on page 29 before proceeding.
Upgrade the Redundancy Module Configuration Tool (RMCT)
Complete the steps described on page 30.
Verify Your RMCT Version
Complete these steps to check or verify the version of the Redundancy Module
Configuration Tool (RMCT) you have installed.
TIP
The RMCT launches at the version that is compatible with the 1756-RM module
firmware that is currently installed.
If you have not upgraded your 1756-RM module firmware after upgrading your
RMCT version, the RMCT version that is indicated may not reflect the version you
upgraded to.
1. In the RSLinx Classic software, start the RMCT for the 1756-RM module
in the primary chassis.
The Module Configuration dialog box opens.
Rockwell Automation Publication 1756-RN650I-EN-E - July 2015
58 ControlLogix Enhanced Redundancy System, Revision 16.081_kit5
2. Right-click the title bar and choose About.
The About dialog box opens and indicates the RMCT version.
Download and Install Redundancy Firmware Bundle
Download and install the redundancy firmware revision bundle from the
Rockwell Automation Support website at:
http://rockwellautomation.com/support
The redundancy firmware bundles are posted in the Downloads section and are
classified in the Control Hardware category.
Rockwell Automation Publication 1756-RN650I-EN-E - July 2015
ControlLogix Enhanced Redundancy System, Revision 16.081_kit5 59
Update EDS Files
If needed, update the EDS files as described on page 31.
Prepare the Redundant Chassis for the Firmware Upgrade
Complete the steps described on page 32.
Update the RSLogix 5000 Software Project
1. Make sure the controller in the secondary chassis is in REM RUN mode.
2. Change your RSLogix 5000 software project as necessary to account for
the newly-installed 1756-EN2T/D module in your system.
For example, verify that the module configuration for each new
1756-EN2T module is Electronic Keying = Compatible Module.
IMPORTANT
When electronic keying is changed in module configuration the connection to
that module is interrupted.
Replace the 1756-EN2T Module in Secondary Chassis
Complete the following steps.
1. Verify that the new 1756-EN2T/D module uses the correct IP address
before inserting it into the disqualified secondary chassis.
We recommend that you set the IP address on the new 1756-EN2T/D
module in a remote chassis outside the RCP.
Use one of the following methods to set a static IP address:
• Module switches
• BOOTP/DHCP server - With this method, after setting the address,
click Disable BOOTP/DHCP so the IP address remains the same after
future power cycles to the module.
• RSLinx Classic software
IMPORTANT
Use the same method to set the IP address for the new 1756-EN2T module as
was used to set the IP address on the 1756-EN2T module it is replacing.
For example, if you used rotary switches to set the IP address, use rotary
switches again.
For more information on how to set the IP address for an EtherNet/IP
communication module, see the EtherNet/IP Network Configuration
User Manual, publication ENET-UM001.
Rockwell Automation Publication 1756-RN650I-EN-E - July 2015
60 ControlLogix Enhanced Redundancy System, Revision 16.081_kit5
2. Verify that the new secondary 1756-EN2T/D module uses the correct
firmware revision.
3. If the module firmware revision needs to be updated, we recommend that
you complete the following steps in a chassis outside the RCP:
a. Launch ControlFLASH software and click Next.
b. Select 1756-EN2T and click Next.
c. Browse to the 1756-EN2T/D module.
d. Click OK.
e. Select the firmware revision and click Next.
f. Click Finish.
The firmware update process begins.
When the update is complete, the Update status dialog box indicates
completion.
Rockwell Automation Publication 1756-RN650I-EN-E - July 2015
ControlLogix Enhanced Redundancy System, Revision 16.081_kit5 61
4. Insert the new 1756-EN2T/D module into the secondary chassis.
After the 1756-EN2T/D module powers up, the configured IP address
increments by one.
5. Connect the new 1756-EN2T/D module to the EtherNet/IP network.
6. Verify that the Synchronization Status tab indicates the modules are fully
compatible.
7. On the Synchronization tab, synchronize the secondary chassis.
Wait for synchronization to complete.
8. Initiate a switchover.
9. Turn off power to the secondary chassis.
10. Remove the 1756-EN2T module from the secondary chassis.
11. If necessary, configure the 1756-EN2T/D module with the correct IP
address before inserting it into the secondary chassis.
12. Insert the 1756-EN2T/D module into the secondary chassis and turn on
power to the chassis.
Rockwell Automation Publication 1756-RN650I-EN-E - July 2015
62 ControlLogix Enhanced Redundancy System, Revision 16.081_kit5
13. On the Configuration tab, from the Auto-Synchronization pull-down
menu, choose Always.
14. Click Apply, Yes, and OK.
15. Verify that the secondary chassis has qualified.
Rockwell Automation Publication 1756-RN650I-EN-E - July 2015
ControlLogix Enhanced Redundancy System, Revision 16.081_kit5 63
Replace the 1756-CN2 Modules
This section describes how to replace ControlLogix ControlNet communication
modules in a ControlLogix enhanced redundancy system. You can replace
ControlNet communication modules 1756-CN2/B and 1756-CN2R/B
modules with 1756-CN2/C, 1756-CN2R/C, 1756-CN2RXT/C, or
1 756-CN2RK/C modules.
IMPORTANT
ControlNet Communication Modules
– References to the 1756-CN2/B modules also apply to the 1756-CN2R/B, and 1756-CN2RXT/B
modules.
– References to the 1756-CN2/C modules also apply to the 1756-CN2R/C, 1756-CN2RXT/C, and
1756-CN2RK/C, modules.
– Catalog numbers 1756-RM, 1756-RM2 and 1756-RM2XT refer any series modules.
IMPORTANT
The following section describes the requirements and tasks used to replace 1756-CN2
modules with 1756-CN2/C modules.
The same requirements and tasks apply when you replace 1756-CN2R modules with
1756-CN2R/C modules with the only differences being between specific catalog
numbers and series levels.
For example, before replacing 1756-CN2/B modules, make sure you have installed the
correct firmware on all 1756-CN2/C modules.
You can replace the 1756-CN2 modules with 1756-CN2/C by using the
following methods:
• Synchronization and Switchover for the 1756-CN2 Modules - Use this
method if the module being replaced is a 1756-CN2 module that is in a
system revision 16.081, 16.081_kit1, 16.081_kit2, 16.081_kit3,
16.081_kit4, or 16.081_kit5. Electronic keying is set to Disabled or
Compatible keying.
For more information on this method, see page 64.
• Upgrade from an Enhanced Redundancy Revision - You must use this
method
– if you are upgrading for an enhanced redundancy system, revision
16.054Enh to revision 16.081_kit4 or 16.081_kit5.
– if you are upgrading for an enhanced redundancy system, revisions
16.054Enh or 16.80.
– if you are upgrading an enhanced redundancy system, revisions 16.081
to 16.081_kit5 with Electronic keying is set to Exact Match.
For more information on this method, see page 28.
Rockwell Automation Publication 1756-RN650I-EN-E - July 2015
64 ControlLogix Enhanced Redundancy System, Revision 16.081_kit5
Synchronization and Switchover for the 1756-CN2 Modules
IMPORTANT
When you upgrade 1756-CN2/B modules to 1756-CN2/C modules, you must do so in
pairs. If not the system cannot synchronize after a switchover.
You can replace 1756-CN2 modules with 1756-CN2/C modules without using
the redundancy system update (RSU) feature if the following conditions exist:
• The module being replaced is a 1756-CN2 module that is in a system
revision 16.081, 16.081_kit1, 16.081_kit2, 16.081_kit3, 16.081_kit4, or
16.081_kit5.
Complete these steps to replace 1756-CN2 modules with
1756-CN2/C modules.
1. Make sure the existing module and replacement module use the same
ControlNet node address.
2. If necessary, upgrade the recent Redundancy Module Configuration tool
(RMCT).
3. If you are using a 1756-RM2, upgrade the firmware to 20.005.
4. In the RSLogix 5000 software, go online with the primary controller.
5. Verify Electronic Keying is set to Compatible Module or Disable Keying.
6. In the RSLinx Classic software, start the RMCT for the 1756-RM module
in the primary chassis
7. On the Configuration tab, from the Auto-Synchronization pull-down
menu, choose Never.
a. Start RSLinx Classic Software.
b. Select Communications and choose RSWho.
Rockwell Automation Publication 1756-RN650I-EN-E - July 2015
ControlLogix Enhanced Redundancy System, Revision 16.081_kit5 65
c. Open the branches of your network until you find the 1756-RM or
1756-RM2 module in the primary chassis.
d. Right-click the 1756-RM or -RM2, and choose Module Configuration.
8. On the Configuration tab, from the Auto-Synchronization pull-down
menu, choose Never.
9. Click Apply.
10. On the Synchronization tab, click Disqualify Secondary.
11. Turn off power to the secondary chassis.
12. Remove the 1756-CN2/B modules from the secondary chassis.
13. Make sure that the node addresses of the replacement ControlNet
modules match the existing modules.
14. Insert each 1756-CN2/C module into the secondary chassis, reconnect
the module to the network, and turn on power to the chassis.
15. If you have not already updated the firmware of the 1756-CN2/C
modules, use the ControlFlash software to update the firmware of each
1756-CN2/C module in secondary chassis.
16. Verify that the Synchronization Status tab indicates the modules are fully
compatible.
Rockwell Automation Publication 1756-RN650I-EN-E - July 2015
66 ControlLogix Enhanced Redundancy System, Revision 16.081_kit5
17. On the Synchronization tab, synchronize the secondary chassis.
Wait for synchronization to complete.
18. Initiate a switchover.
19. Turn off power to the secondary chassis.
20. Remove the 1756-CN2 modules from the secondary chassis.
21. Make sure to match the node address of replacing the ControlNet module
with existing module.
22. Insert each 1756-CN2/C module into the secondary chassis, reconnect
the module to the network, and turn on power to the chassis.
23. If you have not already updated the firmware of the 1756-CN2/C
modules, use ControlFLASH software to update the firmware of each
1756-CN2/C module in secondary chassis.
24. On the Configuration tab, from the Auto-Synchronization pull-down
menu, choose Always.
25. Click Apply, Yes, and OK.
26. Verify that the secondary chassis has qualified.
Rockwell Automation Publication 1756-RN650I-EN-E - July 2015
ControlLogix Enhanced Redundancy System, Revision 16.081_kit5 67
Upgrade Ethernet Modules
when Rotary Switches are Set
between 2…254
This section includes the procedure to upgrade 1756-EN2T/C (or earlier)
modules when the modules’ rotary switches are set between 2…254 and you are
unable to interrupt the primary.
IMPORTANT
Remember the following before using this section:
• This procedure must be executed before the Redundancy System
Update procedure.
• This is a change from prior releases’ upgrade procedures.
• You must physically be present at the location of the redundant chassis to do
this upgrade.
• The term 1756-RM is synonymous with 1756-RM2 in the text and graphics
throughout this section.
Before beginning the steps in this section, download and install the redundancy
firmware revision bundle from the Rockwell Automation Support website at:
http://rockwellautomation.com/support
The redundancy firmware bundles are posted in the Downloads section and are
classified in the Control Hardware category.
If your system is controlling a process and by using rotary switches, follow
these steps.
1. Set the mode switch of the primary and secondary controllers to REM.
If the redundant controllers in both chassis of the redundant chassis pair
are not in Remote Program (REM) mode, the redundancy firmware
upgrade cannot be completed.
2. In the RSLinx Classic software, start the RMCT for the 1756-RM module
in the primary chassis.
3. Click the Configuration tab.
Rockwell Automation Publication 1756-RN650I-EN-E - July 2015
68 ControlLogix Enhanced Redundancy System, Revision 16.081_kit5
4. From the Auto-Synchronization pull-down menu, choose Never.
5. Click Apply, and then click Yes.
6. Click the Synchronization tab.
7. Click Disqualify Secondary, and then click Yes.
The secondary chassis is disqualified as indicated by the RMCT at the
bottom-left of the RMCT and on the redundancy module’s status display.
Status in RMCT
8. Click OK.
Rockwell Automation Publication 1756-RN650I-EN-E - July 2015
ControlLogix Enhanced Redundancy System, Revision 16.081_kit5 69
9. Make a note of the primary Ethernet module’s Port Configuration
including the following:
• IP Address
• Network Mask
• Gateway Address
10. Disconnect the Ethernet cables from the secondary Ethernet module.
11. Remove the secondary Ethernet module from the secondary chassis.
12. Record the original rotary switch settings.
13. Set the module switches to 888 and reinsert it into the secondary chassis.
14. Remove the module from the secondary chassis.
15. Set the switches to 999 and reinsert the module into the secondary chassis.
Rockwell Automation Publication 1756-RN650I-EN-E - July 2015
70 ControlLogix Enhanced Redundancy System, Revision 16.081_kit5
16. Bridging across the backplane (or via the Ethernet module’s USB port),
configure the newly added 1756-EN2T/D module’s Port Configuration
to match the primary Ethernet module’s Port Configuration from step 9.
17. After the update completes, connect the Ethernet cable to the secondary
Ethernet module, cycle power to the chassis, and wait for communication
to resume on the network.
18. Check the Synchronization tab to verify that compatibility is Full for all
modules in the chassis.
19. Repeat steps 9…17 for all Ethernet modules that have their rotary switches
set between 2…254.
20. In RSLinx Classic software, browse this chassis to the primary
1756-RM module.
21. Right-click to select Module Configuration to open the RMCT.
22. Click the Synchronization tab in the RMCT.
23. Click Synchronize Secondary, and then click Yes.
24. After the redundant chassis pair synchronizes, click the Synchronization
tab.
25. Click Initiate Switchover, and then click Yes.
Rockwell Automation Publication 1756-RN650I-EN-E - July 2015
ControlLogix Enhanced Redundancy System, Revision 16.081_kit5 71
26. In the RSLinx Classic software, select Module Configuration on the new
primary Ethernet communication module.
27. Click the Port Configuration tab and change the Gateway address from
0.0.0.0 to 192.168.1.1.
28. Click Apply, and then click OK.
29. Disconnect the Ethernet cable(s) from the secondary Ethernet module.
30. Reconnect the Ethernet cable(s) to the secondary Ethernet module and
wait for communication to resume on the network.
31. Repeat steps 26…30 for all Ethernet modules that have their rotary
switches set between 2…254.
32. In RSLinx Classic software, browse to the primary 1756-RM module.
33. Right-click the primary 1756-RM module and choose Module
Configuration to open the RMCT.
34. Check the Synchronization tab to verify that compatibility is Full for all
modules in the chassis.
35. Click Synchronize Secondary, and then click Yes.
Rockwell Automation Publication 1756-RN650I-EN-E - July 2015
72 ControlLogix Enhanced Redundancy System, Revision 16.081_kit5
36. On the Synchronization tab click Initiate Switchover, and then click Yes.
37. Remove the new secondary Ethernet module from the chassis and reset the
rotary switches back to their original setting from 999.
38. Reinsert the secondary Ethernet module back in the chassis and wait until
network communication resumes.
39. Check the Synchronization tab to verify that compatibility is Full for all
modules in the chassis.
40. Repeat steps 37…38 for all Ethernet modules that have their rotary
switches set between 2…254.
41. Wait 45 seconds.
42. On the Configuration tab, from the Auto-Synchronization pull-down
menu, choose Always.
43. Click Apply, Yes, and OK.
Rockwell Automation Publication 1756-RN650I-EN-E - July 2015
ControlLogix Enhanced Redundancy System, Revision 16.081_kit5 73
Store a Project to Nonvolatile
Memory while Your Process
is Running
Use this procedure to store an updated project and firmware to the nonvolatile
memory of the controller while your process is running.
1. Verify that the redundant chassis are synchronized.
If the redundant chassis are not synchronized, synchronize them before
continuing with the next step.
2. In the RMCT, click the Configuration tab and choose Never from the
Auto-Qualification pull-down.
3. In the Synchronization tab, click Disqualify Secondary.
Rockwell Automation Publication 1756-RN650I-EN-E - July 2015
74 ControlLogix Enhanced Redundancy System, Revision 16.081_kit5
4. In RSLogix 5000 programming software, go online with the secondary
controller.
5. Use the steps described in the Logix5000 Controllers Nonvolatile Memory
Programming Manual, publication 1756-PM017 to store the project.
IMPORTANT
Remain offline after you have stored the project to nonvolatile memory. You must
stay offline through the remainder of this procedure.
6. In the RMCT, set the Auto-Qualification parameter according to your
preference.
7. Synchronize the chassis.
Rockwell Automation Publication 1756-RN650I-EN-E - July 2015
ControlLogix Enhanced Redundancy System, Revision 16.081_kit5 75
Access Product Release Notes
Product release notes for the products used with this enhanced redundancy
firmware bundle are available online within the Product Compatibility and
Download Center.
1. From the Quick Links list on http://www.ab.com, choose Product
Compatibility and Download Center.
2. From the Compatibility Scenarios tab or the Get Downloads tab, search
for and choose your product.
3. Click the download icon
Rockwell Automation Publication 1756-RN650I-EN-E - July 2015
to access product release notes.
76 ControlLogix Enhanced Redundancy System, Revision 16.081_kit5
Additional Resources
These documents contain additional information concerning related products
from Rockwell Automation.
Resource
Description
ControlLogix Redundancy System User Manual,
publication 1756-UM523
Provides design, installation, and troubleshooting
information specific to the standard redundancy system.
FactoryTalk Batch PhaseManager User’s Guide, publication
BATCHX-UM010
This a guide for those using PhaseManager, FactoryTalk
Batch, and RSLogix 5000 software to develop a batch
automation system using phase logic for Logix5000
controllers.
PhaseManager User Manual, publication LOGIX-UM001
This manual provides details about using PhaseManager
software and includes details about tags associated with
the PHASE data type.
Rockwell Automation Technical Support Knowledgebase,
available at
http://www.rockwellautomation.com/knowledgebase/
Provides details about how to assemble and mount the
controller, how to upgrade firmware, and controller
technical specifications.
ProcessLogix and ControlLogix System Redundancy
Module Installation Instructions, publication 1757-IN092
Contains information on how to install the 1757-SRM,
Series B ProcessLogix™ and ControlLogix System
Redundancy Module into the ProcessLogix or ControlLogix
Redundant chassis pair.
ControlFLASH Firmware Upgrade Kit Quick Start,
publication 1756-QS105
Contains information on how to upgrade module
firmware.
ControlLogix Controllers User Manual, publication
1756-UM001
Contains information on how to install, configure,
program, and operate a ControlLogix system.
Product Certifications website, http://www.ab.com
Provides declarations of conformity, certificates, and other
certification details.
ProcessLogix and ControlLogix System Redundancy
Module Installation Instructions, publication 1757-IN092
Contains information on how to install the 1757-SRM,
Series B ProcessLogix and ControlLogix System
Redundancy Module into the ProcessLogix or ControlLogix
Redundant chassis pair.
ControlLogix Redundancy System User Manual,
publication 1756-UM523
Contains information about ControlLogix redundancy
systems and media.
You can view or download publications at
http://www.rockwellautomation.com/literature. To order paper copies of
technical documentation, contact your local Allen-Bradley distributor or
Rockwell Automation sales representative.
Rockwell Automation Publication 1756-RN650I-EN-E - July 2015
ControlLogix Enhanced Redundancy System, Revision 16.081_kit5 77
Notes:
Rockwell Automation Publication 1756-RN650I-EN-E - July 2015
Rockwell Automation Support
Rockwell Automation provides technical information on the Web to assist you in using its products.
At http://www.rockwellautomation.com/support you can find technical and application notes, sample code, and links to
software service packs. You can also visit our Support Center at https://rockwellautomation.custhelp.com/ for software
updates, support chats and forums, technical information, FAQs, and to sign up for product notification updates.
In addition, we offer multiple support programs for installation, configuration, and troubleshooting. For more
information, contact your local distributor or Rockwell Automation representative, or visit
http://www.rockwellautomation.com/services/online-phone.
Installation Assistance
If you experience a problem within the first 24 hours of installation, review the information that is contained in this
manual. You can contact Customer Support for initial help in getting your product up and running.
United States or Canada
1.440.646.3434
Outside United States or Canada
Use the Worldwide Locator at http://www.rockwellautomation.com/rockwellautomation/support/overview.page, or contact your
local Rockwell Automation representative.
New Product Satisfaction Return
Rockwell Automation tests all of its products to help ensure that they are fully operational when shipped from the
manufacturing facility. However, if your product is not functioning and needs to be returned, follow these procedures.
United States
Contact your distributor. You must provide a Customer Support case number (call the phone number above to obtain one) to your
distributor to complete the return process.
Outside United States
Please contact your local Rockwell Automation representative for the return procedure.
Documentation Feedback
Your comments will help us serve your documentation needs better. If you have any suggestions on how to improve this
document, complete this form, publication RA-DU002, available at http://www.rockwellautomation.com/literature/.
Rockwell Automation maintains current product environmental information on its website at
http://www.rockwellautomation.com/rockwellautomation/about-us/sustainability-ethics/product-environmental-compliance.page.
Allen-Bradley, Rockwell Software, Rockwell Automation, ControlLogix-XT, VersaView, ControlLogix, PhaseManager, PanelView, ProcessLogix, RSView, RSLinx, RSLogix, RSNetWorx, FactoryTalk, and Logix5000 are trademarks of Rockwell Automation, Inc.
Trademarks not belonging to Rockwell Automation are property of their respective companies.
Rockwell Otomasyon Ticaret A.Ş., Kar Plaza İş Merkezi E Blok Kat:6 34752 İçerenköy, İstanbul, Tel: +90 (216) 5698400
Publication 1756-RN650I-EN-E - July 2015
Supersedes Publication 1756-RN650H-EN-E - October 2014
PN-309246
Copyright © 2015 Rockwell Automation, Inc. All rights reserved. Printed in the U.S.A.