1
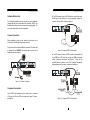
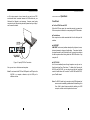
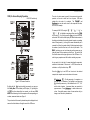
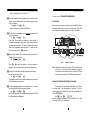
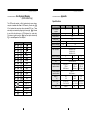
AcroGear User Guide
Table of Content
< Introduction
Overview… … … ...… … … … … … … … … … … … … … … … ..… .1
Package Content… … … … … … … … … … … … … … … … ..… ..1
Features… … … … … … .… … … … … … … … … … … … … … … ..4
< Installations
PC BIOS Notice.… … … … … … … … … … … … … … … … … … .5
Adhesive Rubber Feet.… … … … … … … … … … … … … … .… .6
Console Connection… … … … … … .… … … … … … … … ..… ...6
Computers Connection… … … … … … … … … … … … … .… … .6
< Operations
Front Panel operation… … … … … … … … … … … … … … ...… .9
OSD (On-Screen Display) Operation… … … … … … … … ....10
Hot-Key Commands… … … … … … … … … … … … … … … .… 15
< Cascade Configuration
Connection… … … … … … … … … … … … … … … … ...… ..… ...17
Computer Selection… ..… … … … … … … … … … … ..… ..… ...17
<Sun Keyboard Mapping… … … … … … … … ...… … … .… … .18
< Appendix
Specifications… … … … … … … … … … … … … .… … … … … … 19
Troubleshooting… … … … … … … … … ..… … ...… .… … … … ..20
Please read this manual thoroughly and follow the
Installation procedures to prevent any damage to the AcroGear
or any connecting device.
----------------- Introduction
Overview
The hybrid USB and PS/2 KVM switches – KAG104, KAG104D,
KAG108D, and KAG116D extend your computer management to
either PS/2 and/or USB models, or both from a single PS/2 console.
With the Sync-EmuTM Technology, the advanced KAG104D, KAG108D,
and KAG116D are designed to meet the special requirements from
USB-ready HP Unit systems and Sun servers. Engineered for servers
of the highest level, the KAG104D, KAG108D, and KAG116D
guarantee flawless switching with zero tolerance.
Installation is as easy as connecting USB A -B cables or PS/2 cables in
between computers and the KAG switch. Selecting a computer is as
easy as front panel button pressing or by entering hotkey commands.
The innovated KVM technology ensures smooth switching from one
computer to the other and signal conversion from PS/2 to USB. No
more tangled cables and messy working environment; let the KAG
switches do the computer switching for you.
Package Content
KVM switch x 1
Power Adapter x 1
Foot Pad x 1 set
This device is tested and complies with Part 15 of FCC/class B, CE
and VCCI rules.
Bracket x 2 (optional)
User’s Manual x 1
PS/2 Y-Adapter x 4/6/12 for 4/8/16-port model
1
AcroGear User Guide
AcroGear User Guide
4-port KVM Switch configuration
16-port KVM Switch configuration
8-port KVM Switch configuration
2
3
AcroGear User Guide
AcroGear User Guide
----------------- Installation
Features
PC BIOS Notice
l
Manage from 4 to 16 USB-enabled PCs, iMacs from one PS/2
keyboard, one mouse, and one monitor.
l
For computer with USB or PS/2 interface.
l
Front panel push-buttons for easy computer selection.
l
Support keyboard and mouse Plug-and-Play.
l
Buzzer sound for computer switching confirmation.
l
High VGA resolution up to 1920*1440.
l
Activate Auto Scan by front buttons pressing.
l
USB specification compliant.
l
Support the latest DDC2B VGA monitor.
l
OSD menu for server naming and selection. (OSD Models only)
l
Support USB-ready HP Unix and Sun servers. (OSD Models
only)
The following BIOS setup changes are necessary for PC users using
USB and not necessary for Mac users:
1. In STANDARD CMOS, set HALT ON ERROR to ALL BUT
KEYBOARD.
2. In PNP AND PCI SETUP, set PNP OS INSTALLED to YES and set
USB IRQ to ENABLED.
3. For newer computers: in INTEGRATED PERIPHERALS, set USB
CONTROLLER and KEYBOARD SUPPORT to ENABLED.
Also, make sure USB is properly selected in Device Manager under
Control Panel, as shown in Figure 1.
Figure 1: PC BIOS Notice
Note: For KAG104, switching from one computer to the other is
equivalent to unplugging the USB device from one computer
and plugging it to another. For certain computers neither
accept plug-and-play nor USB hub, the OSD models deal with
it by the advanced Sync-EmuTM Technology emulating USB
devices at all ports individually.
4
5
AcroGear User Guide
Adhesive Rubber Feet
For the desktop operation, you may stick the four round rubber feet
(supplied with the unit) to the bottom of the AcroGear. NOTE: Give
the rubber feet a firm press to the enclosure when applying them. Do
not use the rubber feet for rack mount operation.
AcroGear User Guide
= For USB computer: Use a USB A-B cable to connect from one of
the PC ports to the USB port on the corresponding computer (A
connector, flat connector), as shown in Figure 3.
Console Connection
Before installation, make sure all devices and computers to be
connected to the KVM switch have been turned off.
Plug a monitor to the Console's VGA port; connect a PS/2 mouse and
a keyboard to the CONSOLE port marked with a mouse and a
keyboard as shown in Figure 2.
Figure 3: Computer USB Port Connection
= For PS/2 computer: Connect a "PS/2 Y-adapter", come with the unit,
to the PS/2 port at PC side, then use two mini-DIN6 male-to-male
cables for keyboard and mouse, see Figure 4. There are two
mini-DIN6 female connectors on the "PS/2 Y-adapter" marked with
keyboard and mouse, be sure not to swap the connections.
Figure 2: Console Connection
Computers Connection
Use a HDB15 male-to-female cable to connect from a computer's
VGA output to VGA port of PC side, as shown in Figure 3, Figure 4,
and Figure 5.
6
Figure 4: Computer PS/2 Port Connection
7
AcroGear User Guide
= For Laptop computer: In most cases, all you need is one PS/2
male-to-male cable connected between the KVM switch and your
Notebook; the Y-adapter is not necessary. However, some Laptop
computers do not follow industry standard, please check your Laptop
user's manual for details.
AcroGear User Guide
----------------- Operations
Front Panel
< On-line LED & Selected LED
When the LED turns green, the connected computer is powered-on.
When a computer is selected, its corresponding red LED illuminates.
< Push-buttons
Each computer has a button associated with it on the front panel for
selection.
< K/M RESET
K/M RESET solves most problems developed by keyboard, mouse,
device replacement or change of configuration. Press down both the
front-panel number 1 and 2 push buttons for 2 seconds to re-configure
the whole system without turning either the USB KVM switch or any
computer off.
Figure 5: Laptop PS/2 Port Connection
Now, you can turn on all devices and computers.
Note: Do not connect both PS/2 and USB ports of one PC port on the
KAG104 to a computer; otherwise, only the USB port is
effective at a time.
< AUTO SCAN
Auto Scan automatically scans through computers one by one in a
fixed interval (see Scan Time below). To initiate Auto Scanning, for
KAG104 and KAG104D, you can press down both the front-panel
number 3 and 4 buttons for 2 seconds. For KAG108D and KAG116D,
press 7 and 8 instead.
Note: For KAG104 model only: computers using USB keyboard and
mouse are not immediately operable when selected during Auto
Scan. Wait for about three seconds after switching to a USB
computer, and then use the keyboard and mouse.
8
9
AcroGear User Guide
OSD (On-Screen-Display) Operation
KAG OSD models only
AcroGear User Guide
The color of a device name is green if it has power and is ready for
operation, or the color is white, as it has no power. OSD menu
updates the color when it is activated. The PageUp and
PageDown keys can be used to view 8 other computers at a time,
KAG108D, for example.
For example, KAG116D, using the “ é “, “ ê “, “ 1 “ ~ “ 8 “, or
“ A “ ~ “ H “ to highlight a computer and then press the Enter
key to select it. Or, you may press the Esc key to exit OSD and
remove the OSD menu from the display; the status window returns to
the display and indicates the currently selected computer or operating
status. A triangle mark (4) to the right of a name indicates the port is
cascaded to a Slave; the number at the left of the triangle mark shows
the number of ports the Slave has, i.e. 84for an 8-port switch. The
Enter key brings you one level down and another screen pops up
listing the names of the computers on that Slave. The name of the
Slave will be shown at the upper right corner of the OSD menu. It is
useful to group computers and still be able to see the group name.
An eye mark (N) to the right of a name indicating the computer is
selected to be monitored in Scan mode. In OSD, this mark can be
switched on or off by the function key F2 .
Press the Esc key to exit OSD and to return to the selected
computer; the computer name is also shown on the screen.
Figure 6: OSD screen illustration
By hitting the left Ctrl key twice within two seconds, you may see
the 'Hotkey Menu' if it is enabled (an OSD option). Or, by hitting the
left Ctrl key three times within two seconds, you will see a 'KVM
MENU' screen showing a list of the computers with corresponding port
numbers, names and status, see Figure 6.
=Function key F1 : To edit name entry of a computer or a
Slave with up to 14 characters. First, highlight a port then press
F1 followed by name entry. Valid characters are ‘A’~’Z’, ‘0’~’9’
and the dash character. Lowercase letters are converted to
uppercase ones. Press Backspace to delete a letter one at
a time. Non-volatile memory stores all name entries until you
change, even if the unit is powered down.
The port number of the currently selected computer is displayed in red,
same as the front indicator, at the right corner of the OSD menu.
10
11
AcroGear User Guide
AcroGear User Guide
=Function
key F2 : To switch the eye mark (N) of a
computer on or off. First, use the UP and DOWN arrow
keys to highlight it, then press F2 to switch its eye mark on or
off. If Scan Type is 'Ready PC +N', only the power-on and
eye mark selected computers will be displayed sequentially in
Scan mode.
In this mode, the KAG automatically switches from one
power-on computer to the next sequentially in a fixed
interval. During Auto Scan mode, the OSD displays the
name of the selected computer. When Auto Scan
detects any keyboard or mouse activity, it suspends the
scanning till activity stops; it then resumes with the next
computer in sequence. To abort the Auto Scan mode,
press the left Ctrl twice, or, press any front button.
Scan Type and Scan Rate set the scan pattern. Scan
Type ( F4 : More\Scan Type) determines if scanned
computers must also be eye mark selected. Scan Rate
( F4 : More\Scan Rate) sets the display interval when a
computer is selected before selecting the next one.
=Function
key F3 : To lock a computer from unauthorized
access. To lock a device, highlight it then press F3 . Now,
enter up to 4 characters (‘A’~’Z’, ‘0’~’9, ‘-‘) followed by Enter
as new password. A Security-enabled device is marked with a
lock (Ï) following its port number. To permanently disable the
security function from a locked device, highlight it, press F3
then enter the password.
n
If you want to access the locked device temporarily, simply
highlight it and press Enter , the OSD will ask you for the
password. After entering the correct password, you are allowed
to use the device. This device is automatically re-locked once
you switch to another port. During Scan mode, OSD skips the
password-protected ports.
If you forget the password, the only way to permanently
erase all the passwords is to:
For 108D and 116D, press and hold the front panel buttons
“1” and “2”, then hold “7” and “8”. Release “7” and “8”,
then release “1” and “2”. For 104 and 104D, press “3” and
“4” instead of “7” and “8”.
=Function
key F4 : More functions are available by hitting
F4 . A new screen pops up displaying more functions as
described below. Most of them are marked with a triangle (4)
indicating there are options to choose from. Using the UP
and DOWN arrow keys, select the functions and press
Enter . Available options will be shown in the middle of the
screen. Again, using the UP and DOWN arrow keys to
view options then press Enter to select it. You can press
Esc to exit at any time.
n Auto Scan
12
n
Manual Scan
Scan through power-on computers one by one by
keyboard control. Type (
F4
: More\Scan Type)
determines if scanned computers must also be eye mark
selected. Press the up arrow key é to select the
previous computer and the down arrow key ê to select
the next computer. Press any other key to abort the
Manual Scan mode.
Scan Type
Ready PC +N : In Scan mode, scan through power-on
and eye mark selected computers.
Ready PC: In Scan mode, scan through power-on
computers.
N Only: In Scan mode, scan through any N selected
computer regardless of computer power status.
The non-volatile memory stores the Scan Type setting.
n Scan Rate
Sets the duration of a computer displayed in Auto Scan
mode. The options are 3 seconds, 8 seconds, 15
seconds and 30 seconds. The non-volatile memory
stores the Scan Rate setting.
13
AcroGear User Guide
AcroGear User Guide
n
Keyboard Speed
KAG offers keyboard typematic setting that overrides
the similar settings in BIOS and in Windows. Available
speed options are Low, Middle, Fast and Faster as 10,
15, 20 and 30 characters/sec respectively. The
non-volatile memory stores the Keyboard Speed Setting.
n
n
n
n
higher the resolution the higher the display position. The
non-volatile memory stores the Position setting.
Audio Stick
An optional multimedia module can be linked to the back
of each Integra KVM switch for selecting microphone and
stereo speaker signals. There are two options for Audio
Stick: ON and Off. When set to 'On', audio selection
follows computer selection. When set to 'Off', audio
selection stops following computer selection. It is useful
if you want to listen to a particular computer's audio signal
while operating other computers.
The non-volatile
memory stores the Audio Stick setting.
Hotkey Menu
When you hit the left Ctrl key twice within two seconds,
the "Hotkey Menu" appears displaying a list of hot-key
commands if the option is On. The 'Hotkey Menu' can be
turned Off if you prefer not to see it when the left Ctrl
key is hit twice. The non-volatile memory stores the
Hotkey Menu setting.
CH Display
Auto Off: After you select a computer, the port number
and name of the computer will appear on the screen for 3
seconds then disappear automatically. Always On: The
port number and name of a selected computer and/or
OSD status displayed on the screen all the time. The
non-volatile memory stores the CH Display setting.
Position
The position of the selected computer name and/or OSD
status displayed on screen during operation. The actual
display position shifts due to different VGA resolution, the
14
Upper Left, Upper Right, Middle.
Lower Left, Lower Right.
n
Country Code for Sun
Sun keyboards of different languages have different
layouts. The KVM switch is able to emulate a Sun
keyboard for a specific language type or country such as
Arabic, Belgian, US, Yugoslavia, and so forth. Select
the proper country code that matches ALL of your Sun
computers.
=Function key
F5 : To switch the Sun mark of a port on or
off indicating the computer is a Sun server. Sun servers have
more keys on the keyboard than a PC. When a Sun-marked
port is selected, the KVM switch starts to translate the keys from
a PS/2 keyboard to a Sun keyboard. See Sun Keyboard
Mapping for detail.
= Esc
: To exit the OSD, press the Esc key.
Hot-key commands
Hot-key command is a short keyboard sequence to select a computer,
to activate computer scan, and so forth. The USB KVM switch
interprets keystrokes for hot-keys all the time. A hot-key sequence
starts with two left Ctrl keystrokes followed by one or two more
keystrokes. A built-in buzzer generates a high-pitched beep for
correct hot-key command; otherwise, one low-pitched beep for error
and the bad key sequence will not be forwarded to the selected
computer.
L-CTRL: is the Ctrl key located at the left side of the
keyboard.
1~8:
are the number keys '1' ~ '8' at the upper row of the
keyboard. Do not use the keypad at the right of the
keyboard.
15
AcroGear User Guide
A~H:
represents from Port 9 to Port 16
g To select a computer by hot-key command, you must know its port
address, which is determined by the AcroGear connection at the
back. For example:
left Ctrl + left Ctrl + 4
Selects a computer connected to the PC port 4.
AcroGear User Guide
----------------- Cascade Configuration
Connection
Before connecting a device (a computer or another KAG product) to
the master under power, you must turn off the device. Only PS/2
port is operable for cascade operation, see Figure 7 for details.
g To start Auto Scan, automatically scan power-on computers one by
one at a fixed interval:
left Ctrl + left Ctrl + F1
When Auto Scan detects any keyboard or mouse activity, it
suspends the scanning till activity stops; it then resumes with the
next computer in sequence. The length of the Auto Scan interval
(Scan Rate) is adjustable, please see below. To abort the Auto
Scan mode, press the left Ctrl key twice.
g Manual Scan enables you to manually switch back and forth
between power-on computers.
left Ctrl + left Ctrl + F2
Figure 7: Cascade Connection
Press é or ê to select the previous or the next computer in
sequence. And, press any other key to abort the Manual Scan.
g To adjust Scan Rate which sets the duration before switching to
the next computer in Auto Scan:
left Ctrl + left Ctrl + F3
The AcroGear sends one to four beeps indicating scan interval of 3,
8, 15 and 30 seconds respectively.
g To adjust keyboard typematic rate (characters/sec), this setting
over-rides that of BIOS and any operating system:
left Ctrl + left Ctrl + F4
The AcroGear generates 1 to 4 beeps corresponding to 10, 15, 20
and 30 characters/sec respectively.
16
Note: The Master must have equal or more ‘PC x’ports than that of
the slave, i.e., if an 8-port switch is the Master, an 8-port or
4-port switch can be a Slave, but not a 16-port one. PS/2-only
models can be cascaded with USB-PS/2 universal models.
Computer Selection by Hot-Key Command
The first digit is the port address of the Master unit (1~8) and
the second digit is the port address of the Slave (1~8,A~H).
Please note that only Master's PS/2 ports can be connected to a
Slave's CONSOLE port.
left Ctrl + left Ctrl + 1 + 3
Selects a computer connected to PS/2 or USB port 3 of a Slave
connected to PS/2 port 1 of the Master.
17
AcroGear User Guide
----------------- Sun Keyboard Mapping
(OSD models only)
The OSD models emulate a Sun’s keyboard and mouse when a
computer is marked with a Sun in OSD menu by Function key F5
A Sun keyboard has more keys than a standard PS/2 one. These
extra keys are simulated by tapping the lower-right Ctrl followed
by one of the function keys on a PS/2 keyboard (i.e. combo key)
For instance, tap the lower-right Ctrl key, then tap the function key
F7 to activate Open for a Sun computer.
PS/2 keyboard
right -
Ctrl
1
right -
Ctrl
2
right -
Ctrl
3
Sun keyboard
AcroGear User Guide
----------------- Appendix
Specifications
Specification
KAG104
KAG104D
No. of computers
supported
4
Front panel push button
4
Hot plug-and-play
Ctrl
4
right -
Ctrl
F1
Stop
right -
Ctrl
F2
Again
right -
Ctrl
F3
Props
right -
Ctrl
F4
Undo
right -
Ctrl
F5
Front
right -
Ctrl
F6
Copy
right -
Ctrl
F7
Open
right -
Ctrl
F8
Paste
right -
Ctrl
F9
Find
right -
Ctrl
F10
Cut
right -
Ctrl
H
Help
right -
right - ♦
left -
left - ♦
Compose
right -
Alt
Alt Graph
left -
Alt
Alt
18
KAG116D
8
16
8
16
Yes
Hot-key Control
Yes
On-screen display (OSD)
No
Sync-Emu Technology
No
Yes
Yes
Automatic scan interval
3, 8, 15, 30 seconds
Cable Length (Max)
30M(100ft) for VGA
5M(15ft) for USB
30M(90ft) for PS/2
note
right -
KAG108D
Computer ON-LINE LED
4
8
16
Computer selected LED
VGA
4
8
16
Computer peripheral
connector monitor
1920 X 1440, DDC2B
USB Type B x 4,
PS/2 x 3
HDB15 male x 4
USB Type B x8, USB Type Bx16,
PS/2 x 8
PS/2 x 16
HDB15 male x 8 HDB15 male x 16
PS/2 x 2
HDB-15 female x 1
Console peripheral
connector monitor
Weight (g)
(oz)
900
31.74
H x W x D (mm)
(in)
44 x 220 x 130
1.75 x 8 .75 x 5.125
Size
Compact
2400
84.66
44 x 436 x 180
88 x 436 x 220
1.75 x 17.25 x 7.0 3.5 x 17.25 x 8.7
1U
19
3700
130.5
2U
AcroGear User Guide
AcroGear User Guide
----------------- Troubleshooting
Ensure that all cables are well seated. Label the cable for
each computer to avoid confusion when connected to the
KAG104, KAG104D, KAG108D, and KAG116D.
Symptom
Causes
Solutions
l Keyboard or
l In Auto Scan,
mouse does not
computers using USB
work.
keyboard and mouse
are not operable.
l Too many keyboard or
mouse drivers
installed in one
computer.
l Keyboard or
l The USB computer
mouse does not
does not support
work after
plug-and-play as
switching to a
specified by USB
different USB
standard.
computer.
l Computer
hangs up while
switching
computer.
l USB computer
initialization takes too
much time.
l Auto Scan does l All PCs are off or only
not switch PC
one PC is turned on.
automatically
Scan mode works for
and the switch
power-on computers
beeps.
only.
l Unable to
l The server does not
control a Sun
support USB
server or a HP
plug-and-play or USB
Unix system.
hub.
l Unable to
control a Sun
server while
using OSD
models.
l Sun mark is not
tagged in OSD menu.
20
l Press any front button
to select a computer,
then use the keyboard
and mouse.
l Remove ALL
unnecessary keyboard
and mouse drivers.
l Update that computer's
USB driver. Device
hot plug-and-play is
one of the basic USB
specifications. OSD
models is better suited
for this environment
l Wait at least 5 seconds
before switching from
one USB computer to
another to ensure
proper USB
communication.
l Turn computers on.
l The Sync-Emu™
technology of OSD
models solves this
problem.
PS/2 keyboard
Sun keyboard
right -
Ctrl
1
right -
Ctrl
2
right -
Ctrl
3
right -
Ctrl
4
right -
Ctrl
F1
Stop
right -
Ctrl
F2
Again
right -
Ctrl
F3
Props
right -
Ctrl
F4
Undo
right -
Ctrl
F5
Front
right -
Ctrl
F6
Copy
right -
Ctrl
F7
Open
right -
Ctrl
F8
Paste
right -
Ctrl
F9
Find
right -
Ctrl
F10
Cut
right -
Ctrl
H
Help
note
right -
right - ♦
left -
left - ♦
Compose
right -
Alt
Alt Graph
left -
Alt
Alt
"
l Make sure each Sun
server is tagged with a
Sun mark in the OSD
menu by Function key
F5 .
21
Limited Warranty
IN NO EVENT SHALL THE DIRECT VENDOR'S LIABILITY FOR DIRECT OR
INDIRECT, SPECIAL, INCIDENTIAL OR CONSEQUENTIAL DAMAGES,
LOSS OF PROFIT, LOSS OF BUSINESS, OR FINANCIAL LOSS WHICH
MAY BE CAUSED BY THE USE OF THE PRODUCT EXCEEDS THE PRICE
PAID FOR THE PDOCUDT.
The direct vendor makes no warranty or representation, expressed or implied
with respect to the contents or use of this documentation, and especially
disclaims its quality, performance, merchantability, or fitness for any particular
purpose.
The direct vendor also reserves the right to revise or update the product or
documentation without obligation to notify any user or organization of such
revisions or updates. For further information, please contact your direct
vendor.
All the brand names and registered trademarks are the property of their
respective owners.
* HP is a registered trademark of Hewlett-Packard Company.
* Sun is a registered trademark of Sun Microsystems.
PP5-G0400-000