1
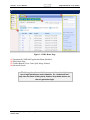
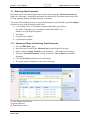
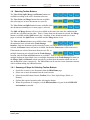
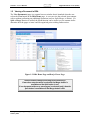
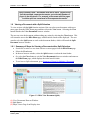
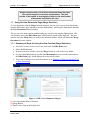
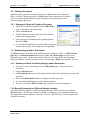
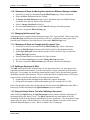
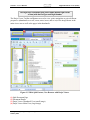
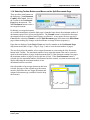
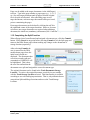
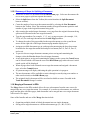
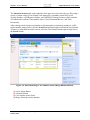
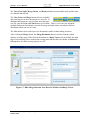
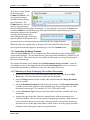
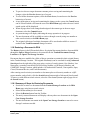
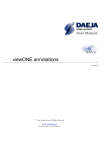
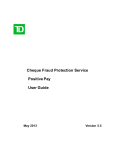
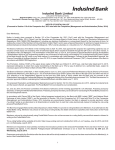
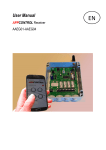
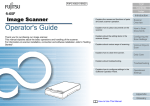
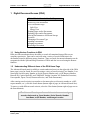
Section 1: User’s Manual Digital Document Access (DDA) 1 Digital Document Access (DDA) DDA: What is Contained in this Chapter Overview and Home Page Retrieving Case Documents View Documents Page: Split View Merge View Printing Pages and/or Documents Deleting Pages and/or Documents Moving Documents to a Different Storage Location Changing a Document Type Splitting a Document Merging Documents Restoring a Document 1.1 Using Various Functions in DDA DDA provides an authorized user the ability to search all committed imaged files across company repositories. Data can be retrieved using a variety of search fields/criteria for documents located in different storage locations. Once accessed, document information can be reorganized with the Split and Merge functions of DDA and also recovered using the Restore function. 1.2 Understanding Different Areas of the DDA Home Page The Advanced Search panel (available to certain authorized users) on the right side of the DDA home page is used to search for case files using a variety of search criteria (Case Number, Last Name plus Social Security Number or Social Security Number only, e-QIP Request Number, Barcode ID, Captiva Batch ID, and COMPANY Storage Location: All Authorized Locations, Unacceptable, Open, Closed, Document Review, and Trash Documents.). After entering search criteria (case number or last name plus social security number or e-QIP request number, etc.), click the Search button (bottom right of page, in Advanced Search area). To start over with different search criteria, select the Clear button (bottom right of page next to the Search button). The Advanced Search panel is used to locate documents using search criteria such as, Case Number, Social Security Number, Last Name, e-QIP Number, and Storage Location. Users_Manual_DDA_011014_DRAFT_v0.1 January 2014 1 Section 1: User’s Manual Digital Document Access (DDA) Figure 1-1. DDA Home Page. (1) Transformed COMPANYApplication Menu (Modules) (2) DDA Home Page (3) Toolbar Buttons (View, Print, Split, Merge, Restore) (4) Advanced Search The Storage Location available to a user is determined by the user’s login permissions and credentials. An “authorized user” only sees the areas of the system, buttons, drop-down menus, etc., that are granted at login. Users_Manual_DDA_011014_DRAFT_v0.1 January 2014 2 Section 1: User’s Manual Digital Document Access (DDA) Table 1-1. DDA Field/Button Descriptions. Fields/Buttons Description View A document’s contents can be viewed with or without performing an action. Print A document can be printed by an authorized user. Split Documents with two or more pages can be split into multiple, separate documents, up to the total number of pages in the document. Merge Two or more documents within the same case can be merged to create one document. The total number of documents to be merged can be up to the total number of documents contained in the case. Restore Deleted or modified documents are held in the Trash Storage Location of the system and can be restored if/when needed. Delete The Delete button is used to delete a document or specific document pages from a search selection on the DDA Home page. Move To The Move To button is used to move a selected document from one Storage Location to another Storage Location selected from a drop-down menu of those available). Sort by Documents on the page can be sorted by Case Number and Document Type, Document Type, Subject Last Name, Subject SSN, Case Number, e-QIP Request Number, Storage Location, and Scan Date within ascending or descending order. Up / Down Arrows Buttons to switch the data display in ascending (up direction) order and descending (down direction) order in the Sort by field. Advanced Search Use various criteria to narrow or widen a search for documents. Case Number Enter a case number to search for all of its associated documents. Last Name (Subject) Enter a subject’s last name (full, last name or the first five characters, plus a secondary search field to ensure retrieval accuracy) to search for all of the documents associated with a subject. Social Security Number Enter a social security number to search for all of the documents associated with a subject’s social security number. e-QIP Request Number Select to search for an e-QIP request number. Users_Manual_DDA_011014_DRAFT_v0.1 January 2014 3 Section 1: User’s Manual Digital Document Access (DDA) Fields/Buttons Description Storage Location: The user only sees the storage location(s) that s/he has access to. Searches can be narrowed to one or more storage locations by selecting the corresponding check box. All Authorized Locations All of the locations available to the authorized user. Unacceptable Documents that have been labeled unacceptable for various reasons (such as, incorrect data). Open Documents that are currently open and need further action. Closed Documents that have been closed and do not require further action. e-QIP Document Review Documents that are in the process of review. Trash Documents Original documents prior to a modification or deletion. Search Enter or select search criteria in the Advanced Search panel and click the search button. Clear Click the Clear button to clear search selections (such as, case number, last name, e-QIP number, or storage location). Users_Manual_DDA_011014_DRAFT_v0.1 January 2014 4 Section 1: User’s Manual Digital Document Access (DDA) 1.3 Retrieving Case Documents Documents can be retrieved through various search criteria using the Advanced Search panel (right side of the page). Depending on what the user needs to do, documents can be selected for viewing, printing, splitting, merging, deleting, or restoring. The system allows authorized users to search for documents associated with a particular Subject using one or more of the following search fields: Case Number (Note: A Last Name search should include up to the first five letters of the name plus a secondary search field of SSN, Case Number, or e-QIP Request Number) Last Name, Social Security Number, e-QIP Request Number 1.3.1 Summary of Steps for Retrieving Case Documents Go to the DDA Home page. Enter the search criteria in the Advanced Search panel (right side of page). Select a specific Storage Location or use the default – “All Authorized Locations.” Select the “Trashed Documents” Storage Location to View or Restore a modified document. Click the Search button (bottom of search panel). The search results will display in the center of the page. (1) Case Number Search Field (2) Queue Selection (3) Search Results Area Users_Manual_DDA_011014_DRAFT_v0.1 January 2014 5 Section 1: User’s Manual Digital Document Access (DDA) 1.4 Selecting Toolbar Buttons The View, Print, Split, Merge, and Restore buttons are available according to the user’s document selection. The View, Print, and Merge buttons become available after selecting two or more documents in a case file. The View, Print, and Split buttons become available when one document containing two or more pages is selected. The Split and Merge buttons will never be available at the same time since the conditions that activate one will deactivate the other. That is, if more than one document is selected, the Merge button is available and the Split button is not. And then, if one document with two or more pages is selected, the Split button is available and the Merge button is not. The View and Restore buttons are available when a single document has been selected in the Trash Storage location. Only one document can be restored at a time, so if more than one document is selected, the Restore button will not be available, but then the Print button will become active. If documents are selected from more than one case file, or multiple documents are selected from the Trash Storage location, only the View and Print buttons are available. That is, a user can view and print multiple documents for multiple cases, or multiple documents in the Trash Storage location, but the Merge, Split, and Restore actions can only be performed on documents within one case or one document at a time, respectively. The View button can be used to review document contents with or without taking any additional action. 1.4.1 Summary of Steps for Selecting Toolbar Buttons Search for or retrieve case documents from the DDA Home page. Select one or more documents from the search results. Select the needed button from the Toolbar (View, Print, Split, Merge, Delete, or Restore). Perform the required operation after selecting the button. When all operations are complete, exit the DDA module or log out of the COMPANY environment, as needed. Users_Manual_DDA_011014_DRAFT_v0.1 January 2014 6 Section 1: User’s Manual Digital Document Access (DDA) 1.5 Viewing a Document in DDA The View Document(s) page is a separate browser window that is launched when the user selects the View button on the DDA Home page. A user can view the selected item contents with or without performing any additional operations (such as, Split, Merge, or Delete). If a Split or Merge function is needed, the View function can be used to review contents and/or determine how the pages or items could be organized prior to taking further action. Figure 1-2. DDA Home Page and Daeja Viewer Page. Toolbar Buttons change according to the selection(s). If more than one document is selected, the Merge button is available and the Split button is not. If one document with two or more pages is selected (only), then the Split button is available and the Merge button is not. Users_Manual_DDA_011014_DRAFT_v0.1 January 2014 7 Section 1: User’s Manual Digital Document Access (DDA) Split Function Limits: Documents with two or more pages can be split into multiple, separate documents, up to the total number of pages in the document. For example, a document with five pages could be split into a maximum of five separate documents. 1.6 Viewing a Document with a Split Selection To view an item with the Split function activated, the user selects one document with two or more pages from the DDA Home page and then selects the View button. Selecting the View button launches the View Documents browser window. The user can view the document without taking any action by selecting the Close button. This will return the user to the DDA Home page with the initial search results displayed. The user can also select the Split button to work on the document further, which will launch the Split Document browser window. 1.6.1 Summary of Steps for Viewing a Document with a Split Selection: Search for or retrieve a case item with two or more pages from the DDA Home page. Select the View button. In the new browser window, select the Split button to work on the item further. Or, select the Close button to exit the View Document(s) browser window and return to the DDA Home page, which displays the initial search results. To see how to Split a document, go to Summary of Steps for Splitting a Document. Figure 1-3. DDA View Document (Split). (1) View Documents Browser Window (2) Split Button (3) Daeja Viewer Page Icon Display Area Users_Manual_DDA_011014_DRAFT_v0.1 January 2014 8 Section 1: User’s Manual Digital Document Access (DDA) Merge Function Limits: Two or more documents within the same case can be merged to create one new document. The total number of documents to be merged are limited to the total number of documents contained in the case. 1.7 Using the View Documents Page (Merge Selection) To view documents with the Merge function activated, the user selects two or more documents from the DDA Home page and then selects the View button. Selecting the View button launches the View Documents browser window. The user can view the document without taking any action by selecting the Close button. This will return the user to the DDA Home page with the initial search results displayed. The user can also select the Merge button to work on the document further, which will launch the Merge Documents browser window. 1.7.1 Summary of Steps for Using the View Function (Merge Selection): Search for or retrieve two or more case items from the DDA Home page. Select the View button. In the new browser window, select the Merge button to work on the items further. Or, select the Close button to exit the View Document(s) browser window and return to the DDA Home page, which displays the initial search results. To see how to Merge two or more documents, go to Summary of Steps for Merging Two or More Documents. Figure 1-4. DDA View Document (Merge). (1) View Documents Browser Window (2) Merge Button (3) Daeja Viewer Page Icon Display Area Users_Manual_DDA_011014_DRAFT_v0.1 January 2014 9 Section 1: User’s Manual Digital Document Access (DDA) 1.8 Printing a Document Authorized users can print documents or pages from different browser windows in DDA. On DDA’s Home page there is a Print button. On the other browser windows (View Document, Split Document, Merge Documents), the print function can be accessed using the print icon. 1.8.1 Summary of Steps for Printing a Document Search for or retrieve documents from the DDA Home page. Select one or more documents. Select the Print button. A Printer dialog box opens with a list of the available printers and printing options. Select the pages for printing and any printing options, then select Print. Or, select the Cancel button to exit the Print function and return to the last page accessed prior to selecting Print. 1.9 Deleting Page(s) and/or Documents The Delete function can be done from different browser windows in DDA. On DDA’s Home page there is a Delete document button in the Toolbar and a Delete pages icon next to the document’s page count. On the other browser windows (View Document, Split Document, Merge Documents), the delete function can be accessed using a Delete button and the “X” icon. 1.9.1 Summary of Steps for Deleting Page(s) and/or Documents Search for or retrieve documents from the DDA Home page. Select one or more documents. Select the Delete button. A Delete dialog box opens with the option to delete the selected documents or cancel the operation. Select the Confirm Delete button to complete the delete operation. Or, select the Cancel button to exit the Delete operation. The user is returned to DDA’s Home page with prior search results displayed. 1.10 Moving Documents to a Different Storage Location A document can be assigned to a different Storage location on DDA’s Home page using the Move To button. The Storage Locations available, according to a user’s login permissions, are: All Authorized Locations (default), Open Case, Closed, e-QIP Doc Review, Unacceptable, and Trashed Documents. Users_Manual_DDA_011014_DRAFT_v0.1 January 2014 10 Section 1: User’s Manual Digital Document Access (DDA) 1.10.1 Summary of Steps for Moving Documents to a Different Storage Location Search for or retrieve a document from the DDA Home page. Select a document. Select the Move To button from the Toolbar. A Storage Location dialog box opens with a drop-down menu of available Storage Locations where the user can move the document. Select a Storage Location from the list. Or, select the Cancel button to exit the Move To Storage Location operation. The user is returned to DDA’s Home page. 1.11 Changing the Document Type A document can be assigned a different document type (Doc Type) on DDA’s Home page using the Edit DocType function once the document is selected. Available document types can be selected from a drop down list when the user clicks on the Edit DocType icon. 1.11.1 Summary of Steps for Changing the Document Type Search for or retrieve a document from the DDA Home page. Select a document. Select the Edit DocType icon next to the DocType label in the document details. A DocType dialog box opens with the option to select a new DocType or cancel the Change DocType operation. Select the Save button to confirm the DocType selection. Or, select the Cancel button to exit the Change DocType operation. The user is returned to DDA’s Home page with prior search results displayed. 1.12 Splitting a Document in DDA The Split feature in the DDA module allows for one document with two or more pages to be separated into different documents, up to the total number of pages contained in the document being split. For example, one document containing three pages can be split into three separate documents using the Split operation. The new documents can be assigned whatever DocType is required. Some of the benefits and uses of the Split function include: Organizing document information into additional, separate documents. Saving new documents as different document types (for example, B0, C0, D0). Once a document has been retrieved and selected, the user selects the Split button from DDA’s Home page Toolbar and launches the Split Document browser window. 1.13 Using the Daeja Viewer Tool when Splitting a Document After clicking the Split button, the Split Document browser window launches, displaying all document pages in the Daeja Viewer. The Daeja Viewer has two main display areas, the orientation of which can be changed depending on the user’s preference. One area shows a large image of the first page of the document (or a selected page) and the second area of the viewer shows all additional pages as icons – that is, a smaller view of each page. Users_Manual_DDA_011014_DRAFT_v0.1 January 2014 11 Section 1: User’s Manual Digital Document Access (DDA) The Page Icon Thumbnails have color labels (bottom right corner of icon) with the DocType and Page Number. The Daeja Viewer Toolbar and Buttons are used to view, print, manipulate or gain a different perspective (thumbnails on or off, zoom, rotate, invert, and so on) of the image shown in the main viewer area as well as the pages in the thumbnails. Figure 1-5. DDA Split Feature, New Browser with Daeja Viewer. (1) Split Document Page (2) Document Details (3) Daeja Viewer Thumbnail View (small image) (4) Daeja Viewer Main View (large image) Users_Manual_DDA_011014_DRAFT_v0.1 January 2014 12 Section 1: User’s Manual Digital Document Access (DDA) 1.14 Selecting Toolbar Buttons and Menus on the Split Documents Page There are three main buttons on the Split page - New Document, Commit, and Cancel. Next to the Toolbar is the Unallocated Pages drop down menu. The New Document button creates a new target document. By default, two target documents are available immediately when the Split page is launched since that is the minimum number of documents required for a split action/operation. The Commit button is selected after the target documents have been completed and all pages are allocated. At any point, the user can select Cancel before selecting Commit to exit the Split Document page and return to the DDA Home page without making any changes to the documents or storage location (repository). Pages that are displayed in the Daeja Viewer are listed by number in the Unallocated Pages drop down menu (that is, Page 1, Page 2, Page 3, and so on to the total number of pages). The user first selects the number of new target documents to create using the New Document button in the Toolbar. The maximum number of new target document s that can be created is equal to the total number of pages in the document (that is, if the document contains four pages, the maximum number of pages it can be split into is four). If the New Document button is selected after the maximum number of documents has been created, a system error message will display indicating the maximum number of new documents has been exceeded. Once the number of new target documents has been selected, the pages of the original target document must be allocated to the new target documents and assigned a document type (available from the drop down menu). Users_Manual_DDA_011014_DRAFT_v0.1 January 2014 13 Section 1: User’s Manual Digital Document Access (DDA) Pages can be added to the target documents via the Add Page(s) text box. Type in the page number or page range (e.g., 1, 4, 1-3, etc.) for each target document until all pages from the original file to be split are allocated. After allocating pages to new target documents, each new target document can be previewed, prior to committing the pages. Extra target documents can be deleted by clicking the red X in the right hand corner of the target document. However, because at least two new target documents are required when splitting a document, the initial two (mandatory) documents (Doc #1 and Doc #2) cannot be deleted. 1.15 Completing the Split Function When all pages have been allocated and assigned a document type, click the Commit button. Select Cancel at any point before selecting Commit to exit the Split page and return to the DDA Home page without making any changes to the documents or storage location (repository). After selecting Commit, the user is returned to the DDA module home page where the initial search results are displayed. The documents that were most recently split and committed to COMPANY will be highlighted. This is how the user can confirm that the documents were split and assigned the correct document type. The original document can be found in the Trash Documents Storage Location. To retrieve the original document, search by its case number with the Trash Storage Location selected. This functionality is available according to user role and login permissions. That is, only authorized users can perform Split and Merge functions and access the Trash Storage Location. Users_Manual_DDA_011014_DRAFT_v0.1 January 2014 14 Section 1: User’s Manual Digital Document Access (DDA) 1.15.1 Summary of Steps for Splitting a Document Search for or retrieve a document from the DDA Home page. Select one document with two or more pages to split into separate documents. Select the Split button from the Toolbar (this action launches the Split Document browser window). Create the number of new target documents needed by selecting the New Document button on the Toolbar. (Note: the maximum number of target documents equals the total number of pages in the original document being split.) After creating the needed target documents, every page from the original document being split must be allocated to the new target documents. Type the page numbers (for example, 1, 3, 5, etc.) or page sequence (for example, 1-10, 25-50, etc.) for each target document into the Add Page(s) textbox. To change the order of the pages added to the target documents, use the up and down arrows on the right side of the target document page number display area. Assign an available document type to each target document using the drop down menu located below the target document label and preview button (Doc #1, Doc #2, Doc #3, and so on). To preview the new target document contents prior to saving and committing the changes, select the Preview button for each target document. At any point prior to saving and committing the changes to the system, the Cancel button can be selected which will return the user to the DDA Home page where the user's initial search results will be displayed. When all pages have been allocated to new target documents and assigned a document type, select the Commit button. A system message will display indicating the split operation is in progress. The new documents will be available to retrieve through a search (using case number or other search criteria) on the DDA Home page. The original (single) document will be saved and available to restore if needed in the Trash Documents Storage Location. 1.16 Merging a Document in DDA The Merge feature in the DDA module allows for two or documents from the same case to be merged into one, new, target document. For example, if a case has two documents, one with two pages and the other with three pages, both documents can be merged into a new target document with a total of five pages. Some of the benefits and uses of the Merge function include: Organizing multiple related or linked documents into one single document. Saving a new target document as a different document type (i.e., B0, C0, D0). Users_Manual_DDA_011014_DRAFT_v0.1 January 2014 15 Section 1: User’s Manual Digital Document Access (DDA) The Advanced Search panel on the right side of the page is used to search for case files using a variety of search criteria (Case Number, Last Name plus a secondary search field, Social Security Number, e-QIP Request Number, and COMPANY Storage Location, which includes: All Authorized Locations, Unacceptable, Open, Closed, Document Review, and Trash Documents). After entering search criteria (case number or last name plus social security number or e-QIP request number, and so forth), click the Search button (bottom right of Advanced Search panel). To start over with different search criteria, select the Clear button (bottom right of page next to the Search button). Figure 1-6. DDA Home Page, Case Number Search (Merge Button enabled). (1) Active Merge Button (2) Advanced Search (3) Case Number Search Field (4) Merge Selection (two documents) Users_Manual_DDA_011014_DRAFT_v0.1 January 2014 16 Section 1: User’s Manual Digital Document Access (DDA) The View, Print, Split, Merge, Delete, and Restore buttons are unavailable until search results are returned and selected. The View, Print, and Merge buttons become available after selecting two or more documents in a case file. If additional documents are selected from more than one case file, only the View and Print buttons are available. That is, a user can view and print multiple documents for multiple cases but the merge and split actions can only be taken on documents within one case at a time. The View button can be used to preview document(s) with or without taking an action. After clicking the Merge button, the Merge Documents browser window launches which displays all of the pages of the selected documents in a Daeja Viewer tool (by default, the main page or selected page shows in the main viewing panel and the others are shown as thumbnails – although there are other viewing options as well). Figure 1-7. DDA Merge Function, New Browser Window with Daeja Viewer. Users_Manual_DDA_011014_DRAFT_v0.1 January 2014 17 Section 1: User’s Manual Digital Document Access (DDA) There are two main buttons on the Merge page; Commit and Cancel. One new target document is available when the Merge page is launched. The Commit button is selected after the target document has been completed and all pages are arranged. At any point, the user can select Cancel before selecting Commit to exit the Merge page and return to the DDA module home page without making any changes to the documents or storage location (repository). After arranging the pages for the new target document, the document can be previewed, prior to committing the pages and saving the new target document. When all actions are complete (that is, all pages have been ordered/reordered in the new target document and assigned a document type), click the Commit button. 1.17 Completing the Merge Function After selecting Commit the user is returned to the DDA module home page with the initial search results displayed. The document that was just merged and committed to COMPANY will display in yellow. This is how the user can confirm the documents were merged and assigned the correct document type. The original documents can be found in the Trash Documents Storage Location. Search by case number to retrieve the original document from Trash Documents to review or restore, as needed (this functionality is available to select roles and login permissions). 1.17.1 Summary of Steps for Merging Two or More Documents Search for or retrieve two or more documents (within the same case) from the DDA Home page. Select the documents to merge into one document. Select the Merge button from the Toolbar (this action launches the Merge Document browser window). Select the Document Properties from the drop down menu. The Document Properties available are one of the properties of the document type already assigned to one of the documents being merged. For example, S65, F62, AUB, and so forth. Assign a Document Type to the new target document from those available in the drop down menu. Arrange the pages as needed. Pages are arranged in the order the documents were selected by default. There is also an option to arrange pages manually. Both textboxes have up and down arrows to move pages. One page must be selected first, then the up and down arrows (to the right of the textbox) can be used to move the page as needed to change the order of the pages in the new target document. Users_Manual_DDA_011014_DRAFT_v0.1 January 2014 18 Section 1: User’s Manual Digital Document Access (DDA) To preview the new target document contents prior to saving and committing the changes, select the Preview button (top of screen). To reset all the document options, select the Clear button, located next to the Preview button (top of screen). At any point prior to saving and committing the changes to the system, the Cancel button can be selected which will return the user to the DDA Home page where the user's initial search results will be displayed. When all pages have been arranged and assigned a document type in the new target document, select the Commit button. A system message will display indicating the merge operation is in progress. The new document will be available to retrieve through a search (using case number or other search criteria) on the DDA Home page. The original collection of multiple documents will be saved and available to restore if needed in the Trash Documents Storage Location. 1.18 Restoring a Document in DDA The Restore feature in the DDA module allows for original documents that have been modified through the Split or Merge functions to be restored from the Trashed Documents Storage Location to the Open Case Storage Location. Documents that were modified in a Split or Merge operation are retained in their original format in the Trashed Storage Location. The original document(s) can be searched for using Advanced Search panel on the right side of the page using a variety of search criteria (Case Number, Last Name plus a secondary search field, Social Security Number, e-QIP Request Number, and COMPANY Storage Location, which includes: All Authorized Locations, Unacceptable, Open, Closed, Document Review, and Trash Documents). After entering search criteria (case number or last name plus social security number or e-QIP request number, and so forth), click the Search button (bottom right of Advanced Search panel). To start over with different search criteria, select the Clear button (bottom right of page next to the Search button). 1.18.1 Summary of Steps for Restoring Documents Search for or retrieve a document from the Trashed Storage Location on the DDA Home page using known search criteria. Select the document(s) to be restored. Select the Restore button from the Toolbar. The newly restored documents will display with any other case documents in the Open Case Storage Location. The new documents can remain in the Open Case Storage Location or moved to a new Storage Location as needed. Users_Manual_DDA_011014_DRAFT_v0.1 January 2014 19