1
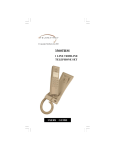
LINK 904
User guide for
Link 904
INDEX
INDEX .......................................................................................................... 2
1. INSTALLATION....................................................................................... 4
1.1 GETTING CONNECTED ............................................................................ 4
1.2 WALL MOUNTING..................................................................................... 4
2. TELEPHONE SETUP .............................................................................. 4
2.1 MICROPHONE SENSITIVITY SETTING.................................................. 4
2.2 MESSAGE WAITING SETUP..................................................................... 5
2.3 DIAL MODE SETUP ................................................................................... 5
2.4 RECALL SETUP .......................................................................................... 5
2.5 AUTO DISCONNECT SETUP .................................................................... 6
2.6 AUTO ANSWER.......................................................................................... 6
2.7 MEMORY PROGRAMMING...................................................................... 6
2.8 RINGER SET UP.......................................................................................... 6
3. OPERATION............................................................................................ 7
3.1 DIALLING.................................................................................................... 7
3.2 REDIAL ........................................................................................................ 7
3.3 PAUSE .......................................................................................................... 7
3.4 SPEED DIALLING....................................................................................... 7
3.5 RECALL ....................................................................................................... 7
3.6 VOLUME CONTROL .................................................................................. 7
3.7 MUTE ........................................................................................................... 7
4. APPROVED USE.................................................................................... 8
5. CE APPROVED ...................................................................................... 8
6. THE NUMBER OF TELEPHONES THAT MAY BE CONNECTED ......... 8
Link 904 – User Manual
2
STORE BUTTON
UNDER LABEL
M1, M2, M3, M4
MEMORY BUTTONS
MUTE BUTTON
DIGITAL VOLUME
CONTROL
RECALL BUTTON
HOLD BUTTON
SPEAKER ON BUTTON
HOLD INDICATION
LED
REDIAL/ PAUSE
BUTTON
MESSAGE WAITING INDICATION
In the manual, some parameters
have to be set up by moving some
switches. These switches are located into
the cable connection compartment at the
back of the phone.
Link 904 – User Manual
3
1. INSTALLATION
1.1 GETTING CONNECTED
Insert the telephone plug into the telephone socket. If
this socket is not present contact your network operator. Check
the telephone is operating correctly by pressing the 'SPEAKER ON'
button and listening for dial tone.
Also supplied with the telephone is a Stub Cable which can
be used to install the unit in locations where a telephone socket is
not practical.
This need to be connected as follows:
•
•
•
•
Yellow Wire - Earth
Green Wire - Line A Conductor
Red Wire - Line B Conductor
Black Wire - Shunt Wire
1.2 WALL MOUNTING
The Link 904 is designed to be wall mounted using the
screws provided.
The excess line cord can be wrapped up using the space
provided at the bottom of the unit. If required the cord can then
run out the unit using the snap out exit at the bottom of the unit.
If the unit is being placed in a bathroom you may want to
ensure a proper waterproof shield. This can be achieved by
applying silicone glue between the unit and the wall.
2. TELEPHONE SETUP
2.1 MICROPHONE SENSITIVITY SETTING
The Link 904 is design for use in a wide variety of
locations. To cater for these different installation conditions it is
possible to adjust the microphone sensitivity of the unit using the
following procedure.
- Press the [SPEAKER ON] button
- Press the [STORE] button (located under the memory
label)
- Press the following sequence of keys:
[0][0][1][2][3][0][3]
- Select the sensitivity
(low to high 0,1,2,3,4,5,6,7,8,9,M1,M2,M3)
Link 904 – User Manual
4
where 'M3' is the highest sensitivity
- Press the [STORE] button again
NOTE: We recommend that the microphone is set to the highest
sensitivity unless the location is particularly noisy.
2.2 MESSAGE WAITING SETUP
The Link 904 has two types of message waiting indication,
90 Volt and Line Reversal.
- To set the unit to 90V, switch MW1 (located in the switch
compartment on base of the unit) to LR1.
- To set the unit to Line Reversal set the MW1 switch to
either LR1 or LR2 dependant on the wiring of your
telephone socket.
The switch should be set to OFF if no message waiting is
required on the installation.
2.3 DIAL MODE SETUP
follows:
To Link 904 can be set to either Tone or Pulse dialling as
PULSE - Press [SPEAKER ON][STORE][3][0][STORE]
TONE - Press [SPEAKER ON][STORE][3][1][STORE]
STORE button is located under the memory label.
NOTE: As most installations require Tone dialling, this is set as
default on the unit.
2.4 RECALL SETUP
The Link 904 can be set to either Earth or Timed Break
recall using the following procedure:
EARTH RECALL - Switch SW3 (located in the base of the
unit) to 'ER'
TIMED BREAK RECALL - Switch SW3 to 'TBR'
The default TBR setting is 300ms but can be set to either 100ms
or 300ms as follows:
100ms - Press [SPEAKER ON][STORE][2][0][STORE]
300ms - Press [SPEAKER ON][STORE][2][1][STORE]
Link 904 – User Manual
5
2.5 AUTO DISCONNECT SETUP
The Link 904 can be set to auto-disconnect the line after
either 60 seconds or 120 seconds if the user is silent.
This can be set via switch SW9 located on the base of the
unit. To activate the facility switch SW9 to either '60s' (60
seconds) or '120s' (120 seconds).
2.6 AUTO ANSWER
The link 904 can be set to auto answer a telephone call
after 5 rings. To select this option set switch SW5 to 'ON'.
2.7 MEMORY PROGRAMMING
follows:
The one-touch memory buttons can be programmed as
-
Press
Press
Press
Enter
Press
Press
[SPEAKER ON]
[STORE] (located under memory label)
[M1], [M2], [M3] or [M4]
the telephone number to store
[STORE]
[SPEAKER ON] to end procedure.
2.8 RINGER SET UP
The ringer volume and ringer melody can be adjusted as
follows:
RINGER VOLUME
LOW - Press [SPEAKER ON][STORE][6][1][STORE]
MED - Press [SPEAKER ON][STORE][6][2][STORE]
HIGH - Press [SPEAKER ON][STORE][6][3][STORE]
RINGER MELODY
MELODY 1 - Press [SPEAKER
MELODY 2 - Press [SPEAKER
MELODY 3 - Press [SPEAKER
MELODY 4 - Press [SPEAKER
MELODY 5 - Press [SPEAKER
ON][STORE][7][0][STORE]
ON][STORE][7][1][STORE]
ON][STORE][7][2][STORE]
ON][STORE][7][3][STORE]
ON][STORE][7][4][STORE]
RINGER ON/OFF
ON - Press [SPEAKER ON][STORE][9][1][STORE]
OFF - Press [SPEAKER ON][STORE][9][0][STORE]
Link 904 – User Manual
6
3. OPERATION
3.1 DIALLING
To dial a new call first press [SPEAKER ON] and listen for
dial tone. Once you hear dial tone, dial the number either using
the keypad or by using one of the three memory buttons. Once
the other party answers, speak clearly in the direction of the
microphone at the front of the unit. To terminate the call press
the [SPEAKER ON] button again.
3.2 REDIAL
After pressing the [SPEAKER ON] button, by pressing the
[REDIAL] button you can dial the last number dialled on the unit.
3.3 PAUSE
Pressing the [PAUSE] button either during a dialling
sequence or when programming one of the memory buttons will
insert a 3 second pause.
3.4 SPEED DIALLING
When you are on line, pressing one of the memory
buttons [M1], [M2], [M3] or [M4] will dial the number stored in
that memory location.
3.5 RECALL
The [RECALL] button can be used to access additional PBX
or network operator services. The telephone supports both Earth
and TBR recall (See section 2.4).
3.6 VOLUME CONTROL
While the telephone is on line, the receive volume control
can be adjusted by pressing the [+] and [-] volume buttons. The
volume level will be remembered by the unit for the next call after
the telephone goes off line.
3.7 MUTE
If you wish to put the phone call on hold for a while or
pick up the call on another telephone connected in parallel, this
can be done by using the [HOLD] button.
Once the [HOLD] button is pressed the call is placed on
hold and the hold indicator is turned on. To resume the call, press
the [SPEAKER ON] button and resume conversation.
Alternatively, pick up another telephone connected in
parallel with the Link 904 and the hold indicator will be turned Off.
Link 904 – User Manual
7
4. APPROVED USE
The Link 904 can be connected to the Public Switched
Telephone Network (PSTN) and compatible to PABX's.
Network Compatibility
The Link 904 has been approved persuant to commission
decision 1999/303/EC for pan-European connection to the public
switched telephone network (PSTN). However, due to differences
between the individual PSTNs provided for in different countries,
the approval does not, of itself, give an unconditional assurance of
successful operation on every PSTN network termination point. In
the event of problems you should contact your equipment supplier
in the first instance.
The Link 904 has been designed to interwork with the
following networks.
Austria
Belgium
Denmark
y
y
y
Germany
Greece
Iceland
y
y
y
Finland
France
y
y
Ireland
Italy
y
y
Liechtenstein
Luxembourg
The
Netherlands
Norway
Portugal
y
y
y
Spain
Sweden
Switzerland
y
y
y
y
y
UK
y
5. CE APPROVED
This unit is fully compliant with the current European EMC
and Safety specifications.
6. THE NUMBER OF TELEPHONES THAT MAY BE
CONNECTED
If you connect too many telephones to your line they may
not ring correctly. To determine the number of telephones that
can be satisfactorily connected to your line, add together the
ringer equivalent numbers (RENs) of all the equipment you wish
to connect. If this number exceeds four, your telephones may not
ring. Your Link 904 telephone has an REN of one (1).
BT
telephones have an REN of one unless otherwise marked.
Link 904 – User Manual
8