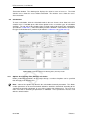
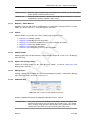
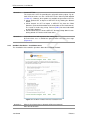
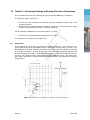
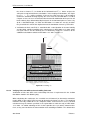
1
CPT based foundation engineering DR AF T D-Foundations User Manual DR AF T T DR AF D-F OUNDATIONS CPT based foundation engineering User Manual Version: 15.1 Revision: 42061 24 September 2015 DR AF T DR AF T D-F OUNDATIONS, User Manual Published and printed by: Deltares Boussinesqweg 1 2629 HV Delft P.O. 177 2600 MH Delft The Netherlands For sales contact: telephone: +31 88 335 81 88 fax: +31 88 335 81 11 e-mail: [email protected] www: http://www.deltaressystems.nl telephone: fax: e-mail: www: +31 88 335 82 73 +31 88 335 85 82 [email protected] https://www.deltares.nl For support contact: telephone: +31 88 335 81 00 fax: +31 88 335 81 11 e-mail: [email protected] www: http://www.deltaressystems.nl Copyright © 2015 Deltares All rights reserved. No part of this document may be reproduced in any form by print, photo print, photo copy, microfilm or any other means, without written permission from the publisher: Deltares. DR AF T D-F OUNDATIONS, User Manual ii Deltares Contents Contents . . . . . . . . . . . . . . . . . . . . . . . . . . . . . . . . . . . . . . . . . . . . . . . . . . . . . . . . . . . . . . . . . . . . . . . . . . . . . . . . . . . . . . . . . . . . . . . . . . . . . . . . . . . . . . . . . . . . . . . . . . . . . . . . . . . . . . . . . . . . . . . . . . . . . . . . . . . . . . . . . . . . . . . . . . . . . . . . . . . . . . . . . . . . . . . . . . . . . . . . . . . . . . . . . . . . . . . . . . . . . . . . . . . . . . . . . . . . . . . . . . . . . . . . . . . . . . . . . . . . . . . . . . . . . . . . . 1 1 1 2 2 2 2 3 6 6 6 8 9 9 2 Getting Started 2.1 Starting D-Foundations . . . . . . . 2.2 Main Window . . . . . . . . . . . . 2.2.1 Menu bar . . . . . . . . . . 2.2.2 Icon bar . . . . . . . . . . 2.2.3 Tree view . . . . . . . . . . 2.2.4 Title panel . . . . . . . . . 2.2.5 Status bar . . . . . . . . . 2.3 Files . . . . . . . . . . . . . . . . 2.4 Tips and Tricks . . . . . . . . . . . 2.4.1 Keyboard shortcuts . . . . . 2.4.2 Exporting figures and reports 2.4.3 Copying part of a table . . . . . . . . . . . . . . . . . . . . . . . . . . . . . . . . . . . . . . . . . . . . . . . . . . . . . . . . . . . . . . . . . . . . . . . . . . . . . . . . . . . . . . . . . . . . . . . . . . . . . . . . . . . . . . . . . . . . . . . . . . . . . . . . . . . . . . . . . . . . . . . . . . . . . . . . . . . . . . . . . . . . . . . . . . . . . . . . . . . . . . . . . . . . . . . . . . . . . . . . . . . . . . . . . . . . . . . . . . . . . . . . . . . . . . . . . . . . . . . . . . . . . . . . . . . . . . . 11 11 11 12 13 13 14 15 15 16 16 16 16 3 General 3.1 File menu . . . . . . . . . . . . . 3.2 Tools menu . . . . . . . . . . . . 3.2.1 Program Options . . . . . 3.2.2 CPT interpretation model . 3.3 Help menu . . . . . . . . . . . . 3.3.1 Error Messages . . . . . 3.3.2 Manual . . . . . . . . . . 3.3.3 Deltares Systems Website 3.3.4 Support . . . . . . . . . . 3.3.5 About D-Foundations . . . 3.4 Project menu . . . . . . . . . . . 3.4.1 Model . . . . . . . . . . 3.4.2 Project Properties . . . . 3.4.3 Location Map . . . . . . . 3.4.4 View Input File . . . . . . 3.5 Project Description . . . . . . . . . . . . . . . . . . . . . . . . . . . . . . . . . . . . . . . . . . . . . . . . . . . . . . . . . . . . . . . . . . . . . . . . . . . . . . . . . . . . . . . . . . . . . . . . . . . . . . . . . . . . . . . . . . . . . . . . . . . . . . . . . . . . . . . . . . . . . . . . . . . . . . . . . . . . . . . . . . . . . . . . . . . . . . . . . . . . . . . . . . . . . . . . . . . . . . . . . . . . . . . . . . . . . . . . . . . . . . . . . . . . . . . . . . . . . . . . . . . . . . . . . . . . . . . . . . . . . . . . . . . . . . . . . . . . . . . . . . . . . . . . . . . . . . . . . . . . . . . . . . . . . . . . . . . . . . . . . . . . . . . . . . . . . . . . . . . . . . . . 19 19 19 20 24 25 25 26 26 26 26 26 27 27 29 30 30 4 Bearing Piles (EC7-NL) – Input & Calculations 4.1 Tree view . . . . . . . . . . . . . . . . . . . . . 4.2 Construction Sequence . . . . . . . . . . . . . . 4.3 Soil . . . . . . . . . . . . . . . . . . . . . . . . 4.3.1 Materials . . . . . . . . . . . . . . . . . 4.3.1.1 Materials – Add from ‘Standard’ . . . . . . . . . . . . . . . . . . . . . . . . . . . . . . . . . . . . . . . . . . . . . . . . . . . . . . . . . . . . . . . . . . . . . . 33 33 34 35 35 36 T . . . . . . . . . . . . . . . . . . . . . . . . . . DR AF 1 General Information 1.1 Preface . . . . . . . . . . . . . 1.2 Features . . . . . . . . . . . . 1.2.1 Overview of options . . . 1.2.2 Feasibility module . . . 1.3 Limitations . . . . . . . . . . . 1.4 Minimum System Requirements 1.5 History . . . . . . . . . . . . . 1.6 Definitions and Symbols . . . . 1.7 Getting Help . . . . . . . . . . 1.8 Getting Support . . . . . . . . . 1.9 Deltares . . . . . . . . . . . . 1.10 Deltares Systems . . . . . . . . 1.11 On-line software (Citrix) . . . . . Deltares . . . . . . . . . . . . . . . . iii D-F OUNDATIONS, User Manual DR AF 4.5 4.6 T 4.4 4.3.1.2 Materials – Add manually . . . . . . . . . . . . . . . . . 4.3.1.3 Materials – Match Material . . . . . . . . . . . . . . . . 4.3.2 Profiles . . . . . . . . . . . . . . . . . . . . . . . . . . . . . . . 4.3.2.1 Adding Profiles . . . . . . . . . . . . . . . . . . . . . . 4.3.2.2 Options for existing profiles . . . . . . . . . . . . . . . . 4.3.2.3 Editing Layers . . . . . . . . . . . . . . . . . . . . . . 4.3.2.4 Additional Data . . . . . . . . . . . . . . . . . . . . . . 4.3.2.5 Viewing Profiles . . . . . . . . . . . . . . . . . . . . . 4.3.2.6 Summary Pressures . . . . . . . . . . . . . . . . . . . Foundation . . . . . . . . . . . . . . . . . . . . . . . . . . . . . . . . . 4.4.1 Pile Types . . . . . . . . . . . . . . . . . . . . . . . . . . . . . 4.4.2 Pile Properties . . . . . . . . . . . . . . . . . . . . . . . . . . . 4.4.3 Top View Foundation . . . . . . . . . . . . . . . . . . . . . . . . Excavation . . . . . . . . . . . . . . . . . . . . . . . . . . . . . . . . . Calculations . . . . . . . . . . . . . . . . . . . . . . . . . . . . . . . . 4.6.1 Options for a Bearing Piles (EC7-NL) calculation . . . . . . . . . . 4.6.2 Preliminary Design for Bearing Piles (EC7-NL) . . . . . . . . . . . 4.6.2.1 Preliminary design: Indication bearing capacity . . . . . . 4.6.2.2 Preliminary design: Bearing capacity at fixed pile tip levels 4.6.2.3 Preliminary design: Pile tip levels and net bearing capacity 4.6.3 Verification for Bearing Piles (EC7-NL) . . . . . . . . . . . . . . . 4.6.3.1 Verification: Design . . . . . . . . . . . . . . . . . . . . 4.6.3.2 Verification: Complete . . . . . . . . . . . . . . . . . . . . . . . . . . . . . . . . . . . . . . . . . 37 38 38 38 45 46 48 50 51 52 53 56 59 60 62 62 65 67 68 68 69 70 71 5 Bearing Piles (EC7-B) – Input & Calculations 5.1 Tree view . . . . . . . . . . . . . . . . . . . . . . . 5.2 Soil . . . . . . . . . . . . . . . . . . . . . . . . . . 5.2.1 Materials . . . . . . . . . . . . . . . . . . . 5.2.1.1 Materials – Add from ‘Standard’ . . 5.2.1.2 Materials – Add manually . . . . . . 5.2.1.3 Materials – Match Material . . . . . 5.2.2 Profiles . . . . . . . . . . . . . . . . . . . . 5.2.2.1 Adding Profiles . . . . . . . . . . . 5.2.2.2 Options for existing profiles . . . . . 5.2.2.3 Editing Layers . . . . . . . . . . . 5.2.2.4 Additional Data . . . . . . . . . . . 5.2.2.5 Viewing Profiles . . . . . . . . . . 5.2.2.6 Summary Pressures . . . . . . . . 5.3 Foundation . . . . . . . . . . . . . . . . . . . . . . 5.3.1 Pile Types . . . . . . . . . . . . . . . . . . 5.3.2 Pile Properties . . . . . . . . . . . . . . . . 5.3.3 Top View Foundation . . . . . . . . . . . . . 5.4 Calculations . . . . . . . . . . . . . . . . . . . . . 5.4.1 Options for a Bearing Piles (EC7-B) calculation 5.4.2 Calculation options for Bearing Piles (EC7-B) . . . . . . . . . . . . . . . . . . . . . . . . . . . . . . . . . . . . . . . . . . . . . . . . . . . . . . . . . . . . . . . . . . . . . . . . . . . . . . . . . . . . . . . . . . . . . . . . . . . . . . . . . . . . . . . . . . . . . . . . . . . . . . . . . . . . . . . . . . . . . . . . . . . . . . . . . . . . . . . . . . . . . . . . . . . . . . . . . . . . . . . . . . . . . . . . . . . . . . . . . . . . . . . . . . . . . . . . . . . . . . . . . . . . . . . . . . . . . . . . . 73 73 74 74 75 76 77 77 77 77 77 77 78 79 79 80 82 83 84 85 86 6 Tension Piles (EC7-NL) – Input & Calculations 6.1 Tree view . . . . . . . . . . . . . . . . . . . . . 6.2 Construction Sequence . . . . . . . . . . . . . . 6.3 Soil . . . . . . . . . . . . . . . . . . . . . . . . 6.3.1 Materials . . . . . . . . . . . . . . . . . 6.3.1.1 Materials – Add from ‘Standard’ 6.3.1.2 Materials – Add manually . . . . 6.3.1.3 Materials – Match Material . . . . . . . . . . . . . . . . . . . . . . . . . . . . . . . . . . . . . . . . . . . . . . . . . . . . . . . . . . . . . . . . . . . . . . . . . . . . . . . . . . . . . . . 89 89 90 90 90 91 93 94 iv . . . . . . . . . . . . . . Deltares Contents 6.3.2 6.4 T 6.5 6.6 Profiles . . . . . . . . . . . . . . . . . . . . . . . . . . . . . . . 6.3.2.1 Adding Profiles . . . . . . . . . . . . . . . . . . . . . . 6.3.2.2 Options for existing profiles . . . . . . . . . . . . . . . . 6.3.2.3 Editing Layers . . . . . . . . . . . . . . . . . . . . . . 6.3.2.4 Additional Data . . . . . . . . . . . . . . . . . . . . . . 6.3.2.5 Viewing Profiles . . . . . . . . . . . . . . . . . . . . . 6.3.2.6 Summary Pressures . . . . . . . . . . . . . . . . . . . Foundation . . . . . . . . . . . . . . . . . . . . . . . . . . . . . . . . . 6.4.1 Pile Types . . . . . . . . . . . . . . . . . . . . . . . . . . . . . 6.4.2 Pile Properties . . . . . . . . . . . . . . . . . . . . . . . . . . . 6.4.3 Top View Foundation . . . . . . . . . . . . . . . . . . . . . . . . Excavation . . . . . . . . . . . . . . . . . . . . . . . . . . . . . . . . . Calculations . . . . . . . . . . . . . . . . . . . . . . . . . . . . . . . . 6.6.1 Options for a Tension Piles calculation . . . . . . . . . . . . . . . 6.6.2 Preliminary Design Tension Piles . . . . . . . . . . . . . . . . . . 6.6.2.1 Preliminary design: Indication bearing capacity . . . . . . 6.6.2.2 Preliminary design: Bearing capacity at fixed pile tip levels 6.6.2.3 Preliminary design: Pile tip levels and net bearing capacity DR AF 7 Shallow Foundations (EC7-NL) – Input & Calculations 7.1 Tree view . . . . . . . . . . . . . . . . . . . . . . . 7.2 Soil . . . . . . . . . . . . . . . . . . . . . . . . . . 7.2.1 Materials . . . . . . . . . . . . . . . . . . . 7.2.1.1 Materials – Add from ‘Standard’ . . 7.2.1.2 Materials – Add manually . . . . . . 7.2.1.3 Materials – Match Material . . . . . 7.2.2 Profiles . . . . . . . . . . . . . . . . . . . . 7.2.2.1 Adding Profiles . . . . . . . . . . . 7.2.2.2 Options for existing profiles . . . . . 7.2.2.3 Editing Layers . . . . . . . . . . . 7.2.2.4 Additional Data . . . . . . . . . . . 7.2.2.5 Viewing Profiles . . . . . . . . . . 7.2.2.6 Summary Pressures . . . . . . . . 7.2.3 Slopes . . . . . . . . . . . . . . . . . . . . 7.3 Foundation . . . . . . . . . . . . . . . . . . . . . . 7.3.1 Types of Shallow Foundations . . . . . . . . 7.3.2 Loads . . . . . . . . . . . . . . . . . . . . 7.3.3 Foundation plan . . . . . . . . . . . . . . . 7.3.4 Top View Foundation . . . . . . . . . . . . . 7.4 Calculations . . . . . . . . . . . . . . . . . . . . . 7.4.1 Options for a Shallow Foundations calculation 7.4.2 Calculation options . . . . . . . . . . . . . . 7.4.2.1 Optimize Dimensions . . . . . . . . 7.4.2.2 Maximize Vertical Loads . . . . . . 7.4.2.3 Verification . . . . . . . . . . . . . . . . . . . . . . . . . . . . . . . . . . . . . . . . . . . . . . . . . . . . . . . . . . . . . . . . . . . . . . . . . . . . . . . . . . . . . . . . . . . . . . . . . . . . . . . . . . . . . . . . . . . . . . . . . . . . . . . . . . . . . . . . . . . . . . . . . . . . . . . . . . . . . . . . . . . . . . . . . . . . . . . . . . . . . . . . . . . . . . . . . . . . . . . . . . . . . . . . . . . . . . . . . . . . . . . . . . . . . . . . . . . . . . . . . . . . . . . . . . . . . . . . . . . . . . . . . . . . . . . . . . . . . . . . . . . . . . . . 8 View Results 8.1 Load-Settlement Curve . . . . . . . . . . . . . . . . . . . . . . . . . . . 8.2 Design Results . . . . . . . . . . . . . . . . . . . . . . . . . . . . . . . 8.3 Intermediate Results . . . . . . . . . . . . . . . . . . . . . . . . . . . . 8.3.1 Intermediate Results for Bearing Piles (EC7-NL) . . . . . . . . . . 8.3.1.1 Limit state EQU (calculation per CPT) . . . . . . . . . . 8.3.1.2 Limit state GEO and serviceability limit state (calculation for each CPT for each pile) . . . . . . . . . . . . . . . . . Deltares . . . . . . . . . . . . . . . . . . 94 94 94 94 97 97 98 99 99 102 104 105 106 107 109 109 110 110 . . . . . . . . . . . . . . . . . . . . . . . . . 113 113 114 114 115 116 117 117 117 117 117 118 118 119 120 121 121 122 123 124 125 125 127 127 128 129 . . . . . 131 131 132 133 133 134 . 135 v D-F OUNDATIONS, User Manual 8.3.2 8.3.3 8.4 Intermediate Results for Bearing Piles (EC7-B) . . . . . Intermediate Results for Shallow Foundations (EC7-NL) 8.3.3.1 Limit state EQU . . . . . . . . . . . . . . . 8.3.3.2 Limit states GEO and serviceability limit state Report and report content selection . . . . . . . . . . . . . . . 8.4.1 Report . . . . . . . . . . . . . . . . . . . . . . . . . 8.4.2 Report content selection . . . . . . . . . . . . . . . . . . . . . . . . . . . . . . . . . . . . . . . . . . . . . . . . . . . . . . . . . . 136 137 137 141 144 144 144 . . . . . . . . . . . . . . . . . . . . . . . . . . . . . . . . . . . . . . . . . . . . . . . . . . . . . . . . . . . . . . . . . . . . . . . . . . . . . . . . . . . . . . . . . . . . . . . . . . . 145 145 146 147 147 148 149 150 151 153 155 155 10 Tutorial 1: Preliminary Design of Bearing Piles for a Storehouse 10.1 Introduction . . . . . . . . . . . . . . . . . . . . . . . . . . 10.2 Setting up a new project . . . . . . . . . . . . . . . . . . . 10.3 Construction sequence . . . . . . . . . . . . . . . . . . . . 10.4 Creating soil profiles . . . . . . . . . . . . . . . . . . . . . 10.5 Defining the foundation . . . . . . . . . . . . . . . . . . . . 10.6 Entering the context . . . . . . . . . . . . . . . . . . . . . . 10.7 Making a preliminary design . . . . . . . . . . . . . . . . . 10.8 Results . . . . . . . . . . . . . . . . . . . . . . . . . . . . 10.9 Conclusion . . . . . . . . . . . . . . . . . . . . . . . . . . . . . . . . . . . . . . . . . . . . . . . . . . . . . . . . . . . . . . . . . . . . . . . . . . . . . . . . . . . . . . . . . . . . . . . . . . 159 159 160 160 160 164 166 167 169 170 . . . . . . . 171 . 171 . 172 . 172 . 172 . 174 . 180 . 184 . . . . . . . . . . . . . . . . . . . . . . . . . . . . . . . . . . . . . . . . . . . . DR AF T 9 Feasibility module 9.1 Selection of soil profile and pile type . . . . . . . . 9.2 GeoBrain Drivability Prediction . . . . . . . . . . . 9.2.1 GeoBrain Prediction – Menu bar . . . . . . 9.2.2 GeoBrain Prediction – Geotechnics menu . . 9.2.3 GeoBrain Prediction – Installation menu . . 9.2.4 GeoBrain Prediction – Result menu . . . . . 9.2.5 GeoBrain Prediction – Prediction Report . . 9.3 GeoBrain Drivability Experiences . . . . . . . . . . 9.3.1 GeoBrain Experiences – Search on Pile Type 9.3.2 GeoBrain Experiences – Search on CPT . . 9.3.3 GeoBrain Experiences – Search on Location . . . . . . . 11 Tutorial 2: Feasibility of Bearing Piles for a Storehouse 11.1 Introduction to the case . . . . . . . . . . . . . . . 11.2 Preparing a new project . . . . . . . . . . . . . . . 11.3 Defining the correct pile tip level(s) . . . . . . . . . 11.4 Defining the pile plan . . . . . . . . . . . . . . . . 11.5 Checking the drivability using GeoBrain prediction . 11.6 Checking the drivability using GeoBrain experiences 11.7 Conclusion . . . . . . . . . . . . . . . . . . . . . . . . . . . . . . . . . . . . . . . . . . . . . . . . . . . . . . . . . . . . . . . . . . . . . . . . . . . . . . . . . . . . . . . . . . . . . . . . . . 12 Tutorial 3: Verification of Bearing Piles for a Storehouse 12.1 Introduction to the case . . . . . . . . . . . . . . . . 12.2 Preparing a new project . . . . . . . . . . . . . . . . 12.3 Starting the calculation . . . . . . . . . . . . . . . . 12.4 Evaluating the results . . . . . . . . . . . . . . . . . 12.5 Conclusion . . . . . . . . . . . . . . . . . . . . . . . . . . . . . . . . . . . . . . . . . . . . . . . . . . . . . . . . . . . . . . . . . . . . . . . . . . . . . 185 . 185 . 186 . 186 . 186 . 188 13 Tutorial 4: Pipeline Duct on Bearing Piles 13.1 Introduction to the case . . . . . . . . 13.2 Project input . . . . . . . . . . . . . 13.3 Preliminary Design . . . . . . . . . . 13.4 Verification of the design . . . . . . . 13.5 Maximum negative skin friction . . . . 13.6 Using continuous flight auger piles . . . . . . . . . . . . . . . . . . . . . . . . . . . . . . . . . . . . . . . . . . . . . . . . . . . . . . . . . . . . . . . . . . . . . . . . . . vi . . . . . . . . . . . . . . . . . . . . . . . . . . . . . . . . . . . . . . . . . . . . . . . . 189 189 190 191 192 195 197 Deltares Contents 13.7 Conclusion . . . . . . . . . . . . . . . . . . . . . . . . . . . . . . . . . . 198 . . . . . . . . . . . . . . . . . . . . . . . . . . . . . . . . . . . . . . . . . . . . . . . . . . . . . . . . . . . . . . . . . . . . . . . . . . . . . . . . . . . . . . . . . . . . . . . . . . . . . . . . . . . . . . . . 199 199 200 200 204 205 206 209 15 Tutorial 6: Farm with a Pond (Shallow Foundations) 15.1 Introduction to the case . . . . . . . . . . . . . 15.2 Entering the project data . . . . . . . . . . . . 15.3 Verification of the design . . . . . . . . . . . . 15.4 Influence of the fishing pond . . . . . . . . . . 15.5 Conclusion . . . . . . . . . . . . . . . . . . . . . . . . . . . . . . . . . . . . . . . . . . . . . . . . . . . . . . . . . . . . . . . . . . . . . . . . . . . . . . . . . . . . . . . . . . . . . . 211 211 212 214 217 219 16 Tutorial 7: Design of Bearing Piles using the Belgian method 16.1 Introduction to the case . . . . . . . . . . . . . . . . . . 16.2 CPTs from the DOV database . . . . . . . . . . . . . . . 16.3 Model . . . . . . . . . . . . . . . . . . . . . . . . . . . 16.4 CPT Interpretation Model . . . . . . . . . . . . . . . . . 16.5 Soil . . . . . . . . . . . . . . . . . . . . . . . . . . . . 16.5.1 Materials . . . . . . . . . . . . . . . . . . . . . 16.5.2 Soil Profile from electrical CPT type E . . . . . . 16.5.3 Soil Profile from mechanical CPT type M2 . . . . 16.5.4 Soil Profile from mechanical CPT type M4 . . . . 16.6 Foundation . . . . . . . . . . . . . . . . . . . . . . . . 16.6.1 Pile Type . . . . . . . . . . . . . . . . . . . . . 16.6.2 Pile Properties . . . . . . . . . . . . . . . . . . 16.7 Location Map . . . . . . . . . . . . . . . . . . . . . . . 16.8 Calculation . . . . . . . . . . . . . . . . . . . . . . . . 16.9 Results . . . . . . . . . . . . . . . . . . . . . . . . . . 16.10 Conclusion . . . . . . . . . . . . . . . . . . . . . . . . . . . . . . . . . . . . . . . . . . . . . . . . . . . . . . . . . . . . . . . . . . . . . . . . . . . . . . . . . . . . . . . . . . . . . . . . . . . . . . . . . . . . . . . . . . . . . . . . . . . . . . . . . . . . . . . . . . . . . . . . . . . . . . . . . . . . . . . . . . . . . . . . . . . . . . . . . . . . . . . . 221 221 222 223 224 225 225 225 227 229 231 232 232 233 234 235 235 . . . . . . . . . . . . . . . 237 . 237 . 237 . 237 . 237 . 238 . 238 . 239 . 241 . 243 . 243 . 243 . 244 . 245 . 246 . 247 . . . . . . . . . . . . . . . . . . . . . DR AF T 14 Tutorial 5: Parking Garage on Tension Piles 14.1 Introduction to the case . . . . . . . . . 14.2 Entering the project data . . . . . . . . 14.2.1 Soil profile . . . . . . . . . . . 14.2.2 Foundation . . . . . . . . . . . 14.2.3 Excavation . . . . . . . . . . . 14.3 Calculation and results . . . . . . . . . 14.4 Conclusion . . . . . . . . . . . . . . . 17 Bearing Piles model (EC7-NL) 17.1 Area of application . . . . . . . . . . . . . . . . . . . . . 17.2 Limit states . . . . . . . . . . . . . . . . . . . . . . . . . 17.3 Calculation process . . . . . . . . . . . . . . . . . . . . . 17.3.1 Verifying limit state STR . . . . . . . . . . . . . . 17.3.2 Verifying limit state GEO and serviceability limit state 17.4 Geometric problems . . . . . . . . . . . . . . . . . . . . 17.5 Problems in interpreting standards . . . . . . . . . . . . . 17.6 Units, dimensions and drawing agreements . . . . . . . . . 17.7 Bearing Piles schematics . . . . . . . . . . . . . . . . . . 17.7.1 Problem boundaries . . . . . . . . . . . . . . . . 17.7.2 Variation in the level of the bearing layer . . . . . . 17.7.3 Skin friction zones . . . . . . . . . . . . . . . . . 17.7.4 Non-rigid/rigid . . . . . . . . . . . . . . . . . . . 17.7.5 Combination of superimposed load/excavation . . . 17.7.6 Merging sub-calculations . . . . . . . . . . . . . . . . . . . . . . . . . . . . . . . . . . . . . . . . . . . . . . . . . . . . . . . . . . . . . . . . . . . . . . . . . . . . . . . . . . . . . . . . . . . . . . . . . . . . . . . . . . . . . . . . . . . . . . . 18 Bearing Piles model (EC7-B) 249 18.1 The De Beer method: determining the pile tip resistance . . . . . . . . . . . 249 Deltares vii D-F OUNDATIONS, User Manual 18.1.1 18.1.2 18.1.3 18.1.4 Step 1: Calculation of the friction angle . . . . . . . . . . . . . . . Step 2: Calculation of βp and βc . . . . . . . . . . . . . . . . . . Step 3: Calculation of dg . . . . . . . . . . . . . . . . . . . . . . Step 4: Determining the values for transition from non-rigid to rigid layers (downward values) . . . . . . . . . . . . . . . . . . . . . . 18.1.5 Step 5: Determining the values for transition from rigid to non-rigid . 18.1.6 Step 6: Determining the ‘mixed’ values . . . . . . . . . . . . . . . . 249 . 250 . 250 . 250 . 250 . 250 . . . . . . . . . . . . 256 257 258 258 259 260 261 262 262 262 263 263 20 Shallow Foundations model (EC7-NL) 20.1 Area of application . . . . . . . . . . . . . . . . . . . . . 20.2 Limit states . . . . . . . . . . . . . . . . . . . . . . . . . 20.3 Calculation process . . . . . . . . . . . . . . . . . . . . . 20.3.1 Verifying limit state STR . . . . . . . . . . . . . . 20.3.2 Verifying limit state GEO and serviceability limit state 20.4 Geometric problems . . . . . . . . . . . . . . . . . . . . 20.5 Units, dimensions and drawing agreements . . . . . . . . . 20.6 Shallow Foundations schematics . . . . . . . . . . . . . . 20.6.1 Problem boundaries . . . . . . . . . . . . . . . . 20.6.2 Variation in the level of the bearing layer . . . . . . 20.6.3 Non-rigid/rigid . . . . . . . . . . . . . . . . . . . 20.6.4 Merging sub-calculations . . . . . . . . . . . . . . DR AF T 19 Tension Piles model (EC7-NL) 19.1 Area of application . . . . . . . . . . . . . . . . . . . . . . . . . . . . . 19.2 Design of tension piles according to EC7-NL (NEN 9997-1+C1:2012) . . . . 19.3 The Netherlands Eurocode 7 (EC7-NL) . . . . . . . . . . . . . . . . . . . 19.4 Verifying displacements of Tension Piles . . . . . . . . . . . . . . . . . . 19.5 Calculating the bearing capacity of a tension pile . . . . . . . . . . . . . . 19.5.1 Step 1: Reduction of the cone resistance due to overconsolidation . 19.5.2 Step 2: Reduction of cone resistance due to excavation . . . . . . . 19.5.3 Step 3: Determination of the design value of the cone resistance (including safety factors) . . . . . . . . . . . . . . . . . . . . . . . . 19.5.4 Step 4: Determination of factor f1 (effect of installation) . . . . . . . 19.5.5 Step 5: Determination of factor f2 (effect of reduction of stresses due to tension forces in pile groups) . . . . . . . . . . . . . . . . . . . 19.5.6 Step 6: Determination of the maximum tension capacity Rt;d . . . . 19.5.7 Step 7: Determination of the total soil weight Rt;kluit;d . . . . . . . 19.5.8 Step 8: Addition of the pile weight . . . . . . . . . . . . . . . . . . 19.6 Problems in interpreting standards . . . . . . . . . . . . . . . . . . . . . 19.7 Units, dimensions and drawing agreements . . . . . . . . . . . . . . . . . 19.8 Tension Piles schematics . . . . . . . . . . . . . . . . . . . . . . . . . . 19.8.1 Problem boundaries . . . . . . . . . . . . . . . . . . . . . . . . 19.8.2 Variation in the pile tip level . . . . . . . . . . . . . . . . . . . . . 19.8.3 Skin friction zone . . . . . . . . . . . . . . . . . . . . . . . . . . 19.8.4 Non-rigid/rigid . . . . . . . . . . . . . . . . . . . . . . . . . . . 19.8.5 Combination of superimposed load and excavation . . . . . . . . . . . . . . . . 251 251 251 252 252 252 253 253 . 255 . 255 . . . . . . . . . . . . . . . . . . . . . . . . . . . . . . . . . . . . . . . . . . . . . . . . . . . . . . . . . . . . 265 265 265 265 265 266 267 268 270 270 271 271 271 21 Cone types used in Belgium 21.1 CPT with mechanical cone (CPT-M1, M2 and M4) . . . . . . . . . . . 21.2 CPT with electrical cone (CPT-E and CPT-U) . . . . . . . . . . . . . 21.3 Measured values . . . . . . . . . . . . . . . . . . . . . . . . . . . 21.4 Conversion of mechanical qc -values into equivalent electrical qc -values . . . . . . . . . . . . . . . . 273 273 273 273 274 22 Benchmarks viii . . . . . . . . . . . . . . . . . . . . . . . . . . . . . . . . . . . . . . . . . . . . . . . . 275 Deltares Contents 277 DR AF T 23 Literature Deltares ix DR AF T D-F OUNDATIONS, User Manual x Deltares List of Figures List of Figures 1.1 1.2 1.3 Deltares Systems website (www.deltaressystems.com) . . . . . . . . . . . . Support window, Problem Description tab . . . . . . . . . . . . . . . . . . . Send Support E-Mail window . . . . . . . . . . . . . . . . . . . . . . . . . 2.1 2.2 2.3 2.4 2.5 2.6 2.7 2.8 2.9 Modules window . . . . . . . . . . . . . . . . . . . . . . D-Foundations main window . . . . . . . . . . . . . . . . D-Foundations menu bar . . . . . . . . . . . . . . . . . . D-Foundations icon bar . . . . . . . . . . . . . . . . . . . D-Foundations tree view when no project is opened . . . . . Tree view when a (Bearing Piles EC7-NL) project is opened . The tree view may be manipulated using pop-up menus . . . Title panel and Status bar at the bottom of the main window Selection of different parts of a table using the arrow cursor . 4.1 4.2 4.3 4.4 4.5 4.6 4.7 4.8 4.9 4.10 4.11 4.12 4.13 4.14 4.15 4.16 4.17 4.18 4.19 4.20 4.21 Deltares . . . . . . . . . . . . . . . . . . . . . . . . . . . . . . . . . . . . . . . . . . . . . . . . . . . . . . 11 12 12 13 13 14 14 15 17 . . . . . . . . . . . . . . . . . . . . . . . . . . . . . . . . . . . . . . . . . . . . . . . . . . . . . . . . . . . . . . . . . . . . . . . . . . . . . . background . . . . . . . . . . . . . . . . . . . . . . . . . 20 20 21 22 22 23 25 26 27 28 28 29 29 T Program Options window, View tab . . . . . . . . . . . . . Program Options window, General tab . . . . . . . . . . . Program Options window, Directories tab . . . . . . . . . . Program Options window, Language tab . . . . . . . . . . Program Options window, Modules tab . . . . . . . . . . . Program Options window, CPT Interpretation tab . . . . . . CPT Interpretation Model window . . . . . . . . . . . . . . Error Messages window . . . . . . . . . . . . . . . . . . Model window . . . . . . . . . . . . . . . . . . . . . . . Project Properties window, Top View Foundation tab . . . . Project Properties window, Load Settlement Curve tab . . . Project Properties window, View CPT/Profile tab . . . . . . Location Map window . . . . . . . . . . . . . . . . . . . . Top View Foundation window showing the Netherlands map picture . . . . . . . . . . . . . . . . . . . . . . . . . . . 3.15 Project Properties – Description window . . . . . . . . . . DR AF 3.1 3.2 3.3 3.4 3.5 3.6 3.7 3.8 3.9 3.10 3.11 3.12 3.13 3.14 . . . . . . . . . . . . . . . . . . . . . . . . . . . . . . . . . . . as . . . . . . . . . . . . . . . . . . . . . . 7 8 8 Main window for the Bearing Piles (EC7-NL) model . . . . . . . . . . . . . Construction Sequence window for the Bearing Piles (EC7-NL) model . . . Soil – Materials window for Bearing Piles (EC7-NL) model . . . . . . . . . NEN 9997-1 Table 1 (Table 2.b NEN 9997-1+C1:2012) window for Bearing Piles (EC7-NL) model . . . . . . . . . . . . . . . . . . . . . . . . . . . . Belgian Annex window for Bearing Piles (EC7-NL) model . . . . . . . . . . Match Material window . . . . . . . . . . . . . . . . . . . . . . . . . . . Import CPTs from file window . . . . . . . . . . . . . . . . . . . . . . . . Import of DOV html file window for electrical (E) or piezometric (U) CPT . . . Import of DOV html file window for mechanical CPT type M2 . . . . . . . . Import of DOV html file window for mechanical CPT type M4 . . . . . . . . Import CPT for D-Foundations window . . . . . . . . . . . . . . . . . . . Import CPT for D-Foundations window after zoom in Rotterdam . . . . . . . Soil – Profiles – New CPT window showing ‘empty’ profile . . . . . . . . . Soil / Profiles node, menu . . . . . . . . . . . . . . . . . . . . . . . . . . Edit CPT Values window . . . . . . . . . . . . . . . . . . . . . . . . . . Soil – Profiles window, Layers tab . . . . . . . . . . . . . . . . . . . . . . Soil – Profiles window, Additional Data tab for Bearing Piles (EC7-NL) model Soil – Profiles window, Additional Data tab . . . . . . . . . . . . . . . . . Soil – Profiles window, Summary Pressures tab . . . . . . . . . . . . . . . Foundation – Pile Types window for Bearing Piles (EC7-NL) model . . . . . Foundation – Pile Properties window for Bearing Piles (EC7-NL) model . . . . 30 . 30 . 33 . 34 . 35 . . . . . . . . . . . . . . . . . . 36 36 38 39 40 41 42 43 44 44 45 46 47 48 51 52 53 56 xi D-F OUNDATIONS, User Manual Pile Grid window for Bearing Piles (EC7-NL) model . . . . . . . . . . . . . Edit properties for all positions window for Bearing Piles (EC7-NL) model . . Foundation – Top View Foundation window for Bearing Piles (EC7-NL) model Excavation window . . . . . . . . . . . . . . . . . . . . . . . . . . . . . Calculation window for Bearing Piles (EC7-NL) model . . . . . . . . . . . . Calculation window, Options for Bearing Piles (EC7-NL) model . . . . . . . Calculation window, Preliminary Design for Bearing Piles (EC7-NL) model . Schematization of the Begemann reduction of cone resistance for a Verification and a Preliminary Design calculation . . . . . . . . . . . . . . . . . . 4.30 Calculation window, Verification for Bearing Piles (EC7-NL) model . . . . . . 67 . 69 5.1 5.2 5.3 5.4 5.5 5.6 5.7 5.8 5.9 5.10 5.11 5.12 5.13 Main window for the Bearing Piles (EC7-B) model . . . . . . . . . . . . . . Soil – Materials window for Bearing Piles (EC7-B) model . . . . . . . . . . NEN 9997-1 Table 1 window for Bearing Piles (EC7-B) model . . . . . . . . Belgian Annex window for Bearing Piles (EC7-B) model . . . . . . . . . . . Soil – Profiles window, Additional Data tab . . . . . . . . . . . . . . . . . Soil – Profiles window, Additional Data tab . . . . . . . . . . . . . . . . . Soil – Profiles window, Summary Pressures tab . . . . . . . . . . . . . . . Foundation – Pile Types window for Bearing Piles (EC7-B) model . . . . . . Foundation – Pile Properties window for Bearing Piles (EC7-B) model . . . Foundation – Top View Foundation window for Bearing Piles (EC7-B) model Calculation window for Bearing Piles (EC7-B) model . . . . . . . . . . . . Calculation window for Bearing Piles (EC7-B) model . . . . . . . . . . . . Calculation window, Preliminary Design for Bearing Piles (EC7-B) model . . . . . . . . . . . . . . . 73 74 75 76 77 78 79 80 82 83 84 85 86 Main window for the Tension Piles (EC7-NL) model . . . . . . . . . . . . . Construction Sequence window for the Tension Piles (EC7-NL) model . . . Soil – Materials window for Tension Piles (EC7-NL) model . . . . . . . . . NEN 9997-1 Table 1 window for Tension Piles (EC7-NL) model . . . . . . . Belgian Annex window for Tension Piles (EC7-NL) model . . . . . . . . . . Soil – Profiles window, Layers tab . . . . . . . . . . . . . . . . . . . . . . Soil – Profiles window for Tension Piles (EC7-NL) model, Pore Pressure and OCR tab . . . . . . . . . . . . . . . . . . . . . . . . . . . . . . . . . . Soil – Profiles window, Additional Data tab . . . . . . . . . . . . . . . . . Soil – Profiles window, Additional Data tab . . . . . . . . . . . . . . . . . Soil – Profiles window, Summary Pressures tab . . . . . . . . . . . . . . . Foundation – Pile Types window for Tension Piles (EC7-NL) model . . . . . Foundation – Pile Properties window for Tension Piles (EC7-NL) model . . . Pile Grid window for Tension Piles (EC7-NL) model . . . . . . . . . . . . . Edit properties for all positions window for Tension Piles (EC7-NL) model . . Foundation – Top View Foundation window for Tension Piles (EC7-NL) model Excavation window . . . . . . . . . . . . . . . . . . . . . . . . . . . . . Calculation window for Tension Piles (EC7-NL) model . . . . . . . . . . . . Calculation window for Tension Piles (EC7-NL) model . . . . . . . . . . . . Calculation window, Preliminary Design for Tension Piles (EC7-NL) model . . . . . . . 89 90 91 92 92 95 . . . . . . . . . . . . . 96 97 98 98 99 102 103 104 104 105 107 107 109 Main window for the Shallow Foundations (EC7-NL) model . . . . . . . . . Soil – Materials window for Shallow Foundations (EC7-NL) model . . . . . . NEN 9997-1 Table 1 window for Shallow Foundations (EC7-NL) model . . . Belgian Annex window for Shallow Foundations (EC7-NL) model . . . . . . Soil – Profiles window, Additional Data tab for Shallow Foundations (EC7-NL) model . . . . . . . . . . . . . . . . . . . . . . . . . . . . . . . . . . . . Soil – Profiles window, Additional Data tab . . . . . . . . . . . . . . . . . Soil – Profiles window, Summary Pressures tab . . . . . . . . . . . . . . . . . . . 113 114 115 116 6.8 6.9 6.10 6.11 6.12 6.13 6.14 6.15 6.16 6.17 6.18 6.19 7.1 7.2 7.3 7.4 7.5 7.6 7.7 xii DR AF 6.1 6.2 6.3 6.4 6.5 6.6 6.7 T 4.22 4.23 4.24 4.25 4.26 4.27 4.28 4.29 . . . . . . . 58 59 59 61 62 63 65 . 118 . 119 . 120 Deltares List of Figures 7.8 7.9 7.10 7.11 7.12 7.13 7.14 7.15 7.16 7.17 Soil – Slopes window . . . . . . . . . . . . . . . . . . . . . . . . . . . . . 120 Foundation – Types window for Shallow Foundations (EC7-NL) model . . . . 121 Foundation – Loads window . . . . . . . . . . . . . . . . . . . . . . . . . 122 Foundation – Foundation Plan window . . . . . . . . . . . . . . . . . . . . 123 Foundation – Top View Foundation window for Shallow Foundations (EC7-NL) model . . . . . . . . . . . . . . . . . . . . . . . . . . . . . . . . . . . . . 124 Calculation window for Shallow Foundations (EC7-NL) model . . . . . . . . . 125 Calculation window for Shallow Foundations (EC7-NL) model . . . . . . . . . 125 Calculation options for the Shallow Foundations (EC7-NL) model . . . . . . . 127 Calculation window, Options sub-window for an Optimize Dimensions calculation127 Calculation window, Options sub-window for a Maximize Vertical Loads calculation . . . . . . . . . . . . . . . . . . . . . . . . . . . . . . . . . . . . . 128 Load / Settlement Curve window Design Results window – Header Design Results window – Header Report Selection window . . . . . . . . . . . . . . . . . . . . . . . . . . . . . . . . . . . . . . . . . . . . . . . . . . . . . . . . . . . . 131 132 133 144 9.1 9.2 9.3 9.4 9.5 9.6 9.7 9.8 9.9 9.10 Select a profile window . . . . . . . . . . . . . . . . . . . . . . . . . . . GeoBrain Prediction window, First page . . . . . . . . . . . . . . . . . . . GeoBrain Prediction window, Menu bar . . . . . . . . . . . . . . . . . . . GeoBrain Prediction window, Geotechnics menu . . . . . . . . . . . . . . GeoBrain Prediction window, Installation menu . . . . . . . . . . . . . . . GeoBrain Prediction window, Result menu . . . . . . . . . . . . . . . . . GeoBrain Prediction window, Report menu . . . . . . . . . . . . . . . . . Prediction Report window, Results prediction section . . . . . . . . . . . . GeoBrain Experiences window . . . . . . . . . . . . . . . . . . . . . . . GeoBrain Experiences window, Type of similarity between the soil profile of the GeoBrain database and the soil profile of the D-Foundations project . . . GeoBrain Experiences window, search on Pile type . . . . . . . . . . . . . GeoBrain Experiences window, Detailed information on the selected project . GeoBrain Experiences window, Search on Pile type – Detailed view of the Refine Query . . . . . . . . . . . . . . . . . . . . . . . . . . . . . . . . GeoBrain Experiences window, Search on Location – View the total per area GeoBrain Experiences window, Search on Location – View individual experiences . . . . . . . . . . . . . . . . . . . . . . . . . . . . . . . . . . . . GeoBrain Experiences window, search on Location . . . . . . . . . . . . . . . . . . . . . . 145 146 147 147 148 150 150 151 152 DR AF . . . . 9.11 9.12 9.13 9.14 9.15 9.16 . . . . . . . . . . . . . . . . . . . . . . . . T 8.1 8.2 8.3 8.4 10.1 Storehouse construction in a delta environment (Tutorial 1) 10.2 Project Properties – Description window . . . . . . . . . 10.3 CPT 01 (Tutorial 1) . . . . . . . . . . . . . . . . . . . . 10.4 CPT 02 (Tutorial 1) . . . . . . . . . . . . . . . . . . . . 10.5 Soil – Profiles window . . . . . . . . . . . . . . . . . . . 10.6 Soil – Profiles window, Additional Data tab . . . . . . . . 10.7 Foundation – Pile Types window . . . . . . . . . . . . . 10.8 Creating new pile types . . . . . . . . . . . . . . . . . . 10.9 Foundation – Pile Types window, Selecting dimensions . . 10.10 Foundation – Pile Properties window . . . . . . . . . . . 10.11 Profiles window, Detail of the Soil . . . . . . . . . . . . . 10.12 Calculation window . . . . . . . . . . . . . . . . . . . . 10.13 Design Results window, Chart tab . . . . . . . . . . . . . . . . . . . . . . . . . . . . . . . . . . . . . . . . . . . . . . . . . . . . . . . . . . . . . . . . . . . . . . . . . . . . . . . . . . . . . . . . . . . . . . . . . . . . . . . . . . . . . . . . . . . . . . . . . . . . . . . . . . . . . . . . . . 153 . 153 . 154 . 155 . 156 . 157 . 158 . . . . . . . . . . . . . 159 160 161 162 163 163 164 165 166 167 167 168 169 11.1 Front and top views of the pile plan (Tutorial 2) . . . . . . . . . . . . . . . . 172 11.2 Pile Grid window . . . . . . . . . . . . . . . . . . . . . . . . . . . . . . . 173 11.3 Top View Foundation window, Overview of the pile plan . . . . . . . . . . . . 174 Deltares xiii 11.4 Select a profile window . . . . . . . . . . . . . . . . . . . . . . . . . 11.5 GeoBrain Prediction window, First page . . . . . . . . . . . . . . . . . 11.6 GeoBrain Prediction window, Introduction . . . . . . . . . . . . . . . . 11.7 GeoBrain Prediction window, Geotechnics menu . . . . . . . . . . . . 11.8 GeoBrain Prediction window, Installation menu . . . . . . . . . . . . . 11.9 GeoBrain Prediction window, Result menu (1st prediction) . . . . . . . 11.10 GeoBrain Prediction window, Result menu (2nd prediction) . . . . . . . 11.11 GeoBrain Prediction window, Result menu for Sondering 02 . . . . . . 11.12 Select a profile window . . . . . . . . . . . . . . . . . . . . . . . . . 11.13 GeoBrain Experiences window, First page . . . . . . . . . . . . . . . 11.14 GeoBrain Experiences window, Search on pile type . . . . . . . . . . . 11.15 GeoBrain Experiences window, Search on pile type after refinement on Result quality . . . . . . . . . . . . . . . . . . . . . . . . . . . . . . 11.16 GeoBrain Experiences window, Detailed information on a project . . . . . . . . . . . . . . . . . . . . . . . . . . the . . . . . . . . . . . . . . . T D-F OUNDATIONS, User Manual . . . . and . . . . . 185 . 186 13.1 13.2 13.3 13.4 13.5 13.6 13.7 DR AF 12.1 Boring, front and top views of the pile plan (Tutorial 3) . . . . . . . . . . 12.2 Calculation window . . . . . . . . . . . . . . . . . . . . . . . . . . . 12.3 Report window, Results of the Verification of Limit States STR, GEO, serviceability limit state . . . . . . . . . . . . . . . . . . . . . . . . . 12.4 Calculation window, Selecting Rigid for the Rigidity of superstructure . . A pipeline duct (Tutorial 4) . . . . . . . . . . . . . . . . . . . . . . . . . CPT 01 at the site where the pipeline duct is to be constructed (Tutorial 4) . Calculation window, Selection of CPT 1 for calculation (Tutorial 4a) . . . . . Design Results window (Tutorial 4a) . . . . . . . . . . . . . . . . . . . . Design Results window (Tutorial 4b) . . . . . . . . . . . . . . . . . . . . Top View Foundation window, Pile plan of the two supports . . . . . . . . . Calculation window, Selection of CPTs and pile type for Verification, Design calculation(Tutorial 4c) . . . . . . . . . . . . . . . . . . . . . . . . . . . 13.8 Design Results window, Text tab (Tutorial 4c) . . . . . . . . . . . . . . . . 13.9 Calculation window, Selection of CPTs and pile type (Tutorial 4d) . . . . . . 13.10 Intermediate Results window (Tutorial 4d) . . . . . . . . . . . . . . . . . . 13.11 Intermediate Results window (Tutorial 4e) . . . . . . . . . . . . . . . . . . 13.12 Foundation – Pile Types window, Adding the continuous flight auger pile (Tutorial 4f) . . . . . . . . . . . . . . . . . . . . . . . . . . . . . . . . . . . 13.13 Design Results window, Text tab (Tutorial 4f) . . . . . . . . . . . . . . . . 174 175 175 176 177 178 179 180 181 181 182 . 183 . 183 . 187 . 188 . . . . . . 189 190 191 192 192 193 . . . . . 194 194 195 196 196 . 197 . 198 14.1 Design of a foundation of a parking garage (Tutorial 5) . . . . . . . . . . . . 14.2 Model window . . . . . . . . . . . . . . . . . . . . . . . . . . . . . . . . 14.3 Soil – Profiles window using NEN Rule and a minimum layer thickness of 10 m 14.4 Soil – Materials window . . . . . . . . . . . . . . . . . . . . . . . . . . . . 14.5 Soil – Profiles window, selection of materials for the profile . . . . . . . . . . 14.6 Soil – Profiles window, Pore Pressure and OCR tab . . . . . . . . . . . . . . 14.7 Soil – Profiles window, Additional Data tab . . . . . . . . . . . . . . . . . . 14.8 Foundation – Pile Types window for a rectangular pile . . . . . . . . . . . . . 14.9 Pile Grid Tension Piles (EC7-NL) window . . . . . . . . . . . . . . . . . . . 14.10 Foundation – Pile Properties window showing input pile grid . . . . . . . . . 14.11 Excavation window with Begemann option selected . . . . . . . . . . . . . . 14.12 Calculation window for Tension Piles ( EC7-NL) model . . . . . . . . . . . . 14.13 The simplified pile plan of the parking garage . . . . . . . . . . . . . . . . . 14.14 Design Results (indicative ξ3 ) window, Text tab . . . . . . . . . . . . . . . . 14.15 Design Results (indicative ξ3 ) window, Chart tab . . . . . . . . . . . . . . . 199 200 201 202 203 203 204 204 205 205 206 207 207 208 209 15.1 Fishing pond near farmhouse (Tutorial 6) . . . . . . . . . . . . . . . . . . . 211 15.2 Soil – Profiles window, Layers tab . . . . . . . . . . . . . . . . . . . . . . . 212 xiv Deltares List of Figures Soil – Profiles window, Additional Data tab for Shallow Foundations model . Foundation – Types window . . . . . . . . . . . . . . . . . . . . . . . . . Foundation - Loads window . . . . . . . . . . . . . . . . . . . . . . . . . Foundation Plan window . . . . . . . . . . . . . . . . . . . . . . . . . . Calculation window with default deformation demands conform to EC7-NL (NEN 9997-1+C1:2012) . . . . . . . . . . . . . . . . . . . . . . . . . . . 15.8 Report window, Results of the Verification of Limit State STR . . . . . . . . 15.9 Report window, Results of the verification of serviceability limit state . . . . 15.10 Report window, Results of the Verification of Limit State GEO . . . . . . . . 15.11 Soil – Slopes window . . . . . . . . . . . . . . . . . . . . . . . . . . . . 15.12 Foundation Plan window . . . . . . . . . . . . . . . . . . . . . . . . . . 15.13 Report window, Results for Limit State STR with and without the pond . . . 15.14 Report window, Results for Limit State EQU without pond and with two different ponds . . . . . . . . . . . . . . . . . . . . . . . . . . . . . . . . . . T 15.3 15.4 15.5 15.6 15.7 DR AF 16.1 Top view position of the pile and the CPTs . . . . . . . . . . . . 16.2 DOV database – Top view of the penetration tests performed near pile location (Stabroek, Belgium) . . . . . . . . . . . . . . . . . 16.3 Model window . . . . . . . . . . . . . . . . . . . . . . . . . . 16.4 CPT Interpretation Model window . . . . . . . . . . . . . . . . . 16.5 Soil – Materials window . . . . . . . . . . . . . . . . . . . . . . 16.6 Import of DOV html file window . . . . . . . . . . . . . . . . . . 16.7 Soil – Profiles window, Layers tab . . . . . . . . . . . . . . . . . 16.8 Soil – Profiles window, Additional Data tab . . . . . . . . . . . . 16.9 Import of DOV html file window . . . . . . . . . . . . . . . . . . 16.10 Soil – Profiles window, Layers tab . . . . . . . . . . . . . . . . . 16.11 Import of DOV html file window . . . . . . . . . . . . . . . . . . 16.12 Soil – Profiles window, Layers tab . . . . . . . . . . . . . . . . . 16.13 Soil – Profiles window, Layers tab . . . . . . . . . . . . . . . . . 16.14 Foundation – Pile Types window . . . . . . . . . . . . . . . . . 16.15 Foundation – Pile Properties window . . . . . . . . . . . . . . . 16.16 Location Map window . . . . . . . . . . . . . . . . . . . . . . . 16.17 Top View Foundation window displaying the background picture . . 16.18 Calculation window . . . . . . . . . . . . . . . . . . . . . . . . 16.19 Design Results window . . . . . . . . . . . . . . . . . . . . . . 17.1 17.2 17.3 17.4 17.5 19.1 19.2 19.3 19.4 . . the . . . . . . . . . . . . . . . . . . . . . . . . . . . . . . . . . . . . . . . future . . . . . . . . . . . . . . . . . . . . . . . . . . . . . . . . . . . . . . . . . . . . . . . . . . . . . . . . . . 213 213 214 214 . . . . . . . 215 216 216 217 217 218 218 . 219 . 222 . . . . . . . . . . . . . . . . . . 223 224 224 225 226 226 227 228 228 229 230 231 232 232 233 233 234 235 . . . . 241 242 245 246 Gap in skin friction zone . . . . . . . . . . . . . . . . . . . . . . . . . . Sign conventions . . . . . . . . . . . . . . . . . . . . . . . . . . . . . . Skin friction levels . . . . . . . . . . . . . . . . . . . . . . . . . . . . . . Two different partial calculations required due to mixed rigidity of structure . Splitting a problem into parts due to a combination of excavation and super imposed loads . . . . . . . . . . . . . . . . . . . . . . . . . . . . . . . . 247 Determination of the change in effective stresses due to the excavation Pulled out soil geometry . . . . . . . . . . . . . . . . . . . . . . . Sign conventions for settlements . . . . . . . . . . . . . . . . . . . Partial calculations for a mixed rigidity structure . . . . . . . . . . . . . . . . . . . . . . . . . . . . 254 258 260 263 20.1 Finding Aef . . . . . . . . . . . . . . . . . . . . . . . . . . . . . . . . . . 266 20.2 Slope adjustment for punch . . . . . . . . . . . . . . . . . . . . . . . . . . 268 20.3 Sign conventions for settlements . . . . . . . . . . . . . . . . . . . . . . . 269 Deltares xv DR AF T D-F OUNDATIONS, User Manual xvi Deltares List of Tables List of Tables 2.1 Keyboard shortcuts for D-Foundations . . . . . . . . . . . . . . . . . . . . 16 8.1 Overview of the displayed design results . . . . . . . . . . . . . . . . . . . 132 13.1 Pile tip levels resulting from the preliminary design . . . . . . . . . . . . . . 192 14.1 Representative values of soil parameters based on boring . . . . . . . . . . 200 15.1 Soil profile near to the farmhouse . . . . . . . . . . . . . . . . . . . . . . . 212 16.1 Characteristics of the CPTs . . . . . . . . . . . . . . . . . . . . . . . . . . 222 T 17.1 Units of the input/output parameters . . . . . . . . . . . . . . . . . . . . . . 242 17.2 Limits applied to the maximum problem size . . . . . . . . . . . . . . . . . 243 19.1 Units of the input/output parameters . . . . . . . . . . . . . . . . . . . . . . 261 19.2 Limits applied to the maximum problem size . . . . . . . . . . . . . . . . . 262 DR AF 20.1 Units of the input/output parameters . . . . . . . . . . . . . . . . . . . . . . 269 20.2 Limits applied to the maximum problem size . . . . . . . . . . . . . . . . . 270 21.1 Overview of the mechanical and electrical cones used in Belgium . . . . . . . 274 21.2 Conversion factors η for mechanical CPTs . . . . . . . . . . . . . . . . . . 274 Deltares xvii DR AF T D-F OUNDATIONS, User Manual xviii Deltares 1 General Information 1.1 Preface Test. . The application of Eurocode 7 for foundation design and practice in the Netherlands has been implemented in the newest Dutch standard (NEN): NEN 9997-1:2012. In reacting to this, D-F OUNDATIONS enables the user to calculate piles (bearing and tension) and shallow foundation in accordance with the Netherlands Eurocode 7 (EC7-NL). There are several documents that have been included on composing the Netherlands Eurocode 7 in Dutch standard NEN 9997-1, they are: NEN-EN 1997-1 (Eurocode 7-1), NEN-EN 1997-1/NB (Nationale bijlage bij Eurocode 7-1), and NEN 9097-1 (Aanvullende bepalingen voor het geotechnische ontwerp). T D-F OUNDATIONS graphical interactive interface requires just a short training period, allowing users to focus their skills directly on the input of sound geotechnical data and on the subsequent design. 1.2 DR AF D-F OUNDATIONS comprehensive range of calculation options means it can be used to produce preliminary advice, to optimize designs and to verify full scale designs. The ability to overrule and redefine various design code parameters allows D-F OUNDATIONS to be used by engineers to perform standard types of design and verification operations (i.e. calculations based entirely on standards and guidelines) as well as specialized calculations using user-defined foundation types and factors. Features D-F OUNDATIONS is a powerful tool, incorporating the following features: Comprehensive coverage D-F OUNDATIONS uses the Netherlands Eurocode (EC7-NL) or Belgian (De Beer) standards and guidelines for accurate design of vertically loaded bearing piles and tension piles and shallow foundations with both horizontal and vertical loading. Easy soil data definition Importing CPT data is possible in several formats, including the Geotechnical Exchange Format (GEF). The automatic CPT interpretation tool provides soil-type dependent proposals, including all additional parameters. Fast design of pile plans D-F OUNDATIONS gives simultaneous indication of capacity and required length for different pile types and different soil conditions. Pile group interaction In calculations, the effect of pile group interaction on settlement is included as well as on bearing capacity for the selected pile type and pile plan. Fast design of shallow foundations Foundation dimensions can be optimized. Also the required width for strip foundations and the capacity and stability of shallow foundations can be checked. Code-based verification A complete verification report can be generated, including all steps performed during calculation. Intermediate results are available in a separate file. Standard parameters All standard parameters provided by NEN (such as soil parameters as provided by table 2.b of NEN 9997-1+C1:2012 (NEN, 2012) as well as pile type parameters) are incorporated within D-F OUNDATIONS for easy and fast selection. Deltares 1 of 280 D-F OUNDATIONS, User Manual 1.2.1 Overview of options The following is an overview of the options available in D-F OUNDATIONS: Design and verification of bearing piles according to the Dutch Eurocode 7 (EC7-NL) implemented in NEN 9997-1+C1:2012 (NEN, 2012). Design and verification of bearing piles according to the Belgian Eurocode 7 (EC7-B) (WTCB, 2010). Design of tension piles according to the Dutch Eurocode 7 (EC7-NL) implemented in NEN 9997-1+C1:2012 (NEN, 2012). Design and verification of shallow foundations according to the Dutch Eurocode 7 (EC7NL) implemented in NEN 9997-1+C1:2012 (NEN, 2012). Feasibility module DR AF 1.2.2 T All the above options include several expert options to perform calculations beyond the guidelines. For example, it is possible to define pile types not covered in these standards and guidelines, and to overrule several factors normally determined according to these standards and guidelines. The Feasibility module enables users to check the feasibility of the pile design. A prediction on the drivability of the chosen piles as well as review the experiences in similar designs can be performed using the experiences from the GeoBrain database (GeoBrain). GeoBrain was created in 2002 by GeoDelft and its project partners. GeoBrain originated as a result of the high failure risks facing the foundations branch. Currently the experiences are mainly from Dutch locations; therefore their relevancy to other locations in the world may be limited. Without a license, this module is not available. Note: For now, the feasibility options are limited to rectangular prefab piles and user defined round piles when using the model Bearing Piles (EC7-NL) and to user defined round piles only for the model Tension Piles (EC7-NL). 1.3 Limitations When working with D-F OUNDATIONS, several limitations apply. As these limitations differ from model to model, they are provided per model in the Background section. The areas of application can be found in: section 17.1 for bearing piles acc. to the Dutch Eurocode 7 (EC7-NL). section 19.1 for tension piles acc. to the Dutch Eurocode 7 (EC7-NL). section 20.1 for shallow foundations acc. to the Dutch Eurocode 7 (EC7-NL). The problem boundaries can be found in: 1.4 section 17.7.1 for bearing piles acc. to the Dutch Eurocode 7 (EC7-NL). section 19.8.1 for tension piles acc. to the Dutch Eurocode 7 (EC7-NL). section 20.6.1 for shallow foundations acc. to the Dutch Eurocode 7 (EC7-NL). Minimum System Requirements The following minimum system requirements are needed in order to run and install the D-F OUNDATIONS software, either from CD or by downloading from the Deltares website via MS Internet Explorer: Operating systems: 2 of 280 Deltares General Information Windows 2003, Windows Vista, Windows 7 – 32 bits Windows 7 – 64 bits Windows 8 Hardware specifications: 1 GHz Intel Pentium processor or equivalent 512 MB of RAM 400 MB free hard disk space SVGA video card, 1024 × 768 pixels, High colors (16 bits) CD-ROM drive Microsoft Internet Explorer version 6.0 or newer (download from www.microsoft.com) History With the introduction of the new Dutch standards in 1991, standards for foundation design were described for the first time (NEN 6740:1991 (NEN, 1991a), NEN 6743:1991 (NEN, 1991b) and NEN 6744:1991 (NEN, 1991c)). This triggered the wish to automate the calculation models within these standards in a computer program. Deltares, at that time known as GeoDelft, in cooperation with Fugro, Mos and Gemeentewerken Rotterdam took up this challenge to create the DOS-program NENGEO, module NENPAAL. This program in its first version offered the possibility to verify bearing piles according to NEN 6740:1991 (NEN, 1991a) and NEN 6743:1991 (NEN, 1991b) and was completed in 1992. DR AF 1.5 T For use of the Feasibility module an Internet connection is needed. To display the D-F OUNDATIONS Help texts properly, the Symbol TrueType font must be installed on the system. In version 2.0 design options for the module NENPAAL where added, making it a design as well as a verification tool. In version 2.1 Deltares (at that time known as GeoDelft) added the module NENSTAAL. This module offered the possibility to verify shallow foundations according to NEN 6740:1991 (NEN, 1991a) and NEN 6744:1991 (NEN, 1991c). Version 3.0 allowed parameters to be overruled in the NENPAAL module, providing more flexibility to the user of the program. MFoundation version 4.0 was introduced in 1999. This was the first Windows version of the program, renamed as MFoundation. This new name emphasized the new objectives of the program. MFoundation is positioned as a general design tool for foundations (which also allows verification) instead of primarily being a verification tool. MFoundation version 4.1 was released in 2000. This version included a new module for designing tension piles according to the so-called GeoDelft method. This method was derived from the DOS-software package MTENSION and incorporated in MFoundation as the Tension Piles (GeoDelft) model. MFoundation version 4.3 was released in March 2002. This version included a new module for designing tension piles according to the CUR Report 2001-4, ‘Design of tension piles’ (CUR, 2001). This method represents the latest insights into the design of tension piles and is incorporated in MFoundation as the tension piles model. MFoundation version 4.7 was released in December 2002. This version included a major Deltares 3 of 280 D-F OUNDATIONS, User Manual redesign of the user interface, a number of small bug fixes and a new software security model. MFoundation version 5.1 was released in January 2006. A tree view has been introduced in MFoundation’s main window, giving the user an overview of the input data and results, and fast access to data which can subsequently be easily edited. The former calculation method ‘Belgian method De Beer’ is removed in this version. It will be replaced by a new model (‘Van Impe / De Beer’) that will be fully compliant with the new Belgian Standard. The Tension Piles – GeoDelft model is now replaced by the Tension Piles (CUR) model. T MFoundation version 6.1 was released in March 2007. The Bearing Piles (NEN) model is designed according to NEN 6743-1:2006 (NEN, 2006) and the Shallow Foundations model according to NEN 6744:2007 (NEN, 2007). The calculation model ‘Belgian method De Beer’ is available. The pile selection has been improved to avoid impossible combinations between shape and type. MFoundation version 6.3 was released in October 2008. The calculation model ‘Belgian method’ has been adapted according to the latest specification of the Belgian Eurocode 7 (WTCB, 2008). DR AF MFoundation version 6.4 was released in April 2010. A new module E-Consult has been added enabling to check the feasibility of the pile design. A prediction on the drivability of the chosen piles as well as a review of the experiences in similar designs can be performed using the experiences from the GeoBrain database (GeoBrain). Also new in this version is the option to import CPTs directly from DINO database (DINO). The maximum number of measurements in a CPT-file has been increased from 5000 to 25000. MFoundation version 7.1 was released in June 2010. Eurocode is actively implemented in Europe on April 2010. In the Netherlands, Eurocode 7 (for geotechnical practice and design) has been implemented in NEN 9997-1:2009 [Lit 13]. The MFoundation version 7.1 has been furthermore updated to accommodate this. The pile models (bearing and tension) and shallow foundation can now be calculated and evaluated based on the Netherlands Eurocode 7 (EC7NL). There is however no update for the current Belgian pile model for bearing piles (EC7-B). D-F OUNDATIONS version 8.1 was released end of 2010. The name of the program has changed: D-F OUNDATIONS replaces MFoundation. Moreover, the Belgian pile model for bearing piles (EC7-B) has been updated according to the latest specification of the Belgian Eurocode 7 (WTCB, 2010). D-F OUNDATIONS version 8.2 was released end of 2012. This version incorporates all changes due to the release of the latest Euro code NEN 9997-1+C1:2012 (April 2012) (NEN, 2012). The most important change is the one to the pile class factors for the models Bearing Piles (EC7-NL) and Tension Piles (EC7-NL). Not only have the pile type categories been changed and extended (e.g. the addition of micro piles) but also some designations of the type of load settlement curves. Furthermore, the new tables for the Bearing Piles model are now also valid for the Tension Piles model, making the old separate tables for the Tension Piles obsolete. This also involves a change in the reduction of the bearing capacity due to large grain sizes for sand and clay for the Tension Piles model. It should be noted that the pile type "Prefabricated screw pile with grout" is still part of this version eventhough it is no longer mentioned in the new NEN. It is kept so users are able to recalculate their old projects using this type. It is therefore advised not to use this type in new projects. Next to the changes in the pile class factors other changes are: Bearing Piles model (EC7-NL): the safety factor for pile groups when calculating the negative skin friction is reduced from 1.4 to 1.2. 4 of 280 Deltares General Information Bearing Piles model (EC7-NL): the Young’s modulus for wood has been changed from 15.000.000 kN/m2 to 3.600.000 kN/m2 . Besides the changes in the code, also the next problems are addressed in this version: Tension Piles model (EC7-NL): the Report Selection option did not work correctly. This is fixed. All Pile Models, Design Results window: The next process led to an error: perform a design calculation,go to design results -> Tab ’Text’ ->, change upper limit (for instance) -> click in the text -> RichEdit line insertion error. This is now fixed. Bearing Piles model (EC7-NL): in some cases, the determination of the bearing capacity of open ended steel pipe piles went wrong, taking into account a wrong pile tip area. This is now fixed. T Finally, some improvements were made to the text in error messages, reports and the user interface. D-F OUNDATIONS version 14.1 (July 2014). This new version incorporates the following changes: DR AF For the Bearing Piles (EC7-NL) model: The old exception for CFA-piles for αs (use 0.01 instead of 0.006 when the cpt is made after pile installation) is no longer part of NEN-EN version 2012 and is therefore removed from the program. So now, αs = 0.006 will always be used. When using a pile with an enlarged base with improper dimensions, the program will now produce an error instead of calculation with β = −1. Trying to calculate when the top of the soil profile is below the first CPT-measurement resulted in an unexpected error. This will now give a neat error message. For Tension Piles (EC7-NL) model: Backward compatibility for reading old MFoundation files for pile types (requires conversion to new pile type definitions) is improved. The weight for hollow pile types is corrected. Note that these are now assumed to be empty. Corrected an error with the determination of the weight of a rectangular pile with enlarged base. D-F OUNDATIONS version 15.1 (April 2015). This new version incorporates the following improvements: Renaming the materials is now possible for user defined materials. Note that standard materials can not be renamed as these are used by the standard interpretation models. The number of digits in the report for the wall thickness of hollow piles is increased. The load settlement curves are now referred to by number (as in the NEN-EN itself) and no longer by the now obsolete names. For Bearing Piles (EC7-NL), the actual used ξ (ξ3 or ξ4 ) is now indicated in the In- termediate Results File (section 8.3.1.1) as well as the Report in case of Verification Calculations. For Report: Verification Complete: as single line in Report just below the ξ -values; Verification Design: in the tables per calculated depth. For Bearing Piles (EC7-NL), the determination of the neutral earth pressure coefficient K0 for the calculation of the negative skin friction is improved if OCR is not 1 (the Jacky formula is used), see section 17.5. For Shallow Foundations, it is now possible to override the partial factors (see Figure 7.14). Deltares 5 of 280 D-F OUNDATIONS, User Manual Besides, the following known bugs are solved: It is not possible any more to add boundaries/layers to the profiles graphically beyond the allowed maximum number of layers. The layer thickness for the interpretation model is now remembered for each separate profile. For Bearing Piles (EC7-NL) and Tension Piles (EC7-NL): Tables 10A and 10B for the determination of ξ3 and ξ4 delivered the wrong (but save) values when the number of CPT’s equals 10. It now returns the proper values. For Bearing Piles (EC7-NL), in the Report, the value given for αs sand/gravel was not correct in some cases (for mainly manual CPT with only a few CPT values). It is now. For Bearing Piles (EC7-NL), the value of αs clay/loam/peat given in the report is not correct in some cases (for mainly manual CPT with only a few CPT values). It is now. T For Bearing Piles (EC7-NL), two missing steel pile types (grouted steel piles) are added. For Bearing Piles (EC7-NL), the check defined by NEN 9997-1+C1:2012 art A.3.3.3 is now performed in the main Report, not only the Intermediate Report. For Shallow Foundations(EC7-NL), the Zoom limits does now work properly for rectangular foundations. For Bearing Piles (EC7-NL), the check on the foundation plan for the pile group criteria 1.6 DR AF could fail if the centre-to-centre distance of the piles is equal to 10 times the minimum pile diameter (i.e. the pile group criteria). This is solved. Definitions and Symbols The definitions and symbols used in D-F OUNDATIONS are explained in the Background section. In section 17.6, section 19.7 and section 20.5, the definitions and symbols for each model are provided. 1.7 Getting Help From the Help menu, choose the Manual option to open the User Manual of D-F OUNDATIONS in PDF format. Here help on a specific topic can be found by entering a specific word in the Find field of the PDF reader. 1.8 Getting Support Deltares Systems tools are supported by Deltares. A group of 70 people in software development ensures continuous research and development. Support is provided by the developers and if necessary by the appropriate Deltares experts. These experts can provide consultancy backup as well. If problems are encountered, the first step should be to consult the online Help at www.deltaressystems.com menu ‘Geo > Products’. Different information about the program can be found on the left-hand side of the window (Figure 1.1): In ‘FAQ’ the most frequently asked technical questions and their answers are listed; In ‘Release notes’ the differences between an old and a new version are listed; In ’Known issues’ the issues of the program are listed; 6 of 280 Deltares DR AF T General Information Figure 1.1: Deltares Systems website (www.deltaressystems.com) If the solution cannot be found there, then the problem description can be e-mailed (preferred) or faxed to the Deltares Systems support team. When sending a problem description, please add a full description of the working environment. To do this conveniently: Open the program. If possible, open a project that can illustrate the question. Choose the Support option in the Help menu. The System Info tab contains all relevant information about the system and the Deltares software. The Problem Description tab enables a description of the problem encountered to be added. Deltares 7 of 280 T D-F OUNDATIONS, User Manual DR AF Figure 1.2: Support window, Problem Description tab After clicking on the Send button, the Send Support E-Mail window opens, allowing sending the current file as an attachment. Mark or unmark the Attach current file to mail checkbox and click OK to send it. Figure 1.3: Send Support E-Mail window The problem report can also either be saved to a file or sent to a printer or PC fax. The document can be emailed to [email protected] or alternatively faxed to +31(0)88 335 8111. 1.9 Deltares Since January 1st 2008, GeoDelft together with parts of Rijkswaterstaat /DWW, RIKZ and RIZA, WL |Delft Hydraulics and a part of TNO Built Environment and Geosciences are forming the Deltares Institute, a new and independent institute for applied research and specialist advice. Founded in 1934, GeoDelft was one of the oldest and most renowned geotechnical engineering institutes of the world. As a Dutch national Grand Technological Institute (GTI), Deltares role is to obtain, generate and disseminate geotechnical know-how. The institute is an international leader in research and consultancy into the behavior of soft soils (sand clay and peat) and management of the geo-ecological consequences which arise from these activities. Again and again subsoil related uncertainties and risks appear to be the key factors in civil engineering risk management. Having the processes to manage these uncertainties makes Deltares the obvious Partner in risk management for all parties involved in the civil and environmental construction sector. Deltares teams are continually working on new mecha- 8 of 280 Deltares General Information nisms, applications and concepts to facilitate the risk management process, the most recent of which is the launch of the concept "GeoQ" into the geotechnical sector. For more information on Deltares, visit the Deltares website: www.deltares.com. 1.10 Deltares Systems On-line software (Citrix) Besides purchased software, Deltares Systems tools are available as an on-line service. The input can be created over the internet. Heavy duty calculation servers at Deltares guarantee quick analysis, while results are presented on-line. Users can view and print results as well as locally store project files. Once connected, clients are charged by the hour. For more information, please contact the Deltares Sales team: [email protected]. DR AF 1.11 T On a more practical level Deltares is active in disseminating and implementing geotechnical knowledge and experience into the civil engineering and construction sectors. It is recognized that ICT-based developments will be the basis of knowledge transfer in the next decades. Deltares Systems hosts internet-facilitated tools, of which D-F OUNDATIONS is part, and experience databases and generally applicable geotechnical software for the calculation of slope stability, settlement, groundwater flow and other phenomena. For more information about geotechnical softwares, including download options, visit www.deltaressystems.com. Deltares 9 of 280 DR AF T D-F OUNDATIONS, User Manual 10 of 280 Deltares 2 Getting Started This chapter section aims to familiarize the user with the structure and user interface of D-F OUNDATIONS. The Tutorial section (chapter 10 to chapter 16) uses a selection of case studies to introduce the program’s functions. 2.1 Starting D-Foundations DR AF T To start D-F OUNDATIONS, click Start and then find D-Foundations under Programs on the Windows menu bar, or double-click a D-F OUNDATIONS input file that was generated during a previous session.For a D-F OUNDATIONS installation based on floating licenses, the Modules window may appear at start-up (Figure 2.1). Check that the correct modules are selected and click OK. Figure 2.1: Modules window When D-F OUNDATIONS is started from the Windows menu bar, the last project that was worked on will open automatically (unless the program has been configured otherwise in the Program Options window, reached from the Tools menu) and D-F OUNDATIONS will display the main window (section 2.2). 2.2 Main Window When D-F OUNDATIONS is started, the main window is displayed (Figure 2.2). This window contains a menu bar (section 2.2.1), an icon bar (section 2.2.2), a tree view (section 2.2.3) providing easy access to all input windows, allowing project data to be edited and added quickly and efficiently, a title panel (section 2.2.4) and a status bar (section 2.2.5). The caption of the main window of D-F OUNDATIONS displays the program name, followed by the model. When a new file is created, the default model is Bearing Piles (EC7-NL) and the project name is Project1. Deltares 11 of 280 T D-F OUNDATIONS, User Manual 2.2.1 DR AF Figure 2.2: D-Foundations main window Menu bar To access a menu, click a menu name on the menu bar and select the appropriate option. Figure 2.3: D-Foundations menu bar The menu bar contains the following functions: File Project Calculation Results Feasibility Tools Window Help 12 of 280 Standard Windows options for opening and saving files as well as several options for exporting and printing the contents of various windows (section 3.1). Options for defining the project and for viewing the input file (section 3.4). Option to open the Calculation window where the calculation can be defined and started. Option to open the Report Selection window where the report content can be chosen (section 8.4). Options to evaluate the feasibility of the project using the GeoBrain database of experiences (chapter 9). Options for editing the program defaults including defining the model used to interpret CPTs (section 3.2). Default Windows options for arranging the program windows and choosing the active window. Online Help options (section 3.3). Deltares Getting Started 2.2.2 Icon bar The buttons on the icon bar can be used to quickly access frequently used functions. Figure 2.4: D-Foundations icon bar Click on the following buttons to activate the corresponding functions: Start a new D-F OUNDATIONS project with or without using the wizard. Save the input file of the current project. Print the contents of the active window. Display a print preview. T Open the input file of an existing project. DR AF Open the Project Properties window. Here various preferences can be set for viewing data. Open the Calculation window. Display the contents of online Help. Display the geo-software’s page of the Deltares Systems website: www.deltaressystems.com 2.2.3 Tree view The tree view on the left side of D-F OUNDATIONS main window can be used to navigate through all input, calculation and result windows of the program. When no project is open, the tree view has no function (Figure 2.5). Figure 2.5: D-Foundations tree view when no project is opened After a project has been opened by choosing New, New Wizard or Open from the File menu, the tree view shows an overview of all available input windows (Figure 2.6). Deltares 13 of 280 T D-F OUNDATIONS, User Manual Figure 2.6: Tree view when a (Bearing Piles EC7-NL) project is opened DR AF The available input windows of the tree view depend on the selected model: Refer to section 4.1 for Bearing Piles EC7-NL; Refer to section 5.1 for Bearing Piles EC7-B; Refer to section 6.1 for Tension Piles EC7-NL; Refer to section 7.1 for Shallow Foundations EC7-NL. Navigate through the input windows by just selecting nodes in the tree. For example, if the Materials node is selected a window opens that enables all material data to be viewed and edited. Some nodes are only present in the tree to reveal the structure of the input data. For example, the Soil node itself does not correspond to an input window. It has three sub-nodes: Materials, Profiles and Slopes (for the shallow foundations model only), that correspond to three windows that contain all soil data. For some types of input data, the tree view can be used to add or delete new items. For example, if the Types node is selected then a list of all available foundation types for the current project is given. To extend a list, right click the node containing the list (e.g. Types) and click New in the pop-up menu that appears (Figure 2.7). To delete an item from a list, right click the item in the list and click Delete in the pop-up menu that appears. Figure 2.7: The tree view may be manipulated using pop-up menus 2.2.4 Title panel This panel situated below the tree view displays the project titles, as entered in the Project Properties – Description window (section 3.5). This panel is displayed only if the corresponding checkbox in the View tab of the Program Options window (section 3.2.1) is selected. 14 of 280 Deltares Getting Started Figure 2.8: Title panel and Status bar at the bottom of the main window 2.2.5 Status bar Files *.foi *.fos D-Foundations input file (ASCII): File containing all relevant input data needed for a calculation in D-F OUNDATIONS. Settings file (ASCII): Working file with settings data. This file does not contain any information that is relevant for the calculation, but only settings that apply to the representation of the data, such as the grid size. Dump file (ASCII): Working file containing the results of a D-F OUNDATIONS calculation. This file is used on generating a report or a graphical representation of the results. Cone Penetration Test file (ASCII): Contains CPT records in the format used by previous versions of D-F OUNDATIONS. Geotechnical Exchange Format file (ASCII): GEF file Contains CPT records in the format as developed by CUR (Geotechnical exchange format for CPT-data, 1999-2004). Cone Penetration Test file (ASCII): Contains CPT records as used by NENGEO, the predecessor of D-F OUNDATIONS. Matrix Data (ASCII): Contains pile grid data. Only available when the Generate pile grid option is used. Windows Meta File WMF file(binary): Export file for images, for instance containing the image of the current Top View Foundation window within an added picture frame. Files of this type can be used to import the image into applications such as Microsoft Word. Drawing Exchange Format file DXF file(ASCII): Export file, containing the image of the current top View Foundation window within an added picture frame. Files of this type can be used to import the image into applications such as AutoCAD. Pile Type Library file (ASCII): Import/Export file, containing the definition of pile types.FOP-files may be used to create a pile type database, which enables users to reuse pile type information in different projects. Adobe PDF-files: Export file for reports. Rich text format\-files Export file for reports. DR AF 2.3 T This bar situated at the bottom of the main window displays a description of the selected icon of the icon bar (section 2.2.2) or button of the current window. This bar is displayed only if the corresponding checkbox in the View tab of the Program Options window (section 3.2.1) is selected. *.fod *.cpt *.gef *.son *.fmd *.wmf *.dxf *.fop *.pdf *.rtf Deltares 15 of 280 D-F OUNDATIONS, User Manual *.html HTML-files Export file for reports and import file for the Flemish DOV database. DOV database ASCII-text-files Export file for reports. *.txt 2.4 2.4.1 Tips and Tricks Keyboard shortcuts T Keyboard shortcuts given in Table 2.1 are another way to reach the features of D-F OUNDATIONS directly without selecting it from the bar menu. These shortcuts are also indicated in the corresponding sub-menus. Table 2.1: Keyboard shortcuts for D-Foundations 2.4.2 Opened window New New Wizard Open Save Save As Print Report Model Start Calculation DR AF Keyboard shortcut Ctrl + N Ctrl + W Ctrl + O Ctrl + S F12 Ctrl + P Ctrl + M F9 Exporting figures and reports All figures in D-F OUNDATIONS such as top view and graphical output can be exported in WMF (Windows Meta Files) format. In the File menu, select the option Export Active Window to save the figures in a file. This file can be later imported in a Word document for example or added as annex in a report. The option Copy Active Window to Clipboard from the File menu can also be used to copy directly the figure in a Word document. The report can be entirely exported as PDF (Portable Document Format) or RTF (Rich Text Format) file. To look at a PDF file Adobe Reader can be used. A RTF file can be opened and edited with word processors like MS Word. Before exporting the report, a selection of the relevant parts can be done with the option Report Selection (section 8.4.2). 2.4.3 Copying part of a table It is possible to select and then copy part of a table in another document (an Excel sheet for example). If the cursor is placed on the left-hand side of a cell of the table, the cursor changes in an arrow which points from bottom left to top right. Select a specific area by using the mouse (see a) in Figure 2.9). Then, using the copy button (or ctrl+C) this area can be copied. 16 of 280 Deltares a) b) c) d) T Getting Started DR AF Figure 2.9: Selection of different parts of a table using the arrow cursor To select a row, click on the cell before the row number (see b) in Figure 2.9). To select a column, click on the top cell of the column (see c) in Figure 2.9). To select the complete table, click on the top left cell (see d) in Figure 2.9). In some tables the buttons Cut, Copy, and Paste Deltares are also present at the left hand. 17 of 280 DR AF T D-F OUNDATIONS, User Manual 18 of 280 Deltares 3 General This chapter contains a detailed description of the available menu options for inputting data for a project, and for calculating and viewing the results. The examples in the Tutorial section (chapter 10 to chapter 16) provide a convenient starting point for familiarization with the program. 3.1 File menu Besides the familiar Windows options for opening and saving files, the File menu contains a number of options specific to D-F OUNDATIONS: New Wizard 3.2 DR AF T Use this option to create a new project quickly. D-F OUNDATIONS takes the user through the required input windows: first the Model window (section 3.4.1) to select the model and then the Import CPTs from file window to create a soil profile. D-F OUNDATIONS will automatically generate four square piles with width 220, 250, 290 and 320 mm and with a pile type depending on the model: – For Bearing Piles (EC7-NL) model, prefabricated concrete pile; – For Bearing Piles (EC7-B) model, precast concrete pile; – For Tension Piles (EC7-NL) model, driven straight-sided precast concrete pile. D-F OUNDATIONS will also add a single pile in the pile plan, with the horizontal co-ordinates of the CPT shifted with 5 m and a Pile head level equal to the ground level. Export Active Window Use this option to export the contents of the active window as a Windows Meta File (*.wmf) for pictures and as text file (*.txt) for the input file. Export Report Use this option to export the report, that results from a calculation, in Portable Document Format (*.pdf), Rich Text Format (*.rtf), HTML (*.htm or *.html) or ASCII text format (*.txt). Page Setup Use this option to define the way plots and reports should be printed. Here the printer, paper size, orientation and margins can be defined. For plots, it can also be specified whether and where axes are required. Click Autofit to let the program define the best fit for data on the page. Print Preview Active Window Use this option to display a preview of the printout of the current contents of some of the input windows (such as Top View Foundation and Excavation window). Print Active Window Print the current contents of some of the input windows (such as Top View Foundation and Excavation window). Print Preview Report Use this option to display a preview of the printout of the current contents of Report window. Print Report Print the current contents of the Report window. Tools menu Deltares 19 of 280 D-F OUNDATIONS, User Manual Program Options On the menu bar, click Tools and then choose Program Options to open the corresponding input window. The various tabs in this window allow the default settings for D-F OUNDATIONS to be specified. When working with a network version of D-F OUNDATIONS using Flex LM, this window allows the users to select the modules they wish to use for their current session. T Program Options – View DR AF 3.2.1 Figure 3.1: Program Options window, View tab Select or deselect the check boxes to indicate whether the toolbar, status bar or title panel should be displayed each time D-F OUNDATIONS is started. Program Options – General Figure 3.2: Program Options window, General tab 20 of 280 Deltares General Save on Calculation DR AF Use Enter key to Click one of these toggle buttons to determine whether a project should be opened or initiated when the program is started. No project: Each time D-F OUNDATIONS is started, the buttons in the toolbar or the options in the File menu must be used to open an existing project or to start a new one. Last used project: Each time D-F OUNDATIONS is started, the last project that was worked on is opened automatically. New project: Each time D-F OUNDATIONS is started, a new project is created ready for fresh input information. Note that this option is ignored when the program is started by doubleclicking an input file. The toggle buttons determine how input data is saved prior to calculation. The input data can either be saved automatically, using the same file name each time, or a file name can be specified each time the data is saved. Always Save: Previously saved project data will be overwritten. Always Save As: The ’Save As’ window will be displayed. This allows saving the project data with a file name. In this way, previously saved project data will NOT be overwritten. The toggle buttons allow the way the Enter key is used in the program: either as an equivalent of pressing the default button (Windows-style) or to shift the focus to the next item in a window (for users accustomed to the DOS version(s) of the program). To use the Feasibility module, the user has to enter an identification name under User ID and a Password. Both will be provided by Deltares Systems only for users with a license including the use of the Feasibility module. Please contact the support team at [email protected] to get them. T Start-up with Feasibility Program Options – Directories Figure 3.3: Program Options window, Directories tab Working directory Deltares Either mark the checkbox to automatically make the last used directory the working directory, or unmark the checkbox and specify a default path for the working directory, which will be set automatically when D-F OUNDATIONS is started. 21 of 280 D-F OUNDATIONS, User Manual T Program Options – Language DR AF Figure 3.4: Program Options window, Language tab Select the language to be used in the D-F OUNDATIONS windows and on printouts. Interface language Output language The only interface language supported is English. This drop-down box is provided for compliance with other Deltares Systems programs. The number of interface languages may be extended in the future. Two output languages are supported, English and Dutch. The output language is used in all results (text or graphs) that are printed on paper. Note that the output settings do not apply to the intermediate results file, which is available in Dutch only. The number of output languages may be extended in the future. Program Options – Modules Figure 3.5: Program Options window, Modules tab This tab provides an overview of the modules for D-F OUNDATIONS. The functionality of this tab 22 of 280 Deltares General depends on the type of license: Display only. Unavailable modules (modules for which the user does not have a license) are shown grayed with the checkbox unchecked, available modules are shown as regular text. This tab can be used to select the available module(s) required for the current session. Unavailable modules, modules for which the user does not have a license or modules, for which all licenses are in use, are shown grayed with the checkbox unchecked. Available modules are shown as regular text with a selectable checkbox. By checking a module, this module becomes available after the dialog window has been closed and the module has been successfully checked out by the license manager (Flex LM). T Dongle (Single User versions), License Files Flex LM (Network versions) The checkbox Show at start program can be used to cause the module selection window to appear each time the program is started. DR AF Program Options – CPT Interpretation Figure 3.6: Program Options window, CPT Interpretation tab Automatic copy of interpretation to profile Deltares Mark this checkbox to interpret the CPT automatically after import. If the checkbox is unmarked press the Transform the interpreted CPT into a profile button in the Profile window to interpret the CPT manually. 23 of 280 D-F OUNDATIONS, User Manual CPT interpretation model On the menu bar, click the CPT Interpretation Model in the Tools menu, to open the CPT Interpretation Model window. This window displays the definition of standard CPT interpretation models and also enables the definition of a user-defined interpretation model using a set of so-called rules. Each rule describes a certain soil type by defining the relationship between the CPT resistance and the Friction Ratio. These relationships are also displayed in a graph. The friction ratio is defined as the shear resistance as a percentage of the cone resistance. In the Interpretation Settings sub-window, a default model to be used to interpret newly imported CPTs can be selected. The minimum layer thickness can also be modified for the default CPT interpretation model. This minimum layer thickness setting is especially useful for avoiding insignificantly small layers. T The supported standard models are: 3-type rule. A basic model, differentiating between sand, clay and peat. CUR rule. 8 different soil types, an extension of the classification according Robertson, 1983, also printed in CUR publication 162. NEN rule. 14 different soil types, according to the Dutch standard NEN 9997-1+C1:2012. qc only rule. A special rule, using only the cone resistance (not the frictional resistance), DR AF 3.2.2 developed especially for the Belgian mechanical CPT type M4 which doesn’t provide the frictional resistance. A user-defined model can also be added as described below: To start a user-defined model from a standard template, click Copy to User Defined to copy the 3-type rule, CUR rule, NEN rule or qc only rule contents to the User Defined model. Use the Add, Insert, Delete and Rename buttons to add or delete rules. Select a rule in the Rule name sub-window, and select the corresponding soil type from those available in the material library. Define or change the Soil name and the rule that describes the soil type in the table contained in the Upper classification limit sub-window. Rules should be defined starting in the top left of the diagram and working towards the bottom right. Rules should not intersect within the limits of the diagram. Click Update Chart to redraw the lines on the chart according to the changes made. 24 of 280 Deltares DR AF T General Figure 3.7: CPT Interpretation Model window In the Interpretation settings sub-window the Selected default model and the Default minimum layer thickness options can be used to select the default interpretation model and minimum layer thickness used for interpreting all CPTs. These values can be changed for individual CPTs in the Soil – Profiles window (section 4.3.2.3, section 6.3.2.3 and section 7.2.2.3). 3.3 Help menu The Help menu allows access to different options. 3.3.1 Error Messages If errors are found in the input, no calculation can be performed and D-F OUNDATIONS opens the Error Messages window displaying more details about the error(s). Those errors must be corrected before performing a new calculation. To view those error messages, select the Error Messages option from the Help menu. They are also writing in the *.err file. They will be overwritten the next time a calculation is started. Deltares 25 of 280 D-F OUNDATIONS, User Manual 3.3.2 T Figure 3.8: Error Messages window Manual 3.3.3 DR AF Select the Manual option from the Help menu to open the User Manual of D-F OUNDATIONS in PDF format. Here help on a specific topic can be found by entering a specific word in the Find field of the PDF reader. Deltares Systems Website SelectDeltares Systems Website option from the Help menu to visit the Deltares Systems website (www.deltaressystems.com) for the latest news. 3.3.4 Support Use the Support option from the Help menu to open the Support window in which program errors can be registered. Refer to section 1.8 for a detailed description of this window. 3.3.5 About D-Foundations Use the About option from the Help menu to display the About D-Foundations window which provides software information (for example the version of the software). 3.4 Project menu Before analysis can be performed, the project data needs to be input. Which data should be entered depends on the selected calculation model (see section 3.4.1). How the data are represented graphically depends on the options selected in the Project Properties window (see section 3.4.2). 26 of 280 Deltares General 3.4.1 Model Choose Model from the Project menu to display the Model window. Project menu the calculation model, used to generate the project results, can be selected. Select the required model from: Bearing Piles (EC7-NL) Bearing Piles (EC-B) Tension Piles (EC7-NL) Shallow Foundations (EC7-NL) DR AF T Figure 3.9: Model window Each model requires specific project data. Changing the selected model for an existing project may mean that some data will need to be edited, or additional information added. When no license is available for a certain model, the name of the model will be followed by (‘demo’) in the Model window. Note: When a model has been selected for which no license is available, the program will automatically switch to the demonstration mode. This is indicated by the ‘DEMO VERSION’ banner at the right top hand side of the program. In this mode, calculations can not be performed and files can not be saved. 3.4.2 Project Properties Choose Properties from the Project menu to display the window where the elements to be displayed in the graphical representation of input and output data can be selected. The window contains three tabs: Top View Foundation Load Settlement Curve View CPT / Profile Mark the Save as default checkbox to apply the specified settings every time D-F OUNDATIONS is used. Deltares 27 of 280 D-F OUNDATIONS, User Manual Project Properties – Top View Foundation T Figure 3.10: Project Properties window, Top View Foundation tab This window contains the following checkboxes relevant to the Top View Foundation window (to view this window select the title in the tree view on the left): Enable this checkbox to display the pile numbers/pile titles in the Top View Foundation window. Enable this checkbox to display the titles of the CPTs. Enable this checkbox to show the rulers at the top and side of the window. Enable this checkbox to use the large cross-hair cursor. DR AF Pile numbers CPT titles Rulers Large cursor Info bar Legend Show grid Snap to grid Enable this checkbox to display the Info bar at the bottom of the window. The Info bar displays the cursor coordinates, the view mode and the ID of the selected object. Use this checkbox to display or hide the legend in the Top View Foundation window. The legend explains the symbols used in this view. Enable this checkbox to display the grid. Enable this checkbox to make objects align to the grid automatically when they are moved or positioned. Project Properties – Load Settlement Curve Figure 3.11: Project Properties window, Load Settlement Curve tab This window contains the following checkboxes relevant to the Load Settlement Curve window (to view this window select the title in the tree view on the left): Rulers 28 of 280 Enable this checkbox to show the rulers at the top and side of the window. Deltares General Large cursor Info bar Enable this checkbox to use the large cross-hair cursor. Enable this checkbox to display the Info bar at the bottom of the window. The Info bar displays the cursor coordinates, the view mode and the ID of the selected object. DR AF T Project Properties – View CPT/Profile Figure 3.12: Project Properties window, View CPT/Profile tab Click the appropriate toggle button to determine which names for the soil materials will be used when viewing CPT profiles. 3.4.3 Location Map Choose Location Map from the Project menu to display the Location Map window where a picture can be imported and then visualized in the Top View Foundation window as background map. This can help the user to check and/or adjust the positions of the inputted CPTs and piles. Figure 3.13: Location Map window Background Picture Left Right Top Bottom Select the picture (in format JPG, JPEG, BMP, EMF or WMF) to be used as background map. Enter the X-coordinate of the map left side. Enter the X-coordinate of the map right side. Enter the Y-coordinate of the map top side. Enter the Y-coordinate of the map bottom side. When clicking OK in the Location Map window, the Top View Foundation window automati- Deltares 29 of 280 D-F OUNDATIONS, User Manual T cally opens (Figure 3.14) displaying the background map (of the Netherlands in this case). 3.4.4 DR AF Figure 3.14: Top View Foundation window showing the Netherlands map as background picture View Input File On the menu bar, click Project and then choose View Input File to display an overview of the input data. The data will be displayed in the D-F OUNDATIONS main window. Click Print Active Window in the File menu to print the displayed file. 3.5 Project Description Before starting a calculation with D-F OUNDATIONS, data that describe and identify the project can be entered. These data do not affect the results of the calculation, but may be very useful when displayed in output reports and plots. The input window containing the relevant input fields may be opened by selecting the Project Properties – Description node in the input tree. Figure 3.15: Project Properties – Description window 30 of 280 Deltares General In this window the following information can be entered: Title 3 Date Drawn by DR AF Project ID Annex ID Geotechnical consultant / Design engineer superstructure / Principal Use Title 1 to give the calculation a unique, easily recognizable name. Title 2 can be added to give more specific characteristics of the calculation. Contains the name of the project file after saving the calculation. The user is prompted to enter a name for the project file when saving a calculation, if it has not already been saved. All three titles will be included on printed output. Enter the date to be used on all printouts. This can either be a fixed date entered in the dialog box (e.g. the start date of the project) or the current date, enabled by selecting the Use current date checkbox. Enter the name of the person who has performed the calculation or initiated the printout. Enter the project ID. Specify the annex number of the printout. In these fields the names of the principal people or parties involved in the project can be entered. If entered, these names will be included in the report that can be printed by D-F OUNDATIONS. Enter the location of the project. If entered, this data will be included in the report. T Title 1 Title 2 Location Deltares 31 of 280 DR AF T D-F OUNDATIONS, User Manual 32 of 280 Deltares 4 Bearing Piles (EC7-NL) – Input & Calculations Two types of data are required to perform a calculation using D-F OUNDATIONS: Firstly, data needs to be input in order to determine the soil behavior. This data includes CPTs with their corresponding soil profiles, including the ground water level, the expected ground level settlement and so on. This data is entered in the windows that appear when selecting the sub-nodes below the Soil node in the tree view. Secondly, data is required to specify the construction (of the foundation), e.g. pile type, pile dimensions, pile plan and so on. The relevant options can be found in the windows that appear when selecting the sub-nodes below the Foundation node in the tree view. Tree view DR AF 4.1 T When the project includes an excavation, data concerning this excavation must be entered at the Excavation node in the tree view. Before calculating the project design, a number of options can be specified that will apply to all piles in the window that appears when the Calculation node is selected in the tree view. Figure 4.1: Main window for the Bearing Piles (EC7-NL) model For the Bearing Piles (EC7-NL) model, the tree view contains the following nodes and subnodes: Project Properties / Description Project Properties / Construction Sequence Soil / Materials Soil / Profiles Foundation / Pile Types Foundations / Pile Properties Deltares Use this option to describe and identify the project. Use this option to specify the execution time of CPTs relative to the pile installation. This information is needed to determine whether the problem qualifies for certain exceptions made in NEN 99971+C1:2012. Use this option to enter the soil material properties. Use this option to enter and view a soil profile for each CPT, as well as to enter additional data related to the CPT. Use this option to enter the required pile types. The pile type can be specified, and its dimensions entered. Use this option to define the pile plan. Apart from the pile positions, the pile head level, a superimposed load next to the pile (if required) and the pile load are entered here. This data can be entered for each pile separately or a grid of piles can be generated at once. 33 of 280 D-F OUNDATIONS, User Manual Calculation Results / LoadSettlement Curve Results / Design Report 4.2 DR AF Results / Intermediate Use this option to display a graphic representation of entered piles and CPTs. Use this option to specify the excavation level along with some additional parameters related to the effect of an excavation. Use this option to specify the calculation settings and verification requirements, and to execute the actual calculation. Use this option to view the load-settlement curve. This option is available only if this curve has actually been calculated (using the verification options). Use this option to view the results of trajectory-based calculation options (Preliminary Design/‘Indication bearing capacity’ and ‘Pile tip levels and net bearing capacity’ options and Verification Bearing Piles/ ‘Design’). The results can be viewed in text format and when possible in graphic format. This option is available only if one of the above calculations has been performed. Use this option to view the intermediate results file, if there is one. Calculation results are written to this file if the Write intermediate results checkbox has been enabled in the Options sub-window of the Calculation window. Use this option to view the output file, input data, and calculation results in a report. T Foundations / Top View Foundation Excavation Construction Sequence Click on the Construction Sequence node under Project Properties in the tree view on the left of the screen. This will open the Project Properties – Construction Sequence window where the relative timing of CPTs with respect to the installation of the piles and the excavation can be specified. With this option the user can specify if D-F OUNDATIONS has to take the effect of an excavation and/or soil compaction due to pile driving into account. These two effects are reducing respectively increasing the CPT values and are dependent on the time in the construction process when the CPT is executed. Figure 4.2: Construction Sequence window for the Bearing Piles (EC7-NL) model As default value the time order CPT – Excavation – Install is used as this is the most common order in the construction process. 34 of 280 Deltares Bearing Piles (EC7-NL) – Input & Calculations 4.3 Soil In the tree view, the Soil node contains the sub-nodes Materials and Profiles, which should be selected to enter or view the corresponding input data. Materials T In the Soil – Materials window the materials and corresponding parameters for the project are entered. DR AF 4.3.1 Figure 4.3: Soil – Materials window for Bearing Piles (EC7-NL) model Note: The table, at start-up, is filled automatically with a list of materials obtained from Table 2.b of NEN 9997-1+C1:2012 and its counterpart of the Belgian Annex. The Belgian materials can be recognized by the prefix B. To make clear which materials are used in the profiles, use the Show Materials filter. To show only the materials which are used in the profiles, select Used materials only. If All is selected, all available materials are shown. There are three ways to fill in the soil parameters: section 4.3.1.1 Adding a ‘standard’ material (including its soil parameters) from Table 2.b as defined in NEN 9997-1+C1:2012 or its counterpart as defined in the Belgian Annex; section 4.3.1.2 Adding manually a material and its required soil parameters. section 4.3.1.3 Changing the properties of an existing material by matching them with the properties of a ‘NEN material’ (i.e. from Table 2.b of NEN 9997-1+C1:2012). Deltares 35 of 280 D-F OUNDATIONS, User Manual Materials – Add from ‘Standard’ The Add from NEN 9997-1 orAdd from Belgian Annex buttons can be used to select a ‘standard’ material (including its soil parameters) from Table 2.b as defined in NEN 99971+C1:2012 or its counterpart as defined in the Belgian Annex. T 1. To add a ‘standard’ material click the Add from 9997-1 button or Add from Belgian Annex button to open the NEN 9997-1 Table 1 window (Figure 4.4) or the Belgian Annex window (Figure 4.5). DR AF 4.3.1.1 Figure 4.4: NEN 9997-1 Table 1 (Table 2.b NEN 9997-1+C1:2012) window for Bearing Piles (EC7-NL) model Figure 4.5: Belgian Annex window for Bearing Piles (EC7-NL) model 2. Select the required soil and then click OK to return to the Soil – Materials window where 36 of 280 Deltares Bearing Piles (EC7-NL) – Input & Calculations the information for the selected soil will have been filled in. 3. To select and add more than one soil at the time, use the Shift or Control key when selecting. T Note: The NEN 9997-1 Table 1 and Belgian Annex windows display either the high or the low values according to the influence of the parameters. For example, for both Bearing Piles models, the soil weight has a negative influence so the high values must be chosen whereas for Tension Piles (NEN-EN 9997-1) and Shallow Foundations models, the soil weight has a beneficial effect on the bearing/tension capacity so the low values much be chosen. The program will for each calculation only use the materials as selected in the Materials window. It will never take values from the standard tables directly. So the user must make sure the proper values have been selected. For instance, when first performing a Bearing Piles (EC7NL) calculation (with ’high’ values), the user should adapt the values before performing a Tension Piles (EC7-NL) calculation by clicking the button in the Soil – Materials window. 4.3.1.2 DR AF Note: Only the parameter D50 (Median) (required for the soil types Gravel and Sand) must always be provided by the user. D-F OUNDATIONS provides a default D50 , but if the soil is coarse grained then the correct value will need to be input for correct calculation. Materials – Add manually and Delete row buttons can be used to help build the table The Insert row , Add row of data. To enter or modify soil information manually, enter the following information in the Soil – Materials window: Color Soil name Soil type Gammaunsat Gamma-sat Friction angle (phi) d50 (median) Deltares The color of a material may be changed by clicking on the colored cell and selecting one of the pre-defined basic colors or custom-creating a color in the window that opens. The name of the soil can be edited here. Select one of the available soil types from the drop-down list: Gravel, Sand, Loam, Clay or Peat. Enter the (representative) dry unit weight of the material (i.e. the unit weight of the soil when above the water level). Enter the (representative) saturated unit weight of the material (i.e. the unit weight of the soil when below the water level). Enter the (representative) angle of internal friction (phi) for the soil. This value must lie between 0 and 90 degrees. Enter the (representative) median grain size. This column only applies to the soil types Sand and Gravel. The median size of the soil can influence the value of parameter αs (NEN 9997-1+C1:2012, Table 7.c and 7.d) which is used to determine the positive skin friction. The following are the reduction factors that have been applied for several situation: For fabricated piles with closed-end toe in coarse sand of d50 > 600 µm, the reduction factor for αs is 90% if installed without vibration and 85% if installed with vibration. The reduction factor for αs in soil grain of d50 = 2 mm for all condition is 75%. For fabricated hollow piles or box piles in coarse sand of d50 > 600 µm or in clay or loam, the reduction factor for αs is 80% if installed without vibration and 70% if installed with vibration. The reduction factor for αs in soil grain of d50 = 2 mm for all condition is 50%. 37 of 280 D-F OUNDATIONS, User Manual 4.3.1.3 Materials – Match Material D-F OUNDATIONS offers the possibility to change the properties of an existing material by matching them with the properties of a material from Table 2.b of NEN 9997-1+C1:2012. DR AF T First select the material from list of the Soil – Materials window. Then click on the Match material button to open the Match Material window (Figure 4.6). D-F OUNDATIONS will propose a list (in the drop down menu) of materials from Table 2.b of NEN 9997-1+C1:2012 with the most likely soil type by matching the cohesion and the friction angle of the current material. The user can choose either to Copy the NEN parameters or to Keep the current parameters. When choosing for the first option, only the soil properties will be updated not the name of the current material. Figure 4.6: Match Material window 4.3.2 Profiles Different actions are possible in the Soil / Profiles node of the tree view: 4.3.2.1 section 4.3.2.1 Adding a profile; section 4.3.2.1 Modifying an existing profile; section 4.3.2.3 Viewing and editing the layers representation of a profile; section 4.3.2.4 Entering additional data; section 4.3.2.5 Viewing the soil profile; section 4.3.2.6 Viewing the pressures profile if available. Adding Profiles The profiles for a project are displayed as sub-nodes in the tree view, below the node Soil / Profiles. To add a profile, three options are available: Add a profile by importing a CPT from file (in CPT, GEF, HTM, HTML or SON format) through the Import CPTs from file window. Add a profile by importing a CPT from the DINO database (Data and Information of the Subsurface of The Netherlands) through the Import CPT for D-Foundations window. Create a new profile by manual input of the Top level and Material of each layer. 38 of 280 Deltares Bearing Piles (EC7-NL) – Input & Calculations Adding Profiles – Import CPTs from file To import one or more CPTs, right-click the Profiles node and select the Import item. Alternatively, if at least one profile is already present then click on the Profiles node and then select Import as the Action to be performed. Note: If there are no profiles yet imported then clicking on the Profiles node will automatically causes the Import CPTs from file window to open. DR AF T The Import CPTs from file dialog that opens allows a file that containing one or more CPTs to be selected. Figure 4.7: Import CPTs from file window Each CPT that is imported causes a new profile to be added to the list. It is possible to select more than one file at the time. A number of formats are supported: *.CPT: former D-F OUNDATIONS format, allowing to re-use CPTs used in older versions of D-F OUNDATIONS. *.GEF: Geotechnical Exchange Format, a Dutch standard, developed by CUR, to exchange geotechnical data such as CPTs. *.HTM, *.HTML: supports the import of files downloaded from the website of the Flemish database called Databank Ondergrond Vlaanderen (DOV). This website can be found at dov.vlaanderen.be. When using files from this site, be sure to read their disclaimer (button ‘Aansprakelijkheid’) first. See also the note below. *.SON: an old simple text format for the exchange of CPT-data as used by NENGEO, the predecessor of D-F OUNDATIONS. Note: In case of CPTs imported from the Flemish database (DOV), four types of CPT are distinguished: electrical CPT type E, piezometric CPT type U and mechanical CPT type M2 and M4. Depending on the selected CPT type, the content of the Import of DOV html file window displayed is different: For electrical (E) or piezometric (U) CPT (Figure 4.8): a graphic representations of the cone resistance qc (conusweerstand), the friction fs (wrijving) and the percentage Deltares 39 of 280 D-F OUNDATIONS, User Manual DR AF T of friction Rf (wrijvingsgetal) are displayed at the left part of the Import of DOV html file window. For mechanical CPT type M2 (Figure 4.9): a graphic representations of the cone resistance qc (conusweerstand), the friction fs (wrijving) and the percentage of friction Rf (wrijvingsgetal) are displayed at the left part of the Import of DOV html file window. For mechanical CPT type M4 (Figure 4.10): a graphic representation of the cone resistance qc (conusweerstand) only is displayed as the mechanical CPT-M4 doesn’t measure the frictional resistance. As for CPT type M2, conversion factors are used to convert the mechanical measured qc -values into equivalent electronic qc -values. Figure 4.8: Import of DOV html file window for electrical (E) or piezometric (U) CPT 40 of 280 Deltares DR AF T Bearing Piles (EC7-NL) – Input & Calculations Figure 4.9: Import of DOV html file window for mechanical CPT type M2 Level top tertiary clay Conversion factors Deltares Enter the top level of the Level top tertiary clay. NOTE: This level is available from the DOV database under isohypses. Enter the conversion factor η (Etta) used to convert the mechanical measured qc values (qc;meas ) into equivalent electronic qc-values (qc;eq ) as used in D-F OUNDATIONS (qc;eq = qc;meas / η ). This conversion factor Etta has different values depending if the soil is a tertiary clay (Etta, Tertiary clay) or not (Etta, Other soil). See Table 21.2 in section 21.4 for the values prescribed in the Belgian Annex of Eurocode 7. 41 of 280 DR AF T D-F OUNDATIONS, User Manual Figure 4.10: Import of DOV html file window for mechanical CPT type M4 Note: New profiles can be added at all times by choosing the Profiles node in the tree view. When there are no profiles available, just cancel the import dialog that pops up. Otherwise, the New option is directly available. Adding Profiles – Import from DINO To import one or more CPTs from the DINO database, right-click the Profiles nodes and select the Import from DINO item. Alternatively, if at least one profile is already present then click on the Profiles node and then select Import from DINO as the Action to be performed. Note: If there are no profiles yet imported then clicking on the Profiles node will automatically causes the Import CPTs from file window to open. Just cancel this window that pops up and choose the Import from DINO option. The Import CPT for D-Foundations window that opens (Figure 4.11) allows searching CPTs from the Google by zooming in to the location of the project. Refer to DINO for more information on the DINO database. 42 of 280 Deltares DR AF T Bearing Piles (EC7-NL) – Input & Calculations Figure 4.11: Import CPT for D-Foundations window Click this button to display a map view including city, street and motorway names and representation. Click this button to display a satellite view. Click this button to display a combination of the Map and Satellite views. Zoom in: Click this button to enlarge the map. Zoom out: Click this button to reduce the map. Minimum length of CPTs Pan: Click this button to move the map by dragging the mouse. Enter a minimum length for the CPTs displayed on the map. Zooming in to the desired location will display the CPTs as separate points (Figure 4.12). Just click on it to add a CPT in the Soil / Profiles node of the tree view. Deltares 43 of 280 DR AF T D-F OUNDATIONS, User Manual Figure 4.12: Import CPT for D-Foundations window after zoom in Rotterdam Adding Profiles – New To create an ‘empty’ new profile at the start of a project, cancel the Import CPTs from file dialog and choose New from the actions on the Soil - Profiles window. This creates an ‘empty’ CPT with an ‘empty’ Profile. In fact, a CPT is created with a qc -value of 0.01 at only two levels (0 m and -20 m). The belonging Profile has only layer (from 0 m to -20 m) with Undetermined as material (Figure 4.13). Figure 4.13: Soil – Profiles – New CPT window showing ‘empty’ profile There are two ways to input new layers in the ‘empty’ new profile: 44 of 280 Deltares Bearing Piles (EC7-NL) – Input & Calculations Manual input of the layers: In the Layers tab of the Soil - Profiles window, add layers manually using the Add row, Insert row and/or Delete row buttons. For each created layer, enter its Top level and select the corresponding Material from the drop-down list (Figure 4.13) containing the soil materials previously defined in the Soil - Materials window (section 4.3.1): those Materials can either be added from ‘Standard’ or added manually. Manual input of the CPT-values (only in case the CPT-values are known but not available in one of the following file formats: CPT, GEF, HTM, HTML or SON): To edit the CPT-values, select the added node in the tree view. Then right-click the node and choose Edit CPT Values. This opens the Edit CPT Values window, allowing editing the actual CPT-values as explained in section 4.3.2.1. Then refer to section 4.3.2.3 for the interpretation of those CPT-values into a soil profile. 4.3.2.2 DR AF T Note: Keep in mind that when working with an inaccurate CPT (which is usually the case in manually added CPTs) this can influence the accuracy of the calculations too. When working with an excavation, the CPT-values need to be reduced due to the excavation. With exception of the manual method, this reduction is a non linear process. When CPTs contain values at only a few depths, the reduction will be calculated less accurate. However, as the reduction is larger with inaccurate CPTs this is a safe approach. But remember that with a real CPT, a better result can be obtained. Options for existing profiles When right-clicking the node of an existing profile (Figure 4.14), different options are available: Figure 4.14: Soil / Profiles node, menu Delete to delete the selected profile; Rename to modify its name; Copy to create a copy of this profile: the entire profile will be copied including the CPTvalues, the layers and the additional data; Edit CPT Values to edit the CPT-values (Figure 4.15) and eventually modify the actual CPT-values; Deltares 45 of 280 T D-F OUNDATIONS, User Manual Figure 4.15: Edit CPT Values window Editing Layers DR AF 4.3.2.3 To view a graphic representation of a CPT, corresponding to its profile, select the corresponding sub-node under the Soil / Profiles node in the tree view. The Layers tab of the Soil – Profiles window opens. The red line in the graph corresponds to the qc value, and the blue line corresponds to the friction. On the right side of the plotted CPT, a soil layer interpretation is drawn. D-F OUNDATIONS automatically interprets all imported CPTs, based on the interpretation rule that is selected by the user in the CPT Rule selection box below the graph. To use the proposed soil layer interpretation, click the button to transport the interpretation into a profile to be used in the project. Note: If during the interpretation of a CPT, the point corresponding to the cone resistance and the friction ratio of a layer is situated outside the limits of the diagram of the selected rule (i.e. Figure 3.7 in section 3.2.2), the program will assign an Undetermined material to this layer with unrealistic properties. That’s why the user must always review the automatic interpretation of the CPT before performing a calculation. In such case, the user must select himself the appropriate material from the drop-down list of available materials using its expertise. 46 of 280 Deltares DR AF T Bearing Piles (EC7-NL) – Input & Calculations Figure 4.16: Soil – Profiles window, Layers tab CPT Rule Min. layer thickness Coordinates Deltares Select the interpretation rule used by D-F OUNDATIONS to automatically interpret the imported CPT. Five different rules are available: The NEN rule The CUR rule The 3-type rule The qc only rule The User defined rule The qc only rule is especially useful for the interpretation of CPTs that do not contain information about the friction. Users may define their own interpretation rules by selecting the last option in the list of rules: User defined rule. Before using a user defined rule, it must have been specified in the CPT Interpretation Model window (section 3.2.2). All interpretation rules make use of one additional parameter: the minimum layer thickness, specified in the Min. layer thickness input field below the selection list. To prevent D-F OUNDATIONS from generating layers that are too thin to be significant when modeling the problem, the minimum layer thickness should be increased. As the CPT file does not always contain X and Y co-ordinates, those values can be entered in the X and Y input fields in the Coordinates sub-window. 47 of 280 D-F OUNDATIONS, User Manual A profile is presented in two ways, both graphically and in a table. The data of the profile can be entered or changed in two ways: by editing data in the table by graphically editing the picture in the middle of the window. Tabular input can be realized by editing the table on the right hand side of the input window. Use the Insert , Add and Delete buttons next to the table to add or remove layers in the profile. The table allows the following changes: The top level of each soil layer can be edited manually. Materials can be selected from the list of soil layers that were entered in the Soil - Materials window. T Top Level Material 4.3.2.4 DR AF Soil layers can be added to the profile by clicking the Add boundary button and clicking anywhere in the graphic representation of the profile to add a layer below that level. Layer boundaries can be changed dragging them upwards or downwards using the mouse. While dragging, the level is indicated in a panel below the button bar and the table is updated continuously. Additional Data Figure 4.17: Soil – Profiles window, Additional Data tab for Bearing Piles (EC7-NL) model Under the Additional Data tab, the following information may be entered: Phreatic level 48 of 280 This value specifies the dividing level between the dry soil (above the phreatic level) and the wet soil (below the phreatic level). The default value used by D-F OUNDATIONS corresponds to the ground level of the imported CPT file (GEF, CPT, DOV or SON) lowered by 0.5 m. Deltares Bearing Piles (EC7-NL) – Input & Calculations DR AF Overconsolidation ratio of bearing layer Although desirable, it usually turns out that the application of a single pile tip level within a project is not realistic. Variations in the level of the bearing layer found in the CPTs force the constructor to apply several pile tip levels. In the bearing piles model the required pile tip level can be specified separately for each CPT. The Preliminary Design, Indication bearing capacity (section 4.6.2.1), the Preliminary Design, Pile tip levels and net bearing capacity (section 4.6.2.3) and the Verification, Design calculation (section 4.6.3.1) calculation options of D-F OUNDATIONS suppress the specified Pile tip level and instead performs a series of calculations over a range of levels defined under Trajectory in the Calculation window. The other calculation options (section 4.6.2.2) (section 4.6.3.2) use just the pile tip level specified here in the Additional Data tab of the Soil – Profiles window. As default value, D-F OUNDATIONS uses the depth of the CPT point with the maximum cone resistance raised by 0.8 m in order to get enough CPT values below the pile tip for CPT interpretation. The over-consolidation ratio (OCR) of the bearing layer is normally caused by historic loads that were applied to this layer over a long period of time. According to article 7.6.2.3(j) of NEN 9997-1+C1:2012, the maximum pile tip resistance should be reduced due to overconsolidation with theq formula: T Pile tip level qc;z;N C = qc;z;OC × Top of positive skin friction zone Bottom of negative skin friction zone Deltares 1 OCR D-F OUNDATIONS uses 1 default value. Enter the level of the top of the positive skin friction zone. (The bottom of the zone coincides with the pile tip level.) For a pre-fabricated pile with a widened tip the top of the zone may never be positioned above the widening (NEN 9997-1+C1:2012 art. 7.6.2.3(c)). Because there is a strong relation between skin friction and the soil layer profile, the skin friction zones are constructed from complete layers. If the top of the positive skin friction zone does not coincide with a layer boundary, D-F OUNDATIONS automatically creates a dummy layer to force this condition (section 17.7.3). D-F OUNDATIONS uses the pile tip level as default value. Enter the level of the bottom of the negative skin friction zone. (The top of the zone coincides with the surface or excavation level.) Because there is a strong relation between skin friction and the soil layer set-up, the skin friction zones are constructed from complete layers. If the bottom of the negative skin friction zone does not coincide with a layer boundary, D-F OUNDATIONS automatically creates a dummy layer to force this condition (section 17.7.3). D-F OUNDATIONS uses the surface level as default value. 49 of 280 D-F OUNDATIONS, User Manual Copy From. . . 4.3.2.5 DR AF Copy To. . . The expected ground level settlement determines how negative skin friction should be incorporated in the calculations (NEN 99971+C1:2012 art. 7.3.2.2(a)). When the expected settlement is at most 0.02 m, negative skin friction is negligible and will not be considered at all. For values ranging from 0.02 m up to and including 0.10 m, the effect of negative skin friction is directly incorporated into the calculated pile settlement by adding half of the expected ground level settlement to the total pile settlement. For values above 0.10 m, the maximum forces due to negative skin friction are calculated. These forces are then used to determine the effect of negative skin friction on the pile settlement. D-F OUNDATIONS uses 0.11 m as default value in order to enforce the calculation of the maximum forces due to negative skin friction. Click this button to display the Additional Data – Copy from Profiles window. In this window select the name of one of the profiles and click OK to copy the additional data given for that CPT into the fields for this profile. Click this button to display the Additional Data – Copy to Profiles window. In this window select the names of any profiles which should have the same additional data as defined for the current profile. Click OK to copy this data to the selected profiles. T Expected ground level settlement Viewing Profiles A graphic representation of the profiles defined for a project can be viewed by clicking one of the two right most tabs in the Soil – Profiles window: The Additional Data tab (Figure 4.18) displays the CPT and, if available, the profile with data such as defined layers, material types per layer and user defined levels (Phreatic level, skin friction levels etc.). In addition to the standard qc diagram (red line in Figure 4.18), the reduced value of qc for the determination of αs (positive skin friction) is also shown (green line in Figure 4.18) when a valid zone for the positive skin friction has been defined. Note that the reduction shown here always assumes the use of a driven prefab concrete pile. The actual reduction as really used in the calculation of course will be determined by the pile type and the construction method used. The Summary Pressures tab (Figure 4.19) also displays the CPT. 50 of 280 Deltares DR AF T Bearing Piles (EC7-NL) – Input & Calculations Figure 4.18: Soil – Profiles window, Additional Data tab Use the buttons in the button bar to manipulate the view. Note: By right-clicking the mouse button in the CPT/Profile view of the Additional Data tab and selecting View Preferences, the Project Properties window opens to determine which names for the soil materials will be used in the profile view. 4.3.2.6 Summary Pressures If they are available, the Summary Pressures tab (Figure 4.19) also displays the soil pressures as derived from the data set in the Soil – Profiles window. Deltares 51 of 280 DR AF T D-F OUNDATIONS, User Manual Figure 4.19: Soil – Profiles window, Summary Pressures tab Use the buttons in the button bar to manipulate the view. Note: Those pressures are always displayed for the original profile, and the excavations and surcharges are not taken into account in this view. 4.4 Foundation In the tree view, the Foundation node contains the following sub-nodes: Pile Types Pile Properties Top View Foundation Browsing through these nodes, allows data applying to the foundation to be viewed and input. The available options are described below. 52 of 280 Deltares Bearing Piles (EC7-NL) – Input & Calculations Pile Types In the Foundation – Pile Types window (reached by clicking on the Pile Types node), types of piles can be added and their characteristics defined. T D-F OUNDATIONS is supplied with a database of pre-defined pile shapes. When one of the pre-defined shapes is selected, a drop down list of pre-defined pile types (depending on the selected shape) becomes available in the Pile type field. If one of the pre-defined types is selected, the corresponding pile type data are filled in automatically and cannot be edited. Select the pile type User defined to enter all data manually. DR AF 4.4.1 Figure 4.20: Foundation – Pile Types window for Bearing Piles (EC7-NL) model The required pile shape can be selected by clicking on the pertinent diagrammatic representation of the geometry in the panel on the left of the window (Figure 4.20). In the Dimensions sub-window at the top, the pile dimensions can be entered. The geometric parameters that are required depend on shape chosen: Deltares Rectangular pile (for piles) Enter the base width and base length of the pile. Rectangular pile with enlarged base Enter the width, length and height of the base, as well as the width and length of the shaft. Rectangular pile (for sheet piling) Enter the base width and base length of the pile. Round pile Only the diameter is required. 53 of 280 D-F OUNDATIONS, User Manual Enter the diameter at the pile tip and the increase in diameter per m pile length. Round hollow pile with closed base Enter the external diameter and the wall thickness of the pile. Round hollow pile with open base Enter the external diameter and the wall thickness of the pile. Round pile with enlarged base Enter the pile and base diameters and the height of the base. DR AF T Round tapered pile Round pile with lost tip Enter the pile and base diameters. The height of the base is automatically set to zero. Round pile with in situ formed expanded base Enter the pile and base diameters and the height of the base. H-shaped profile Enter the height and width of the H-shape, as well as the thickness of the web and of the flange. Note: These dimensions are indicated on the diagrams on the Pile shape sub-window. When the pile shape is selected, the following information can be entered: Pile type 54 of 280 Enter the pile type to be defined. D-F OUNDATIONS is supplied with a database of pre-defined pile types that can be selected from the drop down list in the Pile type field. The available list depends on the selected pile shape. NOTE: For backward compatibility reasons, the pile type "Prefabricated screw pile with grout" present in norm NEN 9997-1:2009 is still present in the program eventhough it is no longer mentioned in the latest norm NEN 9997-1+C1:2012. This pile type is kept so users are able to recalculate their old projects using this type. It is therefore advised not to use this type in new projects. NOTE: Both pile types "Straight timber pile" and "Steel section" are considered to be low vibrating even though they are driven and/or vibrated into place. This is due to their being very easily driven/vibrated into the soil and thus do not generate lots of vibration. Deltares Bearing Piles (EC7-NL) – Input & Calculations αs is the pile factor for the shaft friction. The value for the factor, according to NEN 9997-1+C1:2012, depends on the soil material for cohesive soils: For non-cohesive soils (sand, gravel) the value for αs depends on the pile type. Therefore it can be specified by selecting one of the standard pile types from the combo box. As a result the actual value for αs will be displayed in the current value box. If User defined is selected as the subtype, only the parameter value is entered; the relation of the subtype with the pile type no longer applies. This has the following consequences: The value entered for αs , valid for sand and gravel layers, will NOT be adjusted for any instance of coarse grain (NEN 9997-1+C1:2012 Table 7.c) The exception for the determination of the pile tip shape factor β cannot be met because it is impossible to determine that a cast-inplace pile with a regained steel driving tube is applied (NEN 99971+C1:2012 art. 7.6.2.3(g)). The check on ∆L (length of positive skin friction zone) when a weighted tip is applied cannot be performed because it cannot be determined that a pre-fabricated pile is used (NEN 99971+C1:2012 art. 7.6.2.3(c)). For cohesive soils (clay, peat, loam) the factor according to the standard is depth-dependent and thus has no single value. As a result the current value box displays N.A. (Not Applicable) as the value can not be shown. If User defined is selected as the subtype, only the parameter value is entered. That value can and will be displayed as current value. NOTE: According to NEN 9997-1+C1:2012 Table 7.d, this factor for ‘Very sandy loam’ is equal to the percentage of friction Rf measured by an electrical CPT, with a maximum of 0.025. As this measured parameter is not always available from the CPT data, D-F OUNDATIONS always uses the limit value of 0.025. αp is the pile factor for the pile point. As αs for sand/gravel, αp depends on the pile type for its value. Therefore it can be specified by selecting one of the standard pile types from the combo box. As a result the actual value for αp will be displayed in the current value box. Select User defined to specify another value for αp . If User defined is selected for αp , the pile factor for the pile point, then the exception for ‘continuous flight auger’ piles cannot be taken into account for the reduction of qc -values when determining qc;III;mean . The reason for this is that it cannot be determined if a continuous flight auger pile is used (NEN 9997-1+C1:2012 art. 7.6.2.3(e)). Because the Load-Settlement curves (NEN 9997-1+C1:2012, Figures 7.n and 7.o) contain only lines for three subtypes, in D-F OUNDATIONS too the choice is limited to these three subtypes: - displacement pile - continuous flight auger pile - bored pile αp T DR AF αs Load settlement curve Deltares 55 of 280 D-F OUNDATIONS, User Manual In the Material field select the material of the user defined pile. The corresponding elasticity modulus is provided automatically for concrete, steel and timber and cannot be edited. If the material "User defined" is selected then the Young’s modulus must also be entered. However, choosing the User defined value has the following consequence: For Ep;mat;d , the parameter δj;rep (NEN 9997-1+C1:2012 art. 7.3.2.2(d) and (e)) is always used as follows: δj;rep = 0.75 × ϕj;rep . This is because a User defined pile is always considered as a prefab pile. Slip layer & In the Slip layer field select a slip layer for the pile, if one is to be used. Representative The corresponding representative adhesion is provided automatically and adhesion cannot be edited, unless the value User defined is selected, in which case the required Representative adhesion should be input. Building a pile type database T Material & Young’s modulus 4.4.2 DR AF Pile type definitions created in the Foundation – Pile Types window can be saved to a FOP file by means of the Export option, reached by right clicking the Pile Types node in the tree view and selecting Export from the context menu, or left clicking on the Pile Types node and then selecting Export in the Action sub-window of the Foundation – Pile Types window. This allows a database of pile types to be built up which can be used in future projects, allowing the pile type definition with less effort and less chance of errors. Use the Import option in the same context menu to select a previously saved FOP file for the pile type currently selected. When the appropriate file has been located and opened, the pile types in the FOP-file are added as new nodes under the Pile Types node. Pile Properties Use the Foundation – Pile Properties window to define the positions of the piles and the loads for the project. There are several ways to do this, as described hereafter. Figure 4.21: Foundation – Pile Properties window for Bearing Piles (EC7-NL) model 56 of 280 Deltares Bearing Piles (EC7-NL) – Input & Calculations In this window the following information can be entered: In this box the pile position names are displayed. Each position automatically receives a number when added to the list. The name can be changed if desired. X Enter the X coordinate of the position of the center of the pile. The same coordinate system must be used as when entering the CPT coordinates. Y Enter the Y coordinate of the position of the center of the pile. The same coordinate system must be used as when entering the CPT coordinates. Pile head The pile head level is used to specify for each pile the level of the pile head level with regard to the reference level (usually NAP – the Dutch reference zero level). This allows calculation with deepened pile heads (i.e. below the ground level). If the pile head level is not entered the default level (0.00 m NAP) applies. Surcharge Here the value of a surcharge (or superimposed load) immediately next to the pile can be entered. This value needs be specified only if the load is permanent. If an excavation must also be taken into account, the surcharge is assumed to apply at excavation level. In all other cases it is assumed to apply at surface level. In the theory part of the manual, more information can be found about modeling superimposed loads (Combination of Superimposed load/Excavation, section 17.7.5). Limit state The load on the piles (Fs;d ) can be specified for both STR/GEO and serSTR/GEO viceability limit states. The values for Fs;d (STR/GEO) and Fs;d (serviceability) are derived by multiplying the representative loads of the building on Serviceability the pile foundation with the corresponding load factors which need deterlimit state mined according to NEN 9997-1+C1:2012 appendix A. Usually the calculation values to be entered here are determined by the constructor of the building. For more information on limit state STR/GEO and serviceability, see NEN 9997-1+C1:2012 art. 2.4.7 & 2.4.8. DR AF T Name Use the toolbar on the left side of this window to edit the table: Use this button to insert a row in the table. Use this button to add a row to the table. Use this button to delete a row from the table. Use this button to generate a grid of piles with the same properties (see below). Use this button to change the properties (Pile head level, Surcharge, Design values of load on pile) of all the pile positions (see below). Use this button to cut a selected part of the table. Use this button to copy a selected part of the table. Use this button to paste a selected part in the table. Click the fourth button in Pile Properties window to open a window in which a grid of pile positions can be specified. Deltares 57 of 280 T D-F OUNDATIONS, User Manual DR AF Figure 4.22: Pile Grid window for Bearing Piles (EC7-NL) model The pile properties can also be entered in the Pile Grid window. This results in the same properties for all pile positions in the grid, but, if required, these properties can later be edited individually. In the Pile Grid window the following information can be entered: Start at Centre to centre distance Number of piles Parameters Use pile grid to replace current pile positions Enter the start coordinates for the center of the bottom-left pile in the grid. The same coordinate system must be used as when entering the CPT coordinates. Enter the distance between the pile centers. Enter the number of piles in each direction. For more information see the descriptions for the Foundation – Pile Properties window above (section 4.4.2). Enable this check box to replace the existing pile positions in the project with those defined by the grid. If this check box is left empty, the positions in the pile grid will be added to the existing pile positions. Click the fifth button in Pile Properties window to open the Edit properties for all positions window (Figure 4.23) in which the Pile head level, Surcharge and Design values of load on pile of all pile positions can be edited and/or modified. If modified, the properties of all pile positions will automatically be updated in the corresponding column of the Pile Properties window (Figure 4.21). 58 of 280 Deltares Bearing Piles (EC7-NL) – Input & Calculations Figure 4.23: Edit properties for all positions window for Bearing Piles (EC7-NL) model Top View Foundation T Select Top View Foundation under the Foundation node in the tree view to display this window. Here the pile locations and types and the CPTs can be seen in plan view for a selected Pile type. In case of pile group, the collection of Middle piles (blue bullet in the Legend, see Figure 4.24) shows the piles that could possibly be part of a pile group for the determination of the negative skin friction (NEN 9997-1+C1:2012, art. 7.3.2.2(e)). The collection of Edge piles (black bullet in the Legend, see Figure 4.24) shows the rest of the piles which are not part of the pile group for the determination of the negative skin friction. DR AF 4.4.3 Figure 4.24: Foundation – Top View Foundation window for Bearing Piles (EC7-NL) model The button bar of this window allows the view to be manipulated in various ways: Deltares 59 of 280 D-F OUNDATIONS, User Manual Excavation DR AF 4.5 T Click this button to select objects using the cursor and to finish using any of the other modes described below. Click this cursor to activate the pan mode. Click and drag the view to see a different part of it. Click this button to activate the zoom-in cursor. Then click on the part which is to become the centre of the desired enlarged view. Repeat this step several times if necessary. Click this button to undo the last zoom-in step. If necessary, click several times to retrace each consecutive zoom-in step that was made. Click this button to select a rectangle for enlargement. The selected part will be enlarged to fit the window. Repeat this step several times if necessary. Click this button to measure the distance between two points. Click on one point and the distance from there to the current mouse position is displayed in the panel at the bottom of the view. Click this button to undo the last zoom step. Click this button to restore the original dimensions of the view. Click the Excavation node in the tree view to display this window. Here, one Excavation level can be entered for all soil profiles. Under Reduction of cone resistance select the method by which the cone resistance is to be reduced, in order to take the effect of the excavation into account. 60 of 280 Deltares DR AF T Bearing Piles (EC7-NL) – Input & Calculations Figure 4.25: Excavation window Manual reduction of cone resistance The reduction percentages per layer per CPT can be specified by the user by selecting Manual, selecting the relevant CPT, and then entering the reduction percentages qc Reduction for the Top Level of each soil layer. For the selected CPT the reduction will take place via: qc;red = qc × (100 − red%) 100 (4.1) Safe (NEN) reduction of cone resistance If Safe (NEN) is selected under Reduction of cone resistance, all CPTs are reduced in a very safe manner in accordance with NEN 9997-1+C1:2012 art. 7.6.2.3(k). This implies complete relaxation of the soil beneath the excavation as well as an infinite width of the excavation. Begemann reduction of cone resistance This method also reduces all CPTs at once. It takes into account the proximity of the edge of the excavation to the construction. The distance to this edge can be varied in the Distance edge pile to excavation boundary field. Note that this distance is the distance between the excavation edge and the pile(s) on the outside of the pile plan. To see the excavation, click Top View Foundation in the tree view to display the pile plan. The effect of the excavation (reduction of the cone resistance) can be viewed per CPT in the drawing on the left of the Deltares 61 of 280 D-F OUNDATIONS, User Manual Excavation window. The drawing also displays the effect in terms of stresses. The initial effective stress shows the stress without excavation. The effective stress shows the stress after excavation. 4.6 Calculations DR AF T To start a calculation, click the Calculation node in the tree view or select Start in the Calculation menu. A window opens with various options to be set and the types of calculation available. The top half of the window relates to data required for bearing pile calculations (described in section 4.6.1), whilst the bottom part of the window is related to the selection of the type of calculation to be performed (described in section 4.6.2 to section 4.6.3.2). Figure 4.26: Calculation window for Bearing Piles (EC7-NL) model 4.6.1 Options for a Bearing Piles (EC7-NL) calculation Before performing calculations on the project design, a number of options can be specified that will apply to all bearing piles. Note: Some of the options are found in the sub-window Overrule parameters. This allows certain parameters to be overruled which otherwise would be determined according to the standard (or would be calculated, in case of the negative skin friction area). The user must make sure that an overruling of parameters is allowable. These parameters must be used with the utmost caution. 62 of 280 Deltares Bearing Piles (EC7-NL) – Input & Calculations Figure 4.27: Calculation window, Options for Bearing Piles (EC7-NL) model In the top part of the window the following information can be entered: DR AF T Rigidity of Here the superstructure can be specified as either Non-rigid or Rigid acsuperstructure cording to NEN 9997-1+C1:2012 art. 7.6.1.1(c). A restriction for the schematics is that for each calculation only (parts of) buildings that can be regarded as either “completely rigid” or “completely non-rigid” can be included in one schematic. If a building is regarded as partly “rigid” and partly “non-rigid” (for instance a building with a rigid core) at least two calculations must be carried out: one for the rigid part and one for the non-rigid part. Also if a building consists of several parts that can be regarded as rigid, a calculation must be made for each part. The reason for this restriction is the impossibility of determining the relevant internal distances within the module. Therefore the internal rotations between rigid and non-rigid foundation elements cannot be calculated correctly. The choice between Rigid and Non-rigid influences the calculation in various ways: the factor ξ3 and ξ4 depends on it, as does the calculation method for the bearing capacity, settlement and rotations. Maximum The values given in NEN 9997-1+C1:2012 are provided as the default setallowed tlement demand for which verification takes place. It is possible to edit these settlement values for either of the two limit states. In case of limit state EQU/GEO, the default is an advised value whereas for serviceability limit state the default should be considered a minimum value. If the values do not match the defaults this will be explicitly mentioned in the report. Maximum The values given in NEN 9997-1+C1:2012 are provided as the default relallowed ative rotation demand for which verification takes place. It is possible to relative edit these values for either of the two limit states. In case of limit state rotation EQU/GEO, the default is an advised value whereas for serviceability limit state the default should be considered a minimum value. If the values do not match the defaults this will be explicitly mentioned in the report. ξ3 Here the value for ξ3 (the correlation factor for average value of calculated pile resistances) can be overruled. This factor depends on the rigidity of the superstructure and number of CPTs (see Tables A.10a and A.10b in NEN 9997-1+C1:2012). ξ4 Here the value for ξ4 (the correlation factor for the minimum value of calculated pile resistances) can be overruled. This factor depends on the rigidity of the superstructure and number of CPTs (see Tables A.10a and A.10b in NEN 9997-1+C1:2012). γb Here the value for γb (the partial resistance factor for pile tip) can be overruled (see Tables A.6, A.7, and A.8 in NEN 9997-1+C1:2012). γs Here the value forγs (the partial resistance factor for pile shaft in compression) can be overruled (see Tables A.6, A.7, and A.8 in NEN 99971+C1:2012). Deltares 63 of 280 D-F OUNDATIONS, User Manual Area Eea;gem DR AF Write intermediate results Use pile group Here the value for γf ;nk the safety factor for the negative skin friction, can be overruled. Normally this factor would be derived as prescribed in NEN 9997-1+C1:2012 art. 7.3.2.2(b). Here the influence area per pile, to be used within the calculation of the negative skin friction for pile groups, can be defined by the user. If this option is not used the program itself will determine the influence area. This is done by calculating the average pile distance within the pile group (Davg ) and then setting the area to Davg × Davg . Here the value for the average soil modulus can be overruled. This modulus would normally be calculated according to NEN 9997-1+C1:2012, art. 7.6.4.2(k) (i.e. mean modulus of elasticity of the soil beneath the level of 4D under the pile point). Refer to section 17.5 for more information. Intermediate results can be written to a file by selecting this checkbox. It must be born in mind that such a file can become very large. NOTE: This file is only available in Dutch. In NEN 9997-1+C1:2012 the calculation of the negative skin friction depends on whether the piles are to be considered as one (or more) pile group(s). When piles are within 5 m of each other, the piles form a pile group. Piles with no other piles within this 5 m radius are considered to be single piles. If a pile group exists, calculations for negative skin friction usually take the pile group into account. If this is not desired, disable this checkbox. The reason for this option is that, depending on the pile plan, negative skin friction calculations can take the pile group model for negative skin friction (NEN 9997-1+C1:2012, art. 7.3.2.2(e)) into account. This does not always yield favorable results, especially when the single pile model (NEN 99971+C1:2012, art. 7.3.2.2(d)) is applied and a γf ;nk value of 1.0 (single pile) instead of 1.2 (pile group) can be used for limit state GEO (NEN 99971+C1:2012, art. 7.3.2.2(b)). If this checkbox is enabled, the excavation will not be taken into account. T γf ;nk Overrule excavation Suppress qc;III reduction 64 of 280 When using continuous flight auger piles, a reduction of qc;III;gem needs to be applied. In that case the qc -values for determining qc;III;gem are limited to a maximum of 2 MPa. According to NEN 9997-1+C1:2012 art. 7.6.2.3(e), this reduction can be left out if the CPT has been carried out at a distance of 1 m from the pile, after the pile has been placed. D-F OUNDATIONS therefore contains the option to suppress this reduction. Literally speaking the reduction can only be left out if after installation a CPT is made for each pile at a distance of at most 1 m. As this interpretation is very strict and costly, the user is advised to consult the inspection regarding the required number of CPTs in order to meet this requirement. If the reduction is suppressed, this fact is explicitly mentioned in the output file. Deltares Bearing Piles (EC7-NL) – Input & Calculations Use additional Almere rule Preliminary Design for Bearing Piles (EC7-NL) D-F OUNDATIONS allows a preliminary design to be calculated. Three different preliminary design calculation types are available: DR AF 4.6.2 Due to the special nature of the soil conditions in the Dutch city of Almere, experience in making pile foundations has lead to a more strict approach to calculating these foundations. Select this checkbox to apply this approach to the project. This more strict approach consists of the following: - For the determination of the bearing capacity at the pile point level for each CPT, the maximum allowed value for qb;max is set at 12 MPa. Normally, this limit would be 15 MPa (NEN 9997-1+C1:2012, art. 7.6.2.3(e)). - The contribution of the bearing capacity, produced by the shaft friction per CPT (Rs;max;i ), to the total bearing capacity for each CPT must be limited to at most half the contribution provided by the pile point (Rb;max;i ): Rs;max;i ≤ 0.5 × Rb;max;i In a small special area of Almere, the conditions are even worse which results in a additional rule when working in this area: the total bearing capacity per CPT (Fr;max;i ) must be reduced by 25%. T Use Almere rules Indication bearing capacity outlined in section 4.6.2.1; Bearing capacity at fixed pile tip levels outlined in section 4.6.2.2; Pile tip levels and net bearing capacity outlined in section 4.6.2.3. Note: Preliminary design always considers single piles. Firstly the type of calculation can be selected. Some types require additional data. Next the CPTs and pile types to be included in the preliminary calculations are selected. Note that the order in which the items are selected determines the order of calculations. More detail about the selection process for the different preliminary design types is given in section 4.6.2.1, section 4.6.2.2 and section 4.6.2.3. Figure 4.28: Calculation window, Preliminary Design for Bearing Piles (EC7-NL) model Finally, once the calculation type and relevant parameters have been selected, click Start to begin the calculation. Note: When a calculation is started, any previous calculation results will be replaced. To retain previous results, print the results or make a copy of the project files. Alternatively, set the default action to Always Save As instead of Always Save for the Save on Calculation Deltares 65 of 280 D-F OUNDATIONS, User Manual option on the General tab in the Program Options window (Tools menu). In that case a ‘Save As’ dialog will automatically appear each time a calculation is started. Note: The nature of the calculation that has to be performed greatly influences the time needed to perform the calculation. Apart from the number of piles (when performing verification) and the number of selected CPTs and Pile types, there is another factor that has great impact upon the required calculation time: if positive friction has to be calculated, the required calculation time may increase considerably. This is especially true if the positive friction zone contains cohesive soil types (loam, clay, peat) in which case the calculation time may increase a hundredfold or more. T Note: When a Begemann reduction of cone resistance values is applied in the Excavation window (section 4.5), a pile in the middle of the excavated area (see pile 2 in Figure 4.29) will have a stronger reduction as opposed to a pile at the border of the excavation. For a Verification calculation, D-F OUNDATIONS will calculate this reduction considering the proper input. However, for a Preliminary Design calculation, only one pile is relevant in the calculation. Therefore, this will translate to: on the left of the single pile, the distance is the same as the Distance edge pile to DR AF excavation boundary inputted in the Excavation window; on the right of the single pile, D-F OUNDATIONS assumes that the distance from the edge pile to the excavation boundary is very big so the edge does not have any influence. Therefore, in the case schematized in Figure 4.29, pile 2 will have a lower (so incorrect) reduction for a Preliminary Design calculation than for a Verification calculation.To avoid this the user should make sure that, during a Preliminary Design calculation, theDistance edge pile to excavation boundary inputted in the Excavation window is the same as the real minimum distance edge pile to the excavation boundary of the single pile (called Dmin;2 in Figure 4.29). The user should also make sure that its maximum distance (called Dmax;2 in Figure 4.29) is set to a large value to simulate an endless excavation on the other side of the pile. Following this procedure, the Preliminary Design calculation is sure to give slightly lower (so safer) bearing capacities than the Verification calculation (based on the pile plan with excavation boundaries on both sides). This way, the chance is larger that the Preliminary Design calculation will pass the Verification calculation. 66 of 280 Deltares DR AF T Bearing Piles (EC7-NL) – Input & Calculations Figure 4.29: Schematization of the Begemann reduction of cone resistance for a Verification and a Preliminary Design calculation 4.6.2.1 Preliminary design: Indication bearing capacity This option is used to obtain an indication of the (net) bearing capacity in relation to different pile tip level(s). Instead of the specified pile tip levels per CPT, a pile tip trajectory is used. This trajectory is determined by means of a top and bottom limit in m above or below the reference level (usually NAP). The interval of the trajectory determines the number of calculations to be performed, with a maximum of 151. The bearing capacity is calculated at each pile tip level specified in the trajectory. When defining a trajectory the user need not take account of the specified levels of positive and negative skin friction in the Additional Data tab of the Soil - Profiles window (section 4.3.2.4). If required (for example if the top of positive skin friction zone is below the pile tip level), these levels are adjusted automatically by D-F OUNDATIONS for each calculation step. Both the top and bottom limits of the trajectory must meet a number of requirements. The top limit value (Begin) must be chosen in such a way that the minimum pile length in the ground is 5 × dmin (dmin = the smallest cross measurement of the pile tip cross section). This means the Begin value must be at least 5 × dmin below the lowest surface level, excavation level and pile head level. A Begin value above these levels means that the pile is not a pile according to NEN 9997-1+C1:2012 art. 1.5.2.127. The bottom limit value (End) must be at least 4 × Deq (Deq = equivalent diameter) above the deepest level of the shallowest CPT. Deltares 67 of 280 D-F OUNDATIONS, User Manual This requirement follows necessarily from the calculation model for the bearing capacity (Koppejan). A deeper bottom limit would make correct calculation impossible. The Interval must be chosen in such a way that a maximum of 151 calculations will be performed. If the above requirements are not met, D-F OUNDATIONS will not perform a calculation but will suggest better values to be used. The result of the preliminary calculation is the net bearing capacity (Rc;net;d ) for each CPT as a function of the pile tip level. The results are displayed in tables per pile type as well as in a graph. Rc;net;d is an inferred entity which does not appear in the standard. It is defined as: Rc;net;d = Rc;max;d − Fs;nk;d (4.2) T The calculation value of the maximum bearing capacity (Rc;max;d ) for each CPT is also an inferred value and is as such not included in the standard. In the standard the calculation value of the bearing capacity is determined for each examined foundation and not for CPTs individually. 4.6.2.2 DR AF The results for each trajectory level are presented in a table as well as in a graph. Both the table and graph can be viewed with the Design sub-node in the Results node. For more information on viewing results, refer to chapter 8. Preliminary design: Bearing capacity at fixed pile tip levels This option is used to obtain an indication of the (net) bearing capacity in relation to the pile tip level of each CPT. The result of this calculation is the maximum bearing capacity (= point resistance + shaft friction) for each CPT. The calculation value of the maximum bearing capacity (Fr;max;d ) for each CPT is an inferred value and is as such not included in the standard. In the standard the calculation value of the bearing capacity is determined for each examined foundation and not for CPTs individually. Also the correct negative skin friction is calculated for each CPT, which allows the user to determine the net bearing capacity (Rc;max;d - Fs;nk;d ) for each CPT. The results are presented in a table. The table can be viewed with the Design sub-node in the Results node. The results can also be found in the report (Report node). In the report an additional table presenting the Rc;net;d per pile type per CPT can be found. For more information on viewing results see chapter 8. 4.6.2.3 Preliminary design: Pile tip levels and net bearing capacity This option is used to obtain an indication of the required pile tip level per CPT in order to realize the desired net bearing capacity (Rc;net;d ). This desired net bearing capacity can be regarded as the desired maximum allowable calculation load on the pile in limit state STR/GEO and as such does not appear in the standard. The required pile tip level per CPT is located in a user-defined pile tip trajectory. This trajectory is specified by means of a top (Begin) and bottom (End) limit in m above/below the reference level (usually NAP in the Netherlands). The Interval of the trajectory determines the number of calculations to be performed, with a maximum of 151. Information about the requirements that must be met when defining the trajectory can be found in section 4.6.2.1. When defining a trajectory the user need not take account of the specified levels of positive and negative skin friction. If required, these levels are adjusted automatically for each calculation step. 68 of 280 Deltares Bearing Piles (EC7-NL) – Input & Calculations Together with the trajectory definition the required Net bearing capacity (Rc;net;d ) must be entered. This value is used as a stopping criterion for the calculation. As soon as a level has been detected for a CPT where the calculated net bearing capacity (Rc;net;d ) equals or exceeds the required net bearing capacity, the calculation for that CPT is aborted after which the calculated capacities are displayed. Rc;net;d is again an inferred entity which does not appear in the standard, and is defined as follows: Rc;net;d = Rc;max;d − Fs;nk;d (4.3) If within the trajectory no level is found for a CPT with the required net bearing capacity, this is marked as ’******’ in the Level column. In order to provide some idea of how large the insufficiency is, the calculated capacities for the last trajectory level are included. Verification for Bearing Piles (EC7-NL) This function provides two verification options: Design calculation and Complete calculation. The options for these calculations are outlined in section 4.6.3.1 and section 4.6.3.2 respectively. The CPTs and pile type to be used in the calculation should also be selected here. Contrary to the preliminary design options the calculations are complete and include settlements and rotations. The complete pile plan is also considered, taking care of group effects. Note that only one pile type can be used per verification. The CPT test level is used to perform a separate calculation of the bearing capacities of all CPTs at that level. These bearing capacities are then used to check the compliance with the demands as set by NEN 9997-1+C1:2012 art. 3.2.3(e) regarding the number of CPTs and their spacing. DR AF 4.6.3 T The table can be viewed with the Design sub-node in the Results node. The results can also be found in the report (Report node). In the report an additional table presenting the Rc;net;d per pile type per CPT can be found. For more information on viewing results, refer to chapter 8. Figure 4.30: Calculation window, Verification for Bearing Piles (EC7-NL) model Once all selections have been made, click Start to begin the calculation. Note: When a calculation is started, any previous calculation results will be replaced. To save previous results, print the results or make a copy of the project files. Alternatively, set the default action to Always Save As instead of Always Save for the Save on Calculation option on the General tab in the Program Options window (Tools menu). In that case a ‘Save As’ dialog will automatically appear each time a calculation is started. Note: The nature of the calculation that has to be performed greatly influences the time needed to perform the calculation. Apart from the number of piles (when performing verification) and the number of selected CPTs and Pile types, there is another factor that has great Deltares 69 of 280 D-F OUNDATIONS, User Manual impact upon the required calculation time: If positive friction has to be calculated, the required calculation time may increase considerably. This is especially true if the positive friction zone contains cohesive soil types (loam, clay, peat) in which case the calculation time may increase a hundredfold or more. Verification: Design This option allows a calculation to be performed while at the same time verification for all limit states (EQU, GEO, and serviceability) is carried out. To be able to perform such verifications, the design loads on the piles must have been specified in the sub-node Pile Properties of the Foundation node. T Instead of the specified pile tip levels per CPT, a pile tip trajectory is used. This trajectory is specified by means of a top (Begin) and bottom (End) limit in m above/below the reference level (usually NAP). The Interval of the trajectory determines the number of calculations to be performed, up to a maximum of 151. When defining a trajectory the user need not take account of the specified levels of positive and negative skin friction. If required, these levels are adjusted automatically for each calculation step. It must be born in mind, however, that the defined trajectory will be the same for all CPTs. A given pile tip level in the trajectory is used for all CPTs during the calculation step. This trajectory approach differs from the calculations performed with the Complete calculation option (section 4.6.3.2). DR AF 4.6.3.1 When interpreting the design results the user must be aware of the possible complications caused by using a pile tip trajectory for all CPTs, especially if strongly receding CPT values occur for several CPTs in the calculation area. An example would be a situation with a soft layer varying in height for each CPT. In that case there is a reasonable chance that the design calculation will indicate that no trajectory level meets the requirements. At each level the soft layer (with the corresponding low CPT values) is manifest in one of the CPTs, which will influence the calculation results negatively. The fact that a design calculation does not contain a level that meets the requirements does not mean that these requirements cannot be met at all (see Complete calculation in section 4.6.3.2). It does show, however, that it is impossible to maintain a single pile tip level for all CPTs. For more information about the requirements for the Begin and End values of the trajectory, please refer to "Indication bearing capacity" (section 4.6.2.1]. It must be noted that according to NEN 9997-1+C1:2012 art. 3.2.3(e) the End value must be at least 5 m above the deepest level of the shallowest CPT. Moreover, the same article specifies that the End value must be at least 10 × dmin above the deepest level of the deepest CPT. An End value below this level does not meet the requirements as set by the standard. When such a value is entered the output file will contain a warning that the defined trajectory does not meet the requirements as set by the standard. However, calculations based on levels that are too deep will still be carried out. The result of this calculation is the maximum bearing capacity for the foundation as a function of the pile tip level. Based on the entered loads the foundation will be checked to see if it meets the settlement and rotation requirements in both the limit states EQU/GEO and serviceability limit state. For information on viewing results see chapter 8. 70 of 280 Deltares Bearing Piles (EC7-NL) – Input & Calculations Verification: Complete This option allows a complete verification to be performed according to the NEN 9997-1+C1:2012 standard. All required calculations (bearing capacity, settlement and negative skin friction) are carried out according to these standards. For a complete verification, the user can specify a different pile tip level for each CPT and consequently a soft layer with varying height will not have the same effect as described in the section on Verification, Design calculation (section 4.6.3.1). This increases the chance that the required standard will be met. T The results are presented in the report which can be accessed by clicking the Report node. For more information about viewing results, refer to chapter 8. DR AF 4.6.3.2 Deltares 71 of 280 DR AF T D-F OUNDATIONS, User Manual 72 of 280 Deltares 5 Bearing Piles (EC7-B) – Input & Calculations Two types of data are required to perform a calculation using D-F OUNDATIONS: Firstly, data needs to be input in order to determine the soil behavior. This data includes CPTs with their corresponding soil profiles, including the ground water level and so on. This data is entered in the windows that appear when selecting the sub-nodes below the Soil node in the tree view. Secondly, data is required to specify the construction (of the foundation), e.g. pile type, pile dimensions and so on. The relevant options can be found in the windows that appear when selecting the sub-nodes below the Foundation node in the tree view. Tree view DR AF 5.1 T Before calculating the project design, a number of options can be specified that will apply to the calculation in the window that appears when the Calculation node is selected in the tree view. Figure 5.1: Main window for the Bearing Piles (EC7-B) model For the Bearing Piles (EC7-B) model, the tree view contains the following nodes and subnodes: Project Properties / Description Soil / Materials Soil / Profiles Foundation / Pile Types Foundations / Pile Properties Deltares Use this option to describe and identify the project. Use this option to enter the soil material properties. Use this option to enter and view a soil profile for each CPT, as well as to enter additional data related to the CPT. The phreatic level can be defined here too. Use this option to enter the required pile types. The pile type can be specified, and its dimensions entered. Use this option to define the pile plan. Apart from the pile position, the pile head level, a superimposed load next to the pile (if required) and the pile load are entered here. This data can (at least for now) be entered for only one pile as the Belgian Annex does not cater to pile groups. 73 of 280 D-F OUNDATIONS, User Manual Foundations / Top View Foundation Calculation Results / Design Results / Intermediate 5.2 Use this option to specify the calculation settings and verification requirements, and to execute the actual calculation. Use this option to view the results of trajectory-based design. The results can be viewed in text format and in graphic format. This option is available only if the calculation has been performed. Use this option to view the intermediate results file, if there is one. Calculation results are written to this file if the Write intermediate results checkbox has been enabled in the Options sub-window of the Calculation window. Use this option to view the output file, input data, and calculation results in a report. T Report Use this option to display a graphic representation of entered piles and CPTs. Soil 5.2.1 DR AF In the tree view, the Soil node contains the sub-nodes Materials and Profiles, which should be selected to enter or view the corresponding input data. Materials In the Soil – Materials window the materials and corresponding parameters for the project are entered. Figure 5.2: Soil – Materials window for Bearing Piles (EC7-B) model Note: The table, at start-up, is filled automatically with a list of materials obtained from Table 2.b of NEN 9997-1+C1:2012 and its counterpart of the Belgian Annex. The Belgian materials can be recognized by the prefix B. To make clear which materials are used in the profiles, use the Show Materials filter. To show only the materials which are used in the profiles, select Used materials only. If All is selected, all available materials are shown. There are three ways to fill in the soil parameters: section 5.2.1.1 Adding a ‘standard’ material (including its soil parameters) from Table 74 of 280 Deltares Bearing Piles (EC7-B) – Input & Calculations 2.b as defined in NEN 9997-1+C1:2012 or its counterpart as defined in the Belgian Annex; section 5.2.1.2 Adding manually a material and its required soil parameters. section 5.2.1.3 Changing the properties of an existing material by matching them with the properties of a ‘NEN material’ (i.e. from Table 2.b of NEN 9997-1+C1:2012). Materials – Add from ‘Standard’ The Add from NEN 9997-1 orAdd from Belgian Annex buttons can be used to select a ‘standard’ material (including its soil parameters) from Table 2.b as defined in NEN 99971+C1:2012 or its counterpart as defined in the Belgian Annex. To add a ‘standard’ material click the Add from NEN 9997-1 button or Add from Belgian T Annex button to open the NEN 9997-1 Table 1 window (Figure 5.3) or the Belgian Annex window (Figure 5.4). DR AF 5.2.1.1 Figure 5.3: NEN 9997-1 Table 1 window for Bearing Piles (EC7-B) model Deltares 75 of 280 DR AF T D-F OUNDATIONS, User Manual Figure 5.4: Belgian Annex window for Bearing Piles (EC7-B) model Select the required soil and then click OK to return to the Soil – Materials window where the information for the selected soil will have been filled in. To select and add more than one soil at the time, use the Shift or Control key when selecting. Note: The NEN 9997-1 Table 1 andBelgian Annex windows display either the high or the low values according to the influence of the parameters. For example, for both Bearing Piles models, the soil weight has a negative influence so the high values must be chosen whereas for Tension Piles (EC7-NL) and Shallow Foundations models (EC7-NL), the soil weight has a beneficial effect on the bearing/tension capacity so the low values much be chosen. The program will for each calculation only use the materials as selected in the Materials window. It will never take values from the standard tables directly. So the user must make sure the proper values have been selected. For instance, when first performing a Bearing Piles (EC7NL) calculation (with ’high’ values), the user should adapt the values before performing a Tension Piles (EC7-NL) calculation by clicking the button in the Soil – Materials window. 5.2.1.2 Materials – Add manually The Insert row , Add row and Delete row buttons can be used to help build the table of data. To enter or modify soil information manually, enter the following information in the Soil – Materials window: Color Soil name Belgian soil type 76 of 280 The color of a material may be changed by clicking on the colored cell and selecting one of the pre-defined basic colors or custom-creating a color in the window that opens. The name of the soil can be edited here. Select one of the available soil types from the drop-down list. In contrast with the standard Soil type set (Gravel, Sand, Loam, Clay or Peat), the Belgian Soil type set also contains typical Belgian types such as Tertiary Clay, Sandy Loam and Clayey Sand. Deltares Bearing Piles (EC7-B) – Input & Calculations Gamma-unsat Gamma-sat 5.2.1.3 Enter the (representative) dry unit weight of the material (i.e. the unit weight of the soil when above the water level). Enter the (representative) saturated unit weight of the material (i.e. the unit weight of the soil when below the water level). Materials – Match Material Matching a material with Table 2.b of NEN 9997-1+C1:2012 does not depend on the selected model, so refer to section 4.3.1.3 for Bearing Piles (EC7-NL). 5.2.2 Profiles 5.2.2.1 section 5.2.2.1 Adding a profile; section 5.2.2.2 Modifying an existing profile; section 5.2.2.3 Viewing and editing the layers representation of a profile; section 5.2.2.4 Entering additional data; section 5.2.2.5 Viewing the soil profile; section 5.2.2.6 Viewing the pressures profile if available. DR AF T Different actions are possible in the Soil / Profiles node of the tree view: Adding Profiles Adding a profile does not depend on the selected model, so refer to section 4.3.2.1 for Bearing Piles (EC7-NL). 5.2.2.2 Options for existing profiles Options for existing profiles are the same for all the models, so refer to section 4.3.2.2 for Bearing Piles (EC7-NL). 5.2.2.3 Editing Layers Viewing a graphic representation of a CPT, corresponding to its profile, is similar to the Bearing Piles (EC7-NL) model, so refer to section 4.3.2.3. 5.2.2.4 Additional Data Figure 5.5: Soil – Profiles window, Additional Data tab Under the Additional Data tab, the following information may be entered: Phreatic level Deltares This value specifies the dividing level between the dry soil (above the phreatic level) and the wet soil (below the phreatic level). The default value used by D-F OUNDATIONS corresponds to the ground level of the imported CPT file (GEF, CPT, DOV or SON) lowered by 0.5 m. 77 of 280 D-F OUNDATIONS, User Manual Copy From. . . 5.2.2.5 DR AF Copy To. . . Enter the level of the top of the positive skin friction zone. (The bottom of the zone coincides with the pile base level.) For a pre-fabricated pile with a widened base the top of the zone may never be positioned above the widening. Because there is a strong relation between skin friction and the soil layer profile, the skin friction zones are constructed from complete layers. If the top of the positive skin friction zone does not coincide with a layer boundary, D-F OUNDATIONS automatically creates a dummy layer to force this condition. D-F OUNDATIONS uses the pile tip level as default value. Click this button to display the Additional Data – Copy from Profiles window. In this window select the name of one of the profiles and click OK to copy the additional data given for that CPT into the fields for this profile. Click this button to display the Additional Data – Copy to Profiles window. In this window select the names of any profiles which should have the same additional data as defined for the current profile. Click OK to copy this data to the selected profiles. T Top of positive skin friction zone Viewing Profiles A graphic representation of the profiles defined for a project can be viewed by clicking one of the two right most tabs in the Soil – Profiles window: The Additional Data tab (Figure 5.6) displays the CPT and, if available, the profile with data such as defined layers, material types per layer and user defined levels (phreatic and skin friction zone levels). The standard qc diagram (red line in Figure 5.6) is also displayed. The Summary Pressures tab (Figure 5.7) also displays the CPT. Figure 5.6: Soil – Profiles window, Additional Data tab Use the buttons in the button bar to manipulate the view. 78 of 280 Deltares Bearing Piles (EC7-B) – Input & Calculations Note: By right-clicking the mouse button in the CPT/Profile view of the Additional Data tab and selecting View Preferences, the Project Properties window opens to determine which names for the soil materials will be used in the profile view. 5.2.2.6 Summary Pressures DR AF T If they are available, the Summary Pressures tab (Figure 5.7) also displays the soil pressures as derived from the data set in the Soil – Profiles window. Figure 5.7: Soil – Profiles window, Summary Pressures tab Use the buttons in the button bar to manipulate the view. Note: Those pressures are always displayed for the original profile, and the excavations and surcharges are not taken into account in this view. 5.3 Foundation In the tree view, the Foundation node contains the following sub-nodes: Pile Types Pile Properties Top View Foundation Browsing through these nodes, allows data applying to the foundation to be viewed and input. The available options are described below. Deltares 79 of 280 D-F OUNDATIONS, User Manual Pile Types In the Foundation – Pile Types window (reached by clicking on the Pile Types node), types of piles can be added and their characteristics defined. T D-F OUNDATIONS is supplied with a database of pre-defined pile shapes. When one of the pre-defined shapes is selected, a drop down list of pre-defined pile types (depending on the selected shape) becomes available in the Pile type field. If one of the pre-defined types is selected, the corresponding pile type data are filled in automatically and cannot be edited. Select the pile type User defined to enter all data manually. DR AF 5.3.1 Figure 5.8: Foundation – Pile Types window for Bearing Piles (EC7-B) model The required pile shape can be selected by clicking on the pertinent diagrammatic representation of the geometry in the panel on the left of the window (Figure 5.8). In the Dimensions sub-window at the top, the pile dimensions can be entered. The geometric parameters that are required depend on shape chosen: 80 of 280 Rectangular pile Enter the base width and base length of the pile. Rectangular pile with enlarged base Enter the width, length and height of the base, as well as the width and length of the shaft. H-shaped profile Enter the height and width of the H-shape, as well as the thickness of the web and the flange. Deltares Bearing Piles (EC7-B) – Input & Calculations Only the diameter is required. Round hollow pile with closed base Enter the external diameter and the wall thickness of the pile. Round hollow pile with opened base Enter the external diameter and the wall thickness of the pile. Round pile with enlarged base Enter the pile and base diameters and the height of the base. DR AF T Round pile Round pile with lost tip Enter the pile and base diameters. The height of the base is automatically set to zero. Round pile with in situ formed expanded base Enter the pile and base diameters and the height of the base. Round hollow pile with closed base and bottom plate Enter the pile and base diameters and the wall thickness. The height of the base is automatically set to zero. Note: These dimensions are indicated on the diagrams on the Pile shape sub-window. When the pile shape is selected, the following information can be entered: Pile type αs Deltares Enter the pile type to be defined. D-F OUNDATIONS is supplied with a database of pre-defined pile types that can be selected from the drop down list in the Pile type field. The available list depends on the selected pile shape. αs is the pile factor for the shaft friction. The value for the factor, according to the Belgian Annex, depends on the type of soil material as well as on the type of pile. For soils of type ‘Tertiary Clay’, other values for αs can be found than for soils of other types. Therefore both values are shown and can be edited. When selecting a ‘standard’ pile type from the pile type box, both actual values for αs will be displayed in the current value boxes. If User defined is selected as the subtype, the pile factors can be entered manually. 81 of 280 D-F OUNDATIONS, User Manual αb αb is the pile factor for the pile base. As αs , αb depends on the pile type as well as on the soil type for its value. Again, for soils of type ‘Tertiary Clay’, other values for αb can be found than for soils of other types. Therefore both values are shown and can be edited. When selecting a ‘standard’ pile type from the pile type box, both actual values for αb will be displayed in the current value boxes. If User defined is selected as the subtype, the pile factors can be entered manually. Building a pile type database T Note: For pile type Open ended steel pipe with plugging two calculations are made, one with plugging effect (Shaft friction only on the outside of the pile, pile point considered closed) and one without the plugging effect (Shaft friction on the outside and the inside of the pile, pile point considered open). The least favorable result is automatically taken into account. 5.3.2 DR AF Pile type definitions created in the Foundation – Pile Types window can be saved to a FOP file by means of the Export option, reached by right clicking the Pile Types node in the tree view and selecting Export from the context menu, or left clicking on the Pile Types node and then selecting Export in the Action sub-window of the Foundation – Pile Types window. This allows a database of pile types to be built up which can be used in future projects, allowing the pile type definition with less effort and less chance of errors. Use the Import option in the same context menu to select a previously saved FOP file for the pile type currently selected. When the appropriate file has been located and opened, the pile types in the FOP-file are added as new nodes under the Pile Types node. Pile Properties Use the Foundation – Pile Properties window to define the positions of the piles for the project. Figure 5.9: Foundation – Pile Properties window for Bearing Piles (EC7-B) model In this window the following information can be entered: Pile head level 82 of 280 The pile head level is used to specify for each pile the level of the pile head with regard to the reference level (usually NAP – the Dutch reference zero level). This allows calculation with deepened pile heads (i.e. below the ground level). If the pile head level is not entered the default level (0.00 m NAP) applies. Deltares Bearing Piles (EC7-B) – Input & Calculations Name X Y In this box the pile position names are displayed. Each position automatically receives a number when added to the list. The name can be changed if desired. Enter the X coordinate of the position of the center of the pile. The same coordinate system must be used as when entering the CPT coordinates. Enter the Y coordinate of the position of the center of the pile. The same coordinate system must be used as when entering the CPT coordinates. Use the toolbar on the left side of this window to edit the table: Use this button to add a row to the table. T Use this button to insert a row in the table. Use this button to delete a row from the table. Use this button to cut a selected part of the table. DR AF Use this button to copy a selected part of the table. Use this button to paste a selected part in the table. Note: The number of piles, in combination with the choice between rigid/non rigid superstructure (section 5.4.1), influences the values of ξ3 and ξ4 . 5.3.3 Top View Foundation Select Top View Foundation under the Foundation node in the tree view to display this window. Here the pile locations and types and the CPTs can be seen in plan view. Figure 5.10: Foundation – Top View Foundation window for Bearing Piles (EC7-B) model The button bar of this window allows the view to be manipulated in various ways: Deltares 83 of 280 D-F OUNDATIONS, User Manual Click this button to select objects using the cursor and to finish using any of the other modes described below. Click this cursor to activate the pan mode. Click and drag the view to see a different part of it. Click this button to activate the zoom-in cursor. Then click on the part which is to become the centre of the desired enlarged view. Repeat this step several times if necessary. Click this button to undo the last zoom-in step. If necessary, click several times to retrace each consecutive zoom-in step that was made. T Click this button to select a rectangle for enlargement. The selected part will be enlarged to fit the window. Repeat this step several times if necessary. Click this button to measure the distance between two points. Click on one point and the distance from there to the current mouse position is displayed in the panel at the bottom of the view. DR AF Click this button to undo the last zoom step. Click this button to restore the original dimensions of the view. 5.4 Calculations To start a calculation, click the Calculation node in the tree view or select Start in the Calculation menu. A window opens with various options to be set and the types of calculation available. The top half of the window relates to data required for bearing pile calculations (described in section 5.4.1), whilst the bottom part of the window is related to the type of calculation to be performed (described in section 5.4.2). Figure 5.11: Calculation window for Bearing Piles (EC7-B) model 84 of 280 Deltares Bearing Piles (EC7-B) – Input & Calculations Options for a Bearing Piles (EC7-B) calculation Before performing calculations on the project design, a number of options can be specified that will apply to all bearing piles. T Note: Some of the options are found in the sub-window Overrule parameters. This allows certain parameters to be overruled which otherwise would be determined according to the Belgian Annex. The user must make sure that an overruling of parameters is allowable. These parameters must be used with the utmost caution. Figure 5.12: Calculation window for Bearing Piles (EC7-B) model DR AF 5.4.1 In the top part of the window the following information can be entered: Rigidity of superstructure Area in the pile plan covered per CPT Factor β Factor λ Factor ξ3 Deltares Here the superstructure can be specified as either Non-rigid or Rigid. To determine if a structure may be considered as stiff, one can remove one pile and perform a settlement calculation (SLS). If the settlement due to the removing of the pile is less than 5 mm, the construction may be considered as stiff. The choice between Rigid and Non-rigid influences the determination of the factors ξ3 and ξ4 as described in article 5.6.5 in the Belgian Annex. NOTE: This setting has no influence on overruled values of factors ξ3 and ξ4 . This defines the area of the pile plan covered by a single CPT and its value is used to determine the values for ξ3 and ξ4 . Here the value for β , the pile base shape factor, can be overruled. Normally this value would be derived from article 5.3.1 in the Belgian Annex. Here the value for the factor for the shape of the pile base cross section can be overruled. This is a reduction factor for piles with an enlarged base that causes relaxation of the soil around the shaft during the installation process. Normally this value would be derived from figure 3 in the Belgian Annex. Here the value for ξ3 can be overruled. This factor normally depends on the number of CPTs, number of piles and also whether the construction of the superstructure can be considered to be rigid. The factor would normally be derived as described in articles 5.6.4 and 5.6.5 in the Belgian Annex. NOTE: The automatic determination ξ3 of does NOT take into account the special case where for each pile a CPT is performed within a maximum distance of 3 × Db;eq of the pile. In that case ξ3 would have a value of 1.08. For such a special case, it is advised to use this overrule option. 85 of 280 D-F OUNDATIONS, User Manual Factor ξ4 γr;d T γb DR AF γs Write intermediate results Use quality assurance 5.4.2 Here the value for ξ4 can be overruled. This factor normally depends on the number of CPTs, number of piles and also whether the construction of the superstructure can be considered to be rigid. The factor would normally be derived as described in articles 5.6.4 and 5.6.5 in the Belgian Annex. NOTE: The automatic determination ξ4 of does NOT take into account the special case where for each pile a CPT is performed within a maximum distance of 3 × Db;eq of the pile. In that case ξ4 would have a value of 1.08. For such a special case, it is advised to use this overrule option. Here the value for γr;d , the model factor, can be overruled. Normally this factor would be derived as prescribed in article 5.5.5 in the Belgian Annex. Here the value for γb , the model factor, can be overruled. Normally this factor would be derived as prescribed in article 5.6.5 in the Belgian Annex. Here the value for γs , the model factor, can be overruled. Normally this factor would be derived as prescribed in article 5.6.5 in the Belgian Annex. Intermediate results can be written to a file by selecting this checkbox. It must be born in mind that such a file can become very large. NOTE: This file is only available in Dutch. This influences the determination of γb and γs . If quality assurance about the pile installation can be provided, more favorable values for γb and γs are used. Calculation options for Bearing Piles (EC7-B) D-F OUNDATIONS allows the determination of the bearing capacity of a preliminary design. The bearing capacities of the pile base, the pile shaft and the total bearing capacity are determined in accordance with the Belgian Annex (method De Beer). Figure 5.13: Calculation window, Preliminary Design for Bearing Piles (EC7-B) model The total bearing capacity of a pile is not just a simple sum of the pile base and pile shaft capacity but is determined using partial safety factors etc. as prescribed in article 5.5 of the Belgian Annex. Note: Preliminary design always considers single piles. 86 of 280 Deltares Bearing Piles (EC7-B) – Input & Calculations After selection of the required model, the required Trajectory can be entered to define at which levels the results will be seen. The trajectory for this method must meet a number of requirements. The top limit value (Begin) must be chosen in such a way that the minimum pile length in the ground is 5 × dmin (dmin = the smallest cross measurement of the pile tip cross section). This means the Begin value must be at least 5 × dmin below the lowest surface level, excavation level or pile head level. A Begin above this level means that the pile is not a pile but a shallow foundation (according to NEN 9997-1+C1:2012 art. 1.5.2.127). The bottom limit value (End) must be at least 4 × Deq (Deq = equivalent diameter) above the deepest level of the least deep CPT. Also the bottom limit value has to be at least that high that each CPT at least has 6 more valid measurements deeper than the provided level. This requirement follows necessarily from the calculation model used here (De Beer). A deeper bottom limit would make correct calculation impossible. The interval of the trajectory determines the number of calculations to be performed, with a maximum of 151. T When defining a trajectory the user need not take account of the specified levels of positive friction. If required, these levels are adjusted automatically for each calculation step. DR AF If the above requirements are not met, D-F OUNDATIONS will not perform a calculation but will suggest better values to be used. Also, note that the method De Beer as implemented in D-F OUNDATIONS puts forward an additional requirement on the CPTs. The sampling rate of the CPTs must be at most 0.20 m. Next, the CPTs and pile type to be included in the preliminary calculations are selected. Note that the order in which the CPTs are selected also determines the order of calculations. The last parameter in this window concerns the Cone Diameter. This value is used in the determination of b (a parameter referring to the scale dependant soil shear strength characteristics) as described in article 5.3.1 of the Belgian Annex. The default cone diameter is 35.7 mm as suggested in that article. Finally, once the calculation type and relevant parameters have been selected, click Start to begin the calculation.) Note: When a calculation is started, any previous calculation results will be replaced. To retain previous results, print the results or make a copy of the project files. Alternatively, set the default action to Always Save As instead of Always Save for the Save on Calculation option on the General tab in the Program Options window (Tools menu). In that case a ‘Save As’ dialog will automatically appear each time a calculation is started. The results of the preliminary calculation are shown in different ways. Firstly, directly after each calculation the Design Results window is automatically opened. In this window, the characteristic value of the total pile resistance (Fr;max ) for each CPT as a function of the pile base level is shown. These results are displayed in tables per pile type as well as in a graph. In total, the following characteristic values are presented: Rb;cal;max : pile base resistance (in the Belgian Annex known as Rb ) Rs;cal;max : pile shaft resistance (in the Belgian Annex known as Rs ) Rc;cal;max : total pile resistance (the sum of Rb;cal;max and Rs;cal;max ). These results can be reviewed at any time using the Design sub-node in the Results node. Secondly, the actual design values of the calculation can be reviewed using the Report subnode in the Results node. In compliance with the Belgian Annex, the design values are Deltares 87 of 280 D-F OUNDATIONS, User Manual determined for each examined foundation and not for CPTs individually. The table ‘Review of bearing capacity combined for all CPTs’ will show the design value of the bearing capacity (Rc;d ) per level. This table also shows the values for the correlation factors ξ3 , ξ4 and will tell which of them is actually used in the determination of the bearing capacity. The characteristic values Rb;k (base) and Rs;k (shaft) are part of this table too. DR AF T Finally, when the option ‘Intermediate result’ was checked before starting the calculation, the Intermediate sub-node in the Results node will display a file with additional information on the calculation performed. 88 of 280 Deltares 6 Tension Piles (EC7-NL) – Input & Calculations Two types of data are required to perform a calculation using D-F OUNDATIONS: Firstly, data needs to be input in order to determine the soil behavior. This data includes CPTs with their corresponding soil profiles, including the ground water level, the expected ground level settlement, and so on. This data is entered in the windows that appear when selecting the sub-nodes below the Soil node in the tree view. Secondly, data is required to specify the construction (of the foundation), e.g. pile type, pile dimensions, pile plan, and so on. The relevant options can be found in the windows that appear when selecting the sub-nodes below the Foundation node in the tree view. Tree view DR AF 6.1 T Before calculating the project design, a number of options need to be specified that will apply to all piles in the window that appears when the Calculation node is selected in the tree view. Figure 6.1: Main window for the Tension Piles (EC7-NL) model For the Tension Piles (EC7-NL) model, the tree view contains the following nodes and subnodes: Project Properties / Description Project Properties / Construction Sequence Soil / Materials Soil / Profiles Foundation / Pile Types Deltares Use this option to describe and identify the project. Use this option to specify the execution time of CPTs relative to the pile installation and any excavation. This information is needed to determine whether the problem qualifies for certain exceptions made in NEN 9997-1+C1:2012. Use this option to enter the soil material properties. Use this option to enter and view a soil profile for each CPT, as well as to enter additional data related to the CPT. Use this option to enter the required pile types. The pile type and its dimensions are specified here. 89 of 280 D-F OUNDATIONS, User Manual Foundations / Top View Foundation Excavation Calculation Results / Design Report 6.2 Use this option to define the pile plan. Apart from the pile positions, the pile head level, a superimposed load next to the pile (if required) and of course the pile load are entered. This data can be input by entering information for each pile separately or by generating a grid of piles at once. Use this option to see a graphic representation of entered piles and CPTs. Use this option to specify the excavation level, along with some additional parameters related to modeling the excavation. Use this option to specify the calculation settings and verification requirements, and to execute the actual calculation. Use this option to view the results of trajectory based calculation options. The results can be viewed in graphic format and in text format. Use this option to view the output file. Besides input data, this file also contains the calculation results. Construction Sequence T Foundations / Pile Properties DR AF Click on the Construction Sequence node under Project Properties in the tree view on the left of the screen. This will open the Project Properties – Construction Sequence window where the relative timing of CPTs with respect to the installation of the piles and the excavation can be specified. With this option the user can specify if D-F OUNDATIONS has to take the effect of an excavation and/or soil compaction due to pile driving into account. These two effects are reducing respectively increasing the CPT values and are dependent on the time in the construction process when the CPT is executed. Figure 6.2: Construction Sequence window for the Tension Piles (EC7-NL) model As default value the time order CPT – Excavation – Install is used as this is the most common order in the construction process. 6.3 Soil In the tree view, the Soil node contains the sub-nodes Materials and Profiles, which should be selected in order to enter or view the corresponding input data. 6.3.1 Materials In the Soil – Materials window the materials and corresponding parameters for the project are entered. 90 of 280 Deltares Tension Piles (EC7-NL) – Input & Calculations T Figure 6.3: Soil – Materials window for Tension Piles (EC7-NL) model DR AF Note: The table, at startup, is filled automatically with a list of materials obtained from Table 2.b of NEN 9997-1+C1:2012 and its counterpart of the Belgian Annex. The Belgian materials can be recognized by the prefix B. To make clear which materials are used in the profiles, use the Show Materials filter. To show only the materials which are used in the profiles, select Used materials only. If All is selected, all available materials are shown. There are three ways to fill in the soil parameters: section 6.3.1.1 Adding a ‘standard’ material (including its soil parameters) from Table 2.b as defined in NEN 9997-1+C1:2012 or its counterpart as defined in the Belgian Annex; section 6.3.1.2 Adding manually a material and its required soil parameters. section 6.3.1.3 Changing the properties of an existing material by matching them with the properties of a ‘NEN material’ (i.e. from Table 2.b of NEN 9997-1+C1:2012). 6.3.1.1 Materials – Add from ‘Standard’ The Add from NEN 9997-1 orAdd from Belgian Annex buttons can be used to select a ‘standard’ material (including its soil parameters) from Table 2.b as defined in NEN 99971+C1:2012 or its counterpart as defined in the Belgian Annex. To add a ‘standard’ material click the Add from NEN 9997-1 button or Add from Belgian Annex button to open the NEN 9997-1 Table 1 window (Figure 6.4) or the Belgian Annex window (Figure 6.5). Deltares 91 of 280 T D-F OUNDATIONS, User Manual DR AF Figure 6.4: NEN 9997-1 Table 1 window for Tension Piles (EC7-NL) model Figure 6.5: Belgian Annex window for Tension Piles (EC7-NL) model Select the required soil and then click OK to return to the Soil – Materials window where the information for the selected soil will have been filled in. To select and add more than one soil at the time, use the Shift or Control key when selecting. Note: The NEN 9997-1 Table 1 andBelgian Annex windows display either the high or the low values according to the influence of the parameters. For example, for both Bearing Piles models, the soil weight has a negative influence so the high values must be chosen whereas for Tension Piles (EC7-NL) and Shallow Foundations (EC7-NL) models, the soil weight has a beneficial effect on the bearing/tension capacity so the low values much be chosen. The program will for each calculation only use the materials as selected in the Materials window. 92 of 280 Deltares Tension Piles (EC7-NL) – Input & Calculations It will never take values from the standard tables directly. So the user must make sure the proper values have been selected. For instance, when first performing a Bearing Piles (EC7NL) calculation (with ’high’ values), the user should adapt the values before performing a Tension Piles (EC7-NL) calculation by clicking the button in the Soil – Materials window. Note: Only the parameter D50 (Median) (required for the soil types Gravel and Sand) must always be provided by the user. D-F OUNDATIONS provides a default D50 , but if the soil is coarse grained then the correct value will need to be input for correct calculation. Materials – Add manually Soil – Materials window: Color Soil name Soil type Gammaunsat Gamma-sat Friction angle D50 T The Insert row , Add row and Delete row buttons can be used to help build the table of data. To enter or modify soil information manually, enter the following information in the The color of a material may be changed by clicking on it and selecting one of the pre-defined basic colors from the window that opens, or a custom color to be created by the user. The name of the soil can be edited here. Select one of the available soil types from the drop-down list. Because loam layers are not recognized in NEN 9997-1+C1:2012, D-F OUNDATIONS treats loam layers in the same way as sand layers. The shaft friction αt is usually lower for loam and relaxation due to tension forces are accounted for (f2 correction in NEN 9997-1+C1:2012). Compaction in loam is disregarded, which is considered to be a safe approach. Manually loam layers can be treated the same way as clay, by changing the soil type to clay. If the soil type is changed by the user to sand, compaction will be taken into account. Peat is considered not to contribute to the maximum tension capacity of the pile. In accordance with NEN 9997-1+C1:2012 Tabel 7.d the value for αt is set to 0 by D-F OUNDATIONS. Enter the (representative) dry unit weight of the material (i.e. when the material is above the water level). Enter the (representative) saturated unit weight of the material (i.e. when the material is below the water level). Enter the (representative) angle of internal friction (phi). The value must lie between 0◦ and 90◦ . Enter the (representative) median grain size. This column only applies to the soil types Sand and Gravel. This parameter is used to determine the reduction factor for αt according to NEN 9997-1+C1:2012 Table 7.c and 7.d: For sand with D50 >0.6 mm, αt will be reduced by 25%. For gravel with D50 > 2 mm, αt will be reduced by 50%. DR AF 6.3.1.2 (median) Max. cone resistance type Deltares Choose the type of reduction of the cone resistance to be used when calculating the shaft friction. Selecting Standard will cause the cone resistance to be reduced to either 12 MPa or 15 MPa, depending on the trajectory of high qc values (as required by NEN 9997-1+C1:2012). Selecting Manual will cause the input user defined value in the Maximum cone resistance field to be used as the new maximum value. 93 of 280 D-F OUNDATIONS, User Manual Apply tension Minimal/ Maximal Void Ratio 6.3.1.3 Enter the manual value for the maximum cone resistance in this field. All values in the CPT results larger than the maximum cone resistance will be set to this maximum for the calculation of the shaft friction only. This value will only be used by D-F OUNDATIONS if Max. cone resistance type is set to Manual. Mark the checkbox to allow tension capacity in the material, or unmark the checkbox to define the material as having no tension capacity. The shaft friction factor for materials without tension capacity is set to zero. The minimum/maximum voids ratios are used to allow for soil compaction. The values entered in these fields must lie between 0 and 1. For Dutch conditions the values 0.8 (maximum void ratio) and 0.4 (minimum void ratio) are recommended. Materials – Match Material T Maximum cone resistance 6.3.2 Profiles DR AF Matching a material with Table 2.b of NENEN 9997-1:2012 does not depend on the selected model, so refer to section 4.3.1.3 for Bearing Piles (EC7-NL) model. Different actions are possible in the Soil / Profiles node of the tree view: 6.3.2.1 section 6.3.2.1 Adding a profile; section 6.3.2.2 Modifying an existing profile; section 6.3.2.3 Viewing and editing the layers representation of a profile; section 6.3.2.4 Entering additional data; section 6.3.2.5 Viewing the soil profile; section 6.3.2.6 Viewing the pressures profile if available. Adding Profiles Adding a profile does not depend on the selected model, so refer to section 4.3.2.1 for Bearing Piles (EC7-NL) model. 6.3.2.2 Options for existing profiles Options for existing profiles are the same for all the models, so refer to section 4.3.2.2 for Bearing Piles (EC7-NL) model. 6.3.2.3 Editing Layers To view a graphic representation of a CPT, corresponding to its profile, select the corresponding sub-node under the Soil / Profiles node in the tree view. The Layers tab of the Soil / Profiles window opens. The red line in the graph corresponds to the qc value, and the blue line corresponds to the friction. On the right side of the plotted CPT, a soil layer interpretation is drawn. D-F OUNDATIONS automatically interprets all imported CPTs, based on the interpretation rule that is selected by the user in the CPT Rule selection box below the graph. To use the proposed soil layer interpretation, click the button to transport the interpretation into a profile to be used in the project. Note: If during the interpretation of a CPT, the point corresponding to the cone resistance and the friction ratio of a layer is situated outside the limits of the diagram of the selected rule (i.e. 94 of 280 Deltares Tension Piles (EC7-NL) – Input & Calculations DR AF T Figure 3.7 in section 3.2.2), the program will assign an Undetermined material to this layer with unrealistic properties. That’s why the user must always review the automatic interpretation of the CPT before performing a calculation. In such case, the user must select himself the appropriate material from the drop-down list of available materials using its expertise. Figure 6.6: Soil – Profiles window, Layers tab CPT Rule Min. layer thickness Coordinates Select the interpretation rule used by D-F OUNDATIONS to automatically interpret the imported CPT. Five different rules are available: The NEN rule The CUR rule The 3-type rule The qc only rule The User defined rule The qc only rule is especially useful for the interpretation of CPTs that do not contain information about the friction. Users may define their own interpretation rules by selecting the last option in the list of rules: User defined rule. Before using a user defined rule, it must have been specified in the CPT Interpretation Model window (section 3.2.2). All interpretation rules make use of one additional parameter: the minimum layer thickness, specified in the Min. layer thickness input field below the selection list. To prevent D-F OUNDATIONS from generating layers that are too thin to be significant when modeling the problem, the minimum layer thickness should be increased. As the CPT file does not always contain X and Y co-ordinates, those values can be entered in the X and Y input fields in the Coordinates sub-window. A profile is presented in two ways, both graphically and in a table. The data of the profile can be entered or changed in two ways: by editing data in the table Deltares 95 of 280 D-F OUNDATIONS, User Manual by graphically editing the picture in the middle of the window. Tabular input can be realized by editing the table on the right hand side of the input window. Use the Insert row , Add row remove layers in the profile. and Delete row buttons next to the table to add or The table allows the following changes: Top Level Material The top level of each soil layer can be edited manually. Materials can be selected from the list of soil layers that were entered in the Soil – Materials window. DR AF T Soil layers can be added to the profile by clicking the Add boundary button and clicking anywhere in the graphic representation of the profile to add a layer below that level. Layer boundaries can be changed dragging them upwards or downwards using the mouse. While dragging, the level is indicated in a panel below the button bar and the table is updated continuously. The Pore Pressure and OCR tab allows additional data to be input for each soil layer, as described below the figure: Figure 6.7: Soil – Profiles window for Tension Piles (EC7-NL) model, Pore Pressure and OCR tab Add Pore Pr. top Add Pore Pr. bot OCR 96 of 280 Enter the value of the pore pressure at the top of the layer which is additional to the hydrostatic pore pressure caused by the distance below the phreatic surface. Thus the total water pressure at a point is the sum of the hydrostatic pressure and the additional pore pressure at that point. Additional pore pressures are assumed to vary linearly across each soil layer. Enter the value of the pore pressure at the bottom of the layer which is additional to the hydrostatic pore pressure caused by the distance below the phreatic surface. Thus the total water pressure at a point is the sum of the hydrostatic pressure and the additional pore pressure at that point. Additional pore pressures are assumed to vary linearly across each soil layer. Enter the over-consolidation ratio for each layer. Deltares Tension Piles (EC7-NL) – Input & Calculations 6.3.2.4 Additional Data Figure 6.8: Soil – Profiles window, Additional Data tab Under the Additional Data tab, the following information may be entered: DR AF Pile tip level Top of tension zone Copy From. . . Copy To. . . 6.3.2.5 This value specifies the dividing level between the dry soil (above the phreatic level) and the wet soil (below the phreatic level). The default value used by D-F OUNDATIONS corresponds to the ground level of the imported CPT file (GEF, CPT, DOV or SON) lowered by 0.5 m. Although desirable, it usually turns out that the application of a single pile tip level within a project is not realistic. Variations in the level of the bearing layer found in the CPTs force the constructor to apply several pile tip levels. The required pile tip level can be specified separately for each CPT. The design option of D-F OUNDATIONS suppresses the various specified pile tip levels in favor of the defined pile tip trajectory. In that case each calculation step (read: each pile tip level) uses the trajectory level as the pile tip level for all CPTs involved in the calculation. The calculation of the tension capacity will start from this level. Note that this level must be at least 1 m beneath the excavation level (or the surface level if no excavation is required). D-F OUNDATIONS checks this requirement, and if it is not met, D-F OUNDATIONS provides a warning and resets this level to the required level. Click this button to display the Additional Data – Copy from Profiles window. In this window select the name of one of the profiles and click OK to copy the additional data given for that profile into the fields for this profile. Click this button to display the Additional Data – Copy to Profiles window. In this window select the names of any profiles which should have the same additional data as defined for the current profile. Click OK to copy this data to the selected profiles. T Phreatic level Viewing Profiles A graphic representation of the profiles defined for a project can be viewed by clicking one of the two right most tabs in the Soil – Profiles window: The Additional Data tab (Figure 6.9) displays the CPT and, if available, the profile with data such as defined layers, material types per layer and user defined levels (phreatic level, tension zone level etc.). The standard qc diagram (red line in Figure 6.9) is also displayed. The Summary Pressures tab (Figure 6.10) also displays the CPT Deltares 97 of 280 D-F OUNDATIONS, User Manual T Figure 6.9: Soil – Profiles window, Additional Data tab Use the buttons in the button bar to manipulate the view. 6.3.2.6 DR AF Note: By right-clicking the mouse button in the CPT/Profile view of the Additional Data tab and selecting View Preferences, the Project Properties window opens to determine which names for the soil materials will be used in the profile view. Summary Pressures If they are available, the Summary Pressures tab (Figure 6.10) also displays the soil pressures as derived from the data set in the Soil – Profiles window. Figure 6.10: Soil – Profiles window, Summary Pressures tab Use the buttons in the button bar to manipulate the view. 98 of 280 Deltares Tension Piles (EC7-NL) – Input & Calculations Note: Those pressures are always displayed for the original profile, and excavations and surcharges are not taken into account in this display. 6.4 Foundation In the tree view, the Foundation node contains the following sub-nodes: Pile Types Pile Properties Top View Foundation Pile Types In the Foundation – Pile Types window (reached by clicking on the Pile Types node) types of piles can be added and their characteristics defined. D-F OUNDATIONS is supplied with a database of pre-defined pile shapes. When one of the pre-defined shapes is selected, a drop down list of pre-defined pile types (depending on the selected shape) becomes available in the Pile type field. If one of the pre-defined types is selected, the corresponding pile type data are filled in automatically and cannot be edited. Select the pile type User defined to enter all data manually. DR AF 6.4.1 T Browsing through these nodes, allows data applying to the foundation to be viewed and entered. The available options are described below. Figure 6.11: Foundation – Pile Types window for Tension Piles (EC7-NL) model The required pile shape can be selected by clicking on the pertinent diagrammatic representation of the geometry in the panel on the left of the window (Figure 6.11). In the Dimensions sub-window at the top, the pile dimensions can be entered. The geometric parameters that are required depend on shape chosen: Deltares 99 of 280 D-F OUNDATIONS, User Manual Enter the base width and base length of the pile. Rectangular pile with enlarged base Enter the width, length and height of the base, as well as the width and length of the shaft. Rectangular pile (for sheet piling) Enter the base width and base length of the pile. Round pile Only the diameter is required. DR AF T Rectangular pile (for piles) Round tapered pile Enter the diameter at the pile tip and the increase in diameter per m pile length. Round hollow pile with closed base Enter the external diameter and the wall thickness of the pile. Round hollow pile with open base Enter the external diameter and the wall thickness of the pile. Round pile with enlarged base Enter the pile and base diameters and the height of the base. Round pile with lost tip Enter the pile and base diameters. The height of the base is automatically set to zero. Round pile with in situ formed expanded base Enter the pile and base diameters and the height of the base. H-shaped profile Enter the height and width of the H-shape, as well as the thickness of the web and of the flange. Note: These dimensions are indicated on the diagrams on the Pile shape sub-window. When the pile shape is selected, the following information can be entered: 100 of 280 Deltares Tension Piles (EC7-NL) – Input & Calculations Pile type Use this sub-window to enter information about the pile type. αt is the pile factor for the shaft friction. The value for the factor, according to NEN 9997-1+C1:2012, depends on the soil material: For soil types sand, gravel and loam the value for αt depends on the T pile type. Therefore it can be specified by selecting one of the standard pile types from the combo box. As a result the actual value for αt will be displayed in the current value box. If selecting a user defined pile type for αt , valid for sand, gravel and loam layers, either a vibrating or a low vibrating pile type can be selected. This enables the user to steer the influence of the pile type on the reduction of qc (due to excavation and over-consolidation). Choosing one of the user defined types will always have the consequence that the value entered for αt , valid for sand and gravel layers, will NOT be adjusted for any instance of coarse grain (NEN 9997-1+C1:2012 art. 7.6.2.3(i)). For the soil type clay the factor according to the standard is depth- DR AF dependent and thus has no single value. As a result the current value box displays ‘N.A.’ (Not applicable) as the value can not be shown. If "User defined" is selected as the subtype, only the parameter value is entered. That value can and will be displayed as current value. For αt , valid for clay layers, only one user defined type can be selected. As prescribed by NEN 9997-1+C1:2012, the value for αt must be reduced by 50% if the soil profile holds layers other than clay or peat. The actual value of αt for peat is 0. Material Unit weight pile material NOTE: The value given by the user will also be reduced by 50 % in cases where the profile holds layers other than clay or peat. Select the material from which the pile is made. The corresponding pile weight is provided automatically and cannot be edited. If the material User defined is selected then the unit weight of the pile material needs also to be entered. The total weight of the pile is calculated automatically, based on the pile dimensions and the material weight. Enter the unit weight of the pile material, if the pile Material has been selected as User defined. If this value is set to zero, D-F OUNDATIONS assumes that the uplift of the pile due to the groundwater is also zero. In this case the weight of the pile is not taken into account when calculating the bearing capacity. Building a pile type database Pile type definitions created in the Foundation – Pile Types window can be saved to a FOP file by means of the Export option, reached by right clicking the Pile Types node in the tree view and selecting Export from the context menu, or left clicking on the Pile Types node and then selecting Export in the Action sub-window of the Foundation – Pile Types window. This allows a database of pile types to be built up which can be used in future projects, allowing the pile type definition with less effort and less chance of errors. Use the Import option in the same context menu to select a previously saved FOP file for the pile type currently selected. When the appropriate file has been located and opened, the pile types in the FOP-file are added as new nodes under the Pile Types node. Deltares 101 of 280 D-F OUNDATIONS, User Manual Pile Properties Use the Foundation – Pile Properties window to define the positions of the piles and the loads for the project. There are several ways to do this, as described hereafter. In this window the following information can be entered: Name X Y T Figure 6.12: Foundation – Pile Properties window for Tension Piles (EC7-NL) model In this box the pile position names are displayed. Each position automatically receives a number when added to the list. The name can be changed if desired. Enter the X coordinate of the position of the center of the pile. The same coordinate system must be used as when entering the CPT coordinates. Enter the Y coordinate of the position of the center of the pile. The same coordinate system must be used as when entering the CPT coordinates. The pile head level is used to specify for each pile the level of the pile head with regard to the reference level (usually NAP). This allows calculation with deepened pile heads. If the pile head level is not entered the default level (0.00 m NAP) applies. Selecting Yes allows alternating loads to be accounted for by calculating an extra safety factor γm;var;qc , according to NEN 9997-1+C1:2012 art. 7.6.3.3(c). The maximum tension load on the pile should be higher than the minimum tension load, which may receive a negative (=compressive) value. Representative values of these loads should be specified. In practice, only the ratio between the minimum and maximum value of the loads is important. So, piles with minimum 100 kN and maximum 200 kN have the same safety factor γm;var;qc as piles with minimum 10 kN and maximum 20 kN. Piles with minimum values that equal the maximum values have no extra safety factor (= 1.0). This safety factor never exceeds 1.5. DR AF 6.4.2 Pile head level Use Alternating Loads Maximum/ minimum load on pile Use the toolbar on the left side of this window to edit the table: Use this button to insert a row in the table. Use this button to add a row to the table. Use this button to delete a row from the table. Use this button to generate a grid of piles with the same properties (see below). Use this button to change the properties (Pile head level, Surcharge, Design values of load on pile) of all the pile positions (see below). 102 of 280 Deltares Tension Piles (EC7-NL) – Input & Calculations Use this button to cut a selected part of the table. Use this button to copy a selected part of the table. Use this button to paste a selected part in the table. DR AF T Click the fourth button in Pile Properties window to open a window where a grid of pile positions can be specified. Figure 6.13: Pile Grid window for Tension Piles (EC7-NL) model The pile properties can also be entered in the Pile Grid window. This results in the same properties for all pile positions in the grid, but, if required, these properties can later be edited individually. In this window the following information can be entered: Start at Centre to centre distance Number of piles Parameters Use pile grid to replace current pile positions Enter the start coordinates for the center of the bottom-left pile in the grid. The same coordinate system must be used as when entering the CPT coordinates. Enter the distance between the centers of adjacent piles. Enter the number of piles in each direction. For more information see the Pile Properties (tension piles) window above. Enable this check box to replace the existing pile positions in the project with those defined by the grid. If this check box is left empty, the positions in the pile grid will be added to the existing pile positions. Click the fifth button in Pile Properties window to open the Edit properties for all positions window (Figure 6.14) in which the Pile head level and Maximum/Minimum tension loads on Deltares 103 of 280 D-F OUNDATIONS, User Manual the pile of all pile positions can be edited and/or modified. If modified, the properties of all pile positions will automatically be updated in the corresponding column of the Pile Properties window (Figure 6.12). Top View Foundation Select Top View Foundation under the Foundation node in the tree view to display this window. Here the pile locations and types and the CPTs can be seen in plan view. DR AF 6.4.3 T Figure 6.14: Edit properties for all positions window for Tension Piles (EC7-NL) model Figure 6.15: Foundation – Top View Foundation window for Tension Piles (EC7-NL) model The button bar of this window allows the view to be manipulated in various ways: Click this button to select objects using the cursor and to finish using any of the other modes described below. Click this cursor to activate the pan mode. Click and drag the view to see a different part of it. Click this button to activate the zoom-in cursor. Then click on the part which is to become the centre of the desired enlarged view. Repeat this step several times if necessary. 104 of 280 Deltares Tension Piles (EC7-NL) – Input & Calculations Click this button to undo the last zoom-in step. If necessary, click several times to retrace each consecutive zoom-in step that was made. Click this button to select a rectangle for enlargement. The selected part will be enlarged to fit the window. Repeat this step several times if necessary. Click this button to measure the distance between two points. Click on one point and the distance from there to the current mouse position is displayed in the panel at the bottom of the view. Click this button to undo the last zoom step. Excavation Click the Excavation node in the tree view to display this window. Here, one Excavation level can be entered for all soil profiles. Under Reduction of cone resistance select the method by which the cone resistance is to be reduced, in order to take the effect of the excavation into account. DR AF 6.5 T Click this button to restore the original dimensions of the view. Figure 6.16: Excavation window Deltares 105 of 280 D-F OUNDATIONS, User Manual Manual reduction of cone resistance The reduction percentages per layer per CPT can be specified by the user by selecting Manual, selecting the relevant CPT, and then entering the reduction percentages Qc Reduction for the Top Level of each soil layer. For the selected CPT the reduction will take place via: qc;red = qc × (100 − red%) 100 (6.1) Safe (NEN) reduction of cone resistance Begemann reduction of cone resistance T If Safe (NEN) is selected under Reduction of cone resistance, all CPTs are reduced in a very safe manner in accordance with NEN 9997-1+C1:2012 art. 7.6.2.3(k) and selection of qc is restricted to NEN 9997-1+C1:2012 art 7.6.2.3(i). This implies complete relaxation of the soil beneath the excavation as well as an infinite width of the excavation. DR AF This method also reduces all CPTs at once. It takes into account the proximity of the edge of the excavation to the construction. The distance to this edge can be varied in the Distance edge pile to excavation boundary field. Note that this distance is the distance between the excavation edge and the pile(s) on the outside of the pile plan. To see the excavation, click Top View Foundation in the tree view to display the pile plan. The effect of the excavation (reduction of the cone resistance) can be viewed per CPT in the drawing on the left of the Excavation window. The drawing also displays the effect in terms of stresses. The initial effective stress shows the stress without excavation. The effective stress shows the stress after excavation. 6.6 Calculations To start a calculation, click the Calculation node in the tree view or select Start in the Calculation menu. A window opens with various options to be set and the types of calculation available. The top half of the window relates to data and options required for tension pile calculations (described in section 6.6.1), whilst the bottom part of the window is related to the selection of the type of calculation to be performed (described in section 6.6.2). 106 of 280 Deltares DR AF T Tension Piles (EC7-NL) – Input & Calculations Figure 6.17: Calculation window for Tension Piles (EC7-NL) model 6.6.1 Options for a Tension Piles calculation Before calculating the project design, a number of options, which will apply to all tension piles, need to be specified. Note: Some of the options are found in the sub-window Overrule parameters. This allows certain parameters to be overruled which otherwise would be determined according to the standard. The user must make sure that an overruling of parameters is allowable. These parameters must be used with the utmost caution. Figure 6.18: Calculation window for Tension Piles (EC7-NL) model In the upper half of the Calculation window the following information can be entered: Unit weight water Surcharge Deltares Enter the unit weight of water. The default value is set to 9.81 kN/m3 . Enter the (permanent) surcharge placed at ground level / excavation level. 107 of 280 D-F OUNDATIONS, User Manual DR AF T Rigidity of Indicate the rigidity of the superstructure as either Non-rigid or Rigid acsuperstructure cording to NEN 9997-1+C1:2012 art. 7.6.1.1(c). A restriction for the schematics is that for each calculation only (parts of) buildings that can be regarded as either completely “rigid” or completely “non-rigid” can be included in one calculation. If a building is regarded as partly “rigid” and partly “non-rigid” (for instance a building with a rigid core) at least two calculations must be carried out: one for the rigid part and one for the non-rigid part. Also if a building consists of several different parts that can be regarded as rigid, a calculation must be made for each part. The reason for this restriction is that a proper value for the ξ3 and ξ4 factor (used to calculate the pile tension capacity) cannot be determined for ‘mixed rigidity’ schematics. ξ3 Here the value for ξ3 (the correlation factor for average value of calculated pile resistances) can be overruled. This factor depends on the rigidity of the superstructure and number of CPTs (see Tables A.10a and A.10b in NEN 9997-1+C1:2012). ξ4 Here the value for ξ4 (the correlation factor for the minimum value of calculated pile resistances) can be overruled. This factor depends on the rigidity of the superstructure and number of CPTs (see Tables A.10a and A.10b in NEN 9997-1+C1:2012). γm;var;qc Here the user can enter its own value for γm;var;qc . This factor usually results from the maximum and minimum alternating loads, as given in the Pile Properties window (section 6.4.2) and calculated according to NEN 99971+C1:2012 art. 7.6.3.3(d). The default overruling value is 1. NOTE: If overruled, this factor will have an effect only if alternating loads are used, i.e. only if the option Use Alternating Loads in the Pile Properties window (section 6.4.2) is selected. γst Here the users can define their own value for γs;t the safety factor for materials. Normally this would be derived from Tables A.6-A.8, and A.16 in NEN 9997-1+C1:2012. The default overruling value is 1. γγ Here the users can define their own value for γγ , the safety factor for the total soil weight. Normally this would be derived from Tables A.2-A.3 and A.4a-A.4b in NEN 9997-1+C1:2012. The default overruling value is 1. Use Enable this checkbox to take compaction of soil due to installation of discompaction placement piles into account. The positive effect on the qc value should be checked by performing CPTs after installation (see NEN 9997-1+C1:2012 art. 7.6.2.3(k)). Compaction is not used for non-displacement piles types, such as bored and auger piles. Overrule Enable this checkbox to prevent the excavation from being taken into acexcavation count. Overrule ex- Enable this checkbox to prevent the excess pore pressures (that were speccess pore ified with the Soil - Profiles (EC7-NL) option) from being taken into account. pressure 108 of 280 Deltares Tension Piles (EC7-NL) – Input & Calculations 6.6.2 Preliminary Design Tension Piles D-F OUNDATIONS can perform a preliminary design for tension piles according to the NEN 99971+C1:2012. Three different types of preliminary design calculation are available: Indication bearing capacity outlined in section 6.6.2.1; Bearing capacity at fixed pile tip levels outlined in section 6.6.2.2; Pile tip levels and net bearing capacity outlined in section 6.6.2.3. DR AF T First of all the type of calculation needs to be selected. Some types require additional data. Secondly the CPTs and pile types, to be included in the preliminary calculations, need to be selected. Note that the order in which the items are selected determines the order of the calculations. Figure 6.19: Calculation window, Preliminary Design for Tension Piles (EC7-NL) model Once all of the options and requisite information have been inputted, click Start to start the calculation. Note: When a calculation is started, any previous calculation results will be replaced. To retain previous results, print the results or make a copy of the project files. Alternatively, set the default action to Always Save As instead of Always Save for the Save on Calculation option on the General tab in the Program Options window (Tools menu). In that case a ‘Save As’ dialog will automatically appear each time a calculation is started. Note: The nature of the calculation which has to be performed greatly influences the time needed to perform the calculation. The number of piles and the number of selected CPTs and pile types have an influence on the required calculation time: if a large number of piles is placed in a irregular geometry the calculation time may increase considerably. 6.6.2.1 Preliminary design: Indication bearing capacity This option is used to obtain an indication of the bearing capacity in relation to a range of pile tip level(s). Instead of the specified pile tip levels given per CPT, a pile tip trajectory is used. This trajectory is determined by means of a top and bottom limit in m above or below the reference level (usually NAP). The interval of the trajectory determines the number of calculations to be performed, with a maximum of 151. When defining a trajectory, the specified skin friction zone and pile tip levels do not need to be taken into account. Both the top and bottom limits of the trajectory must meet a number of Deltares 109 of 280 D-F OUNDATIONS, User Manual requirements. The top limit value (Begin) must at least as low as the lowest pile head level and the lowest Top of tension zone (as specified in the Additional Data tab of the Soil – Profiles window in section 6.3.2.3). The Top of tension zone itself must be at least 1 m deeper than the lowest ground level and lowest excavation level. The bottom limit value (End) must be at least as high as the shallowest CPT. The Interval must be chosen so that no more than 151 calculations will be performed. T The results for each trajectory level are presented in a table as well as a graph. Both the table and graph can be viewed with the Design sub-node in the Results node. Depending on the geometry, for each single pile, or group of piles with equal parameters (pile type, pile dimensions, distance to excavation, loading and geometry), the design value of the capacity in tension (Fr;tension;d ), pull out force (Max. mobilized soil weight) and the effective weight of the pile as function of the pile tip level is given. For more information about viewing results, refer to chapter 8. Note: The effective weight of the pile is included in Rt;d as well in the pull out force. 6.6.2.2 Preliminary design: Bearing capacity at fixed pile tip levels DR AF This option is used to obtain an indication of the bearing capacity in relation to the pile tip level of each CPT. The results of this calculation are the design value of the capacity in tension (Rt;d ), pull out force (Max. mobilized soil weight) and the effective weight of the pile for each CPT at its fixed pile tip level. These results are displayed in a table that can be viewed using the Design sub-node in the Results node. For more information about viewing results, refer to chapter 8. Note: The effective weight of the pile is included in Fr;tension;d as well in the pull out force. 6.6.2.3 Preliminary design: Pile tip levels and net bearing capacity This option is used to obtain an indication of the required pile tip level per CPT in order to realize the desired net bearing capacity (Fs;net;d ). This desired net bearing capacity can be regarded as the required tension force for failure of the pile. Using this option, the program will determine, for each CPT entered, the highest pile tip level within the boundaries set for which the design value of the capacity of the pile is greater than or equal to the “net bearing capacity” value. The required pile tip level per CPT is located in a user-defined pile tip trajectory. This trajectory is specified by means of a top (Begin) and bottom (End) limit in m above/below reference level. The Interval of the trajectory determines the number of calculations to be performed, up to a maximum of 151. Information about the requirements that must be met when defining the trajectory can be found in section 6.6.2.1. The trajectory may consist of at most 151 intervals. Together with the trajectory definition the required Net bearing capacity (Fs;net;d ) must be entered. This value is used as a stopping criterion for the calculation. As soon as a level has been detected for a CPT where the calculated tension force equals or exceeds the required net tension capacity, the calculation for that CPT is stopped after which the calculated capacities are displayed. For more information about viewing results, refer to chapter 8. Note: If within the trajectory no level is found for a CPT with the required net bearing capacity, this is marked as ’******’ in the Pile Tip Level column. In order to provide some idea, the 110 of 280 Deltares Tension Piles (EC7-NL) – Input & Calculations DR AF T calculated capacities for the last trajectory level are included. Deltares 111 of 280 DR AF T D-F OUNDATIONS, User Manual 112 of 280 Deltares 7 Shallow Foundations (EC7-NL) – Input & Calculations Just as with the other models, two types of data are required for the shallow foundations model: Firstly, data is required to determine the soil characteristics (soil profiles, including the ground water level, placement depth of foundation, and so on). Although helpful, CPTs are not required for shallow foundations. The soil data is entered in the windows that appear when selecting the sub-nodes below the Soil node in the tree view. Secondly, data is required to specify the construction (of the foundation), for example dimensions, foundation plan, and so on. The relevant options can be found in the windows that appear when selecting the sub-nodes below the Foundation node in the tree view. Tree view DR AF 7.1 T Before calculating the project design, a number of options that will apply to all shallow foundations need to be specified in the window that appears when the Calculation node is selected in the tree view. Figure 7.1: Main window for the Shallow Foundations (EC7-NL) model For the shallow foundations model, the tree view contains the following nodes and sub-nodes: Project Properties / Description Soil / Materials Soil / Profiles Soil / Slopes Foundation / Types Deltares Use this option to describe and identify the project. Use this option to enter the soil material properties. Use this option to enter and view a soil profile, as well as to enter additional data related to the profile. Optionally, CPTs can be used here as base for the profiles. Use this option to input slope geometries, if required. Elsewhere in D-F OUNDATIONS the slopes can be linked to foundation elements. Use this option to enter the dimensions of the project’s foundation elements. Round, rectangular or strip-shaped elements can be analyzed. 113 of 280 D-F OUNDATIONS, User Manual Foundation / Foundation Plan Foundation / Top View Foundation Calculation Results / Intermediate 7.2 Soil Use this option to specify the calculation settings and verification requirements, and to execute the calculation. Use this option to view the intermediate results file, if there is one. Whether or not calculation results are written to this file is determined by enabling the Write intermediate results checkbox in the Calculation window. Use this option to view the output file. This file contains the calculation results and the input data. DR AF Report Use this option to enter the loads together with their initial eccentricities, both for limit state STR/GEO and serviceability limit state. For horizontal loads the angle (in the horizontal plane) between the load and the longitudinal axis of the foundation element can also be specified. Use this option to define the foundation plan. For each position the corresponding element type and the angle (in the horizontal plane) at which the element must be placed can be entered. A load, soil profile and slope (if any) can also be linked to each element. Use this option to display a graphic representation of the layout of the entered foundation element(s) and profiles. T Foundation / Loads In the tree view, the Soil node contains the sub-nodes Materials, Profiles and Slopes, which should be selected to enter or view the corresponding input data. 7.2.1 Materials In the Soil – Materials window the materials and corresponding parameters for the project can be entered. Figure 7.2: Soil – Materials window for Shallow Foundations (EC7-NL) model To make clear which materials are used in the profiles, use the Show Materials filter. To show only the materials which are used in the profiles, select Used materials only. If All is selected, all available materials are shown. There are three ways to fill in the soil parameters: section 7.2.1.1 Adding a ‘standard’ material (including its soil parameters) from Table 2.b as defined in NEN 9997-1+C1:2012 or its counterpart as defined in the Belgian 114 of 280 Deltares Shallow Foundations (EC7-NL) – Input & Calculations Annex; section 7.2.1.2 Adding manually a material and its required soil parameters. section 7.2.1.3 Changing the properties of an existing material by matching them with the properties of a ‘NEN material’ (i.e. from Table 2.b of NEN 9997-1+C1:2012). Materials – Add from ‘Standard’ The Add from NEN 9997-1 orAdd from Belgian Annex buttons can be used to select a ‘standard’ material (including its soil parameters) from Table 2.b as defined in NEN 99971+C1:2012 or its counterpart as defined in the Belgian Annex. To add a ‘standard’ material click the Add from NEN 9997-1 button or Add from Belgian T Annex button to open the NEN 9997-1 Table 1 window (Figure 7.3) or the Belgian Annex window (Figure 7.4). DR AF 7.2.1.1 Figure 7.3: NEN 9997-1 Table 1 window for Shallow Foundations (EC7-NL) model Deltares 115 of 280 DR AF T D-F OUNDATIONS, User Manual Figure 7.4: Belgian Annex window for Shallow Foundations (EC7-NL) model Select the required soil and then click OK to return to the Soil – Materials window, where the information for the selected soil will have been filled in. To select and add more than one soil at the time, use the Shift or Control key when selecting. Note: The NEN 9997-1 Table 1 andBelgian Annex windows display either the high or the low values according to the influence of the parameters. For example, for both Bearing Piles models, the soil weight has a negative influence so the high values must be chosen whereas for Tension Piles (EC7-NL) and Shallow Foundations (EC7-NL) models, the soil weight has a beneficial effect on the bearing/tension capacity so the low values much be chosen. The program will for each calculation only use the materials as selected in the Materials window. It will never take values from the standard tables directly. So the user must make sure the proper values have been selected. For instance, when first performing a Bearing Piles (EC7NL) calculation (with ’high’ values), the user should adapt the values before performing a Tension Piles (EC7-NL) calculation by clicking the button in the Soil - Materials window. 7.2.1.2 Materials – Add manually The Insert row , Add row and Delete row buttons can be used to help build the table of data. To enter or modify soil information manually, enter the following information in the Soil – Materials window: Color Soil Name Soil type Gammaunsat Gamma-sat 116 of 280 Clicking on the color of a material opens the Color window where one of the pre-defined basic colors, or a custom color created by the user, can be selected. The name of the soil can be edited here. Select the soil type from the drop-down list. Enter the (representative) dry unit weight of the material (i.e. for soil above the water level). Enter the (representative) saturated unit weight of the material (i.e. for soil below the water level). Deltares Shallow Foundations (EC7-NL) – Input & Calculations Enter the (representative) angle of internal friction ϕ. It must lie between 0 and 90 degrees. Enter the (representative) effective cohesion c. Enter the (representative) undrained shear strength su . DR AF 7.2.1.3 T Enter the (representative) primary compression index Cc . Enter the (representative) secondary compression index Cα . Enter the (representative) initial void ratio e0 . Note that this parameter does not appear in the NEN 9997-1+C1:2012 Table 2.b as this is not a part of it. However, after selecting a material from the table a default value for this parameter is automatically calculated, using: For peat: e0 = 15.5 when γsat = 10 kN/m3 e0 = 4.9 when γsat = 12 kN/m3 e0 = 2.9 when γsat = 13 kN/m3 For all other soil types: e0 = (γs − γsat ) / (γsat − 10) where γsat is the saturated unit weight and γs is the unit weight of the grains (26.5 kN/m3 ). Friction angle (phi) Cohesion (c) Cu (F_undrained) Cc Ca Initial void ratio (e0) Materials – Match Material Matching a material with Table 2.b of NEN 9997-1+C1:2012 does not depend on the selected model, so refer to section 4.3.1.3 for Bearing Piles (EC7-NL) model. 7.2.2 Profiles Different actions are possible in the Soil / Profiles node of the tree view: 7.2.2.1 section 7.2.2.1 Adding a profile; section 7.2.2.2 Modifying an existing profile; section 7.2.2.3 Viewing and editing the layers representation of a profile; section 7.2.2.4 Entering additional data; section 7.2.2.5 Viewing the soil profile; section 7.2.2.6 Viewing the pressures profile if available. Adding Profiles Adding a profile does not depend on the selected model, so refer to section 4.3.2.1 for Bearing Piles (EC7-NL) model. 7.2.2.2 Options for existing profiles Options for existing profiles are the same for all the models, so refer to section 4.3.2.2 for Bearing Piles (EC7-NL) model. 7.2.2.3 Editing Layers Viewing a graphic representation of a CPT, corresponding to its profile, is similar to the Bearing Piles (EC7-NL) model, so refer to section 4.3.2.3. Deltares 117 of 280 D-F OUNDATIONS, User Manual 7.2.2.4 Additional Data Figure 7.5: Soil – Profiles window, Additional Data tab for Shallow Foundations (EC7-NL) model Phreatic level Copy From. . . Copy To. . . 7.2.2.5 This value specifies the dividing level between the dry soil (above the phreatic level) and the wet soil (below the phreatic level). The default value used by D-F OUNDATIONS corresponds to the ground level of the imported CPT file (GEF, CPT, DOV or SON) lowered by 0.5 m. This is the level at which the bottom of the foundation element is placed, i.e. the foundation level. DR AF Placement depth of foundation element Concentration value according to Frolich T Under the Additional Data tab, the following information can be entered: The concentration factor mσ influences the calculation of the settlement. This calculation (according to NEN 9997-1+C1:2012, article 6.6.2(d)) normally follows the model described by Boussinesq (in which case the concentration value equals 3), but by raising the concentration value to 4, a4, a stiffness increasing with depth can be emulated. Click this button to display the Additional Data – Copy from Profiles window. In this window select the name of one of the profiles and click OK to copy the additional data given for that profile into the fields for this profile. Click this button to display the Additional Data – Copy to Profiles window. In this window select the names of any profiles which should have the same additional data as defined for the current profile. Click OK to copy this data to the selected profiles. Viewing Profiles A graphic representation of the profiles defined for a project can be viewed by clicking one of the two right most tabs in the Soil – Profiles window: The Additional Data tab (Figure 7.6) displays the CPT and, if available, the profile with data such as defined layers, material types per layer and the phreatic level. The standard qc diagram (red line in Figure 7.6) is also displayed. The Summary Pressures tab (Figure 7.7) also displays the CPT. 118 of 280 Deltares T Shallow Foundations (EC7-NL) – Input & Calculations DR AF Figure 7.6: Soil – Profiles window, Additional Data tab Use the buttons in the button bar to manipulate the view. Note: By right-clicking the mouse button in the CPT/Profile view of the Additional Data tab and selecting View Preferences, the Project Properties window opens to determine which names for the soil materials will be used in the profile view. 7.2.2.6 Summary Pressures If they are available, the Summary Pressures tab (Figure 7.7) also displays the soil pressures as derived from the data set in the Soil – Profiles window. Deltares 119 of 280 DR AF T D-F OUNDATIONS, User Manual Figure 7.7: Soil – Profiles window, Summary Pressures tab Use the buttons in the button bar to manipulate the view. Note: Those pressures are always displayed for the original profile, and loads are not taken into account in this view. 7.2.3 Slopes In this window the geometry of the slopes used in the project can be defined: Figure 7.8: Soil – Slopes window For each slope, enter the following information: 120 of 280 Deltares Shallow Foundations (EC7-NL) – Input & Calculations Berm width Slope length Slope height Enter the distance between the edge of the foundation element and the top of the slope. Enter the horizontal measured distance between the slope top and the slope bottom. Enter the difference in height between the slope top and the slope bottom. The meaning of these parameters is illustrated in the picture to the right of the table. 7.3 Foundation Types of Shallow Foundations Loads Foundation plan Top View Foundation T In the tree view, the Foundation node contains the following sub-nodes: 7.3.1 DR AF Browsing through these nodes, allows data applying to the foundation to be viewed and input. The available options are described below. Types of Shallow Foundations In this window, the types of shallow foundations used in the project can be defined. Open the window by selecting the Types sub-node in the tree view and then either selecting New to create a new foundation type, or clicking on one of the names in the Types box to view and edit a previously defined type. Figure 7.9: Foundation – Types window for Shallow Foundations (EC7-NL) model Select the required foundation shape and then enter the requisite information: Round Rectangular Strip Specify the Diameter. Specify the Width and the Length. Specify the Width of the strip. The dimensions are indicated in the diagrams on the right hand side of the window. Deltares 121 of 280 D-F OUNDATIONS, User Manual For Type the choice between Prefab and Cast in place influences the horizontal bearing capacity of the foundation. Cast in place delivers a higher horizontal capacity as its contact surface with the soil is assumed to be rougher. Loads Use this window to enter the vertical and horizontal load components applied to the foundation. A distinction is made between the loads for limit states STR/GEO and serviceability limit state: DR AF 7.3.2 T Strip footings assume an indefinite length (whereas rectangular or round footings assume that all dimensions are known). Because the L is infinite, Aef is in principal also infinite. However, when determining factors like ic (undrained), iq and iγ (drained), Aef is to be determined using Lef = 1 when appropriate (for Kappa = 90 degrees). Not appropriate is the case for ic , iq and iγ where the horizontal load is runs parallel to the length axis of the foundation (Kappa = 0). In that case, Aef is still to be considered infinite. In that case ic , iq and iγ are set to 1. For all angles between 0 and 90 degrees linear interpolation between the values found at 0 and 90 degrees will provide the correct answer. Note that this for the determination of ic differs from the actual NEN 9997-1+C1:2012 article as that does not allow for the influence of the angle. So this article was extended in D-F OUNDATIONS to include the angle. Figure 7.10: Foundation – Loads window Click on Loads in the tree view and then either select New to define a new load, or click on a name in the Loads sub-window to view and edit a previously defined load. In the Foundation – Loads window the following information can be entered: Initial eccentricity along latitudinal axis Initial eccentricity along longitudinal axis Design load 122 of 280 Enter the eccentricity of the vertical load (Fs;v;d ) along the latitudinal axis, measured from the centre of the foundation surface, for limit states STR/GEO and for serviceability limit state. Enter the eccentricity of the vertical load (Fs;v;d ) along the longitudinal axis, measured from the centre of the foundation surface, for limit states STR/GEO and for serviceability limit state. Enter the design value of the vertical load for limit states STR/GEO and for serviceability limit state. Note that when using strip type elements (section 7.3.1), this load is the load in kN/m. Deltares Shallow Foundations (EC7-NL) – Input & Calculations Angle between load and longitudinal axis Initial eccentricity to foundation level Design load Enter the application height of the horizontal load (Fs;h;d ) measured from the centre of the foundation base surface, for limit states STR/GEO and for serviceability limit state. Enter the design value of the horizontal load for limit states STR/GEO and for serviceability limit state. Note that when using strip type elements (section 7.3.1), this load is the load in kN/m. Foundation plan T Use the Foundation – Pile Properties window to specify the foundation plan (layout). DR AF 7.3.3 Enter the angle (in the horizontal plane) which the horizontal load (Fs;h;d ) makes with the longitudinal axis of the foundation element. Figure 7.11: Foundation – Foundation Plan window The following information can be entered in this window: Name X Y Matching type Angle Matching load Matching profile Nearby slope Deltares Enter a name for the foundation element. Enter the x coordinate of the position of the centre of the foundation element. This position is only relevant when Use interaction model has been selected in the Calculation window (section 7.4.1). In that case the position of the elements determines their mutual influence (interaction) on their settlement. Enter the y coordinate of the position of the centre of the foundation element. This position is only relevant when Use interaction model has been selected in the Calculation window (section 7.4.1). In that case the position of the elements determines their mutual influence (interaction) on their settlement. In this field select the type of element that should be placed at this position. The selection box is automatically filled with the types that have been defined in the Foundation – Types window (section 7.3.2). Define the angle in the horizontal plane at which the foundation element is placed in the foundation plan (0 degrees = North, 90 degrees = West). This value has no relevance for round elements. Select the load that will act on the element placed at this position. The dropdown list contains the loads that were defined using the Loads sub-node of the Foundation node of the tree view (section 7.3.2). Select the soil profile that represents the soil beneath this foundation element. The drop-down list contains the profiles that were defined in the Soil – Profiles window (section 7.2.2.3). Select the slope that should be linked to this position, interacting with the foundation element also placed there. The drop-down list contains the slopes that were defined in the Soil – Slopes window (section 7.2.3) as well as the option None for foundations with no nearby slopes. 123 of 280 D-F OUNDATIONS, User Manual Use the toolbar on the left side of this window to edit the table: Use this button to insert a row in the table. Use this button to add a row to the table. Use this button to delete a row from the table. Top View Foundation T Select Top View Foundation under the Foundation node in the tree view to display this window. Here the foundation element locations and types and the CPTs can be seen in plan view. This view can also be used to check visually that there is no overlap between neighboring foundation elements. This is relevant when the Interaction model as been selected in the Calculation window (section 7.4.1) DR AF 7.3.4 Figure 7.12: Foundation – Top View Foundation window for Shallow Foundations (EC7NL) model The button bar of this window allows the view to be manipulated in various ways: Click this button to select objects using the cursor and to finish using any of the other modes described below. Click this cursor to activate the pan mode. Click and drag the view to see a different part of it. Click this button to activate the zoom-in cursor. Then click on the part which is to become the centre of the desired enlarged view. Repeat this step several times if necessary. Click this button to undo the last zoom-in step. If necessary, click several times to retrace each consecutive zoom-in step that was made. 124 of 280 Deltares Shallow Foundations (EC7-NL) – Input & Calculations Click this button to select a rectangle for enlargement. The selected part will be enlarged to fit the window. Repeat this step several times if necessary. Click this button to measure the distance between two points. Click on one point and the distance from there to the current mouse position is displayed in the panel at the bottom of the view. Click this button to undo the last zoom step. Click this button to restore the original dimensions of the view. 7.4 Calculations To start a calculation, click the Calculation node in the tree view. A window opens where: performed can be specified (section 7.4.2). T in the top part of the window, various options are available (section 7.4.1); in the bottom part of the window and information related to the type of calculation to be DR AF Once all the information is correct, click Start to begin the calculation. Figure 7.13: Calculation window for Shallow Foundations (EC7-NL) model 7.4.1 Options for a Shallow Foundations calculation Before performing a calculation, a number of options need to be specified. These will apply to all shallow foundations. Figure 7.14: Calculation window for Shallow Foundations (EC7-NL) model Deltares 125 of 280 D-F OUNDATIONS, User Manual In this part of the window the following information can be entered: DR AF Maximum allowed settlement Maximum allowed relative rotation γg(ST R/GEO) γcoh γphi γf und Indicate the rigidity of the superstructure according to NEN 99971+C1:2012 art. 7.6.1.1(c) as either Non-rigid orRigid. A restriction for the schematics is that for each calculation only (parts of) buildings that can be regarded as either completely “rigid” or completely “non-rigid” can be included in one schematic. If a building is regarded as partly “rigid” and partly “non-rigid” (for instance a building with a rigid core) at least two calculations must be carried out: one for the rigid part and one for the non-rigid part. Also if a building consists of several different parts that can be regarded as rigid, a calculation must be made for each part. The reason for this restriction is the impossibility of determining the relevant internal distances within the module. Therefore the internal rotations between rigid and non-rigid foundation elements cannot be calculated correctly. In the Background section of the manual, more information on this topic (Rigid/Non-rigid) can be found. Enter the settlement demand against which the verification takes place. As default values, the values given in NEN 9997-1+C1:2012 are provided. It is possible to edit these values for either of the two limit states. In case of limit state EQU/GEO, the default is an advised value, whereas for serviceability limit state the default should be considered a minimum value. If the values do not match the defaults this will be explicitly mentioned in the report. Enter the relative rotation demand (between neighboring elements) against which the verification takes place. As default values, the values given in NEN 9997-1+C1:2012 are provided. It is possible to edit these values for either of the two limit states. In case of limit state EQU/GEO, the default is an advised value whereas for serviceability limit state the default should be considered a minimum value. If the values do not match the defaults this will be explicitly mentioned in the report. Here the user can enter its own value for γγ , the partial factor on the soil unit weight for limit states STR/GEO. The default overruling value is 1. Here the user can enter its own value for γc0 , the partial factor on effective cohesion c0 and undrained shear strength su . The default overruling value is 1. Here the user can enter its own value for γϕ , the partial factor on friction angle (tan ϕ). The default overruling value is 1. Here the user can enter its own value for γcu , the partial factor on undrained shear strength su . The default overruling value is 1. Here the user can enter its own value for γγ , the partial factor on the soil unit weight for serviceability limit state. The default overruling value is 1. Here the user can enter its own value for γCc , the partial factor on the primary compression index Cc . The default overruling value is 1. Here the user can enter its own value for γCα , the partial factor on the secondary compression index Cα . The default overruling value is 1. Intermediate results can be written to a file by selecting this checkbox. It must be born in mind that such a file can become very large. Note that this file is only available in Dutch. T Rigidity of superstructure γg(SLS) γCc γCa Write intermediate results 126 of 280 Deltares Shallow Foundations (EC7-NL) – Input & Calculations Use interaction model Calculation options T 7.4.2 Select this checkbox to apply the interaction model when determining the settlement of a foundation element. The interaction model takes the influence of all other foundation elements into account by superposition. This model also allows for the calculation of the rotation between the foundation elements (based on the centre point of the elements), provided no two elements are placed at the same position (i.e. the centre point of the elements may not be the same). If the interaction model is not applied, only the individual settlement of the individual element is determined. This allows simultaneous calculation of several alternatives for a foundation element. In this case, the centre points of the elements are allowed to be at the same position. Shallow Foundations offers three different calculation options (Figure 7.15): DR AF Optimize Dimensions (section 7.4.2.1), Maximize Vertical Loads (section 7.4.2.2), and Verification (section 7.4.2.3). Depending on the chosen option additional data can be entered in the Options sub-window. Figure 7.15: Calculation options for the Shallow Foundations (EC7-NL) model 7.4.2.1 Optimize Dimensions Select Optimize Dimensions in the Calculation sub-window to automatically determine the optimal dimensions of foundation elements, based on the specified forces. D-F OUNDATIONS calculates these dimensions to the nearest 0.05 m between the limits of 0.20 m and of 200 m. Figure 7.16: Calculation window, Options sub-window for an Optimize Dimensions calculation In the Options sub-window the following information can be entered: Keep length constant Deltares Mark this checkbox to only optimize the width of rectangular foundation elements. When this box is unchecked both the width and the length of rectangular elements are optimized. 127 of 280 D-F OUNDATIONS, User Manual Use the 5% limit instead of the 20% limit to determine the settlement The Dutch standard NEN 9997-1+C1:2012 uses a 20% limit to determine which layers should be considered in the determination of the settlement. Only layers of which the increase in the effective vertical stress due to the placement of the foundation is larger than 20% of the original effective vertical stress, are considered to have any effect on the settlement. All other layers are considered not to play any role in the settlement process. Deltares considers this to be a pretty rough approach and believes that a 5% limit is better (more layers play a part in the determination of the settlement) and will lead to more accurate results. The default limit is 20% as used in NEN 9997-1+C1:2012, but Deltares advises marking the checkbox in order to use the 5% limit instead. 7.4.2.2 DR AF T Note: When a calculation is started, any previous calculation results will be replaced. To retain previous results, print the results or make a copy of the project files. Alternatively, set the default action to Always Save As instead of Always Save for the Save on Calculation option on the General tab in the Program Options window (Tools menu). In that case a ‘Save As’ dialog will automatically appear each time a calculation is started. Maximize Vertical Loads Select Maximize Vertical Loads in the Calculation sub-window to calculate the maximum allowed vertical load (without eccentricities) on the foundation elements, based on the specified dimensions. The program calculates these values to the nearest 0.01 kN with a minimum of 0.05 kN. Note: Any horizontal load that has been entered will be fully included in the calculations performed with this option. Figure 7.17: Calculation window, Options sub-window for a Maximize Vertical Loads calculation In the Options sub-window the following information can be entered: Load factor limit state STR/GEO or serviceability limit state 128 of 280 To determine the maximum allowed vertical load, both limit state STR/GEO and serviceability limit state are checked. Normally, the loads for these limit states differ as the loads for limit state STR/GEO (Dutch: ‘uiterste grenstoestand’) are larger than serviceability limit state (Dutch: ‘bruikbaarheidsgrenstoestand’). This difference can be defined here as a load factor: Force in serviceability limit state = load factor × Force in limit state STR/GE0. The exact load factor should be determined based on NEN 99971+C1:2012 but typically this factor would be 0.833. Deltares Shallow Foundations (EC7-NL) – Input & Calculations Use 5% limit instead of 20% limit The Dutch standard NEN 9997-1+C1:2012 uses a 20% limit to determine which layers should be considered in the determination of the settlement. Only layers, of which the increase in the effective vertical stress due to the placement of the foundation is larger than 20% of the original effective vertical stress, are considered to have any effect on the settlement. All other layers are considered not to play any role in the settlement process. Deltares considers this to be a pretty rough approach and believes that a 5% limit is better (more layers play a part in the determination of the settlement) and will lead to more accurate results. The default limit is 20% as used in NEN 9997-1+C1:2012, but Deltares advises marking the checkbox in order to use the 5% limit instead. 7.4.2.3 DR AF T Note: When a calculation is started, any previous calculation results will be replaced. To retain previous results, print the results or make a copy of the project files. Alternatively, set the default action to Always Save As instead of Always Save for the Save on Calculation option on the General tab in the Program Options window (Tools menu). In that case a Save As dialog will automatically appear each time a calculation is started. Verification Select Verification in the Calculation sub-window to start the calculations needed to perform a complete verification according to NEN 9997-1+C1:2012. The results of this option are shown in the report file. For more information about viewing results, refer to chapter 8. Deltares 129 of 280 DR AF T D-F OUNDATIONS, User Manual 130 of 280 Deltares 8 View Results If errors are found in the input, no calculation can be performed and D-F OUNDATIONS opens the Error Messages window displaying more details about the error(s). Those errors must be corrected before performing a new calculation. In the tree view, the Results node contains all or some of the following options, depending on the model used: Load-Settlement Curve The Load / Settlement Curve window, reached by selecting the Load-Settlement Curve subnode under the Results node in the tree view, displays the Load/Settlement curve(s) resulting from the Verification calculations of the Bearing Piles (EC7-NL) model. When a defined problem fully meets the verification requirements, the Load/Settlement curve can be viewed for both limit states. However, if the problem does not fulfill the requirements (see the report) it is possible that only one of the curves can be viewed, or none at all. When loads are too big (and the construction collapses) it is not possible to draw a curve. DR AF 8.1 section 8.1 Load-Settlement Curve section 8.2 Design Results section 8.3 Intermediate Results section 8.4 Report T Figure 8.1: Load / Settlement Curve window Please note that for constructions with a non-rigid superstructure, the results represent the decisive case. For constructions with a rigid superstructure it is in fact not possible to present a decisive case as the result is the average value of all cases. As the average cannot be displayed, the worst case is displayed in order to give the user some idea of the settlement. The button bar of this window allows the view of the load-settlement curve to be manipulated Deltares 131 of 280 D-F OUNDATIONS, User Manual in various ways: Design Results DR AF 8.2 T Click this button to finish using any of the other modes described below. Click this cursor to activate the pan mode. Click and drag the view to see a different part of it. Click this button to activate the zoom-in cursor. Then click on the part which is to become the centre of the desired enlarged view. Repeat this step several times, if necessary. Click this button to undo the last zoom-in step. If necessary, click several times to retrace each consecutive zoom-in step that was made. Click this button to select a rectangle for enlargement. The selected part will be enlarged to fit the window. Repeat this step several times, if necessary. Click this button to undo the last zoom step. Click this button to restore the original dimensions of the view. Click this button to display the result for limit state GEO. Click this button to display the result for serviceability limit state. Click on Design under the Results node in the tree view to open the Results – Design window. The displayed design results will vary with the type of calculation that has been carried out, as shown in Table 8.1. Table 8.1: Overview of the displayed design results Model Bearing Piles (EC7-NL) Calculation type Preliminary Design Verification Bearing Piles (EC7-B) Tension Piles (EC7-NL) Preliminary Design Design Option Chart Text Indication of bearing capacity Bearing capacity at fixed pile tip levels Pile tip levels and net bearing capacity Design Complete Bearing capacity Yes No No Yes No Yes Yes Yes Yes Yes No Yes Indication of bearing capacity Bearing capacity at fixed pile tip levels Pile tip levels and net bearing capacity Yes No No Yes Yes Yes Note: For Bearing Piles (EC7-NL) / Verification / Complete no design results can be viewed. Also note that the Shallow Foundations (EC7-NL) model does not offer this option. The results can be displayed in text format or in chart format by clicking the appropriate tab to adjust the display type. The Chart tab of the Design Results window has the header of Figure 8.2. Figure 8.2: Design Results window – Header 132 of 280 Deltares View Results In this header the following options can be selected: CPT Force Pile type Pile group Use the drop-down list to select to display the chart for either all CPTs or a single CPT. Use the drop-down list to select the appropriate force to be displayed. Use the drop-down list to either select a chart with the results for all pile types together or to display the results for a single pile type. Use the drop-down list to select the pile group for which the results should be displayed. The piles belonging to one group have equal capacity and the group’s content is displayed both in the text option and in the report. T The Text tab of the Design Results window has the header of Figure 8.3. DR AF Figure 8.3: Design Results window – Header In this header the following options can be selected: Filter results Order results by If required, the displayed results can be filtered. Enter a Lower limit and/or an Upper limit as filter criteria. The checkbox Apply filter is used to switch the filter on and off. Select the appropriate toggle button to sort the results by either Depth or CPT. Note: The actual options provided in the headers may vary between models and calculation options. 8.3 Intermediate Results After a successful calculation, the intermediate results can be saved in the optional intermediate results file (*.for) if the option Write intermediate results has been selected in the Calculation window. The contents of this file will reflect the progress of this calculation process. The content of this intermediate results file (and the output file) depends on the calculation type: Refer to section 8.3.1 for the Bearing Piles (EC7-NL) model; Refer to section 8.3.2 for the Bearing Piles (EC7-B) model; Refer to section 8.3.3.1 for the Shallow Foundations (EC7-NL) model. The intermediate results of the calculations are available only in text format and currently only in Dutch. 8.3.1 Intermediate Results for Bearing Piles (EC7-NL) A description is included in the sections below for each calculation step of the most extensive configuration of the *.for file, using the Bearing Piles Calculation Type Verification with Complete calculation options in the Calculation window. With this option, all limit states are run through during calculation. The intermediate results for each calculation step for each limit state are saved in the file. The calculation results are explained for: Deltares 133 of 280 D-F OUNDATIONS, User Manual section 8.3.1.1 Limit state EQU (calculation per CPT) section 8.3.1.2 Limit state GEO and serviceability (calculation per CPT per pile) Using the Preliminary Design option in the Bearing Piles Calculation Type sub-window in the Calculation window, only limit state EQU and the negative skin friction for limit state GEO are calculated for each calculation step. With this type of calculation, therefore, for each calculation step the *.for file is limited to the intermediate results of this these two items. Limit state EQU (calculation per CPT) T The following is executed for limit state EQU (calculation per CPT): DR AF 8.3.1.1 Per CPT: qc;I;gem qc;II;gem qc;III;gem αp β s qb;max;i (voor reductie) qb;max;i (na reductie) Rb;cal;max;i Rs;cal;max;i Rs;cal;max;i End results: ksi3 ksi4 ksi... is used Rb;k Rs;k 134 of 280 Average value of cone resistance for trajectory I. Average value of cone resistance for trajectory II. Average value of cone resistance for trajectory III. Pile class factor. Pile base form factor. Factor for cross-section form of the pile base. Maximum cone resistance around pile tip in the case of CPT i (before reduction to max. 15 MPa). Maximum cone resistance around pile tip in the case of CPT i (after reduction to max. 15 MPa). Maximum (calculated) pile tip resistance in the case of CPT i. Maximum (calculated) pile shaft resistance in the case of CPT i. Maximum (calculated) bearing capacity of the pile in the case of CPT i. Factor ξ3 from NEN-EN-1997-1-NB (adopted in NEN 9997-1+C1:2012 Tables A.10a and A.10b). Factor ξ4 from NEN-EN-1997-1-NB (adopted in NEN 9997-1+C1:2012 Tables A.10a and A.10b). The actual factor ξ (ξ3 or ξ4 ) used in the calculation. Characteristic value of pile tip resistance. Characteristic value of pile shaft resistance. Deltares View Results Gamma_b Gamma_s Rb;d Rs;d Rc;d Limit state GEO and serviceability limit state (calculation for each CPT for each pile) Negative skin friction per CPT per pile: T The following is executed for both limit state GEO and serviceability (calculation per CPT per pile): DR AF 8.3.1.2 Partial resistance factor of pile tip from NEN-EN-1997-1-NB (adopted in NEN 9997-1+C1:2012 Tables A.6-A.8). Partial resistance factor of pile shaft from NEN-EN-1997-1-NB (adopted in NEN 9997-1+C1:2012 Tables A.6-A.8). Design value of pile tip resistance. Design value of pile shaft resistance. Design value of pile bearing capacity. Fnk;rep gamma;f;nk Fnk;d sneg Representative value of the friction force as a result of negative skin friction. Partial load factor γf ;nk . Calculation value of the friction force as a result of negative skin friction. Settlement as a result of the negative skin friction if the expected ground level settlement (mvz ) is between the limits 0.02 < mvz ≤ 0.10 m; otherwise sneg = 0 applies. Per CPT per pile for the settlement calculation: Fc;tot;i Rb;cal;max;i;d Rs;cal;max;i;d s2 Rb;i;d sb sel s1 s Deltares Calculated value of the total load on the pile head. Maximum design value of pile tip resistance. Maximum design value of pile shaft resistance. Calculated value of the settlement caused by compressing the layers under pile tip level. Calculated value of the dominant force in the pile tip (based on pile displacement, see NEN 9997-1+C1:2012 Figures 7.n and 7.o). Calculated value of the settlement of the pile tip as a result of the load on the pile. Calculated value of the settlement of the top end of the pile with respect to the pile tip as a result of the elasticity of the pile itself. Calculated value of the settlement of the top end of the pile. Calculated value of the settlement of the top of a foundation element. 135 of 280 D-F OUNDATIONS, User Manual End results: s_d;max Beta_dGEO Intermediate Results for Bearing Piles (EC7-B) The following is a description of the intermediate results for the qb calculation. The following is executed (calculation per CPT): DR AF 8.3.2 The number of both the CPT and the pile where the maximum shaft tension occurs. The maximum occurring shaft tension. The number of both the CPT and the pile where the maximum settlement occurs. The maximum occurring settlement (for non-rigid structures) or the average settlement (for rigid structures). The maximum occurring relative rotation. T Maximale schachtspanning . . . Sigma_max_schacht_GEO Maximale zakking. . . beta lambda Diepte eff. spanning phi berekend beta conus beta paal Diepte conus 136 of 280 Pile form factor: β . Reduction factor depending on the form of the base: λ. Depth. Initial effective vertical stress. Calculated value for the angle of internal friction ϕ’ (deviating from the ϕ detected in the laboratory) depending on the initial effective stress. Refer to section 18.1.1 for background. Form factor of the cone: βc . Refer to section 18.1.2 for background. Form factor of the pile: βp . Refer to section 18.1.2 for background. Depth. The cone resistance qc . Deltares View Results Neerwaarts Opwaarts Gemengd qr;b0.2 Unit pile resistance calculated using De Beer method, for a pile base diameter of 0.2 m. Unit pile resistance calculated using De Beer method, for a pile base diameter of 0.4 m. Unit pile resistance calculated using De Beer method, for a pile base diameter of 0.282 m. DR AF qr;b0.4 Homogeneous values dg of the cone resistance. Refer to section 18.1.3 for background. Downward values dd of the cone resistance (for transition from non-rigid to rigid layers). Refer to section 18.1.4 for background. Upward values du of the cone resistance (for transition from rigid to nonrigid layers). Refer to section 18.1.5 for background. Mixed values of the cone resistance. Refer to section 18.1.6 for background. T Homogeen qr;b0.2820 Install. Fac Scale Fac Installation factor. Scale factor. Qb Calculation value of the maximum bearing capacity of the foundation. Puntdraagkracht Pile tip resistance Rb . 8.3.3 Intermediate Results for Shallow Foundations (EC7-NL) The following is a description of the intermediate results using the Verification option in the Calculation window. When the Optimize Dimensions and Maximize Vertical Loads options in the Calculation window are used, the file is the same as far as printed parameters are concerned, although the content is now incorporated in the file for each iteration step in the calculation. The intermediate results are saved in the file for each calculation step (= for each foundation element) and for each limit state. The calculations are explained below for: section 8.3.3.1 Limit state EQU section 8.3.3.2 Limit states GEO and serviceability limit state 8.3.3.1 Limit state EQU The following is executed (these parameters are used/calculated) for limit state EQU: Deltares 137 of 280 D-F OUNDATIONS, User Manual Calculation case: The type of calculation to be executed for the determination of the soil parameters, between cases A, B or C (see art. 6.5.2.2(f) of NEN 9997-1+C1:2012). DR AF Berekeningsgeval T Bearing capacity, undrained behavior: Determining initial effective surface A’ on specified foundation level: Vd Vg;v;d b0 l0 Zu ae te Calculation value of the vertical load. Calculation value of the extra load of soil when the foundation level is displaced due to punching. Effective width of the foundation element. Effective length of the foundation element. Foundation level valid at this moment in the calculation. Influence width. Influence depth. Redefinition of A’ when punching occurs: Vd Vg;v;d Bcor Lcor eHcor Bef _p Lef _p Zu Calculation value of the vertical load. Calculation value of the extra load of soil when the foundation level is displaced due to punching. Correction of the width of the foundation element when the foundation level is displaced due to punching (dz × tan 8◦ ). Correction of the width of the foundation element when the foundation level is displaced due to punching (dz × tan 8◦ ). Correction of the arm of the horizontal force when the foundation level is displaced due to punching. Effective width of foundation element in the case of punch. Effective length of foundation element in the case of punch. Foundation level valid at this moment in the calculation. Determination bearing capacity (NEN 9997-1+C1:2012 art. 6.5.2.2(g)): cu;d ic 138 of 280 Calculation value of undrained shear stress. Reduction factor for gradient of the load. Deltares View Results ae te uRd Ftrek sqRd Vd+g;v;d Form factor for the effect of the cohesion. Calculation value of original vertical effective stress at depth z. Calculation value of maximum foundation pressure. Correction factor for any ground level gradient for the effect of cohesion. Correction factor for any ground level gradient for the effect of soil cover. Correction factor for any ground level gradient for the effect of effective volumetric weight of the soil under the foundation surface. Influence width. Influence depth. Maximum calculation value of the undrained vertical bearing capacity. Tensile force per linear m that the foundation can absorb in the case of squeeze (additional information, no verification value). Calculation value of the vertical bearing capacity in the case of squeeze. Maximum calculation value of the total vertical load (including extra load due to punch, Vd + Vg;v;d ). DR AF Bearing capacity, drained behavior: T sc Sv;z;d Smax;d Lambdac Lambdaq Lambdag Calculation case: Berekeningsgeval The type of calculation to be executed for the determination of the soil parameters, between cases A, B or C (see art. 6.5.2.2(h) of NEN 99971+C1:2012). Parameters/Results without punch (NEN 9997-1+C1:2012 art. 6.5.2.2(i)): ic iq iγ sc Deltares Reduction factor for the gradient of the load on the effect of the cohesion. Reduction factor for the gradient of the load on the effect of the soil cover. Reduction factor for the gradient of the load on the effect of the effective weight of the soil under the foundation surface. Form factor for the effect of the cohesion. 139 of 280 D-F OUNDATIONS, User Manual sq sg Form factor for the effect of the soil cover. Form factor for the effect of the effective weight of the soil under the foundation surface. Bearing capacity factor for the effect of the cohesion. Bearing capacity factor for the effect of the soil cover. Bearing capacity factor for the effect of the effective weight of the soil under the foundation surface. Calculation value of the original vertical effective stress at depth z. Calculation value of the maximum foundation pressure. Calculation value of the vertical load Calculation value of the extra load of soil when the foundation level is displaced due to punch. Correction of the width of the foundation element when the foundation level is displaced with respect to punch (dz × tan 8◦ ). Correction of the width of the foundation element when the foundation level is displaced with respect to punch (dz × tan 8◦ ). Correction of arm of horizontal force when the foundation level is displaced with respect to punch. Effective width of the foundation element. Effective length of the foundation element. Foundation level valid at this moment in the calculation. Calculation value of the (weighed) cohesion. Calculation value of the (weighed) effective angle of friction. Calculation value of the (weighed) effective volumetric weight of the soil under the foundation surface. Calculation value of the drained vertical bearing capacity. Maximum calculation value of the total vertical load (including extra load due to punch, Vd + Vg;v;d ). Nc Nq Ng Sv;z;d Smax;d Vd Vg;v;d T Bcor Lcor Bef Lef Zd ce;d fe;d ge;d DR AF eHcor dRd Vd+g;v;d Parameters/Results WITH punch: These match the parameters for the drained situation without punch. Shear, undrained behavior: Most of the parameters match the parameters for bearing capacity, undrained behavior. Additional parameters are: uRd Hd Calculation value of the undrained shear resistance. Calculation value of the horizontal load. 140 of 280 Deltares View Results Shear, drained behavior: dRd Hd Calculation value of the drained shear resistance. Calculation value of the horizontal load. Min b0 Min l0 8.3.3.2 Minimum value of the effective width determined during the calculations. Minimum value of the effective length determined during the calculations. Calculation value of the angle of internal friction of the critical soil layer. DR AF fgem;d T Stability checks: Limit states GEO and serviceability limit state The following are executed for both limit state GE0 and serviceability limit state: Determining initial effective surface Aef : Vd Vg;v;d b0 l0 Calculation value of the vertical load. Calculation value of the extra load of soil when the foundation level is displaced with respect to punch. Effective width of the foundation element. Effective length of the foundation element. A first approach to the settlement to determine the 20% limit layer (NEN 9997-1+C1:2012). This is the deepest layer where the increase in vertical force is still greater than 20%. To gain an impression of the sensitivity of the 20% limit, a 5% limit layer has also been determined. This should be seen as additional information. The first approach is based on Fs;v;d as the point load. Deltares 141 of 280 DR AF T D-F OUNDATIONS, User Manual layer no. depth dsigmav;z;d sigmav;z;o;d percentage 142 of 280 Layer in the soil profile, counting down from the surface. Level in m at which the effective stresses have been determined (middle of the relevant layer). Calculation value of the increase in effective stress at depth z . Calculation value of the original vertical effective stress at depth z . Increase in stress as percentage of the original stress or 100 × dsigmav;z;d / sigmav;z;o;d. Deltares View Results 20% laag 5% laag Number of the lowest layer for which the percentage is above 20%. Number of the lowest layer of which the percentage is above 5%. Calculation of the settlement: DR AF T The effective foundation surface (Aef ) is divided here into 256 equal sections. A point load of the size Fs;v;d /256 is located on each plane. This is aimed at a better way of finding the increase in stress (uniform load approach). layer no. depth Number of the layer in the soil profile. Level in m at which the effective stresses have been determined (middle of the relevant layer). dsigma;v;z;d Recalculated calculation value of the increase in effective stress at depth z. sigma;v;z;o;d Calculation value of the original vertical effective stress at depth z. e Void ratio. e0 Initial void ratio. s1 Calculation value of the primary settlement (w1;d ) based on calculation for s1;gd all layers with stress increases greater than or equal to 20%. If the layer number has an asterisk it involves an additional, purely informative value for the primary settlement (w1;gd ) based on calculating settlements for layers with stress increases greater than or equal to 5%. Comparing w1;d with w1;gd produces an indication for the sensitivity of the layer classification related to the primary settlement. To indicate the accuracy of the settlement calculation: Max. dsigma;v;z;d as percentage of the effective foundation pressure = 98% For purely vertically loaded foundations, this percentage should be above 80% to have an accurate calculation. When horizontal loads are also working on the foundation, the effective foundation area is reduced by the horizontal load and the percentage here will drop considerably. So, in case of horizontal loading this percentage does not provide a directly usable indication. Deltares 143 of 280 D-F OUNDATIONS, User Manual Overview of the calculated settlements: s1 and s1;gd s2 s 8.4 8.4.1 See above. Calculation value of secondary settlement. Calculation value total settlement (s1 + s2 ). Report and report content selection Report 8.4.2 DR AF T The report file is made available each time a calculation has been performed successfully. It can be viewed by clicking on the Report node in the tree view. The report repeats the input and presents the results of the calculation. If the calculation process has been aborted because of calculation errors or input errors, a description of the encountered errors will be displayed in the report. Report content selection Select Report Selection from the Results menu at the top of the screen in order to open the Report Selection window. Figure 8.4: Report Selection window In this window the required content of the report can be chosen by marking the checkboxes. Click Select All to mark all of the checkboxes and Deselect All to un-mark all of the checkboxes. Clicking OK will apply this selection to the report. 144 of 280 Deltares 9 Feasibility module During the analysis of a sheet pile wall, after verifying the wall’s stability, it is also important to perform a feasibility check. For this purpose, the use of the Feasibility module helps the user to evaluate the feasibility of a project by comparison with prior experiences from the GeoBrain database. GeoBrain was started in 2002 at Deltares and aims to develop a prediction model for the feasibility of different types of geotechnical engineering works. The database contains details of hundreds of projects involving the driving of piles. The Feasibility module gives access for the user to those experiences, as explained in section 9.2 and section 9.3. T Note: When using the Feasibility module, the aim is not to judge the feasibility of the project as input into D-F OUNDATIONS but only to provide the user with experiences on practical feasibility. The user retains the final responsibility for the project. 9.1 DR AF Note: For now, the feasibility options are limited to rectangular prefab piles and user defined round piles when using the model Bearing piles (EC7-NL) and to user defined round piles only for the model Tension Piles (EC7-NL). Selection of soil profile and pile type When choosing either GeoBrain drivability prediction or GeoBrain drivability experiences from the Feasibility menu, the Select a profile window first opens in which one of the previously defined soil profiles and pile types must be selected before starting a prediction (section 9.2) or searching similar experiences in the GeoBrain database (section 9.3). Figure 9.1: Select a profile window Profiles Deltares Select one of the available CPT profiles previously defined in the Soil – Profiles window. 145 of 280 D-F OUNDATIONS, User Manual Pile type GeoBrain Drivability Prediction T If the GeoBrain drivability prediction option was selected from the Feasibility menu, the GeoBrain Prediction window opens after selecting a soil profile and a pile type (section 9.1). D-F OUNDATIONS contacts on-line the GeoBrain experience database. DR AF 9.2 Select one of the available pile type previously defined in the Foundation – Pile Types window. At this moment, the feasibility options are restricted to ‘valid’ piles: either rectangular prefabricated concrete piles (without enlarged tips) or round user defined piles. Figure 9.2: GeoBrain Prediction window, First page CPT Pile length Distance between piles Pile dimensions Water level to surface 146 of 280 The name of the selected CPT (section 9.1). The length of the pile as inputted in the Additional Data tab of the Soil – Profiles window of the selected CPT. The minimum distance between two piles from the pile plan (as defined in the Foundation – Pile Properties window). If only one pile was defined, D-F OUNDATIONS will use a default large value of 109 meters. The dimensions of the selected pile type (section 9.1). Ground water level (as inputted in the Additional Data tab of the Soil – Profiles window of the selected CPT) with respect to ground surface. Click this button to first modify the other data before performing a prediction. When clicking this button, the user is directed through the different items of a menu bar. If the user does not know the answer to a question, default values are used. (section 9.2.1). Deltares Feasibility module Click this button to predict directly, without changing the default values for other data. When clicking this button, the user is directly directed to the Result menu (section 9.2.4) if all required information are correct. If not, the user is directed through the different items of a menu bar (section 9.2.1) to fill in the missing required information. 9.2.1 GeoBrain Prediction – Menu bar T When clicking the Refine button, a main screen appears with a menu bar (Figure 9.3) at the top and the bottom. Menus named Geotechnics (section 9.2.2) and Installation (section 9.2.3) contain questions that either have been filled automatically or must be filled by the user before performing any prediction in the Result menu (section 9.2.4) and viewing/saving the report in the Report menu (section 9.2.5). Use the Next > and < Previous buttons to go through this menu. 9.2.2 DR AF Figure 9.3: GeoBrain Prediction window, Menu bar GeoBrain Prediction – Geotechnics menu The Geotechnics menu shows the selected CPT and contains geotechnical questions. Figure 9.4: GeoBrain Prediction window, Geotechnics menu Deltares 147 of 280 D-F OUNDATIONS, User Manual Question 2 Groundwater level with respect to the surface [m]: D-F OUNDATIONS uses as default the ground water level of the first stage (Figure 9.2). GeoBrain Prediction – Installation menu T Current CPT file: The name of the CPT file providing the soil profile of the project. By default, D-F OUNDATIONS uses the selected CPT in the Select a profile window (section 9.1). However, three options are available to get an other CPT file: Select Upload CPT to import a GEF-CPT file by clicking the Browse button; Select Search for CPT to import a GEF-CPT file from the DINO Database (Data and Information of the Subsurface of The Netherlands). The search is made using a map. Refer to (DINO) for more information on the DINO database. Select Default CPT to select a GEF-CPT file from a drop-down list containing default CPT for the main Dutch cities. DR AF 9.2.3 Question 1 The Installation menu contains questions about the installation method. Figure 9.5: GeoBrain Prediction window, Installation menu Question 3 148 of 280 What is the chance that an obstacle will be encountered? Enter 0 if no obstacle. Deltares Feasibility module Question 5 Question 6 Question 7 Question 8 Question 9 DR AF Question 10 Question 11 Question 12 9.2.4 Do you know which pile hammer is used? If Yes, a D-F OUNDATIONS library of machines is available (see Question 5). If No, the user has to input manually the energy needed to install the pile. Type of pile hammer If known, select a type of machine from the drop-down menu. Blow energy pile hammer Enter the energy that must be developed by the machine to install the pile. Kind pile hammer Choose between diesel and hydraulic pile hammer. Spacing between piles Enter the distance between two piles. D-F OUNDATIONS uses as default the Distance between piles of the first stage (Figure 9.2). Diameter of the piles Select the diameter of the piles from the available drop-down menu. D-F OUNDATIONS uses as default the diameter of the first stage (Figure 9.2). If a rectangular pile was selected (section 9.1), D-F OUNDATIONS calculates its equivalent diameter and select as default the closest diameter from the drop-down menu. Length of the piles Enter the length of the piles. D-F OUNDATIONS uses as default the length of the first stage (Figure 9.2). Concrete quality of the piles [B] Enter the quality of the concrete that represents the resistance to pressure. The quality is represented as a series of numbers and letters, for example: B 25 indicates that the material is normal concrete with a resistance to a pressure equal to 25 N/mmš. Different readings exist up to the highest class of resistance which is indicated as B 55. Permanent pre-stressing of the piles Enter the pre-stressing of the piles. T Question 4 GeoBrain Prediction – Result menu To start the prediction, select the Result menu. Deltares 149 of 280 DR AF T D-F OUNDATIONS, User Manual Figure 9.6: GeoBrain Prediction window, Result menu 9.2.5 GeoBrain Prediction – Prediction Report To get a complete report in PDF format containing the input and results, click on the link View the report here as a pdf-file in the Report menu (Figure 9.7). Figure 9.7: GeoBrain Prediction window, Report menu The Prediction Report window opens (Figure 9.8) with the default Internet Explorer program. 150 of 280 Deltares Feasibility module DR AF T Using the appropriate icon on the menu bar, this prediction report can either be printed and/or saved as a PDF document. Figure 9.8: Prediction Report window, Results prediction section 9.3 GeoBrain Drivability Experiences If the GeoBrain drivability experiences option was selected from the Feasibility menu, the GeoBrain Experiences window opens after selecting a soil profile and a pile type (section 9.1). The feasibility of the design using the GeoBrain experience database can be predicted. Deltares 151 of 280 DR AF T D-F OUNDATIONS, User Manual Figure 9.9: GeoBrain Experiences window CPT Pile length Pile dimensions The name of the selected CPT (section 9.1). The length of the pile as inputted in the Additional Data tab of the Soil – Profiles window of the selected CPT. The dimensions of the selected pile type (section 9.1). The GeoBrain database can be consulted in three different ways: Click this button to search experiences in the GeoBrain database based on similar pile length and pile dimensions of the D-F OUNDATIONS project. See section 9.3.1 for a detailed description of the search results. Click this button to search experiences in the GeoBrain database based on a similar soil profile deduced from the imported CPT. Before clicking the CPT button, select from the drop-down menu a type of similarity between the soil profile of the GeoBrain database and the soil profile of the current project. See section 9.3.2 for a detailed description of the search results. Click this button to search experiences in the GeoBrain database close to the location of the current project, by using a map. See section 9.3.3 for a detailed description of the search results. 152 of 280 Deltares Feasibility module Figure 9.10: GeoBrain Experiences window, Type of similarity between the soil profile of the GeoBrain database and the soil profile of the D-Foundations project GeoBrain Experiences – Search on Pile Type T When searching in the GeoBrain experience database projects with similar sheet piling length and resisting moment, the GeoBrain Experiences window displays a list of projects arranged alphabetically (Figure 9.11). DR AF 9.3.1 Figure 9.11: GeoBrain Experiences window, search on Pile type Page: Profile Project Sheet pile Equipment Result Refine query Click the Back button to return to the main search window (Figure 9.9). Select a specific page by clicking on the appropriate page number. The current page displayed is indicated by an arrow below the page number. Click the Next button to go to the next page. The soil profile of the project. The name of the project. Click on the name to access detailed information as shown in Figure 9.12. The sheet pile profile and length. The type of pile hammer used. The quality of the project result. Refine the search by clicking the appropriate requirement, see below for a detailed description. Clicking on the name of the project, give access to more detailed information on the selected project as shown in Figure 9.12. In the window displayed, all sort information on Situation, Deltares 153 of 280 D-F OUNDATIONS, User Manual DR AF T Geotechnics, Sheet piling, Installation, Surroundings and Experiences are available by clicking the corresponding name on the menu bar at the top. Click on Back to return to the projects list (Figure 9.11) and inspect other projects. Figure 9.12: GeoBrain Experiences window, Detailed information on the selected project Using the Refine query table at the right side of the window (Figure 9.11), it is possible to refine the search by clicking the appropriate requirement displayed in green. In parenthesis is the number of projects of the GeoBrain database that meet this requirement. The available requirements concern the quality of the result, the project location, some sheet pile installation settings and some undesirable occurrences as listed below: Result Area Length Dimensions prefab pile Pile hammer, blow energy Undesirable occurrences Choose between Good, Moderate or Poor. Different regions from the Netherlands or different countries (Belgium or Germany) can be selected. Select one of the length intervals of 5 m corresponding to the current project. D-F OUNDATIONS uses as default the length of the first stage (Figure 9.9). Select one of the diameters of the pile. D-F OUNDATIONS uses as default the dimensions of the first stage (Figure 9.9) and if a rectangular pile was selected (section 9.1), D-F OUNDATIONS calculates its equivalent diameter and select as default the closest diameter. Select one of the blow energy intervals used by the pile hammer of the current project. Select one of the undesirable occurrences in the list that are expected to occur in the current project. Using the Refine Query table, it is also possible to change requirements by clicking the arrow behind the requirement, as shown in Figure 9.13 (a) for Length and Resisting moment. This will result in an enlargement of the search results as shown in Figure 9.13 (b) allowing the user to change the requirements. 154 of 280 Deltares DR AF T Feasibility module Figure 9.13: GeoBrain Experiences window, Search on Pile type – Detailed view of the Refine Query 9.3.2 GeoBrain Experiences – Search on CPT When searching in the GeoBrain experience database projects with similar CPT, the GeoBrain Experiences window displays a list of projects with similar CPT compared to the selected CPT (section 9.1). Refer to section 9.3.1 for a detailed description of the resulting list. 9.3.3 GeoBrain Experiences – Search on Location When searching in the GeoBrain experience database projects situated close to the location of the current project, the GeoBrain Experiences window displays a map of the Netherlands (Figure 9.14). Deltares 155 of 280 DR AF T D-F OUNDATIONS, User Manual Figure 9.14: GeoBrain Experiences window, Search on Location – View the total per area Click this button to display a map view including cities, street and motorway names and representation. Click this button to display a satellite view. Click this button to display a combination of the Map and Satellite views. Zoom in: Click this button to enlarge the map. Zoom out: Click this button to reduce the map. Pan: Click this button to move the map by dragging the mouse. Click this button to return to the main search window (Figure 9.9). Zooming out (Figure 9.14) will display the results as pie (i.e. total experiences per area) whereas zooming in (Figure 9.15) will display the results as separate points (i.e. individual experiences). 156 of 280 Deltares DR AF T Feasibility module Figure 9.15: GeoBrain Experiences window, Search on Location – View individual experiences In case of results display as pie, click on the pie (Figure 9.16, left) to get the name of the corresponding province and the number of projects. Click on the “Click here” link to display a detailed list of those projects. Refer to section 9.3.1 for a detailed description of the resulting list.In case of results display as individual points, drag the hand cursor on a point (Figure 9.16, left) to get the name of the corresponding experience and click on the point to display more details on this experience. Refer to section 9.3.1 for a detailed description of the resulting list. Deltares 157 of 280 DR AF T D-F OUNDATIONS, User Manual Figure 9.16: GeoBrain Experiences window, search on Location 158 of 280 Deltares 10 Tutorial 1: Preliminary Design of Bearing Piles for a Storehouse This first tutorial considers the preliminary design of a pile foundation for a storehouse. The objectives of this exercise are: To learn the steps needed to enter relevant data for a preliminary design, such as soil and pile properties. To calculate the bearing capacity with depth of a single pile, just for preliminary design purposes (This preliminary design is verified in Tutorial 2). For this tutorial the following D-F OUNDATIONS module is needed: This tutorial is presented in the file Tutorial-1.foi. Introduction A new storehouse needs to be constructed, in a delta environment. In the light of the expected loads acting on the foundation and the soil profiles usually found in a delta, a pile foundation will be needed. Two cone penetration tests (CPTs) have already been carried out at the proposed location. In order to get a first impression of an appropriate pile type and the corresponding pile length, a preliminary design will be performed using D-F OUNDATIONS, based on a first estimate of the required load capability (400 kN per pile). Two different pile types will be considered: a square 250 mm prefab concrete pile, and a concrete pile with an enlarged base. DR AF 10.1 T D-F OUNDATIONS Standard module (Bearing Piles EC7-NL) Figure 10.1: Storehouse construction in a delta environment (Tutorial 1) Deltares 159 of 280 D-F OUNDATIONS, User Manual 10.2 Setting up a new project DR AF T 1. Start D-F OUNDATIONS and create a new project by clicking the button on the toolbar. The Project Properties – Description window is displayed as indicated in Figure 10.2. 2. Enter the text <Tutorial 1 for D-F OUNDATIONS > for Title 1, and <Bearing Piles calculation with concrete piles> for Title 2. These titles identify the project, and are displayed in all reports and graphs printed. Figure 10.2: Project Properties – Description window to save the project. In the Save As dialog that opens, browse to a folder where the 3. Click tutorial has to be saved and type <Tutorial-1> in the input field File name. 4. Click Save to close the window. An empty project, identified by its name and description, has now been created. The following sections of this tutorial describe how to enter the input needed for the preliminary design of the piles. 10.3 Construction sequence 5. Click on the Construction Sequence node under Project Properties in the tree view on the left of the screen. This will open the corresponding window where the relative timing of CPTs with respect to the installation of the piles can be specified. This execution time is needed to determine whether certain exceptions made in NEN 9997-1+C1:2012 apply, see section 4.2. 6. Select CPT – Excavation – Install since the two cone penetration tests were done prior to the design of the foundation. 10.4 Creating soil profiles For the design of a foundation in D-F OUNDATIONS, CPTs data are needed. These are interpreted to give the soil profile data. The results of the two cone penetration tests carried out at the project site are shown in Figure 10.3 and Figure 10.4. The results show that competent bearing sand for the foundation starts at a reference level of approximately -13 m. It can therefore be initially concluded that the piles need to have a length of more than 13 m minus ground level. It can also be concluded that the skin friction along the pile will switch from negative friction to positive friction at this level, if negative friction is to occur. 7. To import the two CPTs, click the Profiles node under Soil in the tree view. As there are currently no soil profiles in the model, D-F OUNDATIONS automatically opens the Import CPTs 160 of 280 Deltares Tutorial 1: Preliminary Design of Bearing Piles for a Storehouse DR AF T from file dialog. 8. Select the file <Tutorial-1 CPT 01.gef> and click Open. D-F OUNDATIONS reads the selected file and opens the Soil – Profiles window (see Figure 10.5). A new subnode is formed under Profiles bearing the name of the CPT. 9. To import the second CPT click the Profiles node again and select Import under Action. 10. The Import CPTs from file dialog opens as before; this time select Tutorial-1 CPT 02.gef, and click Open. Figure 10.3: CPT 01 (Tutorial 1) Deltares 161 of 280 DR AF T D-F OUNDATIONS, User Manual Figure 10.4: CPT 02 (Tutorial 1) 11. Click the name of one of the CPTs in the tree view to open its corresponding Soil – Profiles window. In this window, two soil profiles are drawn. The left profile is an interpretation of the imported CPT, with the CPT data drawn to the left of it. The interpretation method that is selected as the default method is the NEN Rule (based on NEN 9997-1+C1:2012 Table 2.b). The default minimum layer thickness is 0.10 m, which results in a soil profile with many thin layers. 12. Check that NEN Rule is selected for the CPT Rule. In order to make a visual inspection of the interpreted soil profile feasible, set the Min. layer thickness to 0.20 m. The right-hand profile is the profile that may be edited by the user. It is also presented in tabular format at the right-hand side of the Soil – Profiles window. This profile is used as the input profile for calculations. 13. Click the button to copy the new CPT interpretation to right-hand profile. 14. Repeat this process for the other CPT by selecting the other CPT in the tree view, selecting button again. NEN rule, setting the Min. layer thickness to <0.20 m> and clicking the 162 of 280 Deltares DR AF T Tutorial 1: Preliminary Design of Bearing Piles for a Storehouse Figure 10.5: Soil – Profiles window The profiles that have resulted from this interpretation will be used for the remainder of this tutorial (the right-hand profile), and will function as input for the preliminary design calculations.There is one more parameter that needs to be inputted here, namely the level in the soil profile where the skin friction changes from negative into positive. Based on a visual inspection of the CPT, it can be assumed that this is at reference level -13 m, at the top of the bearing sand layer and just below the soils that are susceptible to settlement. 15. Switch to the Additional Data tab and fill in this value in the input field Top of positive skin friction zone and in the input field Bottom of negative skin friction zone. The default values provided for the other parameters on this tab are as required for this design case and need not to be changed. Figure 10.6: Soil – Profiles window, Additional Data tab Deltares 163 of 280 D-F OUNDATIONS, User Manual 16. Switch from one profile to the other by clicking in the tree, and apply this data to the other profile as well. The input of soil data needed for these basic design calculations is now complete. Optionally, the actual soil parameters used in the calculation can be reviewed under the node Materials. Defining the foundation The next step is to input data on the foundation to be used. For a preliminary design the pile type needs to be defined. T 17. To define the pile types for this tutorial, click the Pile Types node in the tree view. When this node is selected for the first time, D-F OUNDATIONS creates a new pile type and shows its properties in the Foundation – Pile Types window. DR AF 10.5 Figure 10.7: Foundation – Pile Types window The first pile type is a rather simple one: a square prefabricated concrete pile, with a base width of 250 mm. Because rectangular prefabricated concrete piles are the default in D-F OUNDATIONS, only the dimensions of the pile need to be filled in to finish defining the first pile type. 18. In the two input fields Base width and Base length, fill in <0.25 m>. The second pile type, a concrete pile with enlarged base, is not as straightforward to input as the first one. Especially because in this case, the pile manufacturer advises to use a specific value for αρ (αρ = 0.88). 19. To create a new pile type, select the Pile Types node in the tree view, and click New in the Pile Types window. A copy is made of the previous pile type. 164 of 280 Deltares Tutorial 1: Preliminary Design of Bearing Piles for a Storehouse Figure 10.8: Creating new pile types T In this window, enter/edit the data as described below: DR AF 20. Click the picture of Rectangular pile with enlarged base. After selecting this option, the parameters that may be entered appear in the lower half of the input window. 21. Enter the values that are listed below: For base width av: 0.4 m; For base length bv: 0.42 m; For height H: 1.2 m; For shaft width as: 0.32 m; For shaft length bs: 0.32 m; 22. Select <User defined (vibrating)> as the Pile Type. 23. Select <Bored pile (drilling mud, uncased borehole)> under αs sand/gravel to cause the automatic selection of the pertinent pile factor for shaft friction in sand and gravel. 24. Select <According to the standard> under αs clay/loam/peat to allow the pile factor for shaft friction in clay loam and peat to be determined according to the NEN 9997-1+C1:2012 standard. 25. Select <User defined> for αp , the pile factor for the point, and enter the value <0.88> in the input field that appears. 26. Select <Displacement pile> under Load-settlement curve. 27. Select <Concrete> as the Material. The Young’s modulus is given automatically. 28. Select <Synthetic> as the Slip layer. Deltares 165 of 280 T D-F OUNDATIONS, User Manual DR AF Figure 10.9: Foundation – Pile Types window, Selecting dimensions See section 4.4.1 for explanation of the dimensions. These dimensions are also shown in the diagram on the right. Two different pile types have now been defined. Later on, calculations will be made for both types. 10.6 Entering the context The soil profiles and pile types needed for the preliminary design calculation have now been defined. However, some information about the location of the piles and about various conditions that will effect the pile loading still needs to be entered. For instance, the actual piles and their positions have not yet been specified. 29. To enter a pile, click the Pile Properties node in the tree view. 30. In the window that opens, simply click the first row to enter a pile. Note that the X and Y co-ordinate and the pile head level by default are derived from the CPT data available. For this case, these default values are ok. 31. Set the Pile Head Level to <0 m>. This example assumes that within the building area the soil level will be raised with 0.5 m by adding a layer of sand. This will be done after driving the piles to improve the accessibility of the site. This embankment corresponds to a surcharge load of 9 kN/m2 . 32. Enter <9> in the Surcharge column in the table. More piles do not need to be added at this stage. For a preliminary design a single pile is considered in default. A pile plan can only be considered in a design stage. 166 of 280 Deltares Tutorial 1: Preliminary Design of Bearing Piles for a Storehouse Making a preliminary design The next step is to perform a preliminary design calculation, for which only a single pile is considered. 33. Switch back to the Soil – Profiles window in order to view the soil profiles. This will allow the depth range over which the calculation should take place to be determined. The depth range of interest for this design consists of the layers of loam and sand that lie between reference levels -13 m and -22 m because between these levels the soil layer seems able to bear our foundation (it has a relatively high qc ). DR AF 10.7 T Figure 10.10: Foundation – Pile Properties window Figure 10.11: Profiles window, Detail of the Soil To make sure to find the proper level, the actual trajectory is stretched a bit. So it starts at -10 m and ends at -25 m. Please note that CPT-data needs to be available to at least 5 times the pile diameter below the deepest pile tip level (in this case -25 m). 34. Switch to the Calculation window and select Preliminary Design for Calculation Type and Indication Bearing Capacity under Calculation. 35. Mark the Write intermediate results (Dutch) checkbox to make it possible to view the intermediate results file. 36. Enter a Trajectory to Begin at <-10 m> and End at <-25 m>, with an Interval of <0.5 m>. Deltares 167 of 280 DR AF T D-F OUNDATIONS, User Manual Figure 10.12: Calculation window 37. Press the Start button to begin the calculation. Note: For preliminary design calculation always a single pile is considered, whatever the plan of piles has been filled in previously in the Pile Properties window. 168 of 280 Deltares Tutorial 1: Preliminary Design of Bearing Piles for a Storehouse T Results DR AF 10.8 Figure 10.13: Design Results window, Chart tab When the calculation process has finished, the bearing capacity with depth of the pile tip is displayed in graphical format, for both pile types and both soil profiles. Follow the steps given below to inspect the results for the pile types one by one. 38. First, select pile type Rect 250 × 250 from the list of pile types. The two lines in the graph that result give the bearing capacity for both soil profiles. A bearing capacity of 400 kN is needed, which is achieved at a level of -15.7 m. 39. Then select pile type RectEnl 400 × 420 from the list of pile types, and read the values for the bearing capacity for both profiles. Now, the required bearing capacity is achieved at a level of -14.4 m. Note: For a preliminary design and consequently a single pile the default ξ3 and ξ4 -factors that are taken into account are the ξ3 and ξ4 factors for two CPTs (n = 2) and non-rigid structure (also see NEN 9997-1+C1:2012 Table A.10a). For a rigid superstructure, lower ξ3 and ξ4 factors are allowed; resulting a higher bearing capacity for the same piles at the same depth when verifying the preliminary design later on. Most probably the specifications for this foundation, assuming a rigid superstructure, are met at a reference level of -14 m. Note: The design graph shows the level of the piles; as the surface level is at about -0.8 m, these needs to be taken into account for the length of the piles. It can be concluded that the foundation can be constructed either using rectangular piles with a length of at least 15.7 - 0.8 = 14.9 m, or with piles with enlarged base with a length of 14.4 - 0.8 = 13.6 m. The final choice of pile type may depend on several factors, such as bearing capacity, expense of the piles or usefulness of the pile type compared to other pile types available. Deltares 169 of 280 D-F OUNDATIONS, User Manual In the two next tutorials this project will be continued, looking at the feasibility (Tutorial 2 in chapter 11) and at the verification rather than the preliminary design (Tutorial 3 in chapter 12). Conclusion T This tutorial has demonstrated how to enter the data required for a simple preliminary design calculation. The calculation option Preliminary design: Indication bearing capacity allows the minimum pile length to be determined, by finding the bearing capacity as a function of depth for a specified single pile. DR AF 10.9 170 of 280 Deltares 11 Tutorial 2: Feasibility of Bearing Piles for a Storehouse Now the design of the bearing piles for the storehouse is finished (chapter 10), it is time to check the feasibility of the design using the Feasibility module. The objectives of this tutorial are: To learn how to input a grid of piles. To learn how to predict the drivability of the piles using forecasting models in GeoBrainGeoBrain. To learn how to utilize the existing experiences of the GeoBrain database with similar designs. T For this tutorial the following D-F OUNDATIONS modules are needed: D-F OUNDATIONS Standard module (Bearing piles EC7-NL) Feasibility module 11.1 DR AF This tutorial is presented in the file Tutorial-2.foi. Introduction to the case In the first tutorial (chapter 10), a preliminary design for a storehouse foundation was made based on the results of two CPTs, and two given pile types. It was concluded that square concrete piles with a pile tip level of -15.9 m or piles with enlarged base with a pile tip level of -14.4 m would probably be sufficient for a rigid superstructure (section 10.8). The necessary requirements for assuming a rigid superstructure are given in NEN 9997-1+C1:2012 art. 7.6.1.1(c). The pile tip level is important to determine the correct pile length as this length is required in the feasibility options. At this moment, the feasibility options are restricted to either rectangular prefab concrete piles (without enlarged tips) or round user defined piles. This means that, for now, only the feasibility of the Rect 250 × 250 pile type can be checked. In addition to the results of Tutorial 1, the next information about the project and its piles is also available: Concrete quality of pile: B55 Permanent pre-stressing of pile: 0 N/mm2 Pile hammer to be used: JUNTTAN HHK 5 Given the measurements of the storehouse, a pile plan consisting of 36 piles in a 6×6 grid has been devised (Figure 11.1). The piles are 2 m apart from each other. Deltares 171 of 280 DR AF T D-F OUNDATIONS, User Manual Figure 11.1: Front and top views of the pile plan (Tutorial 2) 11.2 Preparing a new project 1. Click Open from the File menu and select the project Tutorial-1. 2. Select Save As in the File menu and save the project as <Tutorial-2> before continuing this tutorial. 3. In the Project Properties – Description window, change Title 1 and Title 2 to respectively <Tutorial 2 for D-F OUNDATIONS > and <Feasibility of Bearing Piles for a Storehouse>. 11.3 Defining the correct pile tip level(s) The first step is to define the correct pile tip levels to be used for the feasibility checks. 4. Switch back to profile 01 by selecting its corresponding node in the tree view. In the Soil – Profiles window that opens, select the second tab: Additional Data. 5. Fill in the value of reference level <-15.7 m> in the input field Pile tip level. Note that this value of -15.7 m represents the pile tip level, which is easily computed from the surface level and the pile length (-0.8 - 14.9 = -15.7). 6. Switch to profile 02 and fill in the same value. 11.4 Defining the pile plan The pile types to be used and the length of the piles have already been defined/determined in the previous tutorial. It now remains to define the pile plan by entering the pile locations, along with some additional data. 7. Click the Pile Properties node in the tree view. A window opens with a table containing the single pile that was entered in the previous tutorial. Based on the maximum bearing capacity of the piles and the weight of the building, the constructor has decided to use a grid of 36 piles, evenly spaced in both the X- and Y directions. The Generate Pile Grid option offers a fast way of entering a regular grid of identical 172 of 280 Deltares Tutorial 2: Feasibility of Bearing Piles for a Storehouse DR AF T piles. Figure 11.2: Pile Grid window 8. Click the Generate Pile Grid button to open the Pile Grid window. In this window, enter the location of the lower left pile in the plane (X = 120000 m; Y = 50000 m), and enter the distance between two piles (2 m in both directions). 9. Specify the number of piles in both directions (6 piles) and the level of the pile head (0 m below the reference level). Note that a level below reference implies a negative value. 10. Fill in a Design value of load on pile of <400 kN> for Limiting state STR/GEO and <300 kN> for Serviceability limit state. As the embankment will still be made, the surcharge does not change. 11. Check the option Use pile grid to replace current pile positions to replace the single pile that was entered in the previous example. 12. Click the OK button to close the window. D-F OUNDATIONS generates a pile plan consisting of 36 piles with the given properties. 13. Click the Top View Foundation node in the tree view to display a graphical representation of the pile plan, as illustrated in Figure 11.3. Deltares 173 of 280 T D-F OUNDATIONS, User Manual Figure 11.3: Top View Foundation window, Overview of the pile plan Checking the drivability using GeoBrain prediction DR AF 11.5 To predict the feasibility of the design, a CPT-profile needs first to be selected. Note: The results may differ as GeoBrain application is an independent and living application. Experiences are added at any time leading to further improvement of the prediction results. 14. Select the option GeoBrain drivability prediction from the Feasibility menu. This displays the window given in Figure 11.4. Figure 11.4: Select a profile window 15. Select <01> at Profiles by clicking on it. Note that Rect 250×250 is for now the only available ‘valid’ pile type so there’s no need for selecting it in this case. 16. Click the OK button to start the prediction module itself. 174 of 280 Deltares DR AF T Tutorial 2: Feasibility of Bearing Piles for a Storehouse Figure 11.5: GeoBrain Prediction window, First page Information as far as available in D-F OUNDATIONS is passed on to the GeoBrain application, as shown at the top of the GeoBrain Prediction window (Figure 11.5). It is possible to make a rough prediction with this information by clicking Predict. To get a better prediction, follow the steps below. 17. Click Refine to use the additional project data in the prediction. This will show the general introduction page of the GeoBrain application (Figure 11.6). Figure 11.6: GeoBrain Prediction window, Introduction 18. Click Continue to go to the next page. Deltares 175 of 280 DR AF T D-F OUNDATIONS, User Manual Figure 11.7: GeoBrain Prediction window, Geotechnics menu 19. In the window displayed (Figure 11.7), the CPT and its belonging profile can changed but as this data is already obtained from D-F OUNDATIONS, just go to the next page by clicking Next >. 20. In the Installation menu (Figure 11.8), provide the additional information about the project as given in section 11.1. 176 of 280 Deltares DR AF T Tutorial 2: Feasibility of Bearing Piles for a Storehouse Figure 11.8: GeoBrain Prediction window, Installation menu Note: Leave a blank field if the required information is not available (such as with Question 3). 21. Click Next > when finished. This will provide the result of the prediction given in Figure 11.9. Deltares 177 of 280 DR AF T D-F OUNDATIONS, User Manual Figure 11.9: GeoBrain Prediction window, Result menu (1st prediction) It can be concluded that the selected pile (type) is overall moderately suitable for the job. To improve the suitability of the pile, one or more of the suggestions provided below suitability result bar, should be adapted: 22. Click < Previous and adapt the pre-stressing value to <4 N/mm2 > and redo the prediction by clicking Next >. 178 of 280 Deltares DR AF T Tutorial 2: Feasibility of Bearing Piles for a Storehouse Figure 11.10: GeoBrain Prediction window, Result menu (2nd prediction) As the suitability of the pile has indeed further improved (Figure 11.10), it can be concluded that raising the pre-stressing level is an option to improve the suitability of the pile for this project. 23. Redo the process (starting at step 14) for Profile 02 (so select 02 at step 15) with a prestressing of 4 kN/mm2 . This results in the prediction given by Figure 11.11 Deltares 179 of 280 DR AF T D-F OUNDATIONS, User Manual Figure 11.11: GeoBrain Prediction window, Result menu for Sondering 02 Then, it can be concluded that the chosen pile (type) is suitable for this project. 11.6 Checking the drivability using GeoBrain experiences To predict the feasibility of the design, the GeoBrain experience database can also be used. 24. Select the option GeoBrain drivability experiences from the Feasibility menu. This displays the Select a profile window (Figure 11.12). 180 of 280 Deltares DR AF T Tutorial 2: Feasibility of Bearing Piles for a Storehouse Figure 11.12: Select a profile window 25. Select <01> at Profiles by clicking on it. Note that Rect 250×250 is for now the only available ‘valid’ pile type so there’s no need for selecting it in this case. 26. Select the OK button to start the experiences module itself. Figure 11.13: GeoBrain Experiences window, First page Deltares 181 of 280 D-F OUNDATIONS, User Manual Information as far as available in D-F OUNDATIONS is passed on to the GeoBrain application, as shown at the top of the GeoBrain Prediction window (Figure 11.13). DR AF T 27. Click the Pile button of the Search on pile to retrieve the experiences with similar pile types (i.e. dimensions and length): Figure 11.14: GeoBrain Experiences window, Search on pile type In total 33 experiences are available to review (this number can be different from Figure 11.14 as the GeoBrain database continuously grows). On the right side of the screen, more information about these experiences is provided. This information can also be used to refine the number of results. 28. Select <Moderate> in the Refine query box to review only the projects with moderate results to get an impression of the problems that were encountered. 182 of 280 Deltares T Tutorial 2: Feasibility of Bearing Piles for a Storehouse DR AF Figure 11.15: GeoBrain Experiences window, Search on pile type after refinement on the Result quality It is clear that so far no real bad experiences are found with this pile type. To return to the behind the Result field in the Refine query box. previous list of results, just press the arrow 29. Select the name of any given project to retrieve more information on the project itself (Figure 11.16). Figure 11.16: GeoBrain Experiences window, Detailed information on a project 30. Clicking either category will display more information about the project. 31. Click on <Back> to return to the list of Figure 11.15 and inspect other projects if wanted. Deltares 183 of 280 D-F OUNDATIONS, User Manual Conclusion T This tutorial has shown how to check the feasibility of a given design. With regards to this project, the prediction of the drivability showed only very small risks. A review of experiences with comparable projects showed that serious problems were never encountered. Hence, it’s safe to conclude that the chosen solution is feasible. DR AF 11.7 184 of 280 Deltares 12 Tutorial 3: Verification of Bearing Piles for a Storehouse A preliminary design step can only be used in order to obtain a first impression of the bearing capacity with depth for a single pile foundation. In this tutorial D-F OUNDATIONS will be used to verify the design from the first tutorial to see if it is actually correct. The objectives of this tutorial are: To verify the preliminary design from Tutorial 1 (chapter 10). For this tutorial the following D-F OUNDATIONS module is needed: D-F OUNDATIONS Standard module (Bearing piles EC7-NL) Introduction to the case In the first tutorial, a preliminary design for a storehouse foundation was made based on the results of two CPTs, and two given pile types. It was concluded that square concrete piles with a length of 14.9 m would probably be sufficient for a rigid superstructure (section 10.8). The necessary requirements for assuming a rigid superstructure are given in NEN 99971+C1:2012 art. 7.6.1.1(c). DR AF 12.1 T This tutorial is presented in the files Tutorial-3a.foi and Tutorial-3b.foi. Figure 12.1: Boring, front and top views of the pile plan (Tutorial 3) Knowing the pile plan and all details about the building, the required design loads per pile are set, by the constructor of the building, at 400 kN for limit state STR/GEO and 300 kN for Deltares 185 of 280 D-F OUNDATIONS, User Manual serviceability limit state (more information on the limit states can be found in section 17.2). 12.2 Preparing a new project 1. Click Open from the File menu and select the project Tutorial-2. 2. Select Save As in the File menu and save the project as <Tutorial-3a> before continuing this tutorial. 3. In the Project Properties – Description window, change Title 1 and Title 2 to respectively <Tutorial 2 for D-F OUNDATIONS > and <Verification of Bearing Piles for a Storehouse>. 12.3 Starting the calculation T Now that all the information about the soil profiles and the pile plan has been entered, the actual calculation can be started. DR AF 4. Switch to the Calculation window by selecting the corresponding node in the tree view. Figure 12.2: Calculation window 5. Mark the Write intermediate results (Dutch) checkbox to make it possible to view the intermediate results file. 6. Select Verification as the Calculation Type and Complete calculation under Calculation. 7. Check that the Pile type name is <Rect 250×250>. 8. Enter a depth of <-15 m> for CPT test level. 9. As dealing with storage facility, set the Rigidity of superstructure to Non-rigid. The input should now correspond with the input given in file Tutorial-2a.foi. 10. Click Start to begin the calculations. A report is automatically opened, containing the calculation results. 12.4 Evaluating the results 11. To see if the design meets the requirements of limit states STR, GEO and serviceability limit state, scroll down to the part of the report shown in Figure 12.3. 186 of 280 Deltares DR AF T Tutorial 3: Verification of Bearing Piles for a Storehouse Figure 12.3: Report window, Results of the Verification of Limit States STR, GEO, and serviceability limit state It can be seen that the design does not satisfy the requirements for limit state GEO and serviceability limit state. Note that this calculation was made for a non-rigid superstructure. This is the default choice, which represents a worst case situation. 12. 13. 14. 15. 16. Click Save As in the File menu and save the project as <Tutorial-3b>. Click Save to close the window. To verify if the design is OK for a rigid superstructure, return to the Calculation window. Select Rigid under Rigidity of superstructure. Click Start again. Deltares 187 of 280 D-F OUNDATIONS, User Manual Figure 12.4: Calculation window, Selecting Rigid for the Rigidity of superstructure Note: There are two alternative ways to let the design meet the demands, namely by choosing a pile type that has a larger diameter, or by using more piles. However, both decisions would increase the cost of the design. If the assumption of a rigid superstructure is legitimate, according to NEN 9997-1+C1:2012 art. 7.6.1.1(c), this option is preferred. Conclusion This tutorial has shown how to define and verify a grid of piles. It has been seen that the rigidity of the superstructure can affect whether the design meets the requirements of the limit states. DR AF 12.5 T From the report that results it can be concluded that the requirements now meet for all limits states. 188 of 280 Deltares 13 Tutorial 4: Pipeline Duct on Bearing Piles In this tutorial the bearing piles foundation for a pipeline duct is designed and verified in accordance with EC7-NL (NEN 9997-1+C1:2012). The objectives of this exercise are: To learn the steps needed for a complete design and verification for a foundation consisting of bearing piles. To gain perception of the consequences of options chosen prior to calculation. To determine the needed pile tip levels for the foundation to be constructed. For this tutorial the following D-F OUNDATIONS module is needed: T D-F OUNDATIONS Standard module (Bearing piles EC7-NL) This tutorial is presented in the files Tutorial-4a.foi to Tutorial-4f.foi. Introduction to the case DR AF 13.1 Figure 13.1: A pipeline duct (Tutorial 4) This tutorial considers the design and verification of a pipeline duct supported on a bearing piles foundation. Due to fluids flowing through the pipe, the weight of the construction and wind loads, there will be horizontal forces, vertical forces and moments acting on the piles. In this tutorial, it is assumed that the vertical loads on the piles are representative for the construction, and that the effects of horizontal forces and moments on the foundation are negligible. Two supports will be considered for the pipeline duct, each consisting of four piles underneath a concrete slab. The required design loads per pile are set by the constructor of the duct at 750 kN for limit state STR/GEO and 500 kN for serviceability limit state (more information on the limit states can be found in section 17.2). In order to collect enough information about the soil profile of the subsoil, two cone penetration tests have been done, one for each support. The depth of the CPT is to approximately reference level -24 m, while the surface level is at reference level +1.3 m. One of the cone penetration tests is shown in Figure 13.2 below. Deltares 189 of 280 DR AF T D-F OUNDATIONS, User Manual Figure 13.2: CPT 01 at the site where the pipeline duct is to be constructed (Tutorial 4) 13.2 Project input 1. Set up a new project (the method is described in Tutorial 1 in section 10.2). 2. Name the project <Tutorial-4a>. 3. Enter <Tutorial 4 for D-F OUNDATIONS > as Title 1 and <Pipeline Duct on Bearing Piles> as Title 2 in the Description window. 4. Make sure that the Project Model is set to be Bearing Piles (EC7-NL) in the Model window. 5. Import the cone penetration tests (that are shipped with D-F OUNDATIONS), named Tutorial4 CPT 01.gef and Tutorial-4 CPT 02.gef. 6. Convert both CPTs to soil profiles (as described in section 10.4), using the <NEN rule> with a minimum layer thickness of <0.05 m>.Because of the compressibility of the soils the expected settlements of the surface exceed 10 cm, so negative skin friction has to be taken in account. Therefore, it should be specified to what depth negative skin friction occurs. Inspect both profiles, either in the graph or the in the table. It appears that negative skin friction occurs above -11.6 m for profile 1 and above -10.2 m for profile 2. Below these levels, the soils are too firm for negative skin friction to develop. 7. Fill in these values on the Additional Data tab for each profile, both for Top of positive skin friction and Bottom of negative skin friction. Also specify the Phreatic level at <0.5 m>. 8. Define two pile types (as described in section 10.5) which are both prefabricated square concrete piles, one with a width of 400 mm and one with a width of 500 mm. 190 of 280 Deltares Tutorial 4: Pipeline Duct on Bearing Piles Preliminary Design The first stage in the design process is to determine the minimum pile tip level needed for limit state EQU. As seen in the previous tutorials, this requires a preliminary design using just a single pile. 9. Enter a single pile as described in section 10.6 and fill in a surcharge of <9 kN/m2 >. This surcharge corresponds to an embankment of sand with a height of 0.5 m. The X and Y co-ordinates of the pile are both set to <0 m>. Leave the Pile head level at <1.3 m>. 10. Click the Calculation node and select Rigid for Rigidity of superstructure. T Note: Since each support consists of one relatively small concrete slab with four piles, one support can be seen as a rigid construction. However the pipeline duct as a complete structure is a non-rigid structure. For a preliminary design only a single pile is considered. 11. Select Preliminary Design andPile tip levels and net bearing capacity,specify a trajectory from reference level <-10 m> to <-20 m> with an interval of <0.1 m> and enter a Net bearing capacity of <750 kN>. 12. Mark the Write intermediate results (Dutch) checkbox. DR AF 13.3 Note: The calculations should be performed separately for each CPT, otherwise the default value for the ξ3 and ξ4 factors will be 1.32 (two CPTs for rigid superstructure) instead of 1.39 (one CPT for rigid superstructure). The latter ξ3 and ξ4 factors are valid for just one rigid support which is the case, so select just one CPT for each calculation. button to transfer it out of the 13. Highlight CPT 2 under Selected CPTs and click the Selected CPTs window and into the Available CPTs window (Figure 13.3). The calculation will now only be performed for CPT 1. Figure 13.3: Calculation window, Selection of CPT 1 for calculation (Tutorial 4a) 14. Click Start to begin the calculation and read the results from the tables from the Design Results window that opens (Figure 13.4). Deltares 191 of 280 D-F OUNDATIONS, User Manual T Figure 13.4: Design Results window (Tutorial 4a) DR AF 15. Click Save As in the File menu and save the project as <Tutorial-4b>. 16. Repeat the calculation for CPT 2, using the and buttons to move the CPTs between the Selected CPTs and Available CPTs windows. 17. Read the results from the tables from the Design Results window that opens (Figure 13.5). Figure 13.5: Design Results window (Tutorial 4b) An overview of the required pile tip levels is given in Table 13.1. Table 13.1: Pile tip levels resulting from the preliminary design Pile type Prefab square 400 mm Prefab square 500 mm 13.4 CPT 1 -13.5 m -12.6 m CPT 2 -13.1 m -11.3 m Verification of the design It is now necessary to verify if the designed construction is OK for limit states STR, GEO and serviceability limit state for the calculated pile tip levels. The pile plan needs to be entered. The co-ordinates of the piles are as follows: for support 1: (1, 2), (1, 4), (3, 2), (3, 4); for support 2: (9, 9), (9, 11), (11, 9), (11, 11). 192 of 280 Deltares Tutorial 4: Pipeline Duct on Bearing Piles The simplest way to enter these piles is to use the Generate Pile Grid option twice. DR AF T 18. Click Save As in the File menu and save the project as <Tutorial-4c>. 19. First enter the piles for support 1. Start at the point (1, 2) with a Centre to centre distance of <2 m> in both directions and with 2 piles in each direction. Keep the pile head at <1.3 m> and the Surcharge load at <9 kN/m2 >. Set the design loads working on each pile of <750 kN> (Limit state STR/GEO) and <500 kN> (Serviceability limiting state). The option Use pile grid to replace current pile positions should be selected. 20. Follow the same procedure to enter the piles for support 2, this time starting at (9, 9). The loads are the same as for support 1. This time the option Use pile grid to replace current pile positions should be deselected to avoid overwriting the input for support 1. Figure 13.6 shows the input pile plan as displayed in the Top View Foundation window. Figure 13.6: Top View Foundation window, Pile plan of the two supports All the information required to verify if the construction meets the requirements for limit state GEO and serviceability limit state has now been entered. 21. Perform a Verification Design calculation for the pipeline construction, selecting both CPTs and pile type Rect 500×500. 22. Change the End of the Trajectory to <-15 m> as now it is known that deeper levels are not of interest. Set CPT test level to <-15 m>. 23. As about to perform a calculation based on the entire pile plan for the entire construction, keep in mind that the construction is only partly rigid (each footing on its own). So make sure that the correct ξ3 and ξ4 factors will be used. Override ξ3 and ξ4 factors by selecting its box and fill in the proper value (for 1 CPT and rigid superstructure): Factor ξ3 and ξ4 = 1.26. If the determination of ξ3 and ξ4 is done by the program with rigid selected, it would be based on 2 CPTs resulting in a value of 1.20 (ξ3 ) and 0.96 (ξ4 ). Deltares 193 of 280 DR AF T D-F OUNDATIONS, User Manual Figure 13.7: Calculation window, Selection of CPTs and pile type for Verification, Design calculation(Tutorial 4c) 24. Click Start to perform the calculation. 25. In the Design Results window that opens (Figure 13.8), select the Text tab. From the table that is shown, it can be seen that limits state GEO and serviceability limit state (SLS) are passed for levels of -12.5 m and deeper for the representative CPT of both CPTs. Figure 13.8: Design Results window, Text tab (Tutorial 4c) 194 of 280 Deltares Tutorial 4: Pipeline Duct on Bearing Piles Maximum negative skin friction D-F OUNDATIONS can be used to calculate the maximum negative skin friction load for piles, in this case prefab concrete square piles with a width of 500 mm and a pile tip level of -12.5 m. Choosing -12.5 m ensures that the full negative skin friction zone is taken into account, hence providing the maximum value. T 26. Click Save As in the File menu and save the project as <Tutorial-4d>. 27. Fill in a Pile tip level of <-12.5 m> in the Additional Data tab for both soil profiles. 28. In the Calculation window, perform a Verification – Complete calculation (Figure 13.9). DR AF 13.5 Figure 13.9: Calculation window, Selection of CPTs and pile type (Tutorial 4d) 29. When the calculation has finished, click the Intermediate node in the tree view. As can be seen in Figure 13.10, the Intermediate Results are only available in Dutch at present. The value of maximum negative skin friction can be found in the column Fs;nk;rep for limit state GEO and in column Fs;nk;d for serviceability limit state for the two CPTs (Sond. Nr.) and the eight piles (Paal Nr. 1 to 8). Scroll through the results and search for the block of data shown in Figure 13.10. Deltares 195 of 280 D-F OUNDATIONS, User Manual T Figure 13.10: Intermediate Results window (Tutorial 4d) From these results, it can be concluded that the maximum negative skin friction value (Fs;nk;d ) in limit state GEO is 465 kN for CPT 1 (Sond. Nr. 1) and 330 kN for CPT 2 (Sond. Nr. 2). DR AF Now, perform the calculation again without looking at pile group effect. To do so: 30. Click Save As in the File menu and save the project as <Tutorial-4e>. 31. Deselect the option Use pile group. This option applies to the calculation of negative skin frictions. If it is not selected, the calculation for negative skin friction will be performed for a single pile instead of a pile group, therefore using a value of 1.0 instead of 1.2 for γf ;nk in limit state GEO, according to standard NEN 9997-1+C1:2012 art. 7.3.2.2. 32. After the calculation has finished, open the Intermediate Results window again. Figure 13.11: Intermediate Results window (Tutorial 4e) From these results, it can be concluded that the maximum value for negative skin friction in limit state EQU has decreased to 425 kN for CPT 1 and 297 kN for CPT 2. As the EC7-NL (NEN 9997-1+C1:2012) allows for both methods, it is also allowed to use the best results (in this case, the ones without the pile group). Note: The negative skin friction (Dutch: Fs;nk ; English: Fs;nsf ) for a single pile is also calculated when performing preliminary design calculations. After performing Indication Bearing capacity, the values can be plotted by selecting Fs;nsf as Force in the Design Results window. 196 of 280 Deltares Tutorial 4: Pipeline Duct on Bearing Piles Using continuous flight auger piles It has come to light that there is some vibration sensitive equipment present in the vicinity of the pipeline duct. Therefore it is advisable to change the pile type to continuous flight auger piles with a diameter of 400 mm. T 33. Fill in this type of pile in the Pile Types window as shown in Figure 13.12 (only the pile type, shape and diameter need to be set). DR AF 13.6 Figure 13.12: Foundation – Pile Types window, Adding the continuous flight auger pile (Tutorial 4f) The pile plan has already been defined, so the Verification – Design calculation can be performed almost right away. Follow the steps below to determine the pile tip level for limit states EQU, GEO, and serviceability limit state, calculating for each cone penetration test separately so that the correct ξ3 and ξ4 factors are applied automatically. 34. Click Save As in the File menu and save the project as <Tutorial-4f>. 35. In the Calculation window, select Verification – Design calculation. 36. Make sure the option Use pile group is deselected, select <Round 400> as the Pile type name, set the End of the Trajectory to <-20 m> and check that both CPTs are selected. 37. Click Start to perform the calculation. 38. Select the Text tab in the Design Results window. Deltares 197 of 280 DR AF T D-F OUNDATIONS, User Manual Figure 13.13: Design Results window, Text tab (Tutorial 4f) It can be seen that from pile tip level -16.70 m downwards, all limit states are met. Therefore, the pile tip level must be reference level -16.70 m or deeper. 13.7 Conclusion This tutorial has shown how to construct a complete design for a simple foundation on bearing piles in accordance with EC7-NL (NEN 9997-1+C1:2012). It has also shown that the options chosen in the Calculation window can affect default values of several parameters. Finally, it shows the effect of granularity of the soil types on the positive skin friction and thus the overall bearing capacity. 198 of 280 Deltares 14 Tutorial 5: Parking Garage on Tension Piles This tutorial considers the design of the foundations for an underground parking garage in accordance with EC7-NL (NEN 9997-1+C1:2012). Tension piles are needed to counter the up thrust caused by the floor of the garage being located below the groundwater level. The objectives of this tutorial are: To learn the steps needed for a complete design and verification of a foundation consisting of tension piles. To learn how to create a soil profile manually instead by automatic interpretation of CPT data. To learn how to reduce the cone resistance due to excavation. T For this tutorial the following D-F OUNDATIONS modules are required: D-F OUNDATIONS Standard module (Bearing piles EC7-NL) Tension Piles module (EC7-NL) 14.1 DR AF This tutorial is presented in the file Tutorial-5.foi. Introduction to the case This tutorial describes the design of a foundation of a parking garage to be constructed underground. The floor of the garage will be located about 4 m below phreatic level, resulting in upward pressure acting on the foundation. This upward pressure is compensated partially by the walls of the garage, but this compensation is not sufficient. Tension piles are needed for a balanced situation. Figure 14.1: Design of a foundation of a parking garage (Tutorial 5) The compensation of the walls is smallest in the center of the garage. Therefore, the center pile of the foundation will bear the greatest tension loads and is most of interest. Soil investigation, consisting of one CPT, was carried out near to the planned parking garage eight years ago. The file data is available in an old format which was used for the predecessor of D-F OUNDATIONS, NENGEO. D-F OUNDATIONS is able to import old CPT file formats such as Deltares 199 of 280 D-F OUNDATIONS, User Manual Table 14.1: Representative values of soil parameters based on boring Top of soil layer to reference level [m] -0.69 -6 -14 -15 Material γdry γwet 3 Loam Soft Clay Peat Sand, clean [kN/m ] 20.0 17.0 12.5 18.0 [kN/m3 ] 20.0 17.0 12.5 20.0 son-files, so this will not be a problem. More recently, a boring has been carried out at the future location of the garage, to obtain additional data for the subsurface. Entering the project data T 14.2 DR AF 1. Create a new project by selecting New in the File menu. 2. In the Project Properties – Description window displayed, enter the text <Tutorial 5 for D-F OUNDATIONS > for Title 1 and <Parking Garage on Tension Piles> for Title 2. 3. Save the project as <Tutorial-5> in the Save As window from the File menu. 4. Select Model from the Project menu and select the Tension Piles (EC7-NL) option in the Model window that opens. Figure 14.2: Model window 5. Click OK to close the window. 14.2.1 Soil profile 6. To import the CPT data, click the Soil - Profiles node in the tree view. 7. Select Tutorial-5 CPT 01.son to import the cone penetration test that was performed on the location where the parking garage is to be constructed. The soil profile derived from the information of the boring is given in Table 14.1. The interpreted soil profile based on the boring shows a somewhat different outline of the subsurface than the CPT does. After comparing the CPT and the boring data it can be concluded that the CPT shows much more sand layers between ground level and the top of the deep Pleistocene sand layer. The tension bearing capacity of a pile in soft soils is much lower than the tension bearing capacity of a pile in sand layers, which has a consequence for the total bearing capacity for tension load of the subsoil. The bearing capacity for tension derived from the CPT data will be higher than the bearing capacity for tension based on a soil profile derived from the boring. Since the boring has been done at the site of the future parking garage recently, whilst the nearby CPT was performed a while ago, it is believed that the information of the boring is more 200 of 280 Deltares Tutorial 5: Parking Garage on Tension Piles accurate for the compilation of the soil profile needed for the calculations. However, according to NEN 9997-1+C1:2012, CPT data is needed for tension pile calculations. A way to get partially round this is to create a soil profile manually, starting from the CPT and modifying the interpretation according to the data from the boring. Naturally in a later stage additional soil investigation needs to be done to check whether the soil profile used really resembles the situation at site. The CPT data has already been imported, so the soil profile can be built up by following these steps: DR AF T 8. Select the <NEN Rule> as CPT Rule and fill in a large value for the Min. layer thickness, say <10 m>, and click the Transform the interpreted CPT into a profile button to copy the interpretation to a new profile. The profile is now reduced to only a few layers with the same material, as shown in Figure 14.3. Figure 14.3: Soil – Profiles window using NEN Rule and a minimum layer thickness of 10 m 9. In the table, select Undetermined from the drop down menu for the Material of each layer. Now the only information still retained from the CPT is its surface level. Now the soil parameters, based on the information of the boring, can be added. Use will be made of the standard table NEN 9997-1+C1:2012 that is provided with D-F OUNDATIONS when filling in the material data. 10. Switch to the Soil – Materials window. 11. Select Used materials only in the Show Materials sub-window. 12. Click the Adapt standard material parameters for current model button to adapt the material Deltares 201 of 280 D-F OUNDATIONS, User Manual 13. 14. 15. 16. DR AF T 17. properties to the current model. Click the Add from NEN 9997-1 button to add a material. In the NEN 9997-1 Table 1 window that opens, select the materials that come closest to the data retrieved from the boring analysis given in Table 14.1, namely: Loam, slightly sandy, moderate Clay, clean, moderate Peat, moderate preloaded, moderate Sand, clean, moderate Manually correct the dry and wet unit weight for the Peat, changing them both to <12.5>. For clarity’s sake, give the materials that have just been added a clear recognizable name, by adding the text <user defined> to the name, as shown at the bottom of Figure 14.4. To make sure the layers containing clay do not contribute to the tension force, set Apply tension to False for the user defined Clay. Figure 14.4: Soil – Materials window 18. Switch to the Soil – Profiles window and compose the soil layer manually, by adding a row, filling in the correct top levels and selecting the right material for each layer from the drop down list available under the material column (see Figure 14.5). 202 of 280 Deltares DR AF T Tutorial 5: Parking Garage on Tension Piles Figure 14.5: Soil – Profiles window, selection of materials for the profile Note: As an alternative to typing layer boundaries in the table, layers can be added graphically using the Add boundary button. Press this button and click anywhere in the graph; a new layer is selected on that position. After enough layers have been added, press the Edit button, select a layer boundary and drag it to the proper position. To change the material, select the required one from the toolbox on the left side of the screen (beneath the tree view), drag this material to the layer of choice and drop it onto the layer. 19. Switch to the Pore Pressure and OCR tab to check that all pore pressures are <0> and that all OCR values are <1>. If the phreatic groundwater level and water pressure of the first aquifer are different this can have an influence on the tension bearing capacity of the piles. Excess pore pressures, which can be negative, with depth in that case can occur. An OCR of 1 means that the soil is not over-consolidated. An over-consolidated soil has been preloaded, either by an actual load on the surface or by other soil layers which have consequently eroded. Figure 14.6: Soil – Profiles window, Pore Pressure and OCR tab 20. Switch to the Additional Data tab and fill in values of <-2 m> for the Phreatic level, <24 m> for the Pile tip level, and <-7 m>, one meter below the excavation level, for the Top of tension zone. Deltares 203 of 280 D-F OUNDATIONS, User Manual Figure 14.7: Soil – Profiles window, Additional Data tab Foundation T Now that the soil profile has been entered, the foundation itself can be inputted. The piles to be used are driven concrete square piles with a width of 450 mm. The pile head level is set to -6 m (= excavation depth), and the center to center distance of the piles is 2 m. 21. Select the Pile Types node in the tree view and enter the pile type as described above. Note that all the default values are OK; only the base height and base length of <0.45 m> need to be filled in. DR AF 14.2.2 Figure 14.8: Foundation – Pile Types window for a rectangular pile 22. Click on the Pile Properties node and generate a pile grid of 3×3 piles using a starting point of (0, 0) and a center to center distance of 2 m in both directions by clicking the Generate Pile Grid button . The building pit will be excavated to a level of reference level -6.0 m, so the Pile head level needs to be set to reference level -6.0 m (Figure 14.9). 204 of 280 Deltares T Tutorial 5: Parking Garage on Tension Piles DR AF Figure 14.9: Pile Grid Tension Piles (EC7-NL) window 23. Click OK. The tension forces acting on the center pile are the forces most of interest. Note that the centre pile in the grid has been given the number 5. 24. Rename pile number 5 as <center> for easier identification later on. Figure 14.10: Foundation – Pile Properties window showing input pile grid 14.2.3 Excavation The next step is to define the excavation for the parking garage. 25. Click the Excavation node in the tree view to open the Excavation window. 26. Fill in an Excavation level of reference level <-6 m>, the level where the floor of the parking garage will be situated. 27. For Reduction of cone resistance, select Begemann. For the requirements needed in order to apply the Begemann method for reduction of the cone resistance see NEN 99971+C1:2012 art. 7.6.3.3(c) (see also section 4.5). 28. For Distance edge pile to excavation boundary, fill in the (unrealistically large) value of <1000 m>. This to simulate a situation where the excavation is infinitely wide. This way, the (positive) influence of the walls of the garage is minimized and a clear picture of the bearing capacity of the middle pile can be obtained. Note that this is a safe approach. 29. Click Begemann again to display the correct results in the graph after changing the distance, as shown in Figure 14.11. The diagram on the right hand side of the window shows the effect of the excavation, as inter- Deltares 205 of 280 D-F OUNDATIONS, User Manual DR AF T preted using the Begemann method. It reduces the stresses in the soil, which is translated to a reduction of the cone resistance of the CPT. Figure 14.11: Excavation window with Begemann option selected 14.3 Calculation and results 30. Switch to the Calculation window and overrule the parameter for ξ3 with a value of <1.25> and ξ4 with a value of <1.00>. Normally, the program would calculate with ξ3 of <1.39> and ξ4 <1.39> (the proper value for a non rigid structure calculated based on one CPT). However, the boring was used to determine the profile and it can be argued that this is a more accurate profile than any profile based on the one CPT only. The superstructure is non-rigid, the other default parameters and options are correct too. 31. Select Indication bearing capacity for the Calculation and define a Trajectory to Begin at <-7 m> and End at <-24 m>, with an Interval of <0.25 m>. 206 of 280 Deltares T Tutorial 5: Parking Garage on Tension Piles DR AF Figure 14.12: Calculation window for Tension Piles (EC7-NL) model 32. Start the calculation by clicking the Start button. In the Design Results window that opens, four lines are plotted, two of which coincide. Each of these lines shows the tension forces on a pile. Note that piles have been grouped. Due to symmetry in the pile plan, the same forces apply to the four piles at the corners, the center pile is unique, and the other four piles can be divided in two groups of two piles. Figure 14.13: The simplified pile plan of the parking garage 33. In order to determine which of the pile groups contains the centre pile, select the Text tab. The results are given separately for each pile group, and the names of the piles included in each group are given. Scrolling down it can be seen that Pile group 4 is the group containing the pile named <center>. Deltares 207 of 280 DR AF T D-F OUNDATIONS, User Manual Figure 14.14: Design Results (indicative ξ3 ) window, Text tab 34. Select the Chart tab. The line with the “+” markers indicates the results of the center pile which are on interest. As can be seen in Figure 14.15, the tension forces are smallest for this pile. 208 of 280 Deltares DR AF T Tutorial 5: Parking Garage on Tension Piles Figure 14.15: Design Results (indicative ξ3 ) window, Chart tab 35. Select 4 under Pile group to display just the results for the center pile. At a level of 24 m a tension force of 440 kN can be read. Looking it up in the Text tab, the value actually equals 442.67 kN. Note: This force does include the pile weight. 14.4 Conclusion This tutorial has shown how to determine the bearing capacity for tension, for the middle pile of a group, in accordance with EC7-NL (NEN 9997-1+C1:2012). It has also shown how to construct a soil profile manually and how to overrule default parameters. Naturally in a later stage additional soil investigation needs to be done to check whether the soil profile used really resembles the situation at site. Deltares 209 of 280 DR AF T D-F OUNDATIONS, User Manual 210 of 280 Deltares 15 Tutorial 6: Farm with a Pond (Shallow Foundations) This tutorial describes how to check the vertical bearing capacity of an existing shallow foundation. Calculations are then performed to give an indication of whether this shallow foundation still has enough bearing capacity and will remain stable under a new loading situation. The objectives of this exercise are: To learn how to use D-F OUNDATIONS to design a shallow foundation in accordance with EC7-NL (NEN 9997-1+C1:2012). To learn how to interpret the results of such a design. For this tutorial the following D-F OUNDATIONS modules are required: 15.1 DR AF This tutorial is presented in the file Tutorial-6.foi. T D-F OUNDATIONS Standard module (Bearing Piles EC7-NL) Shallow Foundations module (EC7-NL) Introduction to the case The owner of an old farm wishes to have a fishing pond near to his farmhouse. He wonders if this could be realized without any damage to the building. This tutorial uses D-F OUNDATIONS to ascertain whether the pond can be dug out near to the farmhouse without failure of the foundations of the farmhouse. FARM Clay 1m Sand Strip foundation Figure 15.1: Fishing pond near farmhouse (Tutorial 6) The farm is founded on two strip footings (each underneath one of the two bearing building walls of the farm) at reference level -1 m. The strip footings have a width of 600 mm and a length of 10 m. The ground surface level near the farm lies at reference level 0 m. The groundwater level is at reference level -0.5 m. For the purpose of this case, all calculations must be performed for the strip at the side of the farm where the pond will be constructed. The representative value of the pressure on the foundation strips is known to be 20 kN/m2 . This force is applied at the center of strip footing. The partial load factor is given as 1.2 for limit states STR and GEO. The wind load acting on the building can be modeled as a horizontal force with representative value of 0.5 kN/m1 applied at a reference level of 3 m. For the evaluation of limit states STR and GEO, an extra partial load factor of 1.3 must be applied for Deltares 211 of 280 D-F OUNDATIONS, User Manual the horizontal load. Results of a CPT are not available, however a boring done near to the farm is. The soil profile given in Table 15.1 has been interpreted from this boring. Table 15.1: Soil profile near to the farmhouse Sand, clean, loose Clay, clean, weak Peat, not prel, weak Clay, clean, moderate Sand, clean, moderate Entering the project data Top of layer relative to reference level 0m -3 m -4 m -7 m -16 m For this tutorial, a new file has to be created together with a new ‘empty’ profile as no CPT is available: DR AF 15.2 Type of soil T Number of soil layer 1 2 3 4 5 1. Create a new project by selecting New in the File menu. 2. Save it as <Tutorial-6.foi>. 3. In the Project Properties – Description window displayed, enter the text <Tutorial 6 for D-F OUNDATIONS > for Title 1 and <Farm with a pond (Shallow foundations)> for Title 2. 4. SelectModel from the Project menu to change the model to Shallow Foundations. 5. Select the Profiles node and cancel the import dialog that pops up. 6. Select New in the Soil – Profiles window. This will generate an empty profile starting at 0 m, ending at -20 m and containing Undetermined as material. Edit this profile (see Figure 15.2) using the values given in Table 15.1. Figure 15.2: Soil – Profiles window, Layers tab 212 of 280 Deltares Tutorial 6: Farm with a Pond (Shallow Foundations) 7. Switch to the Additional Data tab. Here the Phreatic level should be set at <-0.5 m> and the Placement depth of the foundation element at <-1 m>. Specifying the Concentration value according to Fröhlich as 3 means the stress distribution model described by Boussinesq will be followed. If a value of 4 is specified then an increasing stiffness with depth for the soil layers can be simulated. This tutorial uses the default value of <3>. T Figure 15.3: Soil – Profiles window, Additional Data tab for Shallow Foundations model DR AF 8. Click on the Foundation – Types node in the tree view. A new foundation type is automatically created. Define a Rectangular shaped element with a Width of <0.6> m and a Length of <10 m>. Set the Type to <Cast in place>. Figure 15.4: Foundation – Types window 9. Click on the Foundation – Loads node in the tree view. A new load is automatically created. The first objective is to check the current vertical bearing capacity of the foundation of the old farm, so the load entered should be the current load acting on the foundation. The representative vertical design load is calculated from the data given in section 15.1, by multiplying the area of the strip 0.6 m × 10.0 m = 6.0 m2 by the given pressure of 20 kN/m2 . This results in a representative value for the load of (6.0 × 20.0) = 120 kN, which should be entered as the Vertical Design load value for Serviceability limit state (for info on the limit states, see in section 20.2). To calculate the Vertical Design load value for Limit state STR/GEO, multiply this load by the partial factor of 1.2, resulting in a load of 144 kN. The horizontal wind load also needs to be applied in order to determine the vertical bearing capacity. The horizontal load results in a moment, which in turn can be translated to an eccentric vertical load at foundation level. According to NEN 9997-1+C1:2012 art. 6.5.2.2(b), the surface area of the foundation needs to be reduced when an eccentric vertical load acts on the foundation. This results in a (much) lower vertical bearing capacity. This reduction of the surface area is performed automatically by D-F OUNDATIONS when a horizontal or eccentric vertical load is input. Deltares 213 of 280 D-F OUNDATIONS, User Manual The representative value of the horizontal load is 0.5 kN/m. For a strip 10 m long this results in a total horizontal load of 5 kN, which can be entered as the value of the Horizontal Design load for Serviceability limit state. To calculate the value for Limit state STR/GEO, this load must be multiplied in this case by the partial factor of 1.3, resulting in a load of 6.5 kN. DR AF T The horizontal load acts on reference level +3 m and the foundation level is at reference level -1 m. The Initial eccentricity to foundation level (Eh) therefore equals 4 m for both limit state STR/GEO and serviceability limit state. Figure 15.5: Foundation - Loads window 10. In the Foundation – Loads window, input all the load information as given above. 11. Open the Foundation Plan window and click on the first row, to input the foundation plan. The foundation type, load and profile are automatically selected as shown in Figure 15.6. Figure 15.6: Foundation Plan window All information has been entered and is now ready for the first calculation. 15.3 Verification of the design The existing situation can now be verified. 12. Switch to the Calculation window. The maximum allowed settlement and relative rotation given in the Calculation window are according to NEN 9997-1+C1:2012 or are default values of D-F OUNDATIONS. 13. Mark the Write intermediate results (Dutch) checkbox to be able to access to the intermediate results of the calculation. 14. Select Verification under Calculation and click Start. 214 of 280 Deltares T Tutorial 6: Farm with a Pond (Shallow Foundations) Figure 15.7: Calculation window with default deformation demands conform to EC7-NL (NEN 9997-1+C1:2012) DR AF After calculation is complete, the Report window opens. The results of the calculation are given in the section “Shallow Foundations: Results of Verification” of the report. As can be seen in Figure 15.8, the foundation meets all requirements in limit state EQU (PASSED). Note: The only check that is done in D-F OUNDATIONS for the tip over stability is a check whether or not the effective width and effective length of the foundation is smaller than respectively 2/3 of the actual width and 2/3 of the actual length of the foundation. This is according to NEN 9997-1+C1:2012 art. 6.5.4(1)P. If the effective width and effective length are smaller than 2/3 of the actual width and 2/3 of the actual length the tip over stability is indicated as FAILED in the report. Since the foundation has been stable for more than a few decades, the tip over stability most probably is sufficient. Further calculations on tip over stability need to be done in accordance to chapter 9 NEN 9997-1+C1:2012 to verify this. The remainder of this tutorial assumes that the tip over stability criterion is indeed met for the situation without the pond. Deltares 215 of 280 DR AF T D-F OUNDATIONS, User Manual Figure 15.8: Report window, Results of the Verification of Limit State STR For Serviceability limit state, the settlements are sufficiently small in accordance with NEN 99971+C1:2012 art. 2.4.9 and the foundation is indicated as PASSED (Figure 15.9). Figure 15.9: Report window, Results of the verification of serviceability limit state For limit state GEO (Figure 15.10), the criteria of a maximum settlement of 0.15 m is not met when both 5% (suggested by Deltares) and 20% (as required by NEN 9997-1+C1:2012) values are used. 216 of 280 Deltares Tutorial 6: Farm with a Pond (Shallow Foundations) T Figure 15.10: Report window, Results of the Verification of Limit State GEO 15.4 DR AF Calculations for settlement, (NEN 9997-1+C1:2012 art. 6.6.2) are based on increase of vertical effective stresses due to loads on ground level. Since the farm has been built a few decades before with hardly any settlement since, it is concluded that the settlement is sufficiently small in both limit state GEO and serviceability limit state. Influence of the fishing pond Since the fishing pond will be constructed near to the farmhouse, the total stability of the foundation in combination with the slope of the pond needs to be checked as well. The pond is planned at a distance of 1 m from the foundation strip, with a maximum depth of 1.5 m. The slope of the edge of the pond has a ratio of 1:3. In D-F OUNDATIONS it is assumed that the pond extends infinitely beyond the slope. 15. Click the Slopes node in the tree view to open the input window where the parameters that define the pond slope can be entered. 16. Click in the table to create a new slope, and give it a descriptive name such as <Pond Slope>. 17. SlopesEnter the Slope height of <1.5 m>, the Slope length of <4.5 m> (derived from the ratio 1:3) and the Berm width of <1.2 m>. Figure 15.11: Soil – Slopes window 18. Switch to the Foundation Plan window and add a second row by clicking the Add row button. Then select the <Pond Slope> in the last column of the table (Figure 15.12). Deltares 217 of 280 D-F OUNDATIONS, User Manual Figure 15.12: Foundation Plan window T Note: The position (X and Y coordinates) do not need to be changed. When calculating alternatives (i.e. different possible solutions for one problem), all elements may be located at the same position in the foundation plan as the alternatives are all calculated by themselves. Only when performing a calculation of a real foundation plan (i.e. multiple elements in one plan which interact with each other), it is needed to physically separate the elements by giving them their own positions. In that case, the Use interaction model in the Calculation window also needs to be enabled. DR AF 19. Click the Calculation node to open the Calculation window and click Start. Upon completion of the calculation the report is displayed. According to Figure 15.13, the bearing capacity Rd is the same (476.63 kN) for both cases (with and without the presence of the slope) which means that the slope has no influence as it is too far away from the foundation. Figure 15.13: Report window, Results for Limit State STR with and without the pond In order to see the influence of the pond slope on the foundation, the distance between the slope and the shallow foundation (called B in Figure 15.11) must be reduced: 20. Click the Slopes node in the tree view to open the Soil – Slopes window. 21. Add a second slope in the table, and give it a descriptive name such as <Pond Slope near>. 22. Enter the Slope height of <1.5 m>, the Slope length of <4.5 m> (derived from the ratio 1:3) and the Berm width reduced to <0.7 m>. 23. Switch to the Foundation Plan window and add a third row by clicking the Add row button. Then select the <Pond Slope near> in the last column of the table. 24. Click the Calculation node to open the Calculation window and click Start. Note that the bearing capacity Fr;v;d has decreased from 476.63 kN to 245.15 kN. This reduction of the bearing capacity is in accordance with NEN 9997-1+C1:2012 art. 6.5.2.2(p) due to the presence of the slope. However the bearing capacity is still sufficient for the new situation – the verification has still been PASSED. 218 of 280 Deltares Tutorial 6: Farm with a Pond (Shallow Foundations) Figure 15.14: Report window, Results for Limit State EQU without pond and with two different ponds Conclusion DR AF 15.5 T In paragraph 3.1.4 of this report it can be seen that construction of the pond may lead to problems with the tip over stability. This was already the case for the situation without the pond. But now, further calculations on tip over stability need to be done in accordance to chapter 9 NEN 9997-1+C1:2012 to determine whether the situation with the fishing pond is stable for tipping over or not. This tutorial has shown how to determine the vertical bearing capacity when vertical and horizontal loads and moments work on a shallow foundation. It has been noted that if tip over (or total stability) is said to fail this means that failure should be verified by more extended additional calculation in accordance with NEN 9997-1+C1:2012 (EC7-NL). These further stability calculations are not integrated in D-F OUNDATIONS. They would require a lot more input by the user, an additional model and extra output. In fact, these further stability calculations require a program in its own right: such a program is available at Deltares Systems under the name D-G EO S TABILITY (formerly known as MStab). Furthermore it can be concluded that the vertical bearing capacity of a shallow foundation will decrease when the foundation is near a slope. Deltares 219 of 280 DR AF T D-F OUNDATIONS, User Manual 220 of 280 Deltares 16 Tutorial 7: Design of Bearing Piles using the Belgian method This tutorial considers the design of a 4×4 pile group according to the Belgian method and using both electrical and mechanic CPTs imported from the Flemish database DOV (Databank Onderground Vlaanderen) (DOV). The objectives of this exercise are: To create a user-defined model for CPT interpretation using the soil materials provided by the Belgian Annex. To import electrical and mechanical CPTs in D-F OUNDATIONS. To use a background picture. To calculate the bearing capacity with depth of a single pile according to the Belgian T method (De Beer model). For this tutorial the following D-F OUNDATIONS modules are needed: DR AF D-F OUNDATIONS Standard module (Bearing piles EC7-NL) Bearing Piles module (EC7-B) This tutorial is presented in the file Tutorial-7.foi. 16.1 Introduction to the case A 4×4 pile group foundation situated near Stabroek (Flanders, Belgium) with its center at location (X = 145730 m; Y = 229270 m Lambert 72) needs to be designed according to the Belgian method (De Beer model). The piles used are screw piles, shaft with plastic concrete, with a diameter of 0.282 m and a head level situated at +5 m NAP. The phreatic level for this location is at +2.65 m NAP. The results of three CPTs taken from the Flemish database DOV (Databank Ondergrond Vlaanderen) are used to define the soil profile as shown in Figure 16.1: CPT-E is a standard electrical CPT which measures the cone resistance qc and the local frictional resistance fs ; CPT-M2 is a mechanical CPT with an adhesive mantle cone which measures the cone resistance qc and the local frictional resistance fs ; CPT-M4 is a standard mechanical cone (without mantle) which measures only the cone resistance qc . Their characteristics are given in Table 16.1. The required load capacity for the pile group is 150 kN. See chapter 21 for more information about the different types of CPT. Deltares 221 of 280 T D-F OUNDATIONS, User Manual Figure 16.1: Top view position of the pile and the CPTs DR AF Table 16.1: Characteristics of the CPTs CPT name GEO-89/128-SI GEO-92/109-S4 GEO-69/485-S25 16.2 X [m] 145647.8 145702.8 145661.0 Y [m] 229203.3 229174.2 229278.0 Z [m NAP] 3.37 4.91 3.50 Depth [m] 11.4 10.4 10.6 Cone E M2 M4 CPTs from the DOV database This tutorial uses mechanical and electrical CPTs imported from the Flemish database DOV (Databank Ondergrond Vlaanderen) (DOV) and situated near Stabroek (Flanders, Belgium). When researching the DOV website dov.vlaanderen.be using the co-ordinates of the future center pile group (X = 145690 m; Y = 229230 m Lambert 72) with a radius of 1000 m, many penetration tests are displayed as shown in Figure 16.2 (orange points). 222 of 280 Deltares DR AF T Tutorial 7: Design of Bearing Piles using the Belgian method Figure 16.2: DOV database – Top view of the penetration tests performed near the future pile location (Stabroek, Belgium) For this tutorial, only the three CPTs situated nearest the pile co-ordinates and listed in Table 16.1 are selected. The numerical results of those three CPTs can be imported from the DOV database under the HTML format supported by D-F OUNDATIONS (see chapter 21). The HTML files for the three selected CPTs are provided to the user in the same directory as the other tutorials. 16.3 Model For this tutorial, a new file has to be created before importing the CPTs: 1. Select New in the File menu to create a new project. 2. In the Project Properties – Description window displayed, enter the text <Tutorial 7 for D-F OUNDATIONS > for Title 1 and <Design of Bearing Piles using the Belgian method> for Title 2. 3. Select Model in the Project menu to change the model to Bearing Piles (EC7-B). 4. Click the Save as option from the File menu and save the project under name <Tutorial7.foi>. Deltares 223 of 280 D-F OUNDATIONS, User Manual Figure 16.3: Model window CPT Interpretation Model 5. 6. 7. 8. T In the following steps, a user defined CPT Interpretation Model based on the CUR rule but using soil materials from the Belgian Annex instead of the CUR Standard is created: Select the CPT Interpretation Model option in the Tools menu. Select the CUR Rule for the Selected interpretation model. Click on theCopy to User Defined button to base the user defined model on the CUR rule. The soil of each rule (1 to 6) is modified in order to use a Belgian soil material as close as possible of the CUR soil material: for Rule 1 select the Belgian material <BSand, ve sil, moderate> instead of the <Sand, sl sil, moderate>. For Rule 2 to Rule 6 select <BSand, ve sil, loose>, <BLoam, sl san, stiff>, <BClay, sl san, moderate>, <BClay, clean, weak> and <BPeat, sl san, moderate> respectively. 9. Click on the Update Chart button to update the soil names in the qc-fr chart. 10. In the Interpretation Settings sub-window, select User defined as the Selected default model. In order to make a visual inspection of the interpreted soil profile feasible, set the Default minimum layer thickness to <0.20 m>. 11. Click OK to confirm. DR AF 16.4 Figure 16.4: CPT Interpretation Model window 224 of 280 Deltares Tutorial 7: Design of Bearing Piles using the Belgian method 16.5 16.5.1 Soil Materials DR AF T On the tree view, when clicking the Materials node under Soil, the Soil – Materials window opens where, at the bottom of this window, the soil materials from the Belgian Annex are displayed and can be recognized by the prefix B, as shown in Figure 16.5. Figure 16.5: Soil – Materials window 16.5.2 Soil Profile from electrical CPT type E To import the electrical CPT: 12. Click the Profiles node under Soil in the tree view. As there are currently no soil profiles in the model, D-F OUNDATIONS automatically opens the Import CPTs from file window. 13. Select the CPT-E with file name GEO-89128-SI.html and click Open. D-F OUNDATIONS reads the selected file in the Import of DOV html file window (see Figure 16.6). Graphic representations of the cone resistance qc (conusweerstand), the friction fs (wrijving) and the percentage of friction Rf (wrijvingsgetal) are displayed at the left part of the Import of DOV html file window. 14. Click OK to continue. D-F OUNDATIONS opens the Soil - Profiles window (see Figure 16.7). A new sub-node is formed under Profiles bearing the name of the CPT “GEO-89/128-SI”. Deltares 225 of 280 DR AF T D-F OUNDATIONS, User Manual Figure 16.6: Import of DOV html file window Figure 16.7: Soil – Profiles window, Layers tab 15. Switch to the Additional Data tab. For the Phreatic level, the default value provided comes 226 of 280 Deltares Tutorial 7: Design of Bearing Piles using the Belgian method from the HTML file. The phreatic level for this project is at 2.65 m NAP as given in section 16.1. Therefore, change the value of the Phreatic level to <2.65 m>. The default value for the Top of positive skin friction zone need not to be changed. This value coincides with the first clay layer on the profile (starting at the bottom of the profile), see Figure 16.7. Figure 16.8: Soil – Profiles window, Additional Data tab Soil Profile from mechanical CPT type M2 To import the mechanical CPT-M2: DR AF 16.5.3 T Note: Importing a piezometric CPT (type U) is done in the same way as for a standard electrical CPT (type E). 16. Click the Profiles node under Soil in the tree view. 17. Click on Import in the Soil – Profiles window. 18. Select the CPT-M2 with file name GEO-92109-S4.html and click Open. D-F OUNDATIONS reads the selected file in the Import of DOV html file window (see Figure 16.9). Graphic representations of the cone resistance qc (conusweerstand), the friction fs (wrijving) and the percentage of friction Rf (wrijvingsgetal) are displayed at the left part of the Import of DOV html file window. A conversion factor η (Etta) Conversion factor Etta is used to convert the mechanical measured qc -values (qc;meas ) into equivalent electronic qc -values (qc;eq ) as used in D-F OUNDATIONS (qc;eq = qc;meas / η ). This conversion factor Etta has different values depending if the soil is a tertiary clay (Etta, Tertiary clay ) or not (Etta, Other soil). Therefore, the top level of the tertiary clay is an input value for the conversion. This level is available from the DOV database under isohypses (black lines with grey numbers). According to Figure 16.2, the top level of the tertiary clay at the pile location is extrapolated to -22 m. 19. Leave the conversion factors to their default values as prescribed by AOSO and enter a Level top tertiary clay of <-22 m>. 20. Click OK to continue. D-F OUNDATIONS opens the Soil - Profiles window (see Figure 16.10). A second sub-node is formed under Profiles bearing the name of the CPT “GEO-92/109S4”. Deltares 227 of 280 DR AF T D-F OUNDATIONS, User Manual Figure 16.9: Import of DOV html file window Figure 16.10: Soil – Profiles window, Layers tab 21. Switch to the Additional Data tab and change the Phreatic level to <2.65 m> as previously. 228 of 280 Deltares Tutorial 7: Design of Bearing Piles using the Belgian method Soil Profile from mechanical CPT type M4 To import the mechanical CPT-M4: T 22. Click the Profiles node under Soil in the tree view. 23. Click on Import in the Soil – Profiles window. 24. Select the CPT-M4 with file name GEO-69485-S25.html and click Open. D-F OUNDATIONS reads the selected file in the Import of DOV html file window (see Figure 16.11). DR AF 16.5.4 Figure 16.11: Import of DOV html file window At the left part of the Import of DOV html file window, a graphic representation of the cone resistance qc (conusweerstand) only is displayed as the mechanical CPT-M4 doesn’t measure the frictional resistance. As previously, conversion factors are used to convert the mechanical measured qc -values into equivalent electronic qc -values. 25. Leave the conversion factors to their default values as prescribed by AOSO and enter a Level top tertiary clay of <-22 m>, as previously. 26. Click OK to continue. 27. A third sub-node is formed under Profiles bearing the name of the CPT “GEO-69/485-S25”. D-F OUNDATIONS opens the Soil - Profiles window with an almost empty profile (see Figure 16.12). The reason for this is the selected CPT Rule at the bottom of the Soil - Profiles window: if the CPT Rule is the User defined rule, D-F OUNDATIONS needs frictional resistance to perform the analysis, as the User defined rule is based on the CUR rule (see section 16.4). However, the mechanical CPT type M4 doesn’t provide such data’s as shown in Figure 16.11. Therefore, a special rule called qc only Rule must be selected: this rule uses only the cone resistance and does not require the frictional resistance. Deltares 229 of 280 DR AF T D-F OUNDATIONS, User Manual Figure 16.12: Soil – Profiles window, Layers tab 230 of 280 Deltares DR AF T Tutorial 7: Design of Bearing Piles using the Belgian method Figure 16.13: Soil – Profiles window, Layers tab 28. Select the qc only Rule for the CPT Rule. The left-hand profile is modified. 29. Click the button to copy the new CPT interpretation to right-hand profile (Figure 16.13) to use it for calculations. 30. Switch to the Additional Data tab and change the Phreatic level to <2.65 m>. Note: Importing a mechanical CPT type M1 is done in the same way as for a mechanical CPT type M4. 16.6 Foundation The next step is to input data on the foundation to be used. First the pile type needs to be defined. Deltares 231 of 280 D-F OUNDATIONS, User Manual 16.6.1 Pile Type DR AF T 31. To define the pile types for this tutorial, click the Pile Types node in the tree view. When this node is selected for the first time, D-F OUNDATIONS creates a new pile type and shows its properties in the Foundation - Pile Types window. 32. Select a Round pile as Pile shape with type Screw piles, shaft in plastic concrete and with a diameter of <282 mm> as described in section 16.1. Figure 16.14: Foundation – Pile Types window 16.6.2 Pile Properties The co-ordinates of the piles position and the pile head level still needs to be entered. 33. To enter a pile group, click the Pile Properties node in the tree view. 34. In the window that opens, simply click the first row to enter the first pile. Repeat it for the 16 piles by entering the X co-and Y co-ordinates as given in Figure 16.15. 35. Enter a Pile head level of <5 m> as given in section 16.1. Figure 16.15: Foundation – Pile Properties window 232 of 280 Deltares Tutorial 7: Design of Bearing Piles using the Belgian method Location Map In order to check the positions of the three imported CPTs (section 16.5) and the pile (section 16.6), a picture of the top view location from the DOV database is imported and used as background picture. T 36. Choose Location Map from the Project menu to display the Location Map window. 37. In the Background Picture sub-window, select the picture with name Tutorial-7.bmp in the same directory as the examples files. 38. Enter the coordinates of the map given in Figure 16.16. 39. Click OK to confirm. DR AF 16.7 Figure 16.16: Location Map window The Top View Foundation window automatically opens (Figure 16.17) displaying the background picture. As expected, the three CPTs coincide exactly with the CPTs of the DOV database picture. Figure 16.17: Top View Foundation window displaying the background picture Deltares 233 of 280 D-F OUNDATIONS, User Manual Calculation A design calculation can now be performed. T 40. Click the Calculation node in the tree view. The Calculation window is displayed. DR AF 16.8 Figure 16.18: Calculation window 41. Mark the Write intermediate results (Dutch) checkbox to access the intermediate results if needed. 42. Enter the trajectory. The beginning of the trajectory must be at least 5 times the pile diameter lower than the lowest ground level and the lowest pile top level. The allowed maximum level for Begin is therefore min(3.37; 4.91; 3.50) - 5 × 0.282 = 1.96 m. The end of the trajectory must be at least 6 times the measurement interval above the least deepest CPT. The allowed minimum level for End is therefore -5.49 + 6 × 0.2 = -4.29 m. Our depth range of interest consists of the sand layers that lie between -2 m and -4 m because between these levels the soil layer seems to bear our pile (the qc is relatively high), see Figure 16.7, Figure 16.10 and Figure 16.12. 43. Enter a Trajectory with Begin at <-2 m> and End at <-4 m> with an Interval of <0.1 m>. 44. Leave all other input ‘as is’ and press the Start button to perform the calculation. See section 5.4.2 for a detailed description of this window. 234 of 280 Deltares Tutorial 7: Design of Bearing Piles using the Belgian method Results DR AF T 16.9 Figure 16.19: Design Results window When the calculation process has finished, the Design Results window displays the bearing capacity with depth of the pile tip in graphical format (Figure 16.19). The blue line which represents the average bearing capacity Rc;d of the three CPTs (reduced with safety factors) shows that the required bearing capacity of 150 kN is achieved at a level of -3.9 m. Therefore, the minimum length of the pile should be 5 – (-3.9) = 8.9 m. 16.10 Conclusion This tutorial has demonstrated how to enter the data required for a design calculation of a bearing pile according to the Belgian method. CPT data’s imported from the Flemish database DOV were used (mechanical and electrical CPTs). A user defined CPT interpretation model based on the soil materials from the Belgian Annex was also created. Finally the minimum pile length was determined, by finding the bearing capacity as a function of depth. Deltares 235 of 280 DR AF T D-F OUNDATIONS, User Manual 236 of 280 Deltares 17 Bearing Piles model (EC7-NL) 17.1 Area of application The bearing piles (EC7-NL) model is used to design foundations on piles according to the Netherlands Eurocode 7 which has been implemented in NEN 9997-1+C1:2012 (NEN, 2012), and/or to verify them on the basis of this standard. The model can only be used to verify and design pile foundations classified in Geotechnical Category 2 (GC2), which are subject to static or quasi-static loads that cause compressive forces in the piles, provided that the calculation of pile forces and distortions is based on cone penetration tests (CPTs). Any rising of (tension) piles and possible horizontal displacement of piles and/or soil have not been incorporated into this model. Limit states DR AF 17.2 T It should be stated explicitly that the model does not support raking piles. This is because loads affecting raking piles usually do not satisfy the conditions specified in the previous paragraph. The Netherlands Eurocode 7 bases the validation of constructions on three limit states. These are: Limit state STR is the ultimate limit state for checking forces: i.e. is the foundation strong enough to support the building. Limit state GEO is the ultimate limit state for checking distortions of the ground (settlements and rotations): i.e. is the foundation solid enough to keep the building from being torn, ruptured or dislocated. Serviceability limit state is a serviceability limit state, only checking distortions at the service load. 17.3 Calculation process This outlines the way the verifications prescribed by the standards have been processed into procedural step-by-step schematics suitable for use in a computer model: (section 17.3.1) Verifying limit state STR (section 17.3.1) Verifying limit state GEO and serviceability limit state 17.3.1 Verifying limit state STR Verification of limit state STR is implemented in the following way in the bearing piles model. First, for every CPT entered, the maximum bearing capacity for a single pile is determined as the sum of the maximum bearing capacity of the pile tip and the maximum shaft friction force. The following applies to the maximum shaft friction force: Determining the maximum pile shaft friction deserves special attention. The execution factor αs is not a fixed value here and is dependent on the soil type of the layer, as well as on the depth of the relevant layer if the soil type is clay, loam or peat. For each layer, therefore, the program calculates the generated pile shaft friction in that layer after first defining the correct value of αs for the relevant layer. Aggregation of the pile shaft friction calculated per layer in this way for the layers affected by pile shaft friction Deltares 237 of 280 D-F OUNDATIONS, User Manual produces the eventual value of the maximum pile shaft friction. Determining the circumference of the pile segment for which the maximum shaft friction force is calculated as follows. If it involves a non-constant circumference, as is the case with tapered wooden piles and piles with a reinforced tip, for example, the standard (NEN 9997-1+C1:2012 art. 7.6.2.3 (c)) does not actually provide a solution. In that case, the program calculates the mean circumference of the relevant pile segment. Secondly, the maximum bearing capacity of the foundation is determined. Here, the number of piles, the number of CPTs and the whether the structure may be considered as rigid or not (NEN 9997-1+C1:2012 art. 7.6.1.1(c)) play a role. In the case of a rigid structure, regardless of the number of CPTs, the program calcu- T lates the maximum bearing capacity of the foundation based on the average bearing capacity of a single pile, multiplied by the total number of piles, since the foundation element contains all of the piles. In the case of a non-rigid structure, determination of the maximum bearing capacity of 17.3.2 DR AF the foundation depends on the number of CPTs. If there are more than three CPTs, the definition is again based on the average bearing capacity of a single pile, whereas if there are three CPTs or less, the minimum bearing capacity of a single pile is used. In this case, the bearing capacity of a single pile is not multiplied by the total number of piles because the foundation element consists of a single pile. Verifying limit state GEO and serviceability limit state Given the total number of piles and the total number of CPTs, verification of the limit state GEO and serviceability limit state is implemented in the bearing piles model in the following way. Statistical variability is assumed with respect to the location of the CPTs. In other words, it is taken for granted that each CPT in the given pile plan could be executed everywhere, since a bad CPT can, in principle, occur at any location. In this way, dispersion in the CPTs as a result of the heterogeneity of the subsoil is distributed over the entire foundation. The worst forecast value is sought for the settlement in a non-rigid structure, while for a rigid structure the average of the best estimator is defined. An alternative given in the design code for determining the settlement in rigid buildings, based on an advance average calculated from the values from the CPT, can only be applied under very strict conditions (no negative skin friction, equivalent CPTs and soil profiles, no pile groups etc.), and it is therefore not included in this model. 17.4 Geometric problems When working through the standard regulations, the following geometric problems were discovered: NEN 9997-1+C1:2012, art. 3.2.3(e): Size and depth soil test When checking the scope of the soil test, in the case of a random pile plan with several CPTs, it was found that an analogous check on the prescribed area of influence for each CPT of 25 × 25 m2 could lead to very slow response times because of the large number of calculations that this entails. Consequently, an approach has been chosen 238 of 280 Deltares Bearing Piles model (EC7-NL) that in some cases does not provide a solution and results in a warning in the output file. This warning indicates that according to the somewhat restricted check performed by the program, the scope of the soil test is not sufficient, but that the user may be able to demonstrate the opposite manually. This manual confirmation should then be added to the user’s results, of course. NEN 9997-1+C1:2012 art. 7.6.4.2(k): Group of piles, settlement calculation Although parameters A4;D , b1 and b2 specified in this article initially seem to be clear, there is nonetheless a catch. If the cross-section of the pile base contains unequal sides, the pile orientation is found to play a role. This pile orientation is not included in the bearing piles model (to limit the required amount of input), so a conservative approach has been incorporated into the program. NEN 9997-1+C1:2012 art. 7.3.2.2(e): Pile group, negative skin friction calculation 17.5 DR AF T Parameter A in this article has not been clearly defined. In particular, there is no definitive way of determining A if there are irregular centre-to-centre distances between piles within a pile group. For this reason, as high a value as possible is used for A (safe approach). The users can replace this safe value with their own value after selecting Area in the Overrule parameters sub-window of the Calculation window. Problems in interpreting standards Besides geometric problems, the following problems also occurred when interpreting the standards: NEN 9997-1+C1:2012 art. 3.2.3(e): Size and depth of soil test With respect to the depth of the CPTs, this article specifies requirements with respect to the pile tip level. However, because a pile plan can include several pile tip levels (in the Bearing Piles (EC7-NL) model the user can define a pile tip level for each CPT to this end), there is sometimes no such thing as a single pile tip level. The following interpretation is used to solve this problem in the program: Every CPT must be at least 5 m deeper than the pile tip level specified for that CPT. If 10 times the smallest transverse measurement of the pile base is greater than 5 m, then for at least one CPT the depth must also be greater than the corresponding pile tip level increased by 10 times that smallest transverse measurement. If these standard requirements are not satisfied, a warning to this effect (referring the user to the article of the standard) is included in the output file; if possible, calculation will still take place. It is only when a specified depth exceeds the limits of the calculation model of the bearing capacity (Koppejan) that no calculation will be executed. NEN 9997-1+C1:2012 art. 1.5.2.127: Definition of a pile It only makes sense to check the pile length on the basis of the definition of a pile in this article if the phrase: "under ground level" is inserted after "Element for which the length". The length of the pile above ground level actually has no effect on whether the calculation model used in this standard may be applied or not. NEN 9997-1+C1:2012 art. 7.6.4.2(k): Determination of Eea;gem The determination of Eea;gem , the mean modulus of elasticity of the soil beneath the level 4D under the pile point, is blurred. As opposed to a previous version of the norm (NEN 6743:1991, art. 6.3.2), where it was determined from Eea;gem = 5 qc;z;gem , no longer formula is given in NEN 9997-1+C1:2012. Deltares experts decided therefore to use for Eea;gem henceforth 3 qc;z;gem , instead of 5 qc;z;gem , based on Table 2.b of NEN 9997-1+C1:2012, where qc;z;gem is the mean value of the cone resistance over the trajectory in the soil beneath the level 4D under the pile point to the level that is Deltares 239 of 280 D-F OUNDATIONS, User Manual b2 deeper, or, if the cone penetration test has not reached this level, to the actually achieved penetration test level. NEN 9997-1+C1:2012 art. 7.6.2.3(e): Determining the maximum pile tip resistance When determining qc;III;mean , the qc values for continuous flight auger piles should T be reduced to 2 MPa, unless it can be demonstrated, using CPTs performed after pile installation at a maximum distance of 1 m from the pile, that this is not necessary. Because it is not possible to program foresight, which is needed to process this precondition automatically, it has been decided to allow the user to determine whether the above-mentioned reduction should be applied or not prior to calculating continuous flight auger piles. If the reduction does not have to be made, a message to this effect is included in the output file because this assumption should be checked afterwards on the basis of CPTs performed after pile installation. The requisite number of CPTs performed after pile installation should be determined in consultation with the relevant controlling body. DR AF NEN 9997-1+C1:2012 art. 7.6.2.3(k): Requirements related to the CPT If there is any reduction of the qc values in the case of an excavation, the method 0 used to determine the effective vertical tension (σv;z ) is not described in detail. Two methods have therefore been built into the program to reduce the qc values in case of an excavation. The Excavation window allows selection between these two methods and a manual method. NEN 9997-1+C1:2012, art. 7.6.4.2(j): Determining sel;d This article contains two points of interpretation. Firstly, the description of the parameter Ashaf t;d leaves no space for piles with a variable shaft diameter (tapered piles, piles with reinforced base). To cater for this, Ashaf t;d has been interpreted as the average diameter in D-F OUNDATIONS. Secondly, the formula supplied for Fmean;d does not work if there is a gap between the positive and negative skin friction zone (in Figure 17.1, the gap is presented as l2 ). This gap is filled by adding the following formula to the program if this gap has actually been defined by the user: Fgem;d = l1 × Fs;tot;d + l2 × (Fs;tot;d − Fs;nk;d ) + 0.5 × l3 × (Fs;tot;d − Fs;nk;d + Fr;point;d ) NEN 9997-1+C1:2012 art. 7.3.2.2(d): Determining the negative skin friction for single pile 0 is only valid if the water level In this article, the formula specified for determining σv;i;rep is located in the first layer. Moreover, this formula is lacks the surcharge p0 . Therefore, instead of the formula specified in this article, the program uses a more general procedure for determining the effective vertical stresses, and any superimposed load is then also taken into account. Moreover, in this article, the formula for the determination of the characteristic neutral earth pressure coefficient K0;j;k in layer j applies for OCR = 1. In case OCR is not of Jacky: 1, D-F OUNDATIONS uses the formula √ K0;j;k = (1 − sin ϕj;k ) × OCR. NEN 9997-1+C1:2012 art. 7.3.2.2(e): Determining the negative skin friction for pile group 0 With respect to making σm;v;i;rep equal to p0;rep it should be noted that this, of course, is 0 only valid for the 1st layer. For the other layers, the following relationship applies:σm;v;i;rep = 0 σm;v;i−1;rep 240 of 280 Deltares Bearing Piles model (EC7-NL) Fs;tot;d Fs;tot;d(=Fs;d+Fs;nk;d) negative skin friction l1 gap l3 Fr;point;d positive skin friction T l2 Fs;nk;d Fr;point;d 17.6 DR AF Figure 17.1: Gap in skin friction zone Units, dimensions and drawing agreements It should be noted that the bearing piles model is based on a semi 3-dimensional approach. On a flat plane, this is expressed in the pile and CPT plans specified. The third dimension (the depth) is recorded in the CPTs and the corresponding soil profiles. A fully 3-D approach, in which the piles can also be recorded to their full depth (raking piles), is not considered desirable as this would allow pile configurations that are not covered by the calculation model provided by the NEN. The dimensional split between the flat plane on one hand and the depth on the other hand also applies to the drawing agreements. In the flat plane, users are completely free to choose their own axis system for the pile and CPT plans. With regard to the depth, all levels to be entered must be recorded in relation to the reference level. This reference level can be chosen freely as long as it is used consistently throughout a project. In the Netherlands, the most common reference level would be the Amsterdam ordnance zero (i.e. NAP). Here, levels above the reference level are considered as positive and levels below the reference level as negative. Settlements, however, are considered as positive if they are pointing downward (see Figure 17.2). The units of the input and output parameters used in this model are displayed in the table below. Although it has been attempted to keep the units for the parameters equal to the units as they occur in the standards, in some cases this has been deviated from. In those cases, insofar as the requisite accuracy allows this, a larger unit was chosen to somewhat limit the length of the numbers to be entered and displayed. These deviant units are indicated in the table with a * followed by the unit as mentioned in the standard. Deltares 241 of 280 D-F OUNDATIONS, User Manual A +8 NAP pile settlement + expected soil settlement + -24 A T Figure 17.2: Sign conventions Table 17.1: Units of the input/output parameters Symbol PTL DR AF Description Pile tip level Top level positive skin friction zone Bottom level negative skin friction zone Overconsolidation ratio Cone resistance Expected soil settlement Ground level Ground water level Excavation level Bottom level of soil layer Volumetric weight of soil Volumetric weight of saturated soil Effective angle of internal friction Median (sand/gravel) (d50 ) Reduction of cone resistance for excavation Pile dimensions Pile factor for pile point Pile factor for shaft friction Young’s modulus for a pile Representative value of pile adhesion Calculated value of load on pile in limit state Surcharge on soil next to pile Pile head level Representative value of maximum pile tip bearing capacity Representative value of maximum shaft friction Representative value of maximum friction caused by negative skin friction Settlement Relative rotation Calculation value of the resulting maximum shaft tension in the pile. 242 of 280 OCR qc γ γsat ϕ’ αp αs Ep;mat;d ai;rep Fs;d p0 s β Unit m +/- NAP m +/- NAP m +/- NAP MPa m m +/- NAP m +/- NAP m +/- NAP m +/- NAP kN/m3 kN/m3 ◦ (degrees) mm % (percentage) m kN/m2 (*N/m2 ) kN/m2 (*N/m2 ) kN kN/m2 m +/- NAP kN kN kN m m/m N/mm2 Deltares Bearing Piles model (EC7-NL) Coordinates of piles and CPTs for determining the positions in the pile and CPT plans should be specified in m. 17.7 Bearing Piles schematics The requisite data for executing a (verification) calculation for a pile foundation according to the standards can be divided into two groups. One group of data consists of information related to the (foundation) construction (category superstructure, pile type, pile dimensions, pile plan, etc.), while the other group involves data used to typify the subsoil (CPTs with corresponding soil profiles, including height of groundwater level, expected ground level settlement, etc.). 17.7.1 section 17.7.1 Problem boundaries section 17.7.2 Variation in the level of the bearing layer section 17.7.3 Skin friction zones section 17.7.4 Non-rigid/Rigid superstructure section 17.7.5 Combination of superimposed load/excavation section 17.7.6 Merging sub-calculations DR AF T When this data is displayed in a schematic (diagram), account should be taken of the relevant requirements of the standard contained in articles 7.3.1 and 7.6.4.2 of NEN 9997-1+C1:2012. In addition to these requirements, account should also be taken of the capabilities and limitations of the bearing piles model. There are described in the following sections: Problem boundaries Because the model cannot be supplied with unlimited memory, the limits given in Table 17.2 apply to the maximum problem size. Table 17.2: Limits applied to the maximum problem size Maximum number of pile types Maximum number of piles in pile plan Maximum number of CPTs (i.e. soil profiles) Maximum number of qc values per CPT Maximum number of layers per soil profile Maximum number of iterations during design 17.7.2 100 200 350 5000 100 151 Variation in the level of the bearing layer Although desirable, in practice, the use of a single pile tip level in a project is not usually feasible. Variation in the level of the bearing layer for the executed CPTs forces designers to use different pile tip levels. The bearing piles model therefore allows users to define the required pile tip level for each CPT. In this way, the user can cater for the above-mentioned variations in the bearing layer level, at least as far as the Verification; Complete calculation option is concerned. In the program’s Design options, the pile tip levels specified for each CPT are suppressed in favor of the pile tip trajectory. In that case, the relevant pile tip level is retained as a starting point for each calculation step, or for each pile tip level, for all CPTs. It should also be noted that if the variations are significantly large, the project should be split into sub-projects, and the variations should be kept within limits in each sub-project. Deltares 243 of 280 D-F OUNDATIONS, User Manual Skin friction zones The necessary specifications are recorded in NEN 9997-1+C1:2012 for both the positive skin friction zone (to determine Rs;cal;max;i;d ) and the negative skin friction zone (to determine Fs;nk;d ). For the positive skin friction zone, the bottom of that zone coincides with the pile tip level, and for a prefabricated pile with a widened base, the top of that zone may never be above the widening (NEN 9997-1+C1:2012 art. 7.6.2.3(c)). For the negative skin friction zone, the top of this zone coincides with the ground level or excavation level. T Given the strong link between skin friction and the soil layer classification, the skin friction zones are constructed of entire layers. This means that both the top of the positive skin friction zone and the bottom of the negative skin friction zone should always coincide with a layer boundary in the corresponding soil profile. In order to satisfy these requirements in the bearing piles model, it was decided to define the skin friction zones in the following way: The bottom of the positive skin friction zone automatically coincides with the pile tip DR AF 17.7.3 level and therefore does not have to be entered. The top of the positive skin friction zone is specified by the user as a level (in m) relative to the reference level (usually NAP). The top of the negative skin friction zone automatically coincides with the ground level or excavation level and therefore does not have to be entered. The bottom of the negative skin friction zone is specified by the user as a level (in m) relative to the reference level (usually NAP). Because neither the soil layer classification nor the pile type (in relation to a reinforced base) needs to be known when the skin friction zones are being defined, the skin friction levels cannot be checked at that moment. This is why the check is performed at the start of a calculation. If the top of the positive skin friction level does not meet the requirements (NEN 99971+C1:2012 art. 7.6.2.3(c)) this level is automatically adjusted, if possible. The adjustment is performed in a safe way because the skin friction level is always placed on a lower level than that specified by the user (see Figure 17.3). 244 of 280 Deltares Bearing Piles model (EC7-NL) 1 1 2 ; specified level T 2 ; final level Figure 17.3: Skin friction levels DR AF When skin friction levels do not coincide with layer boundaries (as they should), an extra layer boundary, specific for the calculation, is added to the profile in order to be able to perform a successful calculation. Only in the case of overlapping defined skin friction zones is calculation not possible, and an error message is displayed. If it does not involve a design calculation, where automatic adjustment of skin friction levels is necessary, the adjustments are displayed as a warning in the output file, and the original and adjusted levels are specified. Use of prefabricated pile with reinforced tip When a prefabricated pile with a reinforced tip is used and calculation of positive skin friction is desirable, the maximum positive skin friction zone must be limited to the height of the reinforcement in accordance with NEN 9997-1+C1:2012 art. 7.6.2.3(c), as already stated. If the top of the positive skin friction zone is specified as being above the reinforcement, it is automatically adjusted so that the maximum skin friction zone matches the height of the reinforcement. Here, the top of the reinforcement does not have to be located at a layer boundary. In this exceptional case, the program itself applies an individual layer boundary, if necessary, in order to calculate the maximum positive skin friction. 17.7.4 Non-rigid/rigid One restriction when creating schematics is that for each calculation only (parts of) structures that can be considered either as "completely rigid" or as "completely non-rigid" may be included in a single schematic. If a project involves a structure that is partly "non-rigid" and partly "rigid" (for example, a building with a rigid core), the user must execute at least two calculations, one for the non-rigid part and one for the rigid part. Moreover, if the structure consists of several different parts that can be considered as rigid, the user must execute a calculation for each part. Figure 17.4 includes an example of division into sub-calculations. Deltares 245 of 280 D-F OUNDATIONS, User Manual 1 2 T Partial calculation 1: piles for rigid part of structure Partial calculation 2: piles for non-rigid part of structure DR AF Figure 17.4: Two different partial calculations required due to mixed rigidity of structure For a definition of rigid/non-rigid, see NEN 9997-1+C1:2012 art. 7.6.1.1(c). 17.7.5 Combination of superimposed load/excavation If a combination of superimposed (or surcharge) load and excavation occurs, the user encounters the following problem when calculating the bearing capacity. In accordance with the standard, the bearing capacity is calculated for each CPT. Reduction of qc values as a result of the excavation should therefore be executed for each CPT. In the program, a superimposed load is recorded for each pile to give the user more freedom when positioning the superimposed load, since there are generally more piles than CPTs. The consequence of this approach is that when there is a combination of superimposed load (per pile) and excavation, the superimposed load for all piles being considered must be equal to guarantee a correct bearing capacity calculation. The calculation model included in the standard (NEN 9997-1+C1:2012) does not actually support calculation of the bearing capacity per pile per CPT. As a result, no link can be made in the program between the superimposed load to be entered per pile and the excavation. For the schematics, this means that if there is an area in the problem definition with both an excavation and a superimposed load, it is again necessary to split the problem into parts. This should be done in such a way that each part meets one of the following requirements: The relevant part contains neither excavations nor superimposed loads. The relevant part is typified by excavations but there are no superimposed loads. The relevant part is typified by superimposed loads but there are no excavations. The relevant part contains excavations and one identical superimposed load for all piles in this part. Figure 17.5 below is an example of a split. 246 of 280 Deltares Bearing Piles model (EC7-NL) 1 2 3 1 4 5 6 2 8 9 10 11 12 14 15 16 17 18 20 21 22 23 24 26 27 28 29 30 excavation area 7 13 3 T 19 25 4 Partial calculation 1: piles 1,7 Partial calculation 2: piles 2-6, 8-12 Partial calculation 3: piles 13, 19, 25 Partial calculation 4: piles 14-18, 20-24, 26-30 17.7.6 DR AF Figure 17.5: Splitting a problem into parts due to a combination of excavation and super imposed loads Merging sub-calculations When splitting the problem into parts, the users themselves should calculate and verify the rotation between those parts, based on the maximum settlements in limit state GEO and serviceability limit state calculated for each part. The requisite centre-to-centre spacing between rigid and non-rigid building components and between each of the rigid building components should be carefully defined, if possible in consultation with the designer of the superstructure. Deltares 247 of 280 DR AF T D-F OUNDATIONS, User Manual 248 of 280 Deltares 18 Bearing Piles model (EC7-B) The entire Belgian Annex of the Eurocode (WTCB, 2010) is based on the cone resistance found with the electrical cone E1. This is the reference resistance for this method. It is required that CPT data found with other cones is transformed to E1 values. This conversion of CPT-data, if necessary, should be performed before using this method as provided by D-F OUNDATIONS. T As mentioned in the Belgian Annex of the Eurocode (WTCB, 2010), the Bearing Piles (EC7-B) model gives direction to determine the design value of the total bearing capacity of a pile at Ultimate Limit State only. It does not consider deformations, pile group effects, negative skin friction and the effects of an excavation and/or super imposed load. The user has to take care himself that the requirements of Ultimate Limit State are met, i.e. the calculated design bearing capacity of the pile Rc;d exceeds the design load Fc;d applied on the pile. It should also be noted that: Unusual forms of construction or design conditions are not specifically covered and DR AF additional expert consideration will be required by the designer in such cases. The provisions of this section should not be applied directly to the design of piles that are intended as settlement reducers, such as in some piled raft foundations. Part of the determination of the total bearing capacity is the determination of the pile base resistance. The ultimate unit pile base resistance qb is determined using the De Beer method (De Beer, 1971-1972). In the determination of Rb (pile base resistance), the factor λ also plays a part. This λ stands for the reduction factor for piles with an enlarged base. The Annex provides a few exceptions to this reduction which are incorporated in D-F OUNDATIONS as follows: The reduction will be left aside when: the pile type chosen in D-F OUNDATIONS is either ‘cast in situ, shaft in plastic concrete’ (without enlarged bottom plate) or ‘cast in situ, shaft in dry concrete, in situ formed expanded base’. the pile type chosen in D-F OUNDATIONS is either ‘screw piles, shaft in plastic concrete’ or ‘screw piles with lost driving tube’ and Db2 / Ds2 < 1.5. 18.1 The De Beer method: determining the pile tip resistance The pile tip resistance is defined on the basis of CPT values and the initial effective vertical stress. 18.1.1 Step 1: Calculation of the friction angle Using the above mentioned values, a calculation value for the angle of internal friction ϕ’ (deviating from the ϕ detected in the laboratory) is determined according to: qc = 1.3 × exp [2π tan ϕ0 ] × tan2 π 4 0 + f racϕ0 2 × σv0 (18.1) where: 0 σv0 qc Deltares is the vertical effective stress; is the cone resistance. 249 of 280 D-F OUNDATIONS, User Manual 18.1.2 Step 2: Calculation of βp and βc Using the ϕ’ and h/d (h is depth, d is the diameter of pile or cone), a βp and a βc are determined according to the formula: 0 0 h/d = exp (0.5π tan ϕ ) × exp (β tan ϕ ) × tan sin β π ϕ0 + × (18.2) 4 2 1 + δ sin (2ϕ0 ) Here, δ is the factor B /L (for round piles, B/L is equal to 1) as described in the De Beer method.To derive the values for βc (cone) respectively βp (pile), the values for d as well as δ should be given, the proper values for either the cone or the pile. 18.1.3 Step 3: Calculation of dg dg = qc exp [2 (βc − βp ) tan ϕ0 ] (18.3) Step 4: Determining the values for transition from non-rigid to rigid layers (downward values) DR AF 18.1.4 T Using these β values and the CPT values, the homogenous value dg can be determined: For this transition, the hcrit (critical height) for the CPT is defined as 0.2 m. If the calculated ϕ’ is greater than 32.5 degrees, a hcrit of 0.4 m is also taken, and if the angle is greater than 37.5 degrees a hcrit of 0.6 m is also taken. In many cases, this is 1, 2 or 3 times the cone distance. hcrit can never be greater than the pile diameter D . The smallest value calculated with the different hcrit is used. The h0crit for the pile is set at hcrit × D/d with D the pile diameter and d the diameter of the cone. The ‘downward‘ values are now determined according to: γk × h0crit 1+ 0 d 0.2 2σv0 × (dg,i − dd,j ) + × D γk × hcrit hcrit 1+ 0 2σv0 dd,(j+1) = dd,j (18.4) The calculated values may never be greater than dg . 18.1.5 Step 5: Determining the values for transition from rigid to non-rigid This starts at the bottom of the CPT with the formula: du,(q+1) = du,q + (dd,j+1 − du,q ) × d D (18.5) A variant of Impe (after verification on small scale models) is to use the factor 2d/D instead of d/D . The calculated values may never be greater than dg . 18.1.6 Step 6: Determining the ‘mixed’ values Any ‘mixed’ values are now derived from the previous values. Here, the average value of du is determined over a thickness under the considered depth, which is equal to the diameter of the pile base. The value calculated here may never be greater than dg . 250 of 280 Deltares 19 Tension Piles model (EC7-NL) 19.1 Area of application The tension piles model is used to design foundations on piles according to the Netherlands Eurocode 7 standards which has been implemented in NEN 9997-1+C1:2012 (NEN, 2012) and replaced CUR report 2001-4 “Design Rules for Tension Piles” (CUR, 2001). The model can only be used to design pile foundations classified in Geotechnical Category 2 (GC2), which are subject to static or quasi-static loads that cause tension forces in the piles, provided that the calculation of pile forces and distortions is based on cone penetration tests (CPTs). Any rising of tension piles and possible horizontal displacement of piles and/or soil have not been incorporated into this model. DR AF T It should be noted that in the NEN 9997-1+C1:2012 a number of requirements are given with reference to the piles used in calculations with this model. These requirements are checked by D-F OUNDATIONS but when one or more of the requirements are violated, instead of stopping the usage of the model, D-F OUNDATIONS writes warnings to the Report file. The requirements are: minimum length of a pile is 7 m maximum length of a pile is 50 m the ratio between the pile length and pile diameter (or equivalent diameter when appropriate) is at least 13.5 It should be stated explicitly that the model does not support raking piles. Firstly, because loads affecting raking piles usually do not satisfy the conditions specified in the previous paragraphs; secondly, because a fully 3-dimensional approach is needed for the support of raking piles, and this is not considered desirable given the limitations of the chosen hardware platform. A fully 3-D approach would restrict the maximum problem size of this model. 19.2 Design of tension piles according to EC7-NL (NEN 9997-1+C1:2012) For every CPT entered, the design value of the capacity in tension for each pile is determined. The geometry of the piles is taken into account, as well as whether the structure can be considered as rigid or not, any variable loading of the pile, excavation influences and compaction of the soil in the case of displacement piles. Depending on the geometry, for each single pile or group of piles with equal parameters (pile type, pile dimensions, distance to excavation, loading and geometry), the design value of the capacity in tension is given. The design option with fixed pile tip levels determines for each CPT the design value of the bearing capacity for the pile tip level which is specified in the Additional Data tab of the Profiles option for each CPT under the Soil node. Using the design option Pile tip levels and net bearing capacity (section 6.6.2.3), the program will determine, for each CPT, the highest pile tip level within the specified boundaries, for each point where the design value of the capacity of the pile is greater than or equal to the "net bearing capacity" value. Deltares 251 of 280 D-F OUNDATIONS, User Manual 19.3 The Netherlands Eurocode 7 (EC7-NL) The design of tension piles in D-F OUNDATIONS has adopted EC7-NL which is implemented in NEN 9997-1+C1:2012 (NEN, 2012). This norm prescribes how to calculate the bearing capacity of a pile as part of a group for a single CPT by adopting CUR report 2001-4. The stiffness of the pile group construction or extra CPTs are only taken into account when determining the partial factors ξ3 and ξ4 . Because constructions with tension piles are often used, for example in building pits, NEN 99971+C1:2012 should be followed. In such cases (large groups of piles and several CPTs) special attention should be given to determining the bearing capacity of the total construction of tension piles. DR AF T According to the Dutch standard NEN 9997-1+C1:2012, one CPT should be available every 25 m (maximum area 2625 m2 ) when no large variations occur. Otherwise, a maximum of 15 m (maximum area 2225 m2 ) is prescribed. When verifying the design of tension piles this requirement should be checked. If the CPT area is larger than 2625 m2 and/or the distance between 2 CPTs is larger than 25 m the results report will contain a warning (see NEN 99971+C1:2012 art. 3.2.3(e)). The D-F OUNDATIONS module for tension piles calculates not only the capacity for each pile at each CPT and at chosen depths, but also provides the minimum, mean and maximum value of the capacity in tension. According to NEN 9997-1+C1:2012, the bearing capacity of the bearing piles of the foundation should be based on the average capacity of all CPTs and the minimum capacity, whichever is less. 19.4 Verifying displacements of Tension Piles In NEN 9997-1+C1:2012, there is no method given for determining displacements of tension piles. In D-F OUNDATIONS it is not possible to calculate deformations of tension piles. It is assumed that by using the calculation method prescribed, deformations will be small. 19.5 Calculating the bearing capacity of a tension pile This section outlines the way the design and verification of tension piles is prescribed by NEN 9997-1+C1:2012. The bearing capacity of a tension pile is basically considered to be equal to the integration of the maximum shear stress along the pile shaft. Based on NEN 9997-1+C1:2012, the following steps are taken into account: section 19.5.1 Step 1: section 19.5.2 Step 2: section 19.5.3 Step 3: section 19.5.4 Step 4: section 19.5.5 Step 5: section 19.5.6 Step 6: section 19.5.7 Step 7: section 19.5.8 Step 8: 252 of 280 Determination of cone resistance Reduction of cone resistance due to excavation Safety factors: design values Effect of installation Reduction of stresses due to tension forces in pile groups Determining bearing capacity Checking for total soil weight criterion Adding pile weight Deltares Tension Piles model (EC7-NL) 19.5.1 Step 1: Reduction of the cone resistance due to overconsolidation The cone resistance is based on CPTs. If the soil layers have been preloaded in the past (overconsolidation) a correction for the OCR value has to be specified before starting the calculation.The correction for over-consolidation is derived from the OCR values entered in the Soil – Profiles window. The cone resistance will be reduced by: r qc;N C = qc;OC × (19.1) Step 2: Reduction of cone resistance due to excavation T In most cases, the CPTs will be executed before excavation. As a result of the excavation both the vertical stress and the cone resistance will decrease. According to NEN 9997-1+C1:2012, the reduction of the cone resistance due to an excavation depends on the order in which the excavation and installation take place. When piles are installed after excavation (with a vibrating method), there is a linear ratio between the cone resistance and the decrease in effective stress: 0 σv;z = qc;z × 0 σv;z;0 DR AF 19.5.2 1 OCR qc;z;corr (19.2) where: qc;z;corr qc;z 0 σv;z 0 σv;z;0 is the corrected cone resistance; is the measured cone resistance; is the effective vertical stress after excavation; is the effective vertical stress before excavation. When piles are installed before excavation or if no or very little vibration is used, correction of the cone resistance will be: s qc;z;corr = qc;z × 0 σv;z 0 σv;z;0 (19.3) In both cases the corrected cone resistances are limited to a maximum of 12 MPa, or to 15 MPa if these values occur over a trajectory of 1 m or more. The total vertical stress at a certain depth results from the integration of the unit weight of the soil above the considered depth. By subtracting the water pressure at the considered depth, the effective vertical stress is determined. An excavation reduces the vertical stress. The determination of the effective stress after excavation is not given by NEN 9997-1+C1:2012. In the tension piles model the stresses after excavation are determined as follows. The differ0 0 ence between the effective vertical stress before and after excavation (σv;z;i - σv;z ) is equal to the effective weight of the excavated soil per unit area. For the correction of the cone resistance measured before excavation, the limited width of the excavation is taken into account. For an excavation with limited width, the reduction of the vertical stress at a certain location in the excavation can be determined relatively simply using stress distribution formulas for a uniform strip loading (Poulos and Davis, 1974). D-F OUNDATIONS uses the elastic formulas for a uniform load with limited width to determine the change in effective stresses due to the excavation. In the program this method is called Begemann. Deltares 253 of 280 D-F OUNDATIONS, User Manual The correction due to a limited width depends on the location of the pile and the depth of the pile in respect to the excavation boundaries. The excavation is considered to be a uniform strip unloading. The magnitude of the unloading is equal to the effective vertical stress at the excavation level before excavation. The figure below shows the situation considered. 2b p/unit area 01 02 x δ T α (x,z) z DR AF Figure 19.1: Determination of the change in effective stresses due to the excavation The formulas for the decrease of the stresses are: ∆σz = p [α + sin α cos (α + 2δ)] π (19.4) ∆σx = p [α − sin α cos (α + 2δ)] π (19.5) ∆σy = 2p vα π (19.6) For piles at a distance x from the edge of the excavation α and δ can be determined from: α = α1 + α2 = arctan δ = −α2 = − arctan bexc − x z x z + arctan x z (19.7) (19.8) The vertical stress after excavation is: 0 0 σz,new = σz,old − ∆ σz (19.9) Due to tension forces (see step 5 in section 19.5.5) negative stresses could occur in clay layers due to excess pore water pressures. D-F OUNDATIONS sets all negative effective vertical stresses to zero. 254 of 280 Deltares Tension Piles model (EC7-NL) 19.5.3 Step 3: Determination of the design value of the cone resistance (including safety factors) Design values are determined by: correction by γγ for soil weight and therefore for vertical stresses above phreatic level : γd0 = γ/γγ below phreatic level: γd0 = γwet /γγ − γwater where γd0 must be greater than or equal to 0. correction by γst , γm;var;qc and ξ for cone resistance. The cone resistance is corrected according to: qc;z;a γs;t ×γm;var;qc ×ξ where γm;var;qc is determined by: γm;var;qc = 1 + 0.25 × T qc;z;d = (Ft;max;rep − Ft;min;rep ) Ft;max;rep γm;var;qc ≤ 1.5 (19.10) DR AF where: with qc;z;a ξ is the corrected cone resistance taking into account the grain size, the overconsolidation (step 1, Equation 19.1) and the excavation (step 2, section 19.5.2); is the factor for the number of CPTs and the redistribution of the capacity (ξ = ξ3 respectively ξ = ξ4 ) and is determined based on Tables A.10a and A.10b from NEN 9997-1+C1:2012. It is known from test results that the bearing capacity of tension piles decreases with alternating loads, as compared to static loading. In D-F OUNDATIONS, as is common in design practice, this effect is accounted for by using γm;var;qc to achieve a higher factor of safety for alternating loads. (According to Deltares this is not, strictly speaking, correct – the effect of alternating loads should be expressed in lower values for the shaft friction factor.) 19.5.4 Step 4: Determination of factor f1 (effect of installation) A zone of soil compaction will develop around the piles due to installation. The influence of soil compaction due to pile driving is determined on the basis of the following assumptions: The pile displaces the soil grains (the volume of the soil grains does not change; at the position of the pile there is no soil). The pile displaces the soil grains only in the horizontal direction; this means that heave of the soil due to the pile driving is not taken into account. The effect of soil displacements decreases linearly over an area of 6Deq around the pile. The cone resistance is proportional to e3∆Re (Lunne and Christoffersen, 1983). The effect of higher tension due to soil displacement is assumed to be incorporated in the calculation method, therefore calculated pore volumes may be smaller than physically possible (smaller than emin ). Excavation of soil layers does not influence the cone resistance and packing of deeper layers. Based on these assumptions, the influence of pile installation is determined: f1 = exp (3 × ∆Re ) Deltares (19.11) 255 of 280 D-F OUNDATIONS, User Manual with: Pn ∆e emax − emin n X (r − 6) (1 + e0 ) ∆e = − × with r ≤ 6 5.5 50 1 ∆Re = 1 e0 = −Re × (emax − emin ) + emax 1 qc;z Re = × ln 0 0.71 2.91 61 × σv;z;0 where: DR AF emax emin r qc;z 0 σv;z;0 is the void ratio; is the actual void ratio, derived from the relative density at the moment the CPT is executed; is the maximum void ratio (specified in the Materials window, section 6.3.1); is the minimum void ratio (specified in the Materials window, section 6.3.1); is the distance Deq from the considered pile to a neighboring pile; is the measured cone resistance, in kN/m2 ; is the initial vertical effective stress at depth z , in kN/m2 . T e e0 Note: The factor f1 is always greater than or equal to 1. Note: For relatively small values of the cone resistance, the relative density may have a negative value. From a theoretical point of view, there is no objection to this, but a negative value for the relative density causes numerical problems. Therefore, the relative density is limited to a minimum of 0. Note: When the pile installation factor is larger than 1.0, CPTs should be made after pile installation to check the actual compaction rate. The number of CPTs should be equal to 1% of the piles, with a minimum of 3 CPTs. 19.5.5 Step 5: Determination of factor f2 (effect of reduction of stresses due to tension forces in pile groups) Due to the distribution of tension forces over a finite area (the area around the pile in the pile group, i.e. the area of influence) the vertical stress around the pile decreases. This effect is accounted for in the factor f2 . The factor f2 is based on the maximum uplift force on a certain depth, which can be found using: 0 0 − σv;d;2 = σv;d;0 Fmax;uplif t A (19.12) where A is the area of influence around the pile in the pile group. For determining A according to NEN 9997-1+C1:2012, D-F OUNDATIONS uses the following method. The area around the pile is determined by means of the connection lines between the considered pile and surrounding piles. These lines are divided equally and new lines perpendicular to these lines are calculated. The smallest area within the new lines determines the area of influence of the pile. This way, any point in the plan view belongs to the area of influence of the pile closest to this point. 256 of 280 Deltares Tension Piles model (EC7-NL) If the area around the pile is square or nearly square, as is the case in a regular pile pattern (when using the Pile Grid option), A is determined by: A = (center to center distance)2 − Apile (19.13) A may also be an irregularly shaped area. The maximum ratio between the longest and T the smallest side length is always 2. When the ratio between the longest and the smallest distance is larger than 2 the calculation method of the pile changes to an interval method. The pile area is determined in the same way as described above. This area is divided in segments. For each segment the maximum tension force is calculated, as if the pile area had a radius equal to the radius of the segment. This calculation is repeated for all sections and then the results are added to get the total tension force of the pile. This total tension force is compared to the total soil weight criterion and the minimum value is the final bearing capacity of the pile. See also NEN 9997-1+C1:2012. The factor f2 represents the decrease in effective stress as a result of shaft friction along the pile: with: DR AF f2;i r Pi−1 2 0 0 0 0 −Mi + Mi + 2 × σv;j;0;d + γi;d × di × 2 × σv;j;0;d + γi;d × di − 2 × n=0 qt;n;d = 0 0 2 × σv;j;0;d + γi;d × di (19.14) f1;i × Os;gem;i × αt × qc;i;d × di A qt;i;d = Mi × f2;i i−1 X 0 0 σv;j;0;d = γn;d × dn Mi = n=0 19.5.6 Step 6: Determination of the maximum tension capacity Rt;d The factor f2 is determined, varying with depth. The resulting shaft friction is calculated by multiplying f2 by the shaft friction factor Mi : qt;i;d = Mi × f2;i (19.15) The sum of the shaft friction in all layers is equal to the design value of the maximum shaft capacity: Rt;d = A × m X qt;i;d with Rt;d ≤ Rt;kluid;d (19.16) i=1 where: Rt;kluid;d is the soil weight, in kN, calculated according to step 7 (section 19.5.7). Note: For pile with enlarged base, the shaft friction is calculated along the total pile length, not only along the base length. Deltares 257 of 280 D-F OUNDATIONS, User Manual 19.5.7 Step 7: Determination of the total soil weight Rt;kluit;d If the magnitude of the mobilized shear stress exceeds the effective weight of the soil body surrounding a group pile, the pile will pull out this soil body. This means that the calculated tension capacity of a pile in a group is limited by the effective weight of the soil body. This is called the "total soil weight criterion" (Dutch: "kluitcriterium"). The effective weight of the soil body is determined by assuming that an arching effect occurs in the soil between the piles. This means that the soil being pulled out with the pile has the shape of a cone near the pile tips. The angle that the cone edge makes with the vertical is denoted θ . This is presented in the figure below. G* θ DR AF θ pile d piles h T D θ θ (D-d)/2 tan θ θ = 30o θ = 45o Figure 19.2: Pulled out soil geometry The angle θ is related to the type of pile. For displacement piles θ is 45◦ within the pile group and 30◦ at the edge of the group. For non-displacement piles θ is related to the internal friction angle ϕ by 32 ϕ within the pile group and 12 ϕ at the edge of the group. In groups with large pile distances the minimum value of the soil weight using the pile group value and the edge pile value is determined as widely spaced piles may behave more like single piles than as a group. For pile groups with a regular geometry, the square or nearly square area is transformed to a circular area with radius R. The calculation of the height and volume of the cone is based on this circular area. For pile groups with irregularly shaped geometry (when using the method of segments) the total pull-out soil weight is calculated by dividing the area into circular segments. The total soil weight of the pile is equal to the sum of all segments. Note: Comparison of total soil weight and shaft friction takes place only at the calculated pile tip levels. For irregularly shaped pile geometry this comparison is made at pile tip level for the pile as a whole, not for each segment. 19.5.8 Step 8: Addition of the pile weight The total tension capacity of the pile includes the pile weight. If the pile weight is given as 0, the pile weight is not taken into account. If the pile weight is > 0, the pile weight is included in the calculations, even if the effective pile weight is smaller than the weight of the water and the pile experiences uplift. The effect on the total bearing capacity is negative in such a case. The corresponding pile weight is calculated differently for different pile types: 258 of 280 Deltares Tension Piles model (EC7-NL) H-profile The following assumptions are relevant to the calculation of an H-profile pile type: For the calculation of the shaft friction the entire outer area around the pile is taken into account (i.e. the circumference is calculated using: 2 × Height of profile + 4 × Width of profile − 2 × Flange of profile). Compaction of the soil is caused by the steel cross section of the pile. A is the area of influence between the piles minus the outer area of the shaft friction. (i.e. the “plugged” soil is not included in the area of influence.) The weight of the pile is equal to the steel weight plus the soil weight within the shaft friction area. T MV-pile When calculating an MV-pile by using the H-profile input, the pile weight is calculated for the steel area and the inside soil only. Grout weight is considered equal to soil weight. DR AF Open-ended steel pile The calculation method for an open-ended steel pile consists of two parts: Calculation according to NEN 9997-1+C1:2012 for outer shaft friction (A is area around pile, compaction only by the steel surface of the neighboring piles, so the “plugged” soil is not considered part of the area). Maximum shaft friction according to total soil weight criterion (see section 19.5.7). Calculation according to NEN 9997-1+C1:2012 for inner shaft friction (A is area inside pile, no compaction, i.e. the area is only the area of the “plugged” soil). Maximum shaft friction inside is weight of the soil in the pile until the pile tip level. The sum of these two frictions is used to give the tension capacity. Pile with enlarged base For a pile with enlarged base, the pile weight is calculated using only the pile diameter/width (but not the base diameter/width). This gives therefore a slightly lower value than the real pile weight. Piles near excavation Piles at the edge of an excavation may be influenced by the excavation or its retaining walls. These effects should be incorporated manually as described here. When calculating an edge pile, the area of influence is NOT limited to the excavation boundary. The retaining wall is considered to transfer shear stresses. When the users do not want to account for this shear stress (because e.g. the walls are loaded) they need to add “virtual” piles opposite to the retaining wall in order to achieve the required spreading area. 19.6 Problems in interpreting standards The following are interpretation problems encountered while implementing the standard for tension pile model: NEN 9997-1+C1:2012 art. 1.5.2.127: Definition of a pile It only makes sense to check the pile length (see section 19.1 for demands on pile length) on the basis of the definition of a pile in this article if the phrase: "under ground Deltares 259 of 280 D-F OUNDATIONS, User Manual level" is inserted after "Element of which the length". The length of the pile above ground level actually has no effect on whether the calculation model may be used or not. NEN 9997-1+C1:2012 art. 7.6.2.3(k): Requirements related to the CPT If there is any reduction of the qc values in the case of an excavation, the method to be 0 used to determine the effective vertical tension (σv;z ) is described in detail (Begemann). However, D-F OUNDATIONS offers two methods for the reduction of qc values in the case of an excavation. First there is the Safe (NEN) method which offers a more conservative approach. Secondly the qc values can be reduced manually if needed. These options can be found under Reduction of cone resistance in the Excavation window. Units, dimensions and drawing agreements T It should be noted that the Tension Piles model (EC7-NL) is based on a semi 3-dimensional approach. On a flat plane, this is expressed in the pile and CPT plans specified. The third dimension (the depth) is recorded in the CPTs and the corresponding soil profiles. A fully 3-D approach, in which the piles can also be recorded to their full depth (raking piles), is not considered desirable. The dimensional split in the flat plane on the one hand and in the depth on the other hand also applies to the drawing agreements. In the flat plane, the users are completely free to choose their own axis system for the pile and CPT plans. With regard to the depth, all levels to be entered must be recorded in relation to the reference level. This reference level can be chosen freely as long as it is used consistently throughout a project. In the Netherlands, the most common reference level would be the Amsterdam ordnance zero (i.e. NAP). Here, levels above the reference level are considered as positive and levels below the reference level as negative. Settlements, however, are considered as positive if they are pointing downward (see Figure 19.3). DR AF 19.7 A +8 NAP pile settlement + expected soil settlement + -24 A Figure 19.3: Sign conventions for settlements The units of the input and output parameters in this model are displayed in Table 19.1. Although it has been attempted to keep the units for the parameters equal to the units as they occur in the standards, this has been deviated from in some cases. In those cases, in so far as the requisite accuracy allows this, a larger unit was chosen to somewhat limit the length of the figures to be entered and displayed. These deviant units are indicated in the table with a * followed by the unit as mentioned in the standard. In case of alternating loading of tension piles, the factor γm;var;qc is taken into account by enlarging the safety factor for tension piles, γst . The factor γm;var;qc is determined based 260 of 280 Deltares Tension Piles model (EC7-NL) on the representative values of both the maximum and minimum tension loads occurring. The minimum tension load may be a compressive load. According to NEN 9997-1+C1:2012 tension loads have to be entered as positive and compressive loads as negative values. Table 19.1: Units of the input/output parameters Symbol Unit kN/m3 kN/m3 ◦ mm kPa % kN/m2 kN/m2 m +/- NAP m +/- NAP MPa kN/m3 kN/m2 kN kN kN T γunsat γsat ϕ emin emax OCR αt PTL DR AF Description Dry unit weight Wet unit weight Angle of true internal friction Minimum void ratio Maximum void ratio Median Maximum cone resistance Qc reduction Excess pore pressure at top Excess pore pressure at bottom Over-consolidation ratio Shaft friction factor Pile Tip Level Excavation level Cone resistance Unit weight water Surcharge Tension force Pull out force Pile weight (calculated) qc p0 Coordinates of piles and CPTs for determining the positions in the pile and cone plans should be specified in m. 19.8 Tension Piles schematics The required data for executing a calculation for a pile foundation can be divided into two groups: data related to the (foundation) construction (category superstructure, pile type, pile dimensions, pile plan, etc.) and data used to typify the subsoil (CPTs with corresponding soil profiles, including height groundwater level, excavation, etc.). When using the tension piles model the relevant requirements of NEN 9997-1+C1:2012 and the capabilities and limitations should be taken into account. These are explained in more detail in the following sections: section 19.8.1 Problem boundaries section 19.8.2 Variation in the pile tip level section 19.8.3 Skin friction zone section 19.8.4 Non rigid/rigid section 19.8.5 Combination of superimposed load/excavation Deltares 261 of 280 D-F OUNDATIONS, User Manual 19.8.1 Problem boundaries Because the D-F OUNDATIONS model cannot be supplied with unlimited memory, the limits given in Table 19.2 apply to the maximum problem size. Table 19.2: Limits applied to the maximum problem size 19.8.2 Variation in the pile tip level 100 200 350 5000 100 151 T Maximum number of pile types Maximum number of piles in pile plan Maximum number of CPTs (i.e. soil profiles) Maximum number of qc values per CPT Maximum number of layers per soil profile Maximum number of iterations during design DR AF Although desirable, in practice the use of a single pile tip level in a project is not always feasible. Variation in the soil layers for the executed CPTs may force designers to use different pile tip levels. The tension piles model therefore allows users to define the required pile tip level for each CPT using the option Bearing capacity at fixed pile tip levels (section 6.6.2.2). In this way, the user can cater for the above-mentioned variations. In the other design options, the pile tip levels specified for each CPT are suppressed in favor of the pile tip trajectory. In that case, the relevant pile tip level is retained as a starting point for each calculation step, or for each pile tip level, for all CPTs. It should also be noted that if the variations in the pile tip level are significantly large, the project should be split into sub-projects, and the variations should be kept within limits in each sub-project. 19.8.3 Skin friction zone When designing tension piles according to NEN 9997-1+C1:2012, there are no restrictions regarding the layers where friction is taken into account. In some cases (e.g. disturbed soil – when relative soil-pile movements take place – or in layers with very low effective stress) the user may explicitly want to exclude these layers. In D-F OUNDATIONS this can be achieved in the following way: In the Soil – Profiles window the top of the friction zone should be specified (section 6.3.2.3). The tension capacity will be calculated from this level. According to NEN 9997-1+C1:2012 the top of the friction zone should never be higher than 1 m below ground level or excavation level. In the Soil – Materials window, a soil material can be specified as having zero tension capacity by setting the Apply tension value to False (section 6.3.1). In peat layers the tension capacity is automatically taken as zero. For skin friction the following restrictions always apply: no skin friction is calculated above pile head level no skin friction is calculated above ground and/or excavation level no skin friction is calculated in the first m of soil directly below ground or excavation level (NEN 9997-1+C1:2012) 262 of 280 Deltares Tension Piles model (EC7-NL) no skin friction is calculated in layers in which Apply tension is set to False no skin friction is calculated in peat layers (αt = 0) The weight of all soil layers with no friction is taken into account when determining effective stresses and total soil weight. This also includes soil layers above the pile head level. The skin friction zone can be entered at any level. 19.8.4 Non-rigid/rigid DR AF T One restriction when creating schematics is that for each calculation only (parts of) structures that can be considered either as "completely rigid" or as "completely non-rigid" may be included a single schematic. It follows that, for structures that are partly "non-rigid" and partly "rigid" (for example, a building with a rigid core), the user must execute at least two calculations, one for the non-rigid part and one for the rigid part. Moreover, if the structure consists of several different parts that can be considered as rigid, the user must execute a calculation for each part. Figure 19.4 includes an example of division into sub-calculations. 1 2 Partial calculation 1: piles for rigid part of structure Partial calculation 2: piles for non-rigid part of structure Figure 19.4: Partial calculations for a mixed rigidity structure For the definition of rigid/non-rigid, see NEN 9997-1+C1:2012 art. 7.6.1.1(c). 19.8.5 Combination of superimposed load and excavation If a combination of a superimposed load (or surcharge) and excavation occurs, the following restrictions apply when calculating the bearing capacity. When designing building pits, the effect of excavations is taken into account. These excavations have limited dimensions. Due to distribution of stresses in the sub-soil, the effect of the limited excavation on the CPT value is less than for an unlimited excavation. This effect is taken into account while determining the effect of the excavation. This means that one excavation level is determined for the building pit and thereby for all the piles. When using tension piles in a design that will be executed in phases, both the phase with maximum tension load and the phase with the minimum tension load should be considered using two separate calculations. The sequence of phases (which can be defined in the Project Deltares 263 of 280 D-F OUNDATIONS, User Manual Properties – Construction Sequence window) is important when making calculations in this type of project. Surcharge loads can only be included in the calculation when permanently available so temporary surcharges should not be input. Surcharges are always considered to apply only to the last phase in the building process. DR AF T Determining the effect of a surcharge load on the maximum bearing capacity is a complex matter. In Dutch standards the positive effects of surcharge and its influence on the qc are not taken into account. Therefore, the surcharge only has an influence on the effective stresses and total soil weight. The size of the surcharge does not have to be specified by the user as D-F OUNDATIONS assumes an infinite surcharge area. According to Deltares, this described method is a safe approach. If required, the user can manually adjust qc by specifying reduction percentages in the Excavation window. 264 of 280 Deltares 20 Shallow Foundations model (EC7-NL) 20.1 Area of application The shallow foundations model is used to design shallow foundations on the basis of the Netherlands Eurocode 7 standards which has been implemented in NEN 9997-1+C1:2012 (NEN, 2012), and/or to verify them on the basis of this standard. 20.2 Limit states T The model can be used to calculate and verify shallow foundations classified according to Geotechnical Category 2 (GC2), which are subject to static or quasi-static loads. It is assumed that the foundation surface is parallel with the horizon. Foundations laid on rock or in cemented soil are not governed by NEN 9997-1+C1:2012 and therefore should not be analyzed using this model. The Dutch standards base the validation of constructions on three limit states. These are: Limit state STR is the ultimate limit state for checking forces: i.e. is the foundation DR AF strong enough to support the building. Limit state GEO is the ultimate limit state for checking distortions (settlements and rotations) of the ground: i.e. is the foundation solid enough to keep the building from being torn, ruptured or dislocated. Serviceability limit state is a serviceability limit state, only checking distortions at service load. 20.3 Calculation process This section includes an outline of how the verifications of the different limit sates prescribed by the standards are processed into procedural step-by-step schematics suitable for use in a computer model: (section 20.3.1) Verifying limit state STR (section 20.3.2) Verifying limit state GEO and serviceability limit state 20.3.1 Verifying limit state STR Verification of limit state STR has been implemented in shallow foundations model in the following way: Every calculation starts by determining the effective foundation surface area (Aef ) on the basis of the inputted loads and the foundation level. If it is necessary to redefine Aef (for example, in the case of Punch calculations), the original Aef is used as a starting point (see Figure 20.1). Actual calculation begins by determining the maximum bearing capacity on the foundation surface (bearing capacity in a vertical direction). It is determined whether the undrained state can occur in the given problem definition. If so, the calculation method (case a, b, or c) for the undrained state is selected and the pertinent calculations performed. If the undrained state does not occur, the program immediately starts determining the maximum vertical bearing capacity in the drained state. Here, too, the correct calculation method is first determined prior to making the calculations. Determining the maximum horizontal bearing capacity is limited to a consideration of Deltares 265 of 280 D-F OUNDATIONS, User Manual the shear resistance Sh;d in relation to the horizontal load Fs;h;d . Active and passive soil loads are not included in the calculations. In the majority of calculations, the simple test Sh;d = Fs;h;d will be sufficient. If the passive earth pressure is still needed to confirm the horizontal bearing capacity, the users must refer to NEN 9997-1+C1:2012 Chapter 9. Here, the users should remember that for full mobilization of the passive soil load, relatively large deformations/displacements in the horizontal plane are necessary (0.05 × foundation depth, see Table 9.c NEN 9997-1+C1:2012 art. 9.5.4(c)) and thus they should bear in mind if the displacement of the foundation element is permissible. Verification for limit state EQU is concluded with a consideration of the total stability T and the tilting stability according to the requirements in NEN 9997-1+C1:2012 article 6.5.4(1)P. If these are not satisfied, this is indicated by means of a reference to the additional calculation methods of NEN 9997-1+C1:2012, Chapter 11. Fs; v; d DR AF Fs;v;d Fs; h; d Fs;h;d sand, fairly solid Aef Aef' sand, solid clay, fairly solid sand, solid Aef = original effective foundation surface Aef' = effective foundation surface with punch Figure 20.1: Finding Aef 20.3.2 Verifying limit state GEO and serviceability limit state Verification of limit state GEO and serviceability limit state is implemented in the shallow foundations model in the following way: When calculating the settlements, the so-called sun of Newmark (an alternative method offered in NEN) is not used by D-F OUNDATIONS to determine the increase in stress. This graphical method is not really suitable for use in a computer model, so the increase in stress is instead calculated using the formula specified in the explanation of article 6.6.2(d) of NEN 99971+C1:2012. An added advantage of this is that it provides the users with a control mechanism, as they can now define the concentration value according to Fröhlich. The default value 266 of 280 Deltares Shallow Foundations model (EC7-NL) of 3 used by the program follows the model described by Boussinesq, whilst by entering the value as 4 the user can simulate a stiffness that increases with depth. Special attention should be paid to the accuracy of the calculated settlements, particularly in the case of foundation elements for which the (effective) length/width ratio is much greater than 1. The accuracy of the calculated settlement greatly depends on the calculated increase in vertical effective stress. This is calculated for the middle of each layer, in accordance with NEN 9997-1+C1:2012 art. 6.6.2(e), where the load must be distributed equally. T When the soil layers defined by the user are relatively thick, stress and increase in stress is determined at only a few points (as there are only few layer medians). This may lead to a very inaccurate calculation of the settlement. To prevent this occurring the program automatically adds “dummy” layers at every 0.10 m in the profile. This enables the program to calculate the increase of stress at a large number of points, greatly improving the accuracy of the calculated settlement. When consulting the intermediate result file the extra layers, the calculated stress and the increase in the calculated stress can all be seen (see also section 8.3.3.2). DR AF To indicate the accuracy of the increase in stress achieved, its maximum value is expressed in a percentage of the effective foundation pressure (Fs;v;d / Aef ). This percentage is included with the results of the settlement calculation. If the increase in stress is less than 80% in the first layer, it is also followed by a warning. Percentages greater than 100% are reduced to 100% by the program, which limits the maximum increase in stress to the value of the effective foundation pressure. A second effect of the stress curve is that the stress increases seen from below never become smaller (the curve is always descending with increasing depth). An increase in stress is replaced by the deeper value if it is less than that "deeper" value. Calculation and verification of the rotations occurring in a non-rigid structure is performed on the basis of the relative settlements and distances between the centers of gravity of the foundation elements. Rotation of an individual foundation element is not considered. For a rigid structure, the rotations are set to zero in accordance with article 6.6.2(c) NEN 99971+C1:2012. 20.4 Geometric problems While developing the shallow foundations model, the following geometric problems were detected: When working with several foundation elements, it is important that they do not overlap. D-F OUNDATIONS does not check for overlapping foundation elements as this test would take up a disproportionate amount of space in the program. Moreover, the users can easily and quickly check for overlaps themselves, since the foundation plan is displayed graphically, to scale, in the Top View Foundation window. A second problem involves the implementations of slopes. On the one hand, it is desirable that several different slopes can be used with different foundation elements, while on the other hand the requisite input for this should remain limited. The chosen solution was to define slopes fully independently and then merge them at a later stage with the foundation element and soil profile. The slope is attached to the passive longitudinal side of the element and bisects the layers in the soil profile. If necessary (for example, in the case of a punch calculation) the angle β (NEN 9997-1+C1:2012 article 6.5.2.2(q)) will be automatically adjusted (see Figure 20.2). Deltares 267 of 280 D-F OUNDATIONS, User Manual p DR AF Aef T β β: angle ground level - horizontal without punch p: angle ground level - horizontal with punch Figure 20.2: Slope adjustment for punch 20.5 Units, dimensions and drawing agreements It should be noted that the Shallow Foundations model is based on a semi 3-dimensional approach. In the flat surface plane this is expressed in the foundation plan specified. The third dimension (the depth) is recorded using the soil profiles. The split between the flat plane on one hand and the depth on the other hand also applies to the drawing agreements. In the flat plane, the users are completely free to choose their own axis system for the foundation plan. With regard to the depth, all levels must be entered relative to the reference level. This reference level can be chosen freely as long as it is used consistently throughout a project. In the Netherlands, the most common reference level would be the Amsterdam ordnance zero (i.e. NAP). In D-F OUNDATIONS, levels above the reference level are considered as positive. Settlements, however, are considered to be positive if they are pointing downward (see Figure 20.3). 268 of 280 Deltares Shallow Foundations model (EC7-NL) +0,40 NAP -0,60 DR AF detail A T detail A + settlement Figure 20.3: Sign conventions for settlements The units of the input parameters for the shallow foundations model are displayed in the table below. Although it has been attempted to keep the units for the parameters equal to the units as they occur in the standards, this has been deviated from is some cases. In such cases, in so far as the requisite accuracy allows this, a larger unit was chosen to somewhat limit the length of figures to be entered and displayed. These deviant units are indicated in the table with a * followed by the unit as mentioned in the standards. Table 20.1: Units of the input/output parameters Description Berm width Horizontal length of slope Height of slope Foundation level Ground level Groundwater level Fröhlich’s concentration figure Bottom layer level Volumetric weight of soil Volumetric weight of saturated soil Effective angle of internal friction Cohesion Undrained shear strength Primary compression index Secondary compression index (Initial) void ratio Width of foundation element Deltares Symbol B L H FL PL m2 γ γsat ϕ’ c0 fundr cc cα e0 W Unit [m] [m] [m] [m NAP] [m NAP] [m NAP] [-] [m NAP] [kN/m3 ] [kN/m3 ] [◦ ] [kPa] [kPa] [-] [-] [-] [m] 269 of 280 D-F OUNDATIONS, User Manual L D [m] [m] [m] [m] [◦ ] Eb [m] El [m] Vd;STR/GEO Vd;serviceability [kN] [kN] El [m] K [◦ ] Hd;EQU [kN] 20.6 DR AF T Length of foundation element Diameter of foundation element X coordinate of foundation element Y coordinate of foundation element Angle (on a horizontal plane) of the length axis of foundation element with the Y axis. Eccentricity of the vertical load in the direction of latitude of the foundation Eccentricity of the vertical load in the direction of longitude of the foundation Calculated value of the vertical load in the limit state STR/GEO Calculation value of the vertical load in the serviceability limit state Eccentricity of the horizontal load with respect to the bottom of the foundation element Angle (on a horizontal plane) of the horizontal load with the lengths of the foundation element Calculated value of the horizontal load in the ultimate limit state (EQU) Calculated value of the horizontal load in the serviceability limit state Maximum permissible settlement Maximum permissible (relative) rotation Hd;serviceability [kN] sreq βreq [m] [m/m] Shallow Foundations schematics The requisite data for executing a (verification) calculation according to the Dutch standards for a foundation can be divided into in two groups. One group of data consists of information related to the (foundation) construction (superstructure category, dimensions, foundation plan, etc.), while the other group involves data used to typify the subsoil (soil profiles including height groundwater level, placement depth of the foundation element, etc.). Various limitations should be taken into account, concerned with the following: 20.6.1 section 20.6.1 Problem boundaries section 20.6.2 Variation in the level of the bearing layer section 20.6.3 Non-rigid/Rigid section 20.6.4 Merging sub-calculations Problem boundaries Because the model cannot be supplied with unlimited memory, the limits given in Table 20.2 apply to the maximum problem size. Table 20.2: Limits applied to the maximum problem size Maximum number of foundation elements Maximum number of soil profiles Maximum number of layers per profile Maximum number of loadings Maximum number of slopes 270 of 280 20 350 100 20 20 Deltares Shallow Foundations model (EC7-NL) 20.6.2 Variation in the level of the bearing layer Although desirable, in practice the use of a single foundation level in a project is usually not feasible. Variation in the level of the bearing layer within the soil profiles often forces designers to use different foundation levels. The shallow foundations model therefore provides the option of defining the required foundation level for each soil profile. In this way, the user can cater for the above-mentioned variations. 20.6.3 Non-rigid/rigid T One restriction when creating schematics is that for each calculation only (parts of) structures that can be considered either as completely “rigid" or as completely “non-rigid" may be included a single schematic. If the structure is partly "non-rigid" and partly "rigid" (for example, a building with a rigid core), at least two calculations, one for the non-rigid part and one for the rigid part, must be performed. DR AF Moreover, if the structure consists of several different parts that can be considered as rigid, the user must execute a calculation for each part. The reason for this restriction is that the model cannot be used to correctly determine the relevant mutual distances – and therefore the mutual rotations– between the rigid and nonrigid foundation elements. For the definition of rigid/non-rigid elements, see NEN 9997-1+C1:2012 art. 7.6.1.1(c). 20.6.4 Merging sub-calculations When splitting the problem definition into parts, the users should calculate and verify the rotation between those parts them self, based on the maximum settlements in the limit state GEO and serviceability limit state calculated for each part. The required centre-to-centre spacing between rigid and non-rigid building components and between each of the rigid building components should be carefully defined, if possible in consultation with the designer of the superstructure. Deltares 271 of 280 DR AF T D-F OUNDATIONS, User Manual 272 of 280 Deltares 21 Cone types used in Belgium In Belgium, two types of CPT can be performed: The static discontinue penetration test with mechanic cone (CPT-M); The static continue penetration test with standard electrical cone (CPT-E) or piezometric cone (CPT-U). D-F OUNDATIONS allows the importation of those two types of CPT using the HTML file provided by the Flemish DOV databaseDOV database (dov.vlaanderen.be) or using the GEF or CPT file. 21.1 CPT with mechanical cone (CPT-M1, M2 and M4) T Note: In case of CPT results scanned in graphic format (jpg, jpeg, bmp, ico, emf, wmf), the program GEFPlotTool from Deltares Systems can be used to digitize and store them in GEF format. For more information about this program, visit the website www.deltaressystems.com. DR AF For penetration test with mechanical cone (CPT-M), the resistances are measured mechanically with pressure meters. Pressing the borer tube is performed as discontinuous process. For mechanical boring, 3 types of borer point are used in Belgium: Borer point M1 (mantle cone): single cone provided with mantle; Borer point M2 (adhesive mantle cone): cone provided with mantle and adhesive mantle; Borer point M4 (standard cone): single cone without mantle. 21.2 CPT with electrical cone (CPT-E and CPT-U) For penetration test with electrical cone (CPT-E), the resistances at the borer point are measured electrically. Pressing the borer point and tube are performed as continuous process. For electrical boring, two types of borer point are used in Belgium: Standard electrical cone (CPT-E); Piezometric cone (CPT-U). 21.3 Measured values Table 21.1 gives an overview of the measured values provided by each type of CPT: qc is the cone resistance; fs is the local frictional resistance; Qt is the system resistance; u is the water pressure. Note: Mechanical cones M1 and M4 don’t provide frictional data’s. Therefore a special CPT rule called “qc only Rule” must be used by D-F OUNDATIONS to edit the soil profile. Deltares 273 of 280 D-F OUNDATIONS, User Manual Table 21.1: Overview of the mechanical and electrical cones used in Belgium Cone type E U M1 M2 M4 Electrical Electrical Mechanical Mechanical Mechanical Static continue Static continue Static discontinue Static discontinue Static discontinue qc fs Qt u [MPa] X X X X X [MPa] X X O X O [kN] O O X X X [kPa] O X O O O Conversion of mechanical qc -values into equivalent electrical qc -values qc;electrical = T Taking into account the available data up till now, qc -values obtained out of mechanical CPTs shall be reduced by a factor η to get equivalent standard qc -values as used by D-F OUNDATIONS: qc;mechanical η (21.1) Values of the conversion factor η Conversion factor Ettaare given in Table 21.2 and depend on the cone type (M1, M2 or M4) and the soil type (tertiary clay or not). Those values are based on AOSO report of 1997 (results of CPTs at Sint Katelijne Waver, Limelette, Schelle and Koekelare and data from literature). DR AF 21.4 Measured values available Table 21.2: Conversion factors η for mechanical CPTs Cone M1 M2 M4 Tertiary Clay 1.30 1.30 1.15 Other soil 1.00 1.00 1.00 Note: The top level of the Tertiary Clay can be found in the DOV database (dov.vlaanderen.be) under isohypses. In case of a site where both electrical and mechanical CPTs are performed, a conversion factor specific for this site can be determined (rules to be fixed in Part 2 of Eurocode 7 or in the corresponding National Annex). 274 of 280 Deltares 22 Benchmarks Deltares Systems commitment to quality control and quality assurance has leaded them to develop a formal and extensive procedure to verify the correct working of all of their geotechnical engineering tools. An extensive range of benchmark checks have been developed to check the correct functioning of each tool. During product development these checks are run on a regular basis to verify the improved product. These benchmark checks are provided in the following sections, to allow the users to overview the checking procedure and verify for themselves the correct functioning of D-F OUNDATIONS. The benchmarks for D-F OUNDATIONS are subdivided into four separate groups as described below. Group 1 – Benchmarks for Bearing Piles (EC7-NL) model Group 2 – Benchmarks for Bearing Piles (EC7-B) model Group 3 – Benchmarks for Tension Piles (EC7-NL) model Group 4 – Benchmarks for Shallow Foundations (EC7-NL) model DR AF All benchmarks are calculated using spreadsheets. T As much as software developers would wish they could, it is impossible to prove the correctness of any non-trivial program. Re-calculating all the benchmarks in this report, and making sure the results are as they should be, will prove to some degree that the program works as it should. Nevertheless there will always be combinations of input values that will cause the program to crash or produce wrong results. Hopefully by using the benchmark verification procedure the number of times this occurs will be limited. The benchmarks are all described in detail in the Verification Report available in the installation directory of the program. The input files belonging to the benchmarks can be found on CD-ROM or can be downloaded from our website www.deltaressystems.com/geo/downloads/download-page. Deltares 275 of 280 DR AF T D-F OUNDATIONS, User Manual 276 of 280 Deltares 23 Literature CUR, 2001. “Publicatie 2001-4: Design rules for Tension Piles.” . De Beer, E., 1971-1972. “Méthodes de déduction de la capacité portante d’un pieu à partir des résultats des essais de pénétration.” Annales des Travaux Publics de Belgique 4, 5, 6: 191-268, 321-353, 351-405. DINO. URL http://www.dinoloket.nl, database (Data en Informatie van de Nederlandse Ondergrond), Data and Information of the Subsurface of The Netherlands. DOV. “DOV Database (Databank Onderground Vlaanderen).” vlaanderen.be. URL http://dov. T GeoBrain. URL http://www.geobrain.nl/funderingstechniek, database. Lunne, T. and H. Christoffersen, 1983. “Interpretation of cone penetrometer data for offshore sands.” Proceedings Offshore Technology Conference, OTC 4464 . DR AF NEN, 1991a. NEN 6740:1991. Geotechniek - TGB 1990 - Basiseisen en belastingen (Geotechnics - TGB 1990 - Basic requirements and loads), in Dutch. NEN, 1991b. NEN 6743:1991. Geotechniek - Berekeningsmethode voor funderingen op palen - Drukpalen (Geotechnics - Calculation method for bearing capacity of pile foundation Compression piles), in Dutch. NEN, 1991c. NEN 6744:1991. Geotechniek - Berekeningsmethode voor funderingen op staal (Geotechnics - Calculation method for shallow foundations), in Dutch. Nederlands Normalisatie Instituut (Dutch Normalisation Institute). NEN, 2006. NEN 6743-1:2006. Geotechniek - Berekeningsmethode voor funderingen op palen - Drukpalen (Geotechnics - Calculation method for bearing capacity of pile foundation - Compression piles), in Dutch. NEN, 2007. NEN 6744:2007. Geotechniek - Berekeningsmethode voor funderingen op staal (Geotechnics - Calculation method for shallow foundations), in Dutch. Nederlands Normalisatie Instituut (Dutch Normalisation Institute). NEN, 2012. NEN 9997-1+C1:2012 (nl). Geotechnisch ontwerp van constructies - Deel 1: Algemene regels (Geotechnical design of structures - Part 1: General rules), in Dutch. Poulos, H. G. and E. H. Davis, 1974. Elastic Solutions for Soil and Rock Mechanics. New York. WTCB, 2008. Richtlijnen voor de toepassing van Eurocode 7 in België - Deel 1: Het grondmechanisch ontwerp in uiterste grenstoestand van axiaal op druk belaste funderingspalen (NL). WTCB, 2010. Rapport nr 12 (NBN E25007 N006 N), Richtlijnen voor de toepassing van de Eurocode 7 in België - Deel 1: Het grondmechanische ontwerp in de uiterste grenstoestand van axiaal op druk belaste funderingspalen (Guidelines for the implementation of Eurocode 7 in Belgium, Part 1). Deltares 277 of 280 DR AF T D-F OUNDATIONS, User Manual 278 of 280 Deltares DR AF T T DR AF Photo’s by: BeeldbankVenW.nl, Rijkswaterstaat. PO Box 177 2600 MH Delft Rotterdamseweg 185 2629 HD Delft The Netherlands +31 (0)88 335 81 88 [email protected] www.deltaressystems.nl