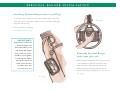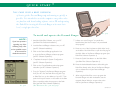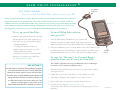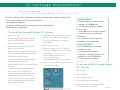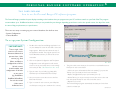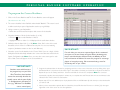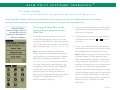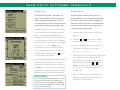
1
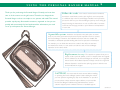
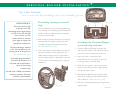
U S E R ’ S M A N UA L
829-210, Rev A
USING THE PERSONAL RANGER MANUAL
Thank you for purchasing the Personal Ranger. Certainly, we know that
Follow the cards. Your manual contains twelve numbered,
time is of the essence on the golf course. Therefore, we designed the
Personal Ranger so that it is simple to use, operate and install. This manual
provides step-by-step, illustrated instructions, organized so that you can
quickly and conveniently find and understand the information you need
to set up and operate the Personal Ranger.
2
stand-alone cards linked around a split ring. Each card corresponds
to a different step in the Personal Ranger installation and operations
process. You will have your Personal Ranger system up and running by
simply following the instructions on each card. The table of contents
on the back of this page provides a quick reference and explanation
of each card.
A portable system. Installation and operation may take place at several
areas of your facility and numerous personnel may be required to learn to operate
the Personal Ranger. Therefore, the individual instruction cards are durable and
removable, to withstand repeated handling and allow for separation and transpor t.
For example, you can divide the manual into cards for the office, the car t barn
and maintenance shed, or a new star ter can take the card on Personal Ranger
Operation to the star ter shack.
Replacement is easy.
The stand-alone system allows you to
replace cards as periodic updates occur. For example, when we upgrade
the PC software for the Personal Ranger, we will send you an upgraded
manual card for PC Software Operation. Simply remove the original PC
Software Operation card from the split ring, replace it with the new
card and discard the original.
caution. You must read this entire manual before installing
or operating the Personal Ranger system. If, after reading the manual,
you have questions regarding any step of the installation or operation
process, please contact customer suppor t before you proceed. See
the Personal Ranger Troubleshooting and Maintenance card for
customer suppor t phone numbers and hours of available suppor t.
829-220, Rev A
TA B L E O F C O N T E N T S
2
Using the Personal Ranger Manual
Explanation of manual use and design.
3
Product Overview
Review of techniques for a complete pace policy.
4
Personal Ranger Installation
How to attach the Personal Ranger to your golf carts or golf bags.
5
Quick Start
Brief over view of installation and setup for a single pace baseline.
6
Palm Pilot Software Installation
Installing the Personal Ranger software onto the Palm Pilot.
7
PC Software Installation
Installing your Personal Ranger software onto a Windows PC.
8
PC Software Operation
9
Palm Pilot Software Operation 1
Using the Personal Ranger software for the Palm Pilot.
Using the Personal Ranger software program on a Windows PC.
9A
Palm Pilot Software Operation 11
More on using the Personal Ranger software for the Palm Pilot.
10
Personal Ranger Operation
How to use the Personal Ranger unit.
11
Personal Ranger Troubleshooting & Maintenance
Caring for your Personal Ranger : troubleshooting, batteries,
general maintenance. Contact Information.
Product Overview #3
PRODUCT OVERVIEW
The Personal Ranger is most effective
when used as the primary tool in a
course's broader pace-of-play policy.
What are the key elements of an
effective pace-of-play policy and how
do you enforce them? We recommend
the following program, which
incorporates all essential elements,
as your guide to maximizing the
strength of your new investment
3
speed
Set the expectation. Set realistic goals
Enforce the policy.
for pacing your golf course. For example, setting
your word. While the Personal Ranger will
a 4-hour round for a championship course with
have a positive impact by raising pace awareness,
little repeat play is probably unrealistic. However,
you inevitably will face the occasional groups
you can expect permanent tee times on weekend
of golfers who cannot or will not keep the pace.
mornings to play at a quicker pace than any first
With such groups, you must act quickly and
timers on your course. Also, you may want to
decisively since the faster you alleviate the
set specific paces for car t path only days and
problem, the better chance of those behind the
special outings.
problematic group getting back on pace. The
Stand behind
Personal Ranger will quiet the group's personal
in the Personal Ranger.
Provide the tool. The Personal Ranger
position, and then you can refer them to the
is the ideal tool. Enforcing a pace expectation
course policy as explained prior to star ting
is difficult without a tool that empowers your
the round.
golfers to objectively evaluate and meet your
Demand will increase.
expectations.
Your
reputation will improve. Consistently following
Explain the policy.
Make yourself
the above steps will help you build a reputation
clear. By properly explaining your overall pace-of-
as a course that cares about the value of its
play policy and how the Personal Ranger suppor ts
customers' time. On any course, a better pace
it, you will get buy-in from your golfers. They
means a better golfing experience. This, in turn,
will leave the first tee wanting to meet your
builds loyalty within your golfing community.
pace goal.
You regularly will attract the best golfers–those
who enjoy the game and its rules.
From the tortoise to the hare, the Personal
Ranger keeps every golfer on a perfect pace.
829-230, Rev A
PRODUCT OVERVIEW
additional
benefits
1
Decreased course supervision.
In command of their pace-of-play, golfers will not need to keep an eye out for a marshal and therefore, will feel more comfor table.
Likewise, they will not worry about being blind-sided at the turn, as they are hit with news of their poor pace performance. They will enjoy
the ability to schedule other events after golf, and your marshals and professional staff will be free to do what they were intended to
do–provide customer service.
2
3
4
Supply.
The relieved pressure on your course will create space for more golfers. Whether public or private, creating space for more golfers
during peak times while increasing golfer satisfaction is a winning proposition.
Greater flexibility.
The ability to adapt the pace to different course conditions, star ting sequences or times of the day allows you to maximize throughput
without harming the golfing experience.
More organized outings.
With the Personal Ranger, you can send off a shotgun outing and have the entire group file into the clubhouse within fifteen minutes of
each other. . . while the food is still hot and the drinks are still cold! Say goodbye to the days of one shotgun taking the course for the entire
day, and star t to schedule a few rounds before and after your outings.
Why does it work?
Awareness is the proven core component of pace-of-play. Most golfers simply are unaware of their expected location at any given time
on a course. Even the most experienced golfers can get distracted during a round. Since the average player has a handicap over thir ty,
left unchecked and without the Personal Ranger, groups with the best intentions have the potential to fall far off pace.
PE R S O NA L R A NG E R I N S TA L L AT I O N
4
THIS CARD EXPLAINS
h o w t o s e c u r e t h e Pe r s o n a l R a n g e r u n i t o n t o a C l u b C a r g o l f c a r t .
Detaching existing scorecard clip:
I M P O RTA N T :
These instructions apply to Club Car
carts only. If attaching the Personal
Ranger to Yamaha or EZ-GO golf carts,
contact us at the number listed on
the back cover page to request the
appropriate instructions.
The Personal Ranger attaches
to the scorecard deck on the
steering wheel of the golf cart.
(See Illustration No. 401)
1 Use a screwdriver to remove the 2 screws on the
back of the steering wheel and remove the scorecard
deck by pulling forward.The deck will detach revealing
2 additional screws.
2 Remove the screws from the back of the existing
scorecard clip.This requires removal of 2 each of
washers, springs and screws. (See Illustration
No. 401)
3 Fit the old screws into the old clip, and set aside
for safe storage. (Since your facility may be leasing
its carts, it is important to save the original parts
A specially designed holster/scorecard
clip functions as a scorecard
and pencil holder in place
of the existing scorecard clip.
No. 402
for replacement at the end of your lease to avoid
penalties by your golf cart distributor.)
Attaching the Personal Ranger
scorecard clip and unit:
1 Orient the Personal Ranger scorecard clip with
the pencil holder on the bottom and the open
end of the scorecard clip at the top.
2 Insert the studs on the back of the scorecard clip
into the existing screw holes on the golf cart's
scorecard deck.
3 Fasten the original washers over the new screws,
insert the new screws into the original springs and
securely fasten screws.
You will need: a Phillips screwdriver
(a battery powered electronic
model is recommended).
4 Slide the Personal Ranger unit into the holster
until it locks. A clicking sound indicates that the
unit is locked. (See Illustration No. 402)
No. 401
5 Place the scorecard deck back on the steering
wheel and secure into place with the original
screws.
829-240, Rev A
PE R S O NA L R A NG E R I N S TA L L AT I O N
4
THIS CARD EXPLAINS
h o w t o s e c u r e t h e Pe r s o n a l R a n g e r u n i t o n t o a n E Z - G O g o l f c a r t .
I M P O RTA N T :
These instructions apply
to EZ-GO carts only.
If attaching the Personal Ranger
to Club Car or Yamaha golf
carts, contact us at the
number listed on the back
cover page to request the
appropriate instructions.
The Personal Ranger attaches
to the scorecard deck on the
steering wheel of the golf cart.
(See Illustration No. 401)
Detaching existing scorecard
clip:
1 Use a screwdriver to remove the 2 screws
and 2 springs from the back of the existing
scorecard clip.
2 Fit the old screws into the old clip, and set
aside for safe storage. (Since your facility may
No. 402
be leasing its car ts, it is impor tant to save the
original par ts for replacement at the end of
your lease to avoid penalties by your golf
car t distributor.)
Attaching the Personal Ranger
scorecard clip and unit:
1 Orient the Personal Ranger scorecard clip
with the pencil holder on the bottom and the
A specially designed holster/
scorecard clip functions as a
scorecard and pencil holder in
place of the existing
scorecard clip.
open end of the scorecard clip at the top.
2 Inser t the studs on the back of the new
scorecard clip into the existing screw holes
on the golf car t's scorecard deck.
You will need: a Phillips screwdriver
(a battery powered electronic
model is recommended).
3 Inser t the new screws into the original
springs and securely fasten screws.
4 Slide the Personal Ranger unit into the holster
No. 401
until it locks. A clicking sound indicates that
the unit is locked. (See Illustration No. 402)
829-240, Rev A
PE R S O NA L R A NG E R I N S TA L L AT I O N
4
THIS CARD EXPLAINS
h o w t o s e c u r e t h e Pe r s o n a l R a n g e r u n i t o n t o a Ya m a h a g o l f c a r t .
I M P O RTA N T :
These instructions apply
to Yamaha carts only.
If attaching the Personal Ranger
to Club Car or EZ-GO golf
carts, contact us at the
number listed on the back
cover page to request the
appropriate instructions.
The Personal Ranger attaches
to the scorecard deck on the
steering wheel of the golf cart.
(See Illustration No. 401)
A specially designed holster/
scorecard clip functions as a
scorecard and pencil holder in
place of the existing
scorecard clip.
Detaching existing scorecard
clip:
No. 402
1 Use a screwdriver to pop off the scorecard deck
from the back of the steering wheel.The deck will
detach revealing 2 additional screws holding the
scorecard onto the deck.
2 Remove the screws from the back of the existing
scorecard clip.This requires removal of 2 each
of washers, springs, screw sleeves and screws.
(See Illustration No. 401)
3 Fit the old screws and screw sleeves into the old
clip, and set aside for safe storage. (Since your
facility may be leasing its carts, it is important to
save the original parts for replacement at the end
of your lease to avoid penalties by your golf cart
distributor.)
Attaching the Personal Ranger
scorecard clip and unit:
1 Orient the Personal Ranger scorecard clip
with the pencil holder on the bottom and the
open end of the scorecard clip at the top.
2 Inser t the studs on the back of the
scorecard clip into the existing screw holes
on the golf car t's scorecard deck.
3 Fasten the new washers over the new screws,
insert the new screws into the original springs
and securely fasten screws.
You will need: a Phillips screwdriver
(a battery powered electronic
model is recommended).
4 Slide the Personal Ranger unit into the holster
until it locks. A clicking sound indicates that the
unit is locked. (See Illustration No. 402)
No. 401
5 Snap the scorecard deck back onto the golf cart's
steering wheel.
829-240, Rev A
PE R S O NA L R A NG E R I N S TA L L AT I O N
Attaching Personal Ranger units to golf bags:
To accommodate walkers, you may have ordered Quick Snap Clips.
No. 404
These clips can be attached to either corner of the Personal Ranger
using the split key ring.
1 Secure the clip to a golf bag.
(See Illustration No. 403)
I M P O RTA N T :
Remember to collect the
Personal Ranger unit
from each walker at the
end of play. We suggest
using a valet key system:
Removing Personal Ranger
units from golf carts:
provide a unit to golfers
in exchange for golfers'
keys. At the end of the
1 Slide the black release fork into the two grooves
round, return the keys
on the backside of the Personal Ranger unit.
to golfers when they
When the fork is fully inser ted, the unit will
turn over their unit.
release from the scorecard clip, and the unit
and fork will slide out together. (See Illustration
No. 404)
No. 403
QU I C K S TA RT
5
T H I S C A R D G I V E S A B R I E F OV E RV I E W
of how to get the Personal Ranger up and running as quickly as
possible. It is intended to assist the computer-savvy–those who
are familiar with downloading software onto a PC and operating
the Palm Pilot–in using the Personal Ranger at its most basic
level, a single pace baseline.
No. 502
To install and operate the Personal Ranger:
N OT E :
If you have questions
regarding any of the
following steps, refer
to the specified section
of the manual for
detailed instructions.
1 Install the Palm Pilot Software onto your PC
(see Palm Pilot Software Installation).
2 Load the Personal Ranger software onto your PC
(see PC Software Installation).
3 Click on the Personal Ranger application icon
to open the Personal Ranger software program
(see PC Software Operation).
4
Complete the steps for System Configuration
(see PC Software Operation).
5 Click on the Course Baselines tab and program
a baseline (see PC Software Operation).
6 Copy (or "Hotsync") the Personal Ranger program
from your PC onto the Palm Pilot using the Copy
to Palm Pilot icon on the desktop of your PC. Then
push the “Hotsync” button on the cradle of the Palm
Pilot to actually transfer the program to the Palm
Pilot (see Palm Pilot Software Installation).
No. 501
7 Initiate one more "Hotsync" to transfer the
baseline data (the first "Hotsync" only transferred
the program).
8 Press any one of the four buttons (with white icons)
at the base of the Palm Pilot to open the first page of
the Main Menu of the Personal Ranger program (see
Palm Pilot Software Operation I).
9 Press the Quick Start button on the Main Menu
(see Palm Pilot Software Operation I).
10 Press the desired baseline button while aiming the
Palm Pilot directly at the face of the Personal Ranger
unit to activate the unit (see Personal Ranger
Operation).
11 After using the Palm Pilot once to program the
Personal Ranger unit with the baseline, use the
magnetic Starter Wand to re-start units at the
first tee (see Personal Ranger Operation).
(See Illustration Nos. 501 and 502)
829-250, Rev A
PA L M P I L OT I N S TA L L AT I O N
6
to computer
serial port
THIS CARD EXPLAINS
h o w t o i n s t a l l t h e Pa l m Pi l o t s o f t w a r e o n t o y o u r P C .
After you program the baselines (or pace data) into your PC, you must transfer the information to the Personal
Ranger units attached to the golf carts.This is done with the Palm Pilot and can be done before or after cart
installation. Of course, the Palm Pilot has many other great uses–it can serve as your personal date book, keeping
No. 601
track of addresses and phone numbers, meetings and appointments and any other items on your "To Do" list.
We suggest that you get the most from your Palm Pilot and take full advantage of all of its features.
To set up your Palm Pilot:
To install Palm Pilot software
onto your PC:
1 Read the Getting Started Guide that is provided
with the Palm Pilot.The Guide explains in easy
1 Insert the Palm Desktop CD-ROM into your computer and
steps how to set up your Palm Pilot including:
follow the prompts to install the "typical" setup. Please refer to the
• installing the batteries
detailed documention that comes with the Palm Pilot for full instructions.
• connecting the Palm Pilot cradle to an
available serial port at the back of your PC
2 During the installation process you will be asked to enter a User Name for your
Palm Pilot. Please enter "Personal Ranger" as the User Name to make it easy to
• install the Palm Pilot software
identify that Palm Pilot as the one you use with the Personal Ranger system.
• performing a “Hotsync” to synchronize data
between your computer to your Palm Pilot
“Hotsync”
button
To copy (or “Hotsync”) the Personal Ranger
program from your PC onto the Palm Pilot:
(See Illustration No. 601)
The software required for this step is installed with your Personal Ranger
I M P O RTA N T :
You will need to re-load the Personal Ranger program
onto the Palm Pilot from your PC if the Palm Pilot
batteries die and/or power is lost on the Palm Pilot.
Therefore, keep a supply of AAA batteries handy and
change the batteries when the battery indicator on
the Palm Pilot shows a low level or when the "low
battery" message appears. Please refer to the
Palm Pilot documentation for detailed instructions.
PC software. See PC Software Installation section.
1 Make sure that the Palm Pilot is placed securely in its cradle and the cradle is
connected to the PC.
2 Double click on the Copy to Palm Pilot icon on the desktop of your PC.
3
"Palm PR.prc" will appear in the Install Tool screen. Click on Done.
4 Click on Okay at the next prompt to start the “Hotsync” process.
5 Press the “Hotsync” button (See Illustration No. 601)
on the cradle of the Palm Pilot to load the Personal Ranger program onto the
Palm Pilot.
829-280, Rev A
P C S O F T WA R E I N S TA L L AT I O N
7
THIS CARD EXPLAINS
h o w t o l o a d t h e Pe r s o n a l R a n g e r s o f t w a r e o n t o y o u r P C .
"The Personal Ranger online documentation uses Adobe Acrobat Reader. If Adobe Acrobat Reader
is not already installed on your PC, you may install it by:
• Opening Windows Explorer.
• Scrolling to and double clicking the designator for your CD-ROM drive.
• Double clicking on rs40eng.exe."
To install the Personal Ranger PC software:
1 Start up your PC.
2 Press the Open/Close button to open the
tray of the CD-ROM drive and place the
CD-ROM disc in the tray.
3 Push the tray in (or press the Open/Close
button) to close the tray.
4 With most PCs, the program will autostart*.
The Personal Ranger PC software installation
screen will automatically appear.
5 Follow the prompts as they appear. Click on
the “Next” button to advance.
6 Select the directory for your Personal Ranger
software:
• Click on Next to automatically default to
the standard c: drive configuration, or
• Manually type an alternative folder in the
window and click on Next to advance, or
• Click on the browse box to the right to
select an existing drive and directory and
click on Next to advance.
7 Continue following prompts as they appear
until the Setup Finished screen appears.
Click on the Finish button to complete
the installation.
8 Remove disc and reboot.
9 When you restart your PC, you will see 3
new Personal Ranger icons on your desktop,
as illustrated (See Illustration No. 701)
• Personal Ranger application icon
• Copy to Palm Pilot icon
• Personal Ranger Help icon (as a pdf file)
10 Click on the Personal Ranger application icon
to run the main program.
I M P O RTA N T :
The Personal Ranger software requires:
• Windows 95, 98, 2000 or NT
• CD-ROM drive (diskettes available
upon request
• 640 x 480 minimum monitor resolution
• available serial port (for Palm Pilot
installation)
• the software currently supports PC
installations only, not Macintosh
A U TO S TA RT *
If the CD-ROM does not autostart,
manually start it by:
• Opening Windows Explorer
• Scrolling to and double clicking on the
designator for your CD-ROM drive
• Double clicking on Install.exe
To un-install the Personal Ranger
PC software:
1 Click on Start.
2 Click on Programs.
3 Click on Personal Ranger.
4 Click on UnInstall Personal Ranger.
5 Follow the prompts as they appear, clicking
on the “Next” button to advance.
No. 701
829-260, Rev A
PE R S O NA L R A NG E R S O F T WA R E O PE R AT I O N
8
THIS CARD EXPLAINS
h o w t o u s e t h e Pe r s o n a l R a n g e r P C s o f t w a r e p r o g r a m .
The Personal Ranger provides the pace-of-play according to the baselines that you program into your PC and then transfer to your Palm Pilot.The program
accommodates up to 10 different baselines so that you can provide for pace changes, depending upon factors such as the specific course, the day of the week,
the time of day, pin placements, or special events.
There are two steps to setting up your course’s baselines for the first time:
• System Configuration
• Course Baselines
To set up your System Configuration:
I M P O RTA N T :
Treat a single, 9 hole
course as one course.
However, facilities that
operate three, 9 hole
courses (e.g., Red,
White, and Blue) as
configurations of three,
18 hole courses
should consider each
configuration of 18 holes
as one course
(e.g., Red/White,
Red/Blue,White/Blue).
You can also create
9 hole course
definitions here.
1 Double-click on the Personal Ranger application icon
on your desktop PC screen. A chart with a scorecard
image appears. Notice the two tabs at the top of
the application window. The program opens to the
Course Baselines tab since you will use this screen
most often.
2 Click on the System Configuration tab.The System
No. 801
Configuration screen will appear.You will use this
screen to set up your facility name, course name(s)
and course par data. (See Illustration No. 801)
3 Type the name of your facility (e.g., Shady Hills
Golf Resort) in the field marked "Your Facility".
4 Use your mouse to move the cursor to the first
field under "Courses".
5 Type in a name for each course at your facility. Use
one field per course (up to a maximum of 6 courses).
6
The grid on this screen shows par for each hole on each defined course.
Enter par for each course listed:
• Click in the open cell beneath the first hole number [1], or press the
Tab key if you are already in the Course name field
• Replace the [0] with the proper par number (3, 4 or 5)
• Hit the Tab key (or use your mouse) to move the cursor to the next
hole and repeat this step for each hole on the first course
• Repeat for all courses
The Personal Ranger program automatically calculates par for the front
9, back 9 and total par.
829-270, Rev A
PE R S O NA L R A NG E R S O F T WA R E O PE R AT I O N
To program the Course Baselines:
1 Click on the Course Baselines tab.The Course Baselines screen will appear.
(See Illustration No. 802)
2 The cursor should be in the first field under the title "Baseline". This screen is used
to define each unique pace-of-play baseline used at your golf facility.
3
Assign a name to your first baseline:
• Delete the word "Unused" and replace with a name for the baseline
4 Select the Number of Holes for the baseline (9 or 18):
• Click the
button under "Number of Holes"
• Highlight and click on either 9 or 18 displayed in the scroll-down window
5 Similarly, select the Start Hole (1 or 10). Note: Select 10 for a nine hole round
that starts on hole 10 or for a 10th tee start as part of a cross-over starting
sequence (simultaneous starts on the 1st and 10th tees).
6 Select the course for this baseline in the "Course" field. If you are a single, 18 hole
facility, this field should already default to the course name that was entered in the
System Configuration tab. Note: Once you enter the course name, par for each
hole of that course will appear on the scorecard below.
I M P O RTA N T :
Baseline names will function as
the program keys on your Palm
Pilot.Therefore, chose baseline
names that accurately describe the
specific course and the pace-of-play
in 10 alphanumeric characters or
less (e.g., "RB Norm" for Red/Blue
course, normal pace).
No. 802
I M P O RTA N T :
For each hole, you must enter separate figures for the estimated
time spent on the tee, fairway and green.When calculating pace,
keep in mind the distance between holes, the difficulty of each
hole, and location of facilities. Structure the program to encourage
players to keep play moving. We recommend using a zero for
the fairway time on par 3 holes.
7 Program the estimated time in minutes for completing each hole on the course. Move the cursor by clicking in the open
field beneath Hole 1 and next to the word Tee. Type in the number of minutes you would like to allocate to the first Tee.
Repeat this process for Fairway and Green. Continue until fields for all holes are completed. Note: The scorecard
automatically calculates the total playtime in minutes as you complete the card.The total time in hours and minutes is also
reflected in the "Time" column for each baseline.
8 Repeat steps 3-7 for each additional pace-of-play baseline. Click on the Edit button (far left column) to select the baseline
you want to edit.
9 When you have entered the required data for all baselines, choose Exit from the File menu or click the [x] in the upper
right-hand corner of the screen to close the application.
PA L M P I L OT S O F T WA R E O PE R AT I O N
9
THIS CARD EXPLAINS
h o w t o u s e t h e Pa l m Pi l o t t o p r o g r a m a n d o p e r a t e Pe r s o n a l R a n g e r u n i t s .
Using the Palm Pilot's "HotSync" feature, you can add the baselines that you created on your PC (see PC Software Operation) to your Palm Pilot.
You can then take your Palm Pilot to remote locations (first tee, cart barn, etc.) to program your Personal Ranger units.
I M P O RTA N T :
Before you begin to operate
the Palm Pilot, you must
complete the steps listed for
Palm Pilot Installation.
1
Navigating the Main Menu of the
Personal Ranger program on your
Palm Pilot:
2 To return to the Main Menu from any of the Personal
To open the Main Menu for the first time or from
3 The Main Menu has two screens.To toggle back and
Ranger applications (e.g., Quick Start), press the Main
Menu button on the screen.
another Palm Pilot application, press any one of the
forth between them, press the
four buttons (with white icons) at the base of the Palm
the screens.
or
buttons on
Pilot. The first page of the Main Menu of the Personal
Ranger program will appear. (See Illustration No. 901)
4 To turn off your Palm Pilot after use, press the green
"Power button" at the base, or your Palm Pilot will turn
No. 901
Note: Alternatively, if switching to the Personal
off automatically after several minutes of non-use.
Ranger program from another Palm Pilot application
Note: A Palm Pilot program will run until you switch
(e.g., Date Book), you can access the Personal Ranger
to another program or use the application page to
program from the Palm Pilot's applications screen.
launch another Palm Pilot application.Therefore, when
(See Illustration No. 902) First, press the applications
you press the green "Power button" to turn on your
icon in the "Writing Area" of the Palm Pilot to open
Palm Pilot, it will always return you to the last program
the applications screen, and then press the Palm PR
in use and to the screen most recently displayed.
icon that appears in the top left corner of the
Likewise, if the Palm Pilot turns off while you are using
applications screen.The first page of the Personal
the Personal Ranger program, when you press the four
Ranger program's Main Menu will appear. (For detailed
buttons at the base of the Palm Pilot, you will return
instructions on Managing Applications, read the
to the most recently displayed screen of the Personal
Palm Pilot Handbook, Chapter 3.)
Ranger program (not necessarily to the Main
Menu screen).
No. 902
829-290, Rev A
PA L M P I L OT S O F T WA R E O PE R AT I O N
Quick Start
Normal Start
The Quick Start function is the fastest way
The Normal Start function allows you to set
to get a Personal Ranger unit running and to
Personal Ranger units in advance of tee-off, change
switch the baseline programmed in a unit. It
start times in the event that play is delayed, and
is recommended for courses with starters that
change the starting hole.This is recommended for
change the pace-of-play throughout the day.
starter-less courses that need to program carts
1 Press the Quick Start button on the first screen
No. 903
of the Main Menu.The Quick Start screen will
appear. A box displaying the Baseline Name,
Number and Total Playtime of each baseline that
you programmed on your PC (see PC Software
Operation) appears in the center of your screen.
(See Illustration No. 903) Note: If you
in advance and for shotgun play.
1 Press the Normal Start button on Main Menu
Page 1.
2 Press the
or
button until the desired
baseline appears. (See Illustration No. 904)
3 Press the OK button. Page 2 of the Normal
programmed more than 6 baselines a down
Start function will appear on the screen.
arrow will appear allowing you to navigate to
(See Illustration No. 905)
a second baseline screen. Press the
button
to view baselines 6 through 10.
4 Notice that the Start Time defaults to the current
time and the Start Hole defaults to the first
No. 904
2 Press the desired baseline button while aiming the
hole. Change the Start Time or the Start Hole
Palm Pilot directly at the face of the Personal
by pressing the appropriate
Ranger unit 4 to18 inches away to activate the
Note: See the Palm Pilot Handbook, Chapter 1,
unit. Note: See instructions for Personal Ranger
for instructions on setting the current time on
Operation for detailed explanation on using the
the Palm Pilot.
or
button.
Palm Pilot to control the Personal Ranger unit.
5 Press the Start Timer button while aiming the
I M P O RTA N T :
No. 905
If you need help understanding the function of any
screen, press the [?] button in the bottom left
corner of the screen. A small window explaining
the use of the screen will appear.To close the help
screen, press the OK button.
Palm Pilot directly at the face of the Personal
Ranger unit to activate the unit.
PA L M P I L OT S O F T WA R E O PE R AT I O N
9A
T H I S C A R D P ROV I D E S M O R E I N F O R M AT I O N O N
h o w t o u s e t h e Pa l m Pi l o t t o p r o g r a m a n d o p e r a t e Pe r s o n a l R a n g e r u n i t s .
Stop Timer
1 Go to Main Menu Page 2 and press the Adjust
Timer button. (See Illustration No. 906)
Press the Stop Timer button to stop a Personal
The Adjust Timer screen will appear.
Ranger unit that is in use.
2 Adjust the time up or down in increments of one
1 Press the Stop Timer button while aiming the
minute by pressing the
or
button. The
Palm Pilot directly at the face of the Personal
amount of time you select will appear in the box
Ranger unit to stop the unit.
to the left. (See Illustration No. 907)
No. 906
Adjust Timer
3 Press the Send Adjustment button while aiming
the Palm Pilot directly at the face of the Personal
The Adjust Timer function is used to change
Ranger unit and the Elapsed Time on the unit will
the time on an activated Personal Ranger unit.
adjust accordingly.
Use of the Adjust Timer function is recommended when a golfer is running late or when
the course closes for a short period due to
weather. To adjust the time of a running
4
Adjust the time up or down in quick increments
of five minutes by pressing the [+5] or [-5]
button on the screen.
Personal Ranger unit:
No. 907
829-291, Rev A
PA L M P I L OT S O F T WA R E O PE R AT I O N
Set/View Baseline
4 Press the
button on Page 1 to select
the desired baseline.
The Set/View function allows you to view
the time grid for each baseline (originally
or
5 Press the Send Baseline button on Page 1
programmed on your PC) from your Palm Pilot.
while aiming the Palm Pilot directly at the face
You can use it to program a Personal Ranger
of the Personal Ranger unit, and the baseline
unit with a particular baseline without starting
programmed to the unit will change accordingly.
the unit's timer. Use of the Set/View Baseline
Get Ranger Data
function is recommended to change the baseline
on all carts in advance. For example, use it to
No. 908
The Get Ranger Data function is used to access
program units on Friday night to begin operating
information on a Personal Ranger unit including:
with the weekend baseline on Saturday morning.
This is helpful particularly if you intend on
starting the units with the Starter Wand rather
than the Palm Pilot.
•
Serial number
•
Hardware level
•
Software level
•
Battery voltage
1 Go to Main Menu Page 2 and press the Set/View
• Whether
it was magnet started
Baseline button.The first Set/View Baseline screen
• Whether
it is in demo mode
(Page 1) will appear displaying the name and time
•
Hours of use
of your first baseline. (See Illustration No. 908)
No. 909
2 Press the [VIEW] button to review the time grid
for your first baseline.The second Set/View
Baseline screen (Page 2) appears displaying the
time grid and total time for holes 1 through 9.
Press the
button and another screen will
appear displaying the time grid and total time for
holes 10 through 18, and the total course time.
Note: To return to Page 2, press the
No. 910
Go to Main Menu Page 2 and press the Get
Ranger Data button. The Get Ranger Data
screen will appear.
2 Press the Get Ranger Data button while aiming
the Palm Pilot directly at the face of the Personal
(See Illustration No. 909)
3
1
button.
To return to Page 1, press the [RETURN] button.
Ranger unit, and data for the individual unit will
appear on the Palm Pilot screen. (See Illustration
No. 910)
PE R S O NA L R A NG E R O PE R AT I O N
10
THIS CARD EXPLAINS
how to use the Palm Pilot and the magnetic Starter Wand to operate Personal Ranger units.
I M P O RTA N T :
Before you can use the
Palm Pilot to control
the Personal Ranger,
you must complete the
steps for Personal
Ranger Installation and
Palm Pilot Installation.
When using the Starter
Wand, do not scrape it
directly on the lense of
the Personal Ranger.
Transmitting data between the Palm Pilot and the Personal Ranger unit:
1 Properly aim the Palm Pilot at the Personal Ranger unit. (See Illustration No. 1001)
• Locate the dark window at the top of the Palm Pilot and the clear window at the top center
of the face of the Personal Ranger unit
• Hold the Palm Pilot so that the dark window is pointed directly at the clear window of
the unit. (For best results, hold the Palm Pilot from 4 to 18 inches away from the unit.)
2 Press the appropriate box on the Palm Pilot to send the desired information. For example,
to Quick Start a unit with your Number 2 baseline, press the button indicating the name of
the Number 2 baseline.
3 A "beep" will sound and digits will display on the unit when the unit has been programmed
correctly. Note: If you make a mistake when programming (e.g., fail to properly aim the
Palm Pilot), an "error" noise will sound to alert you to repeat your attempt.
No. 1001
4 The Baseline, Number and Time will flash on the Personal Ranger's screen.Verify that you programmed the unit
with the proper information.The timer on the Personal Ranger will start.
5 When the total time programmed elapses:
• The counter will roll to hole 19
• The screen will flash
• The timer will count for an additional 30 minutes and then the display will turn off automatically
Starting the Personal Ranger with the Magnetic Starter Wand:
No. 1002
After you have used the Palm Pilot once to program the Personal Ranger unit with a baseline, you can start the unit
with the same baseline by using the magnetic Starter Wand. So, if your golf facility uses a starter on the first tee and
only one pace baseline, you only need to program each Personal Ranger once with the Palm Pilot, and thereafter you
can use the Starter Wand to start the Personal Ranger at the first tee.
1 To reset the Personal Ranger unit, run the wand across the bottom right corner of the unit. (See Illustration No. 1002)
Note: You can use the Starter Wand to stop a unit by running the wand 3 times across the bottom right corner of
829-300, Rev A
the unit within 2 seconds. Run the wand back across the unit again once to re-start it.
PERSONAL RANGER TROUBLESHOOTING & MAINTENANCE
11
T H I S C A R D P ROV I D E S I N F O R M AT I O N O N
general troubleshooting tips, caring for your Personal Ranger units and changing batteries
Troubleshooting
•
•
•
•
•
If you have a problem programming (or beaming) information from
the Palm Pilot to the Personal Ranger unit, make sure that you are
properly aiming the Palm Pilot at the window of the unit:
Locate the dark window at the top of the Palm Pilot and the clear
window at the top center of the face of the Personal Ranger unit.
Hold the Palm Pilot so that the dark window is pointed directly at
the clear window of the unit. (See Illustration No. 1101)
Hold the Palm Pilot between 4 and 18 inches away from the unit.
Firmly press the appropriate button on the Palm Pilot to send the
desired information.
Review the Palm Pilot Handbook, Appendix B, for additional
troubleshooting suggestions.
The Hotsync Manager is properly installed on your PC (the red
and blue “Hotsync” icon should appear at the bottom right of
your computer screen).
• The Personal Ranger software is properly installed on the Palm Pilot.
See Palm Pilot Software Installation card.
• Review the Palm Pilot Handbook, Appendix B, for additional
troubleshooting suggestions.
•
If you are having problems working with the Personal Ranger
application on the Palm Pilot:
• Choose a button, then press and release.You will notice an audio
“click” and a visual change in the button if you successfully activate it.
• Practice!
If you are having a problem "Hotsyncing" the Personal Ranger
program from your PC to your Palm Pilot, make sure that:
• Your Palm Pilot is properly connected to your PC.
• The Palm Pilot is resting securely in its cradle.
No. 1101
829-310, Rev A
PERSONAL RANGER MAINTENANCE
Care
I M P O RTA N T :
Batteries must not
be touching each
other when stored.
We can supply
you with a battery
storage tray upon
request. Please
comply with local
municipal regulations
regarding battery
disposal.
Personal Ranger units are durable and long lasting.To
maximize the life of a unit, we suggest the following:
• Take care when cleaning golf carts to avoid exposing units
to power or high pressure washers. Personal Ranger units
are water-resistant only.They are not waterproof.
• Clean the lense of the unit with mild, soapy water or
standard household cleaners, such as Windex. Do not use
gritty or acidic cleansers on the lenses.
You also must take proper care of your Palm Pilot.
We suggest that you:
• Review the Palm Pilot Handbook, Appendix A, for
detailed care instructions.
• Use the Palm Pilot Rhinoskin case to prevent loss of the
Palm Pilot or damage due to dropping it or exposing it to
extreme temperatures, dust or water. Simply slide the Palm
Pilot into the case and use the clip to secure (to a belt or
other convenient location).To use the Palm Pilot while in
its case, open the face of the case to expose the Palm
Pilot's screen.
Batteries
battery during the starting procedure, whereas the magnet
in the wand does not.
• Remove batteries from the units during the off season.
To change the battery in a Personal
Ranger unit:
Remove the Personal Ranger unit from the golf cart
with the black release fork.
• Remove the four screws from the corners of the unit.
• Remove the back cover to expose the coin battery.
(See Illustration No. 1102)
• Pull the battery out of the battery holder.
• Press the new battery into place. A clicking sound
indicates that the battery is properly secured.
• Before replacing the back cover of the unit, examine
the black gasket in the channel around the perimeter of
the case unit. Make sure that it is in place and clean.
• Replace the back cover. For best results, fasten screws
in diagonal corners first.
Screws should be secure but not overly tight to avoid
cracking the plastic or breaking the seal on the unit.
• Re-attach the Personal Ranger unit to the golf cart's
scorecard clip. (see Personal Ranger Attachment for
detailed explanation)
•
Generally, Personal Ranger batteries will last for
approximately 4 to 6 months.To prolong the life of
a battery, we suggest that you:
• Use the Starter Wand instead of the Palm Pilot to start
the units whenever possible.The infrared communications
between the Palm Pilot and Personal Ranger drains the
No. 1102
Support Information
We offer free technical support. If you have questions regarding any step of the Personal Ranger installation or operation
process that are not answered in this manual or other problems with the Personal Ranger, contact us at 312-258-1000
or email: [email protected].
On-Course Technologies
118 North Clinton, Suite 206 • Chicago, Illinois 60661
312.258.1000 phone • 312.258.1753 fax
[email protected] email • www.personalranger.com website
829-320, Rev A