1
ABMIPOD010
iPod Interface for BMW
Copyrights and Trademarks
iPod is a trademark of Apple,Inc
All rights reserved.
ABMIPOD010
Table of contents
Icon Iegends
Copyrights and trademarks
1
Icon legends
1
Warning and safety
2
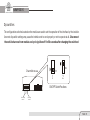
Turn jog dial
Integration kit contents
Turn jog dial repeatedly
Supported ipod models
3
4
DIP switch setting
5
Installation
7
10
Press button
DSP installation
Press button repeatedly
IPOD audio source
11
Text display settings
11
iPod hierarchy
Charging
12
12
Operating the interface
13
Browsing function
15
Auxiliary audio source
16
Troubleshooting
18
scroll
PAGE 01
ABMIPOD010
Warning and safety!
Please read these instructions carefully before proceeding. Failure to follow instructions may result in improper operation or injury.
-Do not open,disassemble or alter the interface in anyway.
-Do not insert anything into the casing.
-Do not cut or try to alter cables in any way and always use the correct connections.
-Only operate unit when stationary or ask passengers to operate it for you.
-Do not allow the Apple iPod to distract you from driving.
-Exercise good judgement and keep your eyes on the road at all times.
-Do not expose unit to extreme temperatures,humidity or shock.
-Keep the unit and iPod away from fluids.
-Keep away from children!-Interface components may contain small parts,can be broken or disassembled and
components may become loose from vibration and heat.Small components and packaging materials may be a chocking
hazard when handled by children.
PAGE 02
ABMIPOD010
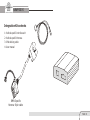
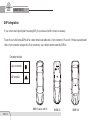
Integration Kit contents
1:
2:
3:
4:
Vehicle specific interface unit
Vehicle specific Harness
iPod docking cable
User manual
BMW Specific
Harness 40pin cable
PAGE 03
ABMIPOD010
Supported ipod models and firmware version requirements
FW:3.1.1
ipod
4th generation
20GB 40GB
FW:1.2.1
ipod
5th generation(video)
30GB 60GB 80GB
FW:1.3.1
ipod nano
1st generation
1GB 2GB 4GB
FW:1.2.1
iPod
4th generation color display
20GB 30GB 40GB 60GB
FW:1.4.1
ipod mini
4GB 6GB
FW:1.1.3
ipod nano
2nd generation(aluminum)
2GB 4GB 8GB
For the latest fireware versions and models not listed, please contact your authorized dealer
PAGE 04
FW:1.0.3
ipod classic
80GB 160GB
FW:1.0.3
ipod nano
3th generation(video)
4GB 8GB
FW:3.0.0
ipod touch
8GB 16GB 32GB
ABMIPOD010
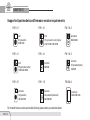
Dip switches
The configuration switches located on the module are used to set the operation of the interface by the installer.
Incorrect dip switch settings may cause the interface not to work properly or not to operate at all. Disconnect
the vehicle harness from module and cycle ignition off for 50 seconds after changing the switches!
ON
Charmlink Module
OFF
1
2
ON
1
IPod Config
Switch
2
3
4
ON/OFF Switch Positions
Car Config
Switch
PAGE 05
ABMIPOD010
Di p switch set tings
Car configuration switches
Ipod configuration switches
Selected emulation
Selected emulation
CD changer 2
CD changer 1
Advance mode
Dip switch3
Dip switch4
Dip switch3
Dip switch4
Dip switch3
Dip switch 4
OFF
OFF
ON
OFF
OFF
OFF
Recommended for late model
Business CD and Navigation
Radio systems.
This setting is to be used on early
model Business CD and Business
Cassette head units.
It is best selected when text display is supported by the radio. After
connecting the ipod you will see the BMW logo on the screen. After
the initialization the ipod will be locked for an increased interface
functionality
ON
OFF
Default
PAGE 06
OFF
OFF
OFF
Default
OFF
ABMIPOD010
Inst al lat ion
Installation should only be performe d by a qualified professional. Bewa re of sharp edges to avoid injury and exercise caution
wh en remo ving trims as they ma y break. The mo dule should be placed at an accessible location to allow AUX cable to be
connected, such as in the glove box, the center consoles, under the front seat or in the trunk.
1: pull vehicle into service bay.
2: Open trunk and access trunk area.
3: Disconnect both battery terminals. These cables must be disconnected during installation to ensure proper
initialization of the charmlink module when it is connected.
4: CD changer cable will be on left hand side on most model (in trunk).
Some models are different:
X3 CD Changer cable is located underneath carpeting under the center console.
Z4 CD changer interface is located between seats, underneath subwoofer.
Mini cooper/Cooper S CD Changer interface is located on right hand side of vehicle(trunk area)
If you car model don't have pre-wired CD changer cable in trunk, please use BMW Specific harness 17 pin and
40 pin cable
5 Remove carpet and side cover to gain access to CD Changer BUS harness. If CD Changer is present, it will
need to be disconnected and/or removed.
PAGE 07
ABMIPOD010
Duri ng insta llati on,make su re th at th e 3 pin connecto r fro m th e vehicle does not have a
brown wire in the middle.The 3 pin Connector of the phone pre-wirin g is identic al looking to
th e 3 pin connecto r of th e CD changer pre -wiri ng!D o not use th e 3pin connecto r th at has a
bro wn wire in th e middle,b ut locate th e one th at has th e bro wn wire on th e sid e!l ncorre ct
connecti on will re su lt in perm anent damage to th e unit and will not be covere d by warra nty!
6 Locate both the 3-pin&6-pin connectors in the trun k If the CD Changer is present,disconnect the cables
and set aside.If no CD Changer is present,the cables will be bundled and tucked away in the rear trunk area.
Some vehicles will have the CD Changer wiring in a protective sheath which may make it
more difficult to locate.
7 Connect both 3-pin and 6-pin cables to the BMW specific harness.
3-pinand 6-pin BMW cables
PAGE 08
Vehicle specific harness
ABMIPOD010
8 Fold down rear seats (if applicable)and route the 5m extension cable to the rear seat bottom cushion
9 Remove bottom seat cushion by lifting up and route wiring underneath
10 Route the remainder of the interface cable in the best possible location(e.g.under the door sill or under the
drivers seat.
11 Connect the vehicle specific connector and the iPod docking cable to the module. Apply cable ties to secure
the cables.
ON
1
Ipod
dock
cable
input
1/8"
AUX
input
2
3
4
Vehicle
specific
connector
IPod docking cable
Vehicle specific connector
PAGE 09
ABMIPOD010
DSP integration
If your vehicle has Digital Signal Processing(DSP), the purchase of a DSP kit may be necessary.
To see if your vehicle has DSP look for a bare metal coax cable and a 3-pin connector. If you don`t find a coax cable an d
` t need this DSP kit.
f ind a 6-pin connector along with a 3-pin connector, your vehicle doesn
Connector location
3-pin connector
DSP amplifier
BMW 5 series and X5
PAGE 10
BMW Z4
BMW X3
ABMIPOD010
IPOD audio source
Text display setting
Ma ke sure to select the appropriate test display setting during the initial set up of the kit.
To configure text display on BMW radios, press DISC 6 then select a Track numb er that corresponds
to the designated display:
Track#
99
Text Displayed On
Application
No Text
All
Characters
01
Radio
3-Series/Z 3/z4/X3/`04 -K1200
12
02
Navigation
All with nav.
15
03
Cluster/OBD
5-Series/7 -Series/X 5 w/o nav.
20
04
MID
Alterna te for 5-Series/7 -Series/X 5
11
05
Alternate Location
All with nav.
8
06
Alt Locat.(large font)
All with nav.
8
07
Resume Text
Use if text does not res ume after phone call
08
Motorcycle
05+K1200
09
No Text
All
12
PAGE 11
ABMIPOD010
te
bl e c on
br ow sa
Artist
Album
b le co
nt en
ow sa
Le ss br
Playlist
Mo re
t
By default,the interface creates a Playlist having a name that is the same as the name
of the iPod.This Playlist is the very first on the list of Playlists shown while browsing in
Playlist mode.This Playlist contains all the songs on the iPod.Once a Playlist is active
an Artist may be selected within that Playlist using the Artist Mode. Albums by the
selected Artist and within the selected Playlist may be selected in Album Mode. ”ALL
ARTIST”and”ALL ALBUM”designate all available content in those categories.
nt
iPod hierarchy
Charging
The interface automatically charges the battery of the iPod when
connected and the key is in the ACC/ON position.
PAGE 12
Charging icon will appear
on the upper right corner
of the iPod screen to
indicate charging.
ABMIPOD010
Operating the interface
Press the MODE button to access th e interface for iPod and its features. Pressing t his button repeatedly
will cycle through sources present in your vehicle. When the iPod audio source is active (DISC 5, track 1), use the
Track button to select next/previous Song.
Press the MODE button to
access the interface
BMW business CD radio
AM
CDC 1 Song * Artist * Album
1
2
3
4
5
FM
SC MODE
RND
TP
6
m
Sou rce ind ica tor
Use bu ton 1- 6
to ch an ge
be twee n DI SC
nu mber s.
Use Random
to enable Shuffle
Songs.
Press and hold the Track
buttons to RW or FFW. On some
older BMW radios the m button
must be engaged perform the
same action.
PAGE 13
ABMIPOD010
BMW radio with Navigation
INFO
Use button 1-6 to
change between
DISC numbers.
1
4
2
5
Press the MODE
button to acc ess the
interf ace .
FM
3
CDC 2-01
PLAYLIST NAME
* Charmaker *
6
TONE SELECT
AM
MODE
MENU
Press this button
to change Track,
press and hold it
to RW or FFW.
01/02 /20 08
Turn the jog dial to change Track. Note that a 9 second timeout is engaged once any of the
alternate display buttons are pressed. lf exiting from anyof these sub-screens without waiting
for then normal timeout, you MUST wait for 9 seconds before being able to use the jog dial again
to navigate content.
PAGE 14
ABMIPOD010
br ow si ng func tion
The inte gration kits features content browsin g. After connectin g the iPod , select the desired browsin g mode
by pressing the appropriate DISC button. Press on turn the Track button repeatedly to browse contents; 1 second after
releasing the button, your selection is executed.
1
CDC 1 Song(1)* Artist * Alb
2
CDC 2 Playlist(1) name
3
CDC 3 Artist(1) name
4
CDC 4 Album(1) name
or
or
or
or
CDC 1 Song(25)* Artist * Alb
CDC 2 Playlist(15) name
CDC 3 Artist(8) name
CDC 4 Album(20) name
In DISC 5, you can select the audio source (ipod/AUX1), in DISC 6, you can set Text display and view firmw are version
information.
PAGE 15
ABMIPOD010
Auxiliary audio source
Co nn ections
1/8"
AUX
input
Sleeve (Ground)
Tip (Left audio)
Ipod
dock
cable
input
Ring (Right audio)
The interface is equipped with a 1/8”AUX jack connection to connect an auxiliary device,such as an MP3 player,DVD player
or other audio source.To access the AUX audio source,select DISC 5 , Track 2 or Preset 5,Channel 2.
1/8"mini stereo jack, not included
Making the adjustments
While listening to the auxiliary device,adjust the volume(gain),bass,mid and treble by turning the Tune dial or pressing
the Seek button.DISC/Preset 1-4 modes select what adjustment the Tune/Seek buttons perform.
PAGE 16
ABMIPOD010
AUX audio source setting
The auxlliary input has settings for gain,bass,mid and treble in order to optimize sound.
Volume (Gain) should be adj usted if the audio level from the auxiliary device is too low or to hig h. If y ou hear distorted
audio while playing the auxiliary device. You need to reduce(-)the gain. If you notice that the audio is too quiet then the
gain setting should be increased(+).Default settings are"50"("68"for gain)and values ma y be adjusted in increme nts
between 01-99,Bass,Mi d and Treble should be adjusted to comp ensate for the acoustic presets of the radio.
Note: If you are using an AUX device that is using the vehicle's power source and not its own battery, you ma y have to use a
GROUND—LOOP isolator to avoid grounding and engine noise
DISC 1
DISC 2
DISC 2
DISC 2
Volume
setting
Bass EQ
setting
Mid EQ
setting
Treble EQ
setting
PAGE 17
ABMIPOD010
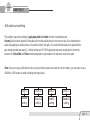
Tr oubl esho ot ing
Problem
Cannot sel ect CD chang er sour ce.
Solution
Check DI P swi tch set tings (ref er to p. 9) . With the igni tion
OFF di sc onnec t vehi cl e har ness from modul e for 50
sec on ds
Radi o/ NA V di spl ay onl y shows DI SC and track num ber , but Sel ect DI SC 5 and make sur e itis set to Tr ack 01.
ther e is no iPod cont rol .
Radi o/ st eer ing wheel cont rol s do not oper at e iPod.
Reset iPod and make sur e most recen t iPod firmware is
inst al lde.
No text disp lay.
Make sur e DI P swi tch set tings ar e cor ret ly set for text
di spl ay. Not e that ear ly model Mini Cooper vehi cl es
do not supp or t Text .
PAGE 18
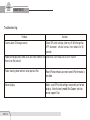
ABMIPOD010
Tr oubl esho ot ing
Problem
Solution
No audio from iPod source.
Reset the iPod.
iPod does not charge.
Check all connections. See if iPod charges while
connectedto computer or wall charger.
Music is distorted or sound level is too low.
Check and make sure all EQ and BASS boost options are
turned off on your iPod.
Correct DIP Switch settings,but still no text display.
Select DISC 6 to set text output to the correcet location.
PAGE 19