1
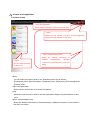
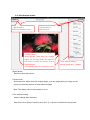
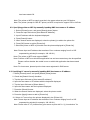
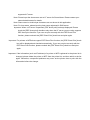
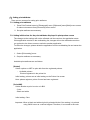
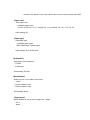
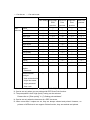
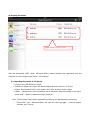
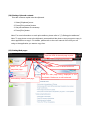
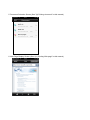
Smart Device Print
User Manual
for iOS
Ver.1.5
Neusoft Japan Co., Ltd.
(1)Introduction
This manual describes how to correctly use the Smart Device Print application on iOS devices
and the precautions of its use.
Please read this document carefully before using the application.
・Application Overview
This application is one that can print photos or documents on iPad/iPhone using Ricoh
printers or MFP.
・Supported iOS devices
iPad, iPad 2, iPad (the 3rd generation), iPad (the 4th generation), iPad mini, iPhone3GS,
iPhone4, iPhone4S, iPhone5*
*:This application is not designed for display on the 4-inch screen of iPhone5, but there is no
problem running it on iPhone5.
・Supported iOS versions
iOS 4.3 or above
・Printer or MFP to print with
Ricoh printers or MFP
For more information on supported models (models on which this application has been
tested OK), please refer to the support page.
・LF (location free) print server to print with
Enhanced Locked Print NX FlexRelease Server V2
・On-demand print application to print with
Enhanced Locked Print NX V2
(2)How to read this manual
2-1.Annotations used in this manual
Important: indicates things you should pay attention to when using the functions of the
application.
Be sure to read carefully, as failure to do so may lead to unexpected
consequences such as misprint or loss of data.
Note:
indicates additional information to the functions, as well as measures to be taken
in case of improper operation.
Buttons or items on the operation screens in this application are indicated by [ ].
Operations and settings other than those done in the application, such as settings on iOS,
iOS device or iTunes, are indicated by <> .
2-2. Notes on this manual
This manual is created based on iPad 2/iPhone4S with iOS version 4.3 or above.
The contents in this manual are subject to change without notice.
Please understand that some of the illustrations or descriptions in this manual may vary due
to changes for improvement in this application, iOS, iOS device or iTunes.
This manual shall not be copied, duplicated, changed, quoted or reproduced in part or in full
without permission.
(3)What can you do with this application
・ Print the photos in <Photograph> applications on iOS devices.
・ Print the documents (PDF, iWork, MSOffice) shared between the application and your
computer through iTunes’ <File Sharing> .
・ Print the images or texts saved on the clipboard.
・ Print the web pages displayed in this application.
・ Print the photos or documents opened in this application by using <Open in... > in other
applications.
・ Print securely using user code or user authentication.
・ Print using on-demand print application.
・ Print using LF (location free) print server.
(4)When using this application
4-1. Connecting your iOS device to Wi-Fi
1. On your iOS device, select <Settings> , <General> and <Network> , then select ON for
<Wi-Fi> .
2. Select and set Wi-Fi network according to your environment and make Wi-Fi connection.
Note: For more information on network settings, please contact your network administrator.
4-2. Connecting to printer or MFP
Please check the user manual of the printer or MFP you are going to use, or consult your
network administrator.
(5)Screens in this application
5-1. Basic Screen
<About this application>
Shows version information and contact information.
<Help>
Shows the user manual on how to use this application,
things to be paid attention to and more.
<Menu contents display area>
Shows
<Menu>
You can select the items
to print or set.
selected
the
detailed
information
photograph(s),
of
clipboard
contents or more based on the menu you
select.
・Menu
You can select the items to print or set. Available menus are as follows:
[Photograph] menu, [Document]menu, [Clipboard] menu, [Web] menu,[Print setting] menu,
[Printers] menu
・About this application
Shows version information and contact information.
・Help
Shows the user manual on how to use this application, things to be paid attention to and
more.
・Menu contents display area
Shows the detailed information of selected photo(s), clipboard contents or more based on
the menu you select.
5-2. Print Preview Screen
<[Back] button>
<[Print] button>
Returns to the basic screen
Executes print.
<Preview area>
Shows preview. When there are multiple
pages, you can swipe (slide your finger on
the screen) to show the preview of each
<Print attribute setting>
individual page.
Used to change print ttributes.
※The display can not be zoomed in or out.
・[Back] button
Returns to the basic screen.
・Preview area
Shows preview. When there are multiple pages, you can swipe (slide your finger on the
screen) to show the preview of each individual page.
Note: The display can not be zoomed in or out.
・Print attribute setting
Used to change print attributes.
Note: Even when [Page Layout] is set to [2 in 1], it will not be reflected in the preview.
・ [Print] button
Executes print.
(6)Specifying the printer, MFP or LF (location free) print server to print with
<[Search printer] button>
Shows the search screen.
<[Printer list] button>
Shows the printer list
<Search printer>
Search printer on Bonjour or by DNS
host name or IP address.
<Printers button>
Shows the printer screen.
To search for LF server, check the
“Search Server” checkbox, and also input
the share name.
<Apply button>
Add the printer found in the search to the printer list.
6-1. Searching and specifying the printer or MFP to print with on Bonjour
1. Select [Printers] menu, and press [Search printer] button.
2. Press [Search on Bonjour] button.
3. When search results are displayed, select one or more printers you want to add.
4. Press [OK] button to add the printer(s) to [Printer list].
5. Select a printer or MFP to print with from the printers displayed in [Printer list].
Note: Printers or MFPs on which this application has not been tested are also shown in the
search results. Please confirm whether the model is one on which this application
has been tested OK.
Note: The printer or MFP to search must be in the same subnet as your iOS device.
Note: The printer (except for GELJET printer) or MFP is required to support PS3 or AirPrint.
6-2. Specifying printer or MFP by manually inputting DNS host name or IP address
1. Select [Printers] menu, and press [Search printer] button.
2. Press the input field next to [Host Name/IP Address:].
3. Input IP address with the keyboard displayed.
4. Press [Search] button.
5. When search results are displayed, select the printer(s) to add to the printer list.
6. Press [OK] button to add to [Printer list].
7. Select the printer or MFP to print with from the printers displayed in [Printer list].
Note: Please input an IP address that consists of four numbers ranging from 0 to 255
separated by periods (for example, 168.190.0.1).
Note: The printer or MFP must support SNMP.
Note: Printers or MFPs on which this application has not been tested may also be specified.
Please confirm whether the model is one on which this application has been tested
OK.
Note: For host name, please input the host name registered in DNS server.
6-3. Specifying LF server by manually inputting DNS host name or IP address
1. Select [Printers] menu, and press [Search printer] button.
2. Check the [Search Server] checkbox.
3. Tap the input field next to [Host name/IP address:]
4. Input the host name or IP address with the keyboard displayed.
5. Tap the input field next to [Share Name: ]
6. Input the share name with the keyboard displayed.
7. Press the [Search] button.
8. When the search results are displayed, select the printer to add.
9. Press the [Apply] button to add to [Printer list].
10. Select a LF server from the printers displayed in the [Printer list].
Note: Please input an IP address that consists of four numbers ranging from 0 to 255
separated by periods (for example, 168.190.0.1).
Note: Please refer to “LF (location free) print server to print with” in “(1) Introduction” for
supported LF server.
Note: Please input the share name set to LF server for Share Name. Please contact your
network administrator for details.
Note: Share name in double-byte characters can not be set in this application.
Note: For host name, please input the host name registered in DNS server.
Important: When a LF server is specified, [PDF direct print] is always displayed. Please
check the [PDF direct print] checkbox only when the LF server you are using supports
PDF direct print function. If you can not print correctly with the PDF Direct Print
function, please uncheck the [PDF Direct Print] check box and print again.
Important: For printers or MFPs that support PDF Direct Print function, the [PDF Direct Print] check
box will be displayed and checked automatically. If you can not print correctly with the
PDF Direct Print function, please uncheck the [PDF Direct Print] check box and print
again.
Important: If the information (such as IP address) of a printer or MFP registered in the printer list is
changed, please delete the printer or MFP from the printer list, and then add it to the list
again. Otherwise, unexpected problems may occur as the printer tries to print with the
information before the change.
(7)Setting print attributes
There are two screens for setting print attributes.
7-1. Setting print attributes
1.Press Print Preview button in [Photograph] menu /[Clipboard] menu/[Web] menu screen.
Or select a document from [Document] menu screen.
2.Set print attributes as necessary.
7-2. Setting initial values for the print attributes displayed in print preview screen
The changes to the settings will not be reflected until the next time the application starts.
If this application remains in the multitasking list, changes will not be reflected even when
you go back to the Home screen or switch to another application.
To reflect the changes, please delete the application from the multitasking list and restart the
application.
1.Select [Print setting] menu.
2.Set print attributes as necessary.
Available print attributes are as follows:
[Printer]
Select a printer or MFP to print with from the registered printers.
・ Available printers
Printers registered in the printer list
Initial setting: printers set as initial setting on the Printer List screen
Note: please register a printer if none has been registered.
[Color/BW]
Select whether to print in color or in BW.
・Color
・Black and white
Initial setting: Color
Important: When a black and white original is printed with the Color setting, it is printed
using CMYK toner as a colored original. Therefore, it is counted in the color
counter in the printer. If you only want to use K toner to print, please set to BW.
[Paper size]
Sets paper size.
・Available paper sizes
A3, B4, A4, B5, A5, 11×17, Legal(8 1/2 × 14), Letter(8 1/2 ×11), 5 1/2 × 8 1/2
Initial setting: A4
[Paper type]
Sets paper type.
・Available paper types
Plain & Recycled, Coated paper
Initial setting: Plain & Recycled
[Orientation]
Sets paper print orientation.
・Portrait
・Landscape
Initial setting: Portrait
[None/Duplex]
Select to print on one side or two sides.
・ None
・Duplex (Open to left)
・Duplex (Open to top)
Initial setting: None
[Page layout]
Select whether or not to print 2 pages into 1 page.
・2 in 1
・None
Initial setting: None
[Input tray]
Select the paper tray to print from.
・Available paper trays
Auto tray select, tray 1, tray 2, bypass tray
Initial setting: Auto tray select
[Job type]
Select how to print.
・Normal print
・Locked print
Initial setting: Normal print
Note: When Locked print is selected, please set user ID and password.
[Print quality]
Select print method.
・Speed priority
Increase print speed without greatly lowering the print quality.
・Quality priority
Print with priority given to image quality.
・High quality
Print with the highest image quality, but it takes some time.
*This option is available when you want to print photo, PDF or clipboard contents on iOS
devices other than iPhone3GS/iPad(1st generation).
Initial setting: Speed priority
Note: Please close other applications and use lower print quality setting when you can not
print correctly with high quality setting.
[Font size]
Set the font size to print the copied text in clipboard.
・Small (10 points)
・Medium (12 points)
・Big (14 points)
Initial setting: Medium (12 points)
[Pages]
Specify print pages.
・from 1 to 99
Initial value: from 1 to 1
[Copies]
Specify the number of copies.
・1~99
Initial setting: 1
[User ID]
Set for locked print or when on-demand print application is used for printing.
・up to 8 alphanumeric [a-z,A-Z,0-9] characters
Initial setting: blank
<Locked Print Details>
[Password]
Set the password for locked print.
・4-8 digit numbers
Initial setting: blank
<Authentication settings>
Set user authentication and user code authentication.
When user authentication setting is on, login user name and login password can be inputted.
When user authentication setting is off, user code can be inputted.
Note: If the driver encryption key set to the printer is changed from its initial setting, user
authentication from this application will fail.
Please contact your administrator for the setting of the driver encryption key.
[User authentication]
Select whether to print with user authentication information or not.
On
Off
Initial setting: off
[Login user name]
Set the login user name for user authentication.
・alphanumeric characters/symbols
Initial setting: blank
[Login password]
Set the login password for user authentication.
・alphanumeric characters/symbols
Initial setting: blank
[User code]
Set the user code for user authentication.
・up to 8-digit numbers
Initial setting: blank
The print attributes that can be set in Print setting and Print preview screens are as follows.
○:Can be set
-:Can not be set
Screens
Print setting Photograph- Document- Clipboard-
Print
Web Print
preview
Print
Print
Print
preview
preview
preview
-
○
○
○
○
○
○
○
○
○
Paper size
○
○
○
○
○
Paper type
○
○※1
○※1
○※1
○※1
Orientation
○
○
○
○
○
None/Duplex
○
○
○
○
○
Page layout
-
-
○※2
-
-
Input tray
○
○
○
○
○
Job type
○
○
○
○
○
Print quality
○
○
○※3
○
-
Font size
-
-
-
○
-
Pages
-
-
○※4
-
-
Copies
○
○
○※5
○
○※5
User ID
○
-
-
-
-
<Locked print
○
-
-
-
-
○
-
-
-
-
Printer
attributes Color/BW
details>
・Password
<Authentication
settings>
・User authentication
・Login user name
・Login password
・User code
*1: Can be set only when you are printing with a GELJET(GelSprinter).
*2: Can be set only when you are printing with PDF Direct Print function.
*3: The prerequisite is that ”High quality” setting can be selected.
Please refer to “[Print quality]” in “(7) Setting print attributes”.
*4: Can be set only when the document is a PDF document.
*5: When more than 2 copies are set, they are always collated and printed. However, on
printers or MFPs that do not support Collate function, they are stacked and printed.
(8) Printing photos
Select the folder where the photo
you want to print is saved.
Print the photos in <Photograph> application on your iOS device.
1. Select [Photograph] menu.
2. The photos in <Photograph> application will be displayed in a list.
3. Select one or more photos to print from the list.
4. Press [Print preview], and the preview will be displayed.
5. Set print attributes as necessary.
6. Press [Print] button.
Note: For more information on each print attribute, please refer to "(7) Setting print
attributes”.
Note: If you do not want to print a photo already selected, press the photo to remove the
check mark. If you want to print the photo again, press it so that a check mark appears
on its upper right corner.
Note: After you have selected a photo and switched from [Photograph] menu to another
menu, when you switch back to [Photograph] menu, a message will be displayed
asking whether you are sure to cancel the selection of photograph. Press [OK] to
cancel the selection, or press [Cancel] to continue selecting photos in the [Photograph]
menu or to print.
(9) Printing document
Select the file you want to print.
Print the documents (PDF, iWork, Microsoft Office) shared between this application and the
computer you are using through iTunes’ <File sharing> .
9-1. Importing documents to iOS device
1. Connect your iOS device to iTunes.
2. Select the <Apps> tab of your iOS device displayed under <Device> in iTunes.
3. Select “Smart Device Print” in the <Apps> list of <File sharing> under <Apps> .
4. When
<Smart Device Print document> list is displayed, drag document(s) to the list or
press <Add...> button to add document(s) to the list.
Note: The documents that can be selected for printing by this application are as follows.
Files in PDF(pdf), Microsoft Office(xls, xlsx, doc, docx, ppt, pptx), or iWork(pages,
numbers, key)format
Note: xls or xlsx files will be printed sheet-by-sheet.
Important: Since Microsoft Office(xls, xlsx, doc, docx, ppt, pptx)or iWork(pages, numbers,
key)files are printed based on print preview by iOS’s WebView, they may not be printed in
correct layout. We recommend you to convert them to PDF before importing to iOS device.
9-2. Printing imported documents
1. Select [Document] menu.
2. The imported documents will be displayed in a list.
3. Select the document you want to print from the list.
4. The document will be previewed.
5. Set print attributes as necessary.
6. Press [Print] button.
Note: For more information on each print attribute, please refer to”(7). Setting print attributes”.
Note: When you specify a printer or MFP to print PDF file, if [PDF Direct Print] checkbox is
checked, the PDF file will be printed using PDF Direct Print function.
[PDF Direct Print] checkbox is only displayed when the printer or MFP supports PDF
Direct Print function.
Note: Due to additional PDF functions such as encrypted PDF, documents may not be
correctly previewed or printed.
Note: For more information on the PDF versions supported by PDF Direct Print function,
please check the user manual of the printer or MFP you are using, or consult your
network administrator.
Note: PDF files can be printed without using PDF Direct Print function, however the image
quality may deteriorate compared to when they are printed using PDF Direct Print
function.
(10) Printing clipboard contents
Print the contents copied onto the clipboard.
1. Select [Clipboard] menu.
2. Press [Print preview] button.
3. Set print attributes as necessary.
4. Press [Print] button.
Note: For more information on each print attribute, please refer to "(7) Setting print attributes”.
Note: To copy photo or text to the clipboard, press and hold the photo or text you want to copy in
other applications to copy it. For details, please refer to the user manual of the iOS you are
using or the application you want to copy from.
(11) Printing Web pages
Input the URL of the web page to print.
Move
to
previous
Reference, edit or delete bookmark.
page/next page.
Add the web page being displayed to the
Refresh/stop reading web page.
bookmark. Reference or edit bookmark.
Print the web page displayed in the application.
1. Select [Web] menu.
2. Tap the URL input field.
3. Input the URL of the web page to print using the keyboard displayed.
4. Set print attributes as necessary.
5. Press [Print] button.
Note: Bookmarks are for this application only.
Note: Depending on the web page to display, web page may not be previewed or printed
correctly.
(12) Printing photos or documents in other applications
Print the photos or documents opened in Smart Device Print application by using
<Open in... >
in other applications.
1. In another application, select the photo or document you want to print in Smart Device
Print application, then with the photo or document displayed or selected, select <Open
in...> in the application.
2. The applications available for <Open in...> are listed.
3. Select Smart Device Print from the list.
4. The application is switched to Smart Device Print, and the photo or document to print is
previewed in Smart Device Print.
5. Set print attributes as necessary like you do in “9-2 Printing imported documents”, and
press [Print] button to print.
Note: For information on things that need your attention, please refer to Note and Important in
“9-2 Printing imported documents”.
Note: Since the exact expression of <Open in...> function may vary with applications, please
refer to the user manual of the application you are using.
Note: A maximum of 9 applications can be selected with <Open in...> function. If Smart Device
Print is not shown in the list, please delete other application(s) from the list.
Reference: Operation screens on iPhone
The following screens are those on iPhone that correspond to the iPad operation screens
described in this manual.
When you press each button, you will get the same function on iPhone as you have on iPad.
1. Basic Screen (See “5-1. Basic Screen” in this manual)\
2. Print Preview Screen (See “5-2. Print Preview Screen” in this manual)
2-1. Print Preview Screen
Change print settings.
2-2. Print Setting Screen
3. Printers Screen (See “(6) Specifying the printer, MFP or LF (location free) server to print with”
in this manual)
3-1. Printer List Screen
Search printers.
3-2. Search Printers Screen
To search for LF server, check the
“Search Server” checkbox, and also
input the share name.
4. Photo Selection Screen (See “(8) Printing photos” in this manual)
4-1. Photograph Screen
Select photos.
4-2. Photo Selection Screen
5. Document Selection Screen (See "(9) Printing document” in this manual)
6. Web Page Display Screen (See “(11) Printing Web page” in this manual)