1
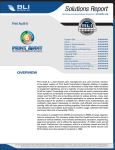
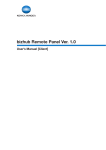
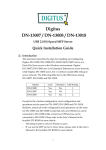
Print and Copy Vending Administrative Guide Print and Copy Vending is an application of Enhanced Locked Print. Read this manual carefully before you use this product and keep it handy for future reference. Important: Contents of this manual are subject to change without prior notice. In no event will the company be liable for direct, indirect, special, incidental, or consequential damages as a result of using this product. All product names, domain names or product illustrations, including desktop images, if used in this document are registered trademarks or the property of their respective companies. Print and Copy Vending and the Ricoh and Ricoh Family Group's logos are trademarks and registered trademarks of Ricoh Company Limited. All other trademarks and trade names are the property of their respective owners and are hereby acknowledged. No part of this publication may be reproduced or transmitted in any form or by any means, electronic or mechanical, including photocopying, recording, or stored in any storage and retrieval system, without express written permission from Ricoh Company Limited or one of its Family Member Companies. 2007 RICOH Corporation. All rights reserved. Table of Contents: 1. Viewing Current Configuration on the MFP: ............................................. 2 2. Viewing / Changing Configuration using Web Interface:........................... 2 2.1. Features Supported: ...................................................................... 2 2.2. Administrative Authentication ......................................................... 3 2.3. Configuration.................................................................................. 3 2.3.1. Locked Print Jobs Delete Options........................................... 4 2.3.2. Non Locked Print Job ............................................................. 4 2.3.3. Job Name in Web Image Monitor ........................................... 4 2.4. Operation Panel ............................................................................. 5 2.4.1. Sort Options for Job List ......................................................... 5 2.4.2. Default Job Selection Settings for Job List.............................. 6 2.4.3. User Authentication ................................................................ 6 2.4.4. Remote Print Function............................................................ 6 2.5. Job List .......................................................................................... 7 2.5.1. Delete Jobs ............................................................................ 7 2.6. Log................................................................................................. 8 2.6.1. Hard Disk Related Error Logs................................................. 8 2.7. Export Configuration File................................................................ 9 2.8. Debug Settings (Service Use Only) .............................................. 10 2.9. Administration .............................................................................. 10 2.10. Remote Server Settings - "FlexRelease" ...................................... 11 2.11. About Locked Print....................................................................... 11 Print & Copy Vending Administrative Guide, Rev 2.3 Page 1 1. Viewing Current Configuration on the MFP: From the MFP Display, entering 23646# from the control panel when on the “User List Screen” will access the current Enhanced Locked Print device settings (Figure 1) Figure 1 Note: This page only allows you to see the current firmware version and settings. To change settings, refer to appropriate section of this Administrative Guide. 2. Viewing / Changing Configuration using Web Interface: Administrator can change Enhanced Locked Print settings using the devices embedded web interface. The web interface application can be accessed by browsing using a standard web browser (such as Internet Explorer) by entering the following URL in the address section: http://<IP Address>/lockedprint/login Where <IP Address> is the IP address of MFP. The default login credentials are: ELP Version prior to V2.3 V2.3 and later User name admin admin Password ricoh password 2.1. Features Supported: 1. 2. 3. 4. 5. 6. 7. 8. 9. 10. Administrative Authentication Configuration (Job Delete Options) Operation Panel (Configure Sort options on Operation Panel User Interface) Job List (To view job list of individual users and also delete option to delete jobs) Log (To view logs generated by locked print application) Export Configuration File Debug Settings (Service Use Only) Administration (To change the login password) Remote Print Group (Central MFP Address) About Locked Print (Displays Version number and other relevant information) Print & Copy Vending Administrative Guide, Rev 2.3 Page 2 2.2. Administrative Authentication From the following screen (Figure 2), Administrators can login to locked print web application to configure & manage locked print application. URL: http://<IPAddress>/lockedprint/login (Default login credentials are shown on the previous page.) Figure 2 2.3. Configuration This page (Figure 3) can be used to configure the Enhanced Locked Print settings. Click "Apply" after making any changes prior to proceeding to the next screen. Figure 3 Print & Copy Vending Administrative Guide, Rev 2.3 Page 3 2.3.1. Locked Print Jobs Delete Options Label Delete After Power Cycle Control List Box Values No Yes Default Description No: Locked print jobs will not be No deleted after power cycle. Yes: Locked print jobs will be deleted after power cycle, Delete Printed Jobs List Box No Yes No No: Locked print jobs will not be deleted after user prints the job. Yes: Locked print jobs will be deleted after user prints the job. Auto Delete List Box No Yes No Edit Box 15 - 10080 [1 Week] 60 No: Jobs will not be deleted automatically after certain time interval. Yes: Jobs will be deleted automatically after time interval entered in the edit box below. This time interval is used to delete jobs automatically when ‘Auto Delete; option is selected as ‘Yes’. 2.3.2. Non Locked Print Job Label Non Locked Print Job Control List Box Values Enable Disable Default Description Enable Enable: MFP will process non Locked Print jobs as well. Disable: MFP will process only Locked Print jobs and will ignore all non-Locked Print jobs. 2.3.3. Job Name in Web Image Monitor Label Hide Job Name Control List Box Print & Copy Vending Administrative Guide, Rev 2.3 Values No Yes Default Description No: Locked Print Job Names are No displayed in Web Image Monitor Print Log. Yes: Locked Print Job Names are hidden [Shown as ****] Page 4 2.4. Operation Panel This page (Figure 4) is used to configure the Sort methods used for displaying locked print jobs. Figure 4 2.4.1. Sort Options for Job List Label Sort By Control List Box Sort Order List Box Print & Copy Vending Administrative Guide, Rev 2.3 Values Job Name Time Default Name Description Name: Job Names are used to sort Job list. Time: Time stamp is used to sort job list. Ascending Ascending Ascending: Jobs will be Descending sorted in ascending order either by Name or Time, depending on the ‘Sort By’ settings. Descending: Jobs will be sorted in descending order either by Name or Time, depending on the ‘Sort By’ settings. Page 5 2.4.2. Default Job Selection Settings for Job List Label Job Selection Control Values List Box All Selected None Selected Printed Not Selected Default All Selected Description All Selected: In the Job List View all jobs will be selected. None Selected: In the Job List View, no jobs will be selected. Printed Not Selected: In the Job List view already printed Jobs will not be selected. Default Enable Description Disable: User Authentication dialog (Password dialog) will be skipped. Enable: User need to enter password to enter Job List Screen 2.4.3. User Authentication Label Control Values Authentication List Box Disable Enable 2.4.4. Remote Print Function Label Remote Print Function Control Values List Box Disable Enable Print & Copy Vending Administrative Guide, Rev 2.3 Default Disable Description Disable: Hides ‘Remote Print’ button in Job List Screen. Enable: Enables ‘Remote Print’ button in Job List Screen Page 6 2.5. Job List This page (Figure 5) is used to view jobs pending by user, as well as job details associated with each user. Figure 5 2.5.1. Delete Jobs To delete stored jobs, click on the “Select” box located at the left of each job you wish to delete and select the [Delete] button. You will be prompted for confirmation before deletion occurs. Print & Copy Vending Administrative Guide, Rev 2.3 Page 7 2.6. Log This page (Figure 6) is used to view the log data created by using the locked print application. Figure 6 - Locked Print Application, Log Screen 2.6.1. Hard Disk Related Error Logs Condition Log Message When HDD is full. [FATAL]: HDD Full Print & Copy Vending Administrative Guide, Rev 2.3 Page 8 2.7. Export Configuration File From this page (Figure 7) a configuration file, containing the current Locked Print Application settings of the MFP, can be downloaded. This file can be used to configure other MFPs on which Locked Print is installed. To download, select the [Configuration File] link (shown as 1 in Figure 7) and then select the [Save] button on the resulting pop-up screen (shown as 2 in Figure 7). Figure 7 - Locked Print Application, Configuration File Screen 1 2 The downloaded configuration file can be sent to additional MFPs via the Locked Print Port [9100 or lpr]. Print & Copy Vending Administrative Guide, Rev 2.3 Page 9 2.8. Debug Settings (Service Use Only) Provides fault level capture settings (Figure 8) to be used for troubleshooting. The fault (errors) are then captured in various log files (arrow) also available from this location. Figure 8 2.9. Administration This page (Figure 9) is used to configure the Administrator’s password required when accessing the Locked Print Web Interface. Figure 9 Print & Copy Vending Administrative Guide, Rev 2.3 Page 10 2.10. Remote Server Settings - "FlexRelease" Sets device address, or name, and port settings (Figure 10) used for the “remote enhanced locked print access” (FlexRelease) feature (see User Manual for details). Figure 10 Label Server IP Address Description IP Address of the MFP that will "centralize" (store) the Enhanced Locked Print jobs. Device name (host name) of the MFP that will "centralize" (store) the Enhanced Locked Print jobs. Communication port to be used for accessing enhanced locked print jobs. Server Name Server Port Note: Only the IP address or device name can be selected. First click on the desired radio button, then enter the data. 2.11. About Locked Print This page, a section of which is shown in the illustration below, displays the Print and Copy Vending version level and can also be used to update the no-charge 30 day trial version, to the full licensed product. (Figure 11) Figure 11 Print & Copy Vending Administrative Guide, Rev 2.3 Page 11