1
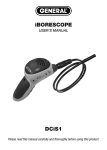
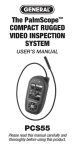
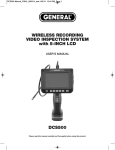
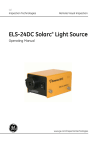
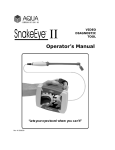
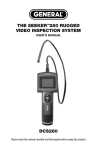
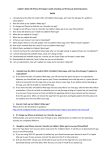
iBorescope
User
Manual
INTRODUCTION
Thank you for purchasing Our iBorescope Camera. Please read this manual carefully and
thoroughly before using the instrument.
iBorescope is a unique instrument that can wirelessly stream high-quality video from a camera
at the tip of a long probe to a nearby iPhone or iPad screen or Android screen.
Typical applications include inspections of hard-to-reach or hard-to-see areas like
crowded engine compartments, equipment enclosures or HVAC ductwork.
KEY FEATURES
•
Generates ad hoc WiFi network (without Internet access) for transmitting transmit probe video to
app-enabled iPhone or iPad
• Long (35 in./900mm), thin (0.39 in./9.8mm diameter) flexible-obedient probe captures VGA (640 x
480 pixel) resolution video. Longer and thinner probes for specific applications are also available.
Please contact us for details.
• Ideal camera depth of field of 1/2 in. to 12 in. (12.7 to 305mm)
• App’s SNAP SHOT soft button captures still .jpg images of live video stream and saves files to
Photos folder on iPhone/iPad. Photos can be viewed immediately, shared immediately by text, or
shared later by e-mail or Skype.
•
Non-replaceable Li-ion battery charges through included USB cable (compatible with
iPhone/iPad Power Adapter and all computers). Full charge is good for three hours of operation.
• Thumbwheel on pistol grip controls camera lighting
• Adjustable video attributes (brightness, contrast, hue, saturation)
• Video Out jack and cable and Low Battery indicator
• includes three useful probe tip accessories (45° mirror, pickup hook, magnetic pickup)
SAFETY INSTRUCTIONS-Warning!
Do not use iBorescope to inspect spaces or enclosures known or suspected to contain live
electrical wiring.
WHAT’S IN THE CASE
The iBorescope’s grip and probe come pre-attached in a protective hard plastic case along with a
USB charging cable (compatible with the iPhone/iPad Power Adapter and all computers), a video
cable, three probe tip accessories (a 45° mirror, a magnetic pickup and a pickup hook) and this user’s
manual.
PRODUCT OVERVIEW
Fig. 1 shows the controls, indicators and physical features of the iBorescope
instrument.
Fig. 2 shows the unit’s standard accessories. Familiarize yourself with the names and functions of all
components before moving on to the Setup Instructions and Operating Instructions.
2
Fig. 1. iBorescope's physical features, indicators, controls.
1. WiFi status light: Red = Preparing hot spot; Green = Hot spot available
2. Video Out jack
3. DC5V charging jack
(Charging) light: Orange = Charging; Off = Fully charged
4.
5. LOW battery charge light (glows red)
6. Power switch/brightness adjustment thumbwheel
7. Pistol grip
8. Camera-tipped probe
9. Camera head
Fig. 2. iBorescope’s standard accessories
10.
12.
14.
45° mirror
Magnetic pickup
USB charging cable
11.
13.
3
Pickup hook Video
bl
SETUP INSTRUCTIONS
CHARGE THE BATTERY
To charge the iBorescope’s battery, insert the USB plug end of the provided charging cable into the
charging port on your iPhone’s or iPad’s Power Adapter (see figures below). Insert the other end of the
cable into the DC5V jack (Fig. 1, Callout 3) on iBorescope.
Alternatively, you can charge iBorescope by inserting the USB plug end of the cable into a USB
port of any computer.
(Fig. 1, Callout 4) will glow
While iBorescope is charging, the light on the right side of the grip
orange. When the unit is fully charged, the light will go out.
It takes about 3 hours to fully charge a depleted iBorescope battery. While you wait,
you can
1) download the app for the instrument (see next section) and
2) begin learning how the unit works while connected to a source of charging current.
DOWNLOAD THE APP
To download the free iBorescope app that enables iBorescope (the instrument), go to
http://itunes.apple.com/app/id509964514 and touch the Free App link at the upper left of the page.
First, you will be prompted to sign in to the iTunes Store using your Apple ID and password. If you do
not have an Apple ID, you can create one now.
Before downloading the app, you will be shown Apple’s Privacy Policy page.
Select the box indicating that “I have read and agree to these terms and conditions.” Then touch
Agree. Doing so will return you to the landing page of the iBorescope app and begin downloading it.
4
OPERATING INSTRUCTIONS
VIEWING VIDEO
1. Turn on iBorescope by rolling the power switch/brightness adjustment thumbwheel (Fig. 1, Callout
6) to the right until you hear a click. The WiFi status light on top of the unit will glow red for 30
seconds while iBorescope prepares to generate an ad hoc hot spot (without Internet connectivity).
2.
When the red light turns green, power on your device and touch the Settings icon to open
your Settings screen.
3. Touch the WiFi row to enter the WiFi Networks screen. The iBorescope hot spot should appear in
the list of available networks. Touching the iBorescope row connects the instrument to the
network, enabling wireless transmission of probe video to a nearby iPhone or iPad running the
iBorescope app. Be aware that while you are connected to the ad hoc iBorescope WiFi network, your
iPhone/iPad will not have Internet connectivity.
The first time you try to connect to the hot spot, you will be prompted to enter the app’s password
(the default password is 12345678). Thereafter, you will not be asked for a password; the
iBorescope line will already have a check mark.
4 Touch the button on your iPhone/iPad to back out of the Settings screen.
5. Locate the iBorescope icon among your apps and touch it. The app’s green splash screen will appear.
6. There are three soft buttons at
the bottom of the iBorescope app.
Initially, the left button is the only
one that is active. Touch it to view live video
captured by iBorescope’s camera tipped
probe.
7. Enabling live video activates the other two
buttons at the bottom of the app. Touching the
middle VIDEO button toggles the display
between live video and a freeze frame of the video.
The freeze frame remains on-screen until you touch
the middle button again, but it is not saved in
memory. Touching the middle VIDEO button also
toggles its icon between PAUSE and PLAY
5
TAKING AND VIEWING PICTURES
1.
2.
3.
To save a still image (also called a screen grab) of live video or paused video, touch the SNAP
SHOT soft button at the bottom of the app. The familiar sound of a camera shutter confirms that
a picture was taken. Pictures are stored as .jpg files within the Photos folder of your iPhone/iPad.
To view your pictures, touch the button on your device to back out of the iBorescope app. Locate
your Photos icon and select it. By default, all of the photos you take with iBorescope are stored
in the Camera Roll subfolder of the Photos folder with a thumbnail view. Touch any thumbnail to
expand the image to fill the screen of your iPhone/iPad.
While your iPhone/iPad is connected to iBorescope's ad hoc WiFi network, your mobile device will
not have Internet access. So if you want to share any snapshots immediately, you must do so by
attaching them to text messages you send over your cellular network. After you have disconnected
your device from the iBorescope network, you can connect to another WiFi network with Internet
access and share your pictures using e-mail or Skype.
USING THE PROBE
Once your iBorescope’s battery has fully charged (indicated by the orange
light going
out), you can disconnect the USB charging cable from the unit and begin using it as a battery-powered
instrument. A fully charged battery will power the instrument for about 3 hours.
If you are unfamiliar with video borescopes, be aware that professional users like contractors and
technicians typically insert a borescope probe into an orifice (a hole in a wall or an engine’s cylinder, for
example) or into an inaccessible or hazardous area (the back or an equipment rack or an engine
compartment, for example) to view components or environments that would otherwise be invisible. Use
the brightness adjustment thumbwheel (Fig. 1, Callout 6) to match the intensity of camera lighting to the
application environment.
In practice, professionals usually insert flexible-obedient probes like the one that comes with iBorescope
head-on into an orifice or area as a first step. They then pull the probe out and adjust its bend one or
more times until the camera in the tip is pointing directly at the target or area of interest. With the probe
inserted, you can twirl it until video appears right-side up, but in many cases you cannot change the
probe’s angle of approach very much.
INSTALLING ACCESSORIES
iBorescope comes with three accessories (see left photo below) in a Ziploc bag that attach to the cameratipped end of the probe. Each accessory has a specific purpose:
• The 45° mirror lets the probe see around corners.
• The pickup hook lets you retrieve otherwise inaccessible items seen by the probe—for example, a
wedding ring accidentally dropped down a sink drain.
• The magnetic hook lets you retrieve lost or dropped metal objects—nuts and bolts, for example—
located by the probe.
6
TO ATTACH AN ACCESSORY:
1. Hold its metal stem with your thumb and index finger.
2. Slide the accessory—plastic clasp first—past the camera head at the probe tip until the clasp is in the
channel 1/4 in. from the end of the probe.
3. Squeeze the clasp until you hear a click (see right photos on previous page), indicating that the two
halves have joined.
TO DETACH AN ACCESSORY:
1. Use the nail of your index finger to unhook the clasp, opening it up.
2. Hold the accessory’s metal stem with your thumb and index finger and slide the accessory and
clasp past the camera head.
3. Put the accessory back in the Ziploc bag it came in.
ADVANCED SETTINGS
To open the iBorescope app’s advanced settings
screen (shown at right), touch the Setting button at
upper right.
As the screen shot shows, you can change
iBorescope’s WiFi Service Set Identifier (SSID) or
password or adjust its video settings while
watching live video in the window in the middle of
the screen.
The default WiFi SSID for the unit is iBORESCOPE.
The default WiFi password is 12345678.
You can change either value to any combination of
letters and numbers that is at least eight digits long.
Enter the new value in the appropriate field and click
Apply.
To restore either default value, click the Restore
button.
To adjust the brightness, contrast, hue or saturation
of the live probe video displayed on your
iPhone/iPad, move its slider to the left or right.
7
SPECIFICATIONS
Image Sensor
1/9” VGA CMOS
Video Resolution
640 x 480 pixels (VGA)
Frame Rate
25fps (VGA on iPhone / iPad)
Video Streaming Format
MPEG4
Operation Temperature
0 ~ 45
Mobile Surveillance
iPad / iPad2 / iPhone3GS / iPhone4 / iPhone 4S/Android
Security
(WiFi) Password Setup
WiFi Range
60 ft. (18m), max (unobstructed)
Camera Lighting
2 white LEDs
Camera Head Diameter
9.8 mm (Optional Camera Head Diameter available)
Gooseneck Length
88 ± 2 cm
Min. bending radius
45mm
Dust & Water Resistance
IP67 (Probe & Camera Head only)
Power Source
Rechargeable Lithium Battery
Operating Voltage
Current Consumption
Operating Temperature
3.7V internal from 5V input
600 mA, max @ 5VDC
32° to 104°F (0° to 40°C)
Power Supply
Rechargeable 2300 mAh Li-ion battery with 5V/1A output
Life of Full Battery Charge
3 hours, typical
OPERATING & MAINTENANCE TIPS
Never insert the probe into a fuel tank or a flammable liquid or gas such as unleaded gasoline, diesel
fuel, machine oil, DOT 4 brake fluid or transmission fluid.
The probe contains thin wires running along its entire length. Accordingly, handle it with care:
• Do not bend it more than 90° anywhere along its length.
• Do not bend the probe more than 70° within 1.2 in. (30mm) of its camera tip.
• Do not bundle the probe into a tight circle to store it.
• Never use the camera end to clear its own path of debris.
• Do not overtighten the collar that secures the probe to the handle.
• To clean the camera lens and LEDs, use a cotton swab and a small amount of mild detergent.
• The grip requires no routine maintenance other than periodic cleaning with a soft, dry cloth. Never
use a wet cloth, corrosive liquids, solvents or water. Avoid getting the grip wet.
• Operate and store iBorescope only in a cool (under 140°F or 60°C), dry, well ventilated place. Avoid
exposing the unit to sunlight for long periods of time.
• iBorescope is designed for industrial and environmental use only. Never use it for human or
any other biological inspection.
8