Download M5.0 Grower Returns - Fresh Computer Systems
Transcript
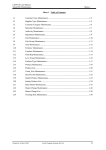
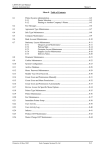
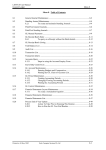
LETTUS User Manual Grower Returns Menu 6 Menu 6 - Table of Contents 6.1 Lots Ready For Pricing List........................................................................... 6-2 6.2 Return Price Entry .........................................................................................6-4 6.2.1 How to enter a Return Price................................................... 6-4 6.2.2 Commission Lot Returns ....................................................... 6-6 6.3 Auto Charge Generation & Approval............................................................ 6-7 6.3.1 Automatic Lot Approval ........................................................ 6-8 6.4 Manual Charge Generation and Approval..................................................... 6-9 6.4.1 To manually generate lot charges .......................................... 6-9 6.4.2 To unapprove a Lot ............................................................... 6-11 6.4.3 Manually Approving Lots..................................................... 6-11 6.5 Lots Ready for Approval List......................................................................6-12 6.6 Supp Ref Profitability List............................................................................6-14 6.7 All-Sold Profitability List.............................................................................6-15 6.8 Trial Profitability List...................................................................................6-17 6.9 Grower Return Estimates.............................................................................. 6-19 6.10 Grower Return Print .....................................................................................6-21 6.10.1 To Print Grower Returns....................................................... 6-21 6.10.2 Printing and Stationery Lineup .............................................6-22 6.11 Grower Return Posting & Unposting ........................................................... 6-23 6.11.1 To post the Grower Returns.................................................. 6-23 6.11.2 Grower Return Unposting..................................................... 6-24 6.12 Cleardown Pools/Profitise Lots .................................................................... 6-25 6.12.1 To profitise Lots or Pools ..................................................... 6-25 6.13 Lot Profitability List .....................................................................................6-27 6.14 Unprofitise Lots............................................................................................ 6-29 6.15 Grower Produce Statistics ............................................................................6-30 6.15.1 Stock Statistics ...................................................................... 6-30 6.15.2 To perform a Query on Stock Statistics................................ 6-30 6.16 Produce Costs List ........................................................................................6-33 6.17 Supplier Costs List........................................................................................ 6-35 Printed on 16 May, 2002 Fresh Computer Systems Pty Ltd 6-1 LETTUS User Manual Grower Returns 6.1 Menu 6 Lots Ready For Pricing List To determine which lots remain Unpriced (i.e. not marked ALL PRICED) the Lots Ready For Pricing Report can be printed. Either Purchase or Non-Purchase (i.e. Basis and Commission) lots can be listed. The report can be used to record the return prices of the lots by the salesman. This can then be used to enter the return prices into the Return Price Entry screen. Select the Lots Ready for Pricing List from the Grower Return Processing menu. After selecting the print/display option required from the printer selection screen, the following screen will be displayed: Make your report selection by completing the following fields: Lot Number If only one lot is required enter the lot number in this field. If more than one lot is required press [NxtFld] leaving this field blank. Use (L)ot or (I)tem Department Show Items under their Lot's Department or under their own. Non Purchase or Purchase Lots Enter (N) to report on non purchase lots or (P) for purchase lots. Note that Nonpurchase lots include both Basis and Commission Lots. Department Code from Enter here the department code for the beginning of the range to be included in this report. [ListVal] may be used to assist in the selection of a department code. Upon entry/selection of a valid code the description will be displayed. Pressing [NxtFld] will default this field to the first department code. Printed on 16 May, 2002 Fresh Computer Systems Pty Ltd 6-2 LETTUS User Manual Grower Returns Department Code to Menu 6 Enter here the ending department code in the range to be printed. If only one code is required then this field will have the same value as the department code from field. Pressing [NxtFld] will default this field to the last department code. Order by (D)ept or (S)upplier Enter (D) to order the report by Department, or (S) to order the report by Supplier. Include Unpriced Lots RECEIVED up to Enter the RECEIVED date of the lots that you wish to price up to. Press [NxtFld] to accept the default of the current (today's) date. List all sold lots Only? Enter (Y) to only report on Lots that have been marked ALL SOLD, enter (N) to report on all lots or enter (D) to report on an ALL SOLD date range. All Sold from Enter the beginning date to report from. The default is the current (today's) date. The cursor only enters this field if (D) is selected in the previous field. All Sold to Enter the ending date to report to. The default is the current (today's) date. All values OK? If you need to change any report selection values enter (N) and press [NxtFld]. If all of the values entered are acceptable then you may accept the default value here by pressing [NxtFld]. The report will now be printed to the device specified in the printer selection screen. Printed on 16 May, 2002 Fresh Computer Systems Pty Ltd 6-3 LETTUS User Manual Grower Returns 6.2 Menu 6 Return Price Entry Prices to be paid for the produce of Basis and Commission lots are entered against the lot using the Enter Return Prices screen. Purchase Lots can be viewed (but not modified) in this screen. On selection of the Return Price Entry option from the Grower Return Processing menu the following screen is displayed: The screen consists of four blocks. The Lot information is displayed in Block 1 while Block 2 contains the lot information at the item level. Block 3 displays Sales Summary details and the return price details are entered in Block 4. Note that the Lot, Item and Value Profit fields reflect the NET Profit values. This includes any no-deduct charges applied to the Lot/Item. More detailed information can be obtained by pressing [ListVal] from either the Lot block or the Item block. When pressed from the Lot block, the details displayed relate to all items of that Lot whereas when pressed from the item block the details displayed relate to the current item only. Note that both the Gross and Net profit values are shown on this screen. 6.2.1 How to enter a Return Price Step 1 Select a lot. This may be done in a number of ways by using the query facilities provided by LETTUS. You may enter a value in one or all of the following fields and the press [ExeQry] to search for all Basis or Commission Lots. Search fields are: Lot Produce Department Profitised Lot Comment Ret Comment All Sold Received Qty Printed on 16 May, 2002 Posted Approved Supplier Received Paid Lot Type Agree Type Freight Indicator Fresh Computer Systems Pty Ltd 6-4 LETTUS User Manual Grower Returns Step 2 Menu 6 Upon selection of the required Lot press [NxtBlk] to go to the Items block. The first three items on the lot are displayed, press [NxtRec] and [PrvRec] keys to display more, or press the [NxtSet] to display three other items at a time. The current item is indicated by a -> symbol on the far left hand side. Any sales summary or sales return prices displayed in the blocks below relate to the current item. Step 3 Ensure that the -> symbol is alongside the item that is to be priced. Step 4 Press the [NxtBlk] key to go to the Sales Return block. Then enter the return price details: Type Enter the return price transaction type. Upon entry of a valid code the description is displayed. Press [ListVal] to assist in the selection of a type. Valid types available here are: N - for a normal return price, this is the default type. Use this type for the entry of return prices. M - Miscellaneous type. Use this type when adjustments are being made, e.g. where the produce has been condemned by D.P.I. A -Allowance type. Use this type for adjustments where the Qty Priced field is not to be affected. For example, say some tomatoes were sold, and the customer subsequently complains that they were of an inferior standard. The agent may credit the customer and recover the adjustment from the grower. To recover the adjustment from the grower enter an A (Allowance) type and the amount to be deducted. Qty Enter the quantity that is to be priced here. Price Enter the amount per unit being returned. If the TYP was N (Normal) then the PRICE entered is the unit price that is being returned to the Grower. This amount should be positive. If the TYP was A (Allowance), then the price is normally negative, a warning will be displayed if the amount entered is positive (i.e. positive price indicates an Allowance reversal). If the TYP was M (Miscellaneous), then the cursor will not enter this field. A price of zero will be displayed. After entry of the Sale Return record, the Unpriced quantity and the Average return price is updated. Where the UNPRICED quantity in the lot is set to 0, the ALL PRICED flag is set to the current system date. The lot and item profit percentage fields (in the Lot block) are also updated. Note that an '*' in these fields represents that this is only an estimate at this stage. For each item, there may be a number of return prices, allowances, and miscellaneous adjustments. These entries can be changed as often as necessary, until the lot has been "APPROVED". Printed on 16 May, 2002 Fresh Computer Systems Pty Ltd 6-5 LETTUS User Manual Grower Returns 6.2.2 Menu 6 Commission Lot Returns Sales value from the Sales Summary block can be conveniently copied to the Sales return block by positioning the cursor in the Sales Return block and pressing [DupRec]. Once the sales have been copied, the quantities and prices can be adjusted at any time until the Lot is APPROVED. Printed on 16 May, 2002 Fresh Computer Systems Pty Ltd 6-6 LETTUS User Manual Grower Returns 6.3 Menu 6 Auto Charge Generation & Approval Lot charges can be generated for all lots that are ALL PRICED as opposed to the manual lot charge generation, which creates the charges for one lot at a time. The screen also allows for those same lots to be approved at the same time the charges are generated. Charges are generated for all lots received up to the selected date. However only lots that are marked as ALL PRICED can be APPROVED. This process applies to Basis and Commission Lots only. To generate charges and optionally approve the lots select the Auto Lot Charge Generation and Approval option from the Grower Return processing menu. After selecting the print/display option from the printer selection screen, the following screen will be displayed: Make your report selection by completing the following fields: Do you want to unapprove lots For normal processing enter (N) here. To make corrections to an Approved lot the lot must be unapproved first. Enter (Y) here to unapprove lots. Note that only Lots that are APPROVED but not POSTED can be unapproved. Unapprove Supplier Reference If (Y) is selected in the previous field enter the Supplier Reference you wish to unapprove. If Supplier Reference is not to be used press [NxtFld] to enter the next field. If (N) was selected in the previous field the cursor does not enter this field. Unapprove Lots APPROVED from If (Y) is selected in the previous field enter the beginning APPROVED date of the Lots that you wish to unapprove. Press [NxtFld] to accept the default of the current (today's) date. If (N) was selected in the previous field the cursor does not enter this field. Printed on 16 May, 2002 Fresh Computer Systems Pty Ltd 6-7 LETTUS User Manual Grower Returns to Menu 6 Enter the ending APPROVED date of the lots that you wish to unapprove. Press [NxtFld] to accept the default of the current (today's) date. Generate Charges for Supplier Reference Enter the Supplier Reference to be used for the selection of lots. Press [ListVal] to assist in the selection of a valid Supplier Reference. If Supplier Reference is not to be used press [NxtFld] to enter the next field. Generate charges for Lots RECEIVED to Enter the date that the Lots were RECEIVED where you wish to process up to. Press [NxtFld] to accept the default of the current (today's) date. Expected Posted Date for these Lots Enter the Expected Posted Date to be used for these lots. This is the expected date that these lots will be posted to the General Ledger Auto Approve Lots Enter (Y) here to generate the charges and approve the lots. Enter (N) here to generate charges only. Supplier Types Enter the supplier types that you wish to generate charges and optionally approve lots for. [ListVal] may be used to assist in the selection of supplier codes. The supplier types will default to the types used when the report was last run. Supplier Code from Enter the beginning supplier code for which to generate charges. [ListVal] may be used if the code is not known. Pressing [NxtFld] will default this field to the first supplier code. to Enter the ending supplier code for which to generate charges. Pressing [NxtFld] will default this field to the last supplier code. If only one supplier is required, the supplier code to field should have the same value as the supplier code from field. All values OK? If you need to change any report selection values enter N and press [NxtFld]. If all of the values entered are acceptable then you may accept the default value here by pressing [NxtFld]. The report will now be printed to the device specified in the printer selection screen. The report after processing displays the number of lots that charges were processed for, the number of lots approved and the deduct and no deduct values. If the lots are not automatically approved the Lots Ready for Approval Listing can be optionally run. 6.3.1 Automatic Lot Approval Manually approving the lot one by one as is done in the Manual Lot Charges Generation and Approval screen is a time consuming procedure. An alternative is to use the Auto Approval facility in the Auto Charge Generation and Approval screen. Lots can be automatically approved when (Y) is entered in the Auto-Approve field on the form, provided that the lot is all priced, the lot was received on or before the nominated date, and the lot is not a purchase lot. Note that the auto approval is on the same screen as the (auto) lot charge generation, you may use the screen to perform the task of generation charges and approving the lots at the same time. Through the approval process the lot record is stamped with the current (today's) date in the Approved field. Printed on 16 May, 2002 Fresh Computer Systems Pty Ltd 6-8 LETTUS User Manual Grower Returns 6.4 Menu 6 Manual Charge Generation and Approval While the Auto Lot Charge Generation and Approval option processes a number of lots the Manual Lot Charge Generation and Approval process only one lot at a time. The manual charge generation screen allows : For the generation of charges for that lot, For a lot to have charges manually entered against it, Charges that have been created (either manually or automatically) can be changed or deleted, For a lot to be approved, For a lot to be unapproved provided that the lot has not been POSTED. 6.4.1 To manually generate lot charges Step 1 Select a lot. This may be done in a number of ways by using the query facilities provided by LETTUS. You may enter a value and press [ExeQry] to search for all lots that match the criteria entered You should scroll (by using [NxtRec] and [PrvRec]) scroll through the records until the lot that wish to generate charges for is displayed on the screen. Note that Purchase Lots can be viewed in this screen, however, charges cannot be generated for them. Step 2 The cursor automatically goes into the option field. Valid options are: [G] - Generate Lot Charges for this lot [A] - Approve this lot for payment [U] - Unapprove this lot. Printed on 16 May, 2002 Fresh Computer Systems Pty Ltd 6-9 LETTUS User Manual Grower Returns Menu 6 [G] Generate Charges for this Lot: Entering (G) in the option field will generate all charges for this lot including levy charges, freight recoveries etc. The lot record is updated with the total of the charges that is to be deducted from the grower, and the total of the charges that are not to be deducted from the grower. [A] Approve this lot for payment: Entering (A) in the option field will approve the charges etc applied to this lot. The lot record is updated with the date of approval, and will be posted in the next posting run. [U] Unapprove this lot: Entering (U) in the option field will unapprove the charges etc applied to this lot, the APPROVED status in the lot record is removed (i.e. the Approve field will now be blank), and the lot will not be processed any further until it is Approved again. Step 3 If required, pressing [PrvBlk] from the option field will move the cursor to the Charges block and allow charges to be inserted, changed or deleted. For Each new Charge enter the charge code, or press [ListVal] to assist in the selection of a code. Upon entry of a valid code the remaining details (as per the record set up in Master Charge Maintenance) will be displayed. These details include: Type The charge type e.g. L - levy, F - freight. Description The charge description. Deduction Are the charges to be deducted from the grower? Rate The rate that will be charged against the priced value of the lot. Qty Used in conjunction with the CENTS/UNIT field, the QTY multiplied by the Cents/Unit results in the Charge $AMT that will be deducted. Unit Type The unit type set up on the master charge record is displayed. Grade The grade set up on the master charge record is displayed. Cents/Unit The cents per unit set up in the master charge record is displayed, and can be changed as required. Charge $Amt This is the total of the number of units multiplied by the cents/unit or where the charge rate % applies, the charge rate multiplied by the Priced value of the produce. This is the amount of the charge. Where the charge has arisen from a supplier invoice, this field will display a (Y) if not a (N) will be displayed. The information in these fields can be changed. To remove a charge from this lot position the cursor on the charge and press [DelRec]. Note that these changes are applicable to this lot only. Printed on 16 May, 2002 Fresh Computer Systems Pty Ltd 6-10 LETTUS User Manual Grower Returns Step 4 Menu 6 After completing the required changes press [NxtBlk] to return to the option field. If required, enter (A) in the option block to approve the lot. NOTE that the Auto Lot Charge Generation and Approval process will override any changes made in this screen. Therefore it is recommended that after making changes manually, the lot be APPROVED. The profit and Profit Percentage fields reflect the NET profit of the Lot. This includes any no-deduct charges entered against the lot. 6.4.2 To unapprove a Lot Step 1 Select the lot. This can be done in a number of ways by using the query facilities provided by the LETTUS system. Step 2 In the Option field, enter (U) to unapprove the lot. Charges can then be made to the lot. See Manually generating lot charges for more information on how to modify lot charges. 6.4.3 Manually Approving Lots Using the Manual Lot Charges Generation and Approval screen allows for a lot to be approved. Note that the lot must have been ALL PRICED, otherwise an error message will be given. To Manually Approve a Lot: Step 1 Select the Manual Lot Charge Generation and Approval option (refer p.6-9) from the Grower Return Processing menu. Step 2 Ensure that the screen is in Query mode. Select the lot that is to be approved. There are a number of ways to do this by using the query facilities of the LETTUS system. Step 3 In the Option field, enter (A) in the options field to approve the lot. If approved in error, the lot can be unapproved, by pressing (U). Printed on 16 May, 2002 Fresh Computer Systems Pty Ltd 6-11 LETTUS User Manual Grower Returns 6.5 Menu 6 Lots Ready for Approval List Once the lots have been Priced and the charges generated they can then go through the approval process. To list all those lots that are due for Approval select the Lots Ready for Approval option. Note that this option is only used if the Auto-Approve Lots option is NOT selected in the Auto Lot Charge Generation and Approval screen (refer p.6-7) To run this report select the Lots Ready for Approval List option from the Grower Return Processing menu. After selecting your print/display option the following screen is displayed: Make your report selection by completing the following fields: Lot Number When only selecting one Lot to report on enter the lot number here. If a range of lots are required press [NxtFld] to leave this field blank. Use (L)ot or (I)tem Department Show Items under their Lot's Department or under their own. (N)on Purchase or (P)urchase Lots Enter (P) to report on Outright Purchase Lots or (N) to report on Basis or Commission Lots. Dept Code From Enter the beginning department code of the range to report on. [ListVal] may be used to assist in the selection of a department code. Pressing [NxtFld] will default this field to the first department code. to Enter the ending department code of the range to report on. Pressing [NxtFld] will default this field to the last department code. Include Unapproved Lots Received up to Enter the selection date to report on or press [NxtFld] to accept the default of the current (today's) date. Printed on 16 May, 2002 Fresh Computer Systems Pty Ltd 6-12 LETTUS User Manual Grower Returns All values OK? Menu 6 If you need to change any report selection values enter N and press [NxtFld]. If all of the values entered are acceptable then you may accept the default value here by pressing [NxtFld]. The report will now be printed to the device specified in the printer selection screen. The report displays the Grade, Count-size and item description for each lot. GP% for Commission lots are automatically calculated. Once you are satisfied with the information on this report the Lots can be Approved. Printed on 16 May, 2002 Fresh Computer Systems Pty Ltd 6-13 LETTUS User Manual Grower Returns 6.6 Menu 6 Supp Ref Profitability List A report similar to the Trial Profitability List is the Supplier Reference Profitability List, which only looks at the selected lots with the relevant Supplier Reference. Note: Lots that have Unpriced or Unsold Items will have Estimate Gross and Nett Profit Values and Percentages To run this report, select the Sup Ref Profitability List option from the Grower Return Processing menu. After selecting your print/display option from the printer selection screen, the following parameter screen will be displayed: Make your report selection by completing the following fields: Supplier Reference from Enter the beginning Supplier Reference to report on. [ListVal] may be used to assist in the selection of a Supplier Reference. Press [NxtFld] to accept the default of the first Supplier Reference. To Enter the ending Supplier Reference to report on. [ListVal] may be used to assist in the selection of a Supplier Reference. Press [NxtFld] to accept the default of the last Supplier Reference. (S)ummary or (D)etailed Enter the format of the report. (D) for a detailed report or (S) for a summary only. All values OK? Printed on 16 May, 2002 If you need to change any report selection values enter (N) and press [NxtFld]. If all of the values entered are acceptable then you may accept the default value here by pressing [NxtFld]. The report will now be printed to the device specified in the printer selection screen. Fresh Computer Systems Pty Ltd 6-14 LETTUS User Manual Grower Returns 6.7 Menu 6 All-Sold Profitability List A report similar to the Trial Profitability List is the All Sold Profitability List, which only looks at lots that are All Sold. It provides more accurate figures than the Trial Profitability List as this report requires the lots to be ALL SOLD. To be included on this report the lot must be: All-priced within the nominated date range AND All-sold up to the To Date OR All-sold within the nominated date range AND All-priced up to the To Date. It is not a requirement of the report for a lot to be Approved. To run this report select the All Sold Profitability List option from the Grower Return Processing menu. After selecting your print/display option from the printer selection screen, the following parameter screen will be displayed: Make your report selection by completing the following fields: (D)epartment or (P)rodice Code Enter (D) to list lots by department or (P) to list by produce code. Code from Enter the beginning department code or produce code of the range to report on. [ListVal] may be used to assist in the selection of a department code. Press [NxtFld] to accept the default of the first department code. to Enter the ending department code or produce code of the range to report on. Press [NxtFld] to accept the default of the last department code. If only one department/produce code is required this field should have the same value of the department/produce code from field. Printed on 16 May, 2002 Fresh Computer Systems Pty Ltd 6-15 LETTUS User Manual Grower Returns Menu 6 Date from Enter the beginning date from which to report. Press [NxtFld] to default this field to the current (today's) date. to Enter the ending date which to report to. Press [NxtFld] to default this field to the current (today's) date. (D)etailed, (S)ummary or (C)ost Enter the format of the report. (D) for a detailed report, (S) for a summary only, or (C) for Special Company Costs Report. All values OK? Printed on 16 May, 2002 If you need to change any report selection values enter (N) and press [NxtFld]. If all of the values entered are acceptable then you may accept the default value here by pressing [NxtFld]. The report will now be printed to the device specified in the printer selection screen. Fresh Computer Systems Pty Ltd 6-16 LETTUS User Manual Grower Returns 6.8 Menu 6 Trial Profitability List The profitability of Lots can be calculated before finalising the Lots. This is done through the Trial Profitability List option. Once the lots have been priced and approved (but not yet profitised) this report can be run to establish the profit margin for each lot. If necessary the prices of these lots can be adjusted to reflect changes in the profit margin. Note that only those lots that are not profitised appear on this report. For a listing of profitised lots see the Lot Profitability List (refer p.6-27). Select the Trial Profitability List option from the Grower Return Processing menu and enter your print/display selection at the printer selection screen, the following screen will be displayed: Make your report selection by completing the following fields: Supplier Enter the supplier code or press [ListVal] to display valid codes. To report on all growers enter '%' or press [Enter] to default % (B)asis, (C)omission, (P)urchase or (A)ll Lots Enter the Agreement type required or (A) for all lots. (R)eceived, (A)pproved or (P)osted Date Range Enter the required date range using the (R)eceived, (A)pproved or (P)osted Date Range Include Partially Sold Lots Enter (Y) to include partially sold lots. Include Approved Lots Enter (Y) to include Approved lots. Include Partially Priced Lots Enter (Y) to include partially priced lots. Printed on 16 May, 2002 Fresh Computer Systems Pty Ltd 6-17 LETTUS User Manual Grower Returns Include Profitised Lots Select Lots by Department code from Menu 6 Enter (Y) to include Profitised lots. Select lots by (D)epartment or (P)roduce Enter the beginning department code of the range to report from. [ListVal] may be used to assist in the selection of a department code. Pressing [NxtFld] will default this field to the first department code. The cursor only enters this field if (D) was selected in the previous field. to Enter the ending department code of the range to report to. Pressing [NxtFld] will default this field to the last department code. If only one department is required, this field will contain the same value as the department code from field. Produce Code from Enter the beginning code of the range of produce codes to report on. [ListVal] may be used to assist in the selection of a produce code. Pressing [NxtFld] will default this field to the first produce code. The cursor only enters this field if a produce code range was selected in the field above. to Enter the ending code of the range of produce codes to report on. Pressing [NxtFld] will default this field to the last produce code. If only one product code is required, this field should contain the same code as the produce code from field. All values OK? If you need to change any report selection values enter (N) and press [NxtFld]. If all of the values entered are acceptable then you may accept the default value here by pressing [NxtFld]. The report will now be printed to the device specified in the printer selection screen. Note that this report does not reflect the final profitability as changes can be made and the lots on this report are not required to be ALL SOLD at this stage. Changes can be made by unapproving the lots and making the required changes. The lot must then be approved again. Printed on 16 May, 2002 Fresh Computer Systems Pty Ltd 6-18 LETTUS User Manual Grower Returns 6.9 Menu 6 Grower Return Estimates The Return Price details can be printed or faxed directly to Growers as soon as the Return price is determined. It is similar to the Purchase Memorandum notes as used in Queensland thus providing another means of informing the Grower of the gross return price before the Lot is processed. The Lot must be all-priced but not profitised to appear on this report. The information on this report includes the Lot number, supplier details, received date, unit, quantity, price. Purchase memo number, supplier ref or return comment can be optionally printed as well. Charges are not included on this report. Note that this report only applies to Suppliers who have a fax number set up in Supplier Maintenance. To set up the facility to fax the Return Estimates contact your Support Office. Select the Grower Return Estimates option from the Grower Return Processing menu. After selecting the print/fax/display option, the following screen will be displayed: To fax the report direct to the Growers, select the fax option from the printer selection screen and the report should be selected using the faxing format. To print or fax the report the following selection must be entered: Print (O)ne Lot or (B)atch To print only one lot enter (O) in this field. Alternatively to print a batch enter (B) in this field. Lot Number If (O) is selected in the previous field the cursor will enter this field allowing you to enter the lot number. Upon pressing [NxtFld] the cursor will skip all other fields and move to the All Values Ok? prompt. Supplier from Enter the beginning supplier code of the range to be printed. [ListVal] may be used to assist in the selection of a code while pressing [NxtFld] will default this field to the first supplier code which has a number set up in the fax number field. Printed on 16 May, 2002 Fresh Computer Systems Pty Ltd 6-19 LETTUS User Manual Grower Returns to Menu 6 Enter the ending supplier code of the range to be printed. Pressing [NxtFld] will default this field to the last supplier code which has a number set up in the fax number field. If only one code is required this field should contain the same code as the supplier code from field. Department Code from Enter the beginning department code of the range to report on. [ListVal] may be used to assist in the selection of the code. Pressing [NxtFld] will default this field to the first department code. to Enter the ending department code of the range to report on. Pressing [NxtFld] will default this field to the last department code. If only one department is required this field should contain the same value as the above field. Produce Code from Enter the beginning produce code of the range to report on. [ListVal] may be used to assist in the selection of a code. Pressing [NxtFld] will default this field to the first produce code. to Enter the ending produce code of the range to report on. Pressing [NxtFld] will default this field to the last produce code. If only one produce code is required this field should contain the same code as the produce code from field. Priced from Enter the beginning date of the range which the lots became All-Priced. The enhanced date feature may be used if required or press [NxtFld] to accept the default of the current (today's) date. to Enter the ending date of the range which the lots became All-Priced. The enhanced date feature may be used if required or press [NxtFld] to accept the default of the current (today's) date. Include partially priced lots Enter (Y) include partially paid lots. Include non priced lots Enter (Y) to include lots that do not have any sale return prices associated with them. Exclude lots already printed Enter (Y) to exclude those lots already printed, (N) to print all. Press [NxtBlk] for Format options Print: A combination of purchase memorandum number, return comment and supplier reference may be printed on the report. Enter (1) in this field to print the purchase memo number and the return comment. Enter (2) to print the supplier reference and return comment and enter (3) to print purchase memo number and supplier reference. All Values OK? If you need to change any report selection values enter (N and press [NxtFld]. If all of the values entered are acceptable then you may accept the default value here by pressing [NxtFld]. The report will now be printed to the device specified in the printer selection form. Printed on 16 May, 2002 Fresh Computer Systems Pty Ltd 6-20 LETTUS User Manual Grower Returns 6.10 Menu 6 Grower Return Print Once the lots have been approved, the returns can be printed and reprinted and when satisfied the returns can be posted to the creditors system. After a return has been printed and it is discovered that a change is required, (e.g. change the return prices) the lot will need to be unapproved (using either the Manual Lot Charge Generation and Approval screen (refer p.6-9), or if more than one lot using the Auto Lot Charge Generation and Approval (refer p.6-7). The changes can then be made and then the lot will be need to be re-approved. Returns can be printed for a single lot or for a batch of lots. A batch of returns are printed based on the following criteria: All lots approved but not posted or All lots posted in the date range nominated. The returns can selectively include a range of supplier types and a range of supplier codes. 6.10.1 To Print Grower Returns Select the Grower Return Print option from the Grower Return Processing menu. After selecting the print/display option from the printer selection screen, the printer (if a printer is chosen) is 'locked' for your use only. The following screen is then displayed: Make your report selection by completing the following fields: (O)ne Lot, (S)upplier Reference or (B)atch Enter (O) to print only one return, (S) to select by Supplier Reference or enter (B) to print a batch of grower returns. Lot Number Printed on 16 May, 2002 Where one lot was selected in the above field enter the lot number that the return refers to. If (B) or (S) is entered in the above field the cursor does not enter this field. Fresh Computer Systems Pty Ltd 6-21 LETTUS User Manual Grower Returns Supplier Reference Menu 6 Enter the Supplier Reference for selection of lots to be printed. Press [ListVal] to assist in the selection of a Supplier Reference. (U)nposted, (P)osted or P(A)id Lots Enter (U) to only print unposted lots. (P) for posted lots or (A) for paid lots. Date from Enter the beginning posted date of the range which to print. Pressing [NxtFld] will default this field to the current (today's) date. To Enter the ending posted date of the range to be printed. Pressing [NxtFld] will default this field to the current (today's) date. If only one posted date is required this field will have the same value as the Date from field. Date to appear on Grower Return Enter the date that you wish to appear on the Grower Returns. Press [NxtFld] to default this field to the current (today's) date. Supplier Types Enter the supplier types that are to be included in the printout. [ListVal] may be used to assist in the selection of a supplier type. The Supplier type description will be displayed upon entry of a valid supplier type. Press [NxtFld] on a blank record to move to the next field. Supplier Code from Enter the first supplier code to be included in the printout. [ListVal] may be used to assist in the selection of a Supplier code. Pressing [NxtFld] will default this field to the first supplier code of the supplier types entered above. Supplier Code to Enter the last supplier code to be included in the printout. Pressing [NxtFld] will default this field to the last Supplier code of the supplier types entered above. All values OK? If you need to change any report selection values enter (N) and press [NxtFld]. If all of the values entered are acceptable then you may accept the default value here by pressing [NxtFld]. The report will now be printed to the device specified in the printer selection screen. 6.10.2 Printing and Stationery Lineup When the returns are to be printed on the printer, LETTUS will stop all other print requests being sent to the printer. The special pre-printed stationery should then be loaded, and if required a test lineup can be done by entering Y at the lineup prompt. When satisfied that the line up is correct answer N to another line up. The Returns will then be printed. Once the returns have been printed, LETTUS will release the printer and advise that the special preprinted stationery be removed from the printer. The Grower returns are printed in the order of lot numbers within Supplier codes. Note that this option prints to the left of the address the following: PURCHASED [ FROM [ for (B)asis Agreement Types and (P)urchase Agreement Types SOLD FOR AND ON BEHALF OF for (C)ommission Agreement Types [ [ [ Printed on 16 May, 2002 Fresh Computer Systems Pty Ltd 6-22 LETTUS User Manual Grower Returns 6.11 Menu 6 Grower Return Posting & Unposting Once the returns have been printed, and no further changes are required, the returns are posted to the ledgers. The following information is updated: The lot is date stamped with the date of posting. A suppliers invoice is created in the accounts payable system for the net amount to pay to the grower. A suppliers invoice is created for any deductions collected on behalf of third parties, for example levies etc, net of any commission/collection charges The general ledger is updated with the following: The Gross Purchases on the lot record The Proceeds of any deductions (eg freight) The Proceeds of any commissions deducted The net liability to the grower. The net liability to any third parties (e.g. for levy deductions) 6.11.1 To post the Grower Returns Select the Grower Return Posting option from the Grower Return Processing menu. After selecting the print/display option from the printer selection screen, and the following screen will be displayed: Make your report selection by completing the following fields: (P)ost or (U)npost Lots Printed on 16 May, 2002 Enter (P) to post lots or (U) to unpost lots. Enter (P) here. To unpost a lot refer below. Fresh Computer Systems Pty Ltd 6-23 LETTUS User Manual Grower Returns Menu 6 Expected up to Enter the date you would like posted up to. All lots with an expected posted date up to this date that are approved will be posted to the General Ledger. This field will default to the current (today's) date by pressing [NxtFld]. Levies Due The date that the levies arising from the grower returns will be due for payment. The default of the current (today's) date will be accepted by pressing [NxtFld]. Supp Types Enter the supplier types to report on. Press [ListVal] to display valid supplier types. [NxtFld] will default this field to the first supplier type. Supp Code from Enter the beginning supplier code to be reported on. [ListVal] may be used to assist in the selection of a supplier code. Press [NxtFld] to default this field to the first supplier code. Supp Code to Enter the ending supplier code to be reported on. [ListVal] may be used to assist in the selection of a supplier code. All values OK? If you need to change any report selection values enter (N) and press [NxtFld]. If all of the values entered are acceptable then you may accept the default value here by pressing [NxtFld]. The report will now be printed to the device specified in the printer selection screen. When complete, the report displays the number of grower invoices generated and the total net amount that will be payable to the growers. Note that the other modules of the LETTUS system (e.g. Creditors and General Ledger) are not updated until the Lots are posted. 6.11.2 Grower Return Unposting Make your report selection by completing the following fields: (P)ost or (U)npost Lots Enter (U) to unpost lots. Unpost a (L)ot, (S)upplier Reference or (D)ate If only one lot is to be unposted enter (L) in this field. Enter (S) to select lots to be unposted by supplier reference or if more than one lot is to be unposted enter (D) and select by date. Lot Enter the lot number to unpost. Note that the cursor only enters this field if (L) was selected in the previous field. Supplier Reference Enter the Supplier Reference to be used for the selection of unposting. [ListVal] may be used to assist in the selection of the supplier reference. Date Enter the date that the Lot or Batch was marked as POSTED. All values OK? If you need to change any report selection values enter (N) and press [NxtFld]. If all of the values entered are acceptable then you may accept the default value here by pressing [NxtFld]. The report will now be printed to the device specified in the printer selection screen. The system will allow you to unpost a lot where a related freight charge (invoice or credit note) has been paid. A Lot can also be unposted if it has zero value payment allocations attached to it. These zero value payments allocations are usually for cancelled or stopped cheques. Printed on 16 May, 2002 Fresh Computer Systems Pty Ltd 6-24 LETTUS User Manual Grower Returns 6.12 Menu 6 Cleardown Pools/Profitise Lots A lot can be profitised when it becomes completely sold, all costs have been taken up and the grower returns processed. Profitising is the process where the computer analyses certain Lots/Pools and the associated sales in order to provide statistical detailed information. The Profitised field is updated with the current (today's) date for those lots that become profitised. This information includes: 1. Sales Statistics - by salesman/customer 2. Stock Statistics - by grower/produce/accounts payable period. 3. Yields - by grower/produce/month 4. Profitability reports - by department/produce. In Technical Terms, the main aims of profitising are as follows: 1. Update Information in the Sales Statistics Each Sales Statistics record represents a group of sales with the same characteristics, e.g. same produce code, accounts receivable period. The records are generated at the time of invoicing, however, some information is not updated until the lots and pools have been profitised. 2. Insert/Update Information in Stock Statistics Each Stock Statistics record represents a group of Lots or pool with the same characteristics, e.g. same supplier, same unit. 3. Insert/Update Information into Yield This is a combination of Sales and Stock Statistics. It represents a group of Yields with the same characteristics, e.g. area type, produce code, unit type. For Pools, the profitising program "clears down" all sales and resets the received and sold balances. This is done to allocate the sales based on FIFO (First in First Out) back the original Lot/Items that sent into each pool. Sales with a negative Pool number are Sales that have been cleared down from a Pool. Note that this option has no effect on the General Ledger. 6.12.1 To profitise Lots or Pools Step 1 Select the Profitise Lots/Pools option from the Grower Return Processing menu. After selecting the print/display option from the printer selection screen, the following screen will be displayed: Printed on 16 May, 2002 Fresh Computer Systems Pty Ltd 6-25 LETTUS User Manual Grower Returns Menu 6 Make your report selection by completing the following fields: Profitise this Lot Type: Enter the Lot type here. Valid entries are (L) to profitise Lots, (P) to profitise Pools or (B) for both. Profitise Lots POSTED up to: All lots POSTED up to this date will be included and marked as profitised. All values OK? Printed on 16 May, 2002 If you need to change any report selection values enter (N) and press [NxtFld]. If all of the values entered are acceptable then you may accept the default value here by pressing [NxtFld]. The report will now be printed to the device specified in the printer selection screen. Fresh Computer Systems Pty Ltd 6-26 LETTUS User Manual Grower Returns 6.13 Menu 6 Lot Profitability List This report shows the final profitability of all lots profitised. It details the produce, supplier, gross sales, grower returns, company profit and the profit margin. Select the Lot Profitability List from the Grower Return Processing menu. After selecting the print/display option from the printer selection screen, the following screen will be displayed: Make your report selection by completing the following fields: (P)rofitised or (R)eceived Date The report can be run by date range based on either the date that the lot was received or the date that the lot became profitised. Enter (P) to select a profitised date range or (R) for a received date range. Date from Enter the beginning date which to report from. The type of date depends on the value in the previous field. Pressing [NxtFld] will default this field to the current (today's) date. to Enter the ending date which to report to. The type of date depends on the value in the above field. (D)etailed or (S)ummary Enter (D) to provide a detailed report or (S) for a Summary. The detailed report lists each lot within the specified date range while the summary lists the details by produce or department. By (D)ept or (P)rod_Code Enter (D) to report by departments or (P) to report by Produce. Code From Printed on 16 May, 2002 Enter the beginning code which to report from. The type of code depends on the value entered in the previous field. Pressing [NxtFld] will default this field to the first code of the range. [ListVal] may be used to assist in the selection of a code. Fresh Computer Systems Pty Ltd 6-27 LETTUS User Manual Grower Returns to Menu 6 Enter the ending code to report up to. The type of code depends on the value entered in the above field. Pressing [NxtFld] will default this field to the last code of the range. Year to Date total from Enter the date which you would like the year to date figures to start from. All values OK? Printed on 16 May, 2002 If you need to change any report selection values enter N and press [NxtFld]. If all of the values entered are acceptable then you may accept the default value here by pressing [NxtFld]. Fresh Computer Systems Pty Ltd 6-28 LETTUS User Manual Grower Returns 6.14 Menu 6 Unprofitise Lots This unprofitising procedure must be done before changes can be made to a profitised lot. Make your report selection by completing the following fields: Unprofitise (O)ne Lot, (S)upplier Reference or (D)ate Range Enter (O) to profitise only one Lot, (S) to make a selection based on supplier reference or enter (D) to unprofitise a range of Profitised lots based on the date they were Profitised. Lot Number to Unprofitise If (O)ne Lot was selected above enter the lot number to unprofitise. The cursor will not enter this field if a (D)ate Range or (S)upplier Reference was chosen in the above field. Supplier Reference If (S)upplier Reference was selected above enter the supplier reference required. Press [ListVal] for assistance in the selection of a valid supplier reference. Unprofitise from: If (D)ate Range was selected above enter the beginning date range to report on. The cursor will not enter this field if (O)ne lot or (S)upplier Reference was selected above. to Enter the ending date of the range to unprofitise. All values OK? If you need to change any report selection values enter N and press [NxtFld]. If all of the values entered are acceptable then you may accept the default value here by pressing [NxtFld]. The report will now be printed to the device specified in the printer selection screen. Printed on 16 May, 2002 Fresh Computer Systems Pty Ltd 6-29 LETTUS User Manual Grower Returns 6.15 Menu 6 Grower Produce Statistics The key to a successful computer system is the ability to use its information to help monitor, evaluate and plan business activities. LETTUS provides a database that allows for complete analysis and evaluation of doing business with a grower; and reports turnover, margins, and product mix. This analysis can cover past periods; weeks, months, years or future periods. There are two areas available for analysis, the first is concerned with information relating to the Grower and the second is information relating to the Customer. The analysis of information relating to the Grower covers two areas. The first is concerned with sales of the Grower's produce - Stock statistics, and the other is concerned with Grower Crop and Yield Analysis. 6.15.1 Stock Statistics The information displayed in the stock statistics screen concerns lots that have been profitised. A profitised lot is one that has been completely sold, all costs have been taken up, and the grower return processed. 6.15.2 To perform a Query on Stock Statistics Step 1 Select the Grower Produce Statistics option from the Grower Return Processing menu. Step 2 Ensure that the screen is already in Query mode. Enter the criteria you wish to query on and press [ExeQry]. The records that match the criteria entered will be displayed. Note that the totals at the top of the screen will be correct only when all rows of the query have been viewed. This Stock Statistics screen provides a detailed statistical analysis of Grower Produce. The screen can be used to query on any field or any combination of fields, to provide the required information. Printed on 16 May, 2002 Fresh Computer Systems Pty Ltd 6-30 LETTUS User Manual Grower Returns Menu 6 Any of the following fields can be included in the selection criteria: Supplier Code Enter the Supplier Code here if known. Name The full name of the supplier will be displayed on entry of valid information. Agr Enter the Agreement Type of the lot. Valid entries are (P)urchase, (B)asis or (C)ommission. Dept The Department Code can be entered here. Produce Enter the Produce Code if known. Unit Enter the Unit Type if known. Size The Count Size of the produce can be entered here. GD Enter the Grade if known. Period The Period Number can be entered. Qty Enter the Quantity of the supplied produce. Sales Enter the value of the sale. Cost The cost of the produce can be entered. The following totals will be displayed: QTY The total units returned from the query. Sale Value The total sales value returned from the query. Cost Value The total costs returned from the query. Gross Profit % The Gross profit percentage (i.e. Gross Profit over sales) Examples of Querying the Stock Statistics Example 1: Query: Enquire on all purchases made from Supplier J. Smith. (Supplier Code SMITH). Step 1 Ensure that the screen is in Query mode. In the Supplier Code field, enter the supplier code SMITH. Step 2 Press [ExeQry]. The screen will then find purchases made from a supplier with the code of SMITH, and display them on the screen. The total sales cost of sales and the gross profit percentage on sales are calculated and displayed. Remember to use [NxtSet] to display the next page of records, and to update the Totals fields. Example 2: Query: Printed on 16 May, 2002 Enquire on all Tomato purchases made from Grower T. Smith. (Supplier Code SMITH, produce code TOM). Fresh Computer Systems Pty Ltd 6-31 LETTUS User Manual Grower Returns Menu 6 Step 1 Press [EntQry], to put the screen in Query mode. In the Supplier Code field, enter the supplier code SMITH, now move the cursor to the Produce Code field, to enter the code TOM. Step 2 Press [ExeQry]. The screen will then find all tomato purchases from SMITH, and display details of them on the screen. The total cost of sales and the gross profit percentage on sales are calculated and displayed. Remember to use [NxtSet] to display the next page of records, and to update the Totals fields. Example 3: Query: Enquire on all produce made from Grower T. Smith during the week ended 21 September 1995. Step 1 Determine the period number that the week ended 21 September 1995 relates to, this is done by checking the Accounts Payable Calendar (see Menu 7 section for more information). In the Stock-Statistics screen press [EntQry], to put the screen in Query Mode. In the Supplier Code field enter the supplier code (SMITH), now move the cursor to the PERIOD field, and enter the period number (e.g. 1995.12). Step 2 Printed on 16 May, 2002 Press [ExeQry]. The screen will then find all purchases that were made from Smith during the period 1995.12, and display details of them on the screen. The total sales cost of sales and the gross profit percentage are calculated and displayed. Fresh Computer Systems Pty Ltd 6-32 LETTUS User Manual Grower Returns 6.16 Menu 6 Produce Costs List The Produce Cost List displays the cost of the produce as known at that stage. The cost of a lot is determined depending on the agreement type of the lot and whether a return price or invoice has been entered against the lot. The criteria for calculating the produce costs are: For Purchase Lots If a stock invoice has been entered against the lot the price, as per the invoice, will be used. If an invoice has not yet been entered the unit cost entered in Grower Lot Entry will be used. For Basis Lots If the Return price has been entered in Return Price Entry this unit cost will be used or if no price exists here the unit cost entered in Grower Lot Entry will be used. Note that when a unit cost is entered in Grower Lot Entry for a Basis Lot, Return Price Entry is also updated. For Commission Lots The unit cost entered in the Return Price Entry option will be used. Where an estimated unit cost is used (e.g. unit cost from Grower Lot Entry) an asterisk is noted beside the value. This report looks at lots based on either a Received or Entered date range. It also consolidates the report by produce code and unit type i.e. one entry for each produce code and unit type only. Select the Produce Cost List option from the Grower Return Processing menu. After selecting the print/display option from the printer selection screen, the following screen will be displayed: Make your report selection by completing the following fields: (R)eceived or (E)nter Date Enter (R) to enter a date range for the received date of lots or enter (E) to enter a date range of when lots were entered into the system. Printed on 16 May, 2002 Fresh Computer Systems Pty Ltd 6-33 LETTUS User Manual Grower Returns Menu 6 Date from Enter the beginning date of the date range to report on. Press [NxtFld] to default this field to the current (today's) date. to Enter the ending date of the date range to report on. Press [NxtFld] to default this field to the current (today's) date. Use (L)ot or (I)tem Department Show Items under their Lot's Department or under their own Department Code from Enter the beginning code of the department code range to report on. [ListVal] may be used to assist in the selection of a department code. Pressing [NxtFld] will default this field to the first department code as set up on the system. to Enter the ending code of the department code range to report on. [ListVal] may be used to assist in the selection of a department code. Pressing [NxtFld] will default this field to the last department code as set up on the system. If only one department code is required this field should contain the same value as the department code from field. Produce Code from Enter the beginning code of the produce code range to report on. [ListVal] may be used to assist in the selection of a produce code. Pressing [NxtFld] will default this field to the first produce code as set up on the system. to Enter the ending code of the produce code range to report on. [ListVal] may be used to assist in the selection of a produce code. Pressing [NxtFld] will default this field to the last produce code. Agreement Type Enter Agreement type. Valid agreement types are (B)asis (P)urchase or (C)commission or '%' for all Agree Types All Values OK? If you need to change any report selection values enter (N) and press [NxtFld]. If all of the values entered are acceptable then you may accept the default value here by pressing [NxtFld]. The report will now be printed to the device specified in the printer selection form. Printed on 16 May, 2002 Fresh Computer Systems Pty Ltd 6-34 LETTUS User Manual Grower Returns 6.17 Menu 6 Supplier Costs List This report looks at lots based on either a Received or Entered date range. It also consolidates the report by supplier code, produce type, and size. Select the Supplier Costs List from the menu. After selecting the print/display option required from the printer selection screen, the following screen will be displayed: Make your report selection by completing the following fields: Supplier Code from Enter the beginning code of the range to report on. [ListVal] may be used to assist in the selection of a code. Pressing [NxtFld] will default this field to the first code as set up on the system. to Enter the ending code of the range to report on. [ListVal] may be used to assist in the selection of a code. Pressing [NxtFld] will default this field to the last code as set up on the system. If only one code is required this field should contain the same value as the code from field. Produce Code from Enter the beginning code of the produce code range to report on. [ListVal] may be used to assist in the selection of a produce code. Pressing [NxtFld] will default this field to the first produce code as set up on the system. to Enter the ending code of the produce code range to report on. [ListVal] may be used to assist in the selection of a produce code. Pressing [NxtFld] will default this field to the last produce code. Size from Enter the beginning size code of the range to report on. [ListVal] may be used to assist in the selection of a code. Pressing [NxtFld] will default this field to the first size code as set up on the system. to Enter the ending size code of the range to report on. [ListVal] may be used to assist in the selection of a code. Pressing [NxtFld] will default this field to the last size code. Printed on 16 May, 2002 Fresh Computer Systems Pty Ltd 6-35 LETTUS User Manual Grower Returns Menu 6 (R)eceived or (E)nter Date Enter R to enter a date range for the received date of lots or enter E to enter a date range of when lots were entered into the system. Date from Enter the beginning date of the date range to report on. Press [NxtFld] to default this field to the current (today's) date. to Enter the ending date of the date range to report on. Press [NxtFld] to default this field to the current (today's) date. All Values OK? If you need to change any report selection values enter N and press [NxtFld]. If all of the values entered are acceptable then you may accept the default value here by pressing [NxtFld]. The report will now be printed to the device specified in the printer selection form. Printed on 16 May, 2002 Fresh Computer Systems Pty Ltd 6-36


