1
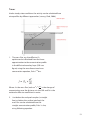
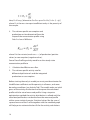
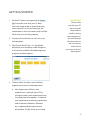
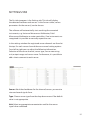
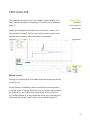
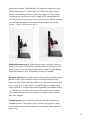
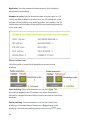
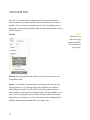
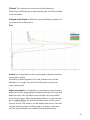
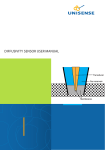
UNISENSE SENSORTRACE SUITE
SENSORTRACE PROFILING
USER MANUAL
1
SensorTrace Suite v2.1 User Manual
Copyright © 2015 · Unisense A/S
Version January 2015
SENSORTRACE PROFILING
USER MANUAL
UNISENSE A/S
TABLE OF CONTENTS
CONGRATULATIONS WITH YOUR NEW PRODUCT . . . . . . . . . . . . . . . . . . . . . . . . . . . . . 6
Support, ordering, and contact information
6
WARRANTY AND LIABILITY . . . . . . . . . . . . . . . . . . . . . . . . . . . . . . . . . . . . . . . . . . . . . . . . . . . 7
OVERVIEW . . . . . . . . . . . . . . . . . . . . . . . . . . . . . . . . . . . . . . . . . . . . . . . . . . . . . . . . . . . . . . . . . . . . 9
RATE CALCULATION FROM CONCENTRATION PROFILES . . . . . . . . . . . . . . . . . . . . . 11
Background
Theory
11
13
SYSTEM FEATURES . . . . . . . . . . . . . . . . . . . . . . . . . . . . . . . . . . . . . . . . . . . . . . . . . . . . . . . . . . 15
INSTALLING THE SOFTWARE . . . . . . . . . . . . . . . . . . . . . . . . . . . . . . . . . . . . . . . . . . . . . . . . . 16
GETTING STARTED . . . . . . . . . . . . . . . . . . . . . . . . . . . . . . . . . . . . . . . . . . . . . . . . . . . . . . . . . . 17
SETTINGS TAB . . . . . . . . . . . . . . . . . . . . . . . . . . . . . . . . . . . . . . . . . . . . . . . . . . . . . . . . . . . . . . . 19
GENERAL FEATURES . . . . . . . . . . . . . . . . . . . . . . . . . . . . . . . . . . . . . . . . . . . . . . . . . . . . . . . . 22
LIVE DATA GRAPH . . . . . . . . . . . . . . . . . . . . . . . . . . . . . . . . . . . . . . . . . . . . . . . . . . . . . . . . . . 24
EXPERIMENT OVERVIEW . . . . . . . . . . . . . . . . . . . . . . . . . . . . . . . . . . . . . . . . . . . . . . . . . . . . 26
SENSORS AND MOTORS . . . . . . . . . . . . . . . . . . . . . . . . . . . . . . . . . . . . . . . . . . . . . . . . . . . . 27
sensors
motors
27
27
CALIBRATION TAB . . . . . . . . . . . . . . . . . . . . . . . . . . . . . . . . . . . . . . . . . . . . . . . . . . . . . . . . . . 30
CALIBRATION OF OXYGEN MICROOPTODES . . . . . . . . . . . . . . . . . . . . . . . . . . . . . . . . 33
MOTOR SETTING . . . . . . . . . . . . . . . . . . . . . . . . . . . . . . . . . . . . . . . . . . . . . . . . . . . . . . . . . . . 35
PROFILING TAB . . . . . . . . . . . . . . . . . . . . . . . . . . . . . . . . . . . . . . . . . . . . . . . . . . . . . . . . . . . . . 37
Motor control
Profile settings
Profile interaction
Profile selection
Manual profiling
37
38
40
41
41
VISUALIZE TAB . . . . . . . . . . . . . . . . . . . . . . . . . . . . . . . . . . . . . . . . . . . . . . . . . . . . . . . . . . . . . . 42
Filters
4
42
Plot
Profile Selection
43
45
ACTIVITY TAB . . . . . . . . . . . . . . . . . . . . . . . . . . . . . . . . . . . . . . . . . . . . . . . . . . . . . . . . . . . . . . . 46
Settings and analysis
Ds and thetha
Settings (Ds and thetha)
Calculate (Ds and thetha)
Table (Ds and thetha)
Analyze
Statistics
46
49
49
50
50
50
51
COMMENTS TAB . . . . . . . . . . . . . . . . . . . . . . . . . . . . . . . . . . . . . . . . . . . . . . . . . . . . . . . . . . . . 55
Output file
56
REFERENCES . . . . . . . . . . . . . . . . . . . . . . . . . . . . . . . . . . . . . . . . . . . . . . . . . . . . . . . . . . . . . . . . 57
TROUBLESHOOTING . . . . . . . . . . . . . . . . . . . . . . . . . . . . . . . . . . . . . . . . . . . . . . . . . . . . . . . . 58
5
CONGRATULATIONS WITH YOUR NEW PRODUCT
Support, ordering, and contact information
If you wish to order additional products or if you encounter any
problems and need scientific/technical assistance, please do not
hesitate to contact our sales and support team. We will respond to
your inquiry within one working day.
E-mail: [email protected]
Unisense A/S
Tueager 1
DK-8200 Aarhus N, Denmark
Tel: +45 8944 9500
Fax: +45 8944 9549
Further documentation and support is available at our website
www.unisense.com
6
WARRANTY AND LIABILITY
Unisense SensorTrace Suite software is checked and validated
on the operating systems as given in the specification, running
English language settings. It comes with lifetime updates.
Software must be installed under administrator rights. Customer
must ensure PC is fully updated and no conflicting third party
software is installed. Unisense do not warrant compliance with any
other operating systems, language settings or third party software.
For instrumentation and sensors, please refer to our warranty
conditions as given in the document “General Terms of Sale and
Delivery of Unisense A/S” found on www.unisense.com
License agreement
The following terms shall apply to the software provided by
Unisense A/S (“Unisense”) in connection with the simultaneous
sale to you (“Customer”) of a Unisense SensorTrace Suite Software.
All rights, title and interest in the software belong to Unisense.
Unisense grants to the Customer a royalty-free, non-exclusive
and non-transferable license to use the software solely in
connection with the Unisense Product purchased from Unisense
simultaneously with the purchase of the software. The Customer
undertakes not to copy, modify, reverse engineer, disassemble or
de-compile all or any part of the software or rent, lease, distribute
or sell the software. The Customer shall, however, be entitled to
make one copy of the software for back-up and recovery purposes
for use solely in connection with the Unisense Products supplied
by Unisense together with the software.
Nothing in this License Agreement or any other agreement
between Unisense and the Customer shall be construed as an
obligation for Unisense to provide to the Customer updates of the
software. This License Agreement shall automatically terminate
if the Customer violates the terms of the license. In case of
termination of the license the Customer shall immediately destroy
the software and any copy thereof.
7
THE CUSTOMER TAKES THE SOFTWARE “AS IS.” UNISENSE
MAKES NO WARRANTY OR REPRESENTATION CONCERNING THE
SOFTWARE, AND EXPRESSLY DISCLAIMS ALL OTHER WARRANTIES
AND CONDITIONS, EXPRESS OR IMPLIED, STATUTORY OR
OTHERWISE, OF WHATEVER KIND OR NATURE, INCLUDING BUT
NOT LIMITED TO ANY AND ALL IMPLIED WARRANTIES, INCLUDING
IMPLIED WARRANTIES OF MERCHANTABILITY AND FITNESS FOR A
PARTICULAR PURPOSE.
UNISENSE SHALL NOT BE LIABLE FOR ANY DAMAGES OF ANY KIND,
INCLUDING INCIDENTAL, SPECIAL, PUNITIVE, CONSEQUENTIAL,
AND SIMILAR DAMAGES, INCLUDING, WITHOUT LIMITATION,
LOSS OF PRODUCTION, LOSS OF PROFIT, LOSS OF DATA, LOSS OF
GOODWILL, LOSS OF CONTRACTS, OR BUSINESS INTERRUPTION
This License Agreement and any dispute arising out of or in
relation to this License Agreement shall be governed by and
construed in accordance with the laws of Denmark exclusive of
its choice of law provisions. The venue for any such dispute shall
be the Danish courts provided however that Unisense shall be
entitled to instigate legal proceedings against the Customer
before the courts with jurisdiction over the matter located in
a country where the Customer has a place of business or is
incorporated or organized.
8
OVERVIEW
SensorTrace Profiling is the profiling program from the Unisense
program SensorTrace Suite. It offers time series data logging
along a path, it can visualize these measurements and calculate
activity rates. The software supports motor controlled automated
measurements, but also manual positioning of individual sensors.
SensorTrace Profiling is compatible with all Unisense instruments
designed for use in laboratories. The program automatically saves
all data in an SQL database and all data can be exported in csv
formatted files for subsequent data analysis.
System requirements:
• +2 GHz PC
• Windows XP, Vista, Windows 7 32 bit/64,
Windows 8/8.1
• Min. 500 MB free hard disk space
• USB port(s)
• Min. 4 GB RAM
• Min. screen resolution 1280 x 800
• Microsoft Excel or a program that can view
exported files (CSV files)
• Unisense amplifier (OXY-Meter, MicroOptode
Meter, Microsensor Multimeter, Field
Microsensor Multimeter or Microsensor
Monometer) or A/D-converter.
9
Other programs available in the full SensorTrace Suite:
SensorTrace Logger+ - For basic data acquisition and motor
control. It offers time-series data-logging and calibration features
we recommend this application.
SensorTrace Photo - For photosynthetic experiments using the
light-dark switch technique we recommend this application.
SensorTrace Rate - For microrespiration experiments to measure
the metabolic rates including respiration rates of small aquatic
animals, bacteria or oxygen production of phytoplankton we
recommend this application.
10
RATE CALCULATION FROM CONCENTRATION PROFILES
High-resolution concentration profiles measured with Unisense
microsensors can be used to identify the location of micro-size
zones of activity (production and consumption), the sizes of
these zones and the diffusive exchange rate across interfaces
e.g. sediment-water interface and biofilm-water interface. The
SensorTrace Profiling program gives you an interactive platform
to experiment with activity calculations from these concentration
profiles. For the interpretation the program uses the shape
of a measured concentration profile together with modeling
techniques. The model implemented in SensorTrace Profiling is
based on the method published by Peter Berg and coworkes in
1998, optimized for biogeochemical interpretations of solutes in
sediment pore water.
Background
A crude amount of information and understanding can be
achieved from analyzing the shape of the concentration curve
(see rules of thumb). However, going beyond the crude qualitative
statement, the model used in the Activity tab describes the
measured concentration profile by the transport phenomena and
processes occurring at different layers within the investigated
system, and how the concentration in each layer is affected by the
transport phenomena and processes in neighboring layers. The
model assumes steady-state conditions where transport of solutes
only occurs by diffusion. In many samples e.g. sediments and
biobilms, the assumption is valid, however if your system is heavily
affected by pore water movements due to burial, groundwater
flow, wave action and similar movements the SensorTrace Profile
activity model should be used with care.
11
Concentration
Consumption
Bulk water phase
Diffusive boundary
layer (DBL)
Straight line:
diffusion only
Surface
Concave curve:
production
Sediment/biofilm/etc
Depth x
Depth x
Convex curve:
consumption
RULES OF THUMB:
If the diffusion coefficient and porosity is constant in
a layer, the following rules of thumb can be used for a
qualitative interpretation of the processes in that layer:
• If the concentration curve is convex there is net consumption (e.g. respiration,
oxidation of reduced compounds).
• If the concentration curve is concave there is net production (e.g. photosynthenthetic production of oxygen, sulfide production by sulfate reduction).
• If the concentration curve is linear, there is no net consumption or production,
only diffusional transport.
12
Theory
Under steady-state conditions the activity can be calculated from
microprofiles by different approaches (see e.g. Glud, 2008):
1. The mass flux, e.g. the diffusive O2
uptake can be calculated from the linear
approximation to the concentration profile
in the diffusive boundary layer (DBL see
figure) using the one-dimensional mass
conservation equation, Ficks 1st law:
dC is the change of Where J is the mass flux (mol cm-2s-1), dz
concentration over the distance z in the DBL and D0 is the
molecular diffusion coefficient in water.
2. Just below the analyzed samples (a straight
line just below the surface interface) the
mass flux can be calculated from the
straight concentration profile, Ficks 1st law,
using following equation:
13
Here, Ds=D0 x φ, [alternative Ds=D0 x φ2 or Ds=D0/(1+3 x (1 - φ))]
where Ds is the mass transport coefficient and φ is the porosity of
the sample.
3. The volume specific consumption and
production can be determined from the
shape of the concentration profile using
Ficks 2nd law of diffusion:
where R is the net rate (nmol cm-3 s-1 ) of production (positive
values) or consumption (negative values).
SensorTrace Profiling activity model uses the steady-state
concentration profile to
1. Calculate the diffusive mass flux.
2. The volume specific activity rate for
different depth intervals and the integrated
production or consumption.
Before starting the analysis model you must provide estimates for
the diffusion coefficient and the porosity in all zones, and some
boundary conditions (see Activity Tab). The model makes an initial
guess of the activity distribution and compares the calculated
profile with the actual measured profile. Using a stepwise
optimization method the activity distribution is refined until the
calculated profile does not deviate from the measured profile
within some statistical margin. Statistical values like the sum of
squared error and the P-value together with the modeled graph
will help you to estimate the best fit for the activity calculations.
14
SYSTEM FEATURES
SensorTrace Profiling is a program for logging a series of
measurement points with a microsensor or microoptode along
path. A detailed overview of the components for a Unisense
profiling measurement set-up can be found in our Profiling System
User Manual.
Basic features of the program are:
• Control of settings for profile start-ups, motor
run and data logging.
• Calibration settings are saved between
profiling for easy set-up of next profiles.
• The program keeps track of measurements
collected in different profiles and can show
them simultaneously for comparison.
• Multiple sensors can be used simultaneously.
• Raw data and results are continually saved
for later data interpretation.
• Graph view of measurements obtained
by one or more sensors during and after
profiling.
• The possibility to model the distribution
of production and consumption based on
measured concentration profiles.
• After the experiment, all measurements
can be exported in a text file (csv) for easy
handling and analysis in Microsoft Excel.
15
INSTALLING THE SOFTWARE
Make sure that you are installing having the full administration
rights.
Start the installation program (.exe file) from the CD. Follow the
instructions given by the installation program.
This will install the SensorTrace Suite program including a version
of this manual in the Knowledge Base of the program.
The Instacal program must be installed on the PC in order to use
SensorTrace Suite. Instacal is install as part SensorTrace Suite and
its install file is by default placed C:\Program Files (x86)\Unisense\
SensorTrace Suite\Drivers\InstaCal Install.exe. The program will be
placed in a program group called “Measurement Computing” after
instillation.
To activate the full SensorTrace Suite program and gain access to
Logger+, Photo, Rate and Profiling enter the License Key supplied
with the installation CD. To access the dialog box for entering the
license key, click on the Enter License Key button in the lower right
corner of the main SensorTrace Suite window. Press Activate when
the key is fully entered. Contact [email protected] to purchase a
license key.
16
GETTING STARTED
1. Set the PC power management to Always
On. And make sure that your PC does
not enter sleep mode or stand by during
measurements as this will interrupt the
connection to the instruments and it will be
necessary to restart the program.
2. Connect all instruments in your set-up to
the computer.
3. Start SensorTrace Suite - it is by default
placed on your computer under Programs
in the Unisense folder. The following main
program window appears:
IMPORTANT
Please make
sure that your PC
does not enter
sleep mode or
stand by during
measurements as
this will interrupt
the connection to
the instruments
and it will be
necessary to restart
the program.
4. Choose either to make a new Profiling
experiment or load an old experiment.
a. New Experiment: When a new
experiment is selected, you will be
asked to create a new experiment from
the dialog box that appears. Create the
new experiment by naming experiment
and researcher identities, followed
by an optional brief experimental
description. Finally select an exsisting
17
master experiment or create a new
master experiment.The master
experiment allows you to group several
sub-experiments e.g. on the same
sample or sample station. Press Create.
b. Load or delete Experiment: All
experiments obtained by SensorTrace
Profiling are stored in the SensorTrace
Suite database. Press Profiling
under Old Experiments. A dialog
box appears were you can choose
the experiment you want to open
or delete. Experiments are grouped
by the following topics: User, Master
Experiment, Experiment name, type
and Created Date. To easily find an
experiment it is possible to sort the
experiments by opening the dropdown
window of the topic bars. Press Load
when the experiment is selected.
The Old Experiment mode is for
working with old data; settings and
parameters cannot be changed, and
new measurements cannot be started.
Press Create.
18
SETTINGS TAB
The first tab to appear is the Settings tab. This tab will display
the detected hardware and sensors. In the Sensors table, various
parameters for the sensor(s) can be chosen.
The software will automatically start searching for connected
instruments, e.g. Unisense Microsensor Multimeter, Field
Microsensor Multimeter or motor controllers. If no instruments are
recognized it is possible to manually repeat the scan.
In the settings window the registered sensor channels are found at
the top. For each sensor channel there are several setting options.
From left to right you can adjust the following information:
Selection of the sensor channel, sensor type, sensor measuring
unit, output range, and sensor name. Furthermore, it is possible to
add a short comment to each sensor.
Sensor: Mark the checkboxes for the channel/sensors you want to
view and record signals from.
Type: Choose sensor type from the drop-down menu if the default
value is not appropriate.
Unit: Select an appropriate concentration unit for the sensor
signal when calibrated.
19
Range (V): Select the voltage range for the amplifier. Select the
smallest range possible to get the most out of the resolution of
the amplifier matching the expected signal range of the sensors.
It is recommended not to select an unnecessary high range as this
may cause a loss in resolution. However the range should not be
chosen so small that the signal gets beyond the selected range.
This will cause the amplifier to get saturated.
Name: Write a name that describes your sensor (optional).
Comment: Write a comment about your sensor (optional).
Motors: The number of connected motors detected by the
program are shown at the bottom of the window. By default
velocity and acceleration are set to 1000. If a Field Microsensor
Multimeter is connected the two motor channels will be shown
even if no motor is connected. The acceleration of the Field Motor
can be set on the Field Microsensor Multimeter. If a 3-D motorized
system is used, motors Z, X and Y should be recognized. For 1-D
system only motor stage Z will be identified. Both the laboratory
motor and the field motor can be used in a combined 2-D or 3-D
motorized system. Here you define which motor should act as Z, X
and Y.
Manual motor: If a manual micromanipulator is part of the
experimental setup, the manual motor setting should be selected
and the user will be prompted every time the sensor should be
moved between measurements.
20
After the Settings have been checked and adjusted accordingly,
press the Start Experiment button. The software will subsequently
make several tabs available.
The sensor and motor configuration will be saved.
Note that settings cannot be changed after starting the
experiment.
21
GENERAL FEATURES
The SensorTrace Profiling application is by default divided into
four main areas: 1. Tab-selection, 2. Live-Data Tab, 3. Experiment
overview Tab and 4. Sensors and Motors. The tabs can be
pinned or unpinned depending on whether you wish to have
a permanent view of the tab. It is possible to move each of the
four tabs and place them on the screen where you want. To move
them, pin the selected tab so it is permanently visible. Drag the
tab where you want to have it by using the mouse. The tabs can
be moved back to their original position using the arrows that will
appear in both sides of the screen and in the middle. Place the
pane on the arrow that represents the direction for the placement.
Alternatively, choose Reset Layout in the windows tab.
NOTE:
You can move
between the tabs
at any time during
profiling
1
4
3
2
2
22
Tab selection (1)
The upper area is divided into tabs which allow you to access
different functions of the program. From left to right, the following
functions are available: Settings, Calibrations, Motor settings,
Profiling, Visualize, Activity and Comments. Multiple tabs can be
shown in one tab window by dragging one or more tab functions
from the tab line into another tab. The tabs can be moved back to
their original position by dragging them back to the tab line.
Live data tab (2)
The lower area, the Live Data, shows the live sensor signals of
one or more sensors. The height of the live data window can be
changed by dragging its upper border.
Experiment Overview tab (3)
In the left side area Experiment Overview lists the profile
experiments.
Sensor and Motors (4)
In the right side area Sensors and Motors show the sensor
selection and if available the motor control.
All components will be described in detail on the following pages.
23
LIVE DATA GRAPH
The Live Data graph is permanently visible in the lower part of the
SensorTrace Profiling interface. It allows the user to view sensor
signals continuously. By default uncalibrated raw sensor signals
are shown but if the Calibrated check box is checked, calibrated
values are plotted (for calibrated sensors). The Live Data holds up
to the last 24 hours. You can change the height of the Live Data
window by dragging its upper border.
Comments, calibrations points and other events generated by the
user or the program can be seen as colored marks in the Live Data
window. For further information on comments and events see also
the section on the Comments tab.
X-axis scale: The time scale (x-axis) is controlled in the Show last
drop down list, where a number of time intervals can be chosen.
To have a look at a certain time span, zoom in on this area by
dragging a rectangle with the mouse from the upper left corner
to the lower right corner of the area of interest. To un-zoom,
right-click and select Reset Zoom-Level or double-click directly on
the graph.
Y-axis scale: By default, the y-axis auto scales to accommodate
the maximum and minimum signals that are shown in the Live
Data.
24
Graph: To have a look at a certain part of the graph zoom in on
this area by dragging a rectangle with the mouse from the upper
left corner to the lower right corner of the area of interest. The
mouse wheel can also be used. Point the cursor on the part of the
graph of interest and zoom to zoom in and out using the wheel.
Calibrated/un-calibrated: You can control whether the graphs
show calibrated signals or raw signals for the sensors by checking
the Calibrated checkbox for each graph. If no calibration has been
performed and the checkbox is checked, no signals will be plotted.
Pause: By clicking the Pause check box the auto updating is halted
and zooming and scrolling through the data is easier. Data is still
logged and un-checking the Pause will update the graph.
Y-zoom: by checking the Y-xoom checkbox, the graph will be
zoomed only on the y-axis and not on the x-axis.
Show last: By default the time scale (x-axis) is controlled in the
Show last drop down list, where a number of preset time intervals
can be chosen.
ZOOM FUNCTION
It is possible to zoom
in and out on the
graph by using the
mouse wheel.
Point the curser on
part of the graph
of interest and use
the mouse wheel to
zoom in and out.
A certain time span:
drag a rectangle
with the mouse
from the upper left
corner to the lower
right corner.
Fast zoom out:
double-click on the
graph
Chart legend: At the top of the Live Data there is a sensor legend
showing the graph color for the associated sensors and their
current signal/concentration value.
Datapoints: The datapoints in the Live Data window can be
cleared by pressing Clear. This will NOT affect the stored data.
25
EXPERIMENT OVERVIEW
The Experiment overview shows all the profile experiments,
profiles, and analysis made in an experiment. The tab is always
visible if pinned and can be hidden when not pinned.
Profile experiment
The program automatically saves all the profiles made in an
experiment. One profile experiment can contain one profile or
multiple profiles repeated in one run defined in the Profiling tab.
These are stored as Profile 1, Profile 2 and so on. It is possible to
delete a profile by right clicking using the mouse and choose
delete.
Analysis
The analysis of a profile made in the Activity tab is stored as an
Analysis under the studied profile. If you make several they are
stored under the same profile as Analysis 1, Analysis 2 and so on.
To open an analysis simply double click it. It is possible to delete an
analysis by right clicking and choosing delete.
26
SENSORS AND MOTORS
sensors
The sensors for the profile measurement are selected here.
motors
This control box allows you to read, adjust, and redefine your
sensor position.
The number of connected motors detected by the program are
shown at the bottom of the window. For a 1-D system only motor
stage Z will be identified. If a 3-D motorized micromanipulator
system is used, motors Z, X and Y should be recognized. For the
X-axis and Y-axis motor the Up and Down movement refers to the
movement relative to the motor position on the moving slide.
Going Down means the movement will go away from the motor.
27
If a manual micromanipulator is part of the experiment setup,
a manual sensor movement can be included and the user will
be prompted every time the sensor should be moved between
measurements.
Actual Depth (µm) indicates the current vertical position of the
sensor tip. NOTE: the Actual Depth is arbitrary until the user has
related the position of the sensor tip to the position of the study
sample – see the example below.
Set Home re-defines the motor position Actual Depth (µm) to the
position given in New Depth (µm).
Go Home. By pressing Go Home, the motor will place the senor tip
at the position set as Home position.
New Depth re-defines the motor position Actual Depth (µm) to
the position given in New Depth (µm).
GoTo. The sensor can be moved directly to a defined depth
compared to the New Depth position by pressing GoTo.
Move by step [µm]. Enter the step size the motor should move the
sensor up or down.
28
IMPORTANT
The depth scale is
positive downwards.
For example, if the
zero is set at the
sediment surface,
positive values in
the boxes below
(Actual, Depth, and
New Depth) will
indicate that the
sensor is in or should
move down into the
sediment. All depths
and step sizes are
given in µm unit.
Example: if you want to define the surface of the
study sample as the zero-position: move the sensor
tip to the sample surface using the Move by step
keys OR by manually moving the sensor. When the
sensor approaches the surface or if the sensor is
hard to see, it is a good idea to use small increments.
Verify the position, e.g. with a microscope. Enter “0”
in the New Depth (µm) field and press Set Home.
Subsequently, the values in Actual Depth (µm), and
New Depth (µm) will reflect the re-defined depth
scale.
Sometimes, if it is not possible to see the sensor,
it will be necessary to do the first profile, find the
sample surface from there, and redefine the depth
scale using the above procedure. If subsequently
you want to move the sensor to a specified position,
e.g. 1000 μm above the sediment, type -1000 under
New Depth (μm) and click GoTo.
29
CALIBRATION TAB
Calibrations are performed in the Calibration tab. The individual
sensor tabs at the top show whether the sensors are calibrated or
not. Calibrations are stored for 24 hours in the calibration tab.
For information on calibration of a specific sensor consult the
sensor manuals.
Choose the Sensor you wish to calibrate. The sensor name, type
and calibration unit is shown for each sensor.
The mV signal in the middle is the current raw sensor signal for the
chosen sensor. The sensor signal can also be followed continuously
in the Live Data graph at the bottom of the screen.
Calibration procedure
1. Prepare the calibration samples.
2. Choose the sensor you want to calibrate.
3. Change the concentration in the
concentration box according to the
actual calibration solution. For oxygen
an automated procedure to calculate the
atmospheric saturation as a function of
temperature and salinity can be invoked by
pressing the button named Calculate O2
30
NOTE:
Profiling is only
possible with a
calibrated sensor.
Conc. The below dialog box will be shown.
Add the temperature and salinity of the
calibration solution to receive the oxygen
concentration. Press Apply.
4. After entering the correct concentration,
add the calibration point by pressing Add
Point. Several points can be added for each
concentration.
5. Change to another calibration standard
and repeat points 3-4. It is possible to use
several different standards and make a
multi-point calibration to verify linearity.
6. If a calibration point is not valid (e.g. due to
typing errors) a single point can be cleared
by selecting it with the mouse and pressing
Delete Point. All calibration points can be
removed by pressing Clear all Points.
7. When you are satisfied with your calibration
press Apply Calibration. A linear regression
will be performed based on the calibration,
and this regression will form the basis for
converting signals to calibrated values.
Values are displayed in the table. If you
have made more than one calibration the
31
program will use the last made calibration.
8. Repeat 2-7 for other sensors.The calibration
table below the calibration graph shows
the calibrations for the chosen sensor.
Each calibration will appear here with
information on calibration number, time of
calibration, linear regression data (slope,
intercept and r2) as well as additional user
comments that can be entered directly into
the table.
All calibration data are stored in the SensorTrace Suite database.
Recalibration procedure
Sensors can be recalibrated at any time during an experiment. The
new calibration applies from the time of calibration onward. To
recalibrate the sensor:
1.Press Clear all Points
2. Follow step 1-6 in the Calibration procedure.
Retrieving a calibration
If you want to use a different calibration; highlight, in the table,
the calibration you want to use and press Retrieve Calibration. The
sensor will then be calibrated according to the new calibration.
Deleting a calibration
If you want to delete a calibration, highlight it in the table and
press Delete Calibration.
Export calibration data and figure
See Visualize Tab on page 42.
32
IMPORTANT
When retrieving
a calibration,
make sure that
the retrieved
calibration
matches your
current sensor
in terms of
signal size and
units, and that
the calibration
temperature etc.
are still valid.
CALIBRATION OF OXYGEN MICROOPTODES
Live data for oxygen MicroOptodes are first shown after a
calibration has been made. A fast calibration can be made to get a
live view. Afterwards continue to make the real calibration.
Sensor: In the top menu you can select the sensor you want
to calibrate. A red cross indicates that the sensor has not been
calibrated, green tag indicate that the sensor has been calibrated.
Temperature sensor: Select Constant-user defined and add the
temperature if the optode is to be used at a constant known
temperature. If a temperature sensor is connected select the
Temperature Sensor of the recording sensor.
Optode type: Add the type of MicroOptode sensor to be
calibrated. The color description refers to the color of the fiber
wire.
Salinity: Add the salinity of the calibration solution. The salinity
should match the salinity of your sample.
33
Humidity: Add the amount of humidity in air used to obtain an
oxygen saturated solution. The optode calibration program can
correct the O2 saturation concentration based on knowledge
about the humidity. By default 100% humidity is used.
Calibration High: Calibrate the MicroOptode by inserting the
optode and the temperature sensor into oxygen saturated
solution, 100% air saturation, as described in the MicroOptode
manual. When a stable signal is obtained click the Calibrate High
button.
Calibration Low: Insert the MicroOptode and temperature sensor
in an anoxic solution, 0% O2, and click the Calibrate Low button
when the signal is stable.
As with all other sensors the green check mark indicates that
the MicroOptode is now calibrated. If you need to make a new
calibration or you made a mistake press Discard Calibration.
Status: In the status bar you find information on the sensor. If the
sensor and reference signals are normal the status bare shows
a green “OK” box. When the sensor signal is low, e.g. because no
sensor is connected, the fiber optic is broken or the sensor dye
has fallen of the tip, the status bar will turn red and give the text
“Sensor signal is too low”.
34
MOTOR SETTING
The manual or motorized movements of x, y and z-axis are
indicated here. The program will automatically set motor when it
recognizes a motor. A manual movement is performed if set on
Manual. If a motor is not connected (or found by the software)
it will automatically set None. Pin the Sensors and Motors and
control the sensor position from here (see how under the Sensors
and Motors page 27)
Z-axis: The vertical movement of the z-axis is controlled by the
Profiling tab.
X and Y axis: The x and y horizontal movements are controlled
from this tab. The start position of the sensor in the x-movement
and y movement is defined in Start. The start position of the
sensor is defined compared to its current position. Define also End
position and Step size moving in the x or y direction.
2D option: For the 2D option the program will make one z-profile
defined in the Profiling tab, then move in the x-direction and make
another z-profile and so on. The y-axis is set on None.
In a 2D setting one cycle includes all the profiles measured along
the x-axis.
35
3D option: In a 3D setting one cycle includes all the profiles
measured along both the x-axis and y-axis. The program will make
one z-profile, then move in the x-direction, make another profile
and so on. When all profiles are performed in the x-direction it
will move one step in the y-direction and repeat. When all profiles
are made in the x/y-grid it will return to the safe position and wait
for a period of time given by the Delay between (s) defined in the
Profiling tab.
36
PROFILING TAB
The Profiling tab controls the z-axis (depth) of your profile. For x
and y setting see Motor setting page 35 and Sensors and Motors
page 27.
IMPORTANT!
The depth
scale is positive
downwards
Profiling with depth can be done with or without a motor unit
(motorized or manual). The functions of this sheet are the same
whether you do your profiles manually or motorized.
Motor control
Here you can read, adjust and redefine the sensor position of the
sensor in use.
Pin the Sensors and Motors tab and control the sensor position
using the motor Z setting. Move the sensor position up and down
using Move by step. Define the Home depth of the sensor tip
e.g. set New Depth at “0” µm, when the sensor tip is placed at the
surface of the sample (see also Sensors and Motors page 27)
37
Profile settings
In this setting you define the profile.
Start (µm) is the depth position relative to the Home depth from
where the profile is started. Negative values are above the surface
and thus normally the start position should be negative.
End (µm) is the depth position relative to the Home depth where
the profile is stopped.
Step size (µm) is the vertical step depths by which the sensor
is moved from start to end position. The step size should not be
smaller than the size of the sensor tip e.g. if the sensor has a tip
size of 50 µm the step sizes should not be smaller than 50 µm.
Safe (µm): The safe position is the position where the motor will
rest between each profile. The safe position is to ensure that the
sensor is resting outside the tissue or sediment between replica
profiles. In 2D and 3D profiles this is also the height above the
sample where the sensor tip will be moved parallel to the sample
surface. Therefore be sure that the safe position is well above the
sample surface.
Sensor angle (°): This box calculates the actual distance the
motor should move a sensor to give the distance added in step
size. Add the angle in which the motor is penetrating the sensor
38
NOTE
You can change
the profile
settings at any
time while
the profile is
running.
tip into the sample. To be added is the angle the motor has been
tilted compared to its vertical position. When the motor moves
the sensor vertically into the surface, the angle is 0. If the motor
is moving the microsensor with an angle of 30° compared to its
vertical position and you want the sensor to move 100µm in detph
you add 30 in to the box and the motor will actually move the
sensor 115 µm (=100 µm/cos (30°)).
Wait before measure (s): When the position is reached, during a
profile, the system will wait for a period of seconds before it starts
measuring. This is to ensure that the sensor signal is stable before
the measurements start. The default setting is 3 seconds.
Measure period (s): sets the duration of the measurement in each
position. Each measurement will be an average value over this
period of time. When making profiles in a noisy environment, such
as on a ship or in a cold room, it can be helpful to average over a
longer period, i.e. increase the measure period. The default setting
is 1 second but should be set to match the measuring condition.
The standard deviation for the values are shown in the visualize
tab when tagged.
Delay Between (s): is used when starting a profile and during
repeating cycles. Each time a cycle is started, the sensor is place
in the Safe position and the profile is started after a delay period
given here.
39
Replicates: Sets the number of measurements that should be
performed at each depth.
Number of cycles: Set the desired number of cycles here. In a 1D
setting a profile is identical to one cycle. In a 2D setting one cycle
includes all the profiles measured along the x-axis whereas in a 3D
setting one cycle includes all the profiles measured along both the
x-axis and y-axis.
Profile interaction
Here the profile is started and stopped at any time during
profiling.
Start Profiling: When all parameters are set press Start. The
data will be logged in the PC memory and when the profile is
finished or stopped the data will be saved to the SensorTrace Suite
database.
Pause profiling: The same button is used to Start and Pause
profiling as illustrated above. Simply press Pause to pause the
profiling. Continue the profiling program by pressing Start again.
40
Stop profiling: Stop the current profiling by pressing Stop. This
will stop the profiling program immediately, and prompt the user
whether the sensors shall be moved to the safe position and the
X/Y profiling to its start position.
Comments: At all times during the experiment it is possible to
enter a comment. Enter the comment and time stamp and press
Add. All comments are listed in the Comment tab.
Remaining cycles: Is a status reading on how many cycles the
program still needs to run.
Calibrated: Marking calibrated will show the calibrated values in
the profile graph.
Profile selection
A profile plot is shown while profiling.
During a profile run it is possible to show previous measured
profiles. Mark the profiles you want to view during the profile run.
Manual profiling
If you do not have a motor unit, you will have to move the sensors
manually with a micromanipulator. In this case, a dialog box will
appear after each measurement that will tell you which depth to
go to. When you have reached the depth appearing in the dialog
box, press OK. The program will use the time indicated in Wait
before measure, measure period, and replicates before a new
dialog box will appear.
41
VISUALIZE TAB
This tab is for advanced visualization of the measured profiles.
You can plot one or more profiles and you can choose to see the
profiles of one sensor or multiple sensors. The zero depth can be
adjusted and the new adjusted profile can be saved and be used in
the Activity tab.
Filters
Sensor: Here you choose the sensor or sensors you want to see
the profiles from.
Cycle: It is possible to choose how many cycles you want to see
on the graph. In a 1D setting using only z-depths one profile is
identical to one cycle. For 2D and 3D cycle the profile of one or
more profiles in one cycle or multiple cycles will be plotted in a 1D
plot. In a 2D setting one cycle includes all the profiles measured
along the x-axis whereas in a 3D setting one cycle includes all the
profiles measured along both the x-axis and y-axis.
42
NOTE
Update a new
filter setting by
choosing Profile.
This will plot the
new graph.
Z Depth: This setting has currently no function because
SensorTrace Profiling cannot make contour plot. It will be available
in future update.
X-Depth and Y-Depth: Profile plots from a defined x position and
y position can be chosen here.
Plot
Profile: Pressing profile you will see the graphs chosen according
to your filter setting.
All profiles including profiles in 2D and 3D dimensions will be
plotted in a 1D graph. SensorTrace Profiling can currently not
make contour plot.
Adjust zero depth: On the graph it is possible to change the zero
depth position by dragging the red horizontal line to the new zero
depth position. Pressing Adjust zero will adjust only the profiles
shown on the graph. The original depth position is re-found when
pressing Reset Depth. The zero depth adjustments will be saved
into the Activity Tab. Analysis can be made in the Activity Tab with
the adjusted zero depths and be saved as an analysis. However,
only the original depths are saved for future data handling.
43
Calibrated: When checking Calibrated the calibrated values are
visible on the graph.
Standard deviation: Checking Standard deviation the graph will
display the standard deviation of the values measured in the
time-period given under measure period in the profile settings.
The standard deviations can be seen on the graph in its zoom out
position and the numbers in the export file.
Export profiles: Here you can export data from the profiles
matched by the filter settings. It is possible to export the
profile date as one or two files: Choosing Export as 2 files: A
file containing Calibration and Comments and a file containing
Data. Choosing Export as 1 file: A file Containing calibration,
comments and data. If you have adjusted the zero depth then
the profiles with the zero depth adjustment will be exported but
not permanently saved. If you want to export the original Depth
values press Reset Depth before you Export Profiles.
44
Profile Selection
The profile selection gives an overview of the profiles plotted on
the graph. Here you can check and uncheck the profiles you want
to see on the graph. See also page 41.
Export figures: The figures in the Calibration Tab, Profiling Tab,
Visualize Tab and Activity Tab can be exported by right clicking the
figure and choosing Export as image.
45
ACTIVITY TAB
Settings and analysis
For background information and the theory behind the Activity
calculation, see ‘Rate calcultaion from concentration profile’
starting at page 11.
Sensor and profile: In the Sensor and Profile fields you choose
the sensor and profile you wish to analyze. This will display the
selected profile in the graph window. Note: The analysis can only
be performed when the concentration is measured in µmol/L and
if the sensor has been calibrated before measuring the profile.
When you have made an analysis you can view the result
under Select analysis or by double clicking the analysis in the
Experiments Overview.
Boundary Conditions: Specify boundary conditions. It is possible
to choose between several different boundary conditions
(see Berg et al., 1998). To choose the right set of conditions it
is important to consider the characteristics of the profile (see
examples in “Boundary condition examples” box). Concentration
and flux numbers for the boundary condition should be added.
46
BOUNDARY CONDITION EXAMPLES BOX
Oxygen profiles in many cases end with a constant
concentration of zero as all the oxygen is used up at
the bottom of the profile. This implies that there is
a zero concentration and also a zero concentration
gradient at the bottom of the profile, and the boundary
concentration Bottom conc. + bottom flux is appropriate
with zero as the parameters entered in the boxes
below. For sulfide profiles on the other hand, the
concentration is typically zero over an interval at the
top of the profile, and consequently also the flux is
zero, so in this case Top conc. + top flux is appropriate.
For flux calculations in the DBL Top conc. + bottom conc.
is selected and the concentration at the top of the DBL
and the conc. at the sediment surface are added.
47
Intervals and zones: Choose the start- and end depth of the
profile where the calculation should be performed. Then choose
the maximum number of zones in Max zones to be used in the
calculation (1-10 zones can be selected). Note that the maximum
number of zones multiplied with the minimum zone width has to
be smaller than the distance between the start and end points.
The min width (µm) is the smallest zone width that the method
allows and it should not be smaller than twice the step size in the
profile. This will typically be the top of the sediment and the end of
the profile. The number of zones giving the best solution can vary
between profiles.
INTERVALS AND ZONES EXAMPLE BOX
1. Diffusive mass flux in the DBL
(Equation 1 in the Theory section): Start depth is the
top depth of the boundary layer,
End depth is the depth of the
sample surface, Max zones is one.
D0 is used for this calculation. Notice
that a mass flux calculated from
the DBL can only be recommended
when sufficient data points are
available from the DBL e.g. by using
sensors with tip size ≤ 50 µm.
2. For volume specific and integrated
consumption and production rate
calculations (Equation 2 and 3 in
the Theory section page 13): Start
depth is the depth of the sediment
surfaces, End depth is the depth
where the profile ends and Max
zone between 1 and 10. Ds values
are used for these calculations.
48
Ds and thetha
To make the calculation, it is necessary for the program to have
values for diffusion coefficients and porosity. These values can
either be measured values obtained by different methods (see e.g.
Ullman and Aller 1982, Iversen and Jørgensen 1993, Revsbech et al
1998) or they can be estimates based on literature values.
Settings (Ds and thetha)
Zones with different diffusion parameters. Add the Number
and borders of the zones with different diffusion coefficient and
porosity. First, select the number of zones in the entry box. Then
adjust the start depth of each zone.
Default Porosity: To specify a uniform porosity in all depths: Enter
a measured or estimated value and click Porosity. To enter variable
porosity: Enter measured or estimated porosity values by typing
directly in the table. If only a subset of the porosity values need
to be different, set a uniform porosity and modify the subset by
typing in the relevant cells afterwards.
49
Calculate (Ds and thetha)
D0 in free water: Enter the diffusion coefficient in free water (D0)
at the actual salinity and temperature. For oxygen D0 the value is
found by using O2-Table. The Unisense table for values for oxygen
diffusion coefficients is also available in the Documentation and
Downloads-section of our website (http://www.unisense.com). For
other solutes D0 can be found in the literature.
Sediment diffusion coefficient equation (Ds): Select an
equation to calculate the sediment diffusion coefficient with
depth from the porosity in the box. See a discussion of the most
suitable equation in Ullman and Aller 1982 and Iversen and
Jørgensen 1993.
Table (Ds and thetha)
In the table you can manually set the start and end depths,
porosity and calulate the diffusion coefficient (Ds).
Diffusion coefficient (Ds): Ds in the table is calculated in the
Calculate section (see above) using the porosity set in the table
and the diffusion coefficient in free water (D0). To use independent
diffusion coefficient values: type diffusion coefficient values –
measured or estimated – directly in the table.
Analyze
Press the Analyze button to start the activity analysis. The
calculation starts automatically by first performing the analysis
with one zone and then makes the calculation for increasingly
high zone numbers until the specified maximum zone number.
50
Statistics
For each zone number, a row in the table is created with the
following parameters:
Zones: The number of zones in the calculation
SSE: Sum of Squared Errors is the difference between the
simulated and observed profile. The smaller this number the
better.
51
P-Value: the probability of the hypothesis that including an extra
zone significantly improves the prediction. The hypothesis is
calculated based on the F value (see Berg et al., 1998).
Top conc: Calculated top concentration in µmol/L.
Bottom conc: Calculated bottom concentration in µmol/L.
Top flux: Calculated top flux in nmol cm-2 s-1.
Bottom conc: Calculated bottom flux nmol cm-2 s-1.
Integrated prod: Calculated integrated production in nmol cm-2
s-1.
Volume specific rate: The volume specific consumption or
production rates in nmol cm-3 s-1 are shown when moving the
curser over the green or red rate bares in the activity plot. The
values are also shown in the exported file, selection nr. 1 Export
data point and selection row in table, see below.
When all calculations are done, the solution with the highest
number of zones, that is significantly better than the previous
solution (P<0.05), will be the best choice. However, it is advisable
to visually check the other estimated solutions by clicking and
thus highlighting these in the table. Furthermore, the effect of
changing boundary conditions and/or minimum zone width can
also be tested.
Save solution: Press the save solution button to save the analysis
in the Experimental overview tab under the analyzed profile. If
the statistics indicate that the number of zones you have chosen
in the max zones are too high or too low you can either reduce or
increase zone number in the max zone setting. Repeat the profile
analysis and save the best solution. An Analysis can be deleted in
the Experiment overview by first right clicking the mouse and then
choose delete.
52
Export data: Click the Export button to export data in a Microsoft
Excel compatible output file format (CSV). Choose how to export
the data:
1. Export data points and selected row in
table where you will save the calibrations,
comments, and for the selected zone
number the statistics and the volume base
rates of production/consumption.
53
2. Export entire result table. You will save
calibrations, comments, and statistics for
all zones.
For references, please see the References section in the back of
this manual.
54
COMMENTS TAB
Comments, calibrations and other events generated by the user
or the program are recorded in the Comment tab. The tab allows
you to enter notes and comments. Any text that you want to save
with your data (e.g. a general description of your experiment) can
be entered. Text entered in the Profiling tab and Calibration tab
are also listed in the Comment tab. All activities can also be seen as
colored marks in the Live Data window.
A comment can be added using 1) the current time or 2) by writing
the text first, wait for an expected event and then update the time.
55
Output file
All logged data and text entered and stored in the SensorTrace
Profiling program are logged to an internal SensorTrace Suite
database. Data, including raw data, are accessible through data
export in an Microsoft Excel compatible output file format (CSV)
to facilitate processing and graphic representation of the data. All
you need is to make sure that you have a program that can view or
import CSV files e.g. Microsoft Excel.
Raw and calibrated data and the calibration values can be
exported from the Visualize Tab page 42 whereas the rate values
calculated in the Activity Tab are exported from this tab, see page
46.
56
REFERENCES
• Berg, P., Risgaard-Petersen, N., and Rysgaard,
S. 1998. Interpretation of measured
concentration profiles in sediment pore
water. Limnology and Oceanography.
43(7):1500-1510.
• Glud, N. R. 2008. Oxygen dynamics of marine
sediments. Marine Biology Research 4:
243-289.
• Iversen, N. and Jorgensen, B.B. 1993.
Diffusion Coefficients of Sulfate and Methane
in Marine Sediments: Influence of Porosity.
Geochimica et Cosmochimica Acta 57(3):
571-578
• Ullman, W.J and Aller, R.C. 1982. Diffusion
Coefficients in Nearshore Marine Sediments.
Limnology and Oceanography 27(3):
552-556. ½
• Revsbech, N.P., Nielsen, L.P., and Ramsing,
N.B. 1998. A Novel Microsensor for
Determination of Apparent Diffusivity in
Sediments. Limnology and Oceanography
43(5): 986-992.
57
TROUBLESHOOTING
Problem
Possible cause 1
Possible cause 2
Solution
Problem
Possible cause 1
Solution
Possible cause 2
Solution
58
Instruments not found
You have not connected your digital sensor
instrument or A/D-converter.
An amplifier with different bit-resolution has just
been connected
Open the configuration utility (InstaCal). InstaCal
will clear any old amplifiers not connected to
your system and search for connected amplifiers
“Noisy” measurements
Physical vibrations from other appliances on
the table are causing movements of the sensor
resulting in instability of experimental set-up and
disturbances in the measurements.
Remove all unrelated appliances from surfaces in
contact with the experimental set-up and ensure
completely stable conditions for the sample.
Electric noise in the system.
Check that the system is properly grounded.
Connect the Ground connection on your sensor
instrument to a ground source (a waterpipe or
similar). Sometimes it can also help to ground
the meter directly to your measuring set-up
with a wire going from the Ground connection
of the sensor instrument to the liquid you are
measuring in.
UNISENSE, DENMARK
www.unisense.com · [email protected]