1
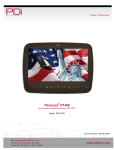
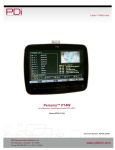
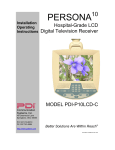
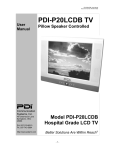
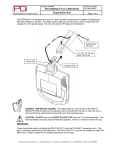
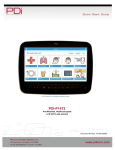
MODEL NUMBER:
Document Number:
PDI-P15Q
®
Better Solutions Are Within Reach
Quick Start Guide
PD196-256R1
Page 1 of 7
PDI-P15Q
HDTV PAL/DVB-T
Arm Mounted Healthcare-Grade Television
Document Number PD196-256R2
MODEL NUMBER:
Document Number:
PDI-P15Q HDTV PAL/DVB-T
Your Source for Healthcare and Wellness
Infotainment™
Overhead Falling Hazard
WARNING: To prevent injury, this apparatus
must be securely attached to the floor/wall in
accordance with the installation instructions. TV’s
can pose a striking hazard when mounted at an
elevated position. Use only PDi mounting brackets, support
arms, and appropriate hardware to assure TV will not fall from
the mounted position. Failure to do so may cause injury or
death.
Oxygen Environment
WARNING: Do not use in any oxygen tent or
oxygen chamber. Such use may cause a fire
hazard.
Rain and Moisture
WARNING: To avoid the hazards of fire or
electrical shock, DO NOT expose this television to
rain or moisture.
Wet Location
Do not use this television near water. Television
shall not be exposed to dripping or splashing and
no objects filled with liquids, such as vases, shall
be placed on the television.
Note to Cable TV Installer
This reminder is provided to call the cable TV systems
installer’s attention to Article 820-40 of the National Electrical
Code. The code provides guidelines for proper grounding and,
in particular, specifies that the cable ground shall be connected
to the grounding system of the building, as close to the point of
the cable entry as practical. Canadian installations shall be
properly grounded in accordance with the Canadian Electrical
Code, Part 1.
Quick Start Guide
PD196-256R2
Page 2 of 7
FCC
This equipment has been tested and found to comply with the
limits for a Class A digital device, pursuant to part 15 of the
FCC Rules. These limits are designed to provide reasonable
protection against harmful interference when the equipment is
operated in a commercial environment. This equipment
generates, uses, and can radiate radio frequency energy and,
if not installed and used in accordance with the instruction
manual, may cause harmful interference to radio
communications. Operation of this equipment in a residential
area is likely to cause harmful interference in which case the
user will be required to correct the interference at his own
expense.
Maintenance and Servicing
The TV does not require periodic maintenance other than
cleaning. Never remove the back cover of the TV; this can
expose you to high voltage and other hazards. If the TV does
not operate properly, unplug it and call an authorized service
center or PDi.
Cleaning and Disinfection
Clean the exterior of this television by removing dust with a lintfree cloth. CAUTION: To avoid damage to the surface of the
television, do not use abrasive or chemical cleaning agents.
Spot test a new disinfectant by test cleaning a non-obvious
small spot on the TV’s back cabinet, keypad, and LCD panel.
Allow the disinfectant to soak per its instructions and then wipe
clean. Do not use the disinfectant if the TV’s surfaces show
any sign of discoloration or softening.
Product Modification
Do not attempt to modify this product in any way without
written authorization. Unauthorized modification could void the
user’s authority to operate this product.
Trademarks
All brand names and product names in this manual are
trademarks, registered trademarks, or trade names of their
respective holder. PDi is a registered trademark of PDi
Communication Systems, Inc., Springboro, Ohio. Dolby and
the double-D symbol are trademarks of Dolby Laboratories.
PDi Communication Systems, Inc. 40 Greenwood Lane Springboro, Ohio 45066 USA PH 800-628-9870 FX 937-743-5664
Document Number PD196-256R2
PDI-P15Q Quick Start Guide
Page 3 of 7
IMPORTANT SAFETY INSTRUCTIONS
CAUTION: THIS INSTALLATION SHOULD BE MADE BY A QUALIFIED SERVICE PERSON AND SHOULD
CONFORM TO ALL LOCAL CODES. READ AND FOLLOW THE SAFETY INSTRUCTIONS BEFORE ATTEMPTING
THIS INSTALLATION.
1. Read these Instructions – All the safety and
operating instructions should be read before the
product is operated.
2. Keep these Instructions – The safety and
operating instructions should be retained for future
reference.
3. Heed all warnings – All warnings on the product
and in the operating instructions should be
adhered to.
4. Follow all instructions – All warnings on the
product and in the operating instructions should be
followed.
5. Do not use this apparatus near water – for
example, near a bath tub, wash bowl, in a wet
basement; or near a swimming pool; and the like.
6. Clean only with dry cloth. Do not use liquid
cleaners or aerosol cleaners.
7. Do not block any ventilation openings. Install in
accordance with the manufacturer’s instructions.
The openings should never be blocked by placing
the product on a bed, sofa, rug, or other similar
surface.
8. Do not install near any heat sources such as
radiators, heat registers, stoves, or other
apparatus (including amplifiers) that produce heat.
9. DO NOT defeat the safety purpose of the
polarized or grounding-type plug. This product is
equipped with a three-wire grounding-type plug, a
plug having a third (grounding) pin. This plug will
only fit into a grounding-type power outlet. This is
a safety feature. If you are unable to insert the
plug into the outlet, contact your electrician to
replace your obsolete outlet.
10. Protect the power cord from being walked on or
pinched particularly at plugs, convenience
receptacles, and the point where they exit from the
product.
11. Attachments – Only use attachments/accessories
specified by the manufacturer.
12. Use only with the cart, stand, tripod, bracket, or
table specified by the manufacturer, or sold with
the apparatus. When a cart is used, use caution
when moving the cart/apparatus
combination to avoid injury from
tip-over.
13. Unplug this apparatus during
lightning storms or when unused
for long periods of time.
14. Refer all servicing to qualified service personnel.
Servicing is required when the apparatus has
been damaged in any way, such as power-supply
cord or plug is damaged, liquid has been spilled or
objects have fallen into the apparatus, the
apparatus has been exposed to rain or moisture,
does not operate normally, or has been dropped.
15. Power Sources – This product should be operated
only from the type of power source indicated on
the marking label. If you are not sure of the type
of power supply to your home, consult your
product dealer or local power company. For
products intended to operate from battery power,
or other sources, refer to the operating
instructions.
16. Oxygen Environment – Do not use in an oxygen
tent or oxygen chamber. Such use may cause a
fire hazard.
17. Lightning – For added protection for this product
during a lightning storm, or when it is left
unattended and unused for long periods of time,
unplug it from the wall outlet and disconnect the
antenna or cable system.
This will prevent
damage to the product due to lightning and powerline surges.
18. If at any time you wish to dispose of this product,
remember that electrical products
should not be disposed of with
household waste. Consult your
local authority or retailer for more
details.
PDi Communication Systems, Inc. 40 Greenwood Lane Springboro, Ohio 45066 USA PH 800-628-9870 FX 937-743-5664
Document Number PD196-256R2
PDI-P15Q Quick Start Guide
Page 4 of 7
INSTALLATION
Location
*Note: Ceiling mounted fluorescent lights and windows may produce unwanted glare and should be considered when
selecting a mounting location
TV to Arm Mounting
This television is designed to attach to a wall mounted suspension arm capable of supporting a television weighing
9.5 pounds (PDI-AA410 Series). The single coaxial cable on top of the TV is used to supply the RF signal to the
television.
DANGER: ARM RECOIL HAZARD
The safety brake pin must remain in the SAFETY BRAKE PIN HOLE whenever the television is
removed from the arm or when the arm is removed from the wall bracket to prevent the arm from
springing open.
1. Remove and save the 1/4-20
(1/4 inch x 20 threads per inch)
Socket Head Cap Screw from
the TV’s Swivel.
2. Remove the two Nose Cover
Retainer Screws and raise the
metal nose cover.
3. Slide the TV’s swivel completely
into the arm’s clevis (slot) such
that the Upper and Lower
Swivel Plates sandwich the
arm’s nose. The nose of the
support
arm
should
rest
between each plate.
4. Align the Retainer Plate’s
mounting hole over the arm
mounting hole. Thread the 1/420 Socket Head Cap Screw
through the Top Retainer Plate,
the arm’s nose and then into the
Lower Retainer Plate. Tighten.
5. The coax cable in the nose of
the arm should be joined with
the coax cable from the
television. Wrench tighten the
connection and cover by sliding
the plastic boot sections into
mating position.
IMPORTANT: Finger only tightening of
this cable connection will result in
reliability problems weeks or months
later.
Wrench tighten all “F” fitting
connections!
1/4-20 Socket Head
Cap Screw
Safety Brake Pin
Coax Cable
Nose Cover
Retainer Screws
Power Supply Cable
Pillow Speaker Cable
USB Port
6. For PDI-500 series arms, remove the Safety Brake Pin from the Safety Brake Pin Hole, reattach the acorn nut
to the pin, and store the assembly inside the nose of the arm by attaching it to the coax cable using the
attached plastic clip. DO NOT store the pin inside the nose of PDI-AA410 series arms.
7. Close the metal nose cover onto the nose. Reinstall the two Nose Cover Retainer Screws.
PDi Communication Systems, Inc. 40 Greenwood Lane Springboro, Ohio 45066 USA PH 800-628-9870 FX 937-743-5664
Document Number PD196-256R2
PDI-P15Q Quick Start Guide
Page 5 of 7
Programming the TV
The PD108-420 programming remote control is required to perform all setup operations for the television. One
remote is sent with each order and additional remotes must be purchased separately.
Note: The following instructions assume you have a programming remote, have correctly mounted the TV and
connected an RF coax cable signal.
Channel Setup
Service Levels Setup
The TV offers three different programmable channel banks or Service Levels: Free, Basic, and Premium. Only one
service level is usable at a time.
Disabled – This is like a mechanical key lock – when in Disabled Service Level, the TV can be turned off and on, but
it cannot be used for viewing. A standard message appears on a black screen
Free – This lets patients watch hospital education and information channels without renting the TV. The channels
containing programming for no charge are typically programmed into this level of service. This is the factory default
setting for Service Level.
Basic – This service level typically allows additional channels beyond those offered in the FREE level.
Premium – This is the highest service level with typically the most channels available for viewing.
1. In “Channel” screen, highlight “Service Level” with ▲ or ▼ arrows on remote.
2. Press ► to enter next screen and select desired service level. Once desired service level is shown it
automatically saves and you may exit the screen.
3. Press “Setup” or “Exit” to exit the screen.
PDi Communication Systems, Inc. 40 Greenwood Lane Springboro, Ohio 45066 USA PH 800-628-9870 FX 937-743-5664
Document Number PD196-256R2
PDI-P15Q Quick Start Guide
Page 6 of 7
Auto Tuning
The TV automatically scans each available channel for activity. Channels that display activity are memorized into the
selected Service Level.
1. In the “Channel” screen, press ▼ to highlight “Service Level.
Press “OK”.
2. Press ▼to highlight “Auto Tuning”. Press “OK”.
3. Press ► to select ATV, DTV, or ATV+DVT
4. Press ▼ and ► to select origin.
5. Press “OK” for auto programming. This step could take
several minutes.
6. Press “Setup” or “Exit” to exit the screen.
Sound Programming
The TV’s internal speakers can be disabled requiring the use of a
pillow speaker for private listening.
Internal Speaker
The speaker’s inside the TV’s cabinet can be Enabled (turned ON) or
Disabled (turned OFF).
1. In the “Sound” menu, press ▼until you reach “Internal
Speaker”
2. Press ►or “OK” and then▼ to select the desired menu item.
3. When menu item is selected press ► to enable or disable.
4. Press “Setup” or “Exit” to exit the screen.
PDi Communication Systems, Inc. 40 Greenwood Lane Springboro, Ohio 45066 USA PH 800-628-9870 FX 937-743-5664
Document Number PD196-256R2
PDI-P15Q Quick Start Guide
Page 7 of 7
Cloning
Cloning allows quick programming of a TV from a USB memory stick (Thumb Drive). Clone operation involves first
downloading setup information from a programmed host TV to a Thumb Drive and then uploading the setup
information to another TV. Cloning can also be used to re-program a programmed TV. (See page 4 for cloning port
location).
Note: After cloning, remotes A, B, C, or D will need to be re-selected. (See user manual PD196-257 for instructions).
Import Settings
1. In the “LOCK” menu, press▼ to highlight “Locks”.
2. Press “OK” to enter “LOCKS”
3. Press▼ to highlight “Import”.
4. Insert USB and press “OK”.
5. TV will re-boot when import is complete.
Save Settings to USB
1. In the “LOCK” menu, press ▼ to highlight “Locks”
2. Press “OK” to enter “LOCKS” screen.
3. Insert USB.
4. Press ▼ to highlight “Export”.
5. Press “OK” to save to USB.
6. Press “Setup” or “Exit” to exit the screen.
Restore Factory Settings to TV
1. In the “Setup” screen, press ▼ until “Reset” is
highlighted.
2. Press “OK” and you will be asked to confirm.
3. Press ◄ to confirm reset.
Additional Information
Additional information is available in the user manual part number PD196-257. Please visit the company web site or
contact PDi.
PDi Communication Systems, Inc.
40 Greenwood Lane
Springboro, Ohio 45066
PDi International, PTE LTD
Henry Building
5 Eunos Ave #2-00 8A
Singapore 409459
WEB:
http://www.pdiarm.com
http://www.pdidisplays.com
PH:
800-628-9870
PH:
+65-6846-1482
PDi Communication Systems, Inc. 40 Greenwood Lane Springboro, Ohio 45066 USA PH 800-628-9870 FX 937-743-5664