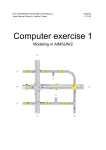
1
GETTING
STARTED
VERSION 4.0
User’s Manual
NOVEMBER 2000
TSS-Transport Simulation Systems
GETRAM v4.0 Getting Started
November 2000
ii
TSS-Transport Simulation Systems
1
INTRODUCTION ............................................................................................................................................1
1.1
2
November 2000
LIST OF ABBREVIATIONS ................................................................................................................................1
MAIN WINDOW..............................................................................................................................................2
2.1 THE MENU BAR ..............................................................................................................................................2
2.2 THE DRAWING AREA ......................................................................................................................................2
THE TOOL BAR ........................................................................................................................................................3
2.4 THE MESSAGE AREA ......................................................................................................................................4
3
THE EDITOR ENVIRONMENT ...................................................................................................................5
3.1
3.2
3.3
3.4
4
OBJECTS..........................................................................................................................................................8
4.1
4.2
5
MAIN WINDOW ...............................................................................................................................................5
THE DRAWING AREA AND THE GRID ..............................................................................................................6
MOVING AROUND THE REAL-WORLD AREA.....................................................................................................6
SELECTING OBJECTS FOR DISPLAY ..................................................................................................................7
SELECTING OBJECTS .......................................................................................................................................8
OPENING AN OBJECT .......................................................................................................................................8
BUILDING A NETWORK ..............................................................................................................................9
5.1 INTRODUCTION ...............................................................................................................................................9
5.2 MANIPULATING SECTIONS ............................................................................................................................11
5.3 THE BUILD-UP PROCESS ................................................................................................................................12
5.3.1
Generation of sections........................................................................................................................12
5.3.2
Joins ...................................................................................................................................................13
5.3.3
Polysections........................................................................................................................................14
5.4 JUNCTIONS....................................................................................................................................................16
5.4.1
Basics .................................................................................................................................................16
5.4.2
Signal Groups.....................................................................................................................................18
5.5 SECTION FACILITIES ......................................................................................................................................19
5.5.1
Basics .................................................................................................................................................19
5.5.2
Lanes ..................................................................................................................................................20
DETECTORS ............................................................................................................................................................21
5.7 VMSS ...........................................................................................................................................................22
5.8 METERING ....................................................................................................................................................22
5.9 BUS STOPS ....................................................................................................................................................23
5.10
PUBLIC LINE .............................................................................................................................................25
5.10.1 Routes.................................................................................................................................................26
5.10.2 Time Tables ........................................................................................................................................26
5.11
PUBLIC TRANSPORT PLANS ......................................................................................................................29
5.12
CONTROL PLANS ......................................................................................................................................30
5.13
RESULT CONTAINERS ..............................................................................................................................34
5.14
CENTROIDS ..............................................................................................................................................37
5.15
O/D MATRICES ........................................................................................................................................39
5.16
OPENING A NETWORK ..............................................................................................................................42
6
AIMSUN2 MAIN WINDOW.........................................................................................................................44
6.1
6.2
6.3
6.4
7
MENU BAR ...................................................................................................................................................44
TOOL BAR ....................................................................................................................................................45
INFORMATION AREA .....................................................................................................................................45
THE SIMULATOR ENVIRONMENT ..................................................................................................................45
A QUICK START TO AIMSUN2.................................................................................................................46
7.1 LOADING A MODEL ......................................................................................................................................46
7.1.1
Load Network Data ............................................................................................................................46
7.1.2
Load Traffic Demand Data ................................................................................................................46
7.1.3
Load Traffic Control Data .................................................................................................................48
7.2 PREPARING THE EXPERIMENT .......................................................................................................................48
7.3 RUNNING THE SIMULATION...........................................................................................................................49
GETRAM v4.0 Getting Started
iii
TSS-Transport Simulation Systems
November 2000
7.4 VIEWING STATISTICS ....................................................................................................................................50
7.4.1
Streams...............................................................................................................................................50
7.4.2
Reports ...............................................................................................................................................51
7.4.3
Statistical Charts ................................................................................................................................55
8
PUBLIC TRANSPORT MODELLING .......................................................................................................57
8.1 PUBLIC TRANSPORT OBJECTS .............................................................................................................57
8.1.1
Bus Lines ............................................................................................................................................57
8.1.2
Bus Stops ............................................................................................................................................58
8.1.3
Timetables ..........................................................................................................................................60
8.2 PT VEHICLE MODELLING ......................................................................................................................60
9
OTHER AIMSUN2 UTILITIES ...................................................................................................................61
9.1 SIMULATION ANALYSIS ................................................................................................................................61
9.1.1
Vehicle Coloring ................................................................................................................................61
9.1.2
Opening an object ..............................................................................................................................63
9.1.3
Opening a vehicle...............................................................................................................................63
9.2 DYNAMIC SIMULATION VARIABILITY ...........................................................................................................64
9.2.1
Actions................................................................................................................................................64
9.2.2
Incidents .............................................................................................................................................66
APPENDIX I: TEDI MENU BAR COMMANDS.................................................................................................67
FILE MENU .............................................................................................................................................................67
EDIT MENU ............................................................................................................................................................67
VIEW MENU ............................................................................................................................................................67
ARRANGE MENU .....................................................................................................................................................68
SECTION MENU .......................................................................................................................................................68
CONTROL MENU ....................................................................................................................................................68
RESULT MENU .......................................................................................................................................................68
O/D MATRIX MENU ...............................................................................................................................................69
TRANSYT MENU .................................................................................................................................................69
PT MENU ...............................................................................................................................................................69
WINDOWS MENU ...................................................................................................................................................70
HELP MENU ...........................................................................................................................................................70
APPENDIX II: AIMSUN2 MENU BAR COMMANDS.......................................................................................71
FILE MENU .............................................................................................................................................................71
OBJECTS MENU ......................................................................................................................................................71
VIEW MENU ...........................................................................................................................................................72
EXPERIMENT MENU ...............................................................................................................................................72
RUN MENU .............................................................................................................................................................73
REPORTS MENU .....................................................................................................................................................73
WINDOWS MENU ...................................................................................................................................................73
HELP MENU ...........................................................................................................................................................74
GETRAM v4.0 Getting Started
iv
TSS-Transport Simulation Systems
November 2000
1 INTRODUCTION
The purpose of this document is to give the user a quick overview of the TEDI network editor
and the AIMSUN2 simulator. Chapter 2 consists of a description of the different elements that
go to make up the main window of the editor. The third chapter introduces the user to the
manipulation of the editor display and the different ways of ‘travelling’ around the drawing area.
Chapter Four is a short one that teaches the user how to select and open objects. This is done
before learning how to draw any objects since these are such general operations; the user should
be familiar with these before going on to build a model. A model is built step-by-step in the next
chapter and this is a useful first exercise for getting the user up and running with TEDI. The last
chapter on TEDI presents a few aids to the task of editing a network, such as backgrounds and
views.
1.1 List of Abbreviations
•
•
•
•
•
•
•
•
•
•
•
•
•
•
•
•
•
A: Arrange Menu
C: Control Menu
E: Edit Menu
EX: Experiment Menu
F: File Menu
H: Help Menu
L: Layout Menu
O: Objects Menu
OD: O/D Matrix Menu
PT: Public Transport Menu
Rep: Reports Menu
Res: Result Menu
Run: Run Menu
S: Section Menu
T: Transyt Menu
V: View Menu
W: Windows Menu
GETRAM v4.0 Getting Started
1
TSS-Transport Simulation Systems
November 2000
2 MAIN WINDOW
When launching the TEDI graphical editor, the window shown in Figure 1.1 appears. This is the
main window in TEDI. It contains a number of special areas, namely the Menu Bar, Tool Bar,
Message Area and Drawing Area (area within which the network is situated, also called real-world
area).
Figure 2-1: Main window of the TEDI graphical editor
2.1 The Menu Bar
The menu bar is located at the top of the window and from each menu the user accesses a set of
options. Although most of these are self-explanatory, a brief description of each menu and its
options is given in Appendix I.
2.2 The Drawing Area
The drawing area is where the traffic network is displayed, providing a realistic view of the
objects. The user can select and manipulate objects by directly clicking and dragging in this
area. All the objects in the drawing area can be directly manipulated with the mouse. All
possible operations are described later in detail, but three of the more important ones are worthy
of mention at this stage:
GETRAM v4.0 Getting Started
2
TSS-Transport Simulation Systems
November 2000
•
Selection of objects. Objects are selected by several methods: clicking on them, area
selection, and selection by menu command. Holding the 'Shift' key pressed, the user can
select more than one object. Once an object is selected, it can be opened for consultation or
for update, moved, deleted, etc..
•
Opening objects. An object is opened by double-clicking on it. Opening an object means
displaying its associated dialog box, which allows the user to read and update the object’s
parameters.
•
Geometrical changes. An object can be moved by dragging it with the mouse, or it can be
rotated, and its size changed by dragging an update point.
2.3
The Tool Bar
The Tool Bar is a column of buttons located on the left-hand side of the window, and
which enables the creation of objects such as text, blocks, sections, junctions. When the
user clicks on a button, it is highlighted showing that an operation has been activated: the
tool remains selected until the user has finished (or aborted) that operation. The user can
cancel an operation either by choosing the Cancel button in the object’s associated dialog
box, or by escaping to a select mode (the two first buttons). The drawing tools may be
classified into three types according to function:
Select buttons. The first and third button. The first one (arrow) provides the normal select
mode, while the third provides the select-by-area mode.
Zoom button. The fourth button. Acts as a ‘zoom in’. If pressed while holding the ‘Shift’
key, it acts as a ‘zoom out’.
Object creation & manipulation buttons. The second and the last ten buttons. These allow
the direct creation and positioning of the objects, which are graphically represented in the
drawing area, namely text, blocks, sections, polysections, junctions, and centroids.
Select: This is the default mouse selection tool; with it the user can click or doubleclick on different objects in the drawing area to select or open them.
Rotate: When pressed the mouse a cross appears at the centre of the selected group of
objects. The cross represents the centre of rotation and may be positioned with the
mouse.
Selection by area: Same as select, but enables all the objects contained in a rectangle to
be selected. The rectangle is specified by clicking on the position of one of the desired
vertices and, without releasing the button, dragging to the position of the opposite
vertex and then releasing the button.
Zoom: When pressed, clicking on the drawing area zooms in, taking that point as the
center of the area to be displayed. Shift-clicking—that is, clicking while keeping the
Shift key pressed— zooms out. The zoom function also has been implemented in the
middle button of the mouse. To zoom into a desired area it has to be selected by
clicking on the position of one of the desired vertices and, without releasing the button,
dragging to the position of the opposite vertex and then releasing the button
Text: When pressed, allows the insertion of text.
Polyline : When pressed, allows the insertion of a continuous line by clicking on the
vertex of the desired line, and double clicking at the final spot.
Polygon: When pressed, allows the insertion of blocks by clicking on the vertex of the
desired polygon, double clicking on the last vertex.
GETRAM v4.0 Getting Started
3
TSS-Transport Simulation Systems
November 2000
Section: When pressed, allows the creation of new sections in the drawing area by clicking on
the origin and ending of the section. A section is a set of contiguous lanes.
Polysection: When pressed, allows the creation of new polysections in the drawing area by
clicking on the vertex of the desired polysection.
Junction: When pressed, allows the creation of new junctions. A junction —or intersection in
USA— is an area where sections with different directions intersect.
Centroid: When pressed, allows the creation of a new centroid, by clicking on its position. A
centroid is a source-sink of vehicles.
Controller: When pressed, allows the creation of a new controller. A controller represents an
element to group traffic control elements: signal groups, detectors, ramp metering and VMS.
Bus Line: When pressed, allows the creation of new bus routes (public lines).
Bus Stop: When pressed, allows the creation and characterization of a bus stop by clicking on
the desired location for the bus stop.
Detector: When pressed, allows the creation of a detector by clicking on its desired position.
VMS: When pressed, allows the creation of a VMS by clicking on its desired position.
Ramp Metering: When pressed, allows the creation of a ramp metering device by clicking on
its desired position.
2.4 The Message Area
The message area is located at the bottom of the window and provides data such as the position
of the mouse pointer in the real world, the scale, and the dimensions of the selected object, see
figure 4-2. For example:
Figure 2-2: Message area.: displayed when a section is selected
• Always displayed:
Real world co-ordinates of the mouse pointer.
Scale: 1: ...
map scale, the relationship between the dimensions of the drawing area
window and those of the real world.
• When selecting an object or a set of objects:
Selection Origin: Position of a selected object or set of objects.
Rotation: window in which to input the number of degrees of a desired rotation for the
selected object or set of objects.
Level: window in which to input the desired level (height) for a selected object or set of
objects.
GETRAM v4.0 Getting Started
4
TSS-Transport Simulation Systems
November 2000
3 THE EDITOR ENVIRONMENT
3.1 Main window
After starting TEDI the first operation is to choose whether to open a new traffic network or an
existing one. Let’s us assume there are no stored networks, so that we choose to open a new
network (New option of the File menu). Once opened, the TEDI window appears as shown in
the next Figure.
Figure 3-1: TEDI window
A number of important areas and tools appear in this window:
Menu Bar: Contents the menu’s main entry points, such as ‘File’, ‘Edit’, etc. Clicking on them
opens the associated options.
Tool Bar: At the left-most part of the window, a column that contents the tools described in
section 1.3.
Message Area: Contains some fixed information and some context-dependent information.
Fixed information is the pointer location in real-world co-ordinates, and the current scale
factor. Depending on the context (like, for instance, having selected a section) additional info
is displayed such as: section length, width, lateral lane length and width, ...
Drawing Area: This is the central area, where all the graphical actions take place and the
network and backgrounds are displayed.
Scroll Bars: Situated at both sides of the drawing area, they are used to move the view from one
place to another of the real-world rectangle. They are used in conjunction with the zoom
control, in order to view other areas and/or at a different detail level.
GETRAM v4.0 Getting Started
5
TSS-Transport Simulation Systems
November 2000
3.2 The Drawing Area and the Grid
The real-world area is a rectangle window to the real world, the area on which drawing will be
permitted. The user specifies the minimum and maximum co-ordinates of this area, (xmin,
ymin), (xmax, ymax), as shown in Figure 3-2.
Figure 3-2: Co-ordinates for specifying the real-world rectangle
(xmax, ymax)
(xmin, ymax)
drawing area
(xmin, ymin)
(xmax, ymin)
The minimum and maximum co-ordinates have to pertain to the positive quadrant. The drawing
size is set at the Drawing Area... folder from the Edit-Preferences option is chosen from the
Layout menu where the modal dialog box in figure 3-3 appears; in it we specify the co-ordinates
of the bottom left and top right corners that define the real-world rectangle and the distance
between grid points.
The grid is a common feature in all CAD programs. In the Layout menu there are two options
associated with the grid: Turn autogrid on and Show grid When the grid is switched on, the
end points of new sections, texts, blocks, etc, are limited to grid points, its update points snap to
the closest grid points when created. Selecting the option Show grid from the Layout menu
makes the grid visible to the user. The option turns to ‘Hide grid’ so that the next time it is
chosen it hides the grid. Hiding the grid doesn’t mean it turns off, just as showing it doesn’t turn
it on. So the grid can be used just as a background reference, with no geometrical consequences,
by showing it while having it turned off.
By default, the distance between grid points is set to 1 meter, but it can be changed at the
Drawing Area folder of the Edit - Preferences option, as can be seen in figure 3-3
Figure 3-3: Preferences dialog window – Drawing Area folder
3.3 Moving around the real-world area
The horizontal and vertical scroll bars can be used to see other parts of the real world area. The
user can also zoom in/out with the zoom tool—zooming out is done by pressing the ‘Shift’ key
at the same time. In order to zoom in/out it is not indispensable to select the key with the lens:
the middle button of the mouse does the same thing. For mice with only two buttons this effect
is obtained by pressing the two buttons simultaneously. One way of using the zoom to move is
GETRAM v4.0 Getting Started
6
TSS-Transport Simulation Systems
November 2000
to zoom out until the desired final location appears in the view, and then zoom in on it. An
initial tactic after loading the background could be to display the whole real-world area (Whole
drawing option of the Arrange menu) and then zoom in on it. Another way of moving around
the real world is by ‘panning’. This is done by moving the mouse pointer and, at the same time,
pressing the right-most mouse button. The result is, sometimes, more convenient than clicking
on the horizontal and/or vertical scroll bars. The last way of moving around is by changing the
scale factor. This is done by directly typing the new scale value in the text box—located in the
message area. This has the same effect as a zoom in/out, but alters the scale by an arbitrary
factor.
3.4 Selecting objects for display
The user can choose the type of objects to display and also whether their identifiers and/or their
names are to be displayed in the drawing area also or not. This is done by going to the Layout
menu and choosing the Show objects... option. A dialog window appears, where for each object
there are three columns: the first one indicates whether or not this type of object is displayed,
the second columns refers to the identifier and the third one to the name, and their state is
changed with a single mouse click on its position with the mouse.
GETRAM v4.0 Getting Started
7
TSS-Transport Simulation Systems
November 2000
4 OBJECTS
Before learning how to draw a network, let’s see what it means to select or open an object. This
will help simplify explanations to come.
TEDI uses the following types of objects: texts, blocks, vehicle classes, centroids, polysections,
sections and nodes—junctures and junctions. Vehicle classes are accessed through the Vehicle
classes... option in the Edit menu. The rest of the objects are geometrical and thus are accessed
directly within the drawing area.
4.1 Selecting objects
Objects in the drawing area are selected as follows:
• Selecting an object. The user can select an object by clicking on it. The object is then
displayed as selected; in the case of a section, this means that the section shows its ‘sizing
handles’ or ‘update points’ while turning transparent. When selecting an object by clicking,
any previously selected objects are deselected.
• Selecting more than one object. To avoid deselecting the previously selected objects, the
user has to ‘Shift’-click on the next object, i.e., click on that object while pressing the ‘Shift’
key. A Control-click on a polysection will select all sections composing the polysection, and
a Control-click on a junction will select the junction and all sections connected to it.
Another way of selecting multiple objects is ‘by area’. This is done by first pressing the ‘select
by area’ button in the drawing tools, then clicking in the drawing area without releasing the click
button and, moving the mouse while holding the click button until a selection area is defined,
graphically represented as a dashed rectangle. All the objects completely inside the dashed
rectangle are selected when the mouse button is released. The selected objects can be of different
type. Previously selected objects are deselected, unless the user presses the ‘Shift’ key
throughout this operation.
• Deselecting objects. As said before, unless the user holds the ‘Shift’ key while selecting
objects, all previously selected objects are deselected. The same result is accomplished by
clicking the mouse anywhere. When more than one object has been selected and only one of
them is to be deselected, it is deselected by Shift-clicking on it.
Figure 4-1: View of a selected section
The ‘Delete’ key can be used to delete all selected objects.
4.2 Opening an object
Double-clicking on an object opens that object, i.e., its associated dialog box is displayed. Opening
an object means displaying its properties, i.e., opening its associated dialog box, which allows the
user to read or update the object’s parameters. This is done by double clicking on it on the drawing
area. Only one object can be open at a time. With the only exception of a set of sections: in that
case the parameters common to all sections can be edited simultaneously for all of them.
GETRAM v4.0 Getting Started
8
TSS-Transport Simulation Systems
November 2000
5 BUILDING A NETWORK
5.1 Introduction
In this section we explain how to build the physical or geometrical network, insert features such
as traffic lights and detectors, define how these elements will work, and set traffic conditions for
the network. All this will be illustrated by building a hypothetical network.
Figure 5-1: Initial View
Exercise 1: Go to File and select New. Then:
•
Go to Preferences-Drawing Area (E), check that the distance between grid points is of 1
meter (3.3 feet) and set the real world size to 1000 x 1000 meter
•
Go to Show Objects (V), choose all the objects and their ids to be shown (V) by clicking on
the empty positions at the Object and Id columns
•
Magnify the image to a convenient scale of 800 changing the number at the Scale window
•
Go to Save as…(F), save the network
The result is shown in the Figure 5-1.
The first aid we need to build a model is a graphical image or a set of images as a background,
to use it as a guide and a reference. This helps with editing large traffic networks, especially for
modeling sections with the right real-world dimensions. The images have to be stored preferably
in DXF format, but bmp, giff, tiff, jpeg and other formats are also accepted. Once loaded in the
drawing area, they can be scaled, moved and rotated, so as to align them with other backgrounds
and traffic objects. In order to access these capabilities, the user has to choose the Background...
option (V), which displays the dialog box shown in Figure 5-2.
GETRAM v4.0 Getting Started
9
TSS-Transport Simulation Systems
November 2000
Figure 5-2: DXF Manager
Before using an image it has to be
registered. This is done by pressing
the ‘Register...’ button, a dialog box
appears where the user just selects the
image file, registers it and repeats the
operation with any other images of
interest.
Once the image has been registered, it
can be loaded as a background; this is
done by selecting it in the list box and
then pressing the ‘Load’ button.
Several problems can arise owing to
the different graphical origins of the
backgrounds; The User Manual
(section 5.3.5) explains how to deal
with these. The background can now
be opened by clicking twice on its
name in the DXF Manager dialog
window. This opens a dialog window
with two folders to manipulate the
background and choose which layers
to display (Figures 5.3 & 5.4).
Figures 5-3 & 5-4 Dialog box for manipulating the background & restricting the layers to be
displayed
GETRAM v4.0 Getting Started
10
TSS-Transport Simulation Systems
November 2000
Exercise 2: select Background… and in the window that appears:
•
Click on Register… and select the NNc1 background at ../Getram/Samples/Donosti/Planero/
•
Click on Open to register the background
•
Select the NNc1.dxf background and click in the Load button
•
Select Whole Drawing (V)
•
Drag the background to separate it a short distance from the origin
•
Double click on the background’s name in the Background Manager window
•
In Translate to input (100, 100) and click enter, in order to set it at (100, 100) meters from
the origin
•
Select the Layers folder of the background dialog window, select the ERAIKUNTZ layer and
deactivate the Visible toggle
•
Close the background’s window and Background Manager window
•
Save the network
Figure 5-5: Initially drawn section
5.2 Manipulating sections
To draw a section we press the uppermost button with two lanes drawn on it, choose the point
where the section is to begin, and click the mouse releasing the button after the click. The
section origin point is now set. Now we move the mouse to the point where the section is to end
and click again. We end up with something like the section in Figure 5-5. However, what we
really want is the section shown in Figure 5-6.
Figure 5-6: New section
To change our original section o the desired one, we
have to do the following. First, we move the selected
section by clicking on it without releasing the button and
dragging it to the right location; be sure to click well
inside the section, where the mouse keeps its familiar
shape of an arrow. Second give the section the desired
width by moving the cursor to one side of the section, to
the point where the familiar cursor changes to a circle
GETRAM v4.0 Getting Started
11
TSS-Transport Simulation Systems
November 2000
with a dot at its center, and then drag only that side of the section, widening it as much as
necessary. As the section widens the number of lanes increases every time there is enough space for
a new one. Repeat this process with the leading edge of the section in order to adjust its length.
Orientation of the entry and exit was done by clicking on the dots on the vertices of the rectangle
and moving the cursor to the desired position of the chosen vertex while holding down the button.
The side lane was added by clicking on the dots situated behind those on the vertices and pulling
outwards, keeping the button pressed. The length and width of this extra side lane is adjusted just in
the same way as a section, by dragging its side. There are several more options.
We can change the width of the lanes of a selected section by clicking the Lane width option in the
Section folder of the Preferences (E) window, and entering the new width in the dialog window
opened for this purpose. If we carry out that last operation without selecting a section, the lane
width introduced will represent the default lane width for all new sections. In the Section menu
there is the Number of lanes option which allows the number of lanes of the section to be set
without having to adjust it by changing manually the width of the section.
Another option of the Section menu is to change the direction of the lanes of the section. The move
backward-move forward options, of the Arrange menu, increases or decreases the absolute value of
the selected sections’ level rather than manually setting the desired level value in the level window.
If there are several overlapping sections the level option
allows the desired vertical position for the selected
section to be chosen. It is also possible to disable the
side lanes, with the appropriate options of the Section
menu, as explained in previous chapters. The section in
Figure 5-7 is the same as the one in Figure 5-6 but with
2 meter lanes instead of the 3 meter original lanes (S), a
change of direction of the lanes (S), and with a level 1
position with respect to the level 0 section that has been
added as a reference (A).
Figure 5-7: Re-transformed section
5.3 The build-up process
5.3.1
Generation of sections
Now that we have drawn a first section we can build further ones. Most of the time what we need to
do is just add one more section at the exit of our initial one to extend the original lanes further on in
a different direction owing to a curve. All we have to do is select the section from which our new
section has to follow, and press the ‘section’ button from the tool bar. The result of doing so, to the
section in Figure 5.6, is presented in Figure 5.8. (If we had wanted the new section to leave the
entry instead of the exit, we would have followed the same process, but held down the shift key
while pressing the ‘section’ button, that is, shift-click the ‘section’ icon. The result of doing this to
the section in Figure 5-6 is presented in Figure 5-9). Our next task is to manipulate the new section
to our convenience. Let’s say that we want the final result seen in Figure 5-10. The change of
orientation and length can be accomplished by clicking and holding the cursor well inside the
section (not too close to the sides) and dragging the section to the desired final orientation and
length: it will grow and rotate around its union with the mother section. Finally, the number of
lanes is reduced from three to two, as if it were an isolated section, by dragging one side with the
mouse. Then the mother section is selected again and the ‘section’ icon pressed again, to generate
the lane that follows from the side lane of the mother section; and this one-lane section is
manipulated in the same way as the previous one (dragging it to make it grow and rotate).
GETRAM v4.0 Getting Started
12
TSS-Transport Simulation Systems
Figure 5-8: New Section
November 2000
Figure 5-9: New section
Figure 5-10: New section transformed plus off ramp
5.3.2
Joins
Another important task is that of joining two sections. Often we will have, for instance, a section
leaving a highway exit, which will have to be linked to a road entry, something like what
happens to the side section (section 3) leaving the first section drawn (section 1) of Figure 5-11.
We have generated the section from the exit, but the other end is created unbounded. In order to
bound the end of section 3 to the entry to the acceleration lane of section 5, the sections have to
be situated one touching the other lane-to-lane, in such a way that the visual appearance is
approximately the same as the one desired for the final join (Figure 5-11). Once that is done, the
last step is to select both sections and to choose the Make join option of the Section menu. The
GETRAM v4.0 Getting Started
13
TSS-Transport Simulation Systems
November 2000
join between two sections is broken in this same way: selecting
both of them and choosing the Break join option of the Section
menu. In both cases we have another possibility, we can make or
break several joins simultaneously by selecting all the sections
involved.
Figure 5-11: Making a join
Quite often the user may find that the two lanes to be joined have
different widths. There are several ways to deal with this
problem, the most popular one is explained in section 5.5.3 of the
TEDI User’s Manual.
5.3.3
Polysections
Polysections are intended for those road sections where there are no
changes in the number of lanes and no bifurcation nor merging, but
that aren’t straight. Instead of having to generate section after
section, the interval may be modeled in a single step with a
polysection. The way to do this is to click at the beginning of the
road interval, then to click on each point where a change in
direction is desired, and then to double-click at the end of the polysection (Figure 5-12). Finally, the
beginning and the end of the polysection are connected to the rest of the network through joins
(Figure 5-13).
Figure 5-12: A polysection
GETRAM v4.0 Getting Started
Figure 5-13: Connecting a polysection to the network
14
TSS-Transport Simulation Systems
November 2000
Figure 5-14: Phase 1 of model building
Exercise 3: using the methodology exposed in this last section, build the sections of a future model
shown in Figure 5.14. Build the ramp from the round about to the south-west exit (section 16) with
a polysection (sections 10, 11, 12, 13 and 14 in the picture).
GETRAM v4.0 Getting Started
15
TSS-Transport Simulation Systems
November 2000
5.4 Junctions
Once all the necessary sections of our network have been drawn, we end up with a geometrical
replica of the real world network. Now we have to add the junctions; we have to define the
allowed directions a vehicle can take wherever more than two sections meet.
To characterize a junction we begin arranging a detailed view of the junction of interest, and then
press the ‘Junction’ icon on the Tool bar. A dialog window will appear. The window has two
different fields: Basics, and Signal Groups.
5.4.1
Basics
Here is stored the information on the tuning movements allowed at the intersection. To define
the allowed turnings in the junction we press the New button, then click on the origin lane and
click on the destination section of the desired turning movement. The result can be seen in
Figure 5-15.
Figure 5-15: Creating a turning
If there are two or more origin lanes, we have to select them all by Shift-clicking on them in the
turn. This last procedure will be repeated with the destination lanes if it is decided to distinguish
between destination lanes (option in Preferences-Network in the Edit menu). Otherwise, when
clicking on one lane of the destination section, all the lanes will be selected as possible
destination for the vehicles in the origin lane. Each turning can be characterized by different
parameters:
Max. speed: This represents the maximum turning speed. The editor calculates a value from the
GETRAM v4.0 Getting Started
16
TSS-Transport Simulation Systems
November 2000
geometrical configuration of the junction and the maximum speed allowed through the sections;
but this value can be changed by directly typing the desired value in the ‘Max. speed’ slot. The
‘Auto Reevaluate Speed’ option reevaluates the turning speed automatically whenever there is a
change in the configuration of the junction.
Warnings: The ‘Warnings’ parameter has three options : none, yield, stop. None means no sign,
and yield and stop mean that the given sign is present in the origin lane. The function of these
options is to simulate the corresponding traffic conditioning.
Optional: This is the object's “joker”. It allows for any additional information not included so
far.
Cost Function: The library of cost functions that may have been edited by the user in addition to
the default ones used by the simulator.
Initial: Cost function associated to that statistical arc (statistical arc = lanes of the section from
which the turning is allowed plus turning) and used at the first path calculation at the beginning
of the simulation.
Current: Cost function associated to that statistical arc and used at each path update during the
simulation.
At the Basics folder we can also edit some additional information like the junction’s name and
whether it is a yellow box (yellow box: vehicles have to try not to stop on the junction’s area).
Figure 5-16: Exercise 4’s Junctions
Exercise 4: go to Preferences-Network (E) and select ‘no’ at Distinguish destination lanes in
turnings. Click on the Junction icon of the toolbar. Create the following turnings:
GETRAM v4.0 Getting Started
17
TSS-Transport Simulation Systems
November 2000
Section 27: lanes 2-3 to section 24, lanes 1-2 to section 20
•
Section 19: both lanes to section 24, set a yield sign
•
Click on the OK button
Click on the Junction icon of the toolbar. Activate the Yellow box toggle. Create the following
turnings:
•
Section 25: lane1 to section 2, lanes 1-2 to section 17, lanes 2-3 to section 4
•
Section 3: both lanes to section 2
•
Section 1: lanes 1-2 to section 17, lanes 2-3 to section 4
•
Click on the OK button
Click on the Junction icon of the toolbar. Create the following turnings:
•
Section 18: lane 1 to section 21, lanes 2-3 to section 23
•
Section 22: its single lane to section 23, set a yield sign
•
Click on the OK button
Click on the Junction icon of the toolbar. Activate the Yellow box toggle. Create the following
turnings:
•
Section 6: both lanes to section 3, lane 1 to section 26
•
Section 4: lane 1 to section 10, lanes 2-3 to section 5
•
Section 23: lane 1 to section 10, lanes 1-2 to section 5, lanes 2-3 to section 26, lane 3 to
section 3
•
Click on the OK button
Click on the Junction icon of the toolbar. Create the following turnings:
•
Section 21: to section 28, to section 31, yield sign
•
Section 29: to section 22, to section 31
•
Section 30: to section 22, yield sign, to section 28, yield sign
•
Click on the OK button
•
Save the network
•
5.4.2
Signal Groups
The Signal Groups folder stores the traffic lights present at the intersection and their associated
turnings. When the Signal Groups button is pressed, the display changes to that of Figure 5-16. To
input traffic lights click on the New button. Click on the turnings you want to be active (allowed,
give way) when that traffic light or group of traffic lights is green. Click on the New button again
and choose the turnings associated with another traffic light, and keep on doing this until all traffic
lights have been included in the model of the junction. The editor allows us to assign one turning to
two different signal groups, but AIMSUN2 will always give a warning for a case like this, because
the simulator won’t know whether to give that turning the light colour associated to one signal
group or the other. The final result will depend on the order in which signal groups are activated in
the final control plan, so be careful when you build up the signal groups. The result for a particular
case is shown in the next Figure.
GETRAM v4.0 Getting Started
18
TSS-Transport Simulation Systems
November 2000
Figure 5-17: Turning stages
To make any changes to a previously designed junction it first has to be opened. (As already
explained, to open an object you just have to double-click on it). If a join is opened, it can be
seen that it is no more than a junction with a single turning and no signal groups.
Exercise 3: Design the following signal groups:
Junction 2:
•
Group 1: all turnings from section 1
•
Group 2: the turning from section 3
•
Group 3: all turnings from section 25
Junction 4:
•
Group 1: all turnings from section 4 and section 6
•
Group 2: all turnings from section 23
5.5 Section facilities
5.5.1
Basics
Section type: There are eight different options for describing the section: arterial, road, freeway,
ring road, on/off ramp, urban road, street and signalised street. Each of these types implies
different values for the capacity and maximum speed. The user can create new section types and
edit the existing ones (Preferences-Section Types (E)). When editing the basic eight types great
care must be exercised.
Maximum speed: Legal speed limit of the section.
GETRAM v4.0 Getting Started
19
TSS-Transport Simulation Systems
November 2000
Capacity: Maximum flow the section can take. AIMSUN2 makes use of capacity only with the
route choice models; there are no capacity restrictions on the simulation of the section. Capacity is
a result of microscopic simulation, not a constraint.
Zone 1: Distance from the next turning point at which the drivers begin to look for a gap to change
lane, if necessary.
Zone 2: Distance from the next turning point at which the drivers begin trying to force a gap to
change lane, if necessary.
On Ramp: It represents, in a certain way, the
distance form the end of the acceleration lane
at which the drivers begin to look for a gap.
More information in AIMSUN2 user’s
manual.
Visibility distance: This is a parameter used
with the give-way algorithms and represents
the distance to the give-way from which the
driver can begin to look for other vehicles
driving towards the intersection from other
directions. It only needs to be set when a
give-way is positioned at the end of the
opened section.
Altitude: Here the slope of the section is
specified (or left blank). It can be done by
specifying the altitude at the origin and at the
end of the section (initial and final altitude),
or it can be done by specifying the degree of
slope in the section (in %) and whether it is
ascending or descending in the direction of
the traffic flow.
Optional: A free space, a “Joker” space, to
enter any possible parameter of the section
not already dealt with.
A more complete explanation of these
parameters and their effect on a simulation
run is given in the AIMSUN’s User’s
Manual.
Figure 5-18: Basic folder
5.5.2
Lanes
This is the field for selecting the lanes of a section to be reserved to a subgroup of vehicle
classes, and to “draw” any of the continuos lines that might limit the lane changing maneuvers
in the section. The way to select the lanes is to specify the number of reserved lanes, the side of
the section on which to put them, the classes of vehicles that are going to be allowed to circulate
on those lanes and whether these vehicles will be forced to take those lanes (compulsory) or will
take them only if the traffic conditions on them are better than in others (optional). Before
reserving any lanes, the vehicle classes must be defined (section 5.2.9, Tedi Manual).
GETRAM v4.0 Getting Started
20
TSS-Transport Simulation Systems
November 2000
Figure 5-19: Lanes folder
The characteristics of the section of figure 5-19 are 1 compulsory reserved lane to the right for
vehicle types classified as ‘Public’, and a continuous line that does not allow vehicles on the
second lane to change to the the first one for the last 50 meters of the total 130 meters of the
section.
5.6 Detectors
In order to create a new detector
it is necessary to click on the
detector icon on the toolbar and
then click on the point in the
section where we want to
position the detector. The
detector will appear, occupying
only one lane, though. Clicking
and dragging from the corner
dots on the detector, its width and
length can be adjusted, and
clicking and dragging from the
middle of the detector its position
may be changed.
Figure 5-20: Detector dialog
window
GETRAM v4.0 Getting Started
21
TSS-Transport Simulation Systems
November 2000
Id: here we name the detector or give it an appropriate identifier.
Name: additional field for assigning a name to the detector.
Distinguish Vehicle Type: this option, when selected, makes the detector distinguish between
different vehicles types, giving the statistics both for all traffic and by vehicle type.
Measuring capabilities: any detector can measure up to five different variables namely: Count,
Speed, Presence, Occupancy and Density.
5.7 VMSs
The process for creating and manipulating a VMS is much the same as that explained for
detectors, except for the fact that VMSs have fixed dimensions.
Id: here we name the VMS or give it an appropriate identifier.
Name: additional field for assigning a name to the detector.
Type: There are two different types of VMSs, namely Gantry signs and Boom poles. This
differentiation is included for the sake of completeness; it has no effect on simulations with
AIMSUN2.
Message: In this window a list of all the possible messages of the VMS is shown. If a particular
message is selected by clicking the cursor on it, its full contents are shown in the secondary
window at the bottom of the section dialog window. If a message number with no message is
selected, a new message can be added just by typing it in the secondary window.
Figure 5-21: VMS folder
5.8 Metering
To create a ramp metering device, click on the Icon and on the section to control. A rhomboid
will appear, representing the controlling traffic light. By clicking and dragging from the middle
of the rhomboid its position can be changed.
GETRAM v4.0 Getting Started
22
TSS-Transport Simulation Systems
November 2000
Figure 5-22: Metering dialog window
Id: here we name the ramp meter or give it an appropriate identifier.
Name: additional field for assigning a name to the detector.
Type: zone with toggle buttons to select whether to meter the green light time, to allow flows of
predetermined platoons of vehicles, or to impose a delay time as a means for modeling the
stoppage of vehicles due to some control facility, such as a toll or customs barrier.
5.9 Bus Stops
Bus stops are created and manipulated in the same way as the rest of the equipment. The length
of a bus stop determines its capacity.
On the following figure we can see an open bus stop.
Id: the code that identifies the bus stop.
Name: additional field for assigning a name to the bus stop.
Type: this option characterizes the bus stop as:
− Normal: on street bus stop, that is, bus blocks the lane when it stops
− Bus Bay: Bus leaves lane to a special side lane where the bus stop is located.
− Bus terminal: Bus station, the buses ‘disappear’ when they enter the terminal and re-enter
the model at that point when starting their route again.
Capacity: capacity of the stop in case of bus terminal: the number of buses it can park.
Information window: In this informative window we can see the lines that stop at this bus stop,
both their id and name.
GETRAM v4.0 Getting Started
23
TSS-Transport Simulation Systems
November 2000
Figure 5-23: Bus stop dialog window
Exercise 4: Reproduce the situation shown in Figure 5-24, which shows the following:
Section 6: one VMS
Section 8: a green light ramp metering
Section 14: a platoon-flow ramp metering for platoons of 4 vehicles
Sections 1, 3, 4, 5 and 6: one two-lane loop detector that measures occupancy and count and
distinguishes between types.
Select the vehicle classes option (E) and create the classes private and public. Remember to
validate any changes when creating the classes with the carry-return.
Select sections 5, 19 and 20. Open them simultaneously by clicking on anyone of them. Select
the lanes folder. Write a ‘1’ on number of lanes, select public from allowed class of vehicles and
configure them as compulsory.
Section 7: set a solid line to prohibit lane change from lane 2 to lane 1, from 50 meters from the
beginning of the section to the end
Section 6: set a solid line to prohibit lane change from lane 3 to lane 2, from the origin to 50
meters from the origin of the section
Sections 5, 19 and 20: set 10 meter normal bus stops
Section 7: set a 10 meter bus bay
To ensure that you have the right type of sections choose the select all option (E) and doubleclick on one of the sections. This will open the. Click on the basic folder and, if the section type
is not arterial, change it.
GETRAM v4.0 Getting Started
24
TSS-Transport Simulation Systems
November 2000
Figure 5-24: Equipped network
5.10 Public line
To create a public line it is necessary to click first on the icon and then on any free area of the
model. The specific spot is not specially important because the created object (on the zoomed
area of figure 5-25, the yellow square with a front view of a bus in it) is just a graphical entity
GETRAM v4.0 Getting Started
25
TSS-Transport Simulation Systems
November 2000
on which to double click when we want to access or consult the data of the public line
represented by that image. It is a different case than that of other objects like detectors or VMSs,
that are linked to the section on which they are created.
Figure 5-25: Public Line
5.10.1 Routes
The process of editing a route is that of :
− Clicking on the sections that compose the route, one after the other in the same order and
direction as that the bus will follow.
− Selecting a section in which the line has a stop and then selecting on which of the stops on
that single section (in case there is more than one) we want the bus to stop. Finally clicking
on the assign stop button.
5.10.2 Time Tables
In the previous figure it can be seen that there is a second data folder besides that of the Route:
the one for time tables. In the next figure we can see its appearance.
The top left window is a list of the different time tables created up to that point. The New button
allows the creation of new time tables. The Delete button erases a selected time table. The
Duplicate button creates a new time table exactly like the one selected, in order to create a new
GETRAM v4.0 Getting Started
26
TSS-Transport Simulation Systems
November 2000
time table very much like an already existing one by cloning that time table and just correcting
the differences instead of creating the new one from scratch.
Once we select a time table we can see that the former buttons are activated and the different
periods of the time table appear listed in the Shedule Slices window.
The New, Delete and Duplicate have the same functionality as in the case of time tables, while
selecting one of the slices not only activates the Delete and Duplicate buttons but shows the
information associated to that slice in the right half of the dialog window (figure 5-26).
Figure 5-26: Interval Schedule
Figure 5-27: Fixed Schedule
A schedule slice is a time period during which the public vehicle generation follows a given
pattern, and the time spent by the public vehicles of the line on a stop is stays more or less
constant.
Type of schedule:
− Interval (figure 5-26): this type of schedule is selected when, for the time interval of the
selected slice, buses are generated periodically on regular intervals.
− Fixed (figure 5-27): a second option is provided, that of creating a list or time table with the
time of departure of each bus.
Linked to line: It allows to condition a given departure of the edited line to the arrival of another
bus of that same line or a different one during the simulation. The linked bus will check whether a
bus of the line it is linked to has arrived during the last period, before departing.
Vehicle Type: Previous to the edition of public transport lines we have to decide what sort of
buses we think convenient to simulate, and then associate them to the model through the Vehicle
Types… option of the PT menu. This option should be used in exactly the same way as with
result containers (pg. 32).
GETRAM v4.0 Getting Started
27
TSS-Transport Simulation Systems
November 2000
Exercise 5:
•
select vehicle types library… (E)
•
select vehicle types… (PT)
•
select the bus type and press the To Model button
•
close the Vehicle Types Library
•
select the bus type in the Vehicle Types window (PT) and select the Classes folder
•
select public and press the Add button
•
close the vehicle types window
click on the public line icon
click beside the origin of section 7
open (double click) the new object
with the public line dialog window opened, click on the following sections respecting the traffic
flow’s direction: Sections 7, 6, 26, 27, 20
select section 7 in the sections’ list in the dialog window and assign the bus stop
select section 20 in the sections’ list in the dialog window and assign the bus stop
select the Time Tables folder
click on New (time table)
select the unnamed time table
change its name to, for instance, morning and press enter
click on New (schedule slices)
select the 00:00:00 slice and change it to, for instance 08:00:00
input a scheduled frequency of a bus every 3 minutes with a standard deviation of 30 seconds
set a stop time of 30 seconds with a deviation of 10 seconds for the first bus stop (the one on
section 7), and of 20 seconds with a deviation of 10 seconds for the second bus stop (the one on
section 20)
Duplicate the scheduled slice, select it and change it to 08:30:00
Change the mean frequency of departure to 00:02:30
Duplicate the morning time table
change the duplicate’s name to, for instance, emergency and press enter
select the 08:00:00 slice
change the frequency to 2:30 and the deviation on the second stop to 20 seconds
select the 08:30:00 slice
change the frequency to 2:00 and the deviation on both stops to 20 seconds
click on OK
save the network
click on the public line icon
click beside the origin of section 19
open (double click) the new object
with the public line dialog window opened, click on the following sections respecting the traffic
flow’s direction: Sections 19, 24, 25, 4, 5
select section 19 in the sections’ list in the dialog window and assign the bus stop
select section 5 in the sections’ list in the dialog window and assign the bus stop
select the Time Tables folder and build a few time tables in the same way as with the first public
GETRAM v4.0 Getting Started
28
TSS-Transport Simulation Systems
November 2000
line (morning and emergency time tables)
5.11 Public Transport Plans
A public transport plan is an assignment of timetables to public transport lines. We may have
edited a set of timetables for each line for different situations (i.e. Monday morning, emergency,
holidays, etc), but at each simulation we are only going to use a particular timetable for each
line. Instead of having to choose one timetable for each line before every single simulation, we
can make the assignment just once at TEDI and save it as a PT Plan.
GETRAM v4.0 Getting Started
29
TSS-Transport Simulation Systems
November 2000
Exercise 6:
select PT Plans (PT)
click on New
select the new plan and name it (for instance: morning)
select line 1 in the available lines window
select the morning time table
click on Add
select line 2 in the available lines window
select the one of the time tables
click on Add
click OK
save network
5.12 Control plans
Control plans contain the definitions for traffic lights timings, their condition (i.e.: fixed), and
the working conditions for ramp metering. To create or alter a control plan the first thing is to
create a new one or to open an existing one (C). If the Control menu is then reopened, it can be
seen that the Junctions..., Metering... and General… options become accessible. If the
Junctions... option is chosen, a dialog window opens, with a list of the network junctions.
Junctions are selected by clicking on their id, listed in the dialog window.
GETRAM v4.0 Getting Started
30
TSS-Transport Simulation Systems
November 2000
Figure 5-28: Adjusting traffic light timing
The control plan for a selected junction is built up in the following way:
Set the type of junction: Uncontrolled (traffic lights deactivated), Fixed (traffic light timings
with the values set in the control plan), Autoadaptive (only meaningful in combination with an
external control plan implemented using the GETRAM Extensions of the GETRAM
environment).
Set the offset: specify at which point of the cycle the junction is situated at the beginning of the
application of the control plan. In other words, we set the moment when the cycle begins when
the control plan is initialized (e.g. an offset of –3 will mean that 0 seconds after the beginning of
the application of the control plan the state of the traffic lights will be that defined for second 3
in the control plan).
Press New button to create a phase, then select it and set the phase’s duration in the Duration
window (remember to validate the input data by pressing the ENTER button).
Select the signal groups active during that phase.
Press the New button again and repeat the procedure until the control cycle for that junction is
completed
Exercise 7: Set de Preferences-Fixed Phase Duration (E) option to yes. Create a new control
GETRAM v4.0 Getting Started
31
TSS-Transport Simulation Systems
November 2000
plan (C). Activate the junctions… option. Set the following phases for junction 2:
Type: fixed
Offset: 0 seconds
Phase 1: 38 s, Groups 1 and 2 active
Phase 2: 4 s, no active groups (interphase)
Phase 3: 24 s, Group 3 active
Phase 4: 4 s, no active groups (interphase)
Set the following phases for junction 4:
Type: fixed
Offset: 4 seconds
Phase 1: 38 s, Groups 1 and 2 active
Phase 2: 4 s, no active groups (interphase)
Phase 3: 24 s, Group 3 active
Phase 4: 4 s, no active groups (interphase)
Press the Dismiss button. Save (C) the control plan as, for instance, 08h00m.
If the Metering... option is chosen a dialog window opens, with a list of network meters.
For green-light metering, the dialog window is just a special case of the one for junctions, in
which there is only one turning, one traffic light and one phase. The parameters to be specified
are the cycle duration, the duration of the green-light phase of the cycle, and the maximum and
minimum acceptable values for this green-light time if it is changed by an external control.
Figure 5-29:Green Light metering
The type of metering also has to be
specified, but the types of metering have
the same significance as for the
junctions: remember that uncontrolled
means that the metering is deactivated
rather than nonexistent. (Figure 5-29).
For a delay meter the parameters are the
mean time vehicles spend stopped, and
the standard deviation from that mean.
(Figure 5-30).
For flow metering, the desired flow of
vehicles is specified, and with it, the
maximum and minimum flows allowed
in case of an autoadaptive metering
(GETRAM Extensions). The desired
flow is accomplished allowing the
vehicles through the metering in
packages, packages of a size defined with the type of metering at the time of positioning the
metering in its section. (Figure 5-31).
GETRAM v4.0 Getting Started
32
TSS-Transport Simulation Systems
November 2000
Figure 5-30: Delay metering
Figure 5-31: Flow Metering
If the General... option is chosen the following dialog window opens.
Figure 5-32: Control Plan Preferences
The parameters to be set in this dialog box are:
•
Plan Offset: the temporal origin for the junction’s offsets
•
Yellow Time: The duration of the yellow light between green and red light
•
Bound phase duration: to be used in combination the GETRAM Extensions
The meaning of the plan offset is the following: the offset for each junction is implemented
thinking on a specific moment for the application of the control plan, for instance eight in the
morning as can be appreciated in the image. That means that a -15 second offset set for a
specific junction will mean that at eight o’clock in the morning the state of the traffic lights for
that junction will be the one specified for second 15 of the cycle for that junction. If the control
plan is applied at some other time than eight in the morning the simulator will internally
recalculate the offsets. So if the plan is applied at nine o’clock in the morning the state of the
GETRAM v4.0 Getting Started
33
TSS-Transport Simulation Systems
November 2000
traffic lights of the junctions at that time will not be the one set in the control plan but the one as
if the control plan had been going on for one hour.
The way to apply the yellow light time is to take away these seconds from the red light time.
That is to say that if we have a 100 seconds cycle and a we set 50 seconds of green light time for
a traffic light and 2 seconds of yellow light time, the final result will be 50 seconds of green
light, 2 seconds of yellow light and 48 seconds of red light.
Exercise 8:
Open the 08h00m control plan and activate the metering… option (C)
Select the flow metering (Type: Flow) and characterize it with an initial vehicle flow rate of 350
vehicles/hour (set all three values before validating the changes by pressing ENTER)
Set it as of Fixed type
Select the green time metering (Type: Green) and characterize it with a cycle of 60 seconds and
an initial green time of 30 seconds
Set it to Fixed
Press the Dismiss button
Open the General option (C) and set a yellow time of two seconds and a plan offset of 8 hours.
Click on OK
Save the control plan (C)
Go to junctions, select junction 2 and change the time for phase 1 to 44 seconds and the time for
phase 3 to 28 seconds
Select junction 4 and change the time for phase 1 to 44 seconds and the time for phase 3 to 28
seconds
Go to metering and change the initial flow of the Flow metering to 450 vehicles/hour
Change the initial green time of the Green Time metering to 40 seconds
Save the control plan (C) as 08h30m. Close the control plan (C).
5.13 Result Containers
A result container is where the results of a simulation are stored, and where the traffic data (flows,
turning proportions) necessary for a traffic simulation can be stored. The simulator has to know all
turnings, the fraction of vehicles that take each turning at a junction, how many vehicles occupy the
network at the beginning of the simulation, etc.. Consequently, the first step is to create a new result
container and save it (R). The next step is to select the vehicle modalities that are going to
circulate. This is done by choosing the vehicle types library… option: first at the Edit menu and
then, without closing the Vehicle Types window from the Edit menu, at the Results menu. Once
we have both windows open, vehicle modalities are added to the model either bringing them
from the library (to model button) or creating a new type. In this second case, we can decide to
create a model’s type and then decide whether we want to take it to the general library (to lib
button) or the other way around. A new state can now be created. We can create either an empty
state or a default state. An empty state is one that it is initially created with no vehicles in the
network, while the default state is one with uniform vehicle density throughout the network. The
real creation of the state comes from characterizing the initial conditions of each section (i.e.:
turning proportions), which is what the Sections... option is for. The window opened by this
option is the one shown in Figure 5-33. Here we see the following information: in section 5
(named East Exit), cars entering from section 2 have a 32% chance of going to section 21. There
are 0.7 cars on the section that are going to section 21 in the first moments of the simulation, 0
GETRAM v4.0 Getting Started
34
TSS-Transport Simulation Systems
November 2000
stopped cars, and the cars try to flow in this direction with an average speed of 50 km/h.
Another necessary input is the average entrance flow of vehicles whenever we characterize an
entry to the network; in the example of Figure 5-33 the entrance flow of cars is shown to be 417
cars/hour, but in this case this number (created as default data) is ignored, as it has no meaning
for a section without an unbounded entry. Information on a particular section is displayed by
clicking on its id in the dialog window. In the dialog window the names of the sections are also
displayed as well as their ids. This is so because it’s easier to find a particular section if it has a
recognizable name in addition to an id.
Figure 5-33: Setting the traffic characteristics of a section
This characterization process has to be repeated for each vehicle class coming from each entry
section.
Exercise 9:
•
Create a new result container (R). Save it as, for instance, morning_peak
•
Select vehicle types library… (E)
•
Select vehicle types… (R)
•
Select the car type and press the To Model button
•
Select the truck type and press the To Model button
GETRAM v4.0 Getting Started
35
TSS-Transport Simulation Systems
•
•
•
•
•
•
•
November 2000
Close the Vehicle Types Library
Select the car type in the Vehicle Types window (Model) and select the Classes folder
Select private and press the Add button
Select the truck type and associate it to the private class
Close the vehicle types window
Create a New State as Empty (R)
Activate the sections... option (R)
Characterize the state in the following way:
For the car vehicle type
•
Section 1: 25% to section 17, 75% to section 4, 1200 cars/hour of entrance flow.
•
Section 4:
coming from section 1: 25% to section 10, 75% to section 5.
coming from section 25: 50% to section 10, 50% to section 5.
•
Section 6:
coming from section 8: 0% to section 26, 100% to section 3.
coming from section 7: 30% to section 26, 70% to section 3.
•
Section 7: 1100 cars/hour.
•
Section 9: 300 cars/hour.
•
Section 15: 800 cars/hour.
•
Section 18: 50% to section 21, 50% to section 23.
•
Section 19: 400 cars/hour.
•
Section 21: 90% to section 28, 10% to section 31.
•
Section 23:
coming from section 22: 0% to section 10, 50% to section 5, 20% to section 26,
30% to section 3.
coming from section 18: 25% to section 10, 25% to section 5, 25% to section 26,
25% to section 3.
•
Section 25: 30% to section 2, 50% to section 17, 20% to section 4.
•
Section 27: 70% to section 20, 30% to section 24.
•
Section 29: 50% to section 31, 50% to section 22, 300 cars/hour.
•
Section 30: 75% to section 22, 25% to section 28, 300 cars/hour.
For the truck vehicle type
•
Section 1: 30% to section 17, 70% to section 4, 200 trucks/hour of entrance flow.
•
Section 4:
coming from section 1: 20% to section 10, 80% to section 5.
coming from section 25: 50% to section 10, 50% to section 5.
•
Section 6:
coming from section 8: 0% to section 26, 100% to section 3.
coming from section 7: 30% to section 26, 70% to section 3.
•
Section 7: 200 trucks/hour.
•
Section 9: 10 trucks/hour.
•
Section 15: 200 trucks/hour.
•
Section 18: 50% to section 21, 50% to section 23.
•
Section 19: 30 trucks/hour.
•
Section 21: 90% to section 28, 10% to section 31.
•
Section 23:
coming from section 22: 5% to section 10, 55% to section 5, 15% to section 26,
25% to section 3.
GETRAM v4.0 Getting Started
36
TSS-Transport Simulation Systems
•
•
•
•
November 2000
coming from section 18: 25% to section 10, 25% to section 5, 25% to section 26,
25% to section 3.
Section 25: 33% to section 2, 33% to section 17, 33% to section 4.
Section 27: 70% to section 20, 30% to section 24.
Section 29: 50% to section 31, 50% to section 22, 20 trucks/hour.
Section 30: 80% to section 22, 20% to section 28, 20 trucks/hour.
The missing sections (like section 16 and 17) are those that are embedded in the network (are not
input sections to the model for the vehicles) and have a unique destination, so that there are no
turning proportions and no entrance flow and it is not necessary to characterize them.
Press the OK button
Save state as (R) 08h00m at time 08:00:00
Save the state as (R) 08h30m at time 08:30:00. Go to Sections (R) and implement the following
changes:
For the car vehicle type
•
Section 7: 1200 cars/hour.
•
Section 9: 400 cars/hour.
Section 19: 500 cars/hour.
Press the OK button
Save the state (R)
Close the state (R)
Save the result container (R)
Close the result container (R).
5.14 Centroids
When working with O/D matrices, the centroids located in a network represent the origins and
destinations. Each centroid is linked to the network through one or more connectors. A connector is
a virtual entity that the vehicles use to jump from/to the centroid to/from the entry/exit sections or
nodes, see Figure 5-34.
GETRAM v4.0 Getting Started
37
TSS-Transport Simulation Systems
November 2000
Figure 5-34: Opened a centroid & connectors
To create a new centroid
Click on the Centroids Icon, (a double circle shape). Click on the drawing area at the place you
want the centroid to be located. A centroid is then drawn at that spot and clicking twice on it the
Centroids Dialog Window appears. In this dialog you may decide to enter a name for the
centroid and then proceed to define the connections.
To define connections
If you want to define a "To"-type connection (i.e. 'To Object', thus requiring a traffic Source or
Origin), just click first on the New To button (Centroid Dialog) and then click on the section (or
node) you want to establish the connection to. If you want to define a type "From" connection
(means 'From Object', so a Sink or Destination of traffic), first click on the New From button
and then click on the section (or node) you want to connect the centroid to. To change an
existing "To"-type connection into a 'From' -type connection, or vice-versa, you must delete the
connection (using the Delete button) and create it again. Once the connections have been
defined, click on the Update button to save the changes. The Automatic and the Consider
Percentages toggles are used to configure the way in which the vehicles are entered through the
connectors. It works as follows:
if Auto… = off and CPerc. = off: the vehicles are distributed among the different connectors
taking into consideration their destinations, that is, they are introduced through those connectors
representing the shortest paths.
if Auto... =off and CPerc.. =on: the vehicles are entered in the proportions established by the
fixed percentage associated with each connector.
if Auto... =on and CPerc.. =off: the vehicles are equally distributed among all the connections.
GETRAM v4.0 Getting Started
38
TSS-Transport Simulation Systems
November 2000
A centroid can also be connected to and connected from an internal section (non-input section)
or junction. This means that any section or junction in the network can be a 'source' and 'sink' of
traffic to model, for instance, a parking lot.
Exercise 9: Open the show objects option. Select to show centroids, their id and their
connectors. Create the following centroids:
Centroid 1 (id=1): de-select the consider percentages toggle, connect it to section 9 and section
15 (‘to’ connectors).
Centroid 2: connected to section 7 (‘to’ connector) and section 5 (‘from’ connector).
Centroid 3: connected to section 16 (‘from’).
Centroid 4: connected to section 30 (‘to’) and section 31 (‘from’).
Centroid 5: connected to section 29 (‘to’) and section 28 (‘from’).
Centroid 6: connected to section 1 (‘to’) and section 2 (‘from’).
Centroid 7: connected to section 19 (‘to’) and section 20 (‘from’).
Centroid 8: de-select the consider percentages toggle, connect it to node 5 (‘to’) and node 5
(‘from’).
With this configuration we have that centroid 1 represents an origin, centroid 3 represents a
destination, and the rest represent origin and destination simultaneously.
5.15 O/D Matrices
Once a set of centroids has been edited as a configuration of origins and destinations, we are ready
to edit an O/D matrix. To define a matrix we have to set the different time periods for a time-sliced
matrix, as well as setting the vehicle flows from each origin to each destiny for each vehicle type
and time interval. After creating and saving a new O/D matrix (OD), the first thing is to associate
with it the desired vehicle types activating that option (OD) in the same way as with result
containers (section 4.6). If the Statements option is then chosen, the window shown in Figure 5-35
opens.
Figure 5-35: Statements dialog window
GETRAM v4.0 Getting Started
39
TSS-Transport Simulation Systems
November 2000
The first thing is to set the time period that is going to characterise the matrix. This is done by
clicking on the set button to open the window in Figure 5-36. First we define the time period in the
From, To boxes. If a time-sliced matrix is wanted, there are two options. When the different
intervals have the same time length, we write it down in the Set Interval Length of box and a list of
the different intervals will automatically appear in the Subintervals list when the Set button is
pressed.
Figure 5-36: Setting the time characteristics of the matrix
When the intervals have different time lengths, the list is generated by creating the intervals one
by one: clicking on the New button, setting the time length in the boxes at the bottom, and
pressing the Enter key to validate the information.
Once the time characterization of the matrix has been completed, it is time to go back to the
parent window, the Statements window. Now traffic data has to be fed into the matrix. There are
several ways of doing this depending on the Vehicle Modality and Time Interval options chosen.
If these tags are left as they appear (‘all’ and ‘all’), the traffic information will involve all time
intervals and all vehicle modalities; which means that if we introduce a ‘2100’, for instance, in
the (2,4) OD pair, this will mean that a total of 2100 vehicles, considering all classes, will
circulate from centroid 2 to centroid 4 during the total length of the simulation. So, in a matrix
with two vehicle classes and three time intervals, 1050 vehicles type 1 and 1050 vehicles type 2
will circulate from centroid 2 to centroid 4, or 700 vehicles will flow within each one of the
three intervals. If ‘vehicle type 1’ and ‘1’ were selected from the tags before mentioned, we
would see a ‘350’ in position (2,4). The different combinations of these two tags give us all the
partial views of the O/D matrix that may be useful: the data on the different time intervals
and/or the data on the different vehicle modalities.
If we have different traffic densities in different time intervals and we do not have the same
proportion of vehicles of each class, data has to be introduced in another fashion. The data is
introduced independently for each time interval and each vehicle class. Recipe: Set class tag to
first vehicle class and interval tag to first time interval. Introduce data and change class tag to
second vehicle class, etc. Repeat for the rest of the time intervals.
GETRAM v4.0 Getting Started
40
TSS-Transport Simulation Systems
November 2000
NB: Always press Enter or change matrix position after introducing data in a position. before
changing the interval tag or the class tag. When introducing specific data for each vehicle
modality and time interval, beware and always check the tags before entering data: entering
data with one of the tags set to ‘all’ will update all the information for that origin-destination
pair; that is, it will be equally distributed across the different vehicle modalities and/or time
intervals, deleting any data introduced previously.
If we already have all the OD information stored in some other application or format, in order to
save us all this work it is possible to import the traffic demand to an OD matrix as long as TEDI
can have access to a text file in tabular format. The precise indications for such an import
maneuver are detailed in the TEDI user’s manual.
Exercise 10: Create a new O/D matrix and save it as, for instance, morning_peak.
•
Select vehicle types library… (E)
•
Select vehicle types… (OD)
•
Select the car type and press the To Model button
•
Select the truck type and press the To Model button
•
Close the Vehicle Types Library
•
Select the car type in the Vehicle Types window (Model) and select the Classes folder
•
Select private and press the Add button
•
Select the truck type and associate it to the private class
•
Close the vehicle types window
•
Activate the Statements… option (OD)
•
Press the Set… button
•
At the from-to spaces set the simulation time from 8:00 to 9:00
•
At Set Interval Length of write ‘30’ and press the Set button
•
Press ‘OK’
•
At the Statements window change Vehicle Type toggle to the ‘car’ vehicle modality (we will
not enter separate information for each time interval in order not to make the exercise to
tiresome)
•
Set the following O/D pairs:
From centroid 1: 30 cars to centroid 2, 800 to 3, 22 to 4, 30 to 5, 250 to 6, 50 to 7 and 50 to 8.
From centroid 2: 60 to 3, 34 to 4, 60 to 5, 950 to 6, 60 to 7 and 50 to 8.
From centroid 4: 50 to 2, 30 to 3, 30 to 5, 30 to 6, 30 to 7 and 50 to 8.
From centroid 5: 50 to 2, 50 to 3, 24 to 4, 20 to 6, 20 to 7 and 20 to 8.
From centroid 6: 700 to 2, 50 to 3, 34 to 4, 100 to 5, 100 to 7 and 100 to 8.
From centroid 7: 90 to 2, 50 to 3, 34 to 4, 100 to 5, 90 to 6 and 90 to 8.
From centroid 8: 50 to 2, 50 to 3, 34 to 4, 50 to 5, 50 to 6 and 50 to 7.
•
Save the O/D matrix (OD)(it is not necessary to close the matrix)
•
At the Statements window change the ‘car’ vehicle modality to ‘truck’
•
Set the following O/D pairs:
From centroid 1: 80 trucks to centroid 3, 6 to 4, 6 to 5, 6 to 6, 6 to 7 and 6 to 8.
From centroid 2: 10 to 3, 6 to 4, 10 to 5, 10 to 6, 10 to 7 and 10 to 8.
From centroid 4: 6 to 2, 6 to 3, 6 to 5, 6 to 6, 6 to 7 and 6 to 8.
From centroid 5: 10 to 2, 6 to 3, 4 to 4, 6 to 6, 6 to 7 and 6 to 8.
From centroid 6: 30 to 2, 10 to 3, 6 to 4, 10 to 5, 10 to 7 and 10 to 8.
From centroid 7: 20 to 2, 10 to 3, 4 to 4, 10 to 5, 10 to 6 and 10 to 8.
GETRAM v4.0 Getting Started
41
TSS-Transport Simulation Systems
November 2000
From centroid 8: 6 to 2, 6 to 3, 4 to 4, 6 to 5, 6 to 6 and 6 to 7.
•
Press the OK button, save the matrix (O/D) and close it (O/D).
5.16 Opening a network
After starting TEDI, the first operation is to choose whether to open a new traffic network or an
existing one. At the beginning of the manual a new one was created. If the intention is to
recover a network to continue working with it, then the procedure is to choose the Open
network... option (F). This opens the modal dialog box shown in Figure 5-37.
Figure 5-37: Dialog box for opening an existing network
GETRAM v4.0 Getting Started
42
TSS-Transport Simulation Systems
November 2000
Figure 5-38: Preview the network “Barcelona”
The box at the left of the dialog lists the files in the current directory. The left-most column in
the list shows the file type: folder icon for directory, paper sheet icon for a possible network.
The user can enter a directory by double-clicking it or pressing the Open button that appears
instead of the Load one once a directory is selected. In order to move upwards to the previous
directory, a combo box on top of the list box allows access to a parent directory. A record of the
10 most recently loaded networks and 10 most recently visited directories is kept at the Files
and Directories headers at the top of the windows. By selecting one of these networks it is
automatically selected for loading, and by selecting one of the directories the browser
automatically jumps to it, saving us the trouble of navigating through the directory structure to
the intended final location. Once the desired network appears in the list box, selecting it in the
list box and clicking on the ‘Load’ button loads it.
GETRAM v4.0 Getting Started
43
TSS-Transport Simulation Systems
November 2000
6 AIMSUN2 MAIN WINDOW
The AIMSUN2 graphical user interface provides all the necessary tools for preparing simulation
experiments, selecting scenarios to simulate, defining simulation parameters, interacting with the
simulator while it is running, viewing the animated graphical output and analyzing statistical
results.
This user interface is based on a windows system. The main window has four parts or areas: the
menu bar, the tool bar, the information area and the network displaying area. Figure 6.1 shows this
main window, where an example network has been loaded.
Figure 6-1: AIMSUN2 Graphical User Interface
6.1 Menu Bar
The menu bar is located on the top of the window and features seven options: File, Objects, View,
Experiment, Run, Reports and Window (Figure 6-2).
Figure 6-2: Menu Bar
GETRAM v4.0 Getting Started
44
TSS-Transport Simulation Systems
November 2000
Although most of these are self-explanatory, a brief description of each menu and its options is
given in Appendix II.
6.2 Tool Bar
The Tool Bar (Figure 6-3) is located on the left side of the main window and has three icons
corresponding to the following functions:
Figure 6-3: Tool Bar
Select (arrow): the mouse cursor becomes an arrow; the user can open any network object by
double-clicking on it.
Zooming (lens): the mouse cursor becomes a magnifying lens; clicking on the mouse left
button it produces a zoom-in, while pressing the shift key at the same time produces a zoomout. This function is implemented in the middle button of the mouse.
Incidents: the mouse cursor becomes an arrow; clicking on a lane of any section the user can
define incidents (lane blockages).
6.3 Information Area
The experiment information area is located at the bottom of the main window and displays the
names of the network, traffic demand data and control plan being simulated as well as the
simulation clock and the scale of the network image. The name of a control system, if
AIMSUN2 is being controlled by some External Control, is also displayed here together with
any other GETRAM extensions, (GETRAM kit 1), as well as the name of the Particular Models
that are being used in the current experiment, if any.
Figure 6-4: Information Area
6.4 The Simulator Environment
The different ways of moving around the real world area are exactly the same as those for the
TEDI editor explained in chapter 2.
GETRAM v4.0 Getting Started
45
TSS-Transport Simulation Systems
November 2000
7 A QUICK START TO AIMSUN2
This section introduces you to AIMSUN2 use by means of a simple example. It covers the basic
functions of the user interface required to perform a simulation experiment. For the sake of brevity,
each step is described in the simplest terms; more expansive explanations are given in the User’s
Manual. The functions illustrated here are the loading of a network, the preparation of a simulation
experiment, the running of the simulation and the visualization of statistical reports.
7.1 Loading a Model
A traffic network model can consists of four parts: the network description, the traffic demand
data, the traffic control plan and the public transport plan. Therefore, to load a traffic network
model you have to load these four components using the following commands from the File
menu:
7.1.1
Load Network Data
The first step consists on loading the network topology, which includes information regarding
sections, junctions, turnings, lanes, etc. To do so, select the command Load Network (F) and the
Open Network window will appear. The window is exactly the same as the Open Network
window for TEDI, and so it is the way you browse and load the network (section 4.9).
7.1.2
Load Traffic Demand Data
Once the network has been loaded you can proceed to load the specific traffic demand data you
want to use to feed the network. The traffic demand data may de defined in two different ways:
1) the input flows and turning proportions (section 4.6) 2) an O-D matrix (section 4.8). They are
exclusive, so you may select one option or the other for a given simulation run, but not
simultaneously both. Figure 7-1 shows the dialog window that appears after activating the Load
Traffic Result (F) command.
GETRAM v4.0 Getting Started
46
TSS-Transport Simulation Systems
November 2000
Figure 7-1: Load Traffic Result Window
Each set of demand data defined as input flows and turning proportions is referred to as a Traffic
Result. A network may have a number of Traffic Results. A list with the available results for the
current network is displayed. Select one of them by clicking on it and the list of states composing
this result will appear. In the example network select the ‘uno_sim’ traffic result. A list of five
states, from time 00:00:00 to time 1:00:00 will appear in the states list box. You may select the ones
to be implemented by clicking on them. Then click on the Load button to accept the result and
states selected. For instance, if states 00h00m and 00h30m were selected, the simulation would
make use of the input flows and turning
proportions in 00h00m for half an hour from the
beginning of the simulation. At that moment the
input flows and turning proportions would
change to those contained in 00h30m. The name
of the Traffic Result is displayed on the
information area of the main window.
Had we selected to load an O/D matrix, the
window shown in Figure 7-2 would have
opened.
Figure 7-2: Load O/D Matrix window
GETRAM v4.0 Getting Started
47
TSS-Transport Simulation Systems
7.1.3
November 2000
Load Traffic Control Data
The traffic control plan is optional and it is only required when controlled traffic signals or ramp
metering are defined in the network model. The control plan consists of specifying the timings
for the stages of all the controlled junctions, and the timings or volumes defining the ramp
metering control. To load one or more control plans we use the Load Control (F) option that
opens the Load Control Plan window shown in Figure 7-3.
Figure 7-3: Load Control Plan Window
This window shows a list box containing the control plans suitable for the current network. A
plan is selected by clicking on it, and then setting the desired time of application of the plan
(remember to press ENTER) in the time-editing window to the right of that with the name of the
plan. If more than one control plan is going to be used repeat the process, and then press the
Load button. The name of the active during each time period will appear in the corresponding
dialog box of the information area at the bottom of the main window.
Exercise 11:
•
load (F) the (c:/program files)/getram/data/samples/example network
•
load (F) the uno_sim result container
•
in the opened window select the states 00h00m and 00h30m
•
press the Load button
•
load (F) the control plans plan1 and plan2:
select plan1
select plan2 without deselecting plan1
set the time for its activation at 00:30:00 (write ‘30’ in the middle window of the triplet and
press ENTER)
•
press the Load button.
7.2 Preparing the Experiment
Before running a simulation experiment, different sets of parameters have to be defined. These
parameters are divided into six categories:
Run Time Parameters: (e.g. simulation length, warm-up period).
GETRAM v4.0 Getting Started
48
TSS-Transport Simulation Systems
November 2000
Modelling Parameters: related to the vehicle behaviour models (e.g. reaction time).
Replications…: dialog window to set a seed for the random number generator or to program the
automatic execution of several simulation experiments or replications.
Output: This menu gives place to three options.
Output Location: where to locate the output files or database.
Statistics: whether or not to produce statistical output and how often.
Detection: whether or not to produce detection output and how often.
Route Choice Parameters: related to the route choice models.
Environmental Models: optional models concerning fuel consumption and pollution emission.
These parameters are assigned default values and the user may view or change them using the
set of commands included in the Experiment option from the menu bar. You may, for instance,
have a look at the Run Time Parameters selecting Run Time (EX), see Figure 7-4
Figure 7-4: Run time parameters window
These parameters are explained in more detail in the User’s Manual, and are fundamental to the
calibration of a model. For the purpose of this first example we will just use the default
parameters.
7.3 Running the simulation
Once a network and a traffic result (or an OD matrix) have been loaded (the control plan is
optional) the simulation is ready to run. Now the option Run of the menu bar will appear active
(it appears deactivated before loading both the network and the traffic demand data). To run the
simulation with the animated display select the Run option (To see the individual vehicles
moving, make sure that the scale is set to some value lower than 1:3000 or just select the
command Minimum Cars Scale (V)). The simulation can run faster in ‘batch mode’ which
means without the animation. This can be done selecting the option Batch (Run). You can
switch from one mode to the other at any time by selecting the appropriate menu command or
by pressing <Control><R> for Run or <Control><B> for Batch. The simulation will halt when
the command Stop (Run) (or pressing <Control><S>) is selected, and it will begin again from
that same point when Run or Batch are chosen again. It will stop definitively when the
GETRAM v4.0 Getting Started
49
TSS-Transport Simulation Systems
November 2000
simulation clock reaches the end of simulation time. Another interesting option is that of Real
Run. On fast computers and/or small networks the simulation may run too fast, the Real Run
option offers the possibility of running it at real time or twice or three times faster than the real
time speed.
Exercise 12:
Select the Stop At… option (Run)
In the opened window select the Stop At Time toggle (this activates the editing windows) and
write down 00:20:00.
7.4 Viewing Statistics
Besides the animated display of the simulation, AIMSUN2 also outputs some statistical measures,
such as flow, speed, density, travel time, delay time, etc.. These variables can also be presented
graphically.
7.4.1
Streams
AIMSUN2 offers the possibility of defining streams as a set of sections. The usefulness of these
streams is that it is then possible to also get statistics for the set of sections that form the stream as a
whole.
Figure 7-4: Streams
Streams are defined through the use of the streams dialog window selecting-deselecting the
sections belonging to the edited stream by clicking on them.
GETRAM v4.0 Getting Started
50
TSS-Transport Simulation Systems
7.4.2
November 2000
Reports
To display a report of the statistical results obtained for the current simulation experiment click
on the Current Report / Statistics (Out) command. You will only be able to do so if the
simulation is not running. Then the Statistics Report window will appear, as shown in Figure 75.
Figure 7-5: Statistics Report Information
The desired format of the statistical information is selected from this window. The statistic
measures can be presented according to two types of time period:
Global: Statistical data gathered from the beginning to the end of the simulation experiment.
Periodic: Statistical data gathered over certain user-defined time periods
Select global or periodic by clicking on the appropriate toggle button in the
Statistics Report window. When selecting Periodic, the list with the different
time periods becomes active and you have to select a period by clicking on it.
The statistical measures are presented at several levels of aggregation:
System: Statistics for the entire network.
Sections: Statistics for each individual section.
O/D matrix: Statistics
Streams: Statistics for the streams selected from those that have been defined (see section 7.1.1).
PT Lines: Statistics for Public Transport Lines.
To select system level statistics, press the ‘System Report’ button and the System Global Report
window will be displayed, as shown in Figure 7.6 (provided that you have previously selected
Global scope).
GETRAM v4.0 Getting Started
51
TSS-Transport Simulation Systems
November 2000
Figure 7-6: System Global Report Window
The information that has to be specified in the case of statistical information for sections is:
Sections: for which sections you want to get results (all, entrances, exits...)
Turnings: whether or not you want the section information to be detailed for each turning.
In Figure 7.7 the data for the two-minute period running from 00:08:00 to 00:10:00, broken down
by vehicle type, has been chosen for a selection of sections (the ones with ids 28, 1, 15, 8). Section
are selected-deselected by clicking on them. Pressing the OK button produces the following
window:
Figure 7-7: Section Report
The next folder is the one related to statistics on Origin-Destination pairs. Again we have a set of
different options. In the case of Figure 7.8 selection of only two pairs has been chosen (pairs 1-6
and 6-9). The pairs can be selected by writing them in the editing windows at the bottom of the
folder or by opening the browser and clicking on pairs of interest.
GETRAM v4.0 Getting Started
52
TSS-Transport Simulation Systems
November 2000
Figure 7-8: Selecting O/D pairs
Figure 7-9: Selecting Pair Centroids
The result of pressing the OK button is shown in Figure 7-10 in the next page:
GETRAM v4.0 Getting Started
53
TSS-Transport Simulation Systems
November 2000
Figure 7-10: Selecting Pair Report
The last case, covering streams, consists of selecting the streams of interest and pressing the OK
button. In Figure 7-11and Figure 7-12 we see stream ‘dos’ selected and the result of pressing the
OK button.
.
Figure 7-11: Selecting Streams
GETRAM v4.0 Getting Started
54
TSS-Transport Simulation Systems
November 2000
Figure 7-12:Selecting Stream Report
7.4.3
Statistical Charts
Another possibility is that of viewing a graph of the evolution of a traffic variable over time.
This is done by selecting the Current Graphics option (Out). This offers to us two choices, a
time plot or a whole network visualization. The time plot allows us to click-select the identifiers
of the sections we want to be represented (figure 7.13) and visualize the time evolution of a
certain traffic magnitude along the simulation (figure 7.14). Up to nine sections can be selected
in this way. We also select the variable we are interested in from the following: flow, speed,
density, travel time, delay time, stop time, stop number, queue length maximum and queue
length mean. Then the ‘Display’ button is pressed and the time graph is displayed (Figure 7-14).
The Whole Network option allows us to choose a certain traffic variable and get a coloring of the
whole network according to the values of that variable for each section (figure 7.15).
Figure 7-13: Chart dialog window
GETRAM v4.0 Getting Started
55
TSS-Transport Simulation Systems
November 2000
Figure 7-14: Graphical Display of Statistical Data
Figure 7-15: Whole Network variable representation
GETRAM v4.0 Getting Started
56
TSS-Transport Simulation Systems
November 2000
8 PUBLIC TRANSPORT MODELLING
There is a particular module for Public Transport Modeling in AIMSUN2, which is applied
whenever a Public Transport Plan is loaded. A public transport plan consists in the definition of
bus lines (routes, reserved lanes and bus stops) and the timetables (departures schedules, stop
times and type of vehicles) for each line.
8.1 PUBLIC TRANSPORT OBJECTS
The main objects that appear in the Public Transport Modeling are the Bus Lines, the Bus Stops
and the Timetables. They are explained in the following sections.
8.1.1
Bus Lines
A Bus Line is composed of a route, a set of bus stops and a timetable. The route is defined as a
set of consecutive sections (or polysections) trough that each bus of the line will have to pass.
The first section of the route is the start section, where the public transport vehicles are input
into the network. The frequency of departures is defined in the Timetable. The last section of the
bus line is the end section, where the vehicles are removed from the network. Each line has also
a number of stops, where the buses will have to stop along their trip during a certain amount of
time. The stop times are also defined in the Timetable.
•
There can be as many Bus Lines as desired in a network. To see the existing bus lines use
command ‘View/Public Transport’ and the Public Transport Dialog shown in figure 8-1 will
appear. Clicking on a line name in the Lines list box will cause the sections composing the
line to be highlighted in a different color on the network.
Figure 8-1: Public Transport Dialog
This dialog has three columns:
• Color: a mark that indicates whether vehicles of this line will be colored in a different color
when selecting ‘View/Vehicle Coloring/Public Transport’ option.
GETRAM v4.0 Getting Started
57
TSS-Transport Simulation Systems
•
•
November 2000
Line Id.: identifier number of the bus line.
Name: name of the bus line
Click on the ‘Open’ button after selecting a line or just simply double-click on the lines list box
and the Public Transport Line Dialog shown in figure 8-2 will appear. In this dialog the list of
the sections composing the route is provided. It is also indicated in what sections of the route
there are stops allocated to the line.
Figure 8-2: Public Transport Line Dialog
8.1.2
Bus Stops
Bus Stops are the places along the Bus Line where public transport vehicles will have to stop
during a certain amount of time in order to pick up or drop off passengers. Each bus stop
belongs to one only section, while a section may have several bus stops. Vehicles belonging to
different bus lines can use a particular bus stop. There are three types of bus stops: normal, bus
bay and terminal.
At a normal stop a bus will stop on the street lane, thus blocking the traffic in that lane.
The bus bay stop provides a special short lane for the buses to stop, so they do not block traffic
in the street. They have a capacity that depends directly on the bay length and the length of the
buses that stop there.
Finally the terminal stop is used to model bus stations or bus parking. They have room for a
limited number of buses, which is the capacity that is defined as an attribute of the stop.
The Bus Stop Dialog shown in figure 5-3 appears after clicking on a bus stop icon in the
network display. It contains information such as the type, position and length of the bus stop.
GETRAM v4.0 Getting Started
58
TSS-Transport Simulation Systems
November 2000
Figure 8-3: Bus Stop Dialog
On the other hand, a list of all stops in the network is displayed in the ‘Stops’ tab folder of the
Public Transport Dialog that is obtained through the ‘View/Public Transport’ command (see
figure 8-4). For each stop the following data is provided: Stop Id. Number, Stop name, Stop
type, Identifier of the section where the stop is located, Lane of the section where the stop is
located (numbered from 1, the rightmost to n, the leftmost), Position of the stop in meters,
measured from the beginning of the section, Length of the stop in meters.
Clicking on a Stop name in the list box causes the Id’s of the lines allocated to this stop to be
shown in another list box.
Figure 8-4: Public Transport Stops Details
GETRAM v4.0 Getting Started
59
TSS-Transport Simulation Systems
8.1.3
November 2000
Timetables
Timetables data is presented in the ‘Time Table’ tab folder of the Public Transport Line Dialog shown in
figure 8-5. This dialog is recalled either by clicking on the Line icon in the network or through the
‘View/Public Transport’ command.
A Timetable consists of a set of Time Slices, each one indicating the Bus Departures Schedule and the
Stop Times at each bus stop allocated to the line.
Figure 8-5: Public Transport Line. Timetables.
8.2 PT VEHICLE MODELLING
Public Transport Vehicles are generated and input into the network through the first section of
each bus line and they drive along the network following the bus line and performing the
corresponding stops. The arrival times are obtained according to the corresponding bus
schedule, defined in the Timetable.
Public Transport Vehicles normally behave as any other vehicle according to car-following and
lane-changing models. Only in case of driving in a section (or polysection) where there is a bus
stop allocated to that line, they change their normal behavior and act properly in order to stop in
the appropriated place. It means that they will try to move to the appropriate lane before
reaching the bus stop and they will decelerate until stopping in the stop place.
If the bus stop is full when a new bus arrives, i.e. there is some bus inside and there is no room
for additional buses, the bus will wait until some bus leaves and there is enough space available.
A bus will be stopped during a time at the bus stop, according to the timetable, and then it will
start and continue its route following the bus line until the next stop.
GETRAM v4.0 Getting Started
60
TSS-Transport Simulation Systems
November 2000
9 OTHER AIMSUN2 UTILITIES
The simple simulation experiment described in chapter 7 should have familiarized you with the
basic features of AIMSUN2. But the simulator offers plenty of other interesting possibilities, which
may be classified in two groups: simulation analysis and dynamic simulation variability. The use of
these features will not be explained in detail here. They will, however, be outlined so that the user
may be aware of their existence and refer to the User’s Manual for more in-depth information.
9.1 Simulation Analysis
9.1.1
Vehicle Coloring
This option of the view menu allows up to nine different colors to be assigned vehicles
according to:
The vehicle type each vehicle belongs to.
The turn that a vehicle plans to take in the next node (Figure 9.1).
The origin centroid that has generated the vehicle.
The destination centroid towards which the vehicle is headed.
Whether the vehicle is lost (has lost its path under a simulation using an OD matrix) or not.
The last option (Section…) is only activated once the simulation has begun, and allows vehicles
to be visualised in different colours according to their destination
Figure 9-1: Turning-dependent coloring
GETRAM v4.0 Getting Started
61
TSS-Transport Simulation Systems
November 2000
Figure 9-2: Object Information Box
GETRAM v4.0 Getting Started
62
TSS-Transport Simulation Systems
9.1.2
November 2000
Opening an object
Double-clicking on an object opens its associated window, where everything concerning it is
displayed. An example of this is shown in the next image.
Figure 9-3: Opened Junction
9.1.3
Opening a vehicle
Stopping a simulation and double-clicking on a vehicle will open a window containing all the information on
the vehicle, e.g., origin, destination, speed... And it will also allow us to follow the vehicle throughout the
simulation as if it was a floating car.
GETRAM v4.0 Getting Started
63
TSS-Transport Simulation Systems
November 2000
Figure 9-4: Opening a vehicle and following it
9.2 Dynamic Simulation Variability
This section includes those features of AIMSUN2 that allow the dynamic alteration of the
conditions set for the simulation experiment. The two main features in this case are Actions and
Incidents.
9.2.1
Actions
Actions are used to model the effect of the different electronic messages from the VMSs on the
drivers reading those messages. The parameters of an action are the sections where it takes effect
and whether it changes the top speed of the section, the turning proportions, the input flows or the
destinations (Figure 9.5). Once the desired actions have been designed, it is then possible to match
the messages of each VMS to the actions that take place when they are activated (Figure 9.6).
GETRAM v4.0 Getting Started
64
TSS-Transport Simulation Systems
November 2000
Figure 9-5: Defining an action
Figure 9-6: Assigning actions to messages
GETRAM v4.0 Getting Started
65
TSS-Transport Simulation Systems
9.2.2
November 2000
Incidents
This option allows for the generation of incidents, modeled as the blocking of a given length of one
of the lanes of a section for a given time period (Figure 9-7). As with most of the AIMSUN2
utilities, other phenomena may be modeled using one’s imagination, like, the effect of vehicles
parking and leaving from a parking lane.
Figure 9-7: Defining an incident
Figure 9-8: Graphical representation of an incident
GETRAM v4.0 Getting Started
66
TSS-Transport Simulation Systems
November 2000
APPENDIX I: TEDI MENU BAR COMMANDS
File Menu
New: Opens a new network.
Open...: Opens an existing network.
Close: Closes the currently open network.
Save: Saves the currently open network.
Save as...: Saves the currently open network, optionally with a new name and format.
Page Setup: Sets the different parameters of the printing conditions.
Print: Sends impression file to the peripheral.
Import…: Imports an EMME/2 network to the GETRAM environment. These option is
available only on those versions equipped with the EMME/2 interface.
Export…: Exports the network as an EMME2 model. These option is available only on those
versions equipped with the EMME/2 interface.
Report Generation…:Generates a report on possible errors and on the geometry of the
network.
Quit: Exits the application.
Edit Menu
Undo: A simple undo operation that can be used to correct undesired object translations.
Redo: Inverse operation to undo.
Cut: Removes the selected objects and puts them on the clipboard.
Copy: Copies the selected objects to the clipboard.
Paste: Copies from the clipboard to the drawing area.
Clear: Deletes the selected objects.
Select all: Selects all the objects in the drawing area.
Find...: Finds objects in the drawing area.
Vehicle classes...: Specifies the classes of vehicle modalities used in the network.
Vehicle Types library: Library with predefined vehicle types.
Function Editor…: Opens a window that makes possible the edition of route choice functions
and cost functions.
Preferences...: Specifies the overall parameters for the editor’s configuration.
View menu
Turn autogrid on: This lets the user toggle between an active and inactive drawing grid.
Activating the grid means that, when creating new objects, end points will be restricted to the
grid.
Show grid: Toggles between hiding and displaying grid points.
Show line pointer: Shows the two lines whose intersection defines the tip of the cursor.
Changes to “Hide line pointer”.
Show objects: Displays a modeless dialog box where the user can specify, for each object,
whether to display it and/or its identifiers.
Show section speed: Displays a sign with the top speed permitted on each section.
Background... Sets the background pixmap to the contents of a set of graphic files.
Whole drawing: Displays the whole real-world rectangle in the display window.
GETRAM v4.0 Getting Started
67
TSS-Transport Simulation Systems
November 2000
Arrange menu
Move forward: Moves the selected objects forward. This means incrementing the level of
these objects, i.e., showing them in front of other objects.
Move backward: Moves the selected objects backward. This means decreasing the priority of
these objects, i.e., showing other objects in front of them.
Group: Groups graphical objects (polylines, polygons, text) for their manipulation as a single
item.
Ungroup: Inverse operation to Group.
Rotate object: A cross appears at the center of the selected object or group of objects. The
cross is the rotation center and can be dragged with the mouse to the desired position. The
objects are rotated by dragging them.
Section menu
Disable side lanes: Disables the creation/update/deletion of side lanes in the sections. This is
useful when modifying a network at a high scale.
Make join: Joins the selected sections, creating a new node automatically.
Break join: Breaks the join between the selected sections. This may delete the node between
them.
Make polysection: groups the selected sections in the order they have been selected, creating a
new polysection automatically.
Break polysection: ungroups the selected components of a polysection, turning them into
isolated sections.
Change direction: Changes the direction of the selected sections.
Number of lanes: Displays a submenu containing the following options: “1”, “2”, “3”, “4”,
“5”, “More...”, “Default”. All them serve to change the number of lanes in the selected
sections. The “Default” option determines the number of lanes according to section width and
default lane width.
Control Menu
New Control: Creates a new control plan in the current view.
Open Control... Opens an existing control plan.
Close Control: Closes the current control plan.
Save Control: Saves changes in the currently open control plan.
Save Control as... Same as “Save Control”, optionally changing the name under which it is
saved.
Delete Control... Deletes control plans.
Junctions... Changes the control plan of junctions.
Meterings... Changes the control plan for ramp-meters.
General… Sets some general parameters of the control plan like the offset, yellow time and an
edit aid.
Result Menu
New Result container: Creates a new result container in the current view.
Open Result container... Opens an existing result container.
Close Result container: Closes the current result container.
Save Result container: Saves changes in the currently open result container.
Save Result container as... Same as “Save Result container”, optionally changing the name
GETRAM v4.0 Getting Started
68
TSS-Transport Simulation Systems
November 2000
how it is saved.
Import result container from EMME/2…: This option allows to import the input flows and
turning proportions result from an EMME/2 assignment, automatically building a GETRAM
result container. These option is available only on those versions equipped with the EMME/2
interface.
Delete Result container: Deletes result containers.
Vehicle types...: Changes the vehicle modalities in the current result container.
New State: Creates a new network state in the current result container.
Open State... Opens an existing network state.
Sections... Changes the state in the sections.
Close State: Changes the state in the sections.
Save State: Saves changes in the current network state.
Save State as... Same as “Save State”, optionally changing the name how it is saved.
Delete State... Deletes network states.
O/D Matrix Menu
New O/D matrix: creates a new O/D matrix.
Open O/D matrix: opens an existing O/D matrix.
Save O/D matrix: saves changes in the current open O/D matrix.
Save O/D matrix as: saves changes, optionally changing the name under which the matrix
is saved (no space in filename) with this option it is also possible to define a (new) start time
of the various network states.
Delete O/D matrix: deletes O/D matrix (not possible if the matrix is open).
Close O/D matrix: closes the current O/D matrix.
Vehicle types: edits the vehicle modalities in the current O/D matrix (same as with result
container).
Statements: sets the different time periods for a time sliced matrix, as well as setting the
vehicle flows from each origin to each destination.
NB: In the simulation the time of entry of vehicles per vehicle type is generated by dividing
the time interval by the number of vehicles, and then assuming that the exact moment of
entry of each vehicle follows a normal probability distribution around the initial moment
derived from the uniform distribution. The standard deviation of this normal distribution is a
percentage of the time fraction assigned to each vehicle through the uniform distribution.
Input from Emme/2: Imports O/D matrices from EMME/2 data bank.
Output to Emme/2: Exports O/D matrices to EMME/2 data bank.
These two last options are available only on those versions equipped with the EMME/2
interface.
TRANSYT Menu
This menu is only active with the TRANSYT interface
PT Menu
PT Plans…: Sets combinations of different timetables for different Public Transport lines
GETRAM v4.0 Getting Started
69
TSS-Transport Simulation Systems
November 2000
Vehicle Types…: edits the vehicle modalities in the current O/D matrix (same as with result
container).
Windows Menu
Help Menu
GETRAM v4.0 Getting Started
70
TSS-Transport Simulation Systems
November 2000
APPENDIX II: AIMSUN2 MENU BAR COMMANDS
File Menu
This gives access to all operations related to the GETRAM DataBase and other files: networks,
control plans, traffic demand data, actions related to message signs and simulation state.
Load Scenario: loads simultaneously a network, a control plan (if one is associated to the
scenario), a result container or OD matrix, and a Public Transport plan (again, if one is
associated to the scenario).
Save Scenario: saves the current combination of network, control plan, result container or
OD matrix and public transport plan.
Unload Scenario: clears the current simulation model .
Load Network: loads a network description (sections, junctions and junctures, turnings,
detectors, Variable Message Signs, ramp metering, stages) and builds the structure of the
simulation model.
Unload Network: clears the current network simulation model .
Load Traffic Result: loads the traffic demand data to simulate, defined as input flows and
turning proportions of one or more traffic states, and feeds the simulation model with this
data.
Unload Traffic Result: clears the current traffic demand data.
Load OD Matrix: loads the network zones definition (centroids) and the demand data to
simulate, defined as a set of O/D Matrices for each time period and each vehicle type.
Unload OD Matrix: clears the current OD matrix and centroids definition.
Load Control: loads one or more traffic control plans for each time period and adds them to
the simulation model .
Unload Control: clears the current traffic control plan.
Load Public Transport: loads a public transport plan (combination of timetables).
Unload Public Transport: clears the current public transport plan.
Load extensions: incorporates any external models the user may have developed with the aid
of Kit 1 of the GETRAM environment in the simulation
Save Message-Actions: saves the definition of the actions associated with the messages that
may be used by the Variable Message Signs (VMSs), and their moment of activation.
Save Current State: saves the current state of simulation as a new state result at the
GETRAM Data Base, which can be used or continued in future simulation experiments.
Quit: exits AIMSUN2.
Objects Menu
Set of options for finding and viewing information on any object composing the model or for
editing some of them. These are grouped into two sets: Show and Edit.
SHOW
Sections: to find sections and show their characteristics (lanes, turnings allowed at each lane,
input flows, turning proportions, detectors, metering).
Junctions: to find junctions and show their characteristics (turnings, stages and control)
Detectors: to find detectors and show their characteristics (position, length, lanes, and
measuring capabilities)
Metering: to find ramp metering points and show their characteristics (type, position, control
parameters)
VMSs: to find VMSs and show their characteristics (position, accepted messages and
GETRAM v4.0 Getting Started
71
TSS-Transport Simulation Systems
November 2000
actions). The user can also activate messages that will cause the execution of their associated
actions (impact in the driver’s behaviour).
Centroids: to find centroids and show their characteristics (type, connections, and O/D
Matrix data)
Paths: to view paths from any section to any destination centroid.
Public Transport: to view Public Transport Lines and Bus Stops.
EDIT
Actions: to edit and show actions related to messages of VMSs.
Streams: to edit and show streams, which may be used to collect statistics related to the
vehicles travelling through certain section streams
View Menu
Set of options regarding the presentation of the network image.
Whole Network: the scale is automatically converted to the minimum one that fits the entire
network image into the window.
Minimum Cars Scale: the scale is automatically converted to the minimum one where the
cars are represented individually.
Vehicle Coloring: to color all the vehicles in the network in order to identify either the
vehicle type, or the next turning movement, or the origin or destination centroid (for some
previously selected centroids), or the Public Transport vehicles, or the lost vehicles, or to
color the vehicles in a section according to their destination.
Number of vehicles: Opens a small window in which is displayed the total number of
vehicles on the network at that moment of the simulation and also shows the number of
vehicles of each type, including the total number of lost vehicles since the beginning of the
simulation.
Show/Hide Objects: to decide which objects must be displayed and whether or not to
display the identifiers.
Show/Hide Legend: to decide whether or not to display a legend in the window, which
either provides the scale of colors for the density or for the vehicle coloring option.
Show/Hide Speed Limits: to display the speed limit icons on the network.
Background: to register and load background DXF files.
Preferences: combination of colors preferred for each object and situation.
Experiment Menu
Set of options to define some parameters of the simulation experiment the user wishes to
perform.
Run Time: to specify time parameters (initial and ending time of simulation, warm-up
period)
Modeling: to specify the modeling simulation parameters, related to the vehicle behavior
models used in AIMSUN2.
Output: contains an extended menu with three option related to the simulation outputs.
- Output Location: to specify where to store the simulation outputs (statistics and
detection) either as ASCII files or as a database, the latter using an ODBC format.
- Statistics: to specify parameters defining the statistical reporting to produce by the
simulation (level of detail and periodicity).
- Detection: to specify whether or not detection must be produced, the type of detection
and frequency.
GETRAM v4.0 Getting Started
72
TSS-Transport Simulation Systems
November 2000
Replications: to specify the number used as initial seed for the random number generator.
Route Choice: to specify the Route Choice Model to be used (fixed or variable, static or
dynamic, binomial or logit) and some related parameters in case of using an OD matrix to
carry out the simulation.
Incidents: to find incidents, show their characteristics and status (active, done or pending)
and delete or save them in a log file for future experiments.
VMS messages…: to find VMSs’ messages, show their characteristics and status (active,
done or pending) and delete or save them in a log file for future experiments.
Environmental Models: to define whether or not to consider Fuel Consumption and/or
Pollution Emission modeling.
Run Menu
Different types of running and stopping the simulation are available.
Run: to run the simulation with continuous animated graphical representation of the traffic.
If the scale is set to the Minimum Cars Scale or lower, all the vehicles are shown as they
move along the network, otherwise only a range of colours representing density is displayed.
Real Run: like the Run option but, if the simulation time is faster than real time it offers the
possibility of slowing down the animation to real time, running it twice as fast as real time or
three times as fast
Step: to run one simulation step, with graphical refreshment.
Batch: to run the simulation without graphical refreshment (faster than Run).
Stop: to halt the Run or Batch simulation immediately, (it doesn’t end the simulation,
selecting any of the four previous commands make it start up again).
Begin: to clear the current simulation experiment.
Stop at: to temporarily stop the simulation when a certain time is reached.
Reports Menu
Options for visualizing statistical reports obtained from current or previous simulation experiments.
The statistics gathered by AIMSUN2 are: mean flows, travel times, delay times, mean speeds,
density, stops, queue lengths and data on any variables (e.g. pollution) measured by any special
models used. All these variables can be specified at different levels: the whole system, sections,
turnings, streams (set of consecutive sections) and OD pairs. The statistics can be global (the whole
simulation time) or periodic (certain statistical interval predefined). Also they can be broken down
by vehicle modalities and the deviation of the statistics of each particular section with respect to the
global ones can also be requested. There are three options available:
File Results: to load statistical reports stored in files, which may have been saved from
previous or current simulation runs.
Current Reports: to view statistics gathered during the current simulation experiment.
Current Graphics: to display time series plots of statistical data gathered during the current
simulation experiment or a whole network coloring according to different traffic magnitudes.
Windows Menu
Set of options for managing windows.
Show Scenario Info: to open the Scenario Dialog containing the definition of the current
Scenario (network, demand data, control plan, public transport plan, etc.).
Show Warnings: to open the Warning Dialog containing the list of Warning Messages
occurred during the session.
GETRAM v4.0 Getting Started
73
TSS-Transport Simulation Systems
November 2000
Hide/Show Tools: to select whether or not to display the tool bar on the left side of the main
window.
Hide/Show Info: to select whether or not to display the Scale and Time at the bottom of the
main window.
Help Menu
Provides general information about the software.
Licenses: type and status of the AIMSUN2 license in use.
On version: current AIMSUN2 version.
GETRAM v4.0 Getting Started
74
TSS-Transport Simulation Systems
November 2000
We at TSS-Transport Simulation Systems have tried
to make the information contained in this manual as
accurate as possible. We cannot, however, guarantee
that it is error-free.
1997-2000 TSS-Transport Simulation Systems.
All rights reserved
GETRAM v4.0 Getting Started
75