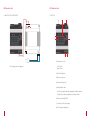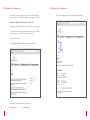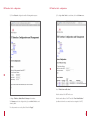
1
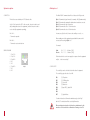
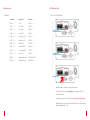
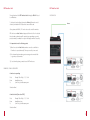
User manual
ERT INTERFACE UNIT IP to RS422
AHnet Communications Protocol
AHmcs Monitor Control Software
ENG – June 2011
Table of contents
Welcome
Safety instructions
4
Thank you for purchasing an ARTHUR HOLM product.
System description
5
AHnet Protocol
7
Our product range has been designed to create the perfect meeting room,
where the screens are a part of the interior design as well as essential
communication tools.
Connecting the equipment
9
ERT Interface Unit
10
ERT Interface Unit – configuration
14
AHmcs Monitor Control Software
24
Please, read this installation and operating instructions carefully and keep
them in a safe place for a future consultation.
We remain at your entire disposal if you have any suggestions
that would help us to improve our products.
Henrik Holm
General Manager
EC Regulations and Security
ATTENTION: Do not disassemble or modify the device in any way.
This symbol warn of the presence of dangerous un-insulated voltages inside
some of the components, of sufficient magnitude to expose people to risk
of electronic shock.
This symbol draws attention to important use and maintenance instructions
in the manual that accompanies the unit.
This symbol indicates that the equipment conforms to the norms
established by the European Community.
System description
The ERT Interface Unit and AHnet Communication Protocol have been
developed to control, configure and diagnose Arthur Holm monitors.
This system converts between RS422 Protocol and IP through a twisted
pair CAT-5 ethernet cable. Each unit has an input connector and LoopThrough, RJ45 type. It is connected in cascade making the wiring simple.
The AHnet Communication Protocol can also be used in diferent
control platforms.
AHmcs software is supplied on a USB pen drive with the ERT unit.
This software provides total control of the Arthur Holm monitors.
COMMUNICATIONS PROTOCOL
Safety instructions
Communication
RS422
Connection
RJ45
Wiring
CAT-5
POWER SUPPLY
This equipment must be powered by an external power supply of 12Vdc.
Always use the power supply that came with your ERT Interface Unit
SPEED & CONFIGURATION
Baud Rate
38400
Place the equipment on a raised area.
Data Bits
8
Place the equipment in a ventilated area.
Parity
None
Keep the equipment away from:
– Rain or water
– Excessive heat, cold or humidity
– Area exposed to direct sunlight
– Dirty areas
– Equipment generating strong magnetic fields
Stop Bits
1
ENVIRONMENT
4
5
System description
AHnet protocol
CONNECTION
The AHnet RS422 Communications Protocol is based on 5 Byte words.
This interface uses a twisted pair CAT-5 ethernet cable.
Only 2 of the 4 pairs in the CAT-5 cable are used. One pair is used to send
data (sending instructions to the equipment), and the other pair is used to
receive data (the equipment responding).
Pins 1 & 2 :
– The monitor responds
Byte 0: Determines the type of monitor, for example 0xFA (Dynamic monitor).
Byte 1: Determines the equipment’s address where instructions are sent.
Byte 2: Determines the type of instruction.
Byte 3: Determines the value 1 of the instruction.
Byte 4: Determines the value 2 of the instruction.
In some cases, Bytes 3 and 4, have no value and they are set to 0x00.
Pins 3 & 6 :
– The monitor receives instructions
When sending a word, the equipment responds with the same word it
receives, but increasing the Byte 0 to 1.
For example:
Send:
Receive:
WIRING DIAGRAM
1
2
3
4
5
6
7
8
Data TX +
Data TX –
Data RX +
NC
NC
Data RD –
NC
NC
12 3 4 5 6 7 8
RJ-45
FA 01 01 01 00 Monitor 1 (UP)
FB 01 01 01 00 Monitor 1 (UP))
If the instruction to be sent is an enquiry, the response from the equipment
on Byte 0 is also increased by 1.
CONTROL BYTE
The control byte can be checked to obtain the status of equipment.
The control byte gives the state of each Bit.
Bit 0
Bit 1
Bit 2
Bit 3
Bit 4
Bit 5
Bit 6
Bit 7
(1) UP position
(1) DOWN position
(1) Screen ON
(1) Button lock
(1) Input DVI (0) Input VGA
(1) System failure
To send an instruction to all monitors simultaneously, set the Byte1
with 0xF9. The instruction will be received by all monitors.
When sending an instruction to all monitors simultaneously, the
monitores do not send back confirmation of having received it.
6
7
AHnet protocol
ERT Interface Unit
COMMANDS
CONNECTING THE EQUIPMENT
Command
Instruction
Response
FA XX 01 01 00
Go UP
FB XX 01 01 00
FA XX 01 00 00
Go DOWN
FB XX 01 00 00
FA XX 02 01 00
Screen ON
FB XX 02 01 00
FA XX 02 00 00
Screen OFF
FB XX 02 00 00
FA XX 03 01 00
Input select VGA
FB XX 03 01 00
FA XX 03 00 00
Input select DVI
FB XX 03 00 00
FA XX 04 01 00
Button LOCK
FB XX 04 01 00
FA XX 04 00 00
Button UNLOCK
FB XX 04 00 00
FA XX 05 00 00
Auto config (VGA)
FB XX 05 00 00
FA XX 13 00 00
Failure OFF
FB XX 13 00 00
FA XX 14 00 00
Inquiry control byte
FB XX 14 CB1 CB2
FA XX 15 00 00
Firmware version
FB XX 15 FW
Maximum number of monitors connected per unit: 30.
Set the address of the equipment (Address). The address of the first
monitor should be 1.
Termination must be active on the last monitor Termination Switch (ON).
aximum length of an entire cable line from ERT unit to the last connected
M
monitor: 500 mts (1640 feet).
8
9
ERT Interface Unit
ERT Interface Unit
The main function of the ERT Interface Unit is linking the RS422 Protocol
to an IP address.
To help control and configure the monitors, AHmcs (AH monitor control
software) is included in the USB pen that comes with the unit.
INSTALLATION
Ethernet
Other systems with RS422 / IP can also be used to control the monitors.
ERT units have an Auto Check working mode. When Auto Check is selected
the unit sends an alarm by email if a monitor stops responding or goes into
protection mode (for example if an object is blocking the monitor cover plate).
It is important to note the following points:
1) When the router is in Auto Check, monitors can not be controlled via
IP and have to operated manually. This way user safety is increased.
2) The alarm mail system sends a generic message when a monitor fails
or goes into protection mode.
3) To use the mail system, you must have an SMTP mail server.
EXAMPLES OF MAILS GENERATED
A unit is not responding
Date:
From:
To:
Monday 15th of May, 2011, 10:22h
[email protected]
John Tech <[email protected]>
Transition Alarm!
A unit is blocked (Protection STOP)
Date:
From:
To:
Monday 15th of May, 2011, 10:22h
[email protected]
John Tech <[email protected]>
Transition Alarm!
10
11
ERT Interface Unit
ERT Interface Unit
CONNECTING THE POWER SUPPLY
FUNCTIONS
3
6
2
4
5
1
7
8
1) Work mode selector:
Power supply connexion diagram.
a) IP Control
b) Auto Check
2) Closed GPI indicator
3) Ethernet connection
4) Operation indicator ON
5) Activity indicator leds:
a) In IP control mode, indicate communication with the monitor
b) In Auto Check mode, the lights warn of monitor failure
6) AHnet connection (RS422)
7) Connection to 12V power supply
8) GPI, for system configuration
12
13
ERT Interface Unit – configuration
ERT Interface Unit – configuration
For remote access web configuration, you need a computer connected to
the network and set to an IP address within the same range as the ERT unit.
4) The main page displays a the menu and basic system information.
The default IP address of the ERT unit is: 192.168.0.125
Remote web configuration is limited to the essential features of the system.
To obtain assistance and information about the system, access the “Help”
menu (some areas are accessible only to the manufacturer).
1) Open your web browser.
2) Key in http://192.168.0.125 and the following screen appears.
3) Enter the username and password. The default is:
Username: user
14
Password: storm
15
ERT Interface Unit – configuration
5) Click on Network configuration and the following window appears.
ERT Interface Unit – configuration
6) To configure Auto Check to send alarms, click on the Alarms menu.
Check “Enable alarm notifications”.
Enter the address of the SMTP mail server.
Configure IP address, Subnet Mask & Gateway in this window.
The Gateway needs to be configured only if you want Auto Check to send
alarms by email.
Enter the email address of the ERT unit after “From E-mail Address:”
(an address in the mail server must have been assigned to the ERT).
The other parameters are set by default. Now click “Apply”.
16
17
ERT Interface Unit – configuration
7) Select Alarm 1. This window appears.
ERT Interface Unit – configuration
8) Finally, to use the Auto Check we have to check the monitors linked to
the ERT Interface Unit. The monitors must be connected and working.
– Place the mode selector work (1) on Auto Check position.
– Turn off the ERT unit.
– Put a wire between GPI connections to close the contact.
– Power up the ERT unit.
– The system will check how many monitors are connected (Wait)
– When the process is completed, all LED indicators will light in
flashing mode.
– Now, turn the power off and remove the cable from GPI.
– The system is now ready for operation.
– In “Send E-mail to...” enter the email address to which the alarm will be sent.
A wire between the
GPI connections
closing the contact
– Press “Apply”.
– You have to repeat the same process again for Alarm 2.
– Press Logout to exit.
18
19
AHmcs Monitor Control Software
AHmcs software is supplied with the ERT unit on a USB pen drive.
AHmcs Monitor Control Software
4) In this window select the installation folder and click Next
This software is designed to control and diagnose an installation of
Dynamic monitors.
The software runs on Windows OS.
AHmcs software can control up to 200 Dynamic monitors in groups of 30.
One ERT unit is needed for every 30 monitors.
INSTALLATION
1) Run the file “Install Monitor Control V2.0.3”
2) Microsoft’s .NET Framework 3.5 has to be installed on the computer.
In current versions of Windows this software comes preinstalled. In older
versions it may not be installed. In such case AHmcs will automatically
install it. During this process an Internet connection is needed.
3) Click Next
5) To confirm installation, click Next
20
21
AHmcs Monitor Control Software
6) This window informs that the installation is complete.
Press Close
AHmcs Monitor Control Software
MAIN SCREEN
8
9 10 11 12 13
14
7
6
5
4
3
2
1
7) You will see this icon on your desktop. Now you can launch the software.
1) Lock & Unlock keys override the Up & Down buttons on the monitor
2) Select input, VGA and DVI
3) LCD screen ON and OFF
4) UP & DOWN monitor movement
5) ALL sends commands to all monitors simultaneously
Auto image adjustment (only for VGA signals)
6) Press + and – keys to select the monitor you want to control
7) Displays the name of the monitor that you are controlling
8) Communications status: Green: OK – Red: FAULT
9) Shows the main control window
10)Shows the main memories window
11) Saves in memory monitor arrangements
12)Access to the setup menu. This option is password protected
13)Displays the pop-up errors window
14)List of memories stored
Please note that some versions of Dynamic monitors do not have all
these features and consecuently they may not all be operational.
22
23
AHmcs Monitor Control Software
AHmcs Monitor Control Software
CREATING MEMORIES
SYSTEM CONFIGURATION
11
The use of Memories helps to set the arrangement of the room for different
situations. The configuration of each and every monitor is stored in the
memory and the stored Memories can be retrieved with a single click to
suit any occasion.
12
To access the setup menu, click on the icon (13).
You must enter the password: config
1) Set each monitor to the desired situation: position (up/down),
input selection, key lock etc.
2) Click the icon to save the memory (11).
3) Select memory number and name it appropriately.
4) Press Save
The monitor arrangement is saved and ready to be retrieved with a click.
24
25
AHmcs Monitor Control Software
AHmcs Monitor Control Software
SYSTEM CONFIGURATION
TEST
12
In the window of the set up menu, configure the monitors connected
to the ERT unit, and the unit’s IP address and port.
12
In this window a test file (Test.xml) can be loaded to set the monitors
running continuously, for verification of the mechanical movement.
This should be carried out only by authorised after-sales service personnel.
1) Clicking on the Name cells, monitor names can be edited.
2) In Monitors, configure the number of monitors connected.
3) For each group of 30 monitors we must enter the IP address and port
of the ERT unit serving that group.
26
27
AHmcs Monitor Control Software
AHmcs Monitor Control Software
TEST
MONITOR SETTINGS
12
Click on Load test file to upload the file.
12
This window is disabled and only accessible by technical service personnel.
Then, click “Run” to start the sequence of continuous movement.
Press “Stop” to stop the test sequence.
28
29
AHmcs Monitor Control Software
AHmcs Monitor Control Software
OPTIONS MENU
EMAIL CONFIGURATION
12
This program can be configured to send an alarm by email if a fault in the
system is detected. The warning can report which monitor is failing and the
cause of the malfunction.
This function must not be confused with the alarms sent by the ERT unit
when set in Auto Check mode.
The mail server must be type POP3 and an account like G-mail can be used.
In this window, set the communication parameters.
Communications
TimeoutIs the length of time, in microseconds (mS), the system
waits for a response from the monitor before sending a
communication error. By default is set at100.
RetriesWhen communication fails the system tries again. Here you
can specify how many retries before displaying a failure
message. By default is set at 3.
In normal circumstances the default values are adequate. These values can
be modified if there are communication problems in the network and the
monitors are controlled via the Internet.
30
31
AHmcs Monitor Control Software
Information on disposal for users of waste electrical
& electronic equipment
ERRORS WINDOW
13
This symbol on the products and/or accompanying documents means
that used electrical and electronic products should not be mixed with
general household waste.
For proper treatment, recovery and recycling, please take these products
to designated collection points, where they will be accepted on a free of
charge basis. Alternatively, in some countries you may be able to return
your products to your local retailer upon the purchase of an equivalent
new product.
Disposing of this product correctly will help to save valuable resources
and prevent any potential negative effects on human health and the
environment which could otherwise arise from inappropriate waste
handling. Please contact your local authority for further details of your
nearest designated collection point.
Penalties may be applicable for incorrect disposal of this waste, in
accordance with national legislation.
For business users in the European Union
If you wish to discard electrical and electronic equipment, please contact
your dealer or supplier for further information.
If a fault occurs, a pop-up window reports the problem.
The faulty monitor is dropped from the system until the Clear button is
pressed. If the problem persists the message appears again.
If a monitor is blocked by an object obstructing its movement, it can be
unlocked by pressing the button: Unlock all.
Information on disposal in countries outside the European Union
This symbol is only valid in the European Union.
If you wish to discard this product, please contact your local authorities or
dealer and ask for the correct method of disposal.
Before unlocking a monitor it is imperative to examine the monitor
personally to determine the reason for blocking.
Press Close to close the window.
32
33
Product Warranty
CONDITIONS OF WARRANTY
Albiral Display Solutions S.L., with this document, guarantees all Albiral
and Arthur Holm Trademark devices against defects in manufacturing in
accordance with the following conditions:
1) This guarantee covers the original product purchaser for a period of 24
months from the date of purchase.
2) This guarantee covers:
a) Parts: During the warranty period, the replacement of any electronic and
mechanical parts against any defects in manufacturing. The guarantee does
not cover any faulty electronic and/or mechanical components arising from
incorrect installation, non-authorised modification, and inadequate transport
or as a result of atmospheric phenomenon.
b) Labour: Albiral Display Solutions S.L covers labour costs for replacement
of any defective parts (in accordance to paragraph 2a) during the period of
this warranty.
c) Transport costs:
i) In the case that a manufacturing defect occurs within 30 days after
the purchase date, both freight and insurance will be paid by Albiral
Display Solutions S.L. Although Albiral Display Solutions S.L pays
for transport and insurance cost, Albiral Display Solutions, S.L.
will not be responsible for the damages caused by transport if the
customer does not inform in writing when receiving the goods.
ii) After 30 days of the purchase date, both freight and insurance costs
will be paid by the customer.
d) Albiral Display Solutions S.L. will not be responsible for the damages
caused by transport, when this is paid by customer.
e) The guarantee is not valid if persons other than authorised service Centre
have handled the product and if the product has been manipulated.
f) The beneficiary of the Guarantee will have to send the devices with the
original packaging or an appropriate one to guarantee there are no damages
during the transport.
g) The guarantee is not valid if the customer does not include RMA form
and copy of the purchasing invoice
3) Albiral Display Solutions S.L. recognized all guaranteed user rights by all
legal rules from its region, and in the absence of them, all established
consumer rights by general law 26/84.
Contact your Authorized Distributor
34
ARTHUR HOLM
Albiral Display Solutions SL
Fàtima 25, Sant Hipòlit de Voltregà
08512 Barcelona – Spain
tel: +34 93 850 23 76 / 23 83
fax: +34 93 850 25 50 / 23 72
web: www.arthurholm.com
e-mail: [email protected]
Arthur Holm is a registered brand
by Albiral Display Solutions SL.
Specifications subject to changes
without previous notice.