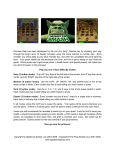
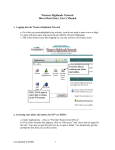
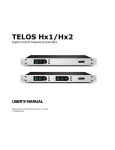
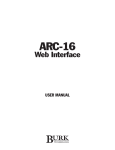
1
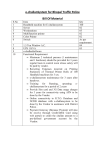
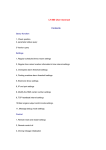
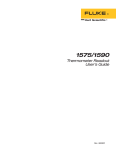
Talash Information System – User Manual INTRODUCTION Talash Information System is an integrated system for linking Arrested, Wanted, Missing, Traced, Kidnapped, Deserters, Escapee, Unidentified dead bodies and unidentified persons based on attribute data available from various police agencies in the country. It is proposed to further integrate attribute-based search with photograph based facial search. We are in the process of acquiring the latest technology in this regard. DOS Version of the software has been in use in various States. To keep pace with the changing time the package is redesigned using windows platform so as to enable users to use the software more effectively. This new version of the package is upgraded version of DOS with value addition features like photograph scanning and export and import of data electronically etc.etc.. The package is developed using MS SQ keeping in view its integration with CCIS and Facial Recognition System. The data entry and enquiry in the window based Talash System is simple and user friendly. Statistical reports have been improved and made flexible to meet user requirements. A module is added in the package to facilitate user to port the existing DOS based data into windows based system. Page 1 of 1 Talash Information System – User Manual Minimum Hardware Requirements Computer Pentium III 128 MB RAM 20 GB HDD Printer DMP/Deskjet/Laserjet Recommended Hardware requirements Server Printer Pentium IV 256 MB RAM 40 GB HDD DAT Drive/CD Writer DMP/Laserjet Software Requirements Windows 2000 Professional Microsoft SQL server 7.0 Anti-Virus MS-Office Loading Procedure Install Software Install Talash Client Software from Talash Setup Directory Install Talash Control from Talash Control Directory Restore TalashBlankDatabase as “TalashSQL” in SqlServer (Go to Enterprise Manager -> Database -> Right Click Select All Tasks -> Restore Database In ‘Restore as Database’ Combo type “TalashSQL” Select ‘From Device’ -> Click Select Devices - >Click Add Browse to ‘Talash2006\Database\TalashBlankDatabase’ or To the location where Talash Software copied/CD Click OK-> Click OK again in Restore devices window Go to Options Tab ensure that the path shown in the grid is same as shown (if your SQL Server path is different than shown in the grid change it accordingly) Page 2 of 2 Talash Information System – User Manual FOR EXISTING SITES WHERE IMPORT EXPORT NOT WORKING INSTALL 'IMPORT EXPORT PATCH' FROM PATCH FOLDER INSTALL TALASH CLIENT APPLICATION FROM SETUP FOLDER FOR FRESH INSTALLATION Detailed Procedure for Blank Database restoration Create a folder named “TalashBlankDatabase” in C or D drive. Copy “TalashBlankDatabase” file in this folder. TalashSQL Database Restore through Enterprise Manager SQL Server Enterprise Open Enterprise Manager as. Click on Start Programs Microsoft Manager. (This will open Enterprise Manager window) Expand Microsoft SQL Servers Expand SQL Server Group Expand server name Expand Databases Icon Click on ALL TASKS, Click on Restore Databases below given figure will appear In restore as Database give Name “TalsahSQL” Page 3 of 3 Talash Information System – User Manual Select ‘From Device’ radio button Click on ‘Select Devices’ button it will open ‘Choose Restore Devices’ window Click on ‘Add’ button it will open ‘Choose Restore Destination’ window Page 4 of 4 Talash Information System – User Manual Click on ‘…’ (Eclipse) button it will open ‘Backup Device Location’ window Select your backup file (backup file name display in file name text box) Click on ‘OK’ button Again click on ‘OK’ button Again click on ‘OK’ button Click on ‘Options’ Tab Select ‘Force Restore Over Exiting Database’ Option In the window “Move to physical file name” give your exact SQL Server path Again click on ‘OK’ button and wait for some time “Restore of Database ‘TalashSQL’ Completed Successfully” message will appear Click ‘OK’ button Close all open windows Page 5 of 5 Talash Information System – User Manual Talash Information System is divided into five basic modules. These modules are selectable from the menus from menu bar in the opening screens. 1) ENTRY : Enables the user to enter new data. This option also Provides the option to edit previously entered data. 2) ENQUIRY : This option allows the user to enquires the database and cull out matching records. 3) REPORT : Statistical and type of person wise reports can be generate using this option 4) MAINTENANCE : 5) CODE MAINTENANCE: Enables the administrator for maintaining the various codes used in the system. 6) EMAIL This module allows the user to maintain the database and perform other administrative functions. : Enables the users to Mail thru Talash system. Useful for sending data. Procedure : The following procedure needs to be followed after setup of New Version of Talash Information System (Version 1.0) Data Conversion: Old version (DOS Version) data can be converted to new system. The User/Administrator can convert the data thru Maintenance. Maintenance menu contains option to Import Old(DOS) Data. After Import of Data the Administrator/user must also convert Name & Father Name using Name Conversion option for generation of phonetic keys. The procedure detailed above is must and required to upload existing data bank to new system. The users installing fresh database need not follow the procedure. Page 6 of 6 Talash Information System – User Manual (Fig. 1) (Fig.1.1) Talash Information System allows only valid users to enter into the system through login procedure (Fig.1). Enter “NCRB” in the user name and “ncrb“ against the password. Click on “Login” to enter. Server name needs to be given when accessing the database on a remote server through network. The user can change his ‘Password’ by clicking on ‘Change’ button. To change a password user must enter correct ‘Password’, ‘New Password’ and ‘Confirm Password’ correctly. Ex: Password : New Password : Confirm Password: (your Old Password) (New password) (Re-enter new password) Page 7 of 7 Talash Information System – User Manual TALASH Information System screen (Fig.2) ENTRY : To enter New data select “New File” . System will automatically generate new File name based on district, date & time of creation, user can start entering the data. To edit or add records in already created file select “Old File”. On selection the screen displays names of all the existing files. Select the desired file to work on. To print an edited/added file select ‘Print’. On selection the screen displays names of all existing files. You can select a file to preview, thru the preview window you can print the file. To remove a file entered/processed select ‘Remove Table’. Screen displays names of all files as detailed above. Page 8 of 8 Talash Information System – User Manual TALASH - Data Entry Form screen is displayed. A B Fig.3 The System allots name automatically to a new batch file/table. Entries in shown in blue color are mandatory. A - Type of person i.e. arrested, deserter etc. Select the desired type of person from the available options or type the ‘Type of Person’ code. B - District & Police Station. Select District and Police Station name from the combo boxes or type District/PS code. Name of the State is entered at the time of configuring the software during installation. FIR /GD No.,/FIR/GD Date and Act/Sections are mandatory fields. Beside above Sex, Age, Build & Height are also mandatory fields, without which system does not allow the data to go into the database. All mandatory fields are shown in blue colour on the input screen. Page 9 of 9 Talash Information System – User Manual TALASH – DATA ENTRY FORM Act & Sections - Name, Alias & Father’s/ Husband’s Name Sex Age & Year of birth Height - Physical features - Address District & Police Station Clothes warn Place of Missing/KidnappedClick on select photo - Select Act(s) from the combo box. TIS allows entry of 3 different Acts and 3 sections under each Act can be selected from available options. These fields are text fields Select from available options User can either enter age or year of birth. System automatically calculates age if year of birth is entered and vice versa. Similar to Age field, one of the two fields viz. Height (in cms) or Height (in feet) can be entered. System calculates the height in feet if height in cms is entered. Face, complexion, eye, hair, deformity and ID marks can be selected from the available options. This is text field. Enter complete address of the person Select from options available. Enter particulars of clothes warn by the person. Enter name of place. Browse and select the scanned/digital photo of the individual. The selected photo should be in ‘JPG’ format only. The photograph is embedded into the database. The system checks for a duplicate ENTRY in the current file (file being entered). In case of any duplicate entry the system warns you accordingly. The system checks for a Duplicate records with the Master Database(your existing databank) ag the entry stage itself. In case any duplicate record found in the master database system warns you. Query in Current File: The users can search for a record in current table for editing/correction.By default the System is in Append Mode To Edit Records the Users needs to cancel the ‘Append Mode’ by clicking on Cancel. The System is now in Default Mode. Click Query to extract records. Enter the parameters for query and click ‘Execute’ to fetch the records. Edit Data Your can browse the file using the First, Previous, Next & Last buttons. To Edit a particular record Click update. The system is now in update mode. Update the Record as required and Save. Page 10 of 10 Talash Information System – User Manual TALASH – ENQUIRY PROCESSING (Fig.5) ENQUIRY The system allows the user to process enquiries in - Online and - Batch mode Page 11 of 11 Talash Information System – User Manual ENQUIRY FORMAT (Fig.6) After making entries/parameters for enquiring click on process to view the result of enquiry. System generates enquiring results along with wireless message (Fig 7) for concerned police authorities. ONLINE QUERY Allows the users to enter any one or combination of parameter(s) in the enquiry screen as displayed above and on pressing view, the option will search the database and displays the result on the screen, which can also be printed. The match or no-match report is generated in the form of a Wireless Message, which can be printed and sent to the concerned addressee(s). The Matching Parameters are given at the bottom of the screen for relaxation in Age & Height etc. A Missing Person query checks for exact Name Match in Online query, however it can be relaxed by checking on ‘Relax Name & Father Name’ the system will also generate missing UD Case Report with this option. In case the FIR Details are missing and a user wants to query for a person, he can relax the same by checking ‘Relax FIR Details’. In this case the system takes the Current Year /date of missing. If Approximate date of missing is known then it should be entered in ‘Date of FIR’ column. Page 12 of 12 Talash Information System – User Manual BATCH This option allows the user to process queries in a batch. One or more batch files can be created and queried. Report(s) similar to on-line mode would be generated in the form of a wireless message for each enquiry, which can be sent to the respective addressee(s). Data is appended to master database after processing the enquiries. The following is the Matching Criteria for Online/Batch Enquiry Arrested Person With Wanted, Deserted, Escaped, Proclaimed Offender & Missing with Relaxation in ‘Other Cases’ for prior cases from the Date of Arrested Person. Missing & Kidnapped Person With Arrested, Traced, Un-Identified Dead body & Person with Relaxation in ‘Other Cases’ for cases after the Date of Missing/Kidnap. Deserted Person & Escaped Person With Arrested, Traced, Un-Identified Dead body & Person with Relaxation in ‘Other Cases’ for for Cases after the Date of FIR/Deserted/Escaped. Wanted Person & Proclaimed Offender With Arrested, Traced, Un-Identified Dead body & Person with Relaxation in ‘Other Cases’ for for Cases before & after the Date of FIR/Wanted. Traced/Found Person With Missing & Kidnapped, Deserted & Wanted with Relaxation in ‘Other Cases’ for cases prior to the Date of Trace. UnIdentified Person & Dead body With Missing, Kidnapped, Wanted, Escaped 7 Deserted with Relaxation in ‘UD Cases’ for cases prior to the Date of Missing/Kidnap. Page 13 of 13 Talash Information System – User Manual ENQUIRY RESULTS The enquiry results will be in format of a wireless message. The Message will also print the Persons Photograph where ever available. The Matched persons photograph will also be printed along with the photograph of the person being matched if available. . (Fig.7) Filename, No. of Records(enquires in the batch), No of Matched cases and classification viz., Arrested, Missing, Wanted, Traced etc. is shown at the bottom of the report Page 14 of 14 Talash Information System – User Manual REPORTS GENERATION - STATISTICS (Fig.8) Three types of reports are generated by Talash Information System. - - Statistical Reports Types of person wise report Special Report Page 15 of 15 Talash Information System – User Manual REPORTS GENERATION -STATISTICS (Fig.9) Click on “Report” to generate report. User can opt for all state or particular state “Type of persons” are automatically selected and report generated. The TIS generates following statistical reports for a given Date Range with option i) For all States and ii) For a selected state/type of person The above screen allows the user to enter desired parameters for generating statistical report. Sample print-out of the reports can be seen on following page. Page 16 of 16 Talash Information System – User Manual REPORTS GENERATION (STATISTICS) - STATE AND TYPE OF PERSON SELECTION (Fig.10) Under this option user has options of selecting Date range Particular state/all states and Type of person for the purpose of report generation. Page 17 of 17 Talash Information System – User Manual REPORT GENERATION – TYPE OF PERSONS (Fig.11) When report for a particular type of person is selected, system prompts for details on state, district and date range to be selected. Click on report, system generates report as shown in Fig.13. SPECIAL REPORT (Fig.12) On selecting this option following screen is displayed for selecting the parameters viz State, Date Range, Age Range & Sex etc.. On the basis of above information Statistical report is generated. This report is used for answering Parliament queries asked from time to time. Page 18 of 18 Talash Information System – User Manual RESULTS OF REPORT GENERATION (Fig.13.) (Fig.13.1) Page 19 of 19 Talash Information System – User Manual MAINTENANCE (Fig.14) This module allows the administrator to perform system administrator activities viz. Import (Dos) Data : This option is used for importing Data of DOS based Talash software and converts the data to SQL server format and then click on name conversion for generation of keys for phonetic search. This is a one-time activity to be undertaken before system is put to use. Name Conversion: Name conversion of Old (Single Name) to New (First Name, Middle Name & Last Name) format and generation of Phonetic keys as described above. Import (DOS) Data and Name Conversion is the first and foremost steps to follow in case Old Version of DOS Data needs to be converted to New System. The database is blank initially. Any enquiry made will show ‘No Match’ report when processed. Export file: This option generates a .txt file of the data file entered (later imported using import process & append option). Import, Process & Append: This option imports the file generated using Export option. It is useful when the States/Districts are sending their data to NCRB/SCRB for uploading to respective servers. Enter the name of the DOS file to be imported. On pressing select file, the file (data) gets imported i.e. data in DOS format gets appended to SQL database. Backup: This is SQL Server backup facility used for taking backup of Talash Database. Restore: Process for restoring Talash Database. Page 20 of 20 Talash Information System – User Manual User Management: Can be used for user creation and assigning permissions. Location Setting: After installation of the system, the system administrator has to set the location setting by selecting the state and district where the system is implemented. This information is used for printing headers etc. in various reports/wireless message generated by the system. Database Size: Gives Information of number of records in Talash database. Database Maintenance: This option is password protected. Only authorized user can access the master database for maintenance purpose. CODE MAINTENANCE This menu option allows user to maintain various codes and their description used in the system. Addition/modification of the codes can be carried out as and when required. Codes and descriptions are maintained as per CCIS Package. (Fig.15) Page 21 of 21 Talash Information System – User Manual MAIL (Fig.16) Double-Click on “Mail” to open an ‘Outlook Express’ or ‘Ms Outlook’ Mailing form to enable you to send mails. EXIT Double Click on ‘Exit’ to quit from Talash Software. Page 22 of 22