Download 4I26B MULTI-IO INTERFACE CARD MANUAL
Transcript
4I26B MULTI-IO INTERFACE CARD MANUAL VERSION 1.0 Copyright 1997 by MESA ELECTRONICS Richmond, CA. Printed in the United States of America. All rights reserved. This document and the data disclosed herein is not to be reproduced, used, disclosed in whole or in part to anyone without the written permission of MESA ELECTRONICS. Mesa Electronics 4175 Lakeside Drive, Suite #100 Richmond, CA 94806-1950 Tel (510) 223-9272 - Fax (510) 223-9585 E-Mail: [email protected] - Website: www.mesanet.com 4I26B USER'S MANUAL 4I26B USER'S MANUAL TABLE OF CONTENTS HANDLING PRECAUTIONS Handling precautions . . . . . . . . . . . . . . . . . . . . . . . . . . . . . . . . . . . . . . . . . . . . . . . . . . . . . . . . . . . . . . . . . . 4 INTRODUCTION General . . . . . . . . . . . . . . . . . . . . . . . . . . . . . . . . . . . . . . . . . . . . . . . . . . . . . . . . . . . . . . . . . . . . . . . . . . . . . . . . 5 HARDWARE CONFIGURATION General . . . . . . . . . . . . . . . . . . . . . . . . . . . . . . . . . . . . . . . . . . . . . . . . . . . . . . . . . . . . . . . . . . . . . . . . . . . . . . . . Default configuration . . . . . . . . . . . . . . . . . . . . . . . . . . . . . . . . . . . . . . . . . . . . . . . . . . . . . . . . . . . . . . . . . . Serial configuration . . . . . . . . . . . . . . . . . . . . . . . . . . . . . . . . . . . . . . . . . . . . . . . . . . . . . . . . . . . . . . . . . . . . Serial interrupt options . . . . . . . . . . . . . . . . . . . . . . . . . . . . . . . . . . . . . . . . . . . . . . . . . . . . . . . . . . . . . . . . . Parallel configuration . . . . . . . . . . . . . . . . . . . . . . . . . . . . . . . . . . . . . . . . . . . . . . . . . . . . . . . . . . . . . . . . . . Floppy/IDE configuration . . . . . . . . . . . . . . . . . . . . . . . . . . . . . . . . . . . . . . . . . . . . . . . . . . . . . . . . . . . . . 6 6 8 8 9 9 I/O CONNECTORS General . . . . . . . . . . . . . . . . . . . . . . . . . . . . . . . . . . . . . . . . . . . . . . . . . . . . . . . . . . . . . . . . . . . . . . . . . . . . . . . 10 Serial port connectors . . . . . . . . . . . . . . . . . . . . . . . . . . . . . . . . . . . . . . . . . . . . . . . . . . . . . . . . . . . . . . . . . 10 Parallel port connector . . . . . . . . . . . . . . . . . . . . . . . . . . . . . . . . . . . . . . . . . . . . . . . . . . . . . . . . . . . . . . . . 11 IDE connectors . . . . . . . . . . . . . . . . . . . . . . . . . . . . . . . . . . . . . . . . . . . . . . . . . . . . . . . . . . . . . . . . . . . . . . . 12 LED connector . . . . . . . . . . . . . . . . . . . . . . . . . . . . . . . . . . . . . . . . . . . . . . . . . . . . . . . . . . . . . . . . . . . . . . . 12 Power connector . . . . . . . . . . . . . . . . . . . . . . . . . . . . . . . . . . . . . . . . . . . . . . . . . . . . . . . . . . . . . . . . . . . . . . 12 Floppy connector . . . . . . . . . . . . . . . . . . . . . . . . . . . . . . . . . . . . . . . . . . . . . . . . . . . . . . . . . . . . . . . . . . . . . 12 SOFTWARE CONFIGURATION General . . . . . . . . . . . . . . . . . . . . . . . . . . . . . . . . . . . . . . . . . . . . . . . . . . . . . . . . . . . . . . . . . . . . . . . . . . . . . . . 13 4I26UTIL. . . . . . . . . . . . . . . . . . . . . . . . . . . . . . . . . . . . . . . . . . . . . . . . . . . . . . . . . . . . . . . . . . . . . . . . . . . . . 13 INSTALLATION General . . . . . . . . . . . . . . . . . . . . . . . . . . . . . . . . . . . . . . . . . . . . . . . . . . . . . . . . . . . . . . . . . . . . . . . . . . . . . . . 19 REFERENCE INFORMATION Specifications . . . . . . . . . . . . . . . . . . . . . . . . . . . . . . . . . . . . . . . . . . . . . . . . . . . . . . . . . . . . . . . . . . . . . . . . . 20 Warranty. . . . . . . . . . . . . . . . . . . . . . . . . . . . . . . . . . . . . . . . . . . . . . . . . . . . . . . . . . . . . . . . . . . . . . . . . . . . . . 21 Schematic diagrams . . . . . . . . . . . . . . . . . . . . . . . . . . . . . . . . . . . . . . . . . . . . . . . . . . . . . . . . . . . . . . . . . . . 23 4I26B USER'S MANUAL HANDLING PRECAUTIONS STATIC ELECTRICITY The CMOS integrated circuits on the 4I26 can be damaged by exposure to electrostatic discharges. The following precautions should be taken when handling the 4I26 to prevent possible damage. A. Leave the 4I26 in its antistatic bag until needed. B. All work should be performed at an antistatic workstation. C. Ground equipment into which 4I26 will be installed. D. Ground handling personnel with conductive bracelet through 1 megohm resistor to ground. E. Avoid wearing synthetic fabrics, particularly Nylon. Page 4 4I26B USER'S MANUAL INTRODUCTION GENERAL The 4I26 is a floppy, IDE, dual serial, and parallel interface card for the PC/104 bus. The 4I26 is intended mainly for developement use with MESA PC/104 CPU cards. The 4I26 IDE interface is fully buffered and has connectors for 3.5" drives (44 pin .1" header) and 2.5" drives (44 pin 2mm header). The AT compatible floppy interface supports 2 standard 360K,720K, or 1.44M floppy drives. The 4I26 parallel interface has bidirectional capability. The serial interface is 16C450 compatible with an option for 16C550 type FIFOed UARTS. The parallel port is capable of bi-directional operation, EPP and ECP modes, and has a bidirectional 16 byte FIFO. Port locations and enables are determined by hardware jumpers but can be changed by software. Alternate interrupts can be selected for the serial and parallel ports. Page 5 4I26B USER'S MANUAL HARDWARE CONFIGURATION GENERAL The 4I26 four sets of hardware configuration options: Serial, parallel, floppy/IDE, and serial interrupt. These jumper selectable options determine the power-up configuration of the 4I26. All of these options except the serial interrupt options can be changed later by using the configuration utility, but must be set so that they do not interfere with existing hardware in the system. The hardware setup will also determines what the BIOS 'sees' at system startup. All options are selected with shorting jumpers placed on three pin headers. In the following discussions, when the words "up" and "down" are used, it is assumed that the 4I26 card is oriented with its bus connectors (J1 and J2) at the bottom edge of the card (nearest the person doing the configuration). DEFAULT CONFIGURATION The 4I26 card is configured in the following manner when shipped from the factory. FUNCTION JUMPERS POSITION SERIAL CONFIG: COM3,COM4, IRQ4,IRQ3 W1-W4 UP,UP,UP,UP PARALLEL CONFIG: LPT@ 0378H W5,W6 DOWN,UP FDC/IDE CONFIG: STD FLOPPY AND IDE ENABLED W7,W8 UP,UP INTERRUPT CONFIG: ALTERNATE SERIAL IRQS (10 AND 11) W9,W10 UP,UP Page 6 4I26B USER'S MANUAL HARDWARE CONFIGURATION DEFAULT JUMPER SETTINGS Page 7 4I26B USER'S MANUAL HARDWARE CONFIGURATION SERIAL CONFIGURATION The startup serial port configuration is determined by the settings on jumpers W1 through W4. Since either serial port can be COM1,COM2,COM3, or COM4, the physical porrts are refered to as serial A and serial B. Serial A connects to P5 and serial B connects to P7. W1,W2,W3,W4 SerA add. IRQ SerB add. IRQ down,down,down,down down,down,down,up down,down,up,down down,down,up,up down,up,down,down down,up,down,up down,up,up,down down,up,up,up up,down,down,down up,down,down,up up,down,up,down up,down,up,up up,up,down,down up,up,down,up up,up,up,down up,up,up,up disabled COM1 - 3F8 COM2 - 2F8 COM3 - 3E8 disabled disabled COM2 - 2F8 COM3 - 3E8 disabled COM1 - 3F8 COM4 -2E8 COM3 - 3E8 disabled COM1 - 3F8 COM2 - 2F8 COM3 - 3E8 ---4/11 3/10 4/11 ------3/10 4/11(S) ---4/11 3/10 4/11 ---4/11 3/10(S) 4/11 disabled disabled disabled disabled COM1 - 3F8 COM3 - 3E8 COM1 - 3F8 COM1 - 3F8 COM2 - 2F8 COM2 - 2F8 disabled COM2 - 2F8 COM4 - 2E8 COM4 - 2E8 COM4 - 2E8 COM4 - 2E8 ------------4/11 4/11 4/11 4/11(S) 3/10 3/10 ---3/10 3/10 3/10 3/10(S) 3/10 Note: interrupt selections marked with an (S) are shared between the two serial ports, and require special software in the interrupt service routine to determine the interrupt source. SERIAL INTERRUPT OPTIONS The two serial port interrupts can be routed to alternate interrupts if desired. The interrupt called 3/10 in the preceding table can be routed to IRQ3 or IRQ10. This selection is made with W9. When W9 is in the up position, IRQ10 is selected, when down, IRQ3 is selected. Similarly, when W10 is in the up position, the 4/11 interrupt is routed to IRQ11, when down, IRQ4 is selected. Page 8 4I26B USER'S MANUAL HARDWARE CONFIGURATION PARALLEL CONFIGURATION Jumpers W5 and W6 determine the initial parallel port location. Other parallel port options must be set by software. W5 W6 PORT LOCATION IRQ down down up up down up down up disabled 378 278 3BC ----IRQ7 IRQ5 IRQ7 FLOPPY/IDE CONFIGURATION Jumpers W7 and W8 determine the initial floppy controller and IDE interface settings. W7 W8 FLOPPY IDE down down up up down up down up disabled primary (3F6) secondary (370) primary (3F6) disabled disabled secondary (170) primary (1F0) Page 9 4I26B USER'S MANUAL I/O CONNECTORS GENERAL The 4I26 connectors are marked with a white square at the pin one end of the connector. When installing cables, this square should be aligned with the colored stripe on the flat cable. Center polarized connectors can be used on the right angle .1" headers if more positive polarization is desired. SERIAL PORT CONNECTORS Connectors P5 and P7 are the serial port connectors. These are 10 pin, dual row .1" headers. The suggested mating connector is AMP 499934-1. This is an IDC (flat cable) type connector. P5 is the primary (SERA) serial port connector, and P7 is the secondary (SERB) serial port connector. These strange serial port names are used because it is possible to re-assign the port addresses with the serial setup jumpers or the setup utility, they are not simply COM1 and COM2. When the flat cable from P5 or P7 is terminated in a male, 9 pin D subminiature connector, the 9 pin connector will have the same pin-out as IBM AT type 9 pin serial ports. The pin 10 wire fron the flat cable must be removed before installing the 9 pin D connector. P5 and P7 serial port pinouts are as follows: HEADER PIN DSUB PIN SIGNAL FUNCTION 1 2 3 4 5 6 7 8 9 10 1 6 2 7 3 8 4 9 5 NC DCD DSR RXD RTS TXD CTS DTR RI GND +5V Handshake in Handshake in Data in Handshake out Data out Handshake in Handshake out Handshake in Signal ground Power or Key Page 10 4I26B USER'S MANUAL IO CONNECTORS PARALLEL PORT CONNECTOR Connector P8 is the parallel printer port connector. P8 is a 26 pin, dual row .1" header. The suggested mating connector is AMP 746285-6. This is an IDC (flat cable) type connector. When the flat cable from P8 is terminated in a female, 25 pin D subminiature connector, the 25 pin connector will have the same pin-out as a standard IBM type parallel port. The pin 26 wire from the flat cable must be removed before installing the 25 pin D connector. P8 parallel port pinout is as follows: (ISA-Standard and PS/2 modes only) HEADER PIN DSUB PIN SIGNAL FUNCTION 1 2 3 4 5 6 7 8 9 10 11 12 13 14 15 16 17 18 19 20 21 22 23 24 25 26 1 14 2 15 3 16 4 17 5 18 6 19 7 20 8 21 9 22 10 23 11 24 12 25 13 NC /PSTB /PAFD /PD0 /PERROR PD1 /PINIT PD2 /PSLIN PD3 GND PD4 GND PD5 GND PD6 GND PD7 GND /PACK GND PBUSY GND PPE GND PSLCT +5V Strobe (out) Auto LF (out) Data 0 Printer error (in) Data 1 Reset printer (out) Data 2 Select printer (out) Data 3 Ground Data 4 Ground Data 5 Ground Data 6 Ground Data 7 Ground Printer Ack (in) Ground Data in (in) Ground Paper out (in) Ground Printer selected (in) Key Page 11 4I26B USER'S MANUAL I/O CONNECTORS IDE CONNECTORS The 4I26 has both .1" 40 pin and 2mm 44 pin IDE drive connectors. These connectors are labled P1 and P4. The 2MM connector is for use with 2.5" drives. The 2mm connector supplies power to the drive, so when 2.5" drives are used, no additional power cable is needed. Pin 20 is removed from both connectors to prevent backwards cable installation. It is suggested that minimum IDE cable lengths be used, as there is no error checking on the IDE cable, the IDE interface is not terminated, and long cables are known to cause problems with any IDE controller / drive combination. A maximum cable length of 18" is reasonable. LED CONNECTOR Two pin connector P2 can drive a disk activity LED. Pin one (the upper pin) connects to the LED cathode. POWER CONNECTOR A 4 pin inline connector is available to supply 5V power to hard or floppy drives. This connector is labled P3. 12V power is not available at P2. The suggested mating connector is AMP MTA type connector 641190-4 (non-feedthrough) or 641198 (feedthrough). The pinout is compatible with 5V only 3.5" floppy drive power connectors. Power connector pinout is as follows: PIN SIGNAL 1 2 3 4 +5V GND GND NC CURRENT RATING 1A 1A 1A XX FLOPPY CONNECTOR Connector P6 is the floppy connector. P6 is a 34 pin, dual row .1" header. The 4I26 uses standard PC type floppy cables (with the twist in the cable for drive A:) Make sure that you have the pin one end of the cable (usually marked with a colored stripe) oriented towards pin one on P6. If the cable is installed backwards, you will destroy any information on diskettes inserted into the floppy drive. The floppy controller chips used on the 4I26 have protection diodes built into all I/O pins. These diodes can cause a problem if a floppy drive is powered by a different power supply than the 4I26. The problem occurs if the 4I26 power is removed when the floppy power is still on. In this case, the protection diodes pull down the floppy interface lines, including drive select and write gate. If you have a separate floppy power supply, make sure to open the floppy door before powering down. Page 12 4I26B USER'S MANUAL SOFTWARE CONFIGURATION GENERAL The 4I26 has many setup options that can be programmed after the system has started up. A much wider range of options is available with this software setup than can be selected by the jumpers. These setting are volatile, and will revert to the jumper selected default settings at power up or hardware reset. If you need to select an option that can not be selected via jumpers, a setup utility program is supplied. The setup utility can be run as part of your AUTOEXEC.BAT file. 4I26UTIL 4I26UTIL is a utility program for reading and setting 4I26 options. 4I26UTIL is invoked with two command line parameters, a function code and a configuration file name or group name. The function code can be either S for Set or R for Read: 4I26UTIL S STANDARD.CFG (To set 4I26 parameters ) (with parameters in STANDARD.CFG) 4I26UTIL R [GROUP] (To read 4I26 parameters) (optional group limits printed data ) 4I26UTIL R >MYOWN.CFG (To save current 4I26 parameters in file) When S is specified, 4I26UTIL changes the current 4I26 settings to those specified in a configuration file. When R is used, 4I26UTIL prints out the current 4I26 configuration. The output of 4I26UTIL can be re-directed to a file to save the current setup options. The configuration file is an ASCII file containing the configuration parameters. The 4I26 distribution disk has two example configuration files, COM5COM6.CFG and STANDARD.CFG. You can use these files as a starting point to creating your own configuration files. The format of the configuration file is very simple: each line of the configuration file consists of a parameter name followed by a parameter value. If a parameter name is not specified in the configuration file, that parameter will not be changed. Any line starting with a semicolon is a regarded as a comment. The parameter names, and parameter values are as follows: The Clock-Off parameter can be used to disable the clock to all serial, parallel, and floppy I/O logic to save power. Enabling this option will disable the 4I26 card. PARAMETER PARAMETER VALUES Clock-Off No Yes (default) Page 13 4I26B USER'S MANUAL SOFTWARE CONFIGURATION 4I26UTIL The FDC-Enable option can be used to change the floppy controller enable status from the hardware configured status. The default setting of this parameter is determined by the floppy/IDE configuration jumpers. PARAMETER PARAMETER VALUES FDC-Enable Yes No The floppy controller on the 4I26 can be set to the Primary address (3F0-3F7) or an alternate (Secondary) address (370 -377). The default setting of this parameter is determined by the floppy/IDE configuration jumpers. FDC-Address Primary Secondary The floppy logic can be turned off if not used, to conserve power. This is done with FDC-DirectPowerdown. FDC-Direct-Powerdown No Yes (default) The floppy logic can be programmed to automatically power-down when not used. This is done with FDC-Auto-Powerdown. FDC-Auto-Powerdown No Yes (default) The parallel port can be enabeled or disabled with this parameter. The default setting of this parameter is determined by the parallel configuration jumpers. PP-Enable Yes No The PP-Address parameter selects the location of the parallel port. The default setting of this parameter is determined by the parallel configuration jumpers. PP-Address 378 278 3BC Page 14 4I26B USER'S MANUAL SOFTWARE CONFIGURATION 4I26UTIL The PP-Mode parameter selects the basic operating mode of the parallel port. The default power up state is ISA-Compatible. This is the standard output only printer port mode. The PS/2-Compatible mode is the simple bidirectional mode. When set to the PS/2-Compatible mode, bit 5 of the printer control port determines the signal direction on the printer data lines. A low on bit 5 sets the lines to the output direction, a high on bit 5 sets the data lines to the input direction. The EPP mode is a more sophisticated bi-directional configuration designed for interfaceing with parallel port peripherals. The EPP mode has hardware handshaking to improve data transfer rates.. The ECP is another sophisticated bidirectional mode that includes a 16 byte FIFO to further improve transfer rates. The ECP mode cannot be selected with the setup utility, but is enabled by a ECP aware driver. PARAMETER PARAMETER VALUES PP-Mode ISA-Compatible PS/2-Compatible EPP ECP (default) The PP-FIFO-Threshold parameter determines how many data bytes must be in the parallel port FIFO to cause an interrupt. This parameter only affects the ECP parallel port mode. When set for 1FOR-15-REV, interrupts will be generated once per output byte (like a standard parallel port) but only when 15 input bytes have been received. When set for 8-FOR-8-REV, interrupts will be generated when 8 bytes have been received or 8 bytes locations are available for output. PP-FIFO-Threshold 1-For-15-Rev 8-For-8-Rev The PP-Direct-Powerdown parameter allows the parallel port to be powered down when not used. PP-Direct-Powerdown No Yes (default) The parallel port logic can be programmed to automatically power-down when not used. this is done with PP-Auto-Powerdown. PP-Auto-Powerdown No Yes (default) Page 15 4I26B USER'S MANUAL SOFTWARE CONFIGURATION 4I26UTIL Serial-A-Enable allows serial port A to be turned off if not used, freeing its I/O space and interrupt. The default setting of this parameter is determined by the serial configuration jumpers. PARAMETER PARAMETER VALUES Serial-A-Enable Yes No The serial A port can be set to eight different addresses.The default setting of this parameter is determined by the serial configuration jumpers. Serial-A-Address 3F8 2F8 220 228 238 2E8 338 3E8 The serial A ports interrupt can be routed to IRQ3/10 or IRQ 4/11. The 3 - 10 or 4 - 11 selection is done with the IRQ configuration jumpers.The default setting of this parameter is determined by the serial configuration jumpers. Serial-A-Irq IRQ3/10 IRQ4/11 The serial A port can use the standard 1.84 MHz baud rate clock or a 2 MHz clock necessary to generate the MIDI baud rate. Serial-A-Clock Standard MIDI Page 16 4I26B USER'S MANUAL SOFTWARE CONFIGURATION 4I26UTIL The Serial-A-Direct-Powerdown parameter allows the serial A port to be powered down when not used. PARAMETER PARAMETER VALUES Serial-A-Direct-PowerDown No Yes (default) The serial A port logic can be programmed to automatically power-down when not used. this is done with Serial-Auto-Powerdown Serial-A-Auto-PowerDown No Yes (default) Serial-B-Enable allows serial port B to be turned off if not used, freeing its I/O space and interrupt. The default setting of this parameter is determined by the serial configuration jumpers. Serial-B-Enable Yes No The serial B port can be set to eight different addresses.The default setting of this parameter is determined by the serial configuration jumpers. Serial-B-Address 3F8 2F8 220 228 238 2E8 338 3E8 The serial B ports interrupt can be routed to IRQ3/10 or IRQ 4/11. The 3 - 10 or 4 - 11 selection is done with the IRQ configuration jumpers.The default setting of this parameter is determined by the serial configuration jumpers. Serial-B-Irq IRQ3/10 IRQ4/11 Page 17 
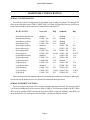
4I26B USER'S MANUAL SOFTWARE CONFIGURATION 4I26UTIL The serial B port can use the standard 1.84 MHz baud rate clock or a 2 MHz clock necessary to generate the MIDI baud rate. PARAMETER PARAMETER VALUES Serial-B-Clock Standard MIDI The Serial-B-Direct-Powerdown parameter allows the serial B port to be powered down when not used. Serial-B-Direct-PowerDown No Yes (default) The serial B port logic can be programmed to automatically power-down when not used. This is done with Serial-Auto-Powerdown Serial-B-Auto-PowerDown No Yes (default) IDE-Enable allows the IDE interface to be turned off if not used, freeing the I/O space occupied by the hard drive (1F0-1F7 or 170-17F hex). The default setting of this parameter is determined by the IDE/Floppy configuration jumpers. IDE-Enable Yes No The IDE decode address can be set to the primary IDE address (1F0-1FF) or the secondary IDE address (170 -17F). Note that this is different from the master/slave drive setup. The default setting of this parameter is determined by the IDE/Floppy configuration jumpers. IDE-Address Primary Secondary Page 18 4I26B USER'S MANUAL INSTALLATION GENERAL When the 4I26 has been properly configured for its application, it can be inserted into a PC/104 stack. The standoffs should then be tightened to secure the 4I26 in its place. The 2mm IDE connector is much easier to install from the top, so if you are using this connector, you should either install the cable before assembling the 4I26 into the PC/104 stack or leave the 4I26 on the top of the stack. When the 4I26 is secured in the stack the other I/O connectors can be plugged in from the side. Page 19 4I26B USER'S MANUAL REFERENCE INFORMATION SPECIFICATIONS MIN MAX UNIT POWER SUPPLY Voltage Supply current (5V) 4.5 --- 5.5 125 V mA BUS LOADING: Input capacitance Input leakage current Output drive capability Output sink current ----150 12 15 5 ----- pF uA pF mA ENVIRONMENTAL: Operating temperature range -I version -C version Relative humidity -40 0 0 +85 +70 90 o Page 20 NOTES C C Percent Non-condensing o 4I26B USER'S MANUAL REFERENCE INFORMATION WARRANTY Mesa Electronics warrants the products it manufactures to be free effects in material and workmanship under normal use and service for the period of 2 years from date of purchase. This warranty shall not apply to products which have been subject to misuse, neglect, accident, or abnormal conditions of operation. In the event of failure of a product covered by this warranty, Mesa Electronics, will repair any product returned to Mesa Electronics within 2 years of original purchase, provided the warrantor's examination discloses to its satisfaction that the product was defective. The warrantor may at its option, replace the product in lieu of repair. With regard to any product returned within 2 years of purchase, said repairs or replacement will be made without charge. If the failure has been caused by misuse, neglect, accident, or abnormal conditions of operation, repairs will be billed at a nominal cost. THE FOREGOING WARRANTY IS IN LIEU OF ALL OTHER WARRANTIES, EXPRESS OR IMPLIED. INCLUDING BUT NOT LIMITED TO ANY IMPLIED WARRANTY OF MERCHANTABILITY, FITNESS, OR ADEQUACY FOR ANY PARTICULAR PURPOSE OR USE. MESA ELECTRONICS SHALL NOT BE LIABLE FOR ANY SPECIAL, INCIDENTAL, OR CONSEQUENTIAL DAMAGES, WHETHER IN CONTRACT, TORT, OR OTHERWISE. If any failure occurs, the following steps should be taken: 1. Notify Mesa Electronics, giving full details of the difficulty. On receipt of this information, service data, or shipping instructions will be forwarded to you. 2. On receipt of the shipping instructions, forward the product, in its original protective packaging, transportation prepaid to Mesa Electronics. Repairs will be made at Mesa Electronics and the product returned transportation prepaid. Page 21 4I26B USER'S MANUAL REFERENCE INFORMATION Page 22 4I26B USER'S MANUAL REFERENCE INFORMATION SCHEMATICS Page 23