1
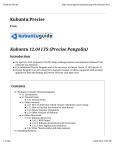
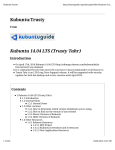
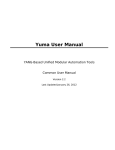
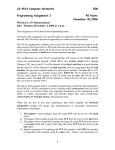
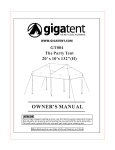
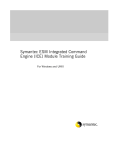
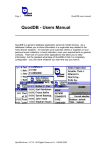
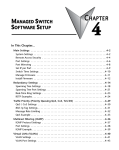
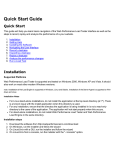
IT Mill Testing Tools 0.9.4
User's Manual
IT Mill 2008
IT Mill Testing Tools User's Manual
This manual covers installation and use of IT Mill Testing Tools for IT Mill Toolkit.
Oy IT Mill Ltd
<ASIAKIRJAN LISENSSI>
<ASIAKIRJAN KÄYTTÖEHDOT>
2
Contents
Chapter 1 Introduction.................................................................................................................... 4
1.1. Overview...................................................................................................................................4
1.2. Features.....................................................................................................................................4
1.3. Requirements............................................................................................................................ 4
Chapter 2 Installation...................................................................................................................... 6
2.1. Overview...................................................................................................................................6
2.2. Installing IT MIll Testing Tools Server....................................................................................6
2.2.1. Apache Tomcat................................................................................................................. 6
2.2.2. Apache Tomcat + Eclipse................................................................................................. 7
2.2.3. Upgrading..........................................................................................................................8
2.3. Installing SSH........................................................................................................................... 8
Chapter 3 Configuration................................................................................................................10
3.1. Configuring IT Mill Testing Tools Server..............................................................................10
3.2. Configuring the Application................................................................................................... 10
Chapter 4 Using the Control Panel............................................................................................... 12
4.1. Overview.................................................................................................................................12
4.2. Starting the Control Panel.......................................................................................................12
4.3. Recoding Mode.......................................................................................................................13
4.3.1. Recording Commands.....................................................................................................13
4.4. Playback Mode....................................................................................................................... 14
4.4.1. Playback Commands ......................................................................................................14
Chapter 5 Managing Tests with Testing Tools Server................................................................15
3
Introduction
Chapter 1 Introduction
1.1. Overview
IT Mill Testing Tools allow you to automate the execution of repeating test cases.
You simply record the test case once and the tool runs it for you as many times as
you want. Test reports and failures are stored in a centralized test server for later
analysis and quality assurance.
The tests and test results are stored on an IT Mill Testing Tools Server, which allows
you to manage, edit, and execute test cases, view the results, and
1.2. Features
Features include:
–
Recording and playing tests
–
Assertion points for validating UI state
–
IT Mill Testing Tools Server for managing tests
–
Advanced inspection of results
–
Execution of tests from Testing Tools Server
–
Scheduled testing
1.3. Requirements
Toolkit applications which are to be tested need at least Toolkit version 4.1.0-rc3.
–
IT Mill Toolkit Release 5.0.0 or newer
–
Java Servlet Container
Dedicated Server Requirements
You can run IT Mill Testing Tools Server on the same Servlet Container in which
you run the applications that you test. On larger test environments it is advisable to
use a dedicated server.
4
Introduction
Requirements for running the Testing Tools Server on a dedicated server:
–
SSH Server
–
On Windows: psexec.exe and taskkill.exe executables (included in
Windows XP)
If the Testing Tools Server runs on a dedicated server, an SSH Server is required on
each testing host.
All client testing hosts need SSH server, also
5
Installation
Chapter 2 Installation
This chapter covers the installation of IT Mill Testing Tools
2.1. Overview
Installation consists of the installation of the IT Mill Testing Tools Server and
configuration of the server and the IT Mill Toolkit applications to be tested.
You can run the Testing Tools Server on the local host or on a dedicated testing
server. Using a dedicated server is recommended because if you run the Testing
Tools Server and the application on the same server, and the application crashes
while being tested, the Application Server can go to a state that causes the Testing
Tools Server to also malfunction.
It is probably the most convenient way to install testing hosts by using virtualization
softwares such as VMware Server or Virtual PC. With virtual servers, it is easy to
setup tens of identical hosts by cloning an existing host.
2.2. Installing IT MIll Testing Tools Server
IT Mill Testing Tools is distributed as a WAR package, which you can deploy to any
Java Application Server or Servlet Container. You should follow the deployment for
the server that you use. Instructions for Apache Tomcat are given below.
For context, we suggest that you use /TestingTools, as used in the examples in
this manual.
2.2.1. Apache Tomcat
With Apache Tomcat, the simplest way to deploy IT Mill Testing Tools is to copy
itmill-testingtools-<version>.war to webapps directory under the Tomcat
installation directory and rename it to TestingTools.war. WAR packages placed
under the webapps directory will be auto-deployed by Tomcat, with the context
name determined from the name of the package.
This way of deployment assumes that you start Tomcat by using the startup script or
system tools. It is suitable for running Tomcat on a separate testing server. When
running Tomcat under Eclipse, you need to follow the instructions given below.
6
Installation
2.2.2. Apache Tomcat + Eclipse
When running Apache Tomcat under Eclipse, the normal deployment directory for
Tomcat is not used. You need to import IT Mill Testing Tools as a WAR project
under Eclipse. In the following instructions, we assume that you have installed and
configured Apache Tomcat as instructed in IT Mill Toolkit Manual.
1. Select File → Import → Web → WAR file.
2. In the Import dialog, click Browse to select the itmill-testingtoolsx.x.war file and when selected, click Ok to close the file selection dialog.
3. In the Web project field, replace the default name with, for example,
TestingTools.
4. Click Finish in the Import dialog
5. Switch to the Java EE perspective
6. Select the Servers tab.
7. Right-click on the installed Tomcat server and select Add and Remove
Projects.
8. In the Available projects list, select the TestingTools project and click
Add. Click Finish.
Assuming that you have also imported IT Mill Toolkit as an example project as
instructed in IT Mill Toolkit Manual, Eclipse IDE will look as shown below.
7
Installation
2.2.3. Upgrading
When you upgrade the Testing Tools by redeploying the new WAR, it will reuse the
existing database, so it is safe to upgrade IT Mill Testing Tools without losing the
old database.
Simply replace the old WAR with the newer one. If you have done some
configuration inside the WAR itself, for example to web.xml, you will need to
reconfigure the new installation.
2.3. Installing SSH
Testing hosts need to have SSH service and an user account. Test accounts
(username and password) can be set through the Testing Tools Server, just ensure
that the accounts exists on the host machine.
Linux
In Linux, you can use either SSH or OpenSSH. Installation depends on the Linux
distribution. On Debian, Ubuntu, and Kubuntu, you can install OpenSSH Server
with:
$ sudo apt-get install openssh-server
Windows
For Windows XP environments, we suggest that you install the OpenSSHD package,
which can be downloaded from Sourceforge at http://sshwindows.sourceforge.net/.
You need to create a C:\TT directory and add files from http://localhost:
8080/TestingTools/ext/AUTClient-bin/winxp to C:\TT, assuming that your
TestingTools Server was deployed on localhost:8080. You also need a freely
8
Installation
downloadable software called PSTOOLS from Microsoft. You can download it from
http://technet.microsoft.com/en-us/sysinternals/bb897553.aspx. Manual installation
is required, just install it to any directory, then copy PSEXEC.EXE into C:\TT and
double-click it once to accept the license.
9
Configuration
Chapter 3 Configuration
3.1. Configuring IT Mill Testing Tools Server
IT Mill Testing Tools Server stores all configuration and test data into an SQL
database. By default, it is located under the directory structure of the Application
Server used. For example with Apache Tomcat, the database files are located under
apache-tomcat-x.x.x\TestingToolsServerDatabase.
If you wish to change the location of the database file, you need to override the
following context-wide web application parameter in the web.xml deployment
descriptor:
<context-param>
<param-name>testingToolsServerDatabaseURL</param-name>
<param-value>TestingToolsServerDatabase</param-value>
<description>Testing Tools Server Database URL</description>
</context-param>
Specify explicit path after file tag, e.g. C:\TT\mydatabase.
The way how you can override the web.xml parameters for a web application is
specific to the Application Server you are using. One solution that should work for
all Application Servers is to unzip the Testing Tools WAR file, edit web.xml by
hand, and rezip the WAR.
3.2. Configuring the Application
You need to activate IT Mill Testing Tools for your web application(s) by adding
following parameter to web.xml deployment descriptor of each application you want
to test:
<web-app>
…
<context-param>
<param-name>testingToolsActive</param-name>
<param-value>true</param-value>
<description>IT Mill Testing Tools activation</description>
</context-param>
…
</web-app>
If the Testing Tools Server is located on the same host as the IT Mill Toolkit
applications that you want to test, no further configuration is required.
10
Configuration
If the Testing Tools Server is located on a different host, you need to tell every
application where the server is located:
<context-param>
<param-name>testingToolsServerUri</param-name>
<param-value>http://localhost:8080/TestingTools/</param-value>
<description>IT Mill Testing Tools URI</description>
</context-param>
On larger environments, it is better to use a dedicated server (or a virtual machine)
for the IT Mill Testing Tools Server.
11
Using the Control Panel
Chapter 4 Using the Control Panel
<LUVUN JOHDANTOTEKSTI>
4.1. Overview
The Control Panel is a
4.2. Starting the Control Panel
Open a web browser and go to your Toolkit application as usual, but add to your
application URL a TT parameter. For example,
http://localhost:
8080/myproject/Calc?TT. This opens the web application with the Control Panel
floating inside the application window.
You can grab the Control Panel to move it to a better place.
Control Panel can be in two different modes, either recording or playback. Each
mode is either active meaning that TT is interacting with the application, or nonactive meaning that TT is not interacting with the application.
Switch modes by clicking "Record" or "Playback".
Control Panel log window is displayed at recording mode.
Recording mode looks like this:
12
Using the Control Panel
4.3. Recoding Mode
Testing Tools Control Panel is immediately in the record mode so you can start
interacting with your application. The recorder records all keyboard and mouse
events.
When done, click on the Save current test case icon. This sends the test case to the
Testing Tools Server and opens the Testing Tools Server window in your browser.
If the Testing Tools Server does not open in a new window, for some reason, check
for all opened browser windows to find where it opened.
4.3.1. Recording Commands
Add comment to the testcase script
Adds javascript comment to testcase script, does nothing while playing testcase
Add a message to testcase
Adds text message which is displayed on log window while playing testcase
Create an assertion point
Creates "checkpoint" using equals operator, assert result is displayed on log window
Save current testcase
Sends recorded testcase to TT Server and opens TT Server GUI to your browser
Open TT Server in a new window
Access TT Server GUI
Stop and show a message during playback
Used for semi-automatic testing, e.g. testcase requires manual interaction before
continuing with testcase
When testcase is played, playback is stopped and given message is shown on log
window
13
Using the Control Panel
Playback can be resumed by clicking Play current testcase icon
Clear current test case
Clears recorded testcase
Minimize TT panel
Gives you more room to interact with your application while recording
4.4. Playback Mode
Playback mode looks like this:
4.4.1. Playback Commands
Play current testcase
•
Plays testcase
Stop on failure
•
If any asserts fail, playing testcase is interrupted
14
Managing Tests with Testing Tools Server
Chapter 5 Managing Tests with
Testing Tools Server
15
Managing Tests with Testing Tools Server
Hakemisto
16