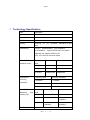
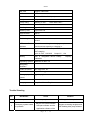
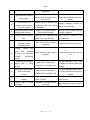
1
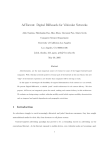
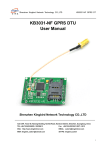
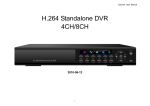
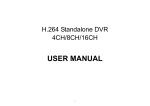
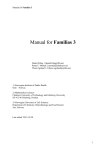
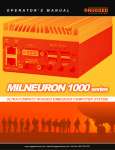
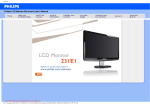
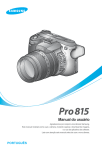
Manual V.1.0.2.4 User’s Manual VT-GPS4345 Page 1 | 36 Manual Read this chapter first, please! ◎ Thanks for buying our company’s product. Please read through the User’s Manual before using. When you use the product, we think you have read through this manual. ◎ The information provided in this manual, is as accurate as possible after being revised carefully. If any printing error or translating mistake occurred in the manual, our company would not bear the outcome due to such mistake or error. ◎ The navigator is hi-tech product, including operating system and the software provided by the third parties. The producer has fulfilled its obligation in the manufacturing of hardware and in the developing and applying of software to ensure the product works normally. If there is something wrong with the product, the producer will shoulder the repair responsibility against the Quality Warrant and will not make any compensation to the property and economy losses incurred from using the product. ◎ The electronics map to be used by the navigator is provided by the third party, who has the copyright of the electronics map and the copyright is subject to the law. The users are not allowed to replicate or use for other purpose, except to use in the navigator. ◎ The navigator producer will not make any warrant or guarantee in denotation or in pretermission to the validity, integrity and accuracy of the information in the electronic map used by the navigator. ◎ The ownership and copyright of the manual belong to our company. The manual is not allowed to replicate or translate in whole or in part for any commercial activity. Our company reserves the final explanation right to the manual contents. Page 2 / 36 Manual 1 Introduction.................................................................................................................................... 5 1.1 Function Overview..................................................................................................................5 GPS navigating.......................................................................................................................5 Communication Function Audio Play ...............................................................................................................................6 Video Play................................................................................................................................6 Image Viewer ..........................................................................................................................6 2 Electronics Text Browse…………………………………………………………. ..……6 1.2 Key-press and jack introduction………………………….…………………...……….. ...…..6 1.3 Product Package ....................................................................................................................8 Users’ Guide of the navigator ....................................................................................................... 9 2.1 Install Precautions ..................................................................................................................9 2.2 Main Functions........................................................................................................................9 2.2.1 ImmediatePositioning ................................................................................................. 9 2.2.2 VMTtelephone/message ............................................................................................. 9 2.2.3 HelpFunction ............................................................................................................. 10 2.2.4 RemoteListenin ....................................................................................................…..10 2.2.5 Remote Controlling……………………… ……………………………………………….10 2.2.6 On-line auto-check……………… …………………………………….…………………10 2.3 3 Using Directions ....................................................................................................................10 Navigating Use Guidance……………………………………………………………................................ 11 3.1 3.2 4 ……………………………………………….……….…...……………6 Explanation………………………………………………………………………….............. 11 Using Preparation……..…… …………………………………………….….………11 3.2.1 VMT Holder Installation ...............................................................................................12 3.2.2 Charger Installation ..................................................................................................... 12 3.2.3 SD Card Usage ........................................................................................................... 12 3.2.4 Usage of Touch Screen and Stylus Pen ...................................................................... 13 3.2.5 Usage of SIM card …………………………….…………….………………………………13 3.3 Interface Introduction ...........................................................................................................13 3.4 Power Use .............................................................................................................................14 3.5 Memory ..................................................................................................................................14 Function Operations.................................................................................................................... 14 Call Center……………………………………………….….………………...….14 4.1 4.1.1 Communication ........................................................................................................... 15 4.2 GPS Navigating ....................................................................................................................22 4.3 Entertainment Function Interface.......................................................................................22 4.3.1 Music Play ................................................................................................................. 22 4.3.2 ImageViewing............................................................................................................ 23 Page 3 / 36 Manual 4.3.3 MoviePlay.................................................................................................................. 24 4.3.4 TextRead ................................................................................................................... 24 4.4 Application………………………..……..………………………………………………………24 4. 5 Set up ............................................................................................................................. .25 4. 6 Interphone .....................................................................................................................................29 5 File storage Path Note ................................................................................................................. 29 6 Precautions .................................................................................................................................. 30 7 6.1 Store .......................................................................................................................................30 6.2 Battery....................................................................................................................................30 6.3 Usage .....................................................................................................................................30 6.4 Net Service ……………………………………………………..…………………..………31 Technology Specification............................................................................................................ 32 Know-how to Use GPS The following is some know-how to use GPS navigating equipment. Read through the know-how before use the GPS navigating equipment in order to improve equipment utilization efficiency. ◎ GPS navigating equipment works by receiving the signals from geostationary satellites for positioning. It may not receive the signals inside the room or in dense buildings, and the signals under viaduct may fade. ◎ When receiving signals from geostationary satellites, the GPS navigating equipment is corresponding to different satellites in different locations, which is called “ephemeris”. An ephemeris covers 300KMs at most. If an ephemeris is confirmed in Location A, you move over 300km with your navigator shut off, the navigator will be under another ephemeris. The satellites searched last time will be all researched to determine the ephemeris, which will last a longer time. It will save plenty of time to click “GPS Reset” button to clean up all the previous satellites with “GPS Test” function for another search. ◎ In high speed moving, it is a little difficult for GPS navigator to search satellite. You’d better stop your vehicle to search satellite to determine your location. ◎ When you charge your GPS navigator with travel charger or VMT charger, you are required to use our company’s original charger. You are required not to charge with your own charger; otherwise you bear the loss incurred from it. Page 4 / 36 Manual 1.Introduction 1.1 Functions Overview Intellectual GPS4345 All-In-One satellite navigator is a brand new concept product newly developed by our company, integrated GPS and communication functions, which is a vital application revolution in GPS industry. Intellectual GPS4345 all-in-one satellite navigator relies on the net operation customer service center, combining the professional GPS geographical information system and vehicle phonetic navigating technology and maintaining the traditional VMT intellectual information terminal position monitoring and position tracing functions. The GPS4345 navigator is a brand new product, perfectively integrated VMT intellectual navigating terminal with independent navigator. The independent navigators can real time display the user’s position and the geographical information around. Meantime, is also a friendly interchanging platform interface for the VMT terminal user. The user can interchange VMT terminal and service center on the platform. The VMT terminal Intellectual GPS4345 has epoch-making meaning, is a revolution of GPS Industry. Its fast, convenient and high quality humanized service will totally alter the ways of driving life, is a milestone concept of “Leading the industry, making new driving life” indeed. z GPS Navigating Accurate Positioning: adopt high quality GPS antenna receiver built-in, receive the signals real time all the weather, fast position accurately. National Map: the Map was offered by the third party. Path Planning: provide the path planning between the departure and the destination and set up the places to be passed or avoided. Phonetic tips: humanized driving path planning, Truman phonetic tips, auto play ways’ name while driving, reach the destination fast and accurately. Automatic Error Correcting: The system can automatically design driving path for you. If you drive into a wrong path, you will be informed, and the system will redesign a driving path to ensure that you can reach the destination fast and accurately without any detour. Facility inquiry: the system can display the facility information for you from the farthest to the nearest within the searching radius, find the domestic installations for you, such as Gas Station, Restaurant, Snack bar, Coffee Shop, Parking Lot , Convenience Store, Guesthouse/hotel, etc. Quick Check: Destination input models, such as phonetic transcription and handwriting, 4.3 inch touch screen, support handwriting input. Display Setting: Daytime and nighttime map display styles, Common driving model, Turning or crossing Zooming in model, Freeway driving model, Freeway Exit model, etc, making you Page 5 / 36 Manual fully know about your position while in driving. z Communication Function Hand free communication, easier communicating and safer driving. z Rearview When you make reverse gear, the navigator will automatically switch to the rearview input status for you to know more clear about the situation behind the vehicle and to finish the rolling back safer and faster. z Audio Play: Support WMA, MP3 and WAV audio play, support Amplifier and Headphone play, support Order lay, Random Order Play and Loop Playback. z Video Play: Support MPEG\WMV\ASF and AVI video play, 480*272 pixel, perfect visual enjoyment of HD and real color, can adjust the play progress, Pause and play the video files full screen. z Image Viewer: Support JPG\BMP\GIF photo browse, can support JPG photos in maximum 2400X1800 pixels. Can freely zoom in /out photos. Also can select Auto Play all the photos under the same file. z Electronics Text Browse Support TXT electronics reading, meet your working and reading needs anytime, anywhere. 1.2 Key function introduction Fig. 1 Front View 6 7 1 2 3 3 4 5 Fig. 2 Side View Page 6 / 36 Manual 10 8 9 Fig. 3 Back View 11 12 13 Fig 4. Down View 15 14 16 Page 7 / 36 Manual S.N. Name Function 1. F1 For the secondary development 2. F2 For the Secondary development 3. Switch For the Secondary development 4. Call Key Make a Call 5. Power on/off Button for ON /OFF, long time press this button in OFF status power on, short time press in ON status into sleeping status. Once return to the normal status, long pressing shutdown. 6. Main Menu Main Menu to show all function 7. Call Number Quickly to make a call Number 8. USB/ Earphone USB Connect and Earphone jack 9. Card Slot SD/MMC Card Slot for Map,Movie, Music….etc. 10. Holder Interphone Holder Fixed 11. Power Supplier Connect to the Car power by cable 12. Speaker Built in Speakers 13. GPS Antenna External GPS Antenna 14. Reset Button Reset position; reset the equipment when in abnormal status by pressing this button. 15. RJ45 Interphone Cable Jack 16. Sim Slot Sim Card Slot for call, GPRS… 1.3 Product Package Intellectual GPS navigator, 1; Vehicle Cable,1; Vehicle holder, 1; GPS Antenna,1; Warranty Card, 1; If any of the above articles is broken or missing, please contact the distributor or agent selling product to you immediately. 2 Using Directions to the Navigator 2.1 z Precautions to installation The installation, repair should be made by our company authorized personnel or professional maintenance man of the local monitoring center. Without our company’s permission, do not install, disassembly and assembly, or repair. Otherwise, you will lose the warranty service right. z This navigator has no waterproof function, cannot be soaked or drenched while cleaning the vehicle. If so, do not open the navigator and contact the local professional maintenance man immediately. Otherwise, all the losses incurred should be borne by yourself. Page 8 / 36 Manual z Because this product has telephone communication function, it sends out radio wave in communication, The personnel who uses heart pacemaker should pay attention: The research of association concerned proved that 15cm or over between the antenna of the mobile phone and the heart pacemaker can avoid the adverse effect on the performance of the heart pacemaker. If you have heart pacemaker, please declare to the installment personnel. z Please check the product connection and the display before driving every time for the sake of your safety. z Please confirm the functions’ normality with the maintenance man before or after sending for repair in order to define the responsibility. 2.2 Main Functions 2.2.1 Real time position This navigator can receive the information command from the service center and send current location and status information to the service center. So, if you have any need, you can call the service center to inquire the vehicle position or to trace the vehicle you concerned. 2.2.2 VMT telephone / message This equipment internally integrated a mobile phone, can provide high-definition Voice Call and Short Message Transmission and Receiving functions combined with the “Communication” function of the navigator, and send out commands via the monitoring center to limit the Call in/Call out functions according to the customer’s requirement. The customer can make voice call directly with the vehicle Hi-Fi and mini Mic by hand-free earphone. 2.2.3 Help Function If needed, the customer can ask the service center for information help (such as traffic path guidance, weather forecast, etc,.), breakdown maintenance help, medical help by the Call center” function button. The monitoring center service people provide timely help to the customer. 2.2.4 Remote Listen In After the service center received the robbery / theft alarm, the service center can start the vehicle listen in equipment by the remote control to further confirm the police information and take corresponding measures, help you out of the dangerous situation. 2.2.5 Remote Controlling The service center, according to the customer’s need, designates the vehicle to report the previous position and status information in the fixed interval after starting up. The time for information reporting is remote set by the center. The time interval is defined as the period between last message sending over and the next time start sending. Page 9 / 36 Manual 2.2.6 Online Auto-check If you want to know another vehicle’s current position (must be equipped with navigator), you can get the basic information of the vehicle via Online Auto Check function, such as current position. 2.3 1) Using Directions Because the operation of the navigator relies on GSM mobile communication net (China Mobile or Unicom), the navigator can work normally within the net coverage and Short Message service or GPRS service is normal. If out of the net coverage or abnormal communication, the product cannot guarantee the valid service, listening in, monitoring, positioning cannot be realized. 2) When the equipment is in sleeping status, the GSM only is working, but the system is still consuming vehicle cell power. When the vehicle is not working for long time, the battery would discharge too much, leading the vehicle not to start. It is suggested to charge the vehicle battery before starting when the vehicle stopped over 10 days. The stopped days (suggested to be 10 days) is influenced by the capacity and the oldness of the battery. Please charge your vehicle battery in time according to its actual situation. 3) All the safety equipments and system would be damaged, so any vehicle equipped with ATS has the possibility to be robbed. In order to minimize such possibility, please pay much attention to the following when park your vehicle: ·After parking, double check the vehicle windows and the door is locked or not. ·To set the anti-theft function successfully once you leave away from the vehicle, only for a moment. ·To park your vehicle at the bright places with crowed cars or people or at the regular parking lot as possible as you can and require invoices or documents; Valuables or luggage or brief case should be taken with yourself or left in the tank or secluded place to avoid the greed of the thief as possible as you can. ·When roadside parking, you should change the position frequently and clean out the dust on the vehicle in order to avoid the thief’s attention. ·At ordinary time, you should look out the abnormal situation of the vehicle. 4) Laws or regulations concerning mobile phone for drivers in different regions is not the same, please check out the laws or regulations in the driving region and abide by strictly. For example, in Shenzhen, handhold telephone is forbidden while in driving (VMT hand free telephone is allowed), the violators will be fined 5) Do not use communication function in dangerous places, such as gas station. It’s better to shut off. 6) This is hi-tech product. The use strict to the regulation can maximize the safety of your vehicle and yourself. Otherwise, it will bring about accidents and unnecessary trouble. So, please read through this handbook before use and can use skillfully. 3 Navigating Use Guidance GPS is fully called Global Positioning System. GPS system contains 3 parts: Space part—GPS satellite constellation; Ground control Part—ground Page 10 / 36 Manual monitoring system; User Equipment Part---GPS signal receiver. GPS navigator is just the GPS receiver. By the GPS navigator, you can quickly find the destination in a strange city, in the best driving path; The camping travelers can quickly find the appropriate camping location with GPS navigator, without worrying about being lost. GPS navigator supports full speed data jack in compliance with USB standard, such as SD/MMC, etc. The customer can interchange data between PC and the equipment so the GPS navigator has data back up function. GPS navigator supports GPS positioning and navigating. This equipment support touch screen input, you can get the real time and accurate positioning information with the colorful and lifelike full screen by pressing it several times. 3.1 Explanation 1) To ensure correctly use the configuration of GPS4345 navigator. 2) Piratical articles or substitutes can make you lose the warranty rights and interests. 3) Do not disassembly the equipments configured in the product by yourself in order to avoid abnormal use and loss, which will make you lose the compensation and warranty. 4) The configuration in different regions will have difference. If any question, please verify to our regional service company or agent. 3.2 1) Using Preparation Put the plug of the VMT charger into the DC jack of the navigator, the other end into cigar lighter plug of the car. 2) Put into the SIM card bought from the ISP.( SIM card bought from other places may not realize some functions, such as remote listen in , remote monitoring, etc,) 3) The Use of lithium batteries z Charger light is red, the time for charging will be about 4 hours; after charging finished, the light went out. z Shut off the backlight of the navigator, the battery can last about 8 hours. z The battery is exhausted, then to charge the battery. Wait for at least 3 minutes, then power on in order to avoid over use. z Do not charge in high temperature environment, such as balcony or sun-exposed places. z Lithium batteries have no process to discharge can be charged when the battery capacity is not exhausted. The navigator can be charged in time in low voltage. z Not in use for long time, please charge every 2 weeks in order to maintain the battery performance. 3.2.1 VMT Holder Installation 1、Make the holder appropriate crooked and slide in the arrow direction to fix, making sure holder is fixed onto the vehicle. 2、 Sandwich the navigator between the holder and slide in the arrow direction to fix, the navigator should be totally binding with the holder. 3、 Please carefully choose the installation position, do not put the navigator into a place, blocking the Page 11 / 36 Manual driving sight. ×Do not block the driving sight. ×Do not fix it before the air bag. 4、 Please maintain reasonable temperature in the car. Lower temperature will affect the sucking capability of the sucker. 3.2.2 Charger Installation 1、VMT charger uses 12V auto standard voltage. Seater charger uses 220V national standard voltage, output voltage is +5V. 2、For VMT charger, connect DC end of the power cable to the power supply jack, the other end cigar lighter connects to the cigar lighter plug of the car. 3、For seat charger, connect the output jack of the charger to the power supply jack of the navigator, input end to the 220V standard voltage plug. 4、The engine is still in working status after shut down the vehicle, so when you do not use the navigator, please power off the system and take out the power supply cable. 5、 After start the vehicle, put into the VMT charger to avoid the damage to navigator during the starting moment. 3.2.3 Use of SD Card 1、 The memory attached to the navigator contains electronics map file, which is a must data for GPS navigating, cannot be deleted. 2、Press the top of the SD card gently; the memory will pop up automatically. 3、 When taking out the memory, make sure that the memory is not in reading status. Otherwise it will make the system halted or the data lost. 4、 Do not set the SD card in protect status so that the system can be used. 6、 In operation, if the memory is taken out by incaution, the navigator will display Error Information. Please return the memory to its position and click Enter button, it will return back to normal. 3.2.4 Use of Touch Screen and Stylus Pen l、The LCD touch screen is easy to be scratched. Please operate with stylus pen. Do not use sharp objects to touch the screen in order not to damage the touch screen. 2、Do not press the touch screen forcedly in order not to damage the screen. 3、Do not expose the touch screen under the sun for avoiding equipment breakdown. 4、Use soft cloth special for LCD screen to clean the surface of the touch screen to keep the screen surface clean in order not to affect the display effect. 5、Using stylus pen directly to choose the symbol items on the touch screen can immediately enter into the corresponding function or open its corresponding floating menu. 7、 The stylus pen’s dragging on the map interface can drag direction and move the map to look for the goal directly. Page 12 / 36 Manual z 3.2.5 Use of SIM card 1, Buy normal SIM card from the ISP. 2, Make sure the SIM card has the corresponding service items; otherwise some functions will be invalid. 3, Install SIM card correctly. Make sure to take out and install SIM card in shut-off status of the navigator to avoid the damage of SIM card. Interface Introduction 3.3 GPS navigating user interfaces contains Power On Logo, Main Menu Program, Recreation Menu interface, GPS navigating interface, Setting Up interface, Communication interface, Application interface, Prompt Dialog Box interface, etc. The main menu has six sub menus; their functions are Call Center, Navigating, Recreation, Application and Setting up. The main interface is illustrated as below: The display screen of the product is touch screen and equipped with a stylus pen, ON/OFF is slide switch operation. Also equipped “Power” button and “M” button. The specific button functions refer to 1.2. 3.4 Use of Power Supply means the battery capacity is full. With the working time added, the capacity will reduce gradually. means the battery capacity is used out. The battery capacity icon is displayed at top right corner in most user interfaces. When happened, the system will show “Battery capacity is not enough, please charge”, and wait for sleeping status when the battery capacity is in low voltage. Page 13 / 36 Manual Lithium batteries are used by this product. AC adapter or VMT AC adapter is used to charge the . Charging will be completed for 2—4 hours battery. While charging, the battery symbol shows and the charging light is red while charging. The red light will fade away when charging is completed and the battery symbol shows . Note: For the first 3 times, more than 4 hours each time for charging will extend the battery’s life. 3.5 Memory SD/MMC card is used by the product to store music, photos and electronics maps, etc. The SD/MMC capability is bigger, the storage will be much bigger, can support SD/MMC card with 32MB~4GB. Once SD/MMC card is inserted, the navigator will identify automatically. 4 Function Operations 4.1 Call Center Press “Call center” button in the main interface, function interface of the call center shows up, as illustrated below. After getting through, you can get in touch with the service center, the service center can provide various personalized services to the customer according to the customer’s needs, such as, Asking Way, the customer is required to tell the service center the destination, locations to be avoided and locations to be needed only, the service center could well plan the driving path based upon these personalized requirements. If the navigating program is working at that moment, the service center will make the navigator realize the navigating function automatically; If the navigating software is not working, the service center can remote start the navigating software to realize the path navigating function. Page 14 / 36 Manual 4.1.1 Communication The communication function can be used only under the condition of being installed SIM card. Pressing “Communication” button in the main interface enter into Communication interface, as illustrated below, preset Telephone, Short Message, Online Auto Check, Phone Book, Auxiliary Functions and Set Up functions. 4.1.1.1 Phone Features Pressing Telephone button displays telephone interface, as illustrated below. Press “Dial” for dialing telephone. Also you can press Received Calls, Dialed Calls and Missed Calls buttons to check the phone book. Pressing return to the communication interface. The customer can make voice call directly with the vehicle Hi-Fi and mini Mic with hand free phone, without hand phone. Page 15 / 36 Manual Dial phone: press “Dial” in the telephone interface, enter into Keyboard Entry area, and enter the telephone number in the Keyboard Entry area, click “backspace” button to modify the telephone number. After telephone entry, press “Dial” button, you can call out telephone. Call in interface shows up, as illustrated below and store the dialed telephone number into the dialed telephone numbers for checking. Pressing button returns to Telephone interface. In calling, clicking the numbers in Keyboard Entry area can realize dialing extension number function. Pressing “Hang Up” button can hang up the telephone; It will close Calling Dialogue Box and return to the Telephone interface in case the telephone call is not answered; When the telephone call is answered, the communication begins, the Calling Dialogue Box shows up; when the communication call is ended, the Calling Dialogue Box is closed, and return to Telephone interface. Page 16 / 36 Manual Answer to the call When the navigator receives call, it will give In-call ring in any operation program and in any interface. When the navigator receives the command of In-call number, the Telephone interface will pop up, as illustrated below. Telephone Management Including Received Calls, Missed Calls, Dialed Calls. Each has 20 records. When 20 records are reached, the first early telephone number will be deleted. Press Received Calls button, the Received Calls interface will be shown up. You can check the received calls by pressing Page up and Page down buttons. Press Back button, return to the Telephone interface. You can check the detailed call records against the corresponding item. Page 17 / 36 Manual 4.1.1.2 Short Message Function Press “Short Message” button in the communication interface, the Short Message interface shows up as illustrated below. Sending Short Message Function: Press New Message button, enter into New Message interface, as illustrated below. Pressing button returns back to Short Message interface. Input the message you want in the new message blank, and then click “Sending out” button, enter into Number Input interface. You may choose sending to service center, also you are required to click ‘Number Input button to input the mobile phone number you want. Page 18 / 36 Manual In New Message interface, also you can click “Sending current position” button to send out your current position. This function is used with the precondition only that GPS navigator can normally receive GPS signals. Page 19 / 36 Manual Receive Short Message: When the navigator receives short message, it will pop up Short Message interface in any operation program and in any interface, as illustrated below, shows the number, time and contents. Press Answer calling button, you can dial the telephone number. The Calling out interface (same as Calling in function) shows up. Once calling finished, return back to Short Message interface; Press Answer Message button, you can send message to this number, New Message interface (same as Sending Message function) shows up, enter back to Short Message interface after ending; Press Delete Record, pop up Delete Dialogue Box, return back to Short Message Content interface after operation; Press return back to the previous interface. Message Management: Including Inbox, Outbox and Deleted Message. Inbox and Outbox can contain 100 messages each. After 100 messages reached, the earlier message would be deleted in order. Press Inbox button in Short Message interface, Receiving Message interface shows up. Press Page Up, Page Down button, you can check the message records. Click telephone number, the message contents show up. Press return back to Short Message interface. Page 20 / 36 Manual Press Delete Message button in Short Message interface, Delete Message interface shows up; Press Inbox button to delete all the received message records; Press Outbox button to delete the whole received message records. 4.1.1.3 Setting Up Press Setting Up button in the Communication interface, Setting Up interface occurs as illustrated below. Setting Up interface contains “Center Number Setting”, Message Number Setting, IP Address Setting, and Monitoring Setting. Page 21 / 36 Manual Center Number Setting To set the service center number. Click and enter into Center Number Setting interface. After finished setting, click Enter button and return back.. Message Number Setting To set the service center number. Click and enter into Message Number Setting interface. After finished setting, click Enter button and return back. IP Address Setting Set up the IP address of the navigator, the address is provided by the service center. Click and enter into IP Address Setting interface. After finished setting, click Enter button and return back.. The initial Password is “000000” 4.2 GPS Navigating Use stylus pen to click Navigating button, enter into navigating interface. The detailed guidance to GPS navigating software, refer to GPS Navigator User’s Manual. 4.3 Entertainment Function Interface Click Recreation button in the main interface; enter into Recreation Function Interface, illustrated as below: click Music, Pictures, Film and Album buttons for corresponding function. 4.3.1 Music play 4.3.1.1 Select Music Use stylus pen to click Music button in the Recreation interface, enter into music list menu, illustrated as below. Page 22 / 36 Manual and After entered into music list, click button to select music. ¾ After chosen the music file, click the music selected into play modal. ¾ After chosen Upper level, you can get into the parent directory. If you want to shut off the music, please click the red mark “ 4.3.1.2 ”. Player Button Operation In music play status, you can also press operate Stop/Play button; Click “ and buttons to select the files you want; free ” button, you can return back to the upper menu. Directly click volume bar to adjust the sound. 4.3.2 Album Browse Select Album menu in Recreation menu, enter into Album List interface. Press and buttons to check the photos, click the photos you selected, enter into photo browse status. Click anywhere of the photo, the Tool Bar shows up at the lowest bottom of the photo, illustrated as below: Page 23 / 36 Manual The button functions are, from the left to the right, Zoom in, Zoom out, Previous, Next, Rotate, Auto Display, Shut off. You can click somewhere you want to zoom in or zoom out. 4.3.3 Movie Play Click Film in the recreation menu, enter into film list menu. 4.3.3.1 Select Video File Click and buttons in the Film List menu to select the files you want to play. The clicked film enters into film play interface, illustrated as below: 4.3.3.2 Video Play Status Button Operation In play status, you can operate Play, Pause, Stop, Position and Shut off functions. Volume can be adjusted by Volume + and Volume – buttons. 4.3.4 Text Read Click Books button in the recreation menu, enter into Book List menu. Press to read the electronics books, and click the book name, enter into reading status. Page 24 / 36 and buttons Manual In Text Read interface, press and to roll one line upper and lower. You can select Auto Play or Manual play. 4.4 Application Click Application icon in the main interface; enter into Application interface, illustrated as below: The user can operate some mini software with this function(must be fit for Win ce system), such as mini game software, etc. The user can set up 5 soft wares at the same time, but it’s better to operate 1 soft ware at the same time to avoid system being halted due to too much resource occupation. Click Application one, enter into application setting interface, illustrated as below. Select the application program to be needed and click Enter button, the setting is completed successfully. Once again click Application One icon, you can enter into the set application program. If the set application program is needed to unload, click Unload button, enter into Unload interface. Select you application program to be unloaded and click Unload button. The unloading is succeed. Page 25 / 36 Manual 4.4.1 4.5 Setting Function Select Setting Function menu in the main menu, click and enter into this menu. Setting function contains Language, Power Supply, Voice, System Setting, Date, Screen Calibrating, GPS monitor, FM transmit. 4.5.1Language Language menu is mainly used for language setting. Chinese/English can be set. 4.5.2 Power Supply Power supply mainly contains battery capacity check, screen lightness adjust, automatically shut off Page 26 / 36 Manual screen setting and automatically shut down setting. Battery capacity: to check the current battery capacity used. Screen lightness: to adjust the lightness of the screen. Automatically Screen Shut off: to set the backlight time when not in use to save power. Automatically down: to set the shut down time in order to save power. 4.5. Sound Sound menu mainly contains Screen Touching Sound setting, Voice report Setting and volume control. Screen Touching sound: Select or not select touching sound. Voice report: set the voice report or not for In call or In message. Volume Control: adjust the volume. 4.5.4System Setting System setting contains Memory Space, Free Space, Firmware, Service Tag, Restore Factory Defaults and GPS Path setting. Memory Space: Total current mailbox space of the memory card. Free Space: the current free space of the memory card. Firmware: the firmware of the navigator. Service Tag: the service tag of the navigator (unique serial number) Restore Factory Defaults: click to restore the factory defaults. GPS Path setting: click to show the GPS path setting interface. Select the executable degree of the Page 27 / 36 Manual electronic map in the list box (an .exe file), then click GPS path to finish the setting. 4.5.5 Period Period menu contains Date, Time and Time Zone setting. Date: click Date button, enter into Date Setting interface. After setting, click Back button; Time: click Time button, enter into Time Setting interface. After setting, click Back button. Time Zone: click Time Zone button, enter into Time Zone Setting interface. After setting, click Back button. 4.5.6 Screen Calibrating Click Screen Calibrating icon, enter into screen calibrating status. Click center of “+”, and let it off after the icon is moved, report this operation. Click anywhere of the screen till the icon fades away, return back the menu. 4.5.7 GPS monitor GPS monitor mainly observes navigator’s status of receiving satellite signals. GPS reset: Click this button, you can re-start GPS receiver. Page 28 / 36 Manual 4.5.8 FM transmit Open FM transmit function, the sound of the vehicle can be sent to the vehicle radio. Click “Open Transmit and shut off speaker” check box, you can open FM transmit function. Click “+,-” to adjust the transmit frequency. 4.6 Interphone Setting This function was offerd by the third party, please contact the third party to offer this function. 5 File Storage Path Note ¾ Audio file to be stored under the music folder established earlier in the memory card; ¾ Video file to be stored under the movie folder established earlier in the memory card; ¾ Image file to be stored under the image folder established earlier in the memory card; ¾ Text file to be stored under the book folder established earlier in the memory card; ※ Note: Do not change GS navigating soft ware path in the SD card factory defaulted. Page 29 / 36 Manual 6 Precautions 6.1 Storage Do not place this product under sunshine or dust location, and do not place with other electronics parts in order to avoid damage. Keep away from those equipments with strong electromagnetic radiation or strong magnetic field as possible as you can. 6.2 Battery 9 When using this product at early stage, please use out the battery capacity and charge it for 2-3 times and 12 hours at least to ensure the usage status of the battery. 6.3 9 Please charge the battery with mating charger. 9 Lithium batteries are used in this product. Do not throw into the fire in case of explosion. 9 Please disassembly the batteries by yourself. Use 9 To prevent electric shock and damage, do not plug out or contact the product with wet hand. 9 Do not pull out the product when it is interchanging data with the computer, otherwise, it will lead the product itself and the data being read to be ruined. 9 While using the product, please avoid fierce vibration to the product in case of damage. 9 Do not disassembly and repair the product that will make the warranty invalid and ruin the product. 9 The LCD screen is easy to be scratched. Please operate with stylus pen and do not touch the screen with sharp object in case of damage to the product. 9 The product has no water prove function. So water spray or soaking will seriously damage the product parts. 9 Do not use volatile petrol, diluents or any other chemicals; otherwise the surface treatment layer of the product will be ruined. 9 Do not use wet cloth to clean the product and its accessories. It is suggested to clean the screen with soft cloth special for the product. 9 Do disconnect the computer power supply and the product prior to maintenance and cleaning. 9 The product cannot totally avoid file or data being damaged or lost due to improper use or other causes. Please have full backup to all the files or data in the SD/MMC used in the product. 9 Photograph should refer to the real products, the photos in the manual are for reference only. 9 In the case that wireless device is forbidden or the use of wireless device will result in interfere or danger, please do not power on the product. Page 30 / 36 Manual 9 Please abide by the local relevant laws and regulation. Try your best to drive the vehicle with both hands. Traffic safety is the first to be considered for driving. 9 All the wireless devices have the possibility of being interfered so that their performance would be affected. 9 Please abide by any relevant restrictions. Please power off near the medical equipment. 9 Do not use the equipment within gas station, and do not use the equipment near the fuel or chemical product. 9 Please abide by any relevant restrictions. Do not use the equipment in the places where blasting operation is proceeding. 9 Qualified personnel only can install and repair the product. 9 The product is used in normal position only. If there is no necessary, do not touch the antenna area. 9 Authorized accessories and batteries only can be used. Do not connect with inconsistent product. 9 Your equipment is not damp proof functional, please keep it dry. 9 Do remember to make a backup or to keep a manual record. to all the important information 9 Please read through the product’s manual for detailed security guidance before connect to other equipment. Do not connect with inconsistent product. 6.4 Net Service 9 You must open the necessary services with the wireless service provider before using the communication function of the equipment. The communication functions can be realizes or not depends upon the functions of the wireless net. It doesn’t mean you can use these net services in any net. You may be required to open the necessary net service with the service provider before use. Your service provider may ask you to submit additional explanation of using net service and explain his charge rates. There would be some restrictions for some nets, which will influence the ways you use net service. 9 This equipment supports WAR2.0 protocol (HTTP and SSL) based upon TC/IP. Some functions of the equipment, such as MMS, net browse and unloading contents through browser or MMS, need to have the relevant networking support technology. Please ask your SIM card seller whether or not they have provided SIM card service and other related information. SIM card seller may be service provider, ISP, or other distributor. Page 31 / 36 Manual 7 Technology Specification Item Description processor ARM9 S3C2451 Nand FLASH 64M SDRAM 128M Display Samsung 4.3' TFT, resolution ratio480*272,16M 533 MH color EGSM900MHZ,DCS1800MHZ, Tri-band GSM/GPRS PCS1900MHZ。 support GPRS class 10/ class 8 (optional) and support GPRS的CS-1, CS-2, CS-3 and CS-4 encode mode. GSM/GPRS Frequency emissive power Maximum Minimum E-GSM900 33dBm ±2db 5dBm±5db DCS1800 30dBm ±2db 0dBm±5db PCS1900 30dBm ±2db 0dBm±5db Band GSM/GRPS Frequency Band Receiving sensibility receiving E-GSM900 < -106dBm DCS1800 < -106dBm PCS1900 < -106dBm sensibility。 GSM/GPRS Receiving sending List Frequency and Receiving Sending E-GSM900 925 ~ 960MHz 880 ~ 915MHz DCS1800 1805~ 1880MHz 1710 ~ Band 1785MHz PCS1900 ~ 1930 1990MHz FM Transmit 88.1MHZ——107.9MHZ Page 32 / 36 1850 ~ 1910MHz stepping 0.1MHZ Manual SD Card Support 128M-4GB USB USB client 1.1 Dimension 160.00 x 77.00 x 27.90 (mm) Weight 315g Temp. Rang Working: 0~60℃ Color Black and white Working time Upper limit: 5h Stand by time Upper limit:72h GPS receiver Built in GPS antenna Built in Positioning time Cold star: about 3minutes; Warm start: about 1 static state:0~80℃ second LED Power Green shows working-in or charging complete. indicator Red shows less capacity or charging in. Charging Input:100~240V AC Output:5V DC, 1.5A VMT charging Input:10~30V ,1.3A MAX Battery Output:5V , 1.5A Built in chargeable lithium battery capacity: 2000mA/H Operating System Windows CE.NET 5.0 Navigating Software Video file format .avi\.mpg\.wmv, etc. Music file format .mp3\.wma\.ogg, etc Photography .jpg\.bmp\.gif,etc. file format E-book .txt Languages Simplified Chinese/English Trouble Shooting No. Breakdown Cause Solution 1 Cannot power on The battery may be exhausted. Charge the battery in time. 2 Third party system halted in operation. May be the conflict between third part software and the application software of the Page 33 / 36 Suggest re-starting navigator and then deleting third party software. Manual equipment. 3 4 Inaccurate click onto the touch screen. long time use. screen. environment and the current Cannot play some music Cannot read the memory Display “cannot find the path” after clicked Display path” “cannot after Maybe the navigator doesn’t support the file format. Suggest changing position or wait for a few minutes. Change to the format that the navigator supports. Maybe the file contents are not Move the file contents to the stored in the given directory. given directory. SD card is not input or input Input SD card or input correctly. find changed E-map or SD card and clicked local weather. incorrectly. navigating button. 8 status and recalibrate the touch satellite signal normally files. 7 touch screen changed due to Satellite signal is related to the and film files normally. 6 Enter into Screen Calibrating Cannot receive the or hard to position. 5 The relevant parameters of the Navigating Maybe the path of the E-map is Reset up the map path, refer to changed. 4.6.4. button. Cannot receive satellite 9 signal while in using E-map. The system reacts slowly 10 while in operating E-map. 11 No sound from the speaker. 12 Cannot dial message. or send Maybe the E-map doesn’t match with the navigator well. Maybe the E-map doesn’t match with the navigator well Set the COM port of the E-map to COM1 port and the baud rate to 9600. Set the COM port of the E-map to COM1 port and the baud rate to 9600. Maybe the built in speaker is set Set the built in speaker to Open, to shut off status. refer to 4.6.8. SIM card is not input or input incorrectly. Page 34 / 36 Input SIM card or input correctly. Manual Warranty Card Attention Please Dear customer: Thanks for buying our GPS portable satellite navigating system. In order to protect your rights and interests of Contract Repairing, Contract Returning and Contract Changing (shortly called Three Contract”, please pay much attention to: 1. Please fill in the Warranty Card completely, accurately and actually when you buy this product. 2. Please keep the valid invoices properly for the product or its accessories. 3. The valid Warranty Card and the invoice are the basic guarantee for your rights and interests of Three Contract, please show to the service person when you report for repair.(The valid Warranty Card and invoices must be filled in completely, actually and correctly, without any sign of erasure; The valid invoices must specify the commodity trademark and model, date, seller’s chap, etc.) 4. Please keep properly all the objects and materials attached to the product. They should be returned completely for returning or changing product. 5. The authorized service person only is allowed to disassembly the product. Please keep the seal completely. The broken seal by the non-authorized service person will exempt the customers from the Three Contract service. Warranty Card *The erased warranty card is regarded as invalid. If lost, cannot be reissued. Model: Serial No: Date: Telephone No.: Customer’s Name: Address: Zip Code: E-mail: Telephone No.: Please fill in the Answer Form and mail back to our company as soon as possible so that you can enjoy better and higher quality free service. We will perform Three Contract service for you since we receive your Answer Form. Page 35 / 36 Manual Precautions to warranty claim For the following causes led to breakdown, our company does not bear the duty of free repairing: 1. The product and its parts not from our company; 2. Exceed the warranty period. 3. Breakdown or ruin due to noncompliance with User’s Manual to use, maintain and storage. 4. You used unauthorized extension parts or peripheral equipments, which led to standard parts damaged or broken. 5. Abnormal causes made the parts damaged or broken (including bad power supply environment, foreign matter, transport, move and collision, etc.) 6. Force majeure: the equipment cannot work normally due to force majeure, such as earthquake, fire, and contingency (theft, being lost, etc.) 7. Self programmed or third party software led the product not to work normally. 8. Breakdowns due to the following operations against rules: 1. Hot plug the power adaptor or other accessories; 2. Disassembly, repair and install selfishly 3. Performance upgrade selfishly. Users’ liability: Confidential information:The customer is responsible for the safety of the exclusive confidential information. Data backup: the customer is responsible for data or program backup to avoid being lost or changing the file, data or program. Our company is not responsible for maintaining the product data, if the data is lost due to no backup of the customer, we will not bear the liability. Page 36 / 36