1
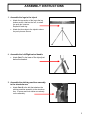
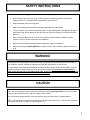
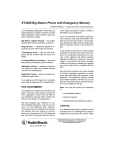
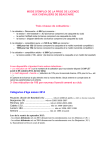
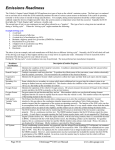
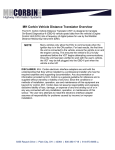
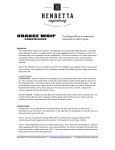
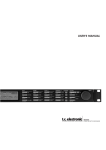
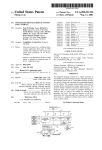
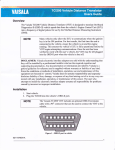
1-888-816-6517
www.cimarronsports.com
Multi-Pitch
Pitching Machine
USER MANUAL
TABLE OF CONTENTS
Thank you for purchasing the Cimarron Multi-Pitch Pitching Machine. The Cimarron Multi-Pitch Pitching
Machine is a high performance pitching machine designed to give you years of enjoyment.
This booklet provides you with:
1. Assembly Instructions…………………….Page 3
2. Specifications/Features…………………..Page 5
3. Operating Instructions ……………………Page 6
4. Safety Instructions………………………...Page 9
5. Maintenance Instructions…………………Page 11
6. Warranty Information…………………….. Page 12
Please read this booklet and pay attention to each section. It is important that the pitching machine is assembled
correctly.
It is also important that you fully understand the operating instructions and maintenance of the machine before you
operate it.
The warranty provides you with the confidence that you have purchased a quality pitching machine and that the
manufacturer stands behind the product and will provide service.
If you have any problems with assembling this pitching machine or its initial use, please call Cimarron Sports Service
Department at 888-816-6517.
Cimarron Sports
PO Box 14175
Tulsa, OK 74159
(918) 806-0096
888-816-6517
1
Removing your Pitching Machine from the package
Carefully lift the machine from the box. Please be certain to maintain careful balance and use
proper lifting techniques as the machine unit alone weighs 45 lbs. Lift by the metal parts
ONLY!
Do not set the machine down with the control panel or with the speed adjustment knob
touching the floor.
Verify all pieces (See Figure 1). You should have the following parts in the box:
A. Pitching machine unit
B. Tripod
C. 3 ea. 2-piece leg sets w/feet attached
D. Softball chute
E. Baseball chute
F. Left to right swivel control
G. Arm to allow pitching machine to rotate for different pitches
H. Control to connect tripod to aluminum arm of pitching machine
I.
Adjustment screw to set tightness of ball chute
J. Bolt, washers, and nut for attaching tripod to aluminum arm assembly
A
D
E
C
B
H
F
G
I
J
2
ASSEMBLY INSTRUCTIONS
ASSEMBLY INSTRUCTIONS
1. Assemble the legs to the tripod
•
Attach the top section of the leg to the leg
bottom section, that has the foot, to where
the push pin is secure.
Repeat for each leg.
•
Attach the three legs to the tripod to where
the push pins are secure.
2. Assemble the Left/Right swivel handle
• Attach Part F to the base of the tripod just
below the bracket.
3. Assemble the pitching machine assembly
to the aluminum arm
•
Attach Part G to the bolt that attaches the
pitching machine assembly to the aluminum
arm. A spacer and lock washer are already
on the assembly.
3
4. Assemble the pitching machine to the tripod
•
Set the pitching machine assembly on top of
the tripod and have someone hold it there
•
Attach Bolt J through the single hole in the
tripod and the hole closest to the end of the
aluminum arm. Put one washer on each
side of the tripod, on the bolt, and attach
the nut so that the connection is loose.
•
Insert Part H through the tripod slit and the
second hole on the aluminum arm and tighten
the nut.
5. Attach the ball chutes
•
Attach Part I to the hole in the baseball or
softball chutes, whatever kind of balls that
you plan to pitch.
•
Insert the baseball or softball chute in the
chute hole, and make sure the chute is all
the way in. Tighten Part I, as needed, to
prevent the chute from turning while in use.
Congratulations! Your new Cimarron Multi-Pitch Pitching Machine is now ready to go!
4
SPECIFICATIONS/FEATURES
•
•
•
•
•
•
•
•
•
•
•
•
•
•
Pitches up to 60mph*
Adjustable speed control
Designed for dimpled balls **
Can be used for baseball or softball
Runs on 110 AC
Adjustable swivel for precise aiming
Adjustable tilt
Baseball and softball feed chute included
Protective wheel cover
Steel grill hand guard
Solid state electronic control
Molded polyurethane wheel designed for accurate pitches
Steel construction
Weighs 70 lbs.
*Baseball will pitch up to 60mph. Softballs will pitch up to 55mph. To achieve maximum speed, set the
speed control to 8 -8.5.
**Though the pitching machine is capable of pitching regulation leather baseballs and softballs, it is
recommended that you use the dimpled pitching machine balls. All one-wheel pitching machines, utilizing
the squeezing action, will reduce the integrity of regulation baseballs and softballs within a short period of
time.
5
OPERATING INSTRUCTIONS
Basic Pitching Operation:
Place the machine on the pitcher’s mound or in an appropriate location. Aim the machine at the hitting area
or home plate.
Ball Feed
Control Panel
Ball Exit
Speed Control
Safety Switch
Select the type of ball (baseball or softball) you are going to pitch and adjust the Squeezer Assembly. The
Squeezer Assembly should be set where it is attached to the lower two small holes which is the setting for
baseballs. To change the setting to softballs, unscrew the handle attached to the Squeezer Assembly and
move it up to the top two small holes and reattach the handle to the upper large hole.
Before plugging the machine into the power source, be certain the speed control knob is turned to “0”. Plug
the machine into a surge protector and plug the surge protector into the power source.
Start the machine by setting the safety switch to “ON”, then turn the speed control knob clockwise to the
desired setting. Allow adequate time for the wheel to reach the required RPM before inserting the first ball
into the feed chute.
Throw the first pitch and adjust the location as required. To adjust ball flight, simply move the pitching
machine left or right on the tripod. To adjust the pitching height, loosen the Pitching Head Elevation and
reposition the head as required. To adjust for the delivery type of pitch, loosen the rotation control and
rotate the machine to the desired pitch.
After setting the speed and type of pitch, pitch at least 10 balls BEFORE allowing the batter to step into the
batter’s box. The hitter should watch these 10 test pitches to become accustomed to the overall speed and
angle of the delivery.
Throwing Groundballs and Fly balls:
To throw fly balls, tilt the pitching head back and lock in place. Set the speed as needed to achieve desired
distance.
To throw groundballs, tilt the pitching head forward. Set the speed as needed.
* To turn the machine off, turn the speed control knob counter-clockwise to “0” then set the safety switch to
“OFF”.
6
GAP SELECTION
Gap Selection
The term “GAP” refers to the space between the pitching wheel and the pad above the wheel. The pitching
machine is designed to throw both baseballs and softballs. Different balls require different “GAPS”.
You may use your Multi-Pitch Pitching Machine to only pitch baseballs or 11” softballs. It is not necessary
to change the GAP very often unless you plan to use different sizes and types of balls.
To Change the Gap
Turn the machine off and unplug the cord
Note that there are several holes on the pitching machine where the pad attaches to the body of the pitching
machine.
To change the Gap for baseballs, lower the squeezer assembly to the lowest two small attachment holes and
insert the handle of the squeezer assembly and tighten it.
To change the Gap for 11” softballs, unscrew that handle and raise the squeezer assembly to the top and two
small holes, screw the handle in place and tighten the handle.
Gap adjuster
Squeezer
Gap
Pitching
Wheel
Hand
Guard
7
CHANGING BASEBALL/SOFTBALL FEED
The Multi-Pitch Pitching Machine comes with a baseball feeder chute and a softball feeder chute.
1. Insert either the baseball or softball feeder into the back of the machine.
2. Attach Part I in the hole, on top of where the feeder chute is attached, and screw it in about 1/8”.
Make sure that the feeder chute is as far in as it will go and adjust it to the pitch you want the
machine to throw, and then tighten Part I to keep the feeder chute in place.
3. If you choose to pitch another size ball, remove the feeder chute, and replace with the other feeder
chute.
8
SAFETY INSTRUCTIONS
•
Never use the pitching machine in or near water or in a high moisture environment.
•
Never place any part of your body on or near any part of the pitching wheel or in front of the
machine while it is in operation and/or connected to a power source.
•
Keep hands away from all moving parts.
•
Batter should always wear protective head gear, preferably with a face guard.
•
Turn the machine off and wait for the pitching wheel to stop rotating before changing the tilt angle of
the pitching head. Do not attempt to manually stop the wheel from rotating, even after turning the
power off.
•
Place a protective pitcher screen in front of the machine to protect both the machine and the
operator. Cimarron pitcher screens are sold separately.
•
Before each use, check the pitching wheel for tightness. Tighten if necessary.
•
Before connecting the Pitching Machine to a power source, make certain the speed control is set
to “0”.
WARNING!
This machine is not guaranteed to be 100% accurate. Occasional errant pitches may occur due to balls in
poor condition, moisture, careless or negligent use, improper maintenance, or other factors.
It is important to make certain that all safety precautions are taken and to instruct all participants on proper
operating procedures before allowing them to operate the machine. It is the owner’s responsibility to
make certain the machine is in good working order, properly maintained, appropriately adjusted, and
all safety measures are followed before and during each use.
CAUTION
Using excessive speeds for amusement can be very dangerous, can lead to serious injury or even death,
and is not recommended. For your safety, we ask that you use the pitching machine only for its intended
purpose. Select speeds that are equal to the batter’s level of ability.
We recommend that high speeds not be used when pitching from little league or softball distance.
NOTE: A 60 mph pitch from 40 feet is equivalent to a 90 mph pitch from 60 feet. To calculate the equivalent
of any pitch from 40 feet, multiply the actual speed by 1.5
9
Power Sources, Extension Cords, & Speeds
Power Sources:
Your Multi-Pitch Pitching Machine operates on 110/120 volt AC electricity (60Hz). You may plug your
machine directly into a standard 110v household outlet or use an extension cord as noted below.
Extension Cords:
If you require an extension cord, it is important that you select one with an adequate wire gauge. An
inadequate cord will cause overheating, poor performance, and premature motor burnout.
Adequate wire gauge size depends on the length of the cord. The longer the cord, the thicker the wire gauge
needed. Wire gauges come in even numbers (8, 10, 12, 14, 16, etc.). The lower the number, the thicker the
wire. For example, an 8-gauge cord is thicker than a 16-gauge cord.
When selecting an extension cord, please follow these basic guidelines:
CORD LENGTH
25 Feet
50 Feet
100 Feet
150 Feet
200 Feet
RECOMMENDED GAUGE
16 Gauge
14 Gauge
12 Gauge
10 Gauge
8 Gauge
Operating Speeds:
Your Pitching Machine has a variable speed control allowing your Pitching Machine to pitch balls at
speeds from about 15mph to 60mph. Make sure the speed control is turned to “0” when turning the machine
on. Slowly increase the speed until you arrive at the pitching machine speed that you desire.
10
MAINTENANCE
Your Pitching Machine requires periodic maintenance. Please follow these basic instructions to
ensure proper performance of your machine.
•
Check all nuts and bolts for tightness before each use
•
There is a single point where the pitching head pivots vertically. The locking handle at this
point should be tight enough to keep the pitching head in the proper elevation without
rotation during use. DO NOT over tighten.
•
When not in use, store the Pitching Machine in a clean, dry location. If you choose to leave
your machine outside, make sure it is covered and kept dry. Cimarron Sports does not
recommend storing your machine outside. Moisture will ruin the electronic circuitry of the
machine and void the warranty. Additionally, constant exposure to direct sunlight will shorten
the lifespan of the pitching wheel.
•
Keep the pitching wheel clean, dry, and free of debris.
•
RESIDUE FROM BALLS MAY BUILD UP ON THE WHEEL AND SHOULD BE REMOVED
AS IT STARTS TO BUILDUP. ACETONE OR GLYCOL ETHER AND A COURSE RAG
WORK VERY WELL IN REMOVING THE RESIDUE FROM THE WHEEL. DO NOT CLEAN
THE WHEEL WITH THE MACHINE PLUGGED IN AND/OR RUNNING!
NOTE: After throwing several thousand pitches, you will notice a groove forming on the pitching
wheel and that material from the wheel has collected on other parts of the machine. This is normal.
Simply remove the material and debris that has collected on the machine.
Use care when transporting your Multi-Pitch Pitching Machine. Avoid the following:
• Allowing the pitching machine wheel to come in contact with the ground.
• Dropping the machine
• Laying the machine down with the speed adjustment knob facing downward.
• Bending any metal parts.
• Stepping or pulling on the electrical cord.
Occasionally, you may need to tighten the pitching wheel set-screw. The pitching wheel on the MultiPitch Pitching Machine is secured to the motor shaft by a set-screw located in the center of the rim
closest to the motor shaft. This set-screw MUST BE as tight as possible.
11
WARRANTY
This warranty is for the Cimarron Pitching Machine.
The full warranty period covers the first three (3) months of use from the date of
purchase for commercial use and one (1) year for residential use from the date of
purchase.
During this period, Cimarron Sports warrants that it will, at its own option, repair, replace, or adjust,
free of charge, any part that Cimarron Sports finds to be defective in materials and/or
workmanship when used within the conditions of this warranty. All shipping costs related to
returning products to Cimarron Sports will be the responsibility of the customer.
Subject Conditions & What Your Warranty Does Not Cover:
•
•
•
•
•
•
•
•
The defect is a consequence of the customer’s failure to properly maintain, or use the
pitching machine in accordance with good practice
This warranty does not apply to conditions caused by abuse, neglect, improper
maintenance, or misuse.
Shipping damage not originating from original product shipment to customer
Normal wear and tear
Water damage.
Use of improper balls
Any damage resulting from acts of nature.
When leather baseballs are used, the warranty period is 3 months for the pitching wheel
CUSTOMER SERVICE
Prior to returning a product to Cimarron Sports, you must do the following:
1. Call us at 888-816-6517
2. Have your proof of purchase (receipt, bill of sale, or invoice) ready
3. Explain the problem to the representative who answers the phone
4. If the representative determines that you should return your product, you will be provided
with a return authorization number. This number should be written on the outside of the
shipping carton when you return the product.
5. Return the product in question along with a brief description of the malfunction.
6. Please include the following information:
• Your full name
• Your address
• Your phone number
• Your e-mail address
• A copy of your proof of purchase
12