1
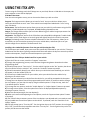
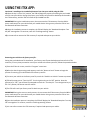
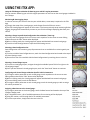
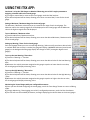
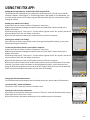
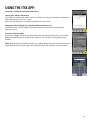
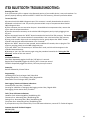
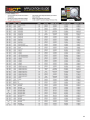
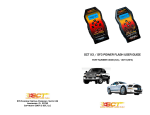
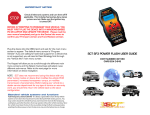
iTSX USER GUIDE
PART NUMBER 4015
Table of Contents
Important Notes before Flashing ................................................................................................................................. 3
Getting Started............................................................................................................................................................. 4
Installing the iTSX App:............................................................................................................................................ 4
Pairing the iTSX Accessory to your mobile device: ................................................................................................. 4
Reconnecting your iTSX accessory to the iTSX App: ............................................................................................... 5
Un-Pairing the iTSX accessory for use with a different mobile device: .................................................................. 5
Using the iTSX APP ....................................................................................................................................................... 6
iTSX Menu Overview: .............................................................................................................................................. 5
Installing a Pre-Loaded Performance Tune into your vehicle using the iTSX: ........................................................ 6
Returning your vehicle to the factory tune file: ...................................................................................................... 7
Using the iTSX Performance Test to measure your vehicle’s performance:........................................................... 8
Using the iTSX Gauges to Monitor & Data Log your vehicle’s engine parameters: ................................................ 9
Reading & Clearing Diagnostic Trouble Codes (DTC) using the iTSX:...................................................................... 11
Viewing the iTSX Information Screen:..................................................................................................................... 11
iTSX Bluetooth Troubleshooting .................................................................................................................................. 13
iTSX Application Guide/Vehicles Supported ................................................................................................................ 14
iTSX Warranty .............................................................................................................................................................. 16
2
IMPORTANT NOTES
Check all electronic systems and turn them off if
applicable. This includes fuel pumps, fans, stereo
systems etc. Make sure the ignition key is turned
OFF.
SCT does not recommend using this device with any other tuning module or device that modifies the vehicle
PCM parameters, increases horsepower, torque, or modifies the transmission characteristics.
Before taking your vehicle to the dealership for any type of service or warranty work, you should first return
the vehicle back to the stock.
Do NOT interrupt the flashing process once it has begun.
You must register your programmer online at www.sctflash.com within 30 days of purchase to validate your
1 year limited warranty.
To power the unit, connect to the vehicle’s OBDII port. The OBDII
port is typically located within 24” of the steering column. If it
fails to power up, check the fuse panel for a faulty
OBDII/cigarette lighter fuse.
Frequently Asked Questions
Q: Where do I find the other pre-loaded tunes?
A: To choose which preloaded tune to install, select adjust options during the programming process.
Q: Does the tuner have to stay plugged in to keep the vehicle tuned?
A: No, after tuning, you can disconnect the programmer.
Q: Can I stack/combine the SCT programmer with another chip or tuning module?
A: All Chips/Tuning Products must be removed from the vehicle before tuning with SCT.
Q: Can I tune more than one vehicle with this programmer?
A: Only 1 vehicle may be tuned at a time. You may return to stock and program another vehicle up to 5 times.
Q: Can the vehicle be tuned while the engine is running?
A: No, this can cause severe damage to the vehicle and PCM.
Q: Can I use a lower octane fuel than the tune file lists?
A: No, you must use the same octane fuel that the vehicle is tuned for. Failure to use the proper octane can
result in severe engine damage.
Q: Is it necessary to disconnect the battery after tuning the vehicle?
A: On 1994-1997 vehicle, you must disconnect the battery cable for 10 seconds or more to reset the PCM’s
adaptive memory.
Q: How often do I update my programmer?
A: You should always check for updates before tuning the vehicle.
3
GETTING STARTED:
Installing the iTSX App:
The iTSX App is a free download from the Apple App store on your iPod, iPhone or iPad device.
1) To install the iTSX App on your mobile device, search the Apple App store for the phrase "iTSX".
2) Once located, touch the "Install" button within the store to automatically download and install the iTSX
App.
iTSX Installation & Setup:
Attaching the wireless accessory to your vehicle:
The iTSX wireless accessory is used to connect the iTSX App to your vehicle using Bluetooth Wireless
technology.
To install the iTSX wireless accessory:
1) Locate the vehicle's OBD-II Diagnostic port. This connector is usually located under the vehicle’s dashboard
on the driver’s side. The port may be covered with a cap or compartment door labeled OBD-II Diagnostic
Port.
2) If the connector pins are covered or the port is located behind a compartment door, remove the
cap or open the compartment door.
3) Connect the iTSX wireless accessory to the vehicles OBD-II Diagnostic port by simply plugging it
into the port.
4) The Status LED located on the back of the iTSX accessory will flash RED, then flash GREEN 2 times
to indicate it is powered on and ready to be “paired” or connected to the iTSX App.
Pairing the iTSX Accessory to your mobile device:
Once you have connected the iTSX accessory to your vehicle's OBD-II diagnostic port, you can now
"pair" the accessory to your iPod, iPhone or iPad using the bluetooth wireless feature on your
device.
To "pair" the iTSX Accessory to your mobile device:
1) From the Home screen of your iPod, iPhone or iPad device, touch the Settings icon to enter the
Setting area of your device.
2) Select the General option from the list of available settings and select Bluetooth from the list of
menu items.
3) If the Bluetooth setting is currently "Off", turn the Bluetooth wireless feature "On" by sliding the
"On / Off" switch to the "On" position.
4) Once Bluetooth is "On", your device will search for available Bluetooth signals that are currently
within range and in "Discoverable" mode.
5) The iTSX accessory will appear in the list of available devices for "pairing".
6) If the iTSX is currently "un-paired", it will appear as "Not Paired" next to the device name.
7) To "pair" the iTSX accessory with your device, simply touch the iTSX item in the list of available
devices.
8) Once "paired", the status of the iTSX accessory will change to "Connected" and "pairing" is
complete.
9) To exit the Bluetooth Settings area, press the "Home" button on the face of your device.
If "pairing" of the the iTSX accessory is unsuccessful, see the "iTSX Troubleshooting" section of this
manual for help.
4
GETTING STARTED:
Reconnecting your iTSX accessory to the iTSX App:
If you have already "paired" your mobile device to the iTSX accessory, there is no need to repeat the
"pairing" procedure. Each time the iTSX accessory is plugged into the vehicle and your mobile device is within
Bluetooth range, the iTSX accessory will automatically "reconnect" to your mobile device.
If the iTSX fails to automatically "reconnect" to your mobile device, see the "iTSX Troubleshooting" section of
this manual for help.
Un-Pairing the iTSX accessory for use with a different mobile device:
NOTE: Not properly "un-pairing" the iTSX accessory before attempting to use it with another device may
result in the iTSX accessory becoming un-responsive and non-discoverable in the Bluetooth setup area. Be
sure to follow the "Un-Pairing" procedure below to properly "un-pair" your iTSX accessory.
Un-Pairing the iTSX accessory:
1) From the iTSX App, touch the "Info" menu item from the main screen.
2) When presented with the "Info" screen, touch the "Un-Pair from Accessory" menu item in the
"Accessory Info" section of the "Info" screen.
3) The iTSX App will display a confirmation screen to confirm you wish to "un-pair" from the iTSX
accessory.
4) To confirm you wish to "un-pair" the iTSX accessory, touch the "Yes, UnPair" button to "un-pair"
the accessory, or touch "No, don't UnPair" if you wish to cancel "un-pairing".
5) When "un-pairing" from the iTSX accessory has completed, a message box will be displayed
prompting you to complete the final steps in "un-pairing".
6) To complete the "un-pairing" procedure, exit the iTSX App by pressing the "Home" button on the
face of your device.
7) From the Home screen of your iPod, iPhone or iPad device, touch the Settings icon to enter the
Setting area of your device.
8) Select the General option from the list of available settings and select Bluetooth from the menu
items.
9) The iTSX accessory will appear in the list of available devices and will be listed as "Not
Connected".
10) Touch the blue circular arrow button to the right of the "Not Connected" text.
11) Once displayed, touch the "Forget this Device" button.
12) To confirm you wish to "Forget this Device", touch the red "Forget Device" button at the bottom
of the screen.
13) The iTSX accessory is now "un-paired" and can be connected to another vehicle or another IOS
mobile device.
5
USING THE iTSX APP:
To start using the iTSX App, touch the iTSX App icon on your iPod, iPhone or iPad device. Once open, the
main navigation screen will be displayed.
iTSX Menu Overview:
From the main navigation screen, you can choose the feature you wish to utilize.
Program: The Program section allows you to install a "tune" into your vehicle or allows you to
return the vehicle back to stock "tune" if the vehicle has already been loaded with a "tune" using
your iTSX device.
Performance: The Performance section allows you to test your vehicle's performance using the iTSX
0-60MPH, 1/4 Mile elapsed time, Top Speed, 60-0MPH Braking elapsed time test.
Gauges: The Gauges feature allows you to monitor & data log your vehicle's engine parameters live
on the iTSX virtual gauge display.
Diagnostics: The Diagnostic section of the iTSX allows you to Read & Clear Diagnostic Trouble Codes
(also known as DTC, Check Engine or Service Engine Soon lights) found in the vehicle's computer.
Settings: The Settings section contains valuable information on the iTSX accessory, allows you to
successfully Un-Pair the wireless accessory from your mobile device, and allows you to set your
vehicle's weight for use with the iTSX Performance Test.
Installing a Pre-Loaded Performance Tune into your vehicle using the iTSX:
The iTSX features pre-loaded, dyno proven tune files specifically calibrated for your vehicle*. These preloaded tune files have been rigorously tested on both the street and on the dyno to ensure they deliver
maximum Horsepower, Torque and Throttle Response to your vehicle.
To install one of the iTSX pre-loaded tune files in your vehicle:
1) From the iTSX main screen, touch the “Program” menu item.
2) To begin the programming process, touch the Start Programming button located on the Start
Programming panel.
3) iTSX will prompt you to “Turn Key On”. Turn the vehicle’s ignition to the “On” position, but do not
start the vehicle. Once the vehicle is “On”, touch the “Continue” button to proceed.
4) iTSX will automatically identify your vehicle. Once your vehicle has been identified, your vehicle
will appear in the Pre-Loaded Tunes list.
5) To install a pre-loaded tune file for your vehicle, select your vehicle from the vehicle list by
touching on the vehicle name.
6) Once you have selected your vehicle from the vehicle list, you will be prompted with the option
to change the User Options that will be programmed into the vehicle. If you do not wish to change
the User Options, you can skip this step by using the default options. To skip this step, touch the
“Use default Options” button.
7) To change the User options, touch the “Unlock Options” or “Adjust Options” button to proceed.
8) To change a User Option, select the option from the list of displayed adjustable options by
touching the option in the list.
9) Select the desired setting for the User Option(s).
10) When you have finished adjusting the User Options, touch the “Approve these options” button
to continue.
11) The iTSX will show a summary screen of the User Options you adjusted and is now ready to send
the pre-loaded tune file and User Options to the vehicle. To proceed, touch the “Send this to the
Vehicle” button.
12) iTSX will prompt you to “Turn Key Off”. Turn the ignition key to the “Off” position. Once the ignition
key is “Off”, you will then be prompted to touch the “Turn Key On”. Turn the ignition key to the “On”
position, but do not start the vehicle.
6
USING THE iTSX APP:
Continued… Installing a Pre-Loaded Performance Tune into your vehicle using the iTSX:
13) Once the key is in the “On” position, the iTSX will begin the process of installing the pre-loaded
tune file into your vehicle. During this process, your factory tune file will be backed up and stored in
the iTSX accessory, and the iTSX will install the pre-loaded tune file.
IMPORTANT: During the installation process, do not remove the iTSX accessory from the OBD-II
port or walk away from your vehicle with your mobile device. Doing so may cause the iTSX to lose
the Bluetooth wireless connection.
14) Once the installation process is complete, the iTSX will display the “Download Complete. Turn
Key Off” message box. To continue, touch the “End Programming” button.
15) It is now safe to remove the iTSX accessory if required and operate your vehicle.
Returning your vehicle to the factory tune file:
During the pre-loaded tune file installation, your factory tune file was backed up and stored in the iTSX
accessory. If at any time you need to return your vehicle to the factory tune file, follow the procedure below:
1) From the iTSX main screen, touch the "Program" menu item.
2) When the Start Programming panel appears, touch the “Return to Stock” button to begin the
process of returning your vehicle back to the factory tune file.
3) To return your vehicle to the factory tune file, touch the “Send this to Vehicle” button to proceed.
4) iTSX will prompt you to “Turn Key Off”. Turn the ignition key to the “Off” position. Once the
ignition key is “Off”, you will then be prompted to touch the “Turn Key On”. Turn the ignition key to
the “On” position, but do not start the vehicle.
5) The iTSX will install your factory tune file back into your vehicle.
IMPORTANT: During the return to stock process, do not remove the iTSX accessory from the OBD-II
port or walk away from your vehicle with your mobile device. Doing so may cause the iTSX to lose
the Bluetooth wireless connection.
6) Once the installation process is complete, the iTSX will display the “Download Complete. Turn Key
Off” message box. To continue, touch the “End Programming” button.
7) It is now safe to remove the iTSX accessory if required and operate your vehicle.
7
USING THE iTSX APP:
Using the iTSX Performance Test to measure your vehicle’s performance:
The iTSX Performance Test feature allows you to measure the 0-60MPH, 1/4 Mile ET, Top Speed & 60-0MPH
braking ET all in one convenient test.
NOTE: Prior to using the iTSX Performance Test, you must configure your vehicle’s weight in the iTSX
Information screen. For information on entering / configuring your vehicle’s weight, see the “Setting
your vehicle’s Weight for use with the iTSX Performance Test:” section of this user manual.
To begin measuring the performance of your vehicle:
1) Touch the Performance menu item from the main iTSX screen.
2) Once the iTSX Performance screen is displayed, bring your vehicle to a complete stop.
3) While maintaining a complete stop with the vehicle, touch the "Test Start" button on the iTSX
performance screen.
4) The iTSX is now ready to measure your vehicle's performance.
5) When ready, release the vehicle's brakes and accelerate. The iTSX will sense the vehicles
movement and will automatically begin the test.
6) Once you have reached a 1/4 mile, the iTSX will automatically stop counting the elapsed time and
will have measured the 1/4 Mile & 0-60MPH elapsed time.
7) To complete the 60-0MPH braking test, slow the vehicle and maintain 60MPH for a few seconds.
When ready, safely apply the vehicle's brakes and bring the vehicle to a complete stop.
8) Once the vehicle has come to a complete stop, the iTSX will display the Performance Test
Overview screen with the results of the performance test.
Saving or E-Mailing the iTSX Performance Test results:
iTSX allows you to share the results of your vehicle's performance tests with your friends or save
them for later reference.
Sharing your Performance Test Results:
1) To share the results of your vehicle's performance with your friends, touch the "Send" button at
the bottom of the Performance Test Overview screen.
2) iTSX will automatically open an email message and attach a Performance Test Overview for you
to email to your friends or to yourself.
3) To send the overview, simply enter an email address when prompted, and touch send.
Saving your Performance Test Results:
1) To Save the results of your Performance Test for later reference, touch "Save" at the bottom of
the Performance Test Overview screen.
2) Your Performance Test results will be saved in your photos for future reference.
8
USING THE iTSX APP:
Using the iTSX Gauges to Monitor & Data Log your vehicle’s engine parameters:
iTSX can monitor & data log your vehicle's engine parameters in real-time on the virtual gauges included in
the iTSX App.
Monitoring & Data Logging Setup:
In order to monitor your vehicle's data via your mobile device, some setup is required in the iTSX
App.
1) To begin the setup of the virtual gauges, touch Gauges from the iTSX main screen.
2) The iTSX virtual gauges will appear on the screen. If you have previously setup monitoring & data
logging, the gauges will automatically connect to your vehicle and begin displaying data from your
vehicle.
Selecting a Gauge Layout & Data Configuration Set to Monitor / Data Log:
1) To setup the virtual gauges for the first time, touch anywhere on the screen to enter Editing
mode and touch the "Edit" button when displayed.
2) When in Editing mode, the virtual gauges will appear with dashed lines around each gauge.
3) Touch the Panel Settings button to open the Panel Settings screen.
Selecting a Data Configuration Set:
Data Configuration sets contain a group of parameters that are available for monitoring with your
vehicle.
1) To select a Vehicle Data Configuration set, touch the Data Configuration box located at the top of
the Panel Settings screen.
2) Choose from one of the available Vehicle Data Configurations by touching the set in the list.
Selecting a Virtual Gauge Layout:
1) To select a virtual gauge layout, navigate through the available layouts flick left or right on the
virtual gauge images.
2) Once you have selected a virtual gauge layout, touch the "Save Panel" button to continue.
Configuring each Virtual Gauge to Monitor Specific Vehicle Parameters:
1) To assign a vehicle parameter to each virtual gauge, touch anywhere on the screen to enter
Editing mode and touch the "Edit" button when displayed.
2) When in Editing mode, the virtual gauges will appear with dashed lines around each gauge.
3) To enter Editing mode, touch the Edit button.
4) To assign a vehicle parameter to each virtual gauge, touch the virtual gauge you wish to assign
the vehicle parameter to.
Assigning a Data Source to the virtual gauge:
1) To assign a parameter to the virtual gauge, touch the Data Source box located at the top of the
Configure Gauge panel.
2) In a drop down menu, a list of available parameters for monitoring will be displayed.
3) Using flick motion, scroll through the list of available parameters.
4) To select a parameter, simply touch the item in the list.
9
USING THE iTSX APP:
Continued… Using the iTSX Gauges to Monitor & Data Log your vehicle’s engine parameters:
Assigning a Custom Label to the virtual gauge:
1) To assign a custom label or name to the virtual gauge, touch the label text box.
2) The device keyboard will be shown, allowing you to enter a custom label / name for the virtual
gauge.
Setting a Minimum / Maximum Range for the virtual gauge:
The Minimum / Maximum values allow you to customize the range of each virtual gauge. The
Minimum value is the starting range that will be displayed on the virtual gauge, and the Maximum
value is the highest range that will be displayed.
To set a Minimum / Maximum value:
1) Touch the Minimum / Maximum text box.
2) The device keyboard will be shown, allowing you to enter the desired Minimum / Maximum value
for the virtual gauge.
Setting up Warning / Alerts for the virtual gauge:
Each virtual gauge allows you to set a Low & High Warning / Alert to notify you when a desired value
is reached. When the set value is reached, the gauge will display a WARNING indicator (round virtual
gauges) or the background of the gauge display will change to “RED” (rectangular digital virtual
gauges).
To set up the Low Warning / Alert value:
1) Touch the “Warning <=” text box.
2) The device keyboard will be shown, allowing you to enter the desired value for the Low Warning /
Alert.
3) Whenever the vehicle parameter assigned to this gauge is equal to or lower than the set value,
the virtual gauge will display a Warning / Alert.
To set up the High Warning / Alert value:
1) Touch the “Warning >=” text box.
2) The device keyboard will be shown, allowing you to enter the desired value for the High Warning
/ Alert.
3) Whenever the vehicle parameter assigned to this gauge is equal to or higher than the set value,
the virtual gauge will display a Warning / Alert.
Monitoring the Virtual Gauges with your configured Parameters:
1) Once you have finished configuring the virtual gauge, touch the “Save Gauge” button to return to Editing
mode.
2) To begin Monitoring / Data Logging your vehicle’s configured parameters, touch the blue Save button.
3) The iTSX will scan the available parameters, and begin displaying the vehicle’s data on the virtual gauges.
10
USING THE iTSX APP:
Reading & Clearing Diagnostic Trouble Codes (DTC) using the iTSX:
The iTSX allows you to Read & Clear any diagnostic trouble codes (DTC’s) found in your vehicle’s
computer. Should a “Check Engine” or “Service Engine Soon” light appear on your dashboard, you
can easily read & clear the DTC code(s) using the iTSX device once you have corrected the issue(s)
causing the code(s).
Reading your vehicle’s DTC Code(s):
1) From the iTSX main screen, touch the “Diagnostics” menu item.
2) When presented with the Diagnostics panel, touch the “Read Codes” button located at the
bottom of the panel.
3) iTSX will prompt you to “Turn Key On”. Turn the vehicle’s ignition to the “On” position, but do not
start the vehicle. Touch the “Ok” button to continue.
4) The iTSX will attempt to read any DTC codes stored in the vehicle’s computer.
Clearing your vehicle’s DTC Code(s):
Once you have corrected / repaired the issue(s) causing the displayed DTC code(s), you can clear
these codes using the iTSX device.
To clear the DTC Code(s) found in your vehicle’s computer:
1) From the iTSX main screen, touch the “Diagnostics” menu item.
2) When presented with the Diagnostics panel, touch the “Clear Codes” button located at the
bottom of the panel.
3) iTSX will prompt you to “Turn Key On”. Turn the vehicle’s ignition to the “On” position, but do not
start the vehicle. Touch the “Ok” button to continue.
4) The iTSX will attempt to clear any DTC codes stored in the vehicle’s computer.
5) If any DTC codes are found, touch the DTC Code number to view a brief description of the codes
meaning. If you require more information on the displayed DTC code(s), consult with your local
garage or dealership to determine the cause of the DTC code(s). Other resources such as www.obdcodes.com may have helpful information as to the cause of the code(s).
Viewing the iTSX Information Screen:
The iTSX Information Screen displays vital information about your vehicle and the iTSX accessory.
To view the iTSX / vehicle information:
1) Touch the “Info” menu item from the iTSX main screen.
Viewing the iTSX accessory information:
1) To view the iTSX accessory information, touch the “iTSX Info” menu item located in the Accessory
Information section of the “Info” screen.
2) The iTSX accessory information will display a list of available accessory information.
11
USING THE iTSX APP:
Continued… Viewing the iTSX Information Screen:
Viewing your vehicle’s information:
1) To view your vehicles information, touch the “Vehicle Info” menu item located in the Accessory
Information section of the “Info” screen.
2) The iTSX will display a list of available information for your vehicle.
Setting your vehicle’s Weight for use with the iTSX Performance Test:
The iTSX uses your vehicle’s weight to estimate the vehicle's performance during the iTSX
Performance Test.
To set your vehicle’s weight:
1) Touch the “Weight” menu item located in the Vehicle Information section of the “Info” screen.
2) When prompted, enter the weight of your vehicle in “lbs” and touch the Save button when
finished.
NOTE: When entering your vehicle’s weight, if you add the weight of the fuel in the vehicle and the
weight of the driver & any passengers, the iTSX Performance Test results will be more accurate.
12
iTSX BLUETOOTH TROUBLESHOOTING:
Resetting the iTSX:
If the iTSX accessory fails to appear in the Bluetooth section of your mobile device, it may not have been “unpaired” properly and may need to be RESET. To RESET the iTSX accessory, follow the procedure below.
To reset the iTSX:
1) Locate the vehicle's OBD-II Diagnostic port. This connector is usually located under the vehicle’s
dashboard on the driver’s side. The port may be covered with a cap or compartment door labeled
OBD-II Diagnostic Port.
2) If the connector pins are covered or the port is located behind a compartment door, remove the
cap or open the compartment door.
3) Connect the wireless accessory to the vehicles OBD-II Diagnostic port by simply plugging it into
the port.
4) Once connected, locate the “RESET” button located on the back of the iTSX accessory. The button
is labeled “RESET” and is located inside of a recessed hole in the in the back of the iTSX accessory.
5) Using a non-metallic object such as a toothpick or similar, gently depress the “RESET” button
located inside the hole and hold the button in for 5 seconds.
6) Once the “RESET” button has been pressed, wait an additional 5 seconds, then un-plug the iTSX
accessory and plug it back into the OBD-II diagnostic port.
7) This will “RESET” the iTSX accessory to “Discoverable” mode, and it should now appear in the
available Bluetooth devices.
8) Attempt to “pair” the iTSX accessory again using the procedure located in the “Pairing the iTSX
Accessory” section of this user manual.
LED Flash Definitions:
Slow Blink: Repeatedly toggles the LED On / Off within 1-2 seconds.
Regular Blink: Repeatedly toggles the LED On / Off 2-3 times per second.
Fast Blink: Repeatedly toggles the LED On / Off many times per second.
Power On:
Red LED followed by 2 Green flashes
Programming:
Uploading Stock Tune has begun: Red / Slow Blink
Erasing Vehicle ECU / TCU has begun: Red / Regular Blink
Download of Tune has begun: Red / Fast Blink
Data Logging / Monitor LED Status Indications:
Communication Lost: Blue / Slow Blink
Scanning for Valid PIDs or Setting up data logging session: Blue / Regular Blink
Data logging Session Active: Blue / Fast Blink
Fault / Error LED Status Indications:
Hardware Fault: Alternating White / Red Blinking LED
Firmware Error: Alternating Blue / Red Blinking LED
Settings Error: Alternating Blue / Blue / Red Blinking LED
File System Error: Alternating Green / Red Blinking LED
If you experience any of the above Fault / Error LED Status Indications, contact SCT’s Technical Support.
Customer Service & Technical Support:
888-684-2588
WWW.SCT-iTSX.COM
13
14
15
iTSX LIMITED WARRANTY IMMEDIATE CONSUMER ACTION REQUIRED!
YOU MUST REGISTER YOUR iTSX POWER FLASH WITHIN 30 DAYS OF PURCHASE TO VALIDATE YOUR 1 LIMITED YEAR
WARRANTY. Please visit www.sctflash.com for more information.
SCT, LLC LIMITED WARRANTY
What Does This Warranty Cover?
This warranty covers any defects or malfunctions with your iTSX hardware within the warranty period set forth below,
subject to the following conditions and limitations.
How Long Does the Coverage Last?
This warranty last for a period of one(1) year following the data of sale by SCT product to the original SCT
dealer/distributor; provided, however, the duration of this warranty will be extended to one (1) year from the date of
original purchase by the consumer from the SCT dealer/distributor so long as the consumer submits the required online
registration information within thirty (30) days of purchase, as provided below. All implied warranties, including
warranties of merchantability and fitness for a particular purchase are limited to the warranty period set forth above.
What Will SCT Do?
SCT will, at its option and as its sole obligation under this warranty, replace or repair any product that has a defect(s) in
manufacturing, material, and/or workmanship provided that SCT is notified of the claim within the warranty period
provide herein. SCT will not be liable for, nor will it reimburse the consumer for any fees, charges or expenses for
shipping and/or handling costs associated with the return to SCT of any defective products sent in for replacement or
repair.
What Does This Warranty Not Cover?
Any damage and/or other problem(s) caused by abuse, misuse, neglect, vandalism, accident, act of God (e.g. flood, fire,
lightning), or other cause beyond the reasonable control of SCT is/are not covered. Also, any damage or problem
resulting from faulty or improper installation is not covered and shall be the responsibility of the installer. SCT IS NOT
LIABLE FOR AND HEREBY EXCLUDES ANY AND ALL INCIDENTAL, SPECIAL OR CONSEQUENTIAL DAMAGES RELATING TO
THE PRODUCTS COVERED BY THIS WARRANTY. This is the consumer’s exclusive warranty and is in lieu of all other
warranties, express or implied, except as may be required by applicable law. Without limiting the generality of the
foregoing, SCT shall not be liable for any breach of any other written or oral warranties given by the consumer by any
third party(ies) such as those (if any) given to the consumer by dealers or distributers of the products.
How Do You Get Service?
In order to be eligible for service under this warranty you MUST complete the online registration information within
thirty (30) days of purchase. To register your SCT product, please log onto www.SCTFLASH.com. If you do not have
internet access, or encounter difficulties with the online registration process, please contact SCT at 407.774.2447. To
initiate a claim under this warranty, you can either log on to the SCT website and follow the warranty claim instructions
or you can call 407.774.2447 and instructions will be provided.
Can This Warranty By Transferred?
This warranty is not transferrable and applies only to the consumer who originally purchased the product.
How Does State Law Apply?
This warranty gives you specific legal rights, and you may also have other rights which may vary from state to state.
Pertinent state law shall control for what period of time following the sale a consumer may seek a remedy under the
implied warranty of merchantability or fitness for a particular purpose. Some states do not allow the exclusion or
limitation of incidental or consequential damages so the above limitation or exclusion may not apply to you.
For questions regarding SCT’s products or warranties please contact SCT at 407.774.2447.
4150 Church Street – Suite 1024
Sanford, Florida 32771
Copyright 2011 © SCT, LLC
16