Download Echo Software User Manual
Transcript
Echo™ Software User Manual © High End Systems, Inc. 2009, All Rights Reserved Information and specifications in this document are subject to change without notice. High End Systems, Inc. assumes no responsibility or liability for any errors or inaccuracies that may appear in this manual. Trademarks used in this text: High End Systems, and Wholehog are registered trademarks; and SHOWPIX, Echo, the High End Systems globe logo are trademarks of High End Systems, Inc. Microsoft, DirectX, Vista and Windows are either registered trademarks or trademarks of Microsoft Corporation in the United States and/or other countries. Other trademarks and trade names may be used in this document to refer to either the entities claiming the marks and names or their products. High End Systems disclaims any proprietary interest in trademarks and trade names owned by others. Echo™ User Manual Version 1.0 January, 2009 i Contacting High End Systems® Sales Department High End Systems, Inc. 2105 Gracy Farms Lane Austin, TX 78758 USA voice: 512.836.2242 fax: 512.837.5290 Toll Free: 800.890.8989 Customer Service High End Systems, Inc. 2105 Gracy Farms Lane Austin, TX 78758 USA voice: 800.890.8989 fax: 512.834.9195 toll free: 800.890.8989 email: [email protected] World Wide Web: http://www.highend.com Patents This High End Systems product is protected by patents and pending patent applications. Patents owned or licensed by High End Systems include: US 4,392,187; US 4,602,321; US 4,688,161; US 4,701,833; US 4,709,311; US 4,779,176; US 4,800,474; US 4,962,687; US 4,972,306; US 4,980,806; US 5,010,459; US 5,031,078; US 5,073,847; US 5,078,039; US 5,186,536; US 5,209,560; US 5,278,742; US 5,282,121; US 5,307,295; US 5,329,431; US 5,331,822; US 5,367,444; US 5,402,326; US 5,414,328; US 5,426,576; US 5,430,629; US 5,432,691; US 5,454,477; US 5,455,748; US 5,502,627; US 5,506,762; US 5,515,254; US 5,537,303; US 5,545,951; US 5,588,021; US 5,590,954; US 5,590,955; US 5,640,061; US 5,647,662; US 5,691,886; US 5,702,082; US 5,728,994; US 5,758,955; US 5,758,956; US 5,769,527; US 5,769,531; US 5,774,273; US 5,788,365; US 5,794,881; US 5,795,058; US 5,798,619; US 5,806,951; US 5,812,596; US 5,823,661; US 5,825,548; US 5,828,485; US 5,829,868; US 5,857,768; US 5,882,107; US 5,921,659; US 5,934,794; US 5,940,204; US 5,945,786; US 5,953,151; US 5,953,152; US 5,969,485; US 5,980,066; US 5,983,280; US 5,984,248; US 5,986,201; US 6,011,662; US 6,029,122; US 6,048,080; US 6,048,081; US 6,054,816; US 6,057,958; US 6,062,706; US 6,079,853; US 6,126,288; US 6,142,652; US 6,142,653; US 6,172,822; US 6,175,771; US 6,188,933; US 6,208,087; US 6,219,093; US 6,220,730; US 6,241,366; US 6,249,091; US 6,255,787; US 6,256,136; US 6,261,636; US 6,278,542; US 6,278,545; US 6,278,563; US 6,288,828; US 6,326,741; US 6,327,103; US 6,331,756; US 6,346,783; US 6,421,165; US 6,430,934; US 6,459,217; US 6,466,357; US 6,502,961; US 6,515,435; US 6,523,353; US 6,536,922; US 6,538,797; US 6,545,586; US 6,549,324; US 6,549,326; US 6,563,520; US 6,565,941; US 6,570,348; US 6,575,577; US 6,578,991; US 6,588,944; US 6,592,480; US 6,597,132; US 6,600,270; US 6,601,974; US 6,605,907; US 6,617,792; US 6,621,239; US 6,622,053; US 6,635,999; US 6,648,286; US 6,664,745; US 6,682,031; US 6,693,392; US 6,696,101; US 6,719,433; US 6,736,528; US 6,771,411; US 6,775,991; US 6,783,251; US 6,801,353; US 6,812,653; US 6,823,119; US 6,865,008; US 6,866,390; US 6,866,402; US 6,866,451; US 6,869,193; US 6,891,656; US 6,894,443; US 6,919,916; US 6,930,456; US 6,934,071; US 6,937,338; US 6,955,435; US 6,969,960; US 6,971,764; US 6,982,529; US 6,988,805; US 6,988,807; US 6,988,817; US 7,000,417; US 7,011,429; US 7,018,047; US 7,020,370; US 7,033,028; US 7,048,838; US 7,055,963; US 7,055,964; US 7,057,797; US 7,073,910; US 7,078,869; US 7,092,098; US 7,119,902; US 7,161,562; US 7,175,317; US 7,181,112; US 7,206.023; US 7,210,798; US 7,253,942; US D347,113; US D350,408; US D359,574; US D360,404; US D365,165; US D366,712; US D370,080; US D372,550; US D374,439; US D377,338; US D381,740; US D409,771; AT E169413; CA 2142619; CA 2145508; CA 2245842; DE 22588.4-08; DE 621495; DE 655144; DE 69320175.4; DE 69322401.0; DE 69331145.2; DE 69525856.7; DE 69734744.3; DE 797503; DK 0655144; DK 1447702; EP 0475082; EP 0621495; EP 0655144; EP 0662275; EP 0767398; EP 0797503; EP 0969247; EP 1447702; ES 0621495; FR 0621495; FR 0655144; FR 0662275; FR 1447702; GB 2043769B; GB 2055842B; GB 2283808B; GB 2290134B; GB 2291814B; GB 2292530B; GB 2292896B; GB 2294909B; GB 2295058B; GB 2303203B; GB 2306887B; GB 2307036B; GB 2316477B; IE 0621495; IT 034244BE; 2005; IT 0621495; IT 0655144; JP 3495373; JP 3793577; NL 0621495; NL 0797503; NL 0969247; UK 0621495; UK 0655144; UK 0662275; UK 0797503; UK 0969247; UK 1447702; ii Echo™ Software User Manual Table of Contents Echo™ Software User Manual .................................................................................. i Contacting High End Systems® ............................................................................ii Patents .............................................................................................................ii Echo Software ..................................................................................................... 1 Echo Setup Hardware Setup .................................................................................................. 2 Installing Echo Software ..................................................................................... 2 Launching Echo ................................................................................................... 2 The Echo User Interface ..................................................................................... 3 Device Window Viewing All Devices ............................................................................................. 4 Viewing Single Device ......................................................................................... 5 Organizing SHOWPIX and StudioPix Content Stock Content Library ......................................................................................... 6 Viewing Content ................................................................................................. 7 Managing Content on the Local Drive Package Options ................................................................................................. 8 Folder Options .................................................................................................... 8 File Options ........................................................................................................ 9 Managing Fixture Content Uploading User Content to a Fixture ................................................................. 10 Updating Content .............................................................................................. 11 Updating Stock Content .....................................................................................11 Updating Pixellage Content ................................................................................12 Deleting Content ............................................................................................... 13 Deleting User Content .......................................................................................13 Deleting Pixellage Content .................................................................................13 Cloning Device Content ..................................................................................... 14 Creating User Content Preparing Content for Echo Conversion ............................................................ 16 Creating a Package and Folder .......................................................................... 17 Echo™ Software User Manual iii Converting Your Content ................................................................................... 18 Frame Playback ............................................................................................... 18 Sample Mask .................................................................................................. 19 Aspect Ratio .................................................................................................... 20 Contrast/Brightness ......................................................................................... 20 Luminance /Distance Weight ............................................................................. 21 Luminance Cutoff ............................................................................................. 21 Cutoff Mode/Luminance .................................................................................... 21 Color .............................................................................................................. 22 Transporting User Content Exporting and Importing a User Content Package ............................................. 23 Exporting a Preview .......................................................................................... 23 Pixellage Content Creating a New Pixellage Package .................................................................... 24 Pixellage Creator Window ................................................................................. 25 Templates ......................................................................................................... 26 Creating a Template ......................................................................................... 26 Adding and Positioning Fixtures ......................................................................... 26 Grid Options ................................................................................................ 26 Pixellage Address ......................................................................................... 27 Media ................................................................................................................ 27 Adding a Media File .......................................................................................... 27 Adjusting the Media ......................................................................................... 29 Saving Pixellage Content .................................................................................. 30 Assigning Pixellage Addresses to Fixtures ........................................................ 31 Updating Pixellage Content ............................................................................... 32 Updating Fixture Firmware Complete Firmware Update ............................................................................... 34 SHOWPIX or StudioPix Fixture ........................................................................... 34 Other HES Fixtures .......................................................................................... 34 Complete Firmware Update Procedure ................................................................ 34 SHOWPIX or StudioPix Component Update ....................................................... 35 iv Echo™ Software User Manual Echo Software You can use Echo software to convert, organize, and transport user content to SHOWPIX and StudioPix fixtures as well as upload content and fixture firmware to High End Systems devices on a DMX link. Echo software communicates with fixtures using a USB upload module or a Wholehog single USB DMX widget to: • Upload fixture firmware to HES fixtures • Convert custom media files to a SHOWPIX and StudioPix format • Convert custom media files to SHOWPIX or StudioPix Pixellage • Organize SHOWPIX and StudioPix content for management and transport • Upload and download content to or from fixtures • Upgrade devices on the link with updated SHOWPIX and StudioPix stock content and fixture software • Create and manage Pixellage Content Echo™ Software User Manual 1 Echo Setup Hardware Setup Echo software requires a computer running Windows XP, with Service Pack 2 or 3 installed or Windows Vista and an internet connection to download the software. For uploading content or fixture firmware to a fixture on a DMX link, you will need a USB upload module or a Wholehog single USB DMX widget. Installing Echo Software The latest version of Echo software is available from the High End Systems website at (http://www.highend.com/support/Echo/EchoSoftware.asp). After downloading Echo to your computer, a standard Windows install wizard will prompt you through the installation process. Launching Echo When you start up Echo, the software automatically initiates a Fixture Discovery process to locate all High End System fixtures along with any other RDM devices connected to the same DMX link. A status bar along the bottom of the Echo window tracks the fixture discovery. Note: This will not happen unless a widget and fixtures are attached. If you click on the Status Bar, a window will open to show the ongoing status of the discovery process and note any errors. When the launch is complete, all discovered devices will be listed in the under Devices in the navigation pane along with their current DMX Start Address. 2 Echo™ Software User Manual The Echo User Interface Echo software uses a typical Windows explorer structure for organizing Device information and Content. View Tabs Column Heading Folder/File List Navigation pane DMX Address Contents pane • The top level of the navigation pane contains Devices, User Content, Stock and Pixellage Content. • At each navigation level you can display the contents as a list or a preview by selecting the tab in the pane. • You can click on a Column Heading to sort the content displayed by Name or Address. Echo™ Software User Manual 3 Device Window Viewing All Devices The Device window displays the following information for all the discovered High End Systems and RDM fixtures on the DMX link. Unique ID is the fixture’s unique 10-character number. Device Name is a name you assign to a fixture up to 26 characters. Protocol indicates the discovery protocol (HES or RDM). Manufacturer lists High End Systems for each. If other RDM devices are discovered by Echo, their manufacturer will be listed. Model identifies the product. Version lists the current fixture software version. DMX Address shows the fixture’s currently assigned Start Channel on the DMX link. 4 Echo™ Software User Manual Viewing Single Device Selecting an individual fixture displays all the available configuration values for that specific device. You can right click on the Parameter column to sort parameters alphabetically. Percent DMX Parameter of fixture Currently Selected Parameter Value memory used NOTE: You can access certain configuration values through the onboard Menu System. Right-click on the selected device in the navigation window to: Change the DMX Address: opens a dialog box allowing you to assign a new address to that fixture. Enable Identify: helps you visually identify a fixture in the rig by causing it to strobe. Set Pixellage Address: lets you specify the Pixellage content this fixture will output. See Assigning Pixellage Addresses to Fixtures on page 31. Echo™ Software User Manual 5 Organizing SHOWPIX and StudioPix Content There are three types of Content. • Stock content is factory provided and cannot be changed. • User content consists of all custom content you create. • Pixellage content is user content you have configured in pixellage format. Packages are containers for multiple folders and their files. Packages can be uploaded to fixtures, cloned and transported. Note: Stock Content cannot be edited. Each folder and the files within a package have associated DMX addresses. Stock content addressing is set and cannot be changed. You will assign DMX values to User and Pixellage content as described in the sections on Content Management. Stock Content Library Every SHOWPIX and StudioPix fixture ships with a stock content library of folders containing collections of media files. Echo software also includes the complete stock content library. As new stock content is developed and shipped with new versions of Echo software, you can update your fixtures. Stock content and it’s associated DMX addresses cannot be renamed or changed. 6 Echo™ Software User Manual Viewing Content Echo will display the name and associated DMX value for every folder and file of Stock or User content. In the Preview display, you can double click for larger image view window. Advance one frame Advance file Rewind one frame View the Frame # playing View the DMX values for current Frame View delay time between frames NOTE: If you are viewing User Content on a SHOWPIX or StudioPix fixture but not on your local drive, you will see an icon with a question mark until Echo downloads a preview of the User Content from the selected device. Echo™ Software User Manual 7 Managing Content on the Local Drive Keep the following in mind when managing User Content: • You cannot undo any action. Before you reset all DMX in a package, be aware that you will remove all currently assigned DMX addresses. • To edit a Folder or File name or DMX address in the list view, you can double click on the name or address and enter a new name or value. Addresses can be entered via the keyboard or by using the scroll up/down buttons on the screen. Package Options If you right click on the User Content bold header on the left column then you can select to create a SHOWPIX or StudioPix package. Packages are grouped by fixture type. You cannot upload packages to different types, however you can copy (or drag) content from one fixture type to another and it will be automatically converted to the correct LED array. When you Right Click on a Package of User Content you see a menu that gives you options to: • Rename the package • Autoset ALL DMX values of the folders within the package • Reset All DMX values of the folders within the package to 0 (no value) • Copy the contents of the package to place in another package on the hard drive or a fixture • Cut the contents of the package to place in another package on the hard drive or a fixture • Delete the package • Create and name a New [SHOWPIX or StudioPix] Package • Export the package to another location on your hard drive or a USB drive for transport Folder Options When you Right Click on a Folder of User Content you see a menu that gives you options to: • Rename the folder • Edit DMX value for this folder • Autoset DMX value of this folder 8 Echo™ Software User Manual • Reset DMX value of this folder • Autoset ALL DMX values of the files within this folder • Reset All DMX values of the files within this folder to 0 (no value) • Copy the contents of this folder to place in another folder on the hard drive or a fixture • Cut the contents of this folder to place in another folder on the hard drive or a fixture • Delete the folder File Options When you Right Click on a Folder of User Content you see a menu that gives you options to: • Rename this file • Edit DMX value for this file • Autoset DMX value of this file • Reset DMX value of this file • Copy the file to place in another folder • Cut the file to place in another folder • Delete the file Echo™ Software User Manual 9 Managing Fixture Content To interact with a SHOWPIX or StudioPix fixture on a DMX link, you will need a USB upload module or a Wholehog single USB DMX widget. The Device Menu gives you options for managing content on any SHOWPIX or StudioPix fixture(s) that Echo has discovered on the DMX link. Uploading User Content to a Fixture You can upload User Content through Echo by cutting and pasting, or simply dragging a package or folder into the User Content Package on the fixture you select. • When you Drag or Paste a package into a device, the folders and their files contained in the package are added to the User Content package on the fixture. Note: Packages are unique by fixture type and cannot be dragged or copied to other fixture types. • When you Drag or Paste a folder into a device the folder and its files are added to the User Content package on the fixture. 10 Echo™ Software User Manual Updating Content Updating Stock Content When you download the latest version of Echo software from the High End Systems website at (http://www.highend.com/support/Echo/EchoSoftware.asp), you may find additional media files available as stock content from High End Systems. To update the Stock Content: 1. Select Update Stock Content to replace the Stock Content currently loaded on SHOWPIX or StudioPix fixture(s) with the latest version in the Echo application. If you haven’t Discovered all the devices on the DMX link at Echo startup, you can select Discover Devices to find them now. 2. A screen will prompt you to choose SHOWPIX or StudioPix fixture type to upgrade. 3. The next screen lets you select any or all of the devices on the link of that type to update. Note: User Content will not be affected on any of the units you select for the Stock Content update. Echo™ Software User Manual 11 Updating Pixellage Content To update Pixellage content files currently loaded on a SHOWPIX or StudioPix fixture: 1. Select Update All Pixellage Content from the Pixellage menu to replace the Pixellage Content currently loaded on SHOWPIX or StudioPix fixture(s) with the content in the Echo application. A built in wizard with prompt you to first select the fixture type (SHOWPIX or StudioPix). 2. Check individual discovered fixtures with Pixellage content you want to update. You can also click Select All to check all the fixtures. Clicking the Clear All button will undo the selection. The Back button takes you to the previous step and Cancel closes the wizard. 3. When you select Finish, all Pixellage content will be updated on the selected fixtures. 4. A screen shows update progress and informs you when the process is complete. Note: Stock content and User content will not be affected with this command. 12 Echo™ Software User Manual Deleting Content Deleting User Content Select Delete All User Content under the Device menu to delete the User content currently loaded on any SHOWPIX or StudioPix fixture(s) on the link. A built in wizard with prompt you to first select the type of fixture (SHOWPIX or StudioPix) and then a specific device. Note: Stock content and Pixellage content will not be affected with this command. Deleting Pixellage Content To delete Pixellage content files currently loaded on a SHOWPIX or StudioPix fixture: 1. Select Delete All Pixellage Content from the Pixellage menu to delete any Pixellage files currently loaded on a SHOWPIX or StudioPix fixture. A built in wizard with prompt you to first select the fixture type (SHOWPIX or StudioPix). 2. Check individual discovered fixtures with Pixellage content you want to delete. You can also click Select All to check all the fixtures. Clicking the Clear All button will undo the selection. 3. When you select Finish, all Pixellage content will be deleted on the selected fixtures. The Back button takes you to the previous step and Cancel closes the wizard. Note: Stock content and User content will not be affected with this command. Echo™ Software User Manual 13 Cloning Device Content Cloning replaces the User Content on one or more fixtures with a package of content you designate from your hard drive or another fixture. You can also clone from one fixture to another. Note: There is no undo command. Any user content that had been previously uploaded to the destination fixture will be permanently removed. Save any user content you want to retain before you initiate a Clone Device command. To clone content: 1. Select Clone Devices from the Device menu. 2. In the Clone Wizard, select the device that will be the source for the User Content to be cloned. Remember, you can only clone packages or fixtures of the same type. 3. Click on Next to continue. 14 Echo™ Software User Manual 4. Select the destination fixture(s) for the User Content you have identified. 5. Click Finish to complete the Cloning process. Echo™ Software User Manual 15 Creating User Content Preparing Content for Echo Conversion Any custom content you create needs to be converted to a format that maps to the SHOWPIX 127-LED or a StudioPix 61-LED pixel array. Echo will convert up to 256 frames of content and saves a preview displaying all 256 frames. Although .mov or animated .gif files are the most common formats to use as custom content, Echo software can accept a wide variety of formats. Video file formats: MPEG-1 (MPG, MPEG) Video codecs: Image formats: MPEG-1 Windows Bitmap (BMP) MPEG-2 (PS, TS, VOB) MPEG-2 Graphic Interchange Format Microsoft (ASF, AVI) MPEG-4 ASP (including DivX, (GIF) Quicktime (MOV) Xvid) Joint Photographic Experts Flash (FLV) MPEG-4 AVC/H.264 Group (JPG, JPEG) Multiple- Digital Video (DV) Microsoft WMV7 image Network Graphics Microsoft WMV8, WMV9 (MNG) Portable Network (limited support) Graphics (PNG) Portable VC-1 Bitmap (PBM) Portable MJPEG Graymap (PGM) Portable H.261 Pixmap (PPM) Tagged Image H.263 File Format (TIFF) FLV X11 Bitmap (XBM) DV X11 Pixmap (XPM) For more information on preparing content for Echo conversion and a Flash template for content creation, go to the SHOWPIX or StudioPix support page at www.highend.com/support. 16 Echo™ Software User Manual Creating a Package and Folder Every User Content file needs to be contained within a folder that is part of a package. To create a new package: 1. Right click on User Content in the navigation pane or in the contents pane when User Content is displayed and selecting New [SHOWPIX or StudioPix] Package. 2. Type the name of your new package in the dialog box that appears and click OK to save. Your new package will now appear in the navigation bar under User Content. To create a folder: 1. Right click in the contents pane of a selected package or on that package in the navigation pane and select New [SHOWPIX or StudioPix] Folder. 2. Type the name of your folder in the dialog box that appears and click OK to save. Your new folder will now appear within your selected package. Echo™ Software User Manual 17 Converting Your Content To convert content to a format compatible with SHOWPIX and StudioPix fixtures, drag the file from your hard drive or network into a folder in an appropriate fixture type package that you have created. Echo converts the file to a .SPI file type which is a list of numbers with values for each pixel in each frame mapping it to a SHOWPIX or StudioPix LED array. A preview window will allow you to make some choices about how your content will be converted. Frame Playback Slide the Frame arrow to preview playback of the file converted from the original to the map of the LED array. 18 Echo™ Software User Manual Sample Mask Click Show on the Sample Mask field to view an overlay of the area being sampled from the original to assign color to an LED in the LED array. Adjusting the Sample Size scale changes the area that is sampled to determine the color assigned to each “pixel”. Echo™ Software User Manual 19 Aspect Ratio If you have a content file with an Aspect Ratio that does not map to 1:1, you can choose whether to retain or adjust the Aspect ratio of the Sample Mask. Clicking Ignore in the Aspect Ratio field stretches the sample mask to fit the shape of the imported file. Clicking Keep centers the Sample mask on the imported image retaining the mask’s circular shape. Contrast/Brightness Contrast adjusts the relative brightness. A higher contrast means that darker areas will appear darker, and brighter areas will appear brighter. A lower contrast means that brighter parts will appear darker and that darker parts will appear brighter. Brightness adjusts the overall brightness, increasing or decreasing it for all parts of an image. 20 Echo™ Software User Manual The following adjustments affect the boundaries between elements of an image. They are especially useful for adjusting the borders of a figure moving against a background. Luminance /Distance Weight The final LED colors in echo are calculated by a weighted average of the pixels surrounding the LED area. Increasing the Luminance Weight, means that brighter pixels will contribute more to the final LED color than darker pixels. Likewise, as Distance Weight is increased, pixels that are closer to the center of the LED will contribute more than pixels that are further away. Luminance Cutoff Specifies the minimum brightness of a pixel for it to be taken into account when calculating the final LED color. This allows you, for example, to keep bright or dark parts of an image from effecting the LED color. Cutoff Mode/Luminance These controls effect how the Luminance Cutoff works. When the Cutoff Mode is set to Less, then pixels that are darker than the specified Luminance Cutoff are ignored. When the Cutoff Mode is Greater, then pixels that are brighter than the Luminance Cutoff are ignored. The Luminance Invert control is used to invert the luminance value before it is tested by the cutoff (it does not invert the final color). Echo™ Software User Manual 21 Color Echo lets you choose how to map the colors in the imported file. Click on the Color button converts the original file’s color palette to the SHOWPIX display’s 256 color palette. Grayscale converts the input to grayscale and Monochrome converts the input to black and white only. Original Color Grayscale Monochrome After you have made the adjustments you want, click OK to import the content into the selected Echo folder. 22 Echo™ Software User Manual Transporting User Content Exporting and Importing a User Content Package You can import or export any package to a portable or networked hard drive for transport to another computer. Content must be in a package to import or export. To export, simply Right click on a package and select Export. Browse to the location on a drive, Name the package and click the Save button. To import a package into Echo: 1. Right click on User Content in the navigation bar or in the right pane and choose Import. 2. Browse to the .pixpkg file you want to import and click Open. The package will be added to the user content in Echo. Exporting a Preview If you want to send a preview of a file that you have converted to SHOWPIX format, you can export it as an animated .gif file that someone without Echo software can view. To export a preview: 1. Select the Preview tab for viewing the User Content file. 2. Right Click on the file and select Export to GIF. A dialog window will let you browse to a location to the save the animated GIF created. Echo™ Software User Manual 23 Pixellage Content The Pixellage effect allows you to divide a single piece of content into discrete files and assign each portion to a different fixture for output. Since SHOWPIX and StudioPix fixtures have different array sizes, Pixellage content must be developed for a specific fixture model and cannot be output on another model type. Generating Pixellage content includes the following: • Creating a template to define how many fixtures will be displaying portions of the media file and their position • Assigning Pixellage addresses to fixtures for playback • Selecting and adjusting the media file Creating a New Pixellage Package By default the Image Folder A and Image Folder B DMX value of 251 is reserved for Pixellage Content. This allows you to designate Pixellage Content for each Image and then crossfade between them. You can import an existing Pixellage package or create a new Pixellage file. To import an existing Pixellage, Right click on SHOWPIX or StudioPix model under Pixellage content in the navigation pane and select Import. Browse to the folder containing the Pixellage content you want to import. To open the Pixellage Creator window, right click on a SHOWPIX or a StudioPix model in the navigation bar under Pixellage Content and select New Pixellage. With Pixellage Content selected, you can also right click on the SHOWPIX or the StudioPix package in the contents pane and select New Pixellage. This will open the Pixellage Creator window. The Pixellage Creator window can also be opened by using the Pixellage menu bar on the top of the Echo window. 24 Echo™ Software User Manual Pixellage Creator Window The Pixellage Creator window is where you define templates and Media content for the Pixellage effect. It also offers several media adjustments options. Create and name Templates Adjust Template options and display Add fixtures Add media Adjust media file display area Position and view templates and media playback Adjust Media Files Save Pixellage content Echo™ Software User Manual 25 Templates Pixellage templates define the number of segments of the media file you want to display and the position of each segment of the output. Templates are specific to SHOWPIX or StudioPix fixtures and cannot be interchanged. Creating a Template To add a new template click Add SHOWPIX Template or Add StudioPix button to create a new template or Remove to delete a selected template. You also have the option to reconfigure existing templates. To rename a template, Double click on a template name and type in a new name up to 24 characters. All Templates will be displayed below the Template buttons. The name will automatically include Sh for SHOWPIX or St for StudioPix. Whatever fixture configuration you create will now be saved as that template and can be used with any media file you designate. Adding and Positioning Fixtures To add a fixture, click the Add SHOWPIX button. A fixture will appear in the Template Display area. Each fixture you add will be stacked on the original position. You can click and drag on the fixture after adding it and place it anyplace in the template display area. Hold CTRL to select multiple fixtures, then release CTRL to position the multiple selection while keeping the relative spacing. Grid Options You can check the Show Grid option to display a grid and select the grid type from the drop down menu. The Snap to Grid option helps you fine tune the fixture positioning. You can lock or unlock the positioning at any point during the Pixellage creation process by checking or unchecking the Lock option box. 26 Echo™ Software User Manual Pixellage Address Each fixture in a template must have a Pixellage address to assign that portion of the media output to a specific fixture when playing back from a DMX console. A default address is assigned to each fixture icon as you create it. You can select a fixture, right click and select Renumber A dialog box with allow you to assign another Pixellage address. Note: Before uploading content to the fixtures, you need to assign the corresponding pixellage address to each fixture. See Assigning Pixellage Addresses to Fixtures on page 31. Media You can select any user content for Pixellage output. Adding a Media File CLick on the Media button and browse to the media file you want to select. Select the file and click on the Open button. The file will now appear in the green outlined display box behind the template. Note: Depending on the file size, this processes can take some time. A status bar at the bottom of the Pixellage Creator window will show import progress. Echo™ Software User Manual 27 You can adjust the green box to stretch and position the media file by clicking and dragging the corners. Note: This action can affect the resolution of a media file. De-selecting the Show Media option displays the media as it will be output from the fixture configuration of your template. 28 Echo™ Software User Manual Clicking on the Expand button below the display box enlarges the display area to help you fine tune the positioning of the fixtures and the media. Selecting the Collapse button reduces the display area to the original size. Adjusting the Media In addition to stretching the media file to fit the template you have designed, you can apply the same adjustments that are available for any SHOWPIX and StudioPix user content using the Settings in the Pixellage Creation window and view the changes in the display window, (see Converting Your Content on page 18. Note: You can view the Sample Size and Sample Zoom adjustments when Show Mask is selected in the Options area, (see Converting Your Content on page 18). You can select the Reset to Defaults button at any point in the process to return to the original file. Echo™ Software User Manual 29 Saving Pixellage Content When you select the Create SHOWPIX Pixellage (or Create StudioPix Pixellage) button at the lower right of the Pixellage Creator window, a dialog box will let you name the content. Click OK to save the Pixellage content in the Echo fixture package. This may take some time depending on the media file size -- a dialog box with prompt you when the Pixellage Export is Complete. When you select the Close button you will return to the Echo interface, and you will see the new content you have added listed as a folder under the fixture type in Pixellage content. Note: If you close the Pixellage Creator window before saving the Pixellage content, the media file with its adjustments will not be saved but the templates you created will remain. Selecting that folder will display the content as a set of discrete files with Pixellage addresses that can be assigned to specific fixtures for output. Pixellage Address Pixellage File number 30 Echo™ Software User Manual Assigning Pixellage Addresses to Fixtures Pixellage addresses match the output from specific fixtures to the template pattern you used to create your Pixellage content. The Pixellage address of a fixture designates the Pixellage file that fixture will output. Content file relates to template position To assign a Pixellage address to a fixture, discover the fixtures; then right click on a fixture in the navigation bar and select Set Pixellage Address. A dialog box will let you assign a Pixellage address for that fixture. The address you set for a fixture will remain upon shut down. Echo™ Software User Manual 31 
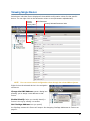
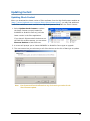
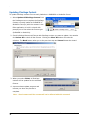
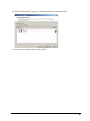
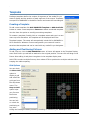
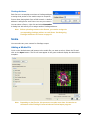
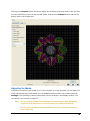
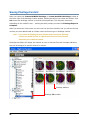
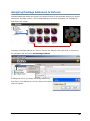
Updating Pixellage Content To update the Pixellage content on a specific fixture: 1. Select Update Pixellage Content from the Pixellage drop down menu. A dialog box will prompt you to select a fixture model. 2. After you have selected SHOWPIX or StudioPix, you will see all the discovered fixtures of that type with their current Pixellage address and DMX address. 3. Select the fixture(s) for Pixellage content update. You can also choose the Select All button to update all the fixtures or Clear All to redo your selection. 4. After completing your selection, click Finish to start uploading. A dialog box will show upload progress and indicate when upload is complete. 5. Once Pixellage content is uploaded, it will be displayed as part of the Device content for the fixture. 32 Echo™ Software User Manual Echo™ Software User Manual 33 Updating Fixture Firmware Complete Firmware Update SHOWPIX or StudioPix Fixture To upgrade SHOWPIX or StudioPix fixture firmware, you will need to download the latest version of Echo software from the website to your computer. When you download Echo, it will contain the latest SHOWPIX and StudioPix fixture software for upgrading fixtures on your DMX link. Note: Any stock content updates will also be contained in each new version of Echo software, (see Updating Content on page 11). If there is a SHOWPIX or StudioPix fixture software update to download from the website, run the installer and it will automatically load into the Echo application on your hard drive. The next time you launch Echo, the latest fixture software will be available to upgrade fixtures on the link. The latest software can always be found on the High End Systems website on the SHOWPIX or StudioPix support page (http://www.highend.com/support/LED). Other HES Fixtures Download the latest software from the HES website on the specific product's support page. Unzip the file to your hard drive and then launch Echo. Complete Firmware Update Procedure To update fixtures: 1. Under the Device Menu, select Upgrade Devices. A Software Upgrade Wizard will prompt you to select which fixtures on the link you want to upgrade. All units are listed by their Unique ID. The next screen lets you choose a fixture type. For non-SHOWPIX and StudioPix fixtures, browse to the .bin file you downloaded from the High End website and click Next to continue. 2. Click in the check box beside each fixture you want to upgrade. 3. Click Finish to automatically upgrade those devices. 34 Echo™ Software User Manual SHOWPIX or StudioPix Component Update If the fixture software become corrupted, Echo will discover not discover the fixture as a SHOWPIX or a StudioPix device. Instead the fixture’s Graphics and Motion components will display separately. To restore the fixture software in this case, you will need to download the fixture software.zip file from the SHOWPIX or StudioPix support page (http://www.highend.com/support/ LED) and extract the files it contains to your hard drive. The following example shows the steps used upgrade separate software components for a SHOWPIX fixture. You can apply the same steps for a StudioPix fixture: 1. Under the Device Menu, select Upgrade Devices. SHOWPIX Motion and SHOWPIX Graphics components are discovered separately. Select the SHOWPIX Graphics fixture component under Devices. 2. An update wizard will prompt you to select from a drop down menu. Select SHOWPIX Graphics and click Next to continue. Echo™ Software User Manual 35 3. Browse to the showpix_graphics.bin file you downloaded from the High End website and click Next to continue. 4. Devices needing a component upgrade will display N/A in the Current Software Version column. Select the device(s) needing a component upgrade and then click Finish to complete the component upgrade. 5. When the upgrade is complete, select Discover Devices from the Device menu to re-discover the devices. If the fixture is discovered as a complete fixture with software versions for both graphics and motion indicated, you are finished. If the devices still indicates the separate motion and graphics components, repeat these steps to upgrade the Motion component. 36 Echo™ Software User Manual