1
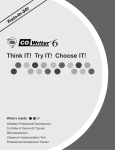
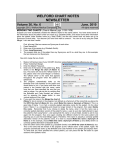
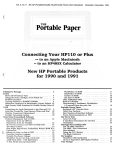
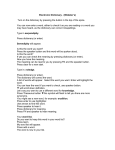
Moderation Advice Label Printer When you first run the application, you’ll be presented with a view like the following. ModAdvice is a disc-based application rather than a memory-based one like a word processor. This means you need to name and save your data file before writing any comments. Details are saved to disc automatically as you make changes to each school record; there is no need to save changes as you go. This is different to the way a word processor operates where you make changes in memory and then periodically save the contents to disc manually. To create a new data file or to open an existing one, left-mouse click on the Data file button. Left-mouse-click on the Data file button. Page 1 of 7 For example, to create an empty data file, select the appropriate options from the menu, as pictured below. Page 2 of 7 From here, you can: add new school names to the list (enter name in the top line of box and press the <Enter> key when finished) edit existing school names (click on the school name and edit the name directly) delete existing school names and associated comments (select school name and press the <Delete> key). For each school in the list you can: create and edit comments (using the included standard RTF word processor) check the spelling using the included Australian dictionary (select misspellings with the right-hand mouse button) Page 3 of 7 Of course, all of the same features are available for creating and editing Monitoring advice files: Speller and Thesaurus buttons “Live spell checking” (right-mouse-click on misspelling for suggestions) Page 4 of 7 You can change the appearance of the application by choosing an alternative skin. To print a set of labels for a school, select the school name in the navigation pane on the left side of the main window, and left-mouse click on the Preview or Print toolbar button. The Print button sends the document directly to the default printer. Whereas, the Preview button brings up a window similar to the representation below. If you are happy with the result you can also print from this preview window. You will need to repeat this process to print labels for each school in the list. After printing the labels for a school, place one sticky label onto each copy of the Form R3 or Form R6 and remember to sign in pen, ensuring all copies are signed. Page 5 of 7 To include the subject name and panel code on the group label, enter the details under Preferences Details: If your printer clips the right-hand margin of the page, choose the Use generous print margins option under Preferences Printer: This will generate a report with wider margins, something like the following: Note: The comment borders have been hidden for aesthetic reasons. Page 6 of 7 At the completion of your meeting, you can save an archive copy of all comments to a PDF, RTF or HTML file by making the appropriate selection under the Export as button. Just follow the prompts to enter a filename and folder location. © 2006-2014, Blaiseware www.blaiseware.com Page 7 of 7