1
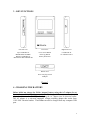
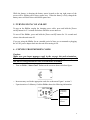
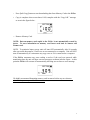
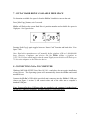
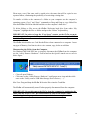
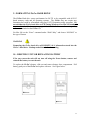
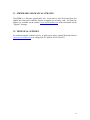
PicPac
7500 Series
Your Digital Camera and More Storage Solution
User Manual
Version 1.0
Revision Date: March 3, 2008
TABLE OF CONTENTS
Description
Page
FCC CERTIFICATION
WARRANTY INFORMATION
PACKAGE CHECKLIST
FEATURES
KEY FUNCTIONS
CHARGING THE BATTERY
TURNING PICPAC ON AND OFF
COPYING FROM MEMORY CARDS
PICPAC HARD DRIVE AVAILABLE FREE SPACE
CONNECTING PICPAC TO COMPUTER
FORMATTING PICPAC HARD DRIVE
RESETING UNIT OR REPLACING BATTERY
FIRMWARE AND MANUAL UPDATES
TECHNICAL SUPPORT
3
3
4
4
5
5
6
6
8
8
11
11
12
12
2
FCC Certifications
This equipment has been tested and found to comply with the limits of a Class B digital device, pursuant to
Part 15 of the FCC Rules. These limits are designed to provide reasonable protection against harmful
interference in a residential installation.
This equipment generates, uses and can radiate radio frequency energy and, if not installed and used in
accordance with the instructions, may cause harmful interference to radio communications.
However, there is no guarantee that interference will not occur in a particular installation. If this equipment
does cause harmful interference to radio or television reception, which can be determined by turning the
equipment off and on, the user is encouraged to try to correct the interference by one or more of the
following measures:
Reorient or relocate the receiving antenna.
Increase the separation between the equipment and receiver
Connect the equipment into an outlet on a circuit different from that to which the receiver is connected.
Warning:
Warranty will be void if mishandled. Please take care in handling the Wolverine Device:
o
o
o
o
o
o
o
o
Do not drop or handle too aggressively as it may cause damage to the device and loss of data.
Do not allow the device to come into contact with water or other liquids. In the event that water or
other liquids enters the interior, immediately turn off the device. Continued use of the device may
result in fire or electrical shock. Please consult your product distributor or the closest support center.
Do not handle with wet hands. Doing so may cause electrical shock and damage the unit.
Do not place the device close to any equipment generating strong electromagnetic fields. Exposure to
strong magnetic fields may cause malfunction or corrupt data.
Do not expose the device to extreme temperatures, humidity or vibrations, which may cause damage to
the device.
Do not open the outer case. If battery needs replacement please, follow the instructions in this manual
on how to replace the battery and take caution not to damage the components inside the unit.
Do not move or disconnect the device from the computer while the device is reading/writing data.
This may cause damage to the data and/or the device.
Under no circumstances should the user try to repair the device. Doing so may cause electrical shock
and void warranty.
IMPORTANT WARRANTY INFORMATION (UNITED STATES ONLY)
WOLVERINE DATA IS NOT RESPONSIBLE FOR CONSEQUENTIAL
DAMAGES, INCLUDING LOSS OF DATA. ALWAYS BACK UP ALL DATA.
FOR FULL WARRANTY STATEMENT CONTACT WOLVERINE DATA.
Wolverine Data has no obligation to repair, replace or issue refunds without a Return Merchandise
Authorization (RMA) number and the receipt of the defective product. Repairs or replacement service will
not be offered to Products that were misused, repaired without authorization or by other reasons beyond the
range of intended use. Products replacement may be either new or refurbished, provided that it has
functionality at least equal to that of the product being replaced. Wolverine Data is not responsible for any
data stored on the returned Product, please backup any data prior to shipping the unit. Wolverine Data will
ship the repaired or replacement product only to an address in the continental United States. Shipments to
other locations will be made freight collect.
The limited warranty for accessories such as included battery is valid for 6 months from the date of
purchase. All OUT OF WARRANTY repairs maybe subject to normal repair fees. Please contact your
dealer or Wolverine Data for current charges.
3
1 - PACKAGE CHECKLIST
Main unit
Carry case
USB cable
User's guide
CD-ROM containing digital copy of this manual and Formatting Software for Windows
Power Adapter (100-240V auto switching)
2 – FEATURES
The Wolverine PicPac has what you need to store and share thousands of photos, videos,
data, and more. A travel-friendly battery powered high-capacity portable hard drive with
built-in 11-in-1 memory card reader, so you can download and save images from your
camera memory card anytime, anywhere with just a press of a button. A perfect
multipurpose device for photographers on assignment, tourists on trips, or everyday folks
who simply need additional data storage space.
o Portable Hard Drive with built-in 11-in-1 memory card readers for:
1. Compact Flash (CF)
2. Micro Drive (MD)
3. Memory Stick (MS)
4. MS-Pro
5. MS-Duo
6. MS-Pro-Duo
7. Secure Digital (SD)
8. SDHC
9. MMC
10. Micro SD
11. XD
o
o
o
o
o
o
o
o
o
o
Transfer digital pictures without a computer with just a press of a button
Status backlit display screen (no picture preview)
PC and Mac Plug-and-Play
High speed USB 2.0 (compatible with USB 1.1) computer interface
Rechargeable and replaceable Li-Ion battery
Universal 110-240V auto switching recharging power adapter
Weigh 8 oz (220 grams)
Dimensions – 4.7x3.1x0.9 inches (120x78x23 mm)
System Compatibility – PC: ME/2000/XP & Vista, Mac: OS 10.x and above; Linux:
2.4x and above
One year limited warranty
4
3 – KEY FUNCTIONS
Left Side View
Front View
Right Side View
Top Card Reader for
MS/SD/SDHC/xD/MMC
Bottom Card Reader for
MS-Duo/Pro-Duo and Mini-SD
Power on/off Button
Info/Copy Button
Battery Slide Door
Card Reader for
CF and Micro Drive
Bottom View
Power DC plug-in Jack
USB port
Figure 1
4 - CHARGING THE BATTERY
Before initial use charge the PicPac internal battery using the AC adapter for at
least 6 hours with the unit powered off. To charge the battery, connect the AC
adapter’s cable into the DC 5V jack and plug the AC adapter into an electrical outlet.
The AC adapter is a universal automatic voltage-switching adapter that works from
110V-240V electrical outlets. The PicPac can also be charged from any computer USB
port.
5
While the battery is charging the battery meter located on the top right corner of the
screen will be flashing one to three square bars. When the battery is fully charged the
battery meter will show three solid black square bars.
5 - TURNING PICPAC ON AND OFF
To turn on the PicPac, unplug the charging power cable, press and hold the [Power
on/off] button for 2-3 seconds and release when the screen turns on.
To turn off the PicPac, press and hold the [Power on/off] button for 3-4 seconds and
release when the unit turns off.
If you are using the PicPac for an extended period of time we recommend re-plugging
the AC/DC power adapter back into the unit after turning it ON.
6 – COPYING FROM MEMORY CARDS
Caution:
Make sure you insert memory cards in the correct slot and orientation.
Otherwise, the card and PicPac will be damaged. Damaging memory card
slot due to wrong insertion is not covered under warranty.
o
Turn on PicPac, “Insert Card” flashes on the screen as shown in below figure:
o Insert memory card in the appropriate card slot as shown on Figure 1 section 3.
o Upon insertion of a Memory Card the PicPac shows the following information:
Used space
on memory
card
Type of card
inserted
6
o
Press [Info/Copy] button to start downloading data from Memory Card to the PicPac
o Copy is complete when screen shows 100% complete with the “Copy O.K.” message
as seen in the figure below:
o Remove Memory Card
NOTE: Data on memory card copied to the PicPac is not automatically erased by
device. To erase information on memory card insert card back in camera and
Format card.
NOTE: To minimize battery usage unit will turn OFF automatically after 90 seconds
after successful data transfer, if not in use or not connected to a computer. Unit will NOT
turn off automatically if it encounters any copy error or if it is connected to a computer.
If the PicPac encounters any error reading a card or if the card was removed while
transferring data, the unit will show an error messages as shown in below figure. At this
point the PicPac will not turn off automatically allowing user to observe error message.
We highly recommend formatting memory card in camera before any new shoot to
minimize any memory card bad sector errors.
7
7 – PICPAC HARD DRIVE AVAILABLE FREE SPACE
To determine available free space left on the PicPac’s hard drive turn on the unit
Press [Info/Copy] button, wait 5 seconds.
PicPac will flash on the screen Hard Drive’s partition number and available free space in
Gigabytes. See figure below.
Pressing [Info/Copy] again toggles between “Insert Card” function and hard drive “Free
Space” info.
Note: Hard drive manufacturers will normally define gigabyte (GB) as 1,000,000,000
bytes. However, Computers and devices like the PicPac defines a gigabyte as
1,073,741,824 bytes which implies that the stated Gigabytes on the drive will show up as
7% less on a computer or the Wolverine device.
8 - CONNECTING PicPac TO COMPUTER
Windows ME/2000-SP3/XP/Vista, Mac OS 10.1.x and above do not require installation
of any Drivers. The Operating system will automatically detect the PicPac and install
needed Drivers.
Connect the PicPac’s USB cable (provided) mini connector into the PicPac’s USB port
(shown on Figure 1 section 3) and connect other end of the cable into a computer’s
standard USB port.
Note: Connect directly to USB ports that are attached to the computer’s motherboard.
Do not use USB ports from hubs, Docking stations or Front USB ports.
8
Connecting the PicPac to the computer will automatically turn ON the PicPac showing
connection status and the battery meter, see figure below. Battery meter may blink one to
three square bars indicating that the USB port is charging the unit.
For Windows operating systems three new drives will appear under “My Computer” as
shown below.
Drive letters are assigned by the operating system based on the next available free driver
letter.
On a Mac system a Wolverine Drive will automatically appear on the Desktop.
To access the data stored on the PicPac Double click the Wolverine Drive.
Memory card data are copied to the <FILES> folder on the PicPac.. Each copy operation
performed from Memory cards are stored in separate sub-folders. The folders are
assigned alphanumeric names dependent on the type of memory card used; i.e. CF0001,
CF00002, CF0003 …. CF9999 are files copied from CF type of memory card as seen in
the figure below. The same naming structure is true for all other types of memory cards,
i.e; SD0001, MS0001 etc.
9
Please note; even if the same card is copied twice, the same data will be copied to two
separate folders, eliminating the possibility of overwriting existing data.
To transfer a folder or the contents of a folder to your computer use the computer’s
operating system “Copy” and “Paste” commands or Drag and Drop to copy folder/files
from the PicPac Wolverine labeled hard drive to the computer’s hard drive.
To delete folders or files access the PicPac Wolverine hard drive from under “My
Computer”, highlight the files or folders and press the “Delete” keyboard key.
IMPORTANT: In order to keep the “Free Space” counter on the PicPac accurate
always empty the Computer’s Recycle or Trash Bin before disconnecting the PicPac
from the computer.
The PicPac also doubles as a Card Reader/Writer when connected to a computer. Insert
any type of Memory Card into its slot to view content, copy, delete or add data.
Disconnecting the PicPac from the Computer
For Windows ME/2000/XP/Vista- to properly disconnect the PicPac from the computer
use the “safely Remove Hardware” icon located on the Quick Launch area as seen in
below figure:
o Close all open Windows
o Click once on the “Safely Remove Hardware” small green arrow icon and then click
once on the “Safely remove USB Mass Storage Device Drives (…..)”.
Mac User- Drag and drop the PicPac Wolverine Drive into the Trash Bin.
The PicPac will automatically turn off when properly disconnected from the computer.
IMPORTANT: Do not disconnect the PicPac from the computer by unplugging the
cable while the PicPac is ON. Do not disconnect or turn off the PicPac while
transferring data. Improper disconnect may result in data corruption.
10
9 - FORMATTING PicPac HARD DRIVE
The PicPac Hard drive comes preformatted as FAT32 to be compatible with all FAT
based memory cards and all operating systems. The PicPac does not require any
formatting but could be reformatted using any FAT32 formatting utility programs. Do
not reformat the PicPac hard drive as NTFS using Windows or as Mac OS standard
or extended. For Windows users a copy of the SwissKnife Freeware formatting utility
software is included on the PicPac CD.
For Mac OS use the “Erase” command under “Disk Utility” and choose “MS-DOS” as
the type of format.
WARNING
Formatting the PicPac hard drive will DELETE ALL information stored into the
PicPac’s hard drive. Backup needed data before formatting.
10 – RESETING UNIT OR REPLACING BATTERY
If for any reason the unit will not turn off using the Power button, remove and
reinstall the battery to reset the unit.
To replace the PicPac’s battery, slide out and remove battery door compartment. Pull
battery gently out of the PicPac and replace with new. See Figure below:
11
11 - FIRMWARE AND MANUAL UPDATES
The PicPac is a firmware upgrade-able unit. From time to time Wolverine Data may
publish new firmware to add new features or support new memory cards. All Firmware
updates are available on the website www.wolverinedata.com under Downloads on the
“Support” webpage.
12- TECHNICAL SUPPORT
For technical support, warranty service, or paid service please contact Wolverine Data at
[email protected] or by calling 949-251-9888 M-F 9:00-5:00 PST
12