1
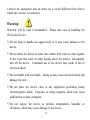
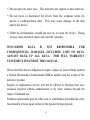
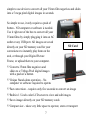
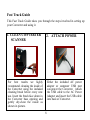
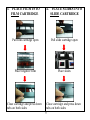
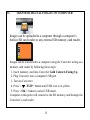
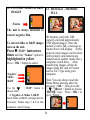
Wolverine 35mm Film to Digital Converter
Model F2D
USER MANUAL
Version 1.01
December 2008
TABLE OF CONTENTS
DESCRIPTION
PAGE
Table of Contents
1
Before Using the F2D Converter
3
FCC Certifications
3
Warning
4
Help Phone Line
6
Features
6
Fast Track Guide
8 ~ 14
1. Clean Converter Camera
8
2. Attach Power
8
3. Place Film Into Cartridge
9
4. Place Slides Into Cartridge
9
1
DESCRIPTION
PAGE
5. Insert Memory Card
10
6. Insert Cartridge
10
7. Power On/Off Converter
10
8. Flip Image
10
9. Convert Image
11
10. Edit Image Options – Flip, Mirror, Rotate
11
11. Transfer Digital Images to Computer
12
12. Convert Slides or B&W Images
13
13. Message – Memory Full
13
14. Playback
14
Technical Support
15
Specifications
15
Limited Warranty
16
2
Before Using the F2D Converter
This section provides important safety information that you should read
before using your F2D Converter.
FCC Certifications
This equipment has been tested and found to comply with the limits of a
Class B digital device, pursuant to Part 15 of the FCC Rules. These limits
are designed to provide reasonable protection against harmful interference
in a residential installation.
This equipment generates, uses and can radiate radio frequency energy and,
if not installed and used in accordance with the instructions, may cause
harmful interference to radio communications.
However, there is no guarantee that interference will not occur in a
particular installation. If this equipment does cause harmful interference to
radio or television reception, which can be determined by turning the
equipment off and on, the user is encouraged to try to correct the
interference by one or more of the following measures:
Reorient or relocate the receiving antenna.
Increase the separation between the equipment and receiver
3
Connect the equipment into an outlet on a circuit different from that to
which the receiver is connected.
Warning:
Warranty will be void if mishandled. Please take care in handling the
Wolverine Device:
?? Do not drop or handle too aggressively as it may cause damage to the
device.
?? Do not allow the device to come into contact with water or other liquids.
In the event that water or other liquids enters the interior, immediately
turn off the device. Continued use of the device may result in fire or
electrical shock.
?? Do not handle with wet hands. Doing so may cause electrical shock and
damage the unit.
?? Do not place the device close to any equipment generating strong
electromagnetic fields. Exposure to strong magnetic fields may cause
malfunction or data corruption.
?? Do not expose the device to extreme temperatures, humidity or
vibrations, which may cause damage to the device.
4
?? Do not open the outer case. This unit does not require or have batteries.
?? Do not move or disconnect the device from the computer while the
device is reading/writing data. This may cause damage to the data
and/or the device.
?? Under no circumstances should the user try to repair the device. Doing
so may cause electrical shock and void the warranty.
WOLVERINE
DATA
IS
NOT
RESPONSIBLE
FOR
CONSEQUENTIAL DAMAGES, INCLUDING LOSS OF DATA.
ALWAYS BACK UP ALL DATA. FOR FULL WARRANTY
STATEMENT SEE END OF THIS MANUAL.
Wolverine Data has no obligation to repair, replace or issue refunds without
a Return Merchandise Authorization (RMA) number and the receipt of the
defective product.
Repairs or replacement service will not be offered to Products that were
misused, repaired without authorization or by other reasons beyond the
range of intended use.
Products replacement may be either new or refurbished, provided that it has
functionality at least equal to that of the product being replaced.
5
Wolverine Data is not responsible for any data stored on the returned
Product, please backup any data prior to shipping the unit.
All OUT OF WARRANTY repairs maybe subject to a normal repair fee.
Please contact your dealer or Wolverine Data for current charges.
Having difficulty using this product? Wolverine Data is
here to help.
Please try the following options before returning the product to the store:
?? Many problems can be resolved by reading this manual
?? Visit www.wolverinedata.com/support to find the latest documentation
and other help tips
?? E-mail our technical support staff at: [email protected]
?? Call us at 949-653-6300 M-F 9:00-5:00 Pacific Time
Features
Now you can take all those stacks of 35mm film and convert them into
digital images to preserve them forever. Wolverine has created a very
6
simple to use device to convert all your 35mm film negatives and slides
into a 5 mega pixel digital images in seconds.
So simple to use, it only requires a push of
button - NO computer or software is needed.
Use it right out of the box to convert all your
35mm films by simply plugging it into an AC
outlet or any USB port. All images are saved
directly on your SD memory card for your
convenience to instantly play them on the
unit, or through your Digital Picture
Frame, or upload them to your computer.
SD Card
?? Converts 35mm film negatives and
slides to a 5 Mega Pixel digital images
with a push of a button
?? Unique Stand-alone operation – No
computer or software required to operate
?? Fast conversion – requires only five seconds to convert an image
?? Built-in 1.5-inch color LCD screen to view and edit images
?? Saves images directly on your SD memory cards
?? Compact size - takes very little space to operate, store or transport
7
Fast Track Guide
This Fast Track Guide takes you through the steps involved in setting up
your Converter and using it.
1. CLEAN CONVERTER
SCANNER
2. ATTACH POWER
For best results we highly
recommend cleaning the inside of
the Converter using the included
cleaning brush before every new
use. Insert the brush face down in
the Converter base opening and
gently dry-clean the inside as
shown in picture.
Either the included AC power
adapter or computer USB port
can power the Converter. Attach
the USB cable to the AC Power
Adapter and insert the USB cable
into back of Converter.
8
3. PLACE FILM INTO
FILM CARTRIDGE
4.
PLACE SLIDES INTO
SLIDE CARTRIDGE
Pull film cartridge open
Pull slide cartridge open
Place negative film
Place slides
Close cartridge and press down
tabs on both sides
Close cartridge and press down
tabs on both sides
9
5. INSERT MEMORY
CARD
6. INSERT CARTRIDGE
SD Card
Insert cartridge into Right Side of
the
F2D
Converter
with
Insert your SD memory card
Upside Down in the card reader
of the back of the unit. The
Gold Contacts will be facing
up.
directional arrow
the base opening
10
pointing to
7. POWER ON/OFF
8. FLIP IMAGE
Flip Button
Press Power button to power
( Orange Button ) ON
Press Power button to power
( Orange Button ) OFF
11
9.
CONVERT IMAGES
10. EDIT IMAGE OPTIONS
1
2
3
4
On screen red blinking dot is an
indication that the Converter is
ready to convert. Press the
<OK> button once and wait for
five seconds.
5
Highlighted icon in yellow is
current selected option.
Use the < / FLIP >
or < / MIRROR > buttons to
choose other options.
Press < OK > to select option.
1.
2.
Save
Rotate image clockwise
3.
4.
5.
Rotate image counter clockwise
Cancel editing
Back to main menu
Save
At above menu prompt press
<OK> button to save digital image
to memory card
12
11.
TRANSFER DIGITAL IMAGES TO COMPUTER
Images can be uploaded to a computer through a computer’s
built-in SD card reader or any external SD memory card reader.
Images can be transferred to a computer using the Converter acting as a
memory card reader by following these steps:
1. Insert memory card into Converter Gold Contacts Facing Up
2. Plug Converter into a computer USB port
3. Turn on Converter
4. Press <
/FLIP> button until USB icon is in yellow
5. Press < OK > button to select USB mode.
Computer at this point will connect to the SD memory card through the
Converter’s card reader
13
12. CONVERT SLIDES or B&W
IMAGES
13. MESSAGE - MEMORY
FULL
Source
The unit is always defaulted to
convert negative film.
To convert slides or B&W images
turn on the unit.
Press / FLIP> button two
times until the “Source” option is
highlighted in yellow.
Press < OK > button to select.
Negative
Slides
B&W
Use the <
/ FLIP> button to
choose from:
1. Negatives 2. Slides 3. B&W
Insert Slides or B&W cartridge into the
Converter. Follow steps 7 & 8 in this
manual to convert image.
SD memory card with 1GB
capacity can hold approximately
1000 digital images. Once the
memory card is full, a message as
shown above will display. At this
point no more images can be taken
until memory card contents are
transferred to another media like a
computer’s hard drive. After
transferring images, delete all
images from SD card or Format
card as FAT Type using your
computer.
Note: You can always reach the
Home Menu showing above by
pressing < OK >, then press the
<
/ Mirror > button to choose
“HOME” icon. Press < OK > to
go to “Home”.
14
14. PLAYBACK
Play
The Converter can be used to view images saved on the SD memory card.
To play a slide show of the images from the “Home” screen Select the
“Play” mode.
Converter defaults to auto slide show play mode
To pause at an image press < OK > button.
To resume slide show play mode press < OK > button. Use the
directional arrow buttons < Flip > or < Mirror > to highlight “EXIT”
icon in yellow. Press < OK > to resume Playback.
Exit
Delete
Save
Home
Rotate +90
Rotate –90
Mirror
Flip
15
Technical Support
For technical support, warranty service, or paid service please contact
Wolverine Data at [email protected] or by calling
949-458-9888 M-F 9:00-5:00 Pacific Time
Specifications
Image Sensor:
Lens:
LCD
Memory Slot
Focus Range:
Exposure Control:
Color Balance:
Scan Quality
Data Conversion
Scan Method
Light Source
Interface:
USB Configuration
Power:
Dimensions
Weight
1/1.8” inch 5 mega pixel CMOS sensor
F no.= 2.0, 4 Glass elements,
1.5” Color TFT LCD
SD/MMC compatible
Fixed focus
Automatic
Automatic
1,800 dpi
10 bits per color channel
Single pass
Back light (3 white LEDs)
USB 2.0
Mass Storage Device Class/MSDC
5V adapter, or USB power
3.2x3.4x7.2-inches
1 lbs
Operating Systems
Windows ME/2000/XP/Vista 32/64 bits, Mac OS 10 and above
16
One-Year Limited Warranty (United States Only)
Wolverine Data manufactures its hardware products from parts and components that
are new or equivalent to new in accordance with industry-standard practices.
Wolverine Data warrants that the hardware products it manufactures will be free
from defects in materials and workmanship. The limited warranty term is one year
beginning on the date of invoice, as further described in the following text.
Damage due to shipping the product to you is covered under this limited warranty.
Otherwise, this limited warranty does not cover damage due to external causes,
including accident, abuse, misuse, problems with electrical power, servicing not
authorized by Wolverine Data, usage not in accordance with product instructions,
failure to perform required preventive maintenance, and problems caused by use of
parts and components not supplied by Wolverine Data.
This limited warranty does not cover any items that are in one or more of the
following categories: software; external devices (except as specifically noted);
accessories or parts added to a Wolverine Data system after the system is shipped
from Wolverine Data its resellers; accessories or parts that are not installed in the
Wolverine Data factory.
17
During the one-year period beginning on the invoice date, Wolverine Data will
repair or replace products returned to Wolverine Data's facility. To request limited
warranty service, you must contact Wolverine Data's Customer Technical Support
within the limited warranty period. Refer to the section titled TECHNICAL
SUPPORT to find the appropriate telephone number for obtaining customer
assistance. If limited warranty service is required, Wolverine Data will issue a
Return Material Authorization Number. You must ship the products back to
Wolverine Data in their original or equivalent packaging, prepay shipping charges,
and insure the shipment or accept the risk of loss or damage during shipment.
Wolverine Data will ship the repaired or replacement products to you freight
prepaid if you use an address in the continental United States, where applicable.
Shipments to other locations will be made freight collect.
NOTE:
Wolverine Data uses new and reconditioned parts made by various
manufacturers in performing limited warranty repairs and building replacement
products. If Wolverine Data repairs or replaces a product, its limited warranty term
is not extended.
THIS LIMITED WARRANTY GIVES YOU SPECIFIC LEGAL RIGHTS, AND
YOU MAY ALSO HAVE OTHER RIGHTS THAT VARY FROM STATE TO
STATE (OR JURISDICTION TO JURISDICTION). WOLVERINE DATA'S
RESPONSIBILITY FOR MALFUNCTIONS AND DEFECTS IN HARDWARE IS
18
LIMITED TO REPAIR AND REPLACEMENT AS SET FORTH IN THIS
LIMITED WARRANTY STATEMENT. ALL EXPRESS AND IMPLIED
WARRANTIES FOR THE PRODUCT, INCLUDING BUT NOT LIMITED TO
ANY
IMPLIED
WARRANTIES
OF
AND
CONDITIONS
OF
MERCHANTABILITY AND FITNESS FOR A PARTICULAR PURPOSE, ARE
LIMITED IN DURATION TO THE LIMITED WARRANTY PERIOD SET
FORTH ABOVE AND NO WARRANTIES, WHETHER EXPRESS OR
IMPLIED, WILL APPLY AFTER SUCH PERIOD. SOME STATES (OR
JURISDICTIONS) DO NOT ALLOW LIMITATIONS ON HOW LONG AN
IMPLIED WARRANTY LASTS, SO THE ABOVE LIMITATION MAY NOT
APPLY TO YOU.
WOLVERINE DATA DOES NOT ACCEPT LIABILITY BEYOND THE
REMEDIES SET FORTH IN THIS LIMITED WARRANTY
STATEMENT
OR
LIABILITY
FOR
INCIDENTAL
OR
CONSEQUENTIAL
DAMAGES,
INCLUDING
WITHOUT
LIMITATION ANY LIABILITY FOR PRODUCTS NOT BEING
AVAILABLE FOR USE OR FOR LOST DATA OR SOFTWARE. SOME
STATES (OR JURISDICTIONS) DO NOT ALLOW THE EXCLUSION
OR LIMITATION OF INCIDENTAL OR CONSEQUENTIAL
DAMAGES, SO THE ABOVE EXCLUSION OR LIMITATION MAY
NOT APPLY TO YOU.
19