1
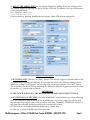
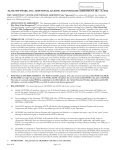
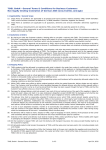
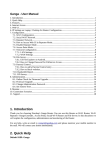
Wireless Wind Monitor
Installation Manual
Version 2.10
For One and Two-Level WindMonitors
July, 2009
PO Box 48, 184 Hill Road, Temple, NH 03084 ~ (603) 878-2720 ~Email [email protected]
Thank you
...for purchasing a Wireless WindMonitor© from WindMonitoring.com.
It’s a great way to assess the wind power potential of your site. It will help you to make wise
decisions about installing wind turbines and generating renewable energy.
Later, if you do go ahead and install a wind turbine, your Wireless WindMonitor can become a part of
a system that measures performance, and ensures proper system operation.
We are very proud of the quality of our products. They use amazing electronic parts that consume
micro-amps but perform more data collection and analysis than any wind data logger that has come
before.
We build our products in the USA, and believe that a strong renewable-energy industry will create
local jobs and a vibrant economy.
We are proud, too, of the people at our company who design, produce and support our products.
If you have questions or need help with your Wireless WindMonitor, please contact us and one of our
staff will be happy to help. We support what we build!
Use this User’s Guide to learn how to install your Wireless WindMonitor quickly and easily.
Please consult the WindWorks User’s Guide for detailed information on how to use the WindWorks data
collection and analysis program.
Also, please visit our website at www.WindMonitoring.com. There you will find:
• Additional help in the form of FAQs (Frequently Asked Questions)
• Downloadable copies of our Manuals and User’s Guides
• Software Updates
• Information on our other products
• Warranty registration
• Service and contact numbers
Again, thank you for buying a Wireless WindMonitor. We trust that you will enjoy its ease of use,
reliability and quality.
Dr. Robert Wills, P.E.
President,
WindMonitoring.com
Temple, New Hampshire, USA
WindMonitoring.com ~ PO Box 48, 184 Hill Road, Temple, NH 03084 ~ (603) 878-2720
Page 2
Contents
Contents................................................................................................................................................................. 3
IMPORTANT SAFETY INSTRUCTIONS......................................................................................................... 4
7BPrecautions ................................................................................................................................................... 4
Quick Start............................................................................................................................................................. 5
General Description ............................................................................................................................................. 8
Polling, Connection, and Sleep ...................................................................................................................... 9
LED Flash Modes ........................................................................................................................................... 10
Battery Management & Battery Life............................................................................................................ 10
About Solar Power & Positioning the Solar Panel .................................................................................... 11
WindMonitor Time ....................................................................................................................................... 11
Installation........................................................................................................................................................... 11
Test Assembly................................................................................................................................................. 12
Zigbee USB Adapter ...................................................................................................................................... 12
Software Installation...................................................................................................................................... 12
Zip File Instructions................................................................................................................................... 12
Windows Installer Instructions................................................................................................................ 13
Software Setup................................................................................................................................................ 13
Hardware Installation ....................................................................................................................................... 14
Mounting the Wind Sensor .......................................................................................................................... 14
Connecting Cables to the WindMonitor..................................................................................................... 15
Setting the Wind Direction Azimuth .......................................................................................................... 15
Tower Grounding & Lightning Protection................................................................................................. 15
Using WindWorks ............................................................................................................................................. 16
Software Updates............................................................................................................................................... 16
Warrantee............................................................................................................................................................ 17
Appendix A – USB Adapter Manual Installation Instructions ................................................................... 18
WindMonitoring.com ~ PO Box 48, 184 Hill Road, Temple, NH 03084 ~ (603) 878-2720
Page 3
IMPORTANT SAFETY INSTRUCTIONS
For your own and other’s safety, please read this User’s Guide before operating your WindMonitor
Basic safety precautions should always be followed to prevent the risk of electric shock, fire, and
personal injury.
.
Precautions
7B
• Carefully unpack the Wireless WindMonitor. Check to see that no damage has occurred in
shipment. Check that all parts are present.
• CHECK FOR DAMAGED PARTS. Before mounting the wind sensor, solar panel and WindMonitor,
check for cracked or missing parts to ensure that all components will be securely fastened.
• TAKE PROPER PRECAUTIONS WHEN WORKING AT HEIGHTS. If climbing towers or other
structures, first ensure that the structure is sound. Use an OSHA-approved safety harness.
• WEAR A HARD HAT AND EYE PROTECTION. When working with items raised above you, wear
a hard hat and safety glasses or goggles. Even a light wind sensor falling from 50 feet can cause harm.
• DON’T WORK ALONE. Don’t work alone when raising masts or working at heights. A helper can
be a life-saver.
• DO NOT USE IN DANGEROUS ENVIRONMENTS. Do not use in the presence of flammable
liquids or gases.
• GUARD AGAINST ELECTRIC SHOCK. Avoid overhead power lines. Do not install a wind sensor
near an electric power line. Monitoring towers should not be erected with electric power lines in their
potential fall-zone.
• KEEP OTHER PERSONS AWAY. Keep people (especially children) not involved with mast
erection out of the erection area. After installation, keep children away from monitoring masts.
• TAKE CARE MOWING. Take care when mowing around the mast base and guy points. Use hand
tools to trim around these areas. A power tool can wrap around the mast or guy and bring it down.
• STAY ALERT WHEN ERECTING MONITORING MASTS OR WORKING AT HEIGHTS. Watch
what you are doing, use common sense and do not work when you are tired.
• PROTECT AGAINST LIGHTNING. If you are installing a metallic wind monitoring mast in an area
that is exposed and that might be subject to lightning storms, take the precautions described in the
tower grounding section of this manual. Do not stand near, or work on a wind monitoring system
when there are thunderstorms in the area.
WindMonitoring.com ~ PO Box 48, 184 Hill Road, Temple, NH 03084 ~ (603) 878-2720
Page 4
Quick Start
Here’s what you need to do in a nutshell:
1. UNPACKING. Unpack components. Remove the WindMonitor cover. Plug the solar panel into the
connector marked Solar. There is no need to thread through the waterproof gland for initial testing.
2. ASSEMBLE ANEMOMETERS. Assemble the Davis anemometers following the instructions
included in the anemometer box. There is no need to align the wind direction sensor – just mount
and tighten the screw. Plug the wind sensor(s) into the data logger. There is no need to thread
through the waterproof gland for initial testing. For a single level system, plug the socket market
“Wind 1”.
3. CHARGING. Place the solar panel somewhere where it will receive direct sunlight, or at least
bright overcast sky. A south-facing window is ideal. Don’t leave the WindMonitor outside without its
cover in place – rain or other moisture could damage it.
4. ACTIVATION. When you receive your WindMonitor, the internal blue LED indicator will
probably show a short flash once every 4 seconds. This means that there is battery power available,
and the unit is DEACTIVATED. A deactivated WindMonitor does not transmit poll messages,
conserving battery power, and eliminating any chance of problems during shipping. To activate your
wind monitor, connect an anemometer to the Wind 1 receptacle, and rotate the cups. (Davis
anemometers have the sense magnet in the cup assembly. It is not sufficient to rotate just the shaft).
A deactivated monitor flashes once every 4 seconds. An activated monitor flashes once per second,
with a bright flash once every 10 seconds when the poll message is transmitted.
5. INSTALL WIRELESS USB ADAPTER. Plug the Zigbee USB Adapter into your computer.
Windows will go through the processes of installing a “new serial port”. Refer to the USB Adapter
section of this manual if you have trouble with this step.
6. INSTALL WINDWORKS. Install the WindWorks program on your PC. Find the Windows
Installer file (“Setup.exe”) on the installation CD. Double-click this file and follow the installer
instructions.
7. WINDMONITOR SETUP. Run WindWorks. If the Setup Window is not showing, chose
Windmonitor Setup from the Setup menu or click on the Setup button at the bottom-right of the main
window:
Perform steps 1 – 9 (or 10 for a two-level installation) in the Setup Window to configure the
WindMonitor (see Figure 1):
1) CHOOSE A SITE NAME. Type the name of your site into the Site Name box top left. The
Site Name sets the data directory location for WindWorks data collection (normally
c:\WindWorks\SiteName).
WindMonitoring.com ~ PO Box 48, 184 Hill Road, Temple, NH 03084 ~ (603) 878-2720
Page 5
2) SELECT THE SERIAL PORT for the Zigbee Adapter by pulling down the serial port list.
The Zigbee adapter is typically the last in the list. Click the Test button. The log at the bottom
of the page will show:
USB Adapter Tests OK
====================
If the test fails, try quitting WindWorks and restart. Some USB drivers require this.
Figure 1 – The Setup Window
3) SET THE CLOCK. Click the “Set Time” button. This sets the logger to the same time as the
computer that is running WindWorks. If successful, the clock state indicator changes from
unknown (yellow) to set (green). You can check the clock time with the “Get Time” button.
The response is shown in the log, including the difference between logger and computer time
in seconds. (+/- one second is normal).
IMPORTANT
IF THE CLOCK IS NOT SET, THE WINDMONITOR WILL NOT COLLECT DATA!
4) SET THE DATA START TIME. This tells WindWorks how far back to go when collecting
data. The Data Start Time is stored in the WindMonitor, so if a new computer with no data
downloaded is brought to site, it will go back to this time. (Normally, WindWorks checks for
any data files collected and proceeds from the current end of data).
a) Click Now to set the date and time displayed to current time
b) Click Set to set the WindMonitor data start time.
WindMonitoring.com ~ PO Box 48, 184 Hill Road, Temple, NH 03084 ~ (603) 878-2720
Page 6
5) SET WINDWORKS UNITS. This sets the units used by WindWorks for display and height
calculations. All wind data is stored in files in metric units and converted (if MPH is selected)
6) SET ANEMOMETER MODE. Here we choose single or dual level anemometers.
If you purchased a single level kit, click Single, else click Dual, and then click Set.
If you choose Dual
f) Try Collecting Data. Wait a minute or two. Click the Collect button to the left. See that data
records are downloaded. Choose the MinData tab. The downloaded data will be displayed.
g) Click the LISTEN Button again. Choose the Poll tab to see real-time graphs of wind and
solar data.
8. INSTALL SENSORS & WIND MONITOR. Install the wind speed/directions sensor in their final
location. Install the solar panel facing south (in the northern hemisphere), and angled up the same
angle as the site latitude (this though is not critical). Mount the WindMonitor using the U-bolts
supplied, or by using suitable corrosion resistant screws through the same holes in the mounting
plate.
9. INSTALL CABLES. Run the sensor cables to the WindMonitor location. Tape or tie-wrap cable
securely so that it does not flap in the wind. (It’s better to wrap a cable around a pipe as it goes along
rather than to run it straight, as it is then less likely to flap in the wind). Thread the wind sensor and
solar panel cables through the waterproof gland. Plug the cables into their respective sockets. Put
desiccant packs in the logger. Replace the cover. Tighten firmly, but do not over tighten. Check that
the cover is sealed all around. Tape up or tie-wrap any excess cable.
10. RUN WINDWORKS. Check that clock is still set (poll should show current time). If there is any
wind, the wind speed and direction will be shown in the poll message. The Poll tab may also be
selected to graph poll data as it comes in.
11. SET WIND DIRECTION AZIMUTH. Set the correct wind direction for each level by observing
the wind vane direction and entering it into the “Observed” box(es) lower right on the setup tab.
Check that the status message shows “Azimuth Set” and that the poll wind direction is indication the
correct value.
The installation is complete.
WindMonitoring.com ~ PO Box 48, 184 Hill Road, Temple, NH 03084 ~ (603) 878-2720
Page 7
General Description
The Wireless WindMonitor (WWM) kit consists of the following:
• One or two Davis Instruments wind speed and direction sensors. The technical name for these
sensors is a “cup anemometer” with a wind-vane.
• A Wireless WindMonitor data logger made by WindMonitoring.com.
• A small solar panel for charging the battery of the WindMonitor. The solar panel serves a
second function as the data loggers solar energy sensor.
• WindWorks, a PC program for downloading and viewing and analyzing data.
• A wireless to USB adapter that lets your computer talk to the WindMonitor.
Unlike other wind data loggers, the Wireless WindMonitor stores data internally. It does not use a
removable card, data plug or require a communication cable. Data is collected via a 2.4 GHz wireless
link using a protocol called “Zigbee”, or “IEEE 802.15.4”. This eliminates the need to go out to the
logger and eliminates the need to open the enclosure (which can lead to moisture problems). In
addition, as the data logger is self-powered, it can be mounted high, close to the wind sensor(s),
eliminating the need for long cable runs down the monitoring mast. In high wind locations, sensor
cable wear is the most common cause of failure for wind monitoring systems.
When you download data, the data stored in the logger is not erased. The WWM holds its data in
“circular buffers” which overwrite when full, but with 8 megabytes of on-board storage, this typically
takes more than 6 months. See the Data Storage section of this manual for more information.
Some other feature of the WindMonitor are:
• Precision wind speed measurement. Other data loggers simply count pulses (i.e. revolutions)
of the anemometer. The WWM accurately measures the time of each pulse, and so is able to
calculate precision wind speeds at low pulse rates. At 5 meters per second, the anemometer
only turns about 4 times per second. Precision wind speed measurement results in one-second
wind data that is potentially 20% more accurate than pulse-counting data loggers.
• Full Statistics. The WWM calculates mean and standard deviation of wind speed and direction
every minute. It also captures wind power (root-mean cube) and the direction of the maximum
gust. Minute data is stored as sums rather than averages, etc., which means that it is easy to
calculate 10 minute or hourly statistics if desired. (The IEC Standard 61400-12 states that large
wind turbines and turbine sites should be assessed using 10 minute average data. The
recommended averaging period for small wind turbines is 1 minute).
• Up to ½ a mile line-of-sight data collection range.
• As well as wind speed and direction, the WWM captures incident solar radiation (using its
solar panel), ambient temperature, and internal battery voltage. These values are included in
the minute data files.
• Data files are in Comma Separated Variable (CSV) format which can easily be read with
Microsoft Excel or other data analysis programs.
• The Wireless WindMonitor draws a fraction of a milliamp when asleep, and an average of
about 1.2 milliamps including wireless transmission times. It’s 600mAh batteries (4 NiMH
AAA cells) provide more than 10 days of operating time without solar power. With a
reasonable amount of sunshine (or even overcast), the logger will run for years without a
stopping.
WindMonitoring.com ~ PO Box 48, 184 Hill Road, Temple, NH 03084 ~ (603) 878-2720
Page 8
•
WindWorks, our data collection and analysis software can:
o Collect data from one or more WindMonitors.
o Display graphs of day, month, and year data.
o Calculate expected energy production from a range of commercially available wind
turbines
o Compensate for height differences between the wind sensors and the proposed turbine
hub-height.
o Calculate the value of electricity produced, estimate installation costs, and assess
payback period.
Polling, Connection, and Sleep
To conserve energy, the Wireless WindMonitor spends most of its time “sleeping”. In this mode, the
data logger draws about 0.1 milliamps (mA) from its battery. It does however continue to monitor
wind speed – every wind speed pulse from the anemometer is captured and “time-stamped” for later
analysis.
Once every second, the WindMonitor shifts to high-speed processing mode and measures wind
direction. Wind statistics for minute and day data are stored. Battery voltage is measured, and the
internal battery regulation circuit is operated if necessary.
Every ten seconds, the WindMonitor sends a poll message.
This message contains the data logger’s current time, the last measured wind speed and direction,
battery voltage, insolation (sunlight intensity) and temperature (both measured at the last minute),
how much the battery voltage regulator has been operating, and some clock synchronization
information for systems with multiple data loggers. The WindMonitor then listens for a short time
(less than a quarter second) for a wake-up message from WindWorks.
The Zigbee radio in the WindMonitor uses a lot of battery power when running (about 50mA while
receiving and 250 mA transmitting). Luckily, the receive periods are short, and the transmit periods
even shorter. By limiting transmit and receive time to once every 10 seconds, the average battery
draw is reduced to about 1.5 mA.
When it’s necessary to communicate with the WindMonitor (setting installation parameters, or
collecting data), the WindWorks PC program responds to a poll message with a “wake up” message.
The WindMonitor then stays in receive mode for 30 seconds, or until commanded to go back to sleep.
Another way of describing the “awake” state is that the PC program and data logger are “connected”.
The three buttons on the left side of the WindWorks screen support these operating modes:
Collect puts the WindMonitor into wake mode and collects data records from the logger. Data is
collected from the last record found in the WindWorks data files through the last
record stored in the WindMonitor. When data collection is complete, the WindMonitor
is immediately put back into sleep mode.
Listen starts WindWorks listening for poll messages. Poll data is shown on the Poll tab (Wind,
solar and temperature data), and on the Housekeeping tab (battery voltage).
Stop sends a message to the WindMonitor for it to go into sleep mode (it will still send poll
messages every 10 seconds). The WindWorks program stops listening. This is useful
WindMonitoring.com ~ PO Box 48, 184 Hill Road, Temple, NH 03084 ~ (603) 878-2720
Page 9
if WindWorks is just to be run for data analysis, or us used away from the monitoring
site and no WindMonitor communications is needed.
LED Flash Modes
The Wireless WindMonitor LED has a several flash modes which can be set from the Housekeeping
Tab:
1A) Power Up. The logger does four quick flashes on power up (batteries inserted, or solar power
available with dead batteries). If batteries are very low, the fast flash continues until enough battery
voltage is seen for reliable operation.
1B) Heartbeat. This is the normal LED mode. The logger does a brief flash once per second while
processing data. There is a longer bright flash every 10 seconds when poll data is sent out. The LED
will also do a bright flash when it receives a command message from WindWorks.
The following LED modes can be set from the House Keeping tab in WindWorks. They are useful for
debugging systems in the field. The WindMonitor will revert to Heartbeat LED mode after 5 minutes
of any of these other LED modes.
2 & 4) Wind Speed. The LED indicates pulses coming from the anemometer.
3 & 5) Wind Direction. The LED indicates spells out wind direction – for example, 340 degrees shows
as 3 blinks, 4 blinks, a brief flash (0) and a delay.
6) Identify. The LED pulses on and off once every two seconds. This can be used to identify a
WindMonitor in multi-logger installations
7) Awake. The LED is on when the logger is awake. This is used for software testing.
Battery Management & Battery Life
The Wireless WindMonitor is very conservatively designed with respect to battery power and energy
use. The four internal AAA NiMH (Nickel Metal-Hydride) cells have enough capacity to power the
logger for more than 10 days. Charging from solar power requires about an hour of bright sunlight,
or half a day of cloudy conditions (bright overcast). It is important however to ensure that the solar
panel has good access to sunlight through most of the day.
When not in sleep mode (receiving or transmitting), the WindMonitor uses significantly more power –
50mA when receiving and 250mA when transmitting. To avoid running out of battery power, do not
operate the WindMonitor in its awake more for any more time than is necessary. The WindWorks
program manages sleep mode for data collection by putting the logger to sleep immediately after
data collection is complete.
Extremely low temperatures are also a concern. Battery capacity is reduced at low temperatures, as is
the ability to recharge. In cold regions, mount the WindMonitor where it can be warmed by the sun
during the day. Also, if possible, download large data files during the warmer part of the day.
WindMonitoring.com ~ PO Box 48, 184 Hill Road, Temple, NH 03084 ~ (603) 878-2720
Page 10
If the WindMonitor’s battery drops to too low a level for reliable data collection, the data transfer is
stopped and WindWorks shows a “low battery” error message.
If the battery drops even further, the WindMonitor will cease sending poll messages until solar
charging recommences. Wind data collection continues, however, uninterrupted.
As the WindMonitor’s internal batteries operate at very low cycle depth, a very long service life can be
expected – perhaps as long as 20 years. If however data collection is critical, we recommend replacing
batteries every 5 years. The data logger battery is a Sanyo model HR-4U (800mAh, 1.2V).
Battery condition can also be monitored by observing battery voltage at night. If the battery voltage
dips below 4.8V by early morning (for normal operating temperatures), then either solar charging is
inadequate, or the battery might be reaching end of life. Because battery voltage is inversely
proportional to temperature, very high temperatures can cause low battery voltage as well – for more
information, please contact WindMonitoring.com customer service.
About Solar Power & Positioning the Solar Panel
Everyone knows that the sun rises in the east and sets in the west. To capture the most solar energy
during the day, and to get a representative measure of the solar energy available at your site, it is
important to mount the WindMonitor’s solar panel facing due south (in the northern hemisphere – or
due north in the southern hemisphere). The position the solar panel at the correct angle, elevate it at
the same angle as the site latitude. For example, a site at 30 degrees north latitude would have a solar
panel mounted 30 degrees up from horizontal, or 60 degrees down from vertical.
This angle is not important unless you are trying to measure accurate solar data as well as wind data.
If the site is typically cloudy rather than always clear, the solar panel (and any solar array at the site)
should be angled another 5-10 degrees lower (towards horizontal) so that it captures more of the full
hemisphere of diffuse solar radiation that is available in cloudy conditions.
WindMonitor Time
IMPORTANT: THE DATA LOGGER WILL NOT COLLECT DATA UNLESS ITS CLOCK IS SET!
This is to protect previous data in memory that might be overwritten by an erroneous clock-time.
The WindMonitor internal clock is set to local time - or whatever time the setup computer shows.
You can check the data logger clock time checking the poll display, or by “connecting” and using the
“GetTime” button on the Setup Tab. The logger time is displayed in the log window.
(A future version of Windworks will support timezone information and allow for daylight saving
time. For now, WindMonitor time equals computer time.)
Installation
It’s best to start with the software installation, keeping the WindMonitor nearby to make sure that
everything works before installing on a tower or other structure.
WindMonitoring.com ~ PO Box 48, 184 Hill Road, Temple, NH 03084 ~ (603) 878-2720
Page 11
Test Assembly
Unpack all of the components. Using a #2 Phillips Screwdriver, unscrew the four screws that fasten
the cover of the data logger:
For initial testing, plug the solar panel and wind sensor(s) into the
data logger with the cover off (it is not necessary to thread the cables
through the waterproof fitting at this point). The solar panel connects
to the two-pin connector at the lower left. The wind sensor has an RJ11 phone-type plug that connects to the connectors in the right side.
If the blue LED light is flashing, the data logger has made it through
the shipping process with energy left in its batteries. This might be
enough for initial testing – but if not, or if the LED is not flashing,
place the logger and solar panel in sunlight (as direct and bright as
possible) with the solar panel plugged into the logger, and facing the
sun (i.e., facing south in the northern hemisphere). One hour of
bright sun, or a few hours of overcast should be sufficient to power
the logger through the setup phase (see the Solar Power section
following for more information). You may be able to sit the logger
and/or solar panel in a window and have it charge while you are setting up the PC software.
Don’t leave the WindMonitor outside without its cover in place – rain or other moisture could
damage it.
Zigbee USB Adapter
Plug the Zigbee USB Adapter into your computer. Windows will go through the process of installing
a “new serial port”. Some computers and operating systems will install the drivers for the USB
adapter automatically. Others require manual direction to achieve the installation. Driver files for the
USB adapter are provided on the WindWorks installation CD and also available from our web site.
Step by step instructions for manual USB adapter installation can be found in Appendix A of this
manual.
Software Installation
The WindWorks program comes in two forms:
• A zip file (WindWorks_Vxxx.zip).
• A Windows Installer file (“Setup.exe”).
Zip File Instructions
1. Make a new folder in your Program Files directory. Name it “WindWorks”.
(C:\Program Files\WindWorks)
2. Copy the zip file into this directory
3. Unzip the file and copy the enclosed files into the WindWorks folder.
4. Make a shortcut to WindWorks.exe and place it on your desktop or in the start menu as desired.
WindMonitoring.com ~ PO Box 48, 184 Hill Road, Temple, NH 03084 ~ (603) 878-2720
Page 12
Windows Installer Instructions
Copy the installer files to a temporary location on your computer, run Setup.exe, and follow the
installer’s instructions.
Software Setup
Start the WindWorks application on your computer. You should see the following screen:
Then do the following to set up the WindMonitor:
a) If the Setup Tab is not showing, chose Setup from the View menu and click on the Setup tab.
b) Set the Site Name. Type a new name into the Site Name box top left. The Site Name sets the
data directory location for WindWorks data collection (normally c:\WindWorks\SiteName).
WindMonitoring.com ~ PO Box 48, 184 Hill Road, Temple, NH 03084 ~ (603) 878-2720
Page 13
c) Select the Serial Port for the Zigbee Adapter.
Pull down the serial port list top right, select the Zigbee adapter port. Click Set to choose and
open the port. If you have multiple serial ports on your machine and can’t work out which
one is the USB Adapter, remove the adapter and pull the list down again. The USB adapter’s
comm port will have disappeared. Re-insert the USB plug, wait for the “install” sound, and
then pull down again.
d) Click the LISTEN Button to the left. A Poll message from the WindMonitor should come in
every 10 seconds.
e) SET THE CLOCK.
IMPORTANT – if the clock is not set, the WindMonitor WILL NOT COLLECT DATA!
This is to protect against potential data overwrite if battery power is lost and the logger is
restarted.
To set the clock, click the CONNECT button to the left of the Setup tab.
Click the “Set Time” button in the bottom left panel. This sets the WindMonitor to the same
time as the computer that is running WindWorks.
If successful, the clock state indicator changes from unknown (yellow) to set (green).
You can check the clock time with the “Get Time” button. This also shows the difference
between logger and computer time in seconds. (+/- one second is normal).
f) Set the Data Start Time. This tells WindWorks how far back to go when collecting data. The
Data Start Time is stored in the WindMonitor, so if a new computer with no data downloaded
is brought to site, it will go back to this time. (Normally, WindWorks checks for any data files
collected and proceeds from the current end of data).
g) Try Collecting Data. Wait a minute or two. Click the Collect button to the left. See that data
records are downloaded. Choose the MinData tab. See if you can display downloaded data.
h) Click the LISTEN Button again. Choose Poll from the View menu to see real-time graphs of
wind and solar data.
Hardware Installation
Mounting the Wind Sensor
Install the wind speed/directions sensor in its final location.
Install the solar panel facing south (in the northern hemisphere), and angled up the same angle as the
site latitude.
Mount the WindMonitor using the mounting plate provided.
WindMonitoring.com ~ PO Box 48, 184 Hill Road, Temple, NH 03084 ~ (603) 878-2720
Page 14
Connecting Cables to the WindMonitor
Remove the outer nut from the waterproof “Sealcon” gland, and extract the two-hole grommet from
inside. For two-level systems, insert the three-hole grommet that is supplied in the parts bag. Note
that the grommet is slit to allow cables with connectors on their ends to be inserted.
Observe this sequence, or you will have to start again:
• Pass the two or three cables through the Sealcon nut from the back to the threaded side.
• Slide each cable into a grommet holes using the slits on the sides. The end of the grommet with
the “step” should face towards the Sealcon nut (away from the logger).
• Pass the connectors one at a time through the Sealcon body on the data logger.
The WindMonitor comes with two desiccant packs in the parts bag. Open the bag and place the
desicant packs inside the WindMonitor enclosure.
Carefully replace the cover. Tighten the cover screw firmly, but do not over-tighten.
Check that the cover is seated well all around.
Setting the Wind Direction Azimuth
The WindMonitoring system eliminates the normal problem of setting the wind vane azimuth. On
other systems, it is necessary to loosen the vane set screw and orient the vane while reading the
azimuth value from the data logger. Our system keeps the Azimuth calibration in non-volatile
memory in the WindMonitor logger. To set the Azimuth zero:
• Run WindWorks.
• Observe the wind vane direction and entering it into appropriate the “Observed” box on the
setup tab.
• Check that the status message shows “Azimuth Set” and that the poll wind direction is
indication now showing the correct value.
Installation is complete.
Tower Grounding & Lightning Protection
Tall towers can attract lighting. Any metal structure over 30 ft in height should be solidly grounded
with an 8 ft ground rod, #6 copper bare stranded wire and suitable clamps (available at an electrical
distributor or most large hardware stores).
WindMonitoring.com ~ PO Box 48, 184 Hill Road, Temple, NH 03084 ~ (603) 878-2720
Page 15
Using WindWorks
Please refer to the WindWorks User Manual for information on how to use all the features of
WindWorks.
Software Updates
The latest versions of our manuals, and software updates for WindWorks and our WindMonitor
products are available on our web site:
www.WindMonitoring.com.
WindMonitoring.com ~ PO Box 48, 184 Hill Road, Temple, NH 03084 ~ (603) 878-2720
Page 16
Warranty
USA and Canada Only
See Warranty Card insert for countries outside the USA and Canada.
Your Wireless WindMonitor is warranted to be free of defects due to workmanship or design for 2
years from the purchase date. If your Wireless WindMonitor fails to operate, or if any operating
problem occurs, please contact WindMonitoring.com technical service at:
1-603-878-2720, or email to [email protected].
Please call between 9:00 AM - 5:30 PM Eastern USA Time.
Do not return this product to the store where you purchased it.
Do not attempt any service or repairs other than those suggested by a WindMonitoring.com
Technical Service Representative.
During the period of warranty, WindMonitoring.com will, at our discretion, repair or replace this
product free of charge and pay for postage or shipping charges providing that the following
conditions are met:
1. A copy of the proof of purchase is provided.
2. The product has been operated for the purpose intended as described in the operating instructions and
has not been abused or mishandled in any way.
3. The product has not been dismantled and no service or repairs have been attempted other than those
suggested by a WindMonitoring.com Technical Service Representative.
4. The product is not damaged by lightning, water ingress, or impact.
5. A Return Goods Authorization number (RGA #) (assigned by WindMonitoring.com) is written on
the shipping label.
Please make certain to package items in such a way as to eliminate further damage during shipping
and ship via a traceable carrier and properly insure the package. No CODs are accepted. Unapproved
shipping charges are nonrefundable.
Complete and mail back the Warranty Registration & Customer Survey, or register online at:
www.WindMonitoring.com
Please Fill in the Following for Your Records.
WindMonitor Model #:
__________ __________ ___________
Serial Number:
__________ __________ ___________
Date of Purchase:
_______ / _______ / _______
Purchased from:
________________________________________
WindMonitoring.com ~ PO Box 48, 184 Hill Road, Temple, NH 03084 ~ (603) 878-2720
Page 17
Appendix A – USB Adapter Manual Installation Instructions
The most reliable way to install the drivers for the Zigbee-USB adapter is to manually select the files
supplied with the WindWorks application (in the XbeeDrivers folder).
These drivers support the following Windows operating systems:
Windows Vista & Vista x64
Windows XP & XP x64
Windows 2000
Windows Server 2003 & Server 2003 x64
Windows Server 2008 & Server 2008 x64
1. Locate the XbeeDrivers folder on the WindWorks distribution CD, or download XbeeDrivers.zip
from www.WindWorks.com/download
2. Insert the adapter USB plug into your computer. A message like the following will appear:
After a few seconds, the Found New Hardware Wizard
appears:
Choose “Install from a list of specific location” and
click Next.
The following dialog appears.
Choose “Include this location in the search”, and
deselect “Search removable media” –
Then click Next.
The following dialog appears, and remains for a minute or so:
WindMonitoring.com ~ PO Box 48, 184 Hill Road, Temple, NH 03084 ~ (603) 878-2720
Page 18
When this completes, the final dialog appears:
Click Finish.. … but we are not done! The first phase installs the USB driver, the second, a virtual
serial port driver. The following message appears:
The same sequence continues:
Choose the second option, click Next and the following dialog appears:
Browse to the XbeeDrivers folder, then click Next.
… Wait a while as until the installation completes:
WindMonitoring.com ~ PO Box 48, 184 Hill Road, Temple, NH 03084 ~ (603) 878-2720
Page 19
Whereupon the final screen appears:
A message balloon should appear at the bottom of the screen indicating a successful installation:
The installation is complete!
WindMonitoring.com ~ PO Box 48, 184 Hill Road, Temple, NH 03084 ~ (603) 878-2720
Page 20