1
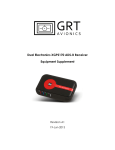
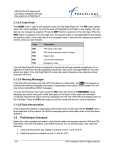
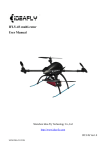
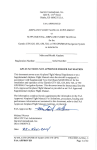
SkyGuardTWX Vision-Pro Plus “978 UAT/1090 ES/AHRS” ADS-B
Transceiver Setup
This Transceiver is a fully integrated 978 mhz UAT and 1090 mhz ES ADS-B radio
transceiver with Levil Technologies AHRS sensor along with a WAAS GPS and WiFi
transmitter. The unit is powered on by plugging the provided DC power adapter into any
aircraft power socket that provides either 12v or 24v DC with a minimum of 3 amps.
There are 5 antennas (one - 9” Blue Blade on 4 ft. coax, two - 5” black, one - 1” black,
and one - 4” black) and a GPS receiver that must be installed prior to powering up the
transceiver. The GPS receiver “puck” is plugged into the ADS-B transceiver unit with
the “arrow” on the GPS plug pointing up. The two 5” black ADS-B receiver antennas are
attached to the outside coax connectors adjacent to and at same end as the GPS plug. The
left side coax connection is the 978 mhz UAT receiver port and the right side coax
connection is the 1090 mhz ES receiver port. The 4 ft. coax cable with 9” Blade antenna
is attached to the center coax connector at the same end as the GPS plug. This is the 978
mhz UAT transmitter port. The 4” black antenna is attached to the coax connector that is
between the transmitter port and the 978 mhz UAT receiver port. The 1” black WiFi
antenna and the DC power adapter plug are connected to the opposite side of the receiver.
See photos just below:
1.
2.
3.
4.
5.
6.
7.
8.
9.
10.
978 mhz receiver antenna (5” Black)
Transponder squawk detection antenna (4” Black)
978 mhz transmitter antenna (9” Blue on 4ft. coax cable)
GPS antenna
1090 mhz receiver antenna (5” Black)
Power plug receptacle
For future use
I/O connector (for future use)
Power LED
WiFi antenna (1” Black)
-
After all antennas, GPS, and power adapter are connected to the main unit, power
up the transceiver. Be sure that all receiver/transmitter antennas are as vertical as
possible to maximize radio reception/transmission.
-
The N-number and ICAO code as well as a default squawk code must be set prior
to your first flight. You can find your aircraft ICAO code by doing an N-number
search on www.faa.gov. This search will bring up a table with the details for
your specific aircraft. The 6 character ICAO code is defined in this table as:
“Mode S Code (base 16/hex)”.
-
If using an iPad or iPhone as your primary flight display, there is an app. available
on the Apple App. store under “SkyGuardTWX” that will allow initial preflight
setup and in-flight control of the transceiver. This app. allows setting/changing
of the specific aircraft parameters for which the transceiver is contained. Be sure
to download/install this app. to your Apple device and configure the transceiver
parameters prior to your first flight. The SkyGuardTWX app. also provides a
visual and audio traffic alert display screen. For details on how this works, read
the app. description on the Apple App. Store.
o On your Apple device, go into “Settings” and turn ON Airplane mode.
o While in “Settings”, turn on WiFi and after a brief search, a WiFi hot spot
will appear showing “SkyGuardTWXxx” where “xx” is a numeric value
specific to your ADS-B transceiver.
o Select this hot spot by tapping on it’s name.
o Wait for approximately 10 seconds for the Apple device to establish a
connection to the ADS-B transceiver over WiFi. If a connection is not
established, turn off your WiFi on the Apple device and power cycle the
transceiver. Then try again.
o Close “Settings” on the Apple device.
o Use the SkyGuardTWX app. for iPad/iPhone to configure your transceiver
at this time.
-
If you are using an Adventure Pilot iFly 720 GPS Display Tablet or the iFly GPS
app. for iPad/Android as your primary flight display device, refer to the iFly 720
user manual for instructions to connect to and configure the transceiver.
o The iFly 720 and iFly GPS app. have a “Transceiver Configuration
Control Panel” that is built into the navigation software main menu. You
can use this to perform the initial transceiver configuration as well as inflight control of the transceiver.
-
Once the transceiver has been initially configured with N-number, ICAO code,
and default squawk code, you are ready to go fly.
-
Select either WingX Pro 7, iFly GPS, SkyRadar Pro, Naviator, or any other Flight
App. that supports the SkyGuardTWX Vision-Pro UAT/ES Transceiver on the
Apple/Android device or the iFly 720 GPS Display Tablet.
Configure the selected Flight App. to connect to the ADS-B transceiver over
WiFi. Refer to the specific setup configuration as provide with the specific
Flight App.
-
You are now ready to transmit your GPS location and receive/display any UAT
Weather/Traffic and additional 1090ES Traffic on your displays moving map.
-
Each time the transceiver is powered up, it will read the transceiver configuration
parameters from internal memory. Then while in flight, if it is necessary to
change any parameters, just use the SkyGuardTWX app. or iFly GPS app. for
iPad/Android or the iFly 720 Display Tablet to modify and save the new
transceiver configuration.
-
One new feature that has been added to the Vision-Pro Plus Transceiver is the
ability to automatically detect your Mode A/C Transponder Squawk Code. This
is accomplished using the 4” black “squawk detector” antenna. Insure this
antenna is vertical and that your Transponder is ON and in Transmit Mode. You
can verify proper operation by viewing the SkyGuardTWX Control Panel in
either iFly GPS or Naviator (both of which display the current ADS-B
Transmitting squawk code). While viewing the control panel, change your
Transponder squawk code and after 3 to 5 seconds, insure this same squawk code
is displayed in the SkyGuardTWX Transceiver control panel window.
This feature has been tested and verified with the following Transponders:
KT76, Garmin 320, 327, and 330
Other transponders may work as well but have not been verified by
SkyGuardTWX.
NOTE: There is a 2 nd 4 ft. coax cable and “female to female” coax adaptor
included with the antenna kit. This extension cable can be used to help
remote mount the 1090 mhz receiver antenna to a location which will
better receive the Squawk Code transmitted from your Mode A/C
Transponder. If you are having trouble receiving a reliable squawk code
with the 1090 mhz receiver antenna mounted directly to the
SkyGuardTWX unit, then try using this extension coax cable and find a
location in your aircraft which will pick up the squawk code reliably.
The best locations should be near to where your Transponder antenna
is mounted on the belly of your aircraft.
-
Another feature incorporated into the Vision-Pro Plus Transceiver is an I/O port
connector. This connector is for “future use” and will allow connection of the
Transceiver to a fixed panel display for depicting traffic and weather information.
-
If your Flight App. supports Levil Technologies AHRS sensors, you will begin to
receive bank, pitch, and yaw data as well as magnetic heading from the internal
sensor which you can display on your Apps. attitude indicator.
-
For the AHRS sensor to properly calibrate, it must remain in a level stable
position for at least 2 minutes after power up. The magnetic heading sensor will
begin to calibrate as well. It requires approximately 45 seconds of turning
changes for the heading sensor to complete calibration. In order to obtain the
correct bank and pitch direction, you must place the transceiver unit on a flat
surface with the antenna connector end of the transceiver unit aligned to the nose
of your aircraft.
-
In order to maximize reception, it is best to place the transceiver on the aircraft
glare shield. If this is not possible, you can place the transceiver anywhere as
long as the antennas have a clear view out the window and are not obstructed by
any metal panels. The transmitter coax antenna has a suction cup for placement.
It is recommended to place the transmit antenna at least 18 inches away from the
transceiver unit. It is also recommended to place the GPS antenna puck at least
12 inches away from the transmitter antenna and with a clear view of the sky.
This will insure no interference between the transmitter, GPS, and the receivers.
Always place the transmit antenna at least 8 inches (20cm) away from any part of
yourself or any passengers.
-
There are additional “Blue Blade Antennas with 4ft. coax extension cable” that
can be used to replace the two 5” black receiver antennas if you want to remote
mount the unit in a location other than on the glare shield. These can be ordered
from www.SkyGuardTWX.com .
Helpful Hints:
-
In order for the transmitter to begin broadcasting your position, altitude, heading,
speed, etc. to the ADS-B ground station towers which will trigger these towers to
begin sending the full traffic messages (TIS-B) back to the transceiver, the
transceiver must have a valid position fix from it’s internal GPS and you must
have configured a valid N-Number and ICAO code into the transceiver. You can
verify the GPS is locked by looking at the small red LED on the side of the GPS
puck antenna. This light should be flashing red on and off at once per second. If
it is solid red, then the GPS is not locked. If it takes more than 15 minutes for the
GPS to receive a valid position fix, then try locating the GPS puck antenna to
another location inside the aircraft. Sometimes avionics equipment can emit RF
noise that will affect the GPS’s ability to receive a sufficient signal. Also ensure
that the transmitter is enabled by using the SkyGuardTWX app. or the iFly
720/iFly GPS app. to show the status of the transmitter.
-
If not receiving any FIS-B (weather) or TIS-B (traffic) messages from the ADS-B
ground station tower and you are sure you are in range of a tower, check that FISB and TIS-B are enabled in the SkyGuardTWX app. Typically in order to
receive any messages from the ground station tower, you need to be in-flight at an
altitude of > 1000 ft. AGL with a clear line of site to your local ADS-B
tower. The SkyGuardTWX Transceivers have a transmit/receive range of up to
60 miles.
-
Always take care to position the receivers and transmitter antennas in the vertical
position with a clear view out the windows of the aircraft. It is best to keep these
antennas away from any metal panels or metal structural supports of the aircraft.
-
Make sure you snug the transmitter coax cable connectors securely with a small
wrench and that the receiver antennas are tightened securely with your fingers.
Important Pilot Advisory Note Regarding Safety of Radio Frequency Energy:
Safe use of this device requires care as to the placement of the long Blade antenna.
Place this antenna at least 20 cm (8 inches) away from any part of your body or that
of other cabin occupants. Only handle the antenna when power is disconnected.
Advise your passenger(s) to avoid contact with the long antenna. Retain these
instructions with your maintenance logs/files and for future reference.
FCC Compliance Statement:
This device complies with part 15 of the FCC Rules. Operation is subject to the
following two conditions:
1. This device may not cause harmful interference, and
2. This device must accept any interference received, including interference that
may cause undesired operation.
Modifications not expressly approved by the manufacturer could void the user's
authority to operate this equipment under FCC rules.
FCC RF Radiation Exposure Statement:
This equipment complies with FCC RF radiation exposure limits set forth for a
public/uncontrolled environment.
WARNING: This Transceiver is to be used to improve pilot situational
awareness only and as a navigational aid. It is not intended for primary
navigation use in IFR or IMC flight conditions.
SkyGuardTWX LLC is not responsible for the Transceiver’s end use and
will not be held liable for any events occurring from the use of the
Transceiver.
Compatible with: