1
KoalaTerm User Manual KoalaTerm Version 3.x & 4.x and Secure KoalaTerm Version 4.x. For latest version of KoalaTerm or Secure KoalaTerm: Download here © 2009 Foxit Corporation. All rights reserved. 1 Contents KoalaTerm ............................................................................ 1 Contents............................................................................... 2 Chapter One - Introduction .................................................. 4 KoalaTerm Overview.........................................................................................................4 KoalaTerm Features ..........................................................................................................5 What's New in KoalaTerm ...............................................................................................7 KoalaTerm International Support...............................................................................11 Chapter Two - Installing KoalaTerm ................................... 12 Chapter Three - The KoalaTerm Window ............................ 13 The KoalaTerm Main Window ......................................................................................13 Menu Bar .............................................................................................................................15 Toolbar..................................................................................................................................16 Chapter Four - KoalaTerm Menus ....................................... 18 Connection Menus............................................................................................................18 Edit Menu.............................................................................................................................20 View Menu...........................................................................................................................21 Window Menu.....................................................................................................................22 Print Menu...........................................................................................................................23 File Transfer........................................................................................................................23 Help Menu ...........................................................................................................................23 Chapter Five - Getting Connected ....................................... 24 Command Line...................................................................................................................24 Other Command Line Options .....................................................................................25 Create New Connection..................................................................................................26 Saving and Opening the Session Files .....................................................................27 Exiting...................................................................................................................................28 Chapter Six - Use KoalaTerm .............................................. 29 KoalaTerm Settings Template .....................................................................................29 File Transfer........................................................................................................................32 KoalaTerm Printing ..........................................................................................................34 Capture to File ...................................................................................................................35 Record Macro .....................................................................................................................36 Chapter Seven - KoalaTerm Settings .................................. 40 Setting Overview ..............................................................................................................40 General Settings ...............................................................................................................42 International Character Settings ................................................................................44 Terminal Settings .............................................................................................................45 Display Settings ................................................................................................................48 Print Settings .....................................................................................................................51 Communication Settings................................................................................................54 2 Keyboard Settings............................................................................................................56 KoalaTerm Key Mapping ................................................................................................58 Button Settings .................................................................................................................63 Color Map Settings...........................................................................................................65 Palette Settings .................................................................................................................67 Chapter Eight - KoalaTerm Script: ...................................... 69 KoalaTerm Script Introduction ....................................................................................69 How to Invoke KoalaScript Scripts ............................................................................71 Overview of KoalaScript Language............................................................................75 KoalaScript Object Reference ......................................................................................81 Contact Us: .........................................................................90 3 Chapter One - Introduction Overview Features What's New in KoalaTerm International Support KoalaTerm Overview For a quick attempt to install KoalaTerm see Installation. ● KoalaTerm for Windows 9X, ME, NT, 2000 and XP, allows you to use your PC (personal computer) to emulate a VT100/220/320/420 terminal and communicate with your VAX or UNIX host. ● KoalaTerm supports Telnet session, Telnet Proxy and SSH through Winsock TCP/IP transportation and serial port, modem dialup as well. While maintaining your connection to your host, you can also work with other Windows applications. ● You can run multiple sessions simultaneously and can also copy and paste information between sessions and between KoalaTerm and other applications on Windows system. Related Topics: Features What's New in KoalaTerm International Support 4 KoalaTerm Features Other KoalaTerm features include (not limited to): 1. The multiple page and cursor coupling features of the VT terminal, variable page length, and 80 or 132 columns. 2. Supporting both TrueType fonts and bitmap fonts. 3. WYSIWYG printing with TrueType scalable fonts. 4. Graphic keymap and emulating VT keyboard mapping. 5. All the VT printing functions, and some additional printing features. 6. History buffer (scroll-back buffer) support with adjustable memory capacity. 7. Automatically change font size to fit in terminal window. 8. Support full-functional scripting capability. 9. Multiple character sets for international display and input support. 10. Chat-line input mode allowing more efficient input for slow links. 11. User-customizable button bar providing up to 32 buttons for various actions. 12. User-customizable tool icon helps user finding text more easily and conveniently. 13. Full customizable screen and text colors. 14. File transfer using ZModem protocol. 15. Mouse support for Linux. 16. Downloadable fonts turn your VT terminal into a graphic terminal. 17. Recording MACRO saves your time to type the same instructions again. 5 Related Topics: Overview What's New in KoalaTerm International Support 6 What's New in KoalaTerm Click the following links to see the new features in each KoalaTerm version. What's What's What's What's What's New New New New New in in in in in Version Version Version Version Version 4.1 3.4 3.2 3.1 3.0 What's New in KoalaTerm 4.1 The best VT terminal emulator gets even better! At Foxit Corporation, we keep our promise to bring the best to our valued customers. Upgrading is always free! ● New support to soft character set: Soft character set is a feature of VT320/VT420 terminals and not found on any affordable emulation programs. KoalaTerm now supports DECDLD command which allows host application to send any customized font to KoalaTerm. With this new feature, your application can display real graphic, special characters, or just alternative fonts on KoalaTerm screen! If you have such applications like word processing, system monitoring, and other graphic applications, KoalaTerm 4.1 is the perfect replacement for your VT terminals! ● Refreshed Larger Buttons: With labels on each of those larger buttons on the toolbar, you don't need to guess what those buttons will do anymore! ● New record-and-playback "MACRO" button: It's an exciting new feature added to KoalaTerm 4.1. Although previous KoalaTerm version has the most capable script in the toolbar facilities among all terminal emulators, it often takes some time for a terminal user to learn how to write those scripts. Now with this all new macro recording feature, you don't need to write a single line of script to make your terminal session much more efficient and convenient! Just press the MACRO button, do what you would normally do to finish some tasks, press the MACRO button again, then all your typing, be it normal characters, or function keys, will be automatically recorded as a KoalaTerm script, and you can assign the script to a customized button or a mapped key. Later on, if you want to repeat what you have done, just press the assigned button or mapped key! ● Revived "RECONN" button: This button exists in previous KoalaTerm versions, 7 but it never worked. Now the reconnecting feature has been added to KoalaTerm 4.1. If you choose not to close the window after disconnected from the host, you will see this button get enabled after you closed a session, and you can reconnect to the host by just press the button, just one click! And your login script, if set up, will also be re-executed! What's New in Version 3.4 ● Display Attribute: This new-setup setting in Color mapping page enable color-mapped character to display on emulation window with their own attributes. ● New Line-Status Display Mode: Sometimes you may need your session window to display status line while communicating with the host. Now Display Status Line in Display page of KoalaTerm Settings will give you help. ● Enable Blink Text: When your host sends character or text with blink attribute and you also hope to remain this feature in your session screen, then you can realize by checking Enable Blink Text in Display Page. ● Answer Back Message: Sometimes the host applications could not identify the emulation windows while negotiating with multi port terminal emulator. Thus the host might send an inquiry asking for terminal ID. In this case using Answer Back dialog box in Display Settings can help you communicate with your host more friendly. ● New Toolbar for finding text: Now the new added toolbar----"find & repeat the last find" in KoalaTerm window can save user time in finding text and improve the efficiency. What's New in Version 3.2 ● DBCS support: Good news for DBCS system users like Chinese and Japanese. Now you can enable "DBCS" support in "International" page of settings dialog, also make sure your Primary Character Set is set to "ISO Latin-1". Then you will be able to view double byte characters. ● New printing feature: Now transparent printing supports output directly to printer ports. You can use this new feature by setting the "Print To" option in "Print" page of KoalaTerm Settings dialog. 8 ● Save everything: Sometimes the host application erase terminal screen before new output, and KoalaTerm used to discard those erased text and not put into history (scroll-back) buffer. Now, with "Save Everything" option enabled in "Terminal" page of KoalaTerm Settings dialog, you can view everything in the history buffer after they got erased. ● File transfer: Finally KoalaTerm has ZModem support. Like all other KoalaTerm good features, it's very easy to use. Just run your favorite ZModem program on your host, and start transferring! When you use Secure KoalaTerm, the file transfer will be secured! Moving your sensitive stuff around has never been so easy! Click here to see how! What's New in Version 3.1 ● Version 3.1: Now bitmap fonts are accepted as well as TrueType fonts. ● Version 3.11: Use -E option in the command line, you will be able to edit the session file without actually connecting to the host. ● Version 3.11: Be able to handle URL style command line issued by web browsers. ● Version 3.11: A new template added for easy connecting to 123 Terminal Server for Windows 95/98 (another quality product from Foxit Corporation) ● Version 3.12: Windows position will be restored when connected with a session file. ● Version 3.12: International characters are able to be captured into files. ● Version 3.13: Added mouse support to Linux OS. You can enable this feature in "Terminal" page of "KoalaTerm Settings" dialog. ● Version 3.14: Better support to auto-sizing the font according to both height and width of the terminal screen. What's New in Version 3.0 ● Improved transparent printing (printer-controller mode): You can redirect the print out to Windows printer handling if your host isn't control the print out. In 9 this way you'll be able to change the font used for print out. ● New Chat-Line input mode: You can select "Chat Line" from "View" menu to show or hide the chat line input box. With chat line, you can input more efficiently especially with a slow link. Your input will stay on local buffer until you press <ENTER> key. ● New 132 column font support: You are able to specify a different font for 132 column mode. To enable the different font, uncheck the "Same as 80 Cols" option in "Display" tab of "KoalaTerm Settings" dialog. When you register KoalaTerm with us, you can get 5 new TrueType fonts free from Foxit (contact [email protected]). Among them you'll find some font suitable for your 132 column applications. ● New KoalaScript: powerful scripting language for automating and customizing KoalaTerm in many aspects. For more information, visit Introduction to KoalaScript. ● Improved button palette: now up to 32 buttons (arranged in 4 pages) can be defined. And the button palette will automatically adjust according to the frame window size. To show/hide the button palette, select "Button Palette" from "View" menu. ● New session title display: By default the host name will be shown at the beginning of the main window caption (so you'll see the host name in the Windows task bar instead of always "KoalaTerm Version ..."). You can also specify your own session title in the "General" tab of "KoalaTerm Settings" dialog. ● New session file format: KoalaTerm 3.0 has a totally redesigned format for session files. This new format will ensure compatibility backward as well as forward. KoalaTerm 3.0 will NOT accept session files generated by previous versions of KoalaTerm. A converter utility, mktfile.exe, has been released along with KoalaTerm 3.0 package. 10 KoalaTerm International Support KoalaTerm works with localized Windows 95 and Windows NT system to support international character sets. ● Because the host system you are connecting to may not use the same character set as Windows system, KoalaTerm provides code translating between the host character set and PC character set. When you input a character on PC keyboard, KoalaTerm picks up its code in PC character set, then translates it to the code in host character set, and sends the translated code to the host. When KoalaTerm receives a character from the host system, it translates the code in host character set to code in PC character set, and displays the PC code on Windows screen. ● While KoalaTerm automatically detects the character set used by Windows system, you have to tell KoalaTerm the character sets used by your host system and applications on the host system. You do so by using Settings dialog. ● There are settings for three character sets in "International" page of "KoalaTerm Settings" dialog tab. You may need to do some experiment to figure them out. You may have to try different choices for "Primary Set" or "Secondary Set". Most hosts only use "Primary Set" so you don't have to choose the "Secondary Set". And the "NRC" set should normally be disabled, unless you are using some kind of application following the DEC NRC specification. ● Windows 95: Unlike Windows NT, it's not possible to display characters outside the native character set (determined when you install Windows 95). If you need a specific character set which is not supported by KoalaTerm now and have complete code table or reference information for it, we would like to add additional character set support if possible. Please write to [email protected] for details. 11 Chapter Two - Installing KoalaTerm Windows System Requirements KoalaTerm runs successfully on the following systems. If your computer does not meet these requirements, you may not be able to use KoalaTerm. 1. 2. 3. 4. Windows Windows Windows Windows Vista Server 2003 Server 2008 7 KoalaTerm is very easy to install. All you have to do is: 1. Use PKUNZIP or other unzip utility to extract files from the ZIP file into a directory. 2. Create an icon for MKT.EXE in that directory or just double click on the MKT.EXE to start KoalaTerm. The file name for Secure KoalaTerm is MKTS.EXE 12 Chapter Three - The KoalaTerm Window The KoalaTerm Main Window Menu Bar Tool Bar The Koala Term Main Window Title Bar: Displays a version name. During a connection session, the transportation type (port or host name) or a session title (if you name it) is displayed next to the version name. To entitle a session, you can select the "General" tab in the KoalaTerm Settings. Menu Bar: Provides drop-down command tabs to enable you to employ the most KoalaTerm operations. For more information, click here. Tool Bar: Holds tools which can serve as shortcut to access menu files or other settings. For more information, click here. Work Area: Displays the data and/or text from your host on screen during a connection session. This work space emulates a VT terminal screen. 13 Chat Line: Sends your commands or request more efficiently while negotiating with the remote host over a slow link. You can select "Chat Line" from "View" menu to show or hide the chat line input box. Button Palette Area: Contains 32 on-screen buttons that you can define them to carry out different actions in button page. If the button palette is not displayed on screen, choose "Button Palette" from the "View" menu. For more information about "Button Palette", click here. Status Line: Reports the event when the mouse points to any menu or tool. Cursor Position Counter: Indicates the current line and the column position of the cursor in the screen. History Buffer: Supports with adjustable memory capacity and enables you to scroll up and down through KoalaTerm screen to view the previous data. 14 Menu Bar Connection Menu: This menu provides options to create, open, save and close files, provides settings to open setting pages. You can use "Save As Template" to save the current settings and open for next time. You also can use "Run Script" to find a script files to edit. For more details, click here. Edit Menu: This menu provides standard Windows editing commands -- "copy, paste, select all, find and find Last" In addition, the new back. For more details, click here. View Menu: This menu provides options to show or hide KoalaTerm components on screen like "Tool Bar, Status Bar, Chat Line, Buttons Palette", to master your current session font. Clear-command enables you to delete the then-current screen contents or delete the contents from history data or scroll buffer. For more details, click here. Window Menu: This menu provides commands for you to create "New Window", to "Cascade" all the terminal windows, to "Title" all the terminal windows so that they can be viewed in one display, or to "Arrange Icons" of the minimized active windows. Also you can select "Next" to display the window one by one, or use "Hold Screen" to freeze the screen. For more details, click here. Print Menu: This menu provides all the VT printing functions: Printing Screen and auto Printing Mode. You also can display the "Printing Setup" dialog box to change the printing parameter and/or select the local or remote print mode. In addition, you can copy selected text and graphics or the entire screen to the clipboard. Then, you can paste the clipboard contents to any application that can print the copied area. For more details, click here. Transfer Menu: This menu provides "Receive Zmodem" and "Send Zmodem". Select "Send Zmodem", you are about to open a "Send File" dialog box to select the file for sending. For more information about how to send file, click here. 15 Toolbar The following provides brief description about the toolbar tools. The dimmed icons indicate inactive or unavailable. Create New Connection: Click this Icon you are about to open a new connection dialog box in which you can choose "Connection Type", As Template" to save the current settings and open for next time. You also can use "Run Script" to find a script files to edit. For more details, feature in Version 4.1 "Record Macro" is added in this menu, you can select this command to record any typing on your screen, and play it select "Template" you previously saved, or change "Settings" for your new session window. This icon is equivalent to the "Connection > New" in the menu bar. Reconnect: If you choose not to close the window after disconnected from the host in KoalaTerm Settings general page, you will see this button get enabled after you closed a session, and you can Reconnect to the host by just press the icon, just one click! And your login script, if set up, will also be re-executed! Open File: If you want to open a file during a session, you can click this icon. This icon is equivalent to the "Connection > Open" in the menu bar. Save: Store all the contents on the active terminal screen including history buffer. This icon is equivalent to the "Connection > Save" in the menu bar. Print: Print the selected text or the entire contents on the current session. This icon is equivalent to the "Print > Print Page" in the file menu. Copy to Clipboard: Copy the data or text you selected to the clipboard from the active session screen. This icon is equivalent to the "Edit > Copy" in the menu bar. Paste from Clipboard: Paste the data or text you already copied to where you want to put. This icon is equivalent to the "Edit > Paste" in the menu bar. Find Text: Enables you to search the text conveniently. All you need to do is inputting the file name in the typing filed, KoalaTerm will show the result with shadowed appearance on screen. Case Sensitive help you to distinguish capital 16 letter or small letter if you check this mode. This icon is equivalent to the "Edit > Find" in the menu bar. Find Next: Enables you to continue last search.This icon is equivalent to the "Edit > Find Next" in the menu bar. Larger Font: Enlarge the font on your active session screen. This icon is equivalent to the "View > Larger Font" in the menu bar. Smaller Font: Lessen the font on your active session window. This icon is equivalent to the "View > Small Font" in the menu bar. Terminal Setup: Click this icon, you are about to open a setup pages in which you can customize all the KoalaTerm Settings. For more information about KoalaTerm Settings, click here. This icon is equivalent to the "Connection > Settings" in the menu bar. Capture to File: If you want to capture the text on the active session screen to your file, click this icon, and click again to stop. For more information about "Capture" click here .This icon is equivalent to the "Connection > Capture To File" in the menu bar. Record Macro: This is a new exciting feature for KoalaTerm 4.1.It can record and play back every typing and actions on your current session screen. For more information about Record Macro, click here. This icon is equivalent to the "Edit > Record Macro " in the menu bar. Help Contents: Provides you KoalaTerm help documents. This icon is equivalent to the "Help > Content" in the menu bar. Exit Icon: Click this icon, you are about to close all sessions and quit the application. There are several ways to exit, for more click here. This icon is equivalent to the "Connection > Exit" in the menu bar. 17 Chapter Four - KoalaTerm Menus This chapter provides introductions to each command in the KoalaTerm drop-down menu. Connection Menu Edit Menu View Menu Window Menu Print Menu Transfer Menu Help Menu Connection Menus New...: Create a new connection to your remote host. When click this command, you are about to open a "New Connection" dialog box whereby you can choose the "Connection Type", change the terminal "Settings" or select a "Template". For more information about connection, click here. Open: Display a file dialog box which enables you to select and open a file you previously saved or saved by template. Close: Disconnect from the host and close all terminal windows. If you choose to quit the application after all session are closed in the "Setup - General" page, this command will close the main window. Save: Save the current terminal connection into your directory. Save As: Save the current terminal connection into your directory under a different name. Save As Template: Save the current session settings as a template file so that at later day you can just open it and don't need to set the settings again. For more information about template, see KoalaTerm Template. Settings: When click this command you are about to display "KoalaTerm Settings" dialog box where you can choose the setting pages and do changing. This command is equivalent to the "Setup" icon in KoalaTerm Menus the tool bar. 18 For more information about KoalaTerm Settings, click here. Run Script: When click this command, you are about to bring up an "Open" dialog box. Just specify the file name and click OK. For more information about "Run Script", see How to Invoke KoalaScritp Scripts. Exit: When click this command, you are about to close all the connected sessions and quit the KoalaTerm application. 19 Edi t Menu Copy: Copy the selected text to clipboard. If no context is marked, this tab is inactive. Paste: Paste the contents from the clipboard into the active current terminal session. Select All: Select all text in your current terminal session to copy or deleted. Find: When click this command, you are about to open a "Find Text" dialog box where you can start to search the text or characters in your active terminal session. If you hope to find text or character only with capital letters or small letters, "Case Sensitive" is a good helper if checked. "Search Down" and "Search Up" enables KoalaTerm begin to find from the initial or from end. Find Last: When click this command, you are about to continue last search. This command is active only after you have used "Find" at least one time in the same session. 20 View Menu Toolbar: When check this command, you are about to show or hide toolbar on the terminal screen. Status Bar: When check this command, you are about to show or hide Status Bar which reports the mouse-point events. Chart Line: When check this command, you are about to show or hide Chat line which enables you to communicate with your remote host more efficiently especially over a slow link. Button Palette: When check this command, you are about to show or hide Button Palette on the terminal screen. For more information about Button Palette, see Button Settings. VT Keyboard: When check this command, you are about to show or hide VT Keyboard. This is a standard PC Keyboard before it is mapped to VT. For more information about keyboard and VT key the file name and click OK. For more information about "Run Script", see How to Invoke KoalaScritp KoalaTerm Menus map, see Keyboard Settings and Key Mapping in KoalaTerm Settings. Clear Display: When check this command, you are about to clear all the contents displayed in the active session screen including the scroll buffer. History: When check this command, you are about to display the buffer bar on your current session, and all the contents on this screen will be saved in the buffer. If you want to stop saving, de-check it. If you want to clear the history, check Clear History. Clear History: When check this command, you are about to delete all the contents in the scroll buffer or history data, and the buffer bar is disappeared. Larger Font: When check this command, you are about to enlarge the font in the current terminal session. Smaller Font: When check this command, you are about to reduce the font in the current terminal session. 21 Window Menu New Window: Create a new terminal window thus enables you run multi-terminal sessions. Cascade: Display the terminal sessions by cascading menu way. Title: Arrange all the terminal windows so that they can be viewed in one display. Arrange Icon: Arrange the minimized window icon to list on the bottom of KoalaTerm main window. Next: Display the next session window if you are running multiple terminal sessions. Hold Screen: Freeze the current screen and you can't type on this screen until you check this command again. 22 Print Menu For more information about this menu, please click here. File Transfer For more information about this menu, please click here. Help Menu Contents: Display KoalaTerm accompanying help documents. Help on KoalaTerm Web: Provide KoalaTerm update online help. Register: Provide access to accelerate your KoalaTerm Version if you are a registered user. What you need to do is input the register number and register code. Unregister: Abort KoalaTerm automatically upgrading application. This is used when you have accelerated you version application. About KoalaTerm: Display KoalaTerm Version number, copyright as well as technical support information. 23 Chapter Five - Getting Connected The re are couple ways to start your KoalaTerm session. Command Line Other Command Line Options Create New Connection Saving and Opening the Session Files Exiting Command Line Currently, KoalaTerm supports command line like following (case insensitive): MKT MKT MKT MKT <session name> -H <host name> -P < port name> -F <file name> where: ● <session name> is file name, port name, or host name. First of all, MKT.EXE will try to open a file such as <session name> or <session name>. mkt if it fails. And then MKT.EXE will keep trying to connect a host or port named as <session name>.If <session name> is like "COM<port number>", MKT.EXE will connect through a serial port, otherwise, MKT.EXE will connect the host via telnet. ● <host name> is Host name or IP address. ● <port name> is a serial port number like "COM<port number>" or simply port number. ● <file name> is a name of the file saved by previous session, which includes host or port information as well as emulation settings. Basically, you can just type "MKT <host name>" to connect a host (assume there is not the same file name as the host name, otherwise, you have to type "MKT -H <host name>"). KoalaTerm can be utilized by Netscape or other browser as a "helper application" for opening telnet sessions. 24 Other Command Line Options ● You can execute a script file immediately after KoalaTerm started a session: MKT -s <script filename> ● You can start a session in "Editing" mode, which allows you to edit the session file, but won't actually establish the connection: MKT -e <session filename> 25 Create New Connection You can double click the MKT.EXE in the Windows Explorer or File Manger to start Koalater. No connection will be make initially. To Start a new connection: 1. Click the New button on the toolbar, or select New... from Connection menu. The New Connection dialog will display. 2. Select a Connection Type .The latest KoalaTerm support five connection type: Telnet, Serial Port, Local, Modem Dailup, and Telnet Proxy. Secure KoalaTerm: Two more connection types are supported: SSH1 and SSH2. 3. Specify host (the connection destination) parameters. There are different parameters to be specified for different connection. ● Telnet: specify the host name or IP (you may type or select from the drop box), and the telnet port. ● Serial Port: specify baud rate, data length, parity, etc. ● Telnet Proxy: specify the address and port of both your host and proxy. ● Secure KoalaTerm: SSH1 or SSH2: specify the method to be used to authenticate you to the host. 4. Click the Terminal Settings... button if you need to customize the emulation settings like terminal settings, display and keyboard settings, international support, etc. The KoalaTerm Settings dialog will appear when you completed this dialog, click OK to make changes effective or Cancel to discard the changes. 5. Click OK to connect to the host or Cancel to do nothing. 26 Saving and Opening the Session Files ● Once you started a connection to a host, you can save the session into a file which you may open it later for automatic reconnection. The session file includes the host information, as well as terminal emulation settings which you may have changed using the "KoalaTerm Settings" dialog. ● If you connect to a variety of hosts, you can create a different settings file for each one and save the settings file with a name descriptive of the host. ● When you open a previously saved session file, the connection to host will be automatically reestablished and all the saved terminal settings will take effect. To save a setting file: 1. Click the Save button on the toolbar, or select Save from Connection menu. If this is the first time to save the session, the Save As dialog box will appear, and you need to name the session file by type in the File Name edit box. 2. Click OK to save or Cancel to cancel. To open a session file: 1. Click Open button on the toolbar, or select Open from Connection menu. The Open dialog box appears. 2. Get to the directory where your session file resides and select the file, or type a file name. 3. Click OK to open the file or Cancel to cancel. The name of the session file will be displayed in the title bar of terminal window, allowing you to quickly identify the host to which you are connected. 27 Exiting There are several ways to exit connected sessions. To close the current connection window, you can choose Close from the Connection menu, or type "exit" or "logout" command in terminal to close the host session. To close all open connection and exit the application, click Exit button on the toolbar or select Exit from Connection menu. 28 Chapter Six - Use KoalaTerm This section describes the following topics: Settings Template File Transfer Printing Capture to File Record Macro KoalaTerm Settings Template KoalaTerm provides template for all settings. In the template, the settings that the user makes in terminal window are recorded, which can help create exactly same or most similar sessions to different hosts, so that the settings of terminal can be greatly simplified. Create Template 1. When a session is connected with the remote host, click the Setup button on the tool bar, or right click the mouse. 2. On the pop-up KoalaTerm Settings dialog box, select the pages and modify the settings, and then click OK to close the box. 3. On the menu bar, click Connection, and click Save As Template. 4. On the pop-up "Save Settings As Template" box (see fig.1), type the Template Name in the text typing field, or select one from the Available Templates list, then click OK to create the template and close the box. Note: If you want to create another template, simply repeat the above four steps. You can create either different sessions to the same host or to a variety of hosts. When you create a different settings template to different hosts, for your using convenience, you are recommended to save this template with a name descriptive of the host. 29 Fig.1 Use Template After create template, now you can fully benefit from it. What you need to do is find it in the directory, then open it, don't need to waste time on modifying terminal settings any longer. In addition, you can change some settings in the template but bring no affection to other settings. 1. Open Template -- On the tool bar, click New, on the pop-up New Connection box (see fig.2), select the template from the Use Template drop list, then click OK to apply this template and close the box. Or you can click Open on the tool bar, then on the pop-up Open box, select the template file, and click OK to open the template. Fig.2 30 2. Apply Template on General Page and Key Mapping Page: KoalaTerm allows you to change a previously saved template on General page and Key Mapping page without affecting other page settings in this template. This feature is very useful when you want to assign a settings template to a new session with a different host. Below shows how-to: To use template on General page, do like this: Click the New icon on the tool bar, on the pop-up New Connection box, on the Use Template drop list, select a template file that you want to use, then click Settings button. On the General page, modify the settings, and then click OK. On the New Connection box, click OK to apply this template. To use template on Key Mapping page, do like this: Click the New icon on the tool bar, on the pop-up New Connection box, on the Use Template drop list, select a template file that you want to use, then click Settings button. Select Key Mapping page, modify the settings, then click OK. On the New Connection box, click OK to apply this template. Note: Use the above way to change the settings, KoalaTerm will not save the changings automatically, not yet prompt you to save when you are about to quit this session. So if you want to save this session file you have to save it using "Save" menu or "Save As Template". After you exit the session, all the settings in this template remain unchanged. Modify Template If you want to delete or change the template name, find it from the directory where you put it before, and then right click the mouse and select the "Delete" or the "Rename" command. 31 File Transfer Receiving File Using ZModem All you need to do is starting the ZModem program (like sz, c-kermit, etc.) and issue sending command by host command line. KoalaTerm can detect file transfer request from the host and automatically start receiving. You will see a small dialog box popping up with receiving status update. By default all received files will be saved into "Received" subdirectory under your KoalaTerm directory (the directory where mkt.exe resides) as shown in Fig.1. You can change the directory settings within "FILE TRANSFER" page in "SETTINGS" dialog as shown in Fig.2. The file name will be the same as on host system. Fig.1 Fig.2 32 You can also disable the "Automatically Receive" option in the settings page as Fig.2. When disabled, you will have to use "Receive ZModem" menu item from "Transfer" menu to start receiving as Fig.3. Fig.3 Example: At host command line, you type: sz myfile KoalaTerm will automatically receive the content of "myfile" and save "myfile" into "Received" subdirectory. Note: KoalaTerm ZModem transfer requires 8-bit communication. If you are using modem or serial port, make sure you are using 8-bit data length. Sending File Using ZModem If your host have "rz" program installed, all you need to do is at the host command line, selecting "Send ZModem" from "Transfer" menu (see Fig.4), the choosing your file. KoalaTerm will start your rz program and send the file content. Fig.4 In case that your ZModem receiving program doesn't happen to be rz, you can change the "Initial String" in "File Transfer" page of "KoalaTerm Settings" dialog as shown in Fig.1. You can tell KoalaTerm how your host ZModem receiving program can be started. Or, if you prefer, you can manually start your program, then select "Send ZModem" menu item, and go ahead. 33 KoalaTerm Printing KoalaTerm provides all the VT printing functions: Printing Screen and Auto Printing Mode. In addition, you can copy the selected text and graphics or the entire screen to the clipboard. Then, you can paste the clipboard contents to any application that can print the copied area. The types of printing supported are: Print Page To print the current session page. Print Selection To print the highlighted text on the screen. This command is unavailable until the text is selected. Print All To print the current page plus all data on the history buffers. Print Mode Printing mode captures data coming over the data communications line and automatically directs it to a printer or a file. This print command has no effect or correlation to where input goes to when you choose it from the session menu; the only factor that determines where printing mode is directed is based on the "Print" page of "KoalaTerm Settings". Print Setup To click this command, you are about to open a "Print Setup" dialog box (see the following figure). In this box, you can select either a local or remote printer, select the paper printing Orientation and set the Properties. In addition, you can print through the terminal data by different font sizes. To change the font size of the current printing, go to "DISPLAY" page in "SETTINGS" dialog. 34 Capture to File "Capture to File" that means Koalaterm can save your current data or text into file, provides you a simple and convenient way to realize what you save is what you need. It will be very useful when you only want to save those important data or text during a session, not everything. Using the capture feature is easy: On the tool bar, just click the Capture button when necessarily, and click it again when unnecessarily. Later on, you can review it by opening the text file. Yet, for it is a text file format, you can't open the file by KoalaTerm application, though KoalaTerm creates it. Show How To 1. On the tool menu, click on the Capture button. Or right click the mouse, and choose Capture. 2. On the pop-up Capture Text to File dialogue box (see below), select the directory, and specify the File Name , then click Save. 3. On the capturing status, the Capture button on the tool bar keeps concave. If you want to stop capturing, simply click it again. 4. Later on, if you want to view this file, you can use Windows Explorer to find the directory where you put the file, and double click it to open. 35 Record Macro Introduction What -- Record Macro is an exciting new feature in KoalaTerm 4.1. It can automatically record all your typings, actions, be it normal characters, or function keys as a KoalaTerm script, and play back exactly as what you have done on your current session. Why -- Macro is designed for saving your time in having to learn writing scripts, thus make your terminal session much more efficient and convenient! Although previous KoalaTerm version has the most capable script in the toolbar facilities among all terminal emulators, it often takes some time for a terminal user to learn how to write those scripts. Now with this new macro recording feature, you don't need to write a single line of script. How-- When you want to record the macro in the current session, just press the MACRO button on the toolbar, do what you would normally do to finish some tasks, press the MACRO button again, then all your operations on this session have been recorded as KoalaTerm script. Then you can save this generated script to a customized button or a mapped key, or copy to clipboard and paste into another application. Later on, if you want to repeat what you have done, just press the designed button or mapped key, and miracle occurs, all that you have done is automatically being performed on the screen, no need even a single typing. Save and Play the MACRO After your macro has been recorded as KoalaTerm Script, you must select a way to save the created script first, you can play it back thereafter. There are totally three ways to save the macro: Save to Button, Save to Mapped Key and Copy to Clipboard. Save to a Customized Button and Play it After you have finished recording the macro, click the MACRO button on the toolbar, then on the popup box (see the fig. below), follow the steps below: 36 1. Check Save to Button on the left side, 2. From the drop-down list, select a Button# for the script. 3. In the Button Caption, specify a title for this button. 4. Click OK to finish and close the box. 5. On the current session screen, if there is no button palette displayed, click View menu, and click Button Palette to show. 6. Now on the Button# selected on step 2, you should see a button with the name specified on step 3. Just click this button. And the whole operating procedures you have done is being executed on your screen. Note: For button palette reference, please refer to BUTTON SETTINGS in SETTINGS page. If you want to view or edit the script, click Edit Script on the bottom If you hope to retain the macro, you can use "Save" menu to save the current session into the directory, then later on you can open this session file, and continue using the macro. Save to Mapped Key and Play it After you have finished recording the macro, click the MACRO button on the toolbar, then on the popup box (see the fig. below), follow the steps below: 37 1. Check Save to Mapped Key on the left side. 2. From the drop-down list, select an item or a combination item as a mapped key. 3. Click OK to finish and close the box. 4. On the current session, just press the mapped key specified in step 2. And the whole operating procedures you have done is being executed on your screen. Note: When you select items other than character, the "text typing box" next to it will be dimmed. The Character can be any numbers or keys. You can select an item plus "CTRL, ALT or SHIFT" to generate a combination mapped key. If you want to view or edit the script, click Edit Script on the bottom If you hope to retain the macro, you can use "Save" menu to save the current session into the directory, then later on you can open this session file, and continue using the macro. Copy to Clipboard After you have finished recording the macro, click the MACRO button on the toolbar, then on the popup box (see the fig. below), follow the steps below: 38 1. Check Copy to Clipboard on the left side. 2. Click OK to finish and close the box. 2. On the current session, click Paste button, and the script recorded by macro is printed on your screen. Or you can paste the script into another editable application, and save it for later references. Note: Use this way to save macro, you can only save the script created by macro, not possible play the operating procedures as the above two ways. 39 Chapter Seven - KoalaTerm Settings Settings Overview General Page International Page Terminal Page Display Page Print Page Communication Page Keyboard Settings Key Map Page Button Page Color Map Page Palette Page Setting Overview A lot of KoalaTerm complexity and features are in the Settings page. Once you have worked your way through that and started a session, things should be reasonably simple after that. KoalaTerm Settings include several pages that can be changed before you start a session, or in the middle of a session. To change the settings for current session, press "Setup" button on the toolbar, or select "Settings" from the drop-down "Connection" menu. Doing so when there is no open session will change the default settings which will effect all new sessions thereafter. Here is the Settings snapshot: 40 41 General Settings In General page, you are able to designate a title for the current session, to choose how to deal with the terminal window or the session editing, to specify the login script or access script, and you can even use the template to load the KoalaTerm settings. In the following section, we provide explanations for each setting in this page. Session Title -- Specifying a title for the current session. A session title is helpful when you open multi terminal windows. And this title will appear on the title bar of the KoalaTerm main window. If you don't specify this, the host name will be used instead. Automatically close terminal window after disconnected -- When checked, the terminal windows will be automatically closed when the connection is disconnected with or by the host. When unchecked, after the session is disconnected from the host, the RECONN button on the toolbar will get enabled, and you can click this button to reconnect. The login script, if set up, will be also re-executed. Automatically exit KoalaTerm after all session closed -- When checked, the whole application will be exited after all terminal windows have been closed. Maximize terminal window while creating -- When checked, the new created session window will be automatically maximized in the KoalaTerm main window. When unchecked, the terminal window will remain restored down. Include selected spaces at end of lines while copying to clipboard -- When checked, the selected spaces (see the fig. below) at the end of terminal lines will be copied to the clipboard along with other selected characters. 42 Automatically copy to clipboard after text selected -- When checked, the selected text will be automatically copied to clipboard immediately after you finished the selection without clicking the tool icon "save connection" on your screen or the "Save" tab in the Connection drop-down menu. Automatically change font size to fit in window -- When checked, the font size displayed on screen will change accordingly whenever you change the size of terminal window. (DEBUG) log control sequences while capturing into file -- When checked, control characters from the host will be logged into file when you use "Capture to File" feature. Use login script -- When checked, KoalaTerm will execute the login script immediately after the connection established. This allows you to automate the login and host application star-up procedure. The "Login Script..." button will be enabled when the option checked to allow you modify the login script. Click here to see more information about KoalaTerm scripting. Allow host to access protected script functions -- Some KoalaScript functions may make changes to your PC system, and sometimes scripts from unknown host may even cause harm to your system by using those functions. Unless you know very well the host you are accessing, don't check this option. Use Template -- This combo box allows you to load KoalaTerm settings from a template. It is very useful when you want to create exactly same or most similar sessions to different hosts. For more information about KoalaTerm template, click here. 43 International Character Settings There are three character sets in this page dialog. You may need to do some experiment to figure them out. You may have to try different choices for Primary Set or Secondary Set. Most hosts only use Primary Set so you don't have to choose the Secondary Set. And the NRC set should normally be disabled, unless you are using some kind of application following the DEC NRC specification. For international support background information, click here. Select a Primary Character Set used by you host's OS or applications. To select a primary character set used by your host's OS or applications. Here the default is ISO Latin 1. For a list of Primary Character Sets, click here. Sometimes your host also uses a Secondary Character Set To select a Secondary Character Set if you host requests. For a list of Secondary Character Sets, click here. If the host uses NRC (National Replacement Charset) To mark the check box of "Using NRC", if your host uses DEC NRC specification. When checked, the combo box under the check box will get enabled, and you can select a Charset from the drop-down list.For a list of NRC, click here. Host Uses Double Byte Charset Enable this option when your host uses double byte charset like Chinese or Japanese. Most likely you should select "ISO Latin-1" as your primary Character Set to ensure correct decoding of the double byte characters. Also you should use 7-bit control characters (in Terminal page). Force Incoming Data to 7-bit Enable this option when your host sometimes sends 7-bit ASCII code with the most significant bit set to 1 Note: If you need a specific character set which is not supported by KoalaTerm now and have complete code table or reference information for it, we would like to add additional character set support if possible. Please write to [email protected] for details. 44 Terminal Settings Terminal page provides settings for the terminal emulation see the fig below. And each of the settings will be described in this section. Connect Status To select that the connection is On Line or Local. Unless in very special cases, should always set connection status at On Line model. In Local mode, the keyboard codes won't be sent to the host, KoalaTerm just gives local echo to your input. Terminal Width To select either "80 columns" or "132 columns" for the terminal. The default is 80 columns. When you change the terminal width during a session, the terminal content will be erased, and the display font will be changed if you specify separate font for 132 columns mode in "Display" page. Page arrangement & History lines To select what kind of the pages for the terminal and how many buffers for the terminal history. There are totally 6 kinds of page arrangements. The default is "24 Lines, 6 Pages" and the 800-lines buffers. 45 Sequence Control To select the sequence for the terminal either Interpret or Display. In Interpret mode, KoalaTerm interprets control sequences from the host and change the terminal screen accordingly. Control sequences are not invisible in this mode. In Display mode, all control sequences are displayed and not interpreted, this is used when you want to debug the host application. Control Character To select either "7-bit" or "8-bit" control for the characters of the terminal. The default is "7-bit" control. This option affects the way KoalaTerm sends out control characters. KoalaTerm accepts both 7-bit and 8-bit control characters. Some host may be requiring one way or another, and then you have to adjust this option to satisfy the host requirement. Auto Wrap When KoalaTerm receives a text line longer than the terminal width (80 or 132) it can either just display the first 80 or 132 characters or wrap the rest to the next. When you found something lost in your screen, you might want to enable this option. Local Echo If "Local Echo" enabled, all characters send to the host will be displayed on the terminal screen. This might result double display for some characters when the host sends the characters back to terminal as shown in the following fig. The default is "No Local Echo". 46 Save Everything Sometimes the host application sends a bunch of text to KoalaTerm and before you can really look at those texts, it erases them. In this case you might want to enable this option. When enabled, KoalaTerm saves everything into the history buffer (scroll-back buffer) before the screen is erased by host application. Terminal ID To select what type of the terminal you are going to use: VT420, VT320, VT220, VT102, VT101, or VT100 (see Fig.5). The default is "VT220". Actually KoalaTerm acts the same way no matter what type of terminal ID you choose, Terminal ID is sent to the host so the host may treat the session differently. Mouse Support KoalaTerm supports use of the mouse inside the terminal screen area. When the mouse button is clicked or released, KoalaTerm will report the event and the mouse position to the host, so the host application can take advantage of it to make some operations easier, like text highlighting or menu selection. Fig.6 shows the supported mouse. The default setting is "None Mouse Support". Answer Back Message and Hide Sometimes your host sends an inquiry to your terminal window asking for terminal ID; in this case you should answer back in this frame. In addition if you don't like other user view your terminal ID, check Hide. 47 Display Settings Display page provides settings regarding terminal screen display, like cursor type, display fonts and line drawing .For color display, please refer to " Color Mapping" section. Display Page Snapshot Screen -- To select either Dark Screen or Light Screen for the terminal. The two figures below show the differences. Cursor -- To select either Visible Cursor or Invisible Cursor for the display. Cursor Style -- To select either Block cursor or Underline cursor for the display. The figures below show the difference. 48 Cursor Blink -- To select either steady cursor or blink cursor for the display. Display font -- To select the font type and size for the display. Koalaterm ONLY supports fixed-width fonts. Foxit Corporation provides the registered users with 5 more fixed-width TrueType fonts for FREE. Registered users, please email to [email protected]. Font for 132 Columns -- You can specify a different font for 132 columns so KoalaTerm will automatically switch fonts for you when terminal width changed. By default KoalaTerm uses the same font for both 80 columns and 132 columns. You should uncheck the "Same as 80 Cols" check box if you want to make your 132 columns font effective. Most likely you may want to use a smaller font size for 132 columns mode. Line Drawing -- Some host application uses "line drawing" feature to draw lines on the terminal screen, they are actually specially shaped characters put together. Some of the fonts you chose for display may not have those line-shaped characters, then, you can use "Draw Lines" option instead of "Use Display Font" to display those lines. Enable Blink Text -- When checked all data or character from host will be shown on your screen with blink attribute. 49 Display Status Line -- When checked, the Status Line will automatically show on the bottom of the session window while negotiating with some hosts. 50 Print Settings Print page provides Printer Settings to select either local or remote printers, print font selection for the printout and printer controller. Fig.1 shows this page. Print Page Snapshot Print Mode -- Print mode supports several particular printing modes: Normal: This is the default mode indicating nothing from host will be printed. Auto Print: In this mode, all the information displayed on the session screen will be automatically printed out until the print operation is aborted. Transparent Print: In this mode, data from the host are sent only to the printer (nothing shows on the terminal screen) Print to -- You have three ways to do the actual printing when print job received from the host (as Fig.): Print Driver: All characters received from the host are sent to Windows printer driver without any modification. You can select the printer using the "Printer Settings" box. This is the default option. You need to make sure you printer is configured properly in the Windows system and selected by KoalaTerm. 51 Redirect to Windows: All characters received from the host will be processed by KoalaTerm first, and then sent to Windows printer. KoalaTerm will make use of the printer format settings and the printing font you specified. This option is commonly used when all the data from the host are text, and you want to print out using particular font and printer settings. Direct to Port: All characters received from the host will be sent to the specified printer port directly without any processing. This option is useful when all you need is a printer port connection and you host takes care of all the formatting and controlling things. Print Font -- The print font specified here is only effective when the "Print To" is set to "Redirect to Windows" (see the following illustration). Printer Settings -- To select and set up a printer either local or remote. Direct to Port -- To select a printer port from the drop list when the "Print To" mode is set to "Direct to Port" (see the following list). Job Timeout -- This label is used when the print model is transparent. Sometimes the host switch between printing mode and non-printing mode quite frequently and there is no indication of end-of-job. KoalaTerm uses a timeout to determine when to finish a job. By default the timeout value is in five seconds. You can specify zero here if you want to print out immediately, but might cause the last one page could not be printed out. Send FF While Finish -- When this option is checked, KoalaTerm will send a "Form Feed" control to a printer (automatically feed the paper to printer after 52 the proceeding one is finished). Most likely it will cause the printers to print out two paper at a time if your printer setting has its own "Form Feed" ability. 53 Communication Settings In the dialog box, you must select and configure a communication port. In most cases, if you try to select a port type that is not available to you, the configure button is dimmed and the explanation box notes that this communication method is not available. Communication Page Snapshot Transportation Type -- To select the communication type to the host, this includes Telnet, Serial Port, Local Modem, and Telnet Proxy(see the following figure). Telnet -- While selected, you need to input the IP or the host name, or a port number if required (see the following figure). 54 Serial Port -- While selected, you need to input all the serial port parameters. See the following segmental illustration for each port parameter. Modem --- While selected, you need to input the correct modem and the phone number to the host (see the following illustration). Telnet Proxy -- While selected, you need to input the IP or the host name, or a port number if required, plus the Proxy server's IP or domain name (see the following illustration). 55 Keyboard Settings Keyboard page provides keypad mode selection, cursor key setup, bell utilities, "Backarrow Key", and "Num Lock Key" key settings. Keyboard Page Snapshot Keypad Mode -- To select the keypad either for Numeric or Application. When the terminal is in Numeric mode, the keypad sends the labeled digits. When the terminal is in Application mode, the keypad sends the preset symbols. Cursor Key Mode -- To select either Normal Cursor or Application Cursor. When the terminal is in Application mode, the cursor key sends its preset symbols. The following illustration describes for this. 56 New Line Mode -- TO select the either No new Line or New Line for the keyboard. When select New Line, the cursor will appear at the head of the next line after you press ENTER. This setting should be altered to No New Line, if the cursor is two lines below by one pressing ENTRE. Margin Bell -- To turn Margin Bell either Off or On. When a text line is to end, Margin bell will automatically remind you this status if enable "On". Warning Bell -- To turn Warning Bell either Off or On. When host sent warning information to your terminal screen, the Warning Bell will automatically rang if enable "On". Backarrow Key-- To make the Backarrow key either Delete or Back Space function. When find your Backrrow Key has no response to the information from host, should reset the mode. Num Lock Key -- To select either PF1 or Switch Keypad Mode. When the terminal is in Application mode, Switch Keypad Mode is a better choice. 57 KoalaTerm Key Mapping KoalaTerm provides a very powerful key mapping feature allowing you to map virtually any key on PC keyboard and combination with modifiers (CTRL, SHIFT and ALT) to VT standard keys, code sequences or KoalaTerm menu items. Key Mapping Page Snapshot How to Map a Key Here are detailed step-by-step instructions on mapping a key (or key combination with modifiers): 1. Click on the key you want to map in the graphic keyboard (see the following illustration). 2. Select any modifiers (Ctrl, Shift, or Alt) by click on check boxes under the graphic keyboard. 3. The name of the key (or key combination) will be shown in the "Key Name" edit box. Make sure it's what you want. 58 4. Select mapping type and input mapping. ● If you want to clear previous mapping, choose "Not Mapped" option. ● If you want to map the key to a standard VT terminal key, choose "Map to VT Key" option, and then click "Change" button to bring up a graphic VT keyboard (as Fig. 2) so you can select a VT key by clicking on that key. ● If you want to map the key to send a character sequence to the host, choose "Send Sequence" option,and then type the sequence in the edit box. See "Sequence Syntax" for the syntax of KoalaTerm character sequence if you want 59 to send any special character like "Control-C", "Carriage Return" or "Escape", etc. ● If you want to map the key to execute a KoalaTerm menu item, choose "Map to Menu" option, and then select a menu item from the drop box. ● If you want to map the key to execute several KoalaScript statements, choose "Execute Script" option, and then type script statements. ● If you want to map the key to execute a KoalaScript file, choose "Run Script File" option, and then type script file path. 5. You must click "Set" button to finish the mapping. You can then repeat all the steps for mapping other keys. Use Key Mapping Template ● Key mapping templates include preset key mappings and mappings from KoalaTerm Template Right now KoalaTerm provides following preset mapping templates. ● To use a key mapping template, select it from the "Use template" drop box. Warming: some of your previous key mapping may be overwritten by the template. Make sure your special mappings still exist by using the same procedure described above for mapping a key. 60 Sequence Syntax KoalaTem only accepts displayable ASCII characters when you input a character sequence, so you need special ways to input special characters in the sequence, like "Control-C", "Carriage Return" or "Escape", etc. You have some different ways to input a special character: For any special characters, if you know the numeric code (most likely an ASCII code) for it, you can use that code to input the character. The format is "\xnn". Where "nn" is the two digit hexadecimal codes. Each digit could be 0-9, A-F or a-f. You must provide two digits, including the prefix '0' for single digit code. For example, the ASCII code for Control-C character is 3, so you can put a "\x03" (Note: double quote mark not included) in the sequence for a Control-C. For special characters which can be generated by pressing a letter key while holding the "Control" key, there is a simpler way to specify the special character, use format "^C", where "C" is the letter (must be uppercase). For example, again Control-C, can be represented simply by "^C". For certain special characters, a more easy-to-read way can be used. These include: "<ESC>" for "Escape", "<CR>" or "Carriage Return", "<LF>" for "Line Feed", and "<CSI>" for 8-bit form of "Escape [". Note: all letters are uppercase. Important: to input literal "\", "<" and "^", put a "\" before them, i.e. "\\", "\<", "\^". Otherwise they may be treated as introducer of special characters How Do I Know What Sequence I Should Map to Suppose you have a host running an application or operating system which requires special keys but can't get it from standard KoalaTerm settings, you need to use key mapping to map keys to those sequences the host or application is expecting. There are several ways to figure out what sequence you should map to: First, if you have document for your host or application, you can look at it and try to find the sequences for special keys. If you have some other terminal or terminal emulator working with your host application, you can use a little program running on the host to detect what sequence the terminal (or emulator) is sending to the host. 61 You should compile this C language program on your host, and run it with one of the terminal (or emulator) which is generating the correct key codes. For Unix system, there is a "termcap" file indicating what kind of sequences expected for special keys. It's typically located in "/etc" directory. It includes entries for different types of terminal. You need to find the entry for the terminal type your application uses. You can check the "term" environment variable for terminal type currently being used. Some applications only support particular types of terminal. From manual page about "termcap", you can get format of this file. Standard Code Sequences for VT Keys Here is a list of code sequences for TV function keys: 62 Button Settings Introduction KoalaTerm provides 32 on-screen buttons you can define them to carry out different actions. They are arranged into 4 pages, each page contains 8 buttons. To show/hide the button palette, you can select "Button Palette" from "View" menu. Button Settings Page Snapshot Each button can carry out several types of action when pressed: sending out sequence to the host, executing KoalaScript statements, or running a KoalaScript file. You can define any of the 32 buttons in the "Buttons" page of "KoalaTerm Settings" dialog box. Show How to Define a Button 1. Select a button number under the Buttons box on the left side. The button number will appear on the right side next to Button. 2. Input the name of the button in Caption text box. The caption will be shown on the on-screen button so that you can easily identify which is which. 63 3. Select a type of action: Send Sequence, Execute Script, or Run Script File. 4. Type the sequence, script statements, or script file name in the Action text-typing box. 5. Press Set to confirm the definition. 6. Finally, on your current screen, just press the button you defined on the above steps to the take the action. 7. You may want to save the button definition along with other settings into a session file, click on Save button on the toolbar or select Save from Connection menu. 64 Color Map Settings Character attributes (bold, underline, inverse, blink) change the way characters appear on the screen. These attributes, or combinations of these attributes, can be assigned to any displayed character. You can add color to the text in your emulation window by mapping the various character attributes and their combinations to various foreground and background color. Color Map Page Snapshot Show How to To map attribute or attribute combination to color 1. From the SETTINGS menu, choose Color Mapping page. 2. Check one or more items from "Attributes to be Mapped". This makes characters with attributes appear in color. 3. Select an attribute in the Attribute list. If no attribute is selected, you are unable to select the ground color. 4. Select Foreground and Background color, then Mapped To will be automatically checked. 65 5. Choose OK. Example: Check Bold under Attribute to be Mapped. Select Normal in the Attribute list, select red for foreground and yellow for background. Click OK. Then you will see your current screen appears like this: To unmap attribute or attribute combination to color From the SETTINGS menu, choose Color Mapping page. Select an attribute or attribute combination in the Attribute list. Un-check Mapped To check box. Choose OK. Note: If you want to delete all the attributes in the Attribute list, click Clear. 66 Palette Settings Your personal computer running Windows may have a different color capability. KoalaTerm provides options that let you obtain the best color match. The color features that are provided on your computer depend largely on whether or not your display adapter uses a palette. Show How to Change th e color for screen background 1. Select Color Index #0 from the current palette. Fig.1 2. Type the value, or use the scroll bars to select values in the Red, Green, and Blue field. (See Fig. 2). Fig.2 3. Choose OK to finish the palette box. (See the effect of screen background in Fig.4) Change the color for normal text color 1. Select the Color Index #7 from the current palette. 67 2. Type the value, or use the scroll bars to select values in the Red, Green, and Blue field (Fig. 3 shows the selected color). Then choose OK (Fig. 4 shows the effect in screen). Fig.3 Fig.4 Reset a color to its previous RGB value Click "Default" button to restore to its previous RGB value. 68 Chapter Eight - KoalaTerm Script: KoalaTerm Script Introduction How to Invoke KoalaScript Scripts Overview of KoalaScript Language KoalaScript Object Reference KoalaTerm Script Introduction Introduction Welcome to KoalaScript, the complete scripting solution for KoalaTerm. KoalaScript is an interpreting language like most other scripting languages; it doesn't need to be compiled to run. KoalaTerm 3.0 uses its built-in interpreter to execute scripts, supply terminal and system status, and display result if any. A KoalaScript file is a plain text file, you may use any text editor to create a script. And there are many ways to invoke a script (loaded from a script file, or just a few lines you can type in the KoalaTerm settings pages): from menu, by keystroke, clicking a button, or triggered by host sequence. KoalaTerm team is improving and enhancing the KoalaScript constantly, we want to develop a powerful enough for everybody to carry out their scripting needs, yet simple enough for everybody to master it easily. So we welcome your opinions as programmers, it will help us to put a priority for every improvement and enhancement. What KoalaScript Can Do for You KoalaScript can generate input and send to the host, just like you do with a keyboard. KoalaScript can get and process the stream sent to your PC from the host, 69 for example, it can screen all the text received and wait for particular strings; KoalaScript can alter many aspect of the terminal settings, just like you do with the "KoalaTerm Settings" dialog; KoalaScript can make use of PC system functions like message boxes, sound file playing, file system operations, etc.; KoalaScript can do other simple process like arithmetic expressions, string operations. 70 How to Invoke KoalaScript Scripts Click the following links to see how to run scripts: Running Running Running Running Scripts Scripts Scripts Scripts from Menu by Keystroke by Button from Host Running Scripts from Menu After you use a text editor to create a script file, and get connected with the host, you can run the script file from KoalaTerm menu: Select "Run Script" from "Connection" menu, specify the file name, press OK, then the file will be loaded and executed in the context of current active terminal session. Running Scripts by Keystroke With KoalaTerm 3.0 key mapping feature, you are able to map a key (or combined with modifier keys) to execute a script file or a few script lines. Here are detailed instructions: 1. Press "Settings" button or select "Settings" from "Connection" menu to bring up "KoalaTerm Settings" dialog; 2. Click on the tab "Key Map"; 3. Click on the key you want to map, and check proper modifiers (SHIFT, ALT, or CTRL); 4. Select "Execute Script" from "Mapping" combo box if you want to execute just a few script lines, then a text box appear allowing you to type a few script lines; 5. Or you can select "Run Script File" from "Mapping" combo box if you want to run a script file instead, you need to type the file name (including path also 71 if not in the KoalaTerm directory); 6. Click on "Set" button to confirm the mapping; 7. You can continue to work with other keys, or press "OK" button to dismiss the settings dialog; 8. You may want to save the key map along with other settings into a session file, click on "Save" button on the toolbar or select "Save" from "Connection" menu. After all these done, you can then simply press the key (with modifiers you selected), the script will be executed in context of current active session. Running Scripts by Button KoalaTerm includes a button palette, which can be shown at the bottom of the terminal screen. If you don't see it, check "Button Palette" from "View" menu. With KoalaTerm 3.0, there are totally 32 buttons you can define as an additional way to do input or execute scripts. Here are detailed instructions on how to use buttons to execute scripts: 1. Press "Settings" button or select "Settings" from "Connection" menu to bring up the "KoalaTerm Settings" dialog; 2. Click on tab "Buttons"; 3. A list box will show all buttons and their names (captions), click on the one you want to define; 4. Input the name of the button in "Caption" text box; 5. Select "Action" as "Execute Script" if you want to execute just a few lines of script, you need to type the lines; 6. Select "Action" as "Run Script File" if you have got the file, you need to type the file name including path; 7. Press "Set" button to confirm the definition; 72 8. Go on with other buttons or press "OK" to dismiss the dialog; 9. You may want to save the button definition along with other settings into a session file, click on "Save" button on the toolbar or select "Save" from "Connection" menu. Running Scripts from Host If you are a host programmer, you may found this way to run a KoalaTerm script very useful. Because KoalaScript has access to most of the terminal settings, it is very convenient for host to send simple script lines over the connection and change many aspects of KoalaTerm simulation. Hosts invoke KoalaScript by sending special sequences defined by KoalaTerm: 1. Activating a script file: <ESC> P $ s <File Path> <ESC> \ Where "<File Path>" is the local path of the script file. If the file resides in the same directory as KoalaTerm does, you may specify only the file name. Note: <ESC> is the ASCII 27 code. All spaces are added just for easier reading, you should not send spaces (except those in file name). For example, the following sequence from host will run script "MyScript.kts" from the current KoalaTerm directory: <ESC> P $ s MyScript.kts <ESC> \ 2. Activating script commands Script-Commands: <ESC> P $ t <Script Lines> <ESC> \ Where "<Script Lines>" is any KoalaScript lines. They may be separated by CR-LF or may not, doesn't matter. See "KoalaScript Syntax" section for details. Note: <ESC> is the ASCII 27 code. All spaces are added just for easier reading, you shouldn't send spaces (except those in script lines). For example: the following sequence from host will show a message box on 73 the PC machine: <ESC> P $ t sys.MessageBox("Hello!"); <ESC> \ 74 Overview of KoalaScript Language Click the following links to see the each language in KoalaScript: KoalaScript Syntax Data Types Variables Statements Operators Functions KoalaScript Syntax The syntax of KoalaScript is very similar to C and C++ programming languages. Basic rules: 1. KoalaScript is case sensitive. So "a" and "A" will be different to KoalaScript interpreter. 2. Identifier: name for variables or functions must be started with a letter, then it can be followed by letters, numbers, or "_" (underscore character). 3. Constant: KoalaScript support number constant like 1234, and string constant which is enclosed by quote mark, either single quote mark, or double quote mark, like "abcd". 4. There can be multiple statement within one line, and the line feed (CR-LF) will be treated as a space. All the space or tab characters, unless they are in string constant, are just for separating syntax elements, any extra spaces or tabs will be ignored. 5. Comments: comments start with double slash "//", all text in the same line after "//" will then be ignored. 75 Data Types KoalaScript supports the following data types: 1. Integer, like 1234 2. String, like "abcd". 3. Built-in Objects like terminal, system, file, etc. 4. Array of integer or string. Right now, only one dimension array is supported. The element of an array can be referred as:<array name>[<subscription>] For example: a[1]. The subscription of an array starts from zero. Variables 1. KoalaScript supports use of variables. Variables can be global or local to a function. 2. You don't need to declare a variable, but you need to initialize it before you can use it. 3. You don't need to declare the data type of a variable, KoalaScript will assign the appropriate one. For example, 4. The statement: a = 1234; will assign a data type of "Integer" to variable "a". Another statement: a = "abcd"; will change the data type of a to "String". KoalaScript provides automatic data type conversion between integer and string. When converting string to integer, 0 is used when the string doesn't represent an integer value. 76 Statements KoalaScript supports the following types of statements 1. Assignment You can assign a value to a variable, like: a = 1234; You can assign a value to an element in array, like: array[10] = "abcd"; You can also assign a value to a property of an object, like: term.AutoWrap = 0; All these statement must be ended with semicolon (";"), no matter if it is the last statement if not. 2. Function or method call You can call a method of an object, like: term.Wait("abcd", 10); Or you can call a function you declare yourself, like: MyFunc(1234); All these statement must be ended with semicolon (";"), no matter if it is the last statement of not. 3. Composite Multiple statements enclosed by a pair of "{" and "}". For example: { a = 1234; b = "abcd"; } 4. Conditional Format: if (<expression>) <if clause> else <else clause> This statement first evaluate the <expression>, if the result is not zero, the <if clause> will be execute, otherwise, the <else clause> (if any) will be executed. 77 For example: if (a > 10) a = a - 10; else a = a + 10; <else clause> may be optional. Both <if clause> or <else clause> can be composite statement, for example: if (a > 10) { a = a - 10; b = b - 10; } else { a = a + 10; b = b + 10; } 5. Loop Format: while (<expression>) <statement> This statement first evaluate the <expression>, if the result is zero (or boolean false), it's finished, otherwise, the <statement> will be execute, and evaluation of <expression> is repeated and checked again, the loop continues until the result of <expression> gets zero (or boolean false). For example, the following statements will initialize an array with 10 elements: Index = 0; while (Index < 10) { Array[Index] = 0; Index = Index + 1; } 6. Return statement Format: return; This statement abort the execution of current function and immediately return. If you use this statement in the main function (the script body), the script will be terminated. 78 Operators Koa laScript supports the following categories of operators: 1. Arithmetic: +-*/% 2. String + (Append second string to first string) 3. Comparison == (Equal to. Can be used with both integer and string values) != (Not equal to. Can be used with both integer and string values) < (Less than. Only for integer values) > (Greater than. Only for integer values) <= (Not greater than. Only for integer values) >= (Not less than. Only for integer values) 4. Boolean && (Logical and) || (Logical or) Note: when KoalaScript evaluate a boolean expression, the shortcut method is used. For example, during evaluation of a expression like this: <expression 1> &&<expression 2> If KoalaScript detects the <expression 1> equals to false, it won't evaluate the <expression 2> anymore, because no matter <expression 2> is, the final result will be always false. 79 Functions You can declare your own functions using format: function <function name>(<parameter list>) { <statements> } Parameters are separated by comma (","). You don't need to specify the data type of parameters, and if you don't have any parameter, leave the <parameter list> blank. For example, the following function take a parameter and show a message: function ShowMessage(param) { sys.MessageBox("The parameter is: " + param); } Functions must be declared before called. All variables used in a function are considered local variables to this function unless they are declared in the main function (the script body). 80 KoalaScript Object Reference KoalaScript supports some built-in objects. Each object has its own methods and properties. You can call object methods to carry out tasks, get object properties to get information about the object, or set object properties to change status of the object. Right now KoalaScript provides the following built-in objects: Terminal object Terminal Settings System Object File Object String Type KoalaScript Sample Terminal Object When a script is started, KoalaScript creates a global variable "term". The value of the variable is a terminal object. This object represents the functionality of a KoalaTerm session. It supports the following methods: 1. Wait ( <wait string>, <timeout>,<callback> ) This function waits for specified string(s). You can wait for multiple strings separated by "|". The <timeout> is in seconds, and the <callback> is name of a function which will be called each time a character received. <timeout> and <callback> parameters are optional. And if <timeout> is zero, it is considered as infinite waiting. For example, the following statement: term.Wait("login:|name:"); will wait for "login:" or "name:". Either one of this received from the host, this waiting ends. The return value of this function is the string received. You can check the returned value to verify what you have actually received. The following example examines the received string and gives different response message: 81 str = term.Wait("continue|exit", 10); if (str == "continue") sys.MessageBox("Continue..."); else if (str == "exit") sys.MessageBox("Want to exit..."); else sys.MessageBox("Nothing received."); Note: the function will return empty string when timeout. The <callback> function can be used to provide customized process to every received character during waiting. The callback function has a single parameter, when it's called, the value of this parameter will be a string consisting the character received. The following example shows a simple use of this mechanism: function OnReceive(char) { sys.MessageBox("Received: " + char); } term.Wait("E", 0, OnReceive); The above example first declare the callback function, it simply displays every single received character with a message box. In the body of the script, a term.Wait method call waits until an "E" character received. During waiting, all characters will be displayed, including the terminator "E" character. 2. Send ( <sequence> ) This function sends a string to host. The syntax for special characters in <sequence> is the same as used in key mapping sequence. For example, the following statement sends a "Carriage Return" to the host: term.Send("<CR>"); Click here for a list of code sequences for standard VT function keys. 3. Get ( <number of characters>, <timeout> ) This function gets specified number of characters from the host. <timeout> is in seconds and is optional. 82 The return value of this function is the received string. When timeout happens, the received string may not contain specified number of characters. You need check the Length property of the string in that case. See the following sample: str = term.Get(40, 10); if (str.Length != 40) MessageBox("Receiving timout. The actually number of characters received:" + str.Length); 4. Screen (<starting row>, <starting column>, <ending row>, <ending column>) (Available since version 3.14) This function gets displayed characters from a rectangle area on the terminal screen. <starting row> must be less than or equal to <ending row>, and <starting column> must be less than or equal to <ending column>. Row numbers and column numbers start from 1 (the upper-left corner of the screen). When getting characters from more than one rows (i.e. <ending row> is greater than <starting row>), <LF><CR> are inserted between two rows. 5. DoMenu ( <menu item name> ) This function simulate the user action of selecting a menu item. The <menu item name> is composed by menu name and menu item name separated by ":". For example, the following statement cause the session to be terminated: term.DoMenu("Connection:Exit"); 6. MapKey ( <PC key code>, <modifiers>, <VT key code>, <string> ) This function set mapping for a key. <PC key code>: Windows standard virtual key code (VK code). To identify this code for a key, you can use the Key Map page of KoalaTerm Setting dialog, click on a key, the VK code will be shown along with the key name; <modifiers>: a combination of flags for modifiers: ALT (1), CTRL (2), or SHIFT (4); 83 <VT key code>: a Midasoft assigned code for VT key you are mapping to. This code is also used to specify mapping type if you aren't mapping to VT key: 252 for mapping to "Run Script File"; 253 for mapping to "Execute Script"; 254 for mapping to "Menu Item"; 255 for mapping to "Send Sequence"; <string>: If you aren't mapping to VT key, then you need to use the parameter to specify mapping. For different type of mapping (described above), the parameter serves as file name, script statements, menu item name, or code sequence. 7. Clear () This function clears the terminal screen, and resets terminal status as well. 8. SendLocal ( <sequence> ) This function sends the sequence to the terminal itself, without going out to the host. This allows you to control the terminal like from a host. The syntax of "sequence" string is the same as used in key mapping and "Send" function. 9. SendBreak () This function sends a break signal (only effective for serial connections). 10. Capture ( <File Name> ) (Available since version 3.3 build 1625) This function starts or stops capturing terminal content (from the host) into a file. When you start capturing, the <File Name> parameter is required for the path and name of the captured file. When you stop the capturing, do not specify file name. 11. Disconnect () (Available since version 3.3 build 1701) This function disconnect the session immediately. 84 Terminal Settings Terminal object also has many properties you can get and set. The properties are actually corresponding to available KoalaTerm settings. You can also get terminal status like current cursor position using some of the properties. Here is a complete list of supported properties: System Object When a script is started, KoalaScript creates a global variable "sys". The value of the variable is a system object. This object provides functionality of Windows system. It supports the following methods right now: 1. MessageBox ( <message>, <title>, <style>) Display a message box with specified message. The <title> and <style> parameters can be omitted. Default title will be "KoalaTerm". The <style> parameter is a number, can be combined from the following values: For example, if you want to display Yes/No/Cancel button with "Cancel" as default button, and a question sign, the style should be 3 + 32 + 512 = 547. This function returns a number indicating which button is pressed by the user to dismiss the message box. 1 for "OK", 2 for "Cancel", 3 for "Abort", 4 for "Retry", 5 for "Ignore", 6 for "Yes", 7 for "No". 2. PlaySound ( <file name> ) Play a wave sound file. 85 3. Sleep ( <number of milliseconds> ) Wait for a period of time. 4. OpenFile ( <file name>, <open mode> ) Open a file. This function returns a file object for you to perform further operations on the file. The <open mode> parameter is a string including one or more open mode tags:"r" for read, "w" for write, "b" for binary. Note: This function is protected. If the script is invoked from the host, and "Allow host to access protected script functions" option in "General" page of "KoalaTerm Settings" dialog is disabled, calling to this function will cause the script execution to be terminated. 5. System ( <command> ) Execute a Windows command. Note: This function is protected. If the script is invoked from the host, and "Allow host to access protected script functions" option in "General" page of "KoalaTerm Settings" dialog is disabled, calling to this function will cause the script execution to be terminated. 6. LoadSession ( <file name> ) Load a KoalaTerm session file and start connection. Note: The file name should be full path including extension name. This function may be used in login script of a session to start another session. By this way, you can open multiple sessions by just loading one file. 7. InputBox ( <prompt>, <default value>, <style> ) (Available since version 3.12) Give user a chance to input a string. Parameter <default value> can be optional. This function returns the inputed string as result. If user pressed "Cancel" button, the result will be null string. Since version 3.15: <style>: 1 for password input, 2 for file save as, 3 for open file. Default or zero for normal input. 86 File Object A file object needs be created by sys.OpenFile method first. Right now file object supports the following methods: 1. Write (<string>) Write a string to the file. 2. Close () Close the file. When script ends, all open files will be automatically closed even if you did’t call Close function. 3. ReadLine () (Available since version 3.12) Read a line from the file. Maximum 255 characters. This function returns the read string as result. Line feed character will be also included in the result string. 4. Read ( <number of bytes> ) (Available since version 3.12) Read specified number of bytes (mostly used with binary files). This function returns the read string as result. String Type KoalaScript supports several operations on strings: 1. Length This property gets the string length (number of bytes). 2. Mid ( <start position>, <byte count> ) (Available since version 3.15) This method returns a substring. The "start position" counts from zero for the first byte. 3. MakeUpper () (Available since version 3.15) This method returns the string with all letters in upper case. 87 4. MakeLower () (Available since version 3.15) This method returns the string with all letters in lower case. 5. Find ( <substring>, <start position> ) (Available since version 3.15) This method finds the "substring" in the string from the "start position" (counting from zero for the first byte) and returns the first appearing position. If not found, -1 is returned. The "start position" can be omitted, default is zero. KoalaScript Sample The following example shows a file logging procedure. The host first sends file header record starting with a tag, then unlimited number of records in file, at last it transmits a file trailer record starting with another tag, following the trailer tag there are fixed number (40) of characters in the trailer record. // First, we need a wait callback function to do the file logging // during waiting for the trailer record tag function OnRecv( char ) { // write every character in file file.Write( char ); } // Start of script // Wait for the file header tag first str = term.Wait ( "[HEADER ]", 30 ); // Check if we actually get the header tag in 30 seconds or not if ( str == "" ) { sys.MessageBox ( "Cannot detect the file header." ); return; } // Open the file for writing file = sys.OpenFile ( "MyLog.txt", "w" ); // Write the header tag into file since it’s also a part of the file file.Write ( str ); // Wait for the file trailer tag, and log every character into file term.Wait ( "[TRAILER]", 0, OnRecv ); // Finally, get fixed number of characters in the trailer record 88 str = term.Get(40); // And write to the file file.Write ( str ); // We are done. Close the file file.Close ( ); 89 Contact Us Feel free to contact us should you need any information or have any problems with our products. We are always here, ready to serve you better. • Office Address: Foxit Corporation 39819 Paseo Padre Parkway Fremont CA 94538 USA • Sales: 1-866-MYFOXIT or 1-866-693-6948 (8AM-5PM PST Monday - Friday) 510-438-9090 (8AM-5PM PST Monday - Friday) 408-307-9358 (8AM-5PM PST Monday - Friday) • Support: 1-866-MYFOXIT or 1-866-693-6948 (24/7) 979-446-0280, (6AM-5PM PST Monday - Friday) • Fax: 510-405-9288 • Website: www.foxitsoftware.com • E-mail: Sales and Information - [email protected] Marketing Service - [email protected] Technical Support - [email protected] Website Questions - [email protected] 90


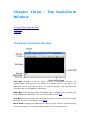


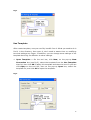
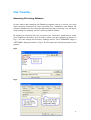
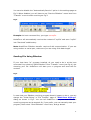
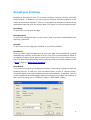
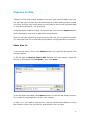
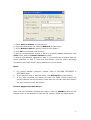
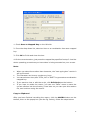

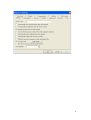

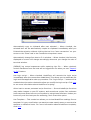
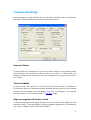
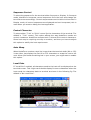
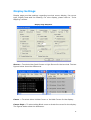
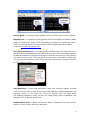

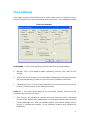
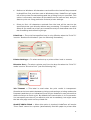

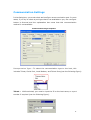
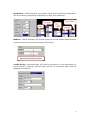
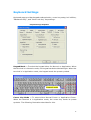
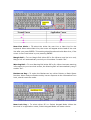
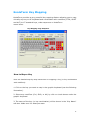
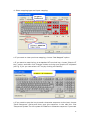
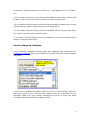
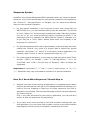
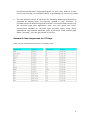
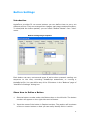
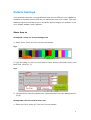


![[Script Editor basics - v1.5] 700 KB](http://vs1.manualzilla.com/store/data/005726068_1-0a14f792b169a78eb7f0605403a4865d-150x150.png)