1
CONTENTS
Basics.................................................................................................................................................................................... 2
Keystroke basics................................................................................................................................................................... 2
Introduction ............................................................................................................................................................ 2
First things to understand ...................................................................................................................................... 2
The Script Editor ................................................................................................................................................................... 4
The “Edit” button .................................................................................................................................................... 4
The “Tools” button ................................................................................................................................................. 5
Event Tester.......................................................................................................................................................................... 5
Device Analyzer .................................................................................................................................................................... 7
Running a script .................................................................................................................................................................... 8
Script contents ...................................................................................................................................................................... 9
Minimal file contents .............................................................................................................................................. 9
Target.tmh ............................................................................................................................................................. 9
The T.A.R.G.E.T function Toolbox ..................................................................................................................................... 10
Linking axes with the MapAxis function.............................................................................................................................. 10
MapAxis optional parameters .............................................................................................................................. 11
Virtual Axis Rotation with RotateDXAxis ............................................................................................................................ 13
Keystroke and DirectX button generation with the MapKey Function ................................................................................ 14
The “null” keystroke ............................................................................................................................................. 14
Single keystroke .................................................................................................................................................. 14
Combo keystrokes ............................................................................................................................................... 15
“PULSE+” command............................................................................................................................................ 16
“DOWN+” and “UP+” commands......................................................................................................................... 16
Generating a keystroke with USB codes............................................................................................................. 16
Generating a DirectX button output ..................................................................................................................... 17
LED and backlighting control............................................................................................................................... 17
Using Macro Files ............................................................................................................................................................... 19
Multiple outputs on a single button ..................................................................................................................................... 20
TEMPO Command .............................................................................................................................................. 20
Layers .................................................................................................................................................................. 20
MapKeyUMD ....................................................................................................................................................... 21
MapKeyIO ............................................................................................................................................................ 21
MapKeyIOUMD.................................................................................................................................................... 22
Generating an event when releasing a button with MapKeyR ............................................................................ 22
CHAIN function: Generating events at the same time ........................................................................................ 23
D() Delay command............................................................................................................................................. 23
LOCK Command ................................................................................................................................................. 24
Sequences........................................................................................................................................................... 25
Axes .................................................................................................................................................................................... 27
SetSCurve ........................................................................................................................................................... 27
SetJCurve ............................................................................................................................................................ 28
SetCustomCurve ................................................................................................................................................. 28
Axis control with buttons ...................................................................................................................................... 28
Axis trimming ....................................................................................................................................................... 29
KeyAxis: Generating events from an axis........................................................................................................................... 31
AXMAP1 .............................................................................................................................................................. 31
AXMAP2 .............................................................................................................................................................. 33
LIST ..................................................................................................................................................................... 34
LockAxis............................................................................................................................................................... 35
Extra functions .................................................................................................................................................................... 35
Launch software from a script ............................................................................................................................. 35
Reject a device from a virtual controller .............................................................................................................. 35
Display a text message in the Script Editor "Output Window" ............................................................................ 36
Advanced features .............................................................................................................................................................. 37
EXEC: Opening Pandora’s box .......................................................................................................................................... 37
Managing functions.............................................................................................................................................. 37
REXEC................................................................................................................................................................................ 39
DeferCall ............................................................................................................................................................................. 40
Script Syntax....................................................................................................................................................................... 41
The following Keywords are supported ............................................................................................................... 41
Operators ............................................................................................................................................................. 41
Generating keystrokes with pure script .............................................................................................................................. 42
Logical Flags....................................................................................................................................................................... 43
Illustration ............................................................................................................................................................ 44
Creating your own function ................................................................................................................................................. 46
T.A.R.G.E.T Script Editor Basics User Manual v1.5 – 1/60
Basics
Keystroke basics
Introduction
You can write your own configuration files without the T.A.R.G.E.T graphical user interface (GUI). To do so, we
will use our own programming language, which is usually called “script”. This language follows on directly from a
document written by Dr. James “Nutty” Hallows: this document provided a complete overhaul of what a device
programming language might be. With the HOTAS Cougar, Thrustmaster pushed the level of controller
programmability to new levels. The basic structure of that script was well-suited to mid-core users, and its
features generally satisfied everyone. Over time, however, some advanced coders began to feel frustrated and
that the basic structure limited their creativity. This new programming language provides a solution for these
users.
This new language is very powerful. You can achieve the same objectives in different ways, by creating your own
functions and linking them to certain external languages... there are almost no limits to what you can do.
To make it accessible to everybody, we have included many new functions which provide users with more
possibilities than with the HOTAS Cougar. These new functions also provide a good way to discover and learn
how to use the script. Most of this manual will be dedicated to describing these functions, as a reference guide.
The document then provides examples of using advanced programming. We recommend that you learn the
functions provided first.
If you are new to programmable controllers, we suggest that you learn to use the T.A.R.G.E.T graphical
user interface (GUI) first. This experience will really help you when you start to learn the script.
The best way to learn the script is just to practice. While it may seem heavy-going to begin with, you will soon find
it simple; in fact, the learning curve is very quick.
Reading this manual will give you an overall understanding of the new script; however, practicing the script is the
only way to really learn and understand it. This document gives you all the tools you need to get started.
First things to understand
T.A.R.G.E.T isn’t just a simple graphical user interface – it is also a powerful driver that is able to simulate other
physical devices such as a mouse, keyboard or joystick. These devices allow us to simulate all the inputs we
need to manage simulator software.
All of the human action on the physical controllers will be merged into one single virtual device, and then sent to
the flight simulator software.
This virtual device may be a combination of several Thrustmaster controllers:
Stick + Throttle
Stick + Throttle + MFDs, etc.
Here is what happens when you launch a configuration:
The physical controllers are disconnected (virtually).
A virtual controller is connected.
You may then launch your flight simulator software.
Advantages of this system:
Different USB devices can interact directly.
Configuration is easier in the flight simulator control panel, with just one ID to manage.
Management is simplified, with one program for all devices.
Compatibility with older software is increased.
2/60 - T.A.R.G.E.T Script Editor Basics User Manual v1.5
It’s not difficult to write a configuration with the script; in fact we have included a number of functions that will
make this simple.
If you are familiar with the HOTAS Cougar script, you will notice that all the syntax is new, and that there are few
differences that just make things more comfortable and flexible.
Note: With these functions, you can already build powerful configurations but if necessary, you can create your
own functions or rewrite a set of features as a unique function. The possibilities are huge and cannot be covered
in a single manual. Once you have learned and used all of the predefined functions and want to look into the new
language in more detail, we recommend that you spend some time discovering the C programming language.
With a few ideas, a bit of logic and some basic C knowledge, you will realize the real power of the T.A.R.G.E.T
script. This manual provides a few samples as examples; each one will show how to achieve your goals,
sometimes using different methods.
This virtual device and the new language let us do everything we want to do. We can create thousands of
programming layers, link to external code and so on. But these features have a price and can quickly become
complex. This is exactly what 99% of users hate… so don’t get too hung up on code. Instead, focus on your main
requirements.
With a little practice, you will find script editing powerful and faster to use than the graphical user interface.
The functions provided were created to easily manage keystroke generation, axis and curve adjustments, which
are the essential requirements.
Using the Thrustmaster functions makes the script easy to read. Everyone can use it and while it may look
complicated due to the number of characters used, it’s really very simple.
Example:
MapKey(&Joystick, TG1, 'x');
If you think that this line generates an “x” keystroke when you press the Joystick’s TG1 (trigger first step) button,
you are correct and are ready to learn more.
Note for HOTAS Cougar users:
The new script is totally different from the Cougar syntax. You will probably feel “at home” quickly, but try to put
the old script out of your mind, as it could reduce your creativity. The T.A.R.G.E.T script is a lower level code and,
as such, is much more flexible.
DirectX limits
Whatever the number of devices inside the virtual controller, this controller will never be able to declare more
axes and DirectX buttons than the official DirectX limits (32 buttons and 8 axes). This simply means that if you
have more than 8 axes available on the real controllers, you cannot use all the buttons and axes programmed in
the DirectX mode. Any unused axes and buttons in DirectX can be used as digital axes and keystroke generators.
Major rules:
Respect the syntax: to begin with, you will probably spend more time solving syntax errors than writing your file.
Always remember that the script is case sensitive, and that when you open a “(”, you must close it with a “)”. This
is also true for a “{“.
The script is a real programming language. The functions included allow you to use it easily, but if you go into
more detail, this will be a good way to start learning to program in C.
T.A.R.G.E.T Script Editor Basics User Manual v1.5 – 3/60
The Script Editor
The script is made up of text only, but we’ve built a dedicated editor to make reading and writing easier. You can
access it from the Windows desktop or Start menuL it’s called the T.A.R.G.E.T Script Editor.
The contents of the Script Editor are simple. On top there is the toolbar. To the left are the files used or linked to
your script. The script is in the main area. The lower section contains the “output window”. Finally, there is a
single line called the “status bar”.
The toolbar is used to manage and test files.
This is a shortcut to save the file.
Lets you “Undo” and “Redo” a script content modification.
Left-click on the Menu icon to open a list of available file management actions (Open, Save, Save
As, Close, Print, etc.).
The “Edit” button
Clicking on the Edit button will give you access to the traditional text editing tools:
Copy will store in memory a text selection that you’ve selected.
Cut will store in memory and delete from the script a text selection that you’ve selected.
Paste will insert the text selection stored in memory from your previous Cut or Copy action.
Undo lets you cancel your most recent actions, step by step.
Redo lets you redo the last modification, if you’ve clicked Undo.
4/60 - T.A.R.G.E.T Script Editor Basics User Manual v1.5
The “Tools” button
Clicking on the Tools button displays the major tools you need to execute and test a script:
Compile is used to compile your file. Your script is transformed into a DLL file, if there are no syntax
errors.
Run compiles and runs the DLL file created from your script. When the program is running, your
controllers will execute your script.
Options displays the options page. We will learn about these later.
Event Tester launches the Event Tester. This is a tool that is used to control outputs (keystroke and
axis values).
Device Analyzer is software dedicated to DirectX control that displays real controllers’ inputs and
virtual controller DirectX outputs.
Event Tester
The Event Tester is an event recorder. We will use it to test the keystroke generation we have programmed on
our controllers.
The Event Tester displays:
Mouse button event (needs to be activated in the Settings menu).
Keyboard event press.
Keyboard event release, and how long the key as been pressed.
The Event Tester uses one line per event, so a momentary press on a key will generate 2 lines.
T.A.R.G.E.T Script Editor Basics User Manual v1.5 – 5/60
Example:
If I press the “L” key quickly, the Event Tester will display:
Key press: L
Key release: L
If we use a combo keystroke, such as “left control” + “L”, we will get:
Key press: L_CTRL
Key press: L
Key release: L_CTRL
Key release: L
This is a basic but useful tool to verify that the button behaves in the way that you want.
6/60 - T.A.R.G.E.T Script Editor Basics User Manual v1.5
Device Analyzer
The Device Analyzer is used to check DirectX button and axis mapping.
By left-clicking the button in the top left of the window, you can select a device to check. If you have a script
configuration running, you can select the virtual “combined” controller.
The display will then be divided in 2 parts:
On the left, the window displays the real controller’s status.
On the right, the window shows the virtual controller’s DirectX outputs.
With the Device Analyzer you can easily view the effect of an axis mapping, a curve and other axis fine-tuning
features.
T.A.R.G.E.T Script Editor Basics User Manual v1.5 – 7/60
Running a script
It is now time to launch the T.A.R.G.E.T Script Editor.
Your Windows desktop contains an icon called T.A.R.G.E.T Script Editor: double-click on it. After the
T.A.R.G.E.T splash screen, you access the main page of the Editor. Please remember that you cannot run the
T.A.R.G.E.T graphical user interface (GUI) and the Editor at the same time.
Click the Menu icon, and select Open.
A T.A.R.G.E.T script is a file with a .tmc extension. This file can come with a .ttm file that contains the keyboard
data.
Open the .tmc file of your choice:
To activate the contents of that file, simply click the Run button in the Tools toolbar.
To stop the script, just click the Stop button (beside the Run button).
Like every program, the script has its own structure. There are a few lines that may look a bit like exotic alien
writing to most of us, so we’ll just ignore that.
Note: All data placed behind // will be ignored until the start of the next line.
// is used to write a comment or disable a line. In the Editor, these comments will appear in green.
You may also notice that files can include script for devices you do not own. This is not a problem: the script can
be run without those devices.
8/60 - T.A.R.G.E.T Script Editor Basics User Manual v1.5
Script contents
Minimal file contents
The following code can be executed. It will launch the virtualization of controllers into a single virtual device, but
as there's no code dedicated to creating functions or events inside of it, nothing will happen if you move an axis or
press a button: it's just the minimum code needed to create a valid T.A.R.G.E.T script file.
include "target.tmh" //here we link this file to the file that contains the default Thrustmaster function code
int main()
{
if(Init(&EventHandle)) return 1; // declare the event handler, return on error
//script and function functions go here and before the }
}
int EventHandle(int type, alias o, int x)
{
DefaultMapping(&o, x);
}
If this appears unclear to you, don’t worry. All we need to do is fill in the line “//script and function functions go
here” with the functions provided.
NOTE: When writing a file, try to consider the people who will read it. The order of functions is free, but try to
avoid combining too many function types, as this will make your file harder to read.
Target.tmh
To get your function to work, you must link your program to a file that contains the code for the Thrustmaster
functions. This file is called a “header”; you will need to call it up in all your files, and it will be the first line of the
file. It is called Target.tmh. The header files are used to store preformatted functions that you will call up in your
main file. This makes the main file’s contents lighter and easier to read. We use headers to store standard tools.
For these examples, we will use a HOTAS Warthog; but don’t worry, since – except the names of buttons
and axes – other USB devices share the same language.
T.A.R.G.E.T Script Editor Basics User Manual v1.5 – 9/60
The T.A.R.G.E.T function Toolbox
Linking axes with the MapAxis function
The first thing to do is to map physical controller axes to virtual controller axes. DirectX has 8 axes. We can link
them to any controller axes. To do so, we will use the MapAxis command. This function maps a physical axis
over a virtual one. By default, all physical axes are unmapped. We will focus on axis response and form later in
this manual.
Syntax:
MapAxis(&Input device, physical axis name, dx_axis name, option1, option2);
Table of Axis names Product Axis Name DirectX Name Script Axis Name HOTAS WARTHOG HOTAS COUGAR T‐16000M X DX_X_AXIS JOYX JOYX JOYX Y DX_Y_AXIS JOYY JOYY JOYY RZ DX_ZROT_AXIS THR_LEFT RUDDER RUDDER Z DX_Z_AXIS THR_RIGHT THROTTLE RX DX_XROT_AXIS SCX RDR_X RY DX_YROT_AXIS SCY RDR_Y Slider0 DX_SLIDER_AXIS THR_FC MAN_RNG THROTTLE Throttle DX_THROTTLE_AXIS
ANT_ELEV MOUSE X MOUSE_X_AXIS MOUSE_X_AXIS MOUSE_X_AXIS MOUSE_X_AXIS MOUSE Y MOUSE_Y_AXIS MOUSE_Y_AXIS MOUSE_Y_AXIS MOUSE_Y_AXIS Let’s start by linking the Warthog joystick X axis to the DirectX X axis.
First we need to specify the name of USB controller hosting the axis:
MapAxis(&Joystick,
Then the physical axis name:
MapAxis(&Joystick, JOYX,
And finally, the DirectX axis name:
MapAxis(&Joystick, JOYX, DX_X_AXIS
As we have opened a “(” we now must close it with a “)” and finish the line with a “;”.
MapAxis(&Joystick, JOYX, DX_X_AXIS);
10/60 - T.A.R.G.E.T Script Editor Basics User Manual v1.5
Note the “;”: this is the only way to finish a line after a function.
Let’s do this for the other HOTAS Warthog axes as well:
MapAxis(&Joystick, JOYY, DX_Y_AXIS);
MapAxis(&Throttle, THR_LEFT, DX_ZROT_AXIS);
MapAxis(&Throttle, THR_RIGHT, DX_Z_AXIS);
MapAxis(&Throttle, SCX, DX_XROT_AXIS);
MapAxis(&Throttle, SCY, DX_YROT_AXIS);
MapAxis(&Throttle, THR_FC, DX_SLIDER_AXIS);
Now that all the axes have been associated with DirectX axes, once you have compiled and executed your script,
your joystick and throttle will work as on a single ID joystick.
Our file now looks like this:
include "target.tmh" //here we link this file to the file that contains function code
int main()
{
if(Init(&EventHandle)) return 1; // declare the event handler, return on error
//script and function functions go here
MapAxis(&Joystick, JOYX, DX_X_AXIS);
MapAxis(&Joystick, JOYY, DX_Y_AXIS);
MapAxis(&Throttle, THR_LEFT, DX_ZROT_AXIS);
MapAxis(&Throttle, THR_RIGHT, DX_Z_AXIS);
MapAxis(&Throttle, SCX, DX_XROT_AXIS);
MapAxis(&Throttle, SCY, DX_YROT_AXIS);
MapAxis(&Throttle, THR_FC, DX_SLIDER_AXIS);
}
int EventHandle(int type, alias o, int x)
{
DefaultMapping(&o, x);
}
If you run the file and check what happens in the Device Analyzer, you will see that your axes are moving. If you
like, you can press a button on the controller and notice that nothing happens. This is simply because the buttons
do not have functions assigned yet.
MapAxis optional parameters
We have only used a few parameters in the previous script. In fact, MapAxis supports the following options:
MapAxis(&Input device, physical axis name, dx_axis name, AXIS_NORMAL or AXIS_REVERSED,
MAP_ABSOLUTE or MAP_RELATIVE):
AXIS_NORMAL: the axis runs in the default direction.
AXIS_REVERSED: reverses the axis direction.
MAP_ABSOLUTE: usual behavior of an axis.
MAP_RELATIVE: in this particular mode, the axis value will stay at the maximum or minimum value
reached until you change your movement direction. This parameter was specially created for Slew
Control axes or ministicks which control a Target Designation Cursor. Only use absolute mode when
needed.
Note: this mode provides for realistic handling of the TDC box in Lock On Modern Air Combat, DCS Flaming Cliffs
1 (and 2 without the patch).
T.A.R.G.E.T Script Editor Basics User Manual v1.5 – 11/60
Example:
MapAxis(&Throttle, SCY, DX_YROT_AXIS, AXIS_REVERSED, MAP_RELATIVE);
MapAxis(&Throttle, SCX, MOUSE_X_AXIS, AXIS_NORMAL, MAP_RELATIVE);
Example of a combination between a HOTAS Warthog joystick and a HOTAS Cougar throttle (TQS).
NOTE: you will notice that the HOTAS Cougar Throttle axes are called up under the joystick device. This is due to
the fact that the Cougar Throttle and Joystick are connected to the computer by a single USB cable (via the
joystick’s base).
include "target.tmh"
int main()
{
if(Init(&EventHandle)) return 1;
//axis mapping Warthog Joystick
MapAxis(&Joystick, JOYX, DX_X_AXIS, AXIS_NORMAL, MAP_ABSOLUTE);
MapAxis(&Joystick, JOYY, DX_Y_AXIS, AXIS_NORMAL, MAP_ABSOLUTE);
//Axis Mapping TQS
MapAxis(&HCougar, THROTTLE, DX_Z_AXIS, AXIS_NORMAL, MAP_ABSOLUTE);
MapAxis(&HCougar, MAN_RNG, DX_SLIDER_AXIS, AXIS_NORMAL, MAP_ABSOLUTE);
MapAxis(&HCougar, ANT_ELEV, DX_THROTTLE_AXIS, AXIS_NORMAL, MAP_ABSOLUTE);
MapAxis(&HCougar, RDR_X, DX_XROT_AXIS, AXIS_NORMAL, MAP_ABSOLUTE);
MapAxis(&HCougar, RDR_Y, DX_YROT_AXIS, AXIS_NORMAL, MAP_ABSOLUTE);
MapAxis(&HCougar, RUDDER, DX_ZROT_AXIS, AXIS_NORMAL, MAP_ABSOLUTE);
}
int EventHandle(int type, alias o, int x)
{
DefaultMapping(&o, x);
}
Once we have defined the mapping for our axes, we can start to assign events to buttons. Later on we will see
how to customize axis response.
Note: When writing a file, try to consider the people who will read it. The order of functions is free, but try to avoid
combining too many function types, as this will make your file harder to read.
Remember that all DirectX axes will still be available, even if not mapped to a physical axis.
12/60 - T.A.R.G.E.T Script Editor Basics User Manual v1.5
Virtual Axis Rotation with RotateDXAxis
RotateDXAxis is a little illustration of the power of the script. This function has been created for people who want
to twist the joystick grip a little. You may need it if you use the joystick as a center stick (rotated counterclockwise)
or as a side stick slightly twisted (clockwise). T.A.R.G.E.T will calculate and project the X and Y axes to keep the
direction of axes realistic, whatever the twist angle you’re going to apply.
Syntax:
RotateDXAxis(DirectX axis Name, Second DirectX axis name, twist angle value);
Examples:
RotateDXAxis(DX_X_AXIS, DX_Y_AXIS, 5); //simulate a 5° twisted side stick like F-16
RotateDXAxis(DX_X_AXIS, DX_Y_AXIS, -15); //simulate a -15° twisted centred stick for A-10, for example.
RotateDXAxis(DX_X_AXIS, DX_Y_AXIS, 90); //transform X to Y and Y to X
NOTE: As this is an important setting, we recommend that you to place it at the top of the MapAxis function list.
This will make it easier for other users to see.
T.A.R.G.E.T Script Editor Basics User Manual v1.5 – 13/60
Keystroke and DirectX button generation with the MapKey
Function
Basically, we are going to call up a function used to associate a keystroke with a button. This function is called:
MapKey
We are going to associate MapKey with a button, but we need to know the name of each button and, more
particularly, each position.
Therefore, all the buttons have a name and all the toggle switch positions have a name, even those without a
DirectX output.
For example: on the Warthog throttle, in the Autopilot panel, the LASTE toggle switch offers 3 positions: the
middle one is null under DirectX, the up one is DX 27 and the down one is DX28. With the script, the middle
position can receive a function: this really makes programming easier. In parallel to this manual, you will find PDF
files describing the names of all buttons for supported devices.
Printed function PATH ALT/HDG ALT DX Button number DX 27 NA DX 28 Script name APPAT APAH APALT MapKey rule
The MapKey function always uses this structure:
Syntax:
MapKey(&input device, button name, event);
Example:
MapKey(&Joystick, TG1, 'a');
The “null” keystroke
If you want to generate nothing, it’s very easy:
MapKey(&Joystick, TG1, 0);
“0” is the null event. In some cases you may want to neutralize a button. To do so, simply ask it to execute “0”.
Single keystroke
First, we must define the button we want to program, for example Trigger 1. We must tell MapKey that our button
is on the Warthog joystick, and its name is TG1, so:
MapKey(&Joystick, TG1,
We have defined that we want to map Trigger 1 on the joystick, but we still have to specify the output we want.
Let’s go for an “a” key:
MapKey(&Joystick, TG1, 'a');
Note that the keystroke we want to generate is between 2 symbols to avoid any mix-up. These ' symbols also
define that you will put a keystroke here.
14/60 - T.A.R.G.E.T Script Editor Basics User Manual v1.5
If you are using someone else’s template, all you have to do is to fill in the output area.
Sometimes you will need to enter special keys such as Escape, the space bar and so on.
As these are not simple letters or numbers, you will need to use a particular syntax. If you are using these
commands, you do not need the ' to “encapsulate” the keystroke.
Example:
MapKey(&Joystick, S3, BSP); //when I press S3 on the joystick, backspace is pressed
The following list describes the syntax for the special keys:
L_CTL
R_CTL
L_SHIFT
R_SHIFT
L_ALT
R_ALT
L_WIN
R_WIN
ESC
1110
F1 to F1223
PRNTSCRN 1124
SCRLCK
1125
BRK
1126
BSP
1015
TAB
1016
CAPS
1030
ENT
1043
1058
SPC
1061
INS
1075
HOME
1080
PGUP
1085
DEL
1076
END
1081
PGDN
1086
UARROW
1083
DARROW
1084
LARROW
1079
RARROW
1089
NUML
1090
KP0
1099
KP1
1093
KP2
1098
KP3
1103
KP4
1092
KP5
1097
1102
KP6
KP7
1091
KP8
1096
KP9
1101
KPENT
1108
In this way, you are now able to map a button with whatever keystroke you would like.
Combo keystrokes
Sometimes, to access a particular command in the simulator, you need to use a key combination using two or
more keys at the same. These combos normally use toggle keys such as Control, Alt and Shift.
MapKey(&Joystick, S1, L_SHIFT+ 'b');
//When S1 on the joystick is pressed, generates a “left shift b” combo
Generate B, after an action on the S1 button. Here is another example:
MapKey(&Throttle, BSF, L_SHIFT+L_CTL+ 'c');
generates a “left shift left control c” combo
//When the Throttle boat switch is in the front position,
T.A.R.G.E.T Script Editor Basics User Manual v1.5 – 15/60
“PULSE+” command
Adding PULSE+ in front of a keystroke will transform it into a momentary key press, even if you continue to press
the button. By default, a “pulsed” keystroke is held for 25 milliseconds.
Example:
MapKey(&Joystick, H4P, PULSE+F1);
MapKey(&Throttle, SPDF, PULSE+L_ALT+’b’);
NOTE: If you are new to toggle switches, you must remember that it is not a momentary button. Once it has been
switched to “ON”, it will stay there. If you’ve mapped a keystroke on the ON position, it will simulate the fact that
you’re still holding the key until you flick the switch off. This can be a problem, so to avoid holding down keys
unnecessarily, you can use the “PULSE+” command.
“DOWN+” and “UP+” commands
If you want to simulate the fact that you are still holding a keystroke, you can use the DOWN+ command.
However, you must be careful with this kind of function: using it means that the order to simulate that you are
holding the key will be given and maintained until you order the key to be released with the command UP+. So be
sure to have an UP+ command associated with your DOWN+ command.
Example:
MapKey(&Joystick, H1U, DOWN+'a');
MapKey(&Joystick, H1D, UP+'a');
Now, it’s time for a little break. Try to play with these functions, build files and test them out. Once you feel
comfortable, you can move on to the next functions.
Generating a keystroke with USB codes
Generating a simple keystroke isn’t the best solution. As national keyboard mapping is different, an “a” can be
read as a “q” by the software.
To avoid this problem, we can use USB codes: the USB codes refer to the physical position of keys on an
American keyboard, and not on what’s printed on it. This means that using USB codes is the best way to create a
file which is compatible with different international keyboards. They are not complicated to use, but they make the
file harder to read. Therefore we recommend that you use //comments to note the associated keystroke.
Syntax:
MapKey(&input device, button name, usb event);
MapKey(&Joystick, TG2, USB[0x07]);
// usb code for “D”
In this example, Trigger 2 generates a “d”: “07” is the hexadecimal USB code for “d” key. You can find these
codes in the appendix to this manual. To call up a USB code, the syntax is: USB[0xXX]
16/60 - T.A.R.G.E.T Script Editor Basics User Manual v1.5
Generating a DirectX button output
For this, we simply use the MapKey function again: we just have to replace our USB code or keystroke with the
DirectX button number. Don’t forget that DirectX only offers you buttons 1 to 32 + 8 directions on the hat.
Syntax of DirectX buttons: DX1, DX2, DX3… DX32.
Syntax of DirectX Point Of View button: DXHATUP, DXHATUPRIGHT, DXHATRIGHT,
DXHATDOWNRIGHT, DXHATDOWN, DXHATDOWNLEFT, DXHATLEFT, DXHATUPLEFT.
Example:
MapKeyIO(&Joystick, TG1, DX1);
LED and backlighting control
The script language lets you control the LED state and backlighting intensity of several controllers, such as the
HOTAS Warthog Throttle and MFD pack.
T.A.R.G.E.T supports some devices that were developed a long time before the software was created. The MFD
lighting support in the T.A.R.G.E.T software is a bonus. If you are experiencing issues like MFDs not responding:
stop the script execution, simply unplug and then reconnect the MFDs and then relaunch the script. This can
happen if the USB port was in "sleep" mode while the MFDs were not being used.
Turn "ON" a LED
Syntax:
LED(&input device, LED_ONOFF,LED_CURRENT operator LEDnumber);
The operator is used to control the status:
- will turn "OFF"
+ will turn "ON"
^ will revert the LED status
Example using a MapKey function (here, we turn "ON" LED 1 on the Warthog Throttle when the joystick Hat 2 Up
position is pressed):
MapKey(&Joystick, H2U, LED(&Throttle, LED_ONOFF, LED_CURRENT+LED1));
Turn "OFF" a LED
LED(&input device, LED_ONOFF,LED_CURRENT-LEDnumber);
Notice that we've just changed the + for a - to turn off the LED. Now let's turn "OFF" our Throttle LED1 each time
Hat 2 down is pressed.
MapKey(&Joystick, H2D, LED(&Throttle, LED_ONOFF, LED_CURRENT-LED1));
Change the status of a LED
Sometimes, you may want to change the status of a LED, whatever its current state (to make it blink, for
example).
LED(&LMFD, LED_ONOFF, LED_CURRENT^LED2)
MapKey(&Joystick, H4P, LED(&RMFD, LED_ONOFF, LED_CURRENT^LED2));
Each time we press the hat 4 push button, the LED 2 on the right MFD will change its state.
The backlighting intensity is controlled nearly the same way. The difference is that we have different backlight
steps.
You can control the Backlighting intensity from null to full. The Warthog throttle offers 6 levels of intensity, while
the MFDs have 256 different levels of intensity, from 0 to 255.
T.A.R.G.E.T Script Editor Basics User Manual v1.5 – 17/60
The throttle and the MFDs share the same command, but as the throttle doesn't offer the same number of levels
of lighting, you have to divide the full range of values:
0 to 42 is OFF
43 to 85 is level 1
86 to 128 is level 2
129 to 171 is level 3
172 to 214 is level 4
215 to 255 is level 5
Syntax:
LED(&Input Device, LED_INTENSITY, value of the intensity)
Let's imagine that we want to control the left MFD backlight power with the Warthog throttle EAC switch.
MapKey(&Throttle, EACON, LED(&LMFD, LED_INTENSITY, 255));
MapKey(&Throttle, EACOFF, LED(&LMFD, LED_INTENSITY, 0));
Start a configuration with all lights in the right status.
It's possible to initialize the LED status when launching the script. For this we use the advanced programming
code (see later). The commands must be placed in the same part of the script as your MapKey functions.
//initialize backlight power
ActKey(PULSE+KEYON+LED(&Throttle, LED_INTENSITY, 129)); //set Throttle backlight power to middle
ActKey(PULSE+KEYON+LED(&LMFD, LED_INTENSITY, 129)); //set left MFD backlight power to middle
ActKey(PULSE+KEYON+LED(&RMFD, LED_INTENSITY, 129)); //set right MFD backlight power to middle
//initialize LED status all "OFF"
ActKey(PULSE+KEYON+LED(&Throttle, LED_ONOFF, LED_CURRENT-LED1)); //set LED 1 OFF
ActKey(PULSE+KEYON+LED(&Throttle, LED_ONOFF, LED_CURRENT-LED2)); //set LED 2 OFF
ActKey(PULSE+KEYON+LED(&Throttle, LED_ONOFF, LED_CURRENT-LED3)); //set LED 3 OFF
ActKey(PULSE+KEYON+LED(&Throttle, LED_ONOFF, LED_CURRENT-LED4)); //set LED 4 OFF
ActKey(PULSE+KEYON+LED(&Throttle, LED_ONOFF, LED_CURRENT-LED5)); //set LED 5 OFF
ActKey(PULSE+KEYON+LED(&LMFD, LED_ONOFF, LED_CURRENT-LED1)); //set left MFD LED 1 OFF
ActKey(PULSE+KEYON+LED(&LMFD, LED_ONOFF, LED_CURRENT-LED2)); //set left MFD LED 2 OFF
ActKey(PULSE+KEYON+LED(&RMFD, LED_ONOFF, LED_CURRENT-LED1)); //set right MFD LED 1 OFF
ActKey(PULSE+KEYON+LED(&RMFD, LED_ONOFF, LED_CURRENT-LED2)); //set right MFD LED 2 OFF
To take full advantages of the LED possibilities, we recommend that you learn the multiple output function call
CHAIN, SEQ... Once you’re done, you will be able to interact with the simulator and play with LEDs at the same
time, with just one action on a button. You can also control the LED or backlight with an axis (the Throttle friction
control, for example) with Axmap2 (please see page 27).
Now you can create files that are almost equal to the “Basic” level of the GUI. Let’s move on and conquer the
advanced level.
18/60 - T.A.R.G.E.T Script Editor Basics User Manual v1.5
Using Macro Files
What is a Macro? A Macro can be described as a shortcut to a keystroke combination. This mean that you can
give a name to a specific keystroke in the macro file, and from the main file simply call up that name. There are
two advantages to using macros: they are much easier to read, and are also easier to adapt if you use custom
flight simulator software key mapping.
Example:
Instead of writing:
MapKey(&Joystick, TG1, SPC);
You write:
MapKey(&Joystick, TG1, Weapon_Fire);
And in the macro file you will find:
define
Weapon_Fire
USB[0x2C]
//Weapon Fire
The files used to store macro files are *.ttm files (for Thrustmaster T.A.R.G.E.T Macro).
If you want to use a macro file with your main TMC file, you must call it up (it must be stored in the same folder as
your TMC file). You only have to “include” the file at the beginning of the TMC.
Example:
include "target.tmh"
include "FC2_MIG_29C_Macros.ttm"
int main()
{
if(Init(&EventHandle)) return 1; // declare the event handler, return on error
MapAxis(&Joystick, JOYX, DX_X_AXIS);
MapAxis(&Joystick, JOYY, DX_Y_AXIS);
….
Example of macro file contents:
// Autopilot **********************
define
define
define
define
define
define
define
define
define
Autopilot_Attitude_Hold L_ALT+USB[0x1E]
//Autopilot - Attitude Hold
Autopilot_Barometric_Altitude_Hold L_ALT+USB[0x21]
//Autopilot - Barometric Altitude Hold
Autopilot
USB[0x04]
//Autopilot
Autopilot_Altitude_And_Roll_Hold L_ALT+USB[0x1F]
//Autopilot - Altitude And Roll Hold
Autopilot_Barometric_Altitude_Hold_H
USB[0x0B]
//Autopilot - Barometric Altitude Hold 'H'
Autopilot_Transition_To_Level_Flight_Control L_ALT+USB[0x20] //Autopilot - Transition To Level Flight
Autopilot_Disengage
L_ALT+USB[0x26]
//Autopilot Disengage
Autopilot_Radar_Altitude_Hold
L_ALT+USB[0x22]
//Autopilot - Radar Altitude Hold
Autopilot_Route_following L_ALT+USB[0x23]
//Autopilot - 'Route following'
Note:
Mr. Raphael Bodego has built a free, T.A.R.G.E.T-compatible Macro file generator. It covers the main simulators
on the market and will make your macro file generation quicker than ever: the software is called Sim2TARGET.
It’s not an official Thrustmaster product, but it is a useful tool. You can find it at www.checksix-fr.com.
T.A.R.G.E.T Script Editor Basics User Manual v1.5 – 19/60
Multiple outputs on a single button
TEMPO Command
Tempo is a sub-function of MapKey: it is based on real aviation ergonomics. TEMPO gives the pilot the possibility
of having 2 functions on a single button. A short press will generate the first output; a long press will generate the
other output. This is a feature used on modern fighters.
Syntax:
TEMPO(key1, key2, delay) delay is optional (500 milliseconds is a good value).
Example:
MapKey(&Joystick, TG1, TEMPO('x', 'y'));
//short press X, long press Y
MapKey(&Joystick, TG1, TEMPO('x', 'y', 1000)); //if pressed for more than 1 second
Layers
Another solution to multiply the number of functions on a button is to use layers.
Using layers is like using several parallel programs. You select the layer you want to use by an action on a
“master button”. The layer selector can be a single button or several buttons, but you will have to set the nature of
the button. Keep in mind that in order to access a layer, the associated “master button” must be pressed. For a
complete description of the layers, we suggest you to read the dedicated GUI pages in the T.A.R.G.E.T GUI
manual.
HOTAS Cougar users know this as I/O/U/M/D modifiers.
T.A.R.G.E.T is dedicated to Thrustmaster flight controllers. There are a lot of control possibilities in using Master
layer selector switches:
On the HOTAS Cougar TQS, we recommend using the Throttle’s 3-position switch (called “Dogfight”)
and the S3 Switch on the Joystick.
On the HOTAS Warthog Throttle, we recommend using the 3-position Boat Switch and S4 (the Paddle
switch) on the Joystick.
On the T16000M, any button on the base could do the job.
On the MFD Cougar, the GAIN, SYM, BRT and CON rocker switches are perfect for this function.
Note: You can also assign the master switches to different items.
The default behavior of the layers is momentary: the layer is activated only when you press the master button that
calls up the layer. If you use a toggle switch as a master layer selector, the U, M, D layers will work like toggled
layers. But if you use a T-16000m, this only offers momentary buttons; therefore you may have to press several
buttons at the same time to work in the layers you want.
To manage this issue, the layer can be defined as momentary or toggle:
Momentary: you have to press a button constantly to access and use the layer’s contents.
Toggle: you simply briefly press a button to declare that you are now working in a specific layer.
Main layers
The Main layers are called Up, Middle and Down. By default, you program the Middle layer.
On the HOTAS Cougar we used to call up the U, M and D layers with the Dogfight switch. This switch is a 3position toggle switch and perfectly suits our needs. As it is a toggle switch, the button stays in the position you’ve
just moved into; you will declare that the UMD layer works as momentary, as the button always selects the layer
for you.
20/60 - T.A.R.G.E.T Script Editor Basics User Manual v1.5
Sub-layer
Each layer has an internal sub-layer, knows as In/Out for HOTAS Cougar owners. This is traditionally used as a
momentary layer, activated from a button used as a kind of “Shift”. You can use that layer to control secondary
flight simulator functions, like external views and so on.
In our file, we must declare the switches that will control access to the layer. Here we choose the behavior we
want, or the kind of switch that controls the selection. We have several possibilities:
S4, PSF and PSB are button position names.
SetShiftButton(&Joystick, S4, &Throttle, PSF, PSB);
setting. All layers are momentary.
// no toggle for U/M, usual HOTAS Cougar
SetShiftButton(&Joystick, S3, &Throttle, PSF, PSB, IOTOGGLE);
// toggle only for I/O button.
SetShiftButton(&Joystick, S3, &Throttle, PSF, PSB, IOTOGGLE+UDTOGGLE); // toggle for I/O and U/M/D
buttons.
SetShiftButton(&Joystick, S3, &Throttle, PSF, PSB, UDTOGGLE);
// toggle for U/D buttons.
Note: as Middle is the default layer, you do not have to call it or specify anything, since if you’re not in the U or the
D layer, you can only be in the M layer.
Using layers does not change the way buttons are programmed too much:
MapKeyUMD
To program the Up, Middle and Down layer only, you will have to call up MapKeyUMD
Function(&input device, button name, Up output, Middle output, Down output);
MapKeyUMD(&Joystick, S4, 'u', 'm', 'd'); //when pressing the S4 button, if layer UMD master switch is Up,
generates a “u”, if middle generates an “m” and if Down, generates a “d”
There are no rules for using these features, but UMD is great for controlling 3 different layers: one for Air to Air,
one for Navigation (landing, etc.) and one for Air to Ground.
MapKeyIO
To program the In/Out only sub-layer, you simply call up MapKeyIO:
Function(&input device, button name, Out output, In output);
MapKeyIO(&Joystick, S1, L_SHIFT+ 'b', 'a');
If you press the joystick’s S1 button, depending on the position of the shift button, you will generate “B” or “a”.
If pressing the shift button (In): will generate a “Lshift + b”
If the shift button is not pressed: will generate an “a”
Now let’s imagine that you want to keep the default DirectX mapping on TG1 and generate a “b” when the shift
button is pressed.
MapKeyIO(&Joystick, TG1, DX1, 'b');
T.A.R.G.E.T Script Editor Basics User Manual v1.5 – 21/60
MapKeyIOUMD
MapKeyIOUMD allows you to generate up to 6 different outputs on a single button (although in doing so, it
obviously becomes more difficult to remember all the outputs!).
Each U, M and D layer supports an I/O sub-layer.
MapKeyIOUMD(&Joystick, S4, KP1, KP2, KP3, KP4, KP5, KP6);
This one is clearly not easy to read, but we can change the way we display it.
MapKeyIOUMD(&Joystick, S3,
KP1, // BSF button, if shift button In generate Keypad 1
KP2, //BSF, if shift button Out generate Keypad 2
KP3, // BSM, if shift button In generate Keypad 3
KP4, // BSM, if shift button Out generate Keypad 4
KP5, //BSB, if shift button In, generate Keypad 5
KP6); //BSB, if shift button Out, generate Keypad 6
Written this way, it’s just much easier to read.
With a little practice, you will probably have noticed that sometimes being able to press a key does not provide
total control of the simulator. While having the ability to create an event when a button turns “ON” is OK, it may
also be advantageous to be able to generate an event when a button turns “OFF”.
Generating an event when releasing a button with MapKeyR
MapKeyR works exactly like MapKey, except that the function is activated when the controller button turns “OFF”.
You can now send a keystroke when you release a button.
MapKeyR
MapKeyR also supports In, Out, Up, Middle and Down layers:
MapKeyRIO
MapKeyRUMD
MapKeyRIOUMD
MapKeyR does not have to be equal to the MapKey statement applied to the same button. You can have:
MapKeyUMD(&Joystick, S4, ‘a’, ‘b’, ’c’);
MapKeyRIO(&Joystick, S4, ’y’, ‘z’);
Note: All keys generated on button release (mapped with MapKeyR) are automatically “pulsed”, even if you don't
explicitly put “PULSE + 'key'”. This prevents key sticking. You can cheat using a DOWN+ function.
When using I/O or UMD, the output layer will be equal to the one you’ve used while pressing the button using
MapKeyIO, even if you release the Shift switch.
22/60 - T.A.R.G.E.T Script Editor Basics User Manual v1.5
CHAIN function: Generating events at the same time
CHAIN is the command that gives you the ability to have multiple outputs by pressing a button once. CHAIN
provides more possibilities than just generating several events on one action; it also defines the timing of those
events with the Delay and Lock commands (please see further along in this manual for more details).
CHAIN(PULSE+'a', PULSE+ 'b')
//this chain generates “a” and “b” momentary keystrokes.
Let’s place our CHAIN into a MapKey function.
Syntax:
MapKey(&Device, button name, CHAIN(event 1, event2,…)
Example:
MapKey(&Joystick, H3U, CHAIN(PULSE+'a', PULSE+ 'b')); // When I press the Hat 3 Up direction on the joystick,
“a” and “b” are going to be pulsed.
If you test this line with the Event Tester software, you will notice that:
“a” and “b” are pressed at the same time, then released together. This means that if you use several
combo keystrokes in your CHAIN, they will be mixed up. To avoid this, use the Delay (see later).
If you remove the PULSE for the b keystroke and still hold the HAT3 button Up, “b” will be held until you
release the button. To avoid key holding, you can simply use the PULSE+ command.
You can put an unlimited number of events in a chain, but there is a computer hardware limitation:
The keyboard only supports 5 to 6 keys pressed at the same time, and we have seen that our chain presses the
keys at the same time. Therefore, if a CHAIN contains more than 5 keystrokes, Windows can simply ignore the
output from 6 to the end. There is a simple solution to avoid this.
We know that the “pulse” duration is 25 milliseconds. Let’s wait for our first pulse to finish before pressing the next
keystroke. For this, we will use the Delay command.
D() Delay command
If you insert a simple D() in your CHAIN, you will place the default delay duration between your 2 events. You can
define your own Delay duration by filling the () with the duration of your choice in milliseconds.
MapKey(&Joystick, H3U, CHAIN(PULSE+'a', D(), PULSE+ 'b'));
When testing this code with the Event Tester, you will find that “a” is pressed and then released, and then “b” is
pressed and released.
As the Delay sets the time for the first key to be released, you can create CHAINs with lots of keystrokes and
combo keystrokes. Remember, if you want to separate the keystrokes pulses, use a Delay.
The default delay (and key pulse duration) can be adjusted with the following function call:
SetKBRate(25, 33); // PULSE is 25 ms, D() is 33 ms
T.A.R.G.E.T Script Editor Basics User Manual v1.5 – 23/60
Example:
You can use a CHAIN to create automatic chaff and flare programs or manage the most important radio
messages. In most of the simulators, to manage radio, you press a key that opens a list of possibilities, then you
select a choice in a sub-menu.
Let’s imagine that to call your wingman, you need to press the “w” key, then order him to Engage (F2) your
current target (F3).
With the Warthog Throttle radio switch, you can use one of the directions to create a shortcut button to order your
wingman to attack your current target. Instead of 3 keys to press successively, you will only have one button to
press.
You must write this line of code:
MapKey(&Throttle, MSD, CHAIN(
PULSE+'w', //call wingman
D(),
PULSE+F2, //Engage radio Menu
D(),
PULSE+F3 //My current Target
));
Or this way:
MapKey(&Throttle, MSD, CHAIN(PULSE+'w', D(),PULSE+F2, D(), PULSE+F3)); //wingman attack my target
shortcut
If the keystroke program is generated too quickly for the simulator, simply increase the delay value, like this for
example:
MapKey(&Throttle, MSD, CHAIN(
PULSE+'w', //call wingman
D(50),
PULSE+F2, //Engage radio Menu
D(50),
PULSE+F3 //My current Target
));
Sometime, you must protect your CHAIN keystrokes from any keyboard disturbance. All other keystrokes
generated from other buttons will have to wait for completion (or specific parts of the CHAIN) before any other
keystroke events are generated.
To achieve this, you simply use the LOCK+ command
LOCK Command
The LOCK command protects your keystroke generation from others keystroke-generated events. This way, your
chain cannot be broken by another event.
Syntax:
At the beginning of the area you wish to lock: LOCK+Keystroke
At the end of the locked area: LOCK
Examples:
MapKey(&Joystick, H2U, CHAIN(LOCK+KP1, KP2, LOCK));
24/60 - T.A.R.G.E.T Script Editor Basics User Manual v1.5
Or a slightly more complex one:
MapKey(&Joystick, TG1, CHAIN(
LOCK+
//Open the locked area
PULSE+'a',
D(1000),
//Wait 1 second
PULSE+'b',
D(1000),
//Wait 1 second
PULSE+'c',
D(1000),
//Wait 1 second
LOCK
//Close the locked area, unlock
));
When starting the CHAIN, Lock then pulse 'a', wait 1 second, then pulse 'b', wait 1 second then pulse 'c' and
finally unlock.
Note: If you have a very long CHAIN, you can create several LOCK areas in your CHAIN and leave some time for
any events from another button.
Example:
MapKey(&Joystick, TG1, CHAIN(
LOCK+
//Toggle lock
PULSE+'a',
D(1000), //Wait 1 second
PULSE+'b',
D(1000), //Wait 1 second
LOCK,
//Unlock
D(33),
//Delay in milliseconds for possible // keystroke event
LOCK+
//Toggle Lock
PULSE+'c',
D(1000),
PULSE+'d',
LOCK
//Unlock
));
Sequences
The SEQ (from sequence) function is used to generate different keystrokes each time you press the button. This
way you can manage all external views or select your weapons just by pressing one button:
MapKey(&Joystick, S1, SEQ('a', 'b', 'c'));
In this case, pressing TG1 once will provide an 'a' that can be held until you release the trigger; press the trigger
again and you will get 'b'; press again and you will get a 'c' that you can hold, and then from the beginning again –
'a'...
You can define some keystrokes to be pulsed if needed:
MapKey(&Joystick, S1, SEQ('a', PULSE+'b', 'c'));
A SEQ can be included in the whole MapKey and MapKeyR family:
MapKeyIOUMD
(&Joystick, H2U,
'a',
SEQ(KP1, KP2, KP3, KP4),
'c',
'd',
'e',
'f');
//Hat2 on the joystick UP
Please note that you can call up a Sequence inside another Sequence to allow you to construct more complex
structures, like in the following example (although it is unlikely that you will need to do so):
T.A.R.G.E.T Script Editor Basics User Manual v1.5 – 25/60
MapKeyR(&Joystick, TG1, SEQ(SEQ('1', '2'), R_SHIFT+'s') );
This construction will generate the following sequence of key pulses on each TG1 release: 1, S, 2, S, 1, S...
You can also call up a CHAIN. For example:
MapKey(&Joystick, H2U, SEQ(
CHAIN(PULSE+KP1, D(), PULSE+KP2),
CHAIN(PULSE+KP3, PULSE+KP4)
));
//First CHAIN
//Second CHAIN
CHAIN and SEQ can be combined to suit your needs (including one inside the other) to obtain complex
behaviors.
For instance, you can toggle the 'a' key on TG1 (on first action on TG1 press 'a', on second action on TG1 release
'a'), then press 'b' after the default delay time:
MapKey(&Joystick, TG1, CHAIN(SEQ(DOWN+'a', UP+'a'), D(), PULSE+'b'));
26/60 - T.A.R.G.E.T Script Editor Basics User Manual v1.5
Axes
We already have learned to associate physical axes with DirectX axes. Now we will fine-tune the behavior of
axes. The first point is to define the kind of axis we want to edit. If it is a mechanically centered axis, like the
Joystick X and Y axes, we will use SetSCurve. If it is a Slider axis like a Throttle or brake, we will use SetJCurve.
SetSCurve
SetSCurve is the function used to fine-tune your Joystick axis and rudder axes response.
Syntax:
SetSCurve(&Device, axis name, left_deadzone, center_deadzone, right_deadzone, curve, scale);
SetSCurve(&Throttle, SCX, 0, 30, 0, 0, -4);
Or
SetSCurve(&Joystick, JOYX,
5,
//Left Deadzone set to 5%
2,
//Center Deadzone set to 2%
5,
//Right Deadzone set to 5%
3,
//Curve set to 3
0
//Scale/zoom neutral
);
The Deadzones are value ranges where nothing happens if the axis cursor reaches the zone.
The value is a % of the total axis range. This higher the value, the larger the Deadzone. Be careful with
deadzones, as you can easily negatively impact your controller's behavior.
The center Deadzone: You can use this one if you want to ignore small axis movements when the axis
cursor reaches the center area (usually set between 0 to 5%).
The Left and Right Deadzones: Increasing these areas will make the maximum and minimum axes
values reached before the physical limits of the mechanical axis travel. The result is that the stick
sensitivity increases (usually not used).
The Curve parameter defines the controller’s sensitivity. With this parameter, you choose to make the stick:
Less sensitive in the center position, but more sensitive at the extreme axis values.
More sensitive in the center position, but with more precise control at the extreme axis values.
There is a range of 40 values: -20 to +20. Negative values make the axis more sensitive around the center, while
positive values provide better control in the center position.
The Scale is a new parameter. Scale is a kind of multiplier/divider:
With a negative value it will limit the travel on the axis.
With a positive value it will make the minimum and maximum values on the axis reached before the
mechanical axis limits.
Using scale is the best way to fine-tune a cursor control with a ministick or the Warthog Throttle “Slew Control”. If
you find it too sensitive in the simulator, simply enter a negative value.
The higher the value, the more the scale will affect the axis (use values between -20 and 20; zero has no effect).
Example of settings to control the mouse with the HOTAS Warthog Throttle slew control:
MapAxis(&Throttle, SCX, MOUSE_X_AXIS, AXIS_NORMAL, MAP_RELATIVE);
SetSCurve(&Throttle, SCX, 0, 10, 0, 0, -4);
MapAxis(&Throttle, SCY, MOUSE_Y_AXIS, AXIS_REVERSED, MAP_RELATIVE);
SetSCurve(&Throttle, SCY, 0, 10, 0, 0, -4);
T.A.R.G.E.T Script Editor Basics User Manual v1.5 – 27/60
SetJCurve
SetJCurve is dedicated to adjusting the sensitivity of the axes used to control a throttle, mixture, propeller pitch
and brakes. You define a particular DirectX axis value that must be emulated when the physical axis reaches a
particular value. The default linear response is combined with these 2 parameters.
Application example:
You can use it to make the throttle more or less sensitive when at high RPM.
You can use it to make the software afterburner trigger match the physical controller’s trigger.
Syntax:
SetJCurve(&device, axis name, physical axe value, DirectX output value);
The value and DirectX output value are in percentages.
Example:
SetJCurve(&Throttle, THR_LEFT, 80, 95);
have reached 95% of the axis value.
//At 80% of the physical controller’s axis travel, the DirectX axis must
SetCustomCurve
Sometimes you may need to build your own curve or add zones where the axis output value almost doesn’t
change, or dead zones. SetCustomCurve gives you the opportunity to do exactly what you want. For this you
just need to define a LIST of positions associated with the DirectX output value on an axis. The curve is blended
to match your points. Values are in %.
NOTE: a SetCustomCurve Statement cannot be used in an EXEC function.
Syntax:
SetCustomCurve(&device, axis name, LIST(Axis physical position 1, Axis output Value 1, Axis physical position 2,
Axis output value 2, …);
Examples:
SetCustomCurve(&Joystick, JOYX, LIST(0,0,
response
25,25,
50,50,
75,75, 100,100)); //create a perfect linear
SetCustomCurve(&Joystick, JOYX, LIST(0,0,
the axis, between 45% and 55%.
45,50,
55,50,
100,100));//create a deadzone in the middle of
SetCustomCurve(&Joystick, JOYX, LIST(0,0,
behaviour.
25,50,
50,0,
75,50, 100,0)); //create useless but funny axis
Axis control with buttons
You may also manage axes with any kind of button. This is a good alternative solution to accurately control a
mixture or a range parameter without mapping a physical axis controller.
Syntax:
AXIS(DirectX axis name, increment, delay before repeat);
Example: virtual mouse over the Joystick HAT 2
MapKey(&Joystick, H1U, AXIS(MOUSE_Y_AXIS, -80, 20));
MapKey(&Joystick, H1D, AXIS(MOUSE_Y_AXIS, 80, 20));
MapKey(&Joystick, H1L, AXIS(MOUSE_X_AXIS, -80, 20));
MapKey(&Joystick, H1R, AXIS(MOUSE_X_AXIS, 80, 20));
28/60 - T.A.R.G.E.T Script Editor Basics User Manual v1.5
Axis trimming
Trim functions are fairly easy to use; but if you want to use them effectively, you must be familiar with the EXEC
function described later in this manual.
A trim value is an offset applied to the real value of the axis. You read the axis value, add or subtract the value of
the trim and then send it to DirectX.
Trim is useful for joystick axes and rudder axes. We will use it to tweak the aircraft’s control surface to get a more
neutral action for the Joystick and the rudder.
Note: In T.A.R.G.E.T, the trim provides 2048 values (+/- 1024) to cover the full axis range.
Most simulators offer an internal trim solution. You are free to use the T.A.R.G.E.T trim or the default trim. One
advantage of simulator trims is that you can have a graphic display that explains the current trim value applied.
One advantage of the T.A.R.G.E.T trim is that it is fully adjustable, and you can choose how you define trim
values.
With T.A.R.G.E.T, we can:
Add or subtract a trim value in relation to an axis. This is the normal way to manage a digital trim: each
time you press a button, the axis offset is changed. You can define the offset value and its direction.
Force a trim value. We will use this value to reset trims, for example. In that case we will define the offset
to have a zero value.
Read an axis value and apply it as a trim value to the same axis or another axis and apply some
mathematics if needed.
Typical application (don’t worry if you can’t understand the lines: that is because the EXEC function is
described later. You can simply copy and paste them into your file):
Add or subtract a trim
MapKey(&Joystick, H1U, EXEC("TrimDXAxis(DX_Y_AXIS, -10);"));
MapKey(&Joystick, H1D, EXEC("TrimDXAxis(DX_Y_AXIS, 10);"));
MapKey(&Joystick, H1L, EXEC("TrimDXAxis(DX_X_AXIS, -10);"));
MapKey(&Joystick, H1R, EXEC("TrimDXAxis(DX_X_AXIS, 10);"));
In these lines, each time I press a button, it offsets the joystick X or Y axis by 10 points. If I hold the button down,
it will have no effect; the trim value is only “EXECuted” once. If I want the offset value to loop until I release the
button, I will use the REXEC function (please see later on in this manual for an explanation).
MapKey(&Joystick, H1L, REXEC(0, 100, "TrimDXAxis(DX_X_AXIS, -5);"));
MapKey(&Joystick, H1R, REXEC(0, 100, "TrimDXAxis(DX_X_AXIS, 5);"));
MapKey(&Joystick, H1U, REXEC(1, 100, "TrimDXAxis(DX_Y_AXIS, -5);"));
MapKey(&Joystick, H1D, REXEC(1, 100, "TrimDXAxis(DX_Y_AXIS, 5);"));
Force a trim value
MapKey(&Joystick, S4, EXEC("TrimDXAxis(DX_X_AXIS, SET(0));TrimDXAxis(DX_Y_AXIS, SET(0));"));
I force the trim value to zero; the result is a trim reset. Here, when I press the S4 button on the Joystick, I set the
X and the Y axis trim offset to zero.
Read an axis value and apply it as trim offset to the same axis
MapKey(&Joystick, S1, EXEC("TrimDXAxis(DX_X_AXIS, CURRENT);TrimDXAxis(DX_Y_AXIS, CURRENT);"));
When I press the Joystick S1 button, I memorize the X and Y axis position and calculate the difference to the
center of the axis, and then I apply it to the X and Y axis. It simply works in the same way as the DCS BlackShark
trim. In this case, the use of a cancel trim event is highly recommended.
T.A.R.G.E.T Script Editor Basics User Manual v1.5 – 29/60
This next one is a little bit more complicated:
MapKey(&Joystick, S1, EXEC("TrimDXAxis(DX_Y_AXIS, SET(Throttle[THR_FC]/32));"));
When I press the Joystick S1 button, I read the THRrottle_Friction axis value, I divide it by 32 and then I apply the
offset. Why? Simply because my axis has 65536 values; but my trim offers 2048 steps to cover the full range.
With 65536/32=2048 I “scale” my axis value to a trim-compatible value.
30/60 - T.A.R.G.E.T Script Editor Basics User Manual v1.5
KeyAxis: Generating events from an axis
Sometimes you may need to use an axis to generate events like keystrokes, for example: we call this a “digital
axis”. If the flight simulator software gives you the ability to choose between traditional axis mapping and a digital
axis, keep things simple and choose the traditional, analog method.
Digital axes are recommended when all the analog axes are already being used, or when the function you want to
control cannot be associated with an axis.
There are several possible cases and possible configurations, so we will use as many examples as possible.
Syntax:
KeyAxis(&Device, axis name, ‘concerned layer’, kind of digital axis program);
‘Concerned layers’
Here you define which layers are concerned by the function.
Examples:
KeyAxis(&Joystick, JOYX, '',... //will be applied to all layers
KeyAxis(&Joystick, JOYX, 0,... //will be applied to all layers
KeyAxis(&Joystick, JOYX, 'i',...//will be applied only when the “In” toggle is active
KeyAxis(&Joystick, JOYX, 'ud',...//will be applied only in the Up and Down Layers.
Note: logically, there is no point including “i” and “o” at the same time because
‘ioud’ = ‘ud’,
It is the same when on; if it is always active, there is no point declaring all the layers.
‘ioumd’ = 0 = ''
Depending on how the simulator manages keystrokes and functions, there can be several different requirements
to match the input flight simulator software logic. To support all cases, we have created 2 ways to map the axes.
Note: HOTAS Cougar users usually choose between 5 types of digital axis. All HOTAS Cougar digital axis types
can be achieved in a different way by T.A.R.G.E.T.
AXMAP1
AXMAP1 is the first one. In mode 1, it is the “direction” of the axis that defines the output event (keystrokes, for
example).
Use it when the simulator offers one key to increase a value, and another key to decrease it.
Note: AXMAP1 is able to simulate HOTAS Cougar types 1, 5, 6.
Example:
You can adjust the engine rpm with Key Pad “+” and “-”.
Syntax:
KeyAxis(&Device, axis name, layer(s), AXMAP1(number of zones, up event, down event, optional center event);
Example:
KeyAxis(&Joystick, JOYX, 0, AXMAP1(5, PULSE+'r', PULSE+'l'));
T.A.R.G.E.T Script Editor Basics User Manual v1.5 – 31/60
Or:
KeyAxis(&Joystick, JOYX, 0,
AXMAP1(
//use AXMAP mode 1
5,
//Divide the axis range into 5 equal areas
PULSE+'r', //when axis value is increasing, pulse "r" in each area
PULSE+'l' //when axis value is decreasing, pulse "l" in each area
));
Moving the HOTAS Warthog joystick X axis from left to right will generate:
rrrrr
Returning from full right to full left and then going full right again will generate:
lllllrrrrr
Note: the keystrokes have the PULSE+ flag associated, to avoid the keys being held.
This use of AXMAP1 will be perfect for controlling the zoom factor of radar, a camera or a throttle that is
controlled by 2 keys.
AXMAP1 offers an optional “center of axis” event generation. To use it, keep in mind that the center position
event is not a zone, it is a value. If there is a zone over the center position, the event will not be generated. This
means that all odd zone numbers are incompatible with the “center of axis” events, as our axis is divided into
equal zones.
KeyAxis(&Joystick, JOYX, 0,
AXMAP1(
//use AXMAP mode 1
2,
//Divide the axis range into 2 equal areas
PULSE+'r', //when axis value is increasing, pulse "r" in each area
PULSE+'l', //when axis value is decreasing, pulse "l" in each area
PULSE+'c',
));
Will generate “rcr” if you move the stick’s X axis from full deflection left to full deflection right. With:
KeyAxis(&Joystick, JOYX, 0,
AXMAP1(
//use AXMAP mode 1
3,
//Divide the axis range into 3 equal areas
PULSE+'r', //when axis value is increasing, pulse "r" in each area
PULSE+'l', //when axis value is decreasing, pulse "l" in each area
PULSE+'c',
));
You will only generate “rrr” if you move the stick’s X axis from full deflection left to full deflection right. The pulsed
“c” is ignored.
Remember that you can use the Null Event “0” when you do not want to generate anything.
32/60 - T.A.R.G.E.T Script Editor Basics User Manual v1.5
For these examples we have used simple events, but if you want, you can use our usual MapKey functions like
CHAIN, SEQ, SEQ inside a CHAIN…
KeyAxis(&Joystick, JOYX, 0,
AXMAP1(
2,
CHAIN(
LOCK+PULSE+'h',D(),
PULSE+'e',D(),
PULSE+'l',D(),
PULSE+'l',D(),
PULSE+'o',LOCK),
CHAIN(
LOCK+PULSE+'g',D(),
PULSE+'o',D(),
PULSE+'o',D(),
PULSE+'d',D(),
PULSE+'b',D(),
PULSE+'y',D(),
PULSE+'e', LOCK),
CHAIN(
LOCK+PULSE+'e',D(),
PULSE+'c',D(),
PULSE+'h',D(),
PULSE+'o', LOCK),
));
AXMAP2
AXMAP2 is the second Digital axis mode. AXMAP2 generates functions that only depend on the zone.
Use this mode when the simulator offers shortcuts to direct parameter values, or to control a cursor.
Note: AXMAP2 is able to simulate HOTAS Cougar types 2, 3, 4.
Example: if the engine’s RPM is controlled with the 0, 1, 2, 3, 4, 5, 6, 7, 8, 9 keys.
Syntax
KeyAxis(&Device, axis name, layer(s), AXMAP2(number of zones, event1, event 2, event3…);
Note: the number of zones must be equal to the number of events.
Example:
KeyAxis(&Throttle, THR_RIGHT, 'ioumd', AXMAP2(5, PULSE+KP5, PULSE+KP4, PULSE+KP3, PULSE+KP2,
PULSE+KP1));
Or:
KeyAxis(&Throttle, THR_RIGHT, 'ioumd',
AXMAP2(
5,
PULSE+KP5,
PULSE+KP4,
PULSE+KP3,
PULSE+KP2,
PULSE+KP1
));
Moving the right Warthog Throttle from the “IDLE” position to “MAX” will generate 2345: the zone number 1 is
ignored, as you started from that zone.
T.A.R.G.E.T Script Editor Basics User Manual v1.5 – 33/60
Moving the right Warthog Throttle from the “MAX” to “IDLE” position will generate 4321: the zone number 5 is
ignored, as you started from that zone.
Note: the keystrokes have the PULSE+ flag associated, to avoid the keys being held.
Now let’s imagine that we want to control a radar Target Designation Cursor with the HOTAS Warthog throttle
“Slew Control” device. The simulated cursor is controlled with the arrow keys.
Note: With the HOTAS Cougar, we would have used a Type 3 digital axis. Here we will simply set up AXMAP2 to
perform like the old Cougar Type 3.
We will divide each axis into 3 zones:
Down or Left
Center (where we don’t want the cursor to move)
Up or Right
As we do not want any events in the center zone, we will have to use a “null” event(0).
KeyAxis(&Throttle, SCX, 0, AXMAP2(3, LARROW, 0, RARROW));
KeyAxis(&Throttle, SCY, 0, AXMAP2(3, UARROW, 0, DARROW));
We did not use the PULSE+ command because the arrow keys must be pressed for a constant Target
Designation Cursor movement.
The KeyAxis commands are really flexible to use, but the solution to equally divide up the axis range cannot be
adapted for all situations. This is where the LIST command comes in.
LIST
LIST is a command used to replace our “axis range divisor”, the number of zones. LIST allows custom size zone
building: it’s useful when you want to place an event accurately. To use LIST, you need simply replace the “zone”
number by LIST(ranges of zone in %).
LIST(0,10,90,100) = 3 zones, one from 0 to 10%, one from 10 to 90% and one from 90 to 100%
Examples:
KeyAxis(&Joystick, JOYX, 0,AXMAP2(LIST(0,10,90,100), PULSE+'l',0, PULSE+'r')); //when the joystick axis value
enters the last 10% of the left deflection of the joystick, pulse an “l”; when entering the last 10% of the right of the
axis, generate an “r” keystroke.
Let’s activate a boost (“b” keystroke) when the left Throttle passes over the afterburner trigger:
KeyAxis(&Throttle, THR_LEFT, 0, AXMAP1(LIST(0,80,100), 0, PULSE+'b'));
You will notice that the “b” keystroke is activated only when you enter the axis afterburner range (80 to 100%). If
there is a keystroke to shut down the boost, we can pulse it when we reach the first zone. If “n” is the keystroke to
deactivate the boost:
KeyAxis(&Throttle, THR_LEFT, 0, AXMAP1(LIST(0,33,100), PULSE+'n', PULSE+'b'));
34/60 - T.A.R.G.E.T Script Editor Basics User Manual v1.5
LockAxis
LockAxis is a Function that “freezes” the value of a particular axis. You can use it in your main file and in an
EXEC flag (see advanced script).
By playing with layers and digital axes, you can easily use one physical axis to control several digital axes without
moving the DirectX axis value.
Syntax:
"LockAxis(&Device, Axis name, status);
LockAxis(&Throttle, THR_LEFT, 1);
LockAxis(&Throttle, THR_LEFT, 0);
//will lock the Warthog left throttle
//will unlock the Warthog left throttle
Extra functions
The script code also supports some useful functions. These functions are used to give you more flexibility, or help
you to be as efficient as possible.
Launch software from a script
It can be useful to launch the simulator or another application from the script.
As the \ is a special character from the code point of view, we have to double it to get things working well. Pay
special attention to the " and the way the function is built: it's very easy to make a mistake here. Place it just
before your MapKey functions.
Syntax:
system("spawn -w\"software main folder" \ "exe shortcut"");
Here are some examples:
system("spawn -w \"D:\\DCS A-10C\" \"D:\\DCS A-10C\\bin\\Launcher.exe\"");
system("spawn -w \"D:\\Rise of Flight\\bin_game\\release\" \"D:\\Rise of
Flight\\bin_game\\release\\rof_updater.exe\"");
Reject a device from a virtual controller
You can choose which devices will be included in the virtual controller. If you want to keep one working 100% in
DirectX mode, simply reject it with the EXCLUDE function.
Syntax:
Configure(&Device name, MODE_EXCLUDED);
This line must be placed at the beginning of file, just after the first {.
Example: here only the Warthog Joystick and Throttle can be programmed.
include "target.tmh"
int main()
{
Configure(&HCougar,MODE_EXCLUDED);
Configure(&T16000,MODE_EXCLUDED);
Configure(&LMFD,MODE_EXCLUDED);
Configure(&RMFD,MODE_EXCLUDED);
if(Init(&EventHandle)) return 1;
SetKBRate(32, 50);
SetKBLayout(KB_FR);
}
int EventHandle(int type, alias o, int x)
T.A.R.G.E.T Script Editor Basics User Manual v1.5 – 35/60
{
DefaultMapping(&o,x);
}
Display a text message in the Script Editor "Output Window"
The script lets you display messages in the dedicated area of the Script Editor. This can be useful when you want
to test a complicated logic structure, or simply display your name while a file is launched.
Syntax:
printf("text to print \xa");
Example:
printf(" this file has been written by John Doe \xa");
This function can be called from the main part of your script file. If you want to execute it in a MapKey, you will
have to use the EXEC advanced function. In that case, the syntax becomes a little bit more complicated:
Syntax:
MapKey(&Device, button name, EXEC("printf(\" text you want to display \\xa\");"));
Example:
MapKey(&Joystick, S2, EXEC("printf(\" i've just pressed S2 \\xa\");"));
36/60 - T.A.R.G.E.T Script Editor Basics User Manual v1.5
Advanced features
Before you use the following code, make sure that you have mastered the previous features. Until now, we have
only used the predefined T.A.R.G.E.T functions. We are now going to start using the script's full power and
flexibility. Let’s start with an incredible function: EXEC.
EXEC: Opening Pandora’s box
This is a powerful function which basically simply “executes” the associated function or code.
In fact, this function is made to be used in the default T.A.R.G.E.T function (MapKey, etc.) and open a direct door
to the script code or call up other functions.
There are multiple ways to use EXEC: you can use EXEC to manage functions, or the execute script code for
logical flag or pure code.
Managing functions
EXEC can be used in all the MapKey family, KeyAxis, etc. You can place EXEC in your CHAIN, SEQ or TEMPO,
as it is just an event. It’s very simple to use, because you already know the functions.
For this example, we will use EXEC to change the Warthog Joystick X and Y axis curves when the user presses
the S4 paddle switch.
Syntax:
EXEC(“……”)
MapKey(&Joystick, S4, EXEC("SetSCurve(&Joystick, JOYX, 0, 0, 0 ,5, 0); SetSCurve(&Joystick, JOYY, 0, 0, 0 ,5, 0);"));
Notice that in the EXEC() we have added “ at the beginning of the function list, and at the end.
This isn’t very easy to read, so we can also separate the functions by jumping to the next line, but we will have to
limit all functions with “:
MapKey(&Joystick, S4,
EXEC(
"SetSCurve(&Joystick, JOYX, 0, 0, 0 ,5, 0);"
"SetSCurve(&Joystick, JOYY, 0, 0, 0 ,5, 0);"
));
This way it’s much easier to read… Once executed (Paddle Switch pressed momentarily), the new setting will
stay active.
If you want to return to the original setting, you can simply apply a SEQuence to your S4 button. The first event
generated by an action on the S4 button will EXEC a first batch of functions. A second press will execute another
batch of functions that return to the default settings:
MapKey(&Joystick, S4,
SEQ( //open the sequence
EXEC( //open the first EXEC
"SetSCurve(&Joystick, JOYX, 0, 0, 0 ,5, 0);"
"SetSCurve(&Joystick, JOYY, 0, 0, 0 ,5, 0);"
), //close the first EXEC
EXEC( //open the second EXEC
"SetSCurve(&Joystick, JOYX, 0, 0, 0 ,0, 0);"
"SetSCurve(&Joystick, JOYY, 0, 0, 0 ,0, 0);"
) //close the second EXEC
) //close the Sequence
); //close the MapKey
T.A.R.G.E.T Script Editor Basics User Manual v1.5 – 37/60
This example was just a little demonstration of the capabilities of EXEC. You could also write this by using a
SEQuence that contains 2 CHAINs of 2 EXEC per CHAIN (one per axis). But this way seems to be simpler.
With EXEC you can also:
Remap all axes (swap, move, revert, work as absolute or relative, etc.).
Change the settings for axes (Deadzones, curves, Scale, etc.).
Change digital axis behavior.
Change all your T.A.R.G.E.T functions, etc.
Avoid using some logical flags.
In short, simply by calling up EXEC, you can apply a totally new configuration to your controller.
You can also use EXEC as a kind of mini-layer, or dynamic key mapping.
For example, in DCS Flaming Cliffs 2, the autopilot modes are directly activated by dedicated keystrokes. This is
not realistic behavior for an autopilot and it makes the keystroke delicate to manage if you want to have realistic
Autopilot handling with the dedicated panel on the HOTAS Warthog base.
The solution is to change the Autopilot Engage/Disengage button output depending on the LASTE switch position.
The LASTE toggle switch position will define the APENG output keystroke.
MapKey(&Throttle, APPAT, EXEC("MapKey(&Throttle, APENG, L_ALT+'6');"));
MapKey(&Throttle, APAH, EXEC("MapKey(&Throttle, APENG, L_ALT+'2');"));
MapKey(&Throttle, APALT, EXEC("MapKey(&Throttle, APENG, L_ALT+'4');"));
We do not even need to apply a default MapKey function to APENG, as this is done by the LASTE toggle switch.
However, you will need to move it once to execute one of the functions to get the APENG that generates a
keystroke.
If you EXEC a function generating an event linked to a button state, the function will be loaded in the
memory, but will be executed only when the related button is pressed.
To keep your CPU’s resources for your flight simulator software, using SEQ, CHAIN, EXEC, TEMPO, AXIS,
LIST inside an EXEC is forbidden. This limit can be overcome by creating a function which contains the
SEQ, CHAIN, EXEC, TEMPO, AXIS, LIST and calls up that function in the EXEC statement (please see the
Creating your own function chapter in this manual for more details).
38/60 - T.A.R.G.E.T Script Editor Basics User Manual v1.5
REXEC
REXEC is a function built to repeat an EXEC until you want to stop by releasing the button or sending the order to
stop. You can run several REXECs at the same time: this is why the first parameter of REXEC is a “handle”. The
handle is a reference number, like an ID (between 0 and 99). This way, if you have several REXECs running, you
can specify the one you want to stop. The second parameter of REXEC is a delay in milliseconds: use it to define
the repeat rate. The smaller the value, the faster the REXEC will “loop”.
REXEC is useful for trimming or simply to launch an event or a function that will loop.
Syntax:
REXEC(Handle, Delay, “code goes here”, optional RNOSTOP)
By default, REXEC will loop until you release it. You can also force it to loop until you order it to stop. For this you
will need to add the optional RNOSTOP.
To stop the REXEC, you simply have to use StopAutoRepeat(HANDLE number) in an EXEC statement:
EXEC("StopAutoRepeat(4);")
//stop the REXEC number 4
Example:
MapKey(&Joystick, H1L, REXEC(4, 100, "TrimDXAxis(MOUSE_X_AXIS, -10);", RNOSTOP));
MapKey(&Joystick, H1R, EXEC("StopAutoRepeat(4);"));
NOTE: if you include an event that takes some time (like a chaff and flare sequence), be sure that your event is
finished before you REXECute it.
In the next event we could have used 4 different handles, but as we can’t press all buttons at the same time, we
can use the same handle per axis.
MapKey(&Joystick, H1L, REXEC(0, 100, "TrimDXAxis(DX_X_AXIS, -5);"));
MapKey(&Joystick, H1R, REXEC(0, 100, "TrimDXAxis(DX_X_AXIS, 5);"));
MapKey(&Joystick, H1U, REXEC(1, 100, "TrimDXAxis(DX_Y_AXIS, -5);"));
MapKey(&Joystick, H1D, REXEC(1, 100, "TrimDXAxis(DX_Y_AXIS, 5);"));
To keep your CPU resources for your flight simulator software, using SEQ, CHAIN, EXEC, TEMPO, AXIS,
LIST inside an REXEC is forbidden. This limit can be overcome by creating a function that contains the
SEQ, CHAIN, EXEC, TEMPO, AXIS, LIST and calls that function in the REXEC statement (please see the
Creating your own function chapter in this manual for more details).
T.A.R.G.E.T Script Editor Basics User Manual v1.5 – 39/60
DeferCall
DeferCall is a command used to call up a function after a programmed delay. This is the best tool for inserting a
delay into an EXEC or an REXEC statement. The delay is started when the line is EXECuted. This means that if
you want 3 events, spaced by one second apart:
For the first event, you will not use DeferCall.
For the second event, you will use a DeferCall of 1000 milliseconds.
For the third event, you will use a delay of 2000 milliseconds.
Syntax:
DeferCall(Delay, code goes here);
Example:
MapKey(&Joystick, H4U, EXEC("ActKey(KEYON+PULSE+'a'); DeferCall(1000, &ActKey, KEYON+PULSE+'b');
DeferCall(2000, &ActKey, KEYON+PULSE+'c');));
40/60 - T.A.R.G.E.T Script Editor Basics User Manual v1.5
Script Syntax
Now let’s go a little bit deeper. EXEC allows us to execute some code. The goal of this document isn’t to teach
you to code (unfortunately, this requires a great deal of practice and would make this manual extremely boring).
Therefore, we will only use the most basic features as examples, and then you can build our own functions. Let’s
start off with some vocabulary.
The following Keywords are supported
char, byte, short, word, int, alias, float, struct, include, if - else, do - while, while, return, goto, break
Operators
Operators are used for compare, transform, math, etc. We will use them to check a status to validate an output.
Reference:
& (placed before a variable) – obtain the physical address of the variable
Double Reference: && (placed before a variable) – obtain the physical address of the variable buffer
Logical NOT:
!
Multiplication:
*
Division:
/
Modulus:
%
Addition:
+
Subtraction:
Right shift:
>>
Left Shift:
<<
Greater than:
>
Less than:
<
Less than or equal to: <=
Greater than or equal to: >=
Equal to:
==
Not equal to:
!=
Bitwise AND:
&
Bitwise XOR:
^
Bitwise OR:
|
Very few of us are able to effectively use these operators, as they are real programming tools. However, with
some basic examples, we can decode them and see how and when they are used.
T.A.R.G.E.T Script Editor Basics User Manual v1.5 – 41/60
Generating keystrokes with pure script
(Or how to be able to generate a keystroke without MapKey).
The script has its own syntax to press a key, activate an event and sometimes a custom function. This is called
ActKey. ActKey is compatible with our previous flags like “PULSE+, L_SHIFT…”
ActKey(KEYON+'x');
//Will press and hold the “x” key
ActKey('x');
//Will release the “x” key
You must use KEYON flag to turn the key “On”.
ActKey(PULSE+KEYON+'A');
//Will pulse the “a” key
ActKey(PULSE+L_SHIFT+KEYON+'b');
//Will pulse L shift+ “b” combo
ActKey(PULSE+KEYON+autopilot);
//Will activate the autopilot function
Example:
MapKey(&Joystick, S2, PULSE+’j’);
=
MapKey(&Joystick, S2, EXEC("ActKey(PULSE+KEYON+'j');"));
The only difference is that in the second line, we have used EXEC to launch script code instead of using the usual
function.
Most of the time, we will use ActKey as the result of an input condition, for example a logical statement. Notice the
way a switch's physical position is written in the first EXEC.
MapKey(&Joystick, S4, EXEC(
"if(Joystick[TG1]) ActKey(PULSE+KEYON+'a');"
));
=
MapKey(&Joystick, S4, EXEC(
MapKey(&Joystick, TG1, PULSE+'a');
));
Note: You can also use USB codes inside an ActKey.
42/60 - T.A.R.G.E.T Script Editor Basics User Manual v1.5
Logical Flags
A Logical Flag is a box used to store a value. With some basic logic requests, you can create events that depend
on the content of the Flag.
Note: Cougar had 32 programmable Logical Flags. The flag value was zero or one.
With T.A.R.G.E.T, there are no limits on the number of flags, and the flag can store any kind of value, letter or
number. You must also give your flag a name. Therefore it is much more comfortable to use compared to the old
Cougar script: it just feels easier.
Depending on the contents of the flag, you can create an event. As the flag content is not limited to 0 or 1, we can
easily avoid using lots of flags.
The first thing to do is to define your flag. Do this at the start of the file, just after including your .tmh file.
Just type “char name of your flag;”.
“char” simply defines that the box you are about to name will contain characters.
Choose a name related to the function you’re managing, such as:
Autopilot_status
Master_weapon_status
Etc.
By default, when launching the configuration, the flag will be null. You may need to fill it in automatically, or by a
human action. This is not always necessary, but it is better to be sure that everything starts the way you want it to:
Autopilot=0; // will start your configuration with the “Autopilot” flag set to 0.
Autopilot=1; // will start your configuration with the “Autopilot” flag set to 1.
In the following example, the Warthog Joystick S4 switch is used to secure the S1 button output. If S4 isn’t
pressed, S1 will have no output. For this case, flags aren’t chosen just with simplicity in mind; a simple EXEC can
achieve this function without any flag.
We will use an “if” statement as a condition for the execution of an ActKey. Depending on the Flag state, we may
or may not generate the ActKey event.
include "target.tmh"
char flag1; //we create a flag called flag1
int main()
{
if(Init(&EventHandle)) return 1;
flag1=0; //set the flag1 value to 0 at startup of the configuration
MapKey(&Joystick, S4, EXEC("flag1=1;")); //set the flag1 to 1 (true) when S4 is pressed
MapKeyR(&Joystick, S4, EXEC("flag1=0;")); //set the flag1 to 0 (false) when S4 is released
MapKey(&Joystick, S1, EXEC("if(flag1) ActKey(PULSE+KEYON+'a');")); //If flag1 true (=1) press “a” keystroke
when S1 is pressed.
}
int EventHandle(int type, alias o, int x)
{
DefaultMapping(&o, x);
}
In the last example, S1 will only generate the ActKey if the Flag is true (=1).
Now let’s imagine that when the Flag is False (=0) we want a “b” keystroke to be pressed.
T.A.R.G.E.T Script Editor Basics User Manual v1.5 – 43/60
For this, we can call up the operator “Equal to:”, which is written this way: “==”.
We only have to edit our MapKey S1 line:
MapKey(&Joystick, S1, EXEC(
"if(flag1) ActKey(PULSE+KEYON+'a');
if(flag1==0) ActKey(PULSE+KEYON+'b');"
));
It works perfectly, but in fact we didn’t need to call up an operator. We only have 2 kinds of outputs, “a” and “b”; so
logically, if the “a” condition is false, it can only be “b”. You will also notice that we've only used an operator to
check whether Flag 1 was equal to zero (false). This is specific to the C style language. If Flag 1 contains
something, it is true; if Flag 1 equal zero, it simply doesn’t exist. In fact I’m not asking if the Flag 1 is zero, I’m
asking if Flag 1 has been created. A flag is created only when it becomes true.
We could obtain the same results with this code:
MapKey(&Joystick, S1, EXEC(
"if(flag1) ActKey(PULSE+KEYON+'a');
else ActKey(PULSE+KEYON+'b');"
));
For simple things like this, remember that it can be achieved easily with EXEC. Keep the flags for things that
really need a memory, or complex events.
Illustration
Now, we are going to manage a Flag used as a memory.
Let’s imagine that we have an autopilot button, like on the Warthog’s Autopilot panel.
The first time you press it, it activates the Autopilot, sending the keystroke “a”.
On the second press, you want it to deactivate the simulator autopilot, sending “shift + a”.
This is very easy with a SEQ and a MapKey:
MapKey(&Throttle, APENG, SEQ('a', L_SHIFT+'a'));
Now let’s imagine that there are 2 different physical buttons to control the Autopilot: one on the autopilot panel
and another on the Left Thumb Button on the left throttle (like in the real A-10 airplane, for example).
We must synchronize them to be sure that they will produce the right output regardless of the button we press.
We will use a flag called “autopilot”. The output of the 2 buttons will change according to the state of that flag.
Therefore each button must have 2 possible keystroke outputs, depending on the flag.
This gives us:
"if(autopilot=1) ActKey(PULSE+KEYON+'a'); else ActKey(PULSE+KEYON+L_SHIFT+'a');"
But we must also change the Flag state each time a button is pressed.
"if(autopilot=1)autopilot=0 else autopilot=1;"// if the autopilot =1 set it to 0 else set it to 1
This one can be simplified using an operator!
autopilot = !autopilot; // reverse the flag status
44/60 - T.A.R.G.E.T Script Editor Basics User Manual v1.5
As we have 2 different kinds of event to generate at the same time, we will use a CHAIN:
MapKey(&Throttle, LTB,CHAIN(
EXEC(
"if(autopilot) ActKey(PULSE+KEYON+'a'); else ActKey(PULSE+KEYON+L_SHIFT+'a');"),
EXEC("autopilot = !autopilot;")));
Therefore, this works for the LTB button. We must do the same for APENG
MapKey(&Throttle, APENG,CHAIN(
EXEC(
"if(autopilot) ActKey(PULSE+KEYON+'a'); else ActKey(PULSE+KEYON+L_SHIFT+'a');"),
EXEC("autopilot = !autopilot;")));
And it works. The autopilot flag is shared by the 2 buttons.
The complete file:
include "target.tmh"
char autopilot; // we create the flag
int main()
{
if(Init(&EventHandle)) return 1;
MapKey(&Throttle, LTB,CHAIN(
EXEC(
"if(autopilot) ActKey(PULSE+KEYON+'a'); else ActKey(PULSE+KEYON+L_SHIFT+'a');"),
EXEC("autopilot = !autopilot;")));
MapKey(&Throttle, APENG,CHAIN(
EXEC(
"if(autopilot) ActKey(PULSE+KEYON+'a'); else ActKey(PULSE+KEYON+L_SHIFT+'a');"),
EXEC("autopilot = !autopilot;")));
}
int EventHandle(int type, alias o, int x)
{
DefaultMapping(&o, x);
}
You may notice that 80% of the code for the operation of the 2 buttons is similar. There is a way to make this
simpler to write and manage. We have “brainstormed” from the button point of view, but we can also manage the
autopilot. We’ve seen that from the autopilot, it was a simple SEQuence between 2 outputs. We will transform this
SEQuence into a function and define the buttons used to call it up.
T.A.R.G.E.T Script Editor Basics User Manual v1.5 – 45/60
Creating your own function
Creating a function is a good way to turn complex writing into something simple, or to get around technical limits.
But before we create the function, we need to define its role and contents.
Let’s start with a simple case.
You’ve written the following line, and it doesn’t work:
MapKey(&Throttle, CSD, EXEC("SetCustomCurve(&Throttle, SCX, LIST(0,35, 45,50, 55,50, 100,65));"));
It doesn’t work because inside your EXEC(), you have used a LIST statement and this one is simply forbidden in
an EXEC.
The solution is to create a function that contains your LIST. Then you will simply call up the function in your
EXEC().
Our file uses 2 LISTs, to change the behavior of an axis. We cannot avoid using LISTs, as we are creating
custom curves.
So let’s create these functions. We will call them “list1” and “list2”
The syntax to declare the 2 functions will be the following:
int list1, list2; //declaring our custom LIST
NOTE: Our functions are declared with the int syntax. This one must be placed before the int main(). With one
“int”, we have introduced 2 different functions. As usual, we’ve finished the line with a “;”.
Then we need to define the contents of the functions:
list1 = LIST(0,30, 45,50, 55,50, 100,70);
list2 = LIST(0,35, 45,50, 55,50, 100,65);
All we have to do now is call up our list in our EXEC() statement:
MapKey(&Throttle, CSD, EXEC("SetCustomCurve(&Throttle, SCX, list1);"));
MapKey(&Throttle, CSU, EXEC("SetCustomCurve(&Throttle, SCX, list2);"));
Here is the complete file. If we press CSU and CSD, we will change the sensitivity of the SCX and SCY axes.
include "target.tmh"
int list1, list2; //declaring our custom LIST
int main()
{
if(Init(&EventHandle)) return 1; // declare the event handler, return on error
MapAxis(&Throttle, SCX, DX_XROT_AXIS); //mapping axis
MapAxis(&Throttle, SCY, DX_YROT_AXIS); //mapping axis
list1 = LIST(0,30, 45,50, 55,50, 100,70);//defining list1
list2 = LIST(0,35, 45,50, 55,50, 100,65);//defining list2
MapKey(&Throttle, CSU,EXEC("SetCustomCurve(&Throttle, SCX, list1);
SetCustomCurve(&Throttle, SCY, list1);"));//changing axis behaviour
MapKey(&Throttle, CSD,EXEC("SetCustomCurve(&Throttle, SCX, list2);
SetCustomCurve(&Throttle, SCY, list2);"));//changing axis behaviour
}
int EventHandle(int type, alias o, int x) {
46/60 - T.A.R.G.E.T Script Editor Basics User Manual v1.5
DefaultMapping(&o, x);
}
You will see that it is not complicated to use a custom function, and it makes things much easier to read. You can
also imagine that when something is used in several places in your program, it will sometimes be better to create
a function and call it up when you need it.
Let’s study another case.
In the DCS Flaming Cliffs 2 software, you cannot create your own chaff and flare program. T.A.R.G.E.T gives you
the possibility of generating keystroke outputs. This is how we will create our custom chaff and flare program.
We want to release 4 chaffs and 4 flares 400 milliseconds apart, and we will repeat this program every 4 seconds.
We also want the ability to have this program looping automatically.
We will use the Joystick HAT4 to manage the chaff and flares.
H4U will launch the program and loop it until I release the button.
H4D will launch the program to loop until I order a stop.
H4P will stop the Program.
The interesting point here is that we will use the same program twice. So, rather than write it twice, we will create
a function that contains our keystrokes. This way, we will only have to call up the function in H4U and H4D.
For the program, we will use a CHAIN with delays to manage the keystroke outputs. The big difference here is
that we will not associate this CHAIN with any MapKey. We will create a function called: Chaff_Flare_Program_1
Chaff_Flare_program_1 = CHAIN(
PULSE+INS,D(400),
PULSE+INS,D(400),
PULSE+INS,D(400),
PULSE+INS,D(400),
PULSE+DEL,D(400),
PULSE+DEL,D(400),
PULSE+DEL,D(400),
PULSE+DEL);
Now that the program is ready, we need to associate it with our buttons.
We want the function to loop, so we will use REXEC. The program uses 2800 milliseconds, then we want a break
of 4 seconds (4000 milliseconds): we must REXECute our function every 4000+2800 = 6800 milliseconds.
For H4U:
MapKey(&Joystick, H4U, REXEC(0, 6800, "ActKey(KEYON+Chaff_Flare_program_1);"));
For H4D:
MapKey(&Joystick, H4D, REXEC(1, 6800, "ActKey(KEYON+Chaff_Flare_program_1);", RNOSTOP));
And to stop the automatic loop:
MapKey(&Joystick, H4P, EXEC("StopAutoRepeat(0);"));
Now, all we have to do is to declare our Function before the int main ():
int Chaff_Flare_program_1; //we declare our new function
T.A.R.G.E.T Script Editor Basics User Manual v1.5 – 47/60
And here is the complete file:
include "target.tmh" //here we link this file to the file that contains the default Thrustmaster function code
int Chaff_Flare_program_1; //we declare our new function
int main()
{
if(Init(&EventHandle)) return 1;
MapKey(&Joystick, H4P, EXEC("StopAutoRepeat(1);")); //stop repeating chaff and flare program 1
MapKey(&Joystick, H4U, REXEC(0, 6800, "ActKey(KEYON+Chaff_Flare_program_1);")); //execute and loop chaff and flare
program 1 until I release the button
MapKey(&Joystick, H4D, REXEC(1, 6800, "ActKey(KEYON+Chaff_Flare_program_1);", RNOSTOP)); //execute and loop
chaff and flare program 1
Chaff_Flare_program_1 = CHAIN(
PULSE+INS,D(400),
PULSE+INS,D(400),
PULSE+INS,D(400),
PULSE+INS,D(400),
PULSE+DEL,D(400),
PULSE+DEL,D(400),
PULSE+DEL,D(400),
PULSE+DEL); //contents of the chaff and flare program 1
}
int EventHandle(int type, alias o, int x)
{
DefaultMapping(&o, x);
}
This example was a little application, with a simple function. Remember that when things become very complex to
write, or repeat several times, it’s simply much better to create a function. There is no ultimate function. As things
can be done in several ways, the right one to use is the one you like the most.
It’s clear that you can optimize things and sometimes divide the number of lines of code by 3. Most of the time,
once you’ve finished writing your file, you will already have new ideas about how to better manage the complex
aspects.
Let’s try another function and go back to our Flaming Cliffs 2 autopilot management. We did this using a flag, but
there may be a function to simplify how we code this.
Somewhere in the autopilot flag program, we have:
MapKey(&Throttle, LTB,CHAIN(
EXEC(
"if(autopilot) ActKey(PULSE+KEYON+'a'); else ActKey(PULSE+KEYON+L_SHIFT+'a');"),
EXEC("autopilot = !autopilot;")));
MapKey(&Throttle, APENG,CHAIN(
EXEC(
"if(autopilot) ActKey(PULSE+KEYON+'a'); else ActKey(PULSE+KEYON+L_SHIFT+'a');"),
EXEC("autopilot = !autopilot;")));
We can clearly see that we are writing exactly the same thing twice. This is the ideal case for a function to make
things simpler. We have seen that from the Autopilot point of view, the output is a simple sequence of toggling ON
and OFF. Our function will manage that toggling using a SEQuence.
48/60 - T.A.R.G.E.T Script Editor Basics User Manual v1.5
Let’s transform the previous program using a function:
include "target.tmh"
int autopilot; // we declare the autopilot function
int main()
{
if(Init(&EventHandle)) return 1;
autopilot = SEQ( EXEC("ActKey(PULSE+KEYON+'a');"),
EXEC("ActKey(PULSE+KEYON+L_SHIFT+'a');")
); //we define the contents of the autopilot function
MapKey(&Throttle, LTB, autopilot); //we simply call up our function inside the MapKey
MapKey(&Throttle, APENG, autopilot); //we simply call up our function inside the MapKey
}
//and that’s all!
int EventHandle(int type, alias o, int x)
{
DefaultMapping(&o, x);
}
Here, we have used a simple function; the result of it is just 2 keystrokes toggling. The content of a function isn’t
limited to keystrokes; inside it you can use all the operators and C keywords to manage data.
Let’s continue to work with that autopilot example.
In DCS Flaming Cliffs 2, we would like to use a realistic way to manage the autopilot for the A-10.
There is a 3-position toggle switch:
APATH
APAH
APPAT
And 2 buttons to activate/deactivate the autopilot.
LTB
APENG
The 2 buttons must be synchronized, and the “autopilot ON” keystroke depends on the LASTE 3-position toggle
switch.
So when we press the LTB or APENG for the first time, we want to generate a keystroke that depends on the
LASTE switch position.
There are several ways to manage this:
Only with logical flags, using one flag for the Autopilot status and one flag for the toggle switch position
(playing with 3 values like 1, 2, 3 inside the flag). This is long and boring to write.
Using flags and a function, flags to manage the toggle switch position and a function to manage autopilot
status/keystroke output (we can also do the opposite).
Using 2 functions, a new function that manages the toggle switch positions called up inside the autopilot
function.
T.A.R.G.E.T Script Editor Basics User Manual v1.5 – 49/60
We will keep our toggling SEQuence but the “autopilot ON” keystrokes are going to be replaced by a function
linked to the LASTE toggle switch. The result of this function will depend on the LASTE Toggle switch position.
include "target.tmh"
int main()
{
if(Init(&EventHandle)) return 1;
int autopilot = SEQ(EXEC("ap_ON_output();"), PULSE+L_ALT+'9');//defining the autopilot function
MapKey(&Throttle, APENG, autopilot);
MapKey(&Throttle, LTB, autopilot);
}
//notice that the next function is built out of the main program
int ap_ON_output() //naming the function
{
if(Throttle[APPAT]) ActKey(KEYON+PULSE+L_ALT+'6');
else if(Throttle[APALT]) ActKey(KEYON+PULSE+L_ALT+'4');
else ActKey(KEYON+PULSE+L_ALT+'2'); //if it's not the 2 others, it can only be APAH
}
int EventHandle(int type, alias o, int x)
{
DefaultMapping(&o, x);
}
Let’s take care of another setting: the Autopilot Alt mode can use Barometric or Radar. This is chosen according
to the position of the RDR ALTM toggle switch. This adds a new variable in our function. We will not create a new
function to manage this, but simply use a logic filter inside our function. We only have to use the “&” operator.
int apkey()
{
if(Throttle[APPAT]) ActKey(KEYON+PULSE+L_ALT+'6');
else if(Throttle[APALT] & Throttle[RDRDIS]) ActKey(KEYON+PULSE+L_ALT+'4');
else if (Throttle[APALT] & Throttle[RDRNRM]) ActKey(KEYON+PULSE+L_ALT+'5');
else ActKey(KEYON+PULSE+L_ALT+'2');
}
For the same function, using macros, things are much easier to read:
int apkey()
{
if(Throttle[APPAT]) ActKey(KEYON+PULSE+Autopilot_Route_following);
else if(Throttle[APALT] & Throttle[RDRDIS]) ActKey(KEYON+PULSE+Autopilot_Barometric_Altitude_Hold);
else if (Throttle[APALT] & Throttle[RDRNRM]) ActKey(KEYON+PULSE+Autopilot_Radar_Altitude_Hold);
else ActKey(KEYON+PULSE+Autopilot_Altitude_And_Roll_Hold);
}
Another example, using more code: an indexed list.
This one is a little bit complicated.
We have a list of 8 flight modes and we want to select them with just 2 buttons. We could cheat using SEQuence;
it may make the things very easy to write. But what we want is a little bit more complex. We want to have our list
of modes act like a sequence, but with the ability to choose the direction of the SEQuence. For this we need to
use a custom function and an index.
We will create a function called listmode that contains the SEQuence. And we will use the index to jump between
each event in the SEQuence.
50/60 - T.A.R.G.E.T Script Editor Basics User Manual v1.5
On the buttons used to choose the direction of the SEQuence jump, we will EXEC the index to define the offset
value and apply it to the Sequenced function.
Here is the code:
include "target.tmh"
include "FC2_MIG_29C_Macros.ttm"
int listmode, index; //master modes list function & index
int main()
{
if(Init(&EventHandle)) return 1;
listmode = SEQ(_8__Gunsight_Reticle_Switch,
_7__Air_To_Ground_Mode,
_6__Longitudinal_Missile_Aiming_Mode,
_5__Close_Air_Combat_HMD_Helmet_Mode,
_4__Close_Air_Combat_Bore_Mode,
_3__Close_Air_Combat_Vertical_Scan_Mode,
_2__Beyond_Visual_Range_Mode,
_1__Navigation_Modes);
//China Hat is used for Modes selection--------------MapKey(&Throttle, CHF, EXEC("index = (index+1)%8; ActKey(KEYON+PULSE+X(listmode, index));")); // forward
MapKey(&Throttle, CHB,EXEC("index = (index+7)%8; ActKey(KEYON+PULSE+X(listmode, index));")); // 7 is 8-1
= backward
}
int EventHandle(int type, alias o, int x)
{
DefaultMapping(&o, x);
}
Let’s break down the contents of the EXEC:
index = (index+1)%8; Here we define the index: we have 8 events in the Listmode SEQuence, so the modulus
(%) is 8. We want to offset the index by 1 step, so +1 is our offset value.
ActKey(KEYON+PULSE+X(listmode, index)); After defining the index offset value, we need to apply it. For this we
will use X(list, index) function, a special function created to manage SEQ (or CHAIN, or LIST) as an initialized list.
X will index this SEQ and will return the corresponding element.
Here X checks the index of the listmode SEQuence. As we’ve just moved the index by one step, X will send the
next event.
For the second line it is exactly the same, except that we add an “almost complete loop” to our sequence.
Our sequenced list has 8 events and returns to event 1 after event 8 has been carried out. So whatever the event,
if I add 7, I will go to the previous event.
Example:
I’m on event number 6 of 8: if I add 7 steps, I will go to 8 with 2 steps, and the last 5 steps bring me to event
number 5. I was on event 6, I’m now on event 5. This is perfect.
Why not use -1 to return to previous the event? Simply because once you have reached event 1, it cannot move
anymore. The sequence is made to loop only when the end of the sequence is reached.
T.A.R.G.E.T Script Editor Basics User Manual v1.5 – 51/60
Let's start to count
For some special actions, you may want to count how many times a button or a flag have been used. This is
something that’s easy to manage:
include "target.tmh"
int count; // init with value=0
int main()
{
if(Init(&EventHandle)) return 1;
MapKey(&Joystick, TG1, EXEC("count = count + 1;")); // add 1 unit to "count"
// if count is greater than 5 hits (6 hits as we start from zero) pulse "d" Key
MapKey(&Joystick, S2, EXEC("if (count > 5) ActKey(KEYON+PULSE+'d');"));
MapKey(&Joystick, S3, EXEC("count = 0;")); //reset the count
}
//event handler
int EventHandle(int type, alias o, int x)
{
DefaultMapping(&o, x);
}
Math exercise
With the script, you're also able to use some math to correct or solve some issues.
We've seen that the RotateDXAxis parameter was helpful to simulate a rotation of the handle for a center
mounted stick. If you use high angles, you may notice that it becomes impossible to reach the corner of the axes’
range of values. This can be solved with the scale parameter, but you may have to try several times in order to
get the right value. Let's let the script calculate the right scale value for you, depending the virtual rotation you've
defined.
include "target.tmh"
define angle
-15 //set the virtual rotation angle
int main()
{
if(Init(&EventHandle)) return 1;
SetKBRate(25, 33);
MapAxis(&Joystick, JOYX, DX_X_AXIS, AXIS_NORMAL, MAP_ABSOLUTE); //map the X axis
MapAxis(&Joystick, JOYY, DX_Y_AXIS, AXIS_NORMAL, MAP_ABSOLUTE); //map the Y axis
SetSCurve(&Joystick, JOYX, 0,0,0,0,ZoomScale(angle)); //notice that the scale parameter has been replaced
SetSCurve(&Joystick, JOYY, 0,0,0,0,ZoomScale(angle)); //notice that the scale parameter has been replaced
RotateDXAxis(DX_X_AXIS, DX_Y_AXIS, angle); //notice that the value has been replaced by our angle
}
float ZoomScale(float ang)
{
ang = ang * 3.1415926 / 180;
// convert angle from degrees into radians
return 2 / ln(2) * ln(abs(cos(ang) + abs(sin(ang)))); // returns the optimal zoom scale
}
int EventHandle(int type, alias o, int x)
{
DefaultMapping(&o, x);
}
52/60 - T.A.R.G.E.T Script Editor Basics User Manual v1.5
The Event Handle
Some may wonder about the role of the last 4 lines of a script. This function is in fact a loophole for those who
want to create things that cannot be done with the current script functions.
In the following example, the user wants to map the Joystick X and Y axes to the mouse, but in polar coordinates
(Y axis to be the circle radius, and X axis the angle). In the script, there's no tool to achieve this kind of operation:
after all, it's impossible to predict all of the ideas script creators might have. So let’s do this in the EventHandle.
include "target.tmh"
define PI
3.1415926
int main()
{
if(Init(&EventHandle)) return 1;
//nothing here this time
}
int EventHandle(int type, alias o, int x)
{
if(&o == &Joystick & (x == JOYX | x == JOYY)) // if the event came from Joystick X or Y axis
{
DXAxis(MOUSE_X_AXIS, abs(Joystick[JOYY]) * sin(Joystick[JOYX] / AMAXF * PI));
DXAxis(MOUSE_Y_AXIS, Joystick[JOYY] * cos(Joystick[JOYX] / AMAXF * PI));
}
else DefaultMapping(&o, x);
}
T.A.R.G.E.T Script Editor Basics User Manual v1.5 – 53/60
Appendix: USB Keydown and Keyup codes
Key Name
aA
bB
cC
dD
eE
fF
gG
hH
iI
jJ
kK
lL
mM
nN
oO
pP
qQ
rR
sS
tT
uU
vV
wW
xX
yY
zZ
1!
2@
3#
4$
5%
6^
7&
8*
9(
0)
Return
Escape
Backspace
Tab
Space
-_
=+
[{
]}
\|
Europe 1 (See notes)
;:
'"
`~
,<
.>
/?
Caps Lock
F1
F2
F3
F4
F5
F6
F7
54/60 - T.A.R.G.E.T Script Editor Basics User Manual v1.5
USB HID code
04
05
06
07
08
09
0A
0B
0C
0D
0E
0F
10
11
12
13
14
15
16
17
18
19
1A
1B
1C
1D
1E
1F
20
21
22
23
24
25
26
27
28
29
2A
2B
2C
2D
2E
2F
30
31
32
33
34
35
36
37
38
39
3A
3B
3C
3D
3E
3F
40
F8
F9
F10
F11
F12
Print Screen
Scroll Lock
Break (Ctrl-Pause)
Pause
Insert
Home
Page Up
Delete
End
Page Down
Right Arrow
Left Arrow
Down Arrow
Up Arrow
Num Lock
Keypad /
Keypad *
Keypad Keypad +
Keypad Enter
Keypad 1 End
Keypad 2 Down
Keypad 3 PageDn
Keypad 4 Left
Keypad 5
Keypad 6 Right
Keypad 7 Home
Keypad 8 Up
Keypad 9 PageUp
Keypad 0 Insert
Keypad . Delete
Europe 2 (See notes)
Keypad =
F13
F14
F15
F16
F17
F18
F19
F20
F21
F22
F23
F24
Keyboard Execute
Keyboard Help
Keyboard Menu
Keyboard Select
Keyboard Stop
Keyboard Again
Keyboard Undo
Keyboard Cut
Keyboard Copy
Keyboard Paste
Keyboard Find
Keyboard Mute
Keyboard Volume Up
Keyboard Volume Dn
Keyboard Locking Caps Lock
41
42
43
44
45
46
47
48
48
49
4A
4B
4C
4D
4E
4F
50
51
52
53
54
55
56
57
58
59
5A
5B
5C
5D
5E
5F
60
61
62
63
64
67
68
69
6A
6B
6C
6D
6E
6F
70
71
72
73
74
75
76
77
78
79
7A
7B
7C
7D
7E
7F
80
81
82
T.A.R.G.E.T Script Editor Basics User Manual v1.5 – 55/60
Keyboard Locking Num Lock
Keyboard Locking Scroll Lock
Keypad ,
(Brazilian Keypad . )
Keyboard Equal Sign
Keyboard Int'l 1
(Ro)
Keyboard Intl'2
(Katakana/Hiragana)
Keyboard Int'l 2
¥ (Yen)
Keyboard Int'l 4
(Henkan)
Keyboard Int'l 5
(Muhenkan)
Keyboard Int'l 6
(PC9800 Keypad , )
Keyboard Int'l 7
Keyboard Int'l 8
Keyboard Int'l 9
Keyboard Lang 1
(Hanguel/English)
Keyboard Lang 2
(Hanja)
Keyboard Lang 3
(Katakana)
Keyboard Lang 4
(Hiragana)
Keyboard Lang 5
(Zenkaku/Hankaku)
Keyboard Lang 6
Keyboard Lang 7
Keyboard Lang 8
Keyboard Lang 9
Keyboard Alternate Erase
Keyboard SysReq/Attention
Keyboard Cancel
Keyboard Clear
Keyboard Prior
Keyboard Return
Keyboard Separator
Keyboard Out
Keyboard Oper
Keyboard Clear/Again
Keyboard CrSel/Props
Keyboard ExSel
Left Control
Left Shift
Left Alt
Left GUI
Right Control
Right Shift
Right Alt
Right GUI
83
84
85
86
87
88
89
8A
8B
8C
8D
8E
8F
90
91
92
93
94
95
96
97
98
99
9A
9B
9C
9D
9E
9F
A0
A1
A2
A3
A4
E0
E1
E2
E3
E4
E5
E6
E7
NOTES:
These keys have various positions depending upon the region for which the keyboard is manufactured. Europe 1 is
typically in the AT-101 Key Position 42, next to the Enter key. Europe 2 is typically in the AT-101 Key Position 45,
between the Left Shift and Z keys.
56/60 - T.A.R.G.E.T Script Editor Basics User Manual v1.5
In order to continue to improve its T.A.R.G.E.T. software, Thrustmaster invites you to report any bugs related to
use of the interface or the software’s functionalities, via a dedicated space at:
http://target-bugtracker.thrustmaster.com.
Attention: this space is reserved for reporting bugs in the T.A.R.G.E.T. software only, and must not be used for
reporting hardware problems under any circumstances (should you experience any problems with your hardware,
please contact Thrustmaster Technical Support). Questions regarding other software such as games, or operating
systems which Thrustmaster has indicated are not supported, are not accepted at this space either.
TECHNICAL SUPPORT
If you encounter a problem with your product, please go to http://ts.thrustmaster.com and click Technical Support. From there you will
be able to access various utilities (Frequently Asked Questions (FAQ), the latest versions of drivers and software) that may help to
resolve your problem. If the problem persists, you can contact the Thrustmaster products technical support service (“Technical
Support”):
By email:
In order to take advantage of technical support by email, you must first register online. The information you provide will help the agents
to resolve your problem more quickly. Click Registration on the left-hand side of the Technical Support page and follow the on-screen
instructions. If you have already registered, fill in the Username and Password fields and then click Login.
By telephone:
ENGLISH
United Kingdom
08450800942
Charged at local rate
Monday to Saturday from 8 a.m. to 7 p.m.
Monday to Friday from 9 a.m. to 8 p.m.
Saturday from 8 a.m. to 2 p.m.
(Eastern Standard Time)
1-866-889-5036
United States
Free
Monday to Friday from 6 a.m. to 5 p.m.
Saturday from 5 a.m. to 11 a.m.
(Pacific Standard Time)
Monday to Friday from 9 a.m. to 8 p.m.
Saturday from 8 a.m. to 2 p.m.
(Eastern Standard Time)
1-866-889-2181
Canada
Free
Monday to Friday from 6 a.m. to 5 p.m.
Saturday from 5 a.m. to 11 a.m.
(Pacific Standard Time)
80887690
Monday to Saturday from 9 a.m. to 8 p.m.
Denmark
Free
(English)
0200884567
Monday to Saturday from 9 a.m. to 8 p.m.
Sweden
Free
(English)
0800 913060
Monday to Saturday from 10 a.m. to 9 p.m.
Finland
Free
(English)
Hours of operation and telephone numbers are subject to change. Please visit http://ts.thrustmaster.com for the most up-to-date Technical
Support contact information.
FRANÇAIS
Du lundi au samedi de 7h à 14h
1-866-889-2181
(Heure de l’Est)
Canada
Gratuit
Du lundi au samedi de 4h à 11h
(Heure du Pacifique)
France
02 99 93 21 33
Numéro fixe France Telecom non surtaxé.
Tarif selon opérateur
Du lundi au samedi de 9h à 20h
Suisse
0842 000 022
Tarif d’une communication locale
Du lundi au samedi de 9h à 20h
Belgique
078 16 60 56
Tarif d’une communication nationale
Du lundi au samedi de 9h à 20h
80028612
Du lundi au samedi de 9h à 20h
Gratuit
Horaires et numéros de téléphone susceptibles de changer. Veuillez consulter http://ts.thrustmaster.com pour obtenir une liste à jour.
Luxembourg
T.A.R.G.E.T Script Editor Basics User Manual v1.5 – 57/60
DEUTSCH
Deutschland
08000 00 1445
Kostenlos
Montag bis Freitag 9:00 bis 20:00 Uhr
Samstag 9:00 bis 13:00 Uhr und 14:00 bis 18:00 Uhr
Österreich
0810 10 1809
Zum Preis eines Ortsgesprächs
Montag bis Freitag 9:00 bis 20:00 Uhr
Samstag 9:00 bis 13:00 Uhr und 14:00 bis 18:00 Uhr
Schweiz
0842 000 022
Zum Preis eines Ortsgesprächs
Montag bis Freitag 9:00 bis 20:00 Uhr
Samstag 9:00 bis 13:00 Uhr und 14:00 bis 18:00 Uhr
Montag bis Freitag 9:00 bis 20:00 Uhr
80028612
Samstag 9:00 bis 13:00 Uhr und 14:00 bis 18:00 Uhr
Kostenlos
Geschäftszeiten und Telefonnummern können sich ändern. Bitte besuchen Sie für die aktuellen Kontaktinformationen des Technischen
Supports http://ts.thrustmaster.com.
Luxemburg
NEDERLANDS
Belgïe
078 16 60 56
Kosten van interlokaal gesprek
Van maandag t/m vrijdag van 9:00 tot 13:00 en van 14:00 tot 18:00
Van maandag t/m vrijdag van 9:00 tot 13:00 en van 14:00 tot 18:00
(Nederlands)
Nederland
Van maandag t/m zaterdag van 9:00 tot 20:00
(Engels)
Bedrijfsuren en telefoonnummers kunnen gewijzigd worden. Ga naar http://ts.thrustmaster.com voor de actuele contactgegevens van
Technical Support.
0900 0400 118
Kosten van lokaal gesprek
ITALIANO
848999817
costo chiamata locale*
*costo massimo alla riposta de 0.1 Euro
Italia
Lun - Ven: 9:00-13:00 e 14:00-18:00
Gli orari di reperibilità e i numeri telefonici sono soggetti a modifiche. Per conoscere le informazioni più aggiornate su come contattare il
Servizio di Assistenza Tecnica, ti preghiamo di visitare il sito http://ts.thrustmaster.com.
ESPAÑOL
901988060
De lunes a viernes de 9:00 a 19:00
Precio de una llamada telefónica local
Las horas de funcionamiento y los números de teléfono pueden cambiar. En http://ts.thrustmaster.com se puede obtener la información de
contacto de Soporte técnico más actualizada.
España
58/60 - T.A.R.G.E.T Script Editor Basics User Manual v1.5
WARRANTY INFORMATION
Worldwide, Guillemot Corporation S.A. (“Guillemot”) warrants to the consumer that this Thrustmaster product will be free from material
defects and manufacturing flaws for a period of two (2) years from the original date of purchase. Should the product appear to be
defective during the warranty period, immediately contact Technical Support, who will indicate the procedure to follow. If the defect is
confirmed, the product must be returned to its place of purchase (or any other location indicated by Technical Support).
Within the context of this warranty, the consumer’s defective product will, at Technical Support’s option, be either repaired or replaced.
Where authorized by applicable law, the full liability of Guillemot and its subsidiaries (including for indirect damages) is limited to the
repair or replacement of the Thrustmaster product. The consumer’s legal rights with respect to legislation applicable to the sale of
consumer goods are not affected by this warranty.
This warranty shall not apply: (1) if the product has been modified, opened, altered, or has suffered damage as a result of inappropriate
or abusive use, negligence, an accident, normal wear, or any other cause not related to a material defect or manufacturing flaw; (2) in
the event of failure to comply with the instructions provided by Technical Support; (3) to software not published by Guillemot, said
software being subject to a specific warranty provided by its publisher.
Additional warranty provisions
In the United States of America and in Canada, this warranty is limited to the product’s internal mechanism and external housing. Any
applicable implied warranties, including warranties of merchantability and fitness for a particular purpose, are hereby limited to two (2)
years from the date of purchase and are subject to the conditions set forth in this limited warranty. In no event shall Guillemot
Corporation S.A. or its affiliates be liable for consequential or incidental damage resulting from the breach of any express or implied
warranties. Some States/Provinces do not allow limitation on how long an implied warranty lasts or exclusion or limitation of
incidental/consequential damages, so the above limitation may not apply to you. This warranty gives you specific legal rights, and you
may also have other legal rights which vary from State to State or Province to Province.
T.A.R.G.E.T Script Editor Basics User Manual v1.5 – 59/60
End User License Agreement
IMPORTANT: Please read the following End User License Agreement before using the device. The term "Software" refers to all executable
programs, managers, libraries, data files and to any documentation relating to the programs, as well as the complete operating system
included in the product. The Software is licensed, and not sold, to the User, exclusively for use complying with the terms of this License
Agreement. You hereby accept and agree to abide by the Terms & Conditions of this License Agreement. If you disagree with the Terms &
Conditions of this License Agreement, please do not use the Software.
The Software is protected by international copyright laws and agreements, as well as other international laws and agreements relating to
intellectual property.
The Software (excluding the software sub-applications) remains the property of Guillemot Corporation S.A. All rights reserved. Guillemot
Corporation S.A. grants only a limited and non-exclusive right to use the Software.
Guillemot Corporation S.A. reserves the right to cancel this License Agreement in the event of failure to abide by its Terms &
Conditions.
License granted:
1. The license is granted to the original Buyer alone. Guillemot Corporation S.A. remains the sole owner and holder of the Software
(excluding the software sub-applications), and reserves all rights that are not expressly granted by this License Agreement. The User is
not allowed to sub-license the rights granted by this License Agreement. The User is allowed to transfer this License, provided that the
original Buyer retains no part of the Software and that the Transferee reads and accepts the Terms & Conditions of this License
Agreement.
2. The Buyer may only use the software on one computer at a time. The machine-readable part of the Software may be copied to another
computer, provided that the Software is deleted from the first computer and that it is impossible to use the Software on several
computers at the same time.
3. The Buyer hereby acknowledges and accepts the copyright belonging to Guillemot Corporation S.A. The copyright shall in no event be
removed from the Software, nor from any documentation, whether printed or electronic, provided with the Software.
4. The License grants the User the right to perform one (1) copy of the machine-readable part of the Software for archival purposes,
provided that the User also copies Software's copyright.
5. Except within the limits expressly allowed by this License Agreement, the Buyer may not agree or allow any third party to agree to: grant
a sublicense; provide or divulge the Software to other third parties; allow use of the Software on several computers at a time; perform
alterations or copies of any kind; reverse engineer, decompile or modify the Software in any way or attempt to obtain information relating
to the Software that is not accessible to the User; perform copies or translations of the User Manual.
Warranty limitation:
The Software is provided "as is", with no guarantee whatsoever from Guillemot Corporation S.A. regarding its use and/or performance.
Guillemot Corporation S.A. does not guarantee that the operation of the Software will be free from interruptions or errors. The use or the
performance of the Software remain under the Buyer's entire responsibility, and Guillemot Corporation S.A. can provide no guarantee of
any kind with regard to the performance and results obtained by the Buyer while using the Software. No guarantee of any kind, whether
explicit or implied, is offered by Guillemot Corporation S.A. with regard to the non-violation of third party rights, the merchantability or the
adequacy of the Software to a specific use.
In no event shall Guillemot Corporation S.A.'s liability be engaged in the event of damages of any kind arising from the use or the
incapacity to use the Software.
Applicable law:
The Terms & Conditions of this License Agreement are subject to French Law.
COPYRIGHT
© 2010 Guillemot Corporation S.A. All rights reserved. Thrustmaster® is a registered trademark of Guillemot Corporation S.A.
T.A.R.G.E.T is a trademark of Guillemot Corporation S.A. All other trademarks and brand names are hereby acknowledged and are
property of their respective owners. Illustrations not binding. Contents, designs and specifications are subject to change without notice and
may vary from one country to another. Made in China.
ENVIRONMENTAL PROTECTION RECOMMENDATION
At the end of its working life, this product should not be disposed of with standard household waste, but rather dropped off at
a collection point for the disposal of Waste Electrical and Electronic Equipment (WEEE) for recycling.
This is confirmed by the symbol found on the product, user manual or packaging.
Depending on their characteristics, the materials may be recycled. Through recycling and other forms of processing Waste
Electrical and Electronic Equipment, you can make a significant contribution towards helping to protect the environment.
Please contact your local authorities for information on the collection point nearest you.
Reference: 5075862
www.thrustmaster.com
60/60 - T.A.R.G.E.T Script Editor Basics User Manual v1.5


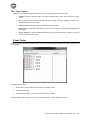
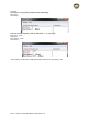
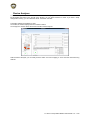
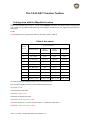

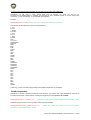
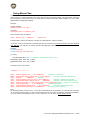

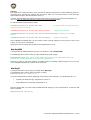


![[User manual (English) - v1.6] 1.7 MB](http://vs1.manualzilla.com/store/data/005855357_1-51a3ddd110ebec5d1eef2b5791ba3868-150x150.png)