1
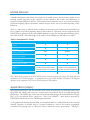
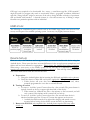
MOBILE DEVICES FOR SURVEY WORK Guidelines for administrators (Sep 6, 2013) Mobile Devices: Android-based phones and tablets, also referred to as mobile devices, have become a reliable tool in assisting country programs in the collection of data related to the control and elimination of Neglected Tropical Diseases (NTDs). This includes but not limited to survey tools used for baseline prevalence mapping, impact assessment, sentinel site spot checks, and even routine reporting of key indicators. There is a wide range of android devices available on the market, but fortunately all android devices have a similar set-up when preparing them for data collection. Electronic surveys supported by the ENVISION program all use the same LINKS application (app) for entering and transferring survey data from the field. The LINKS app can be used on both smartphones and tablets (see table 1). Table 1: Smartphone Vs. Tablet Smartphone Tablet ✔ ✔ ✔ ✔ Both Wireless Can collect data when no data connect is available ✔ ✔ Cost effective and can function on many devices ✔ ✔ Can change survey once devices are in the field ✔ ✔ Few reporters of large amounts of data or data that include barcodes and GPS coordinates Few reporters of large amounts of data or data that include barcodes and GPS coordinates Anywhere Anywhere Can support multiple or bilingual surveys Can collect GPS + scan barcodes Can send data via cellular or Internet connection Ideal for Central server for data Note: Mobile devices procured by the ENVISION project remain the property of the project and will be kept and maintained by ENVISION partners. As appropriate, devices will be made available to National NTD Program Managers for the completion of NTD survey work that follows WHO protocols. Applications (Apps): Most paper-based surveys and data collection tools can be converted into an electronic format using Open Data Kit (ODK) and stored on a central server (cloud-based) that is accessible through the LINKS app. The LINKS app is free and can be downloaded through the Android Market (Google Play) on to any android device (search for: “Task Force LINKS”). Most devices procured by ENVISION will already have the LINKS app downloaded. A Geographical Positioning System (GPS) is automatically built-in to android-based devices and will function regardless of whether there is a wireless connection. Surveys that require geographical coordinates will prompt users to ‘Record Location’ within the survey questionnaire. Although a GPS app is not required to be downloaded for a survey, a stand-alone app like “GPS essentials” might be useful if a program only needs to occasionally collect a geographic coordinate. Additional apps like “Zxing barcode” might be necessary if the survey design includes collection of specimens that are labeled with barcodes. A barcode scanner is a fast and accurate way of linking a unique identifier on a particular specimen with an individual. LINKS Icons: The following are standard navigation symbols used on the LINKS App (found at the bottom of the screen) and are part of the android operating system. Icons may vary slightly between devices. Device Set-up: There are only a few functions and set-up procedures you must be familiar with before using the Android device. Please note that there are some differences in the set-up between smartphones and tablets and has been indicated as appropriate. Please charge the Android first before continuing. When using a new survey on the LINKS system for the first time it is important to conduct a practice test at least 2 weeks before actual field data is collected. This will help identify problems and correct them before teams are sent into the field. A. Preparations a. Charge the Android phone before inserting the SIM card (applicable only to phones) b. Check that there is a Micro SD card in place (applicable only to phones). i. Tablet devices will store data automatically onto an internal card, unless manually programmed to save data to external SD card. B. Turning off and on a. To turn on - hold the “power” button down for a few seconds. The power button is typically located on the top or upper right hand-side of the device. i. When turned on, Androids may take a few minutes to find a network, and will only connect if the airplane mode is turned off (see below). b. To turn off - hold the “power” button down for a few seconds when device is unlocked and then press the “Power off” button that appears on the screen. i. Androids should be turned off at night while charging and turned on every morning before leaving for the field to ensure that they are functioning. C. Remove the PIN lock (only required if the Android phone requests PIN entry when turned on) D. E. F. G. a. Tap the Menu button (bottom of phone, looks like a group of 4 small squares, the upper left one of which is solid white) b. Tap "Settings" c. Tap “Location & security” d. Tap “Set up SIM card lock” e. If the square next to “Lock SIM card” is green, then the PIN lock is turned on. Tap it to turn it off. You will need to enter the PIN for the SIM. Verify date and time a. Tap the Menu button b. Tap “Settings” c. Tap “Date & time” d. Tap “Select time zone”, then tap on the time zone that you're in. e. Make sure that the “Automatic date & time” box is not selected, then manually set the time f. Select the check box "Use 24-hour format" (if available) g. Tap on "Select date format", choosing the one that represents dd/mm/yyyy h. Now select the check box "Automatic date & Time" Verify that LINKS app is updated a. Navigate to and tap "Play Store" b. Tap the Apps Menu button, then tap "My Apps" or tap the download symbol (arrow pointing to horizontal line) c. Scroll down to Task Force LINKS, and tap it. d. Tap "Update" if shown. e. Tap "Accept & download" f. Tap the Home button to return to the main screen. Check that an admin password has been set a. Open the LINKS app b. Tap the Menu button c. Tap "Admin Login". If you are asked to enter a password here, it is "1325" (without the quotation marks). If you are not asked to enter a password, you are not required to set one, however it is recommended: d. Tap the Menu button again e. Tap “Change settings” f. Scroll to the bottom and you will see "Admin Password". Enter “1325” g. Use the same password for all the devices in your project. Delete old surveys - to be done before starting a new survey. a. Open the LINKS app b. Tap the Menu button, c. Tap "Admin Login" d. Enter the password, then tap "OK" e. Tap "Delete Saved Form" f. Tap "Blank Forms" in the top-right corner, then tap forms that should be deleted, then tap "Delete Selected" g. Confirm by tapping "Delete Forms". h. Tap the Back button once to return to the previous screen, or twice to return to the LINKS main screen. H. Set Server Settings and Download Survey(s) - There are 2 settings currently approved for ENVISION depending on the type of survey being conducted. a. Open the LINKS app b. Tap the Menu button >> tap "Admin login". Enter Admin password if prompted “1325” c. Tap the Menu button again >> tap "Change settings" i. Please consult with a RTI ENVISION technical advisor to obtain correct “Server”, “username”, and “password” ii. Tap the Back button iii. Tap "Get blank form" iv. If you see a login prompt, reenter the username and password as shown in section ii above and tap "OK" v. Tap the check boxes for the forms you wish to download. 1. Some surveys have only one form and others are broken into multiple forms that are linked through unique identifiers entered by users; tap the check boxes for the forms that are part of the survey. Example: a. [Project_Name] CLUSTER b. [Project_Name] HOUSEHOLD c. [Project_Name] RESIDENT d. [Project_Name] ABSENT RETURN e. [Project_Name] CLUSTER COMPLETE f. [Project_Name] ERROR REPORT g. [Project_Name] SUPERVISOR vi. Tap "Get Selected" vii. You will see a confirmation that forms have been downloaded. Tap "OK". viii. Tap the Back button to return to the LINKS main screen. I. Starting the Survey a. From the main menu screen >> tap “Fill Blank Form”. b. View list of survey files that have been downloaded to the device. Click on the appropriate form to start. The system will automatically launch into the data collection mode. c. The opening screen of the survey will let you know about navigation though the survey. To move to the next question, tap the right pointing directional arrow. To return to a question tap the left pointing directional arrow. d. Please note that some surveys use multiple forms that are automatically linked based on previous entries; e.g. resident record form is liked to household record form. For this reason it is preferable that only one android device be used to enter all the data from any one cluster. e. Most surveys will ask for IDs for a particular implementation or administrative unit. Although each country may have a different system for assigning IDs, please verify with the RTI technical advisor which ID codes should be used for district administrative units. f. Once all required information has been entered onto a form, review data. g. Once data is reviewed tap “Save and send Form” button. This will bring you back to the main menu screen where you can continue to fill in another form using the Fill Blank Form button. J. Uploading Data a. Data is automatically sent to a specified server when a connection is available. When a connection is not available the system will store the data and the number of records waiting to be sent will be indicated on the “Send Finalized Form” button on the main screen. b. If airplane mode is on (or there is no reception) during fieldwork, upload data once there is reception. Data should be uploaded every day to prevent potential loss of data. c. When all data have been sent, the number next to the button “Send Finalized Form” should be zero. If data are not sending, manually send data: i. Turn off airplane mode in an area with good reception. ii. Give a few minutes to connect to the network iii. Open the LINKS application and tap on “Send Finalized Form”. The number of forms should reflect any recent forms filled out but not sent. iv. Tap on “Toggle All”, which will select all forms. v. Tap on “Send Selected”, which will begin uploading your forms. You may see a message saying “Background send running, please try again shortly”. This indicates that the forms are uploading automatically: return to the main LINKS menu, where you should see the number of forms remaining decreasing. Continue checking this until all forms are sent. If not all forms are uploaded, try again. vi. If uploading is interrupted because the Android loses its network connection, you can re-enter LINKS later to continue uploading the remaining forms. d. Once uploading has finished, turn off the Android and charge it for the next day. K. After Mobile Device Trainings a. clear training data (on each Android) i. Tap the Menu button and login to "Admin Login" ii. Tap the "Delete Saved Form" button iii. Tap the "Toggle All" button at the bottom to select all saved forms iv. Tap "Delete Selected" v. Tap the Back button, then back again, to return to the main LINKS screen vi. Tap the "Fill Blank Form" button to make sure the actual surveys were not deleted General Use: Please refer to the User’s Manual for specific devices for more details. Status Bar A red bar across the top of the LINKS app indicates when there is no network connection available. In addition, at the top of the Android screen, there is a status bar that provides useful information about the Android’s settings. The first step when troubleshooting is to look at this bar; it should be monitored frequently. Does the Android have a network connection? You should be able to see bars of reception when you are in network range. Is the Android currently in airplane mode? When in airplane mode, an airplane will show in the Status Bar. Can the Android send/receive data? You will have an E on this bar, either inside a box with arrows or with curved reception lines coming from it How much battery does the Android have left? There is a green battery icon on this bar, which shows how much battery you have left. You should monitor this during the day, so if required you can use an emergency battery charger to recharge the Android before it fails. Is the Android enabled to use GPS services? A round circle icon at the top of the bar will usually appear when you are trying to use GPS services to record a location. If you are unable to record GPS coordinates while using the app, you should check that the use of GPS satellites is enabled. Instructions on how to do this are below. Battery Life Androids must be charged each night to ensure they have adequate power for a full day of survey work. Use provided chargers to plug in to the main power (preferred). If available, devices can be charged with a car charger or an emergency back-up battery charger. Airplane Mode Keeping the Android on airport mode disables the network. This means you cannot send data automatically. When you do not need a network connection, putting the Android in airplane mode will conserve battery. An airplane will show in the status bar when it is turned on, and indicates that you have no network connection. During fieldwork Airplane mode should normally be kept ON. This will preserve battery while you are in the field and using the Android. When the Android is on this mode, the surveys will be saved to the micro SD card or internal card but not uploaded to the server. The only time you should turn off the airplane mode is when you are uploading data to the server, which should be done at least once every day when you have good reception. Turn off airport mode by clicking on the airplane button on the main screen. If this does not work, go into the Settings menu, where the first option allows the user to turn airplane mode on or off. Before and after fieldwork While travelling to the survey site and in the evenings, you should turn the Android off. Phones should be turned off while charging them in the evening. This will conserve battery and allow your phone to be charged faster. Use a surge protector when charging your phone as any losses of power and subsequent power surges could weaken the battery. Memory The Android device has sufficient space to collect many days worth of survey data, providing it is used for work only and not for personal use. Do not download any applications (without permission) or use the camera for taking pictures - these things use up memory and leave less room for the survey data. Levels of access: To register for an account and password for a particular survey dashboard go to: https://linkssystem.org/login/ For access to GTMP trachoma baseline data go to: https://linkssystem.org/GTMP/registerproject.php Prior to posting a survey on LINKS, a project coordinator should submit a list of names, contact information, and the level of access to be granted to individual users. The levels of access may vary between countries and surveys, and depending on your level of data access, you may have the ability to view additional details at each level, but in general there are four levels of access: Example Organization NTD Programme Coordinator Individual Dr. James Brown E-mail [email protected] Rights Full access to both approved and raw data summaries Can download raw datasets Can download clean dataset Can mark clean data as approved Group1: Ministry of Health o Full access to both approved and raw data summaries o Can download raw datasets o Can download clean dataset o Can mark clean data as approved Group 2: Partner Organizations o Can view raw data summary but not download data o Can view approved data summary but not download data Group 3: Authorized user o No access to raw data o Can view approved data summary but not download data Group G: Data manager o Access to the data manager tools o Can view raw and approved data summary but not download data Data Flow: The system is setup to track users, permissions, and approvals. An online dashboard page will allow you to see summary information on the data that have been collected for a particular project area. The data flow process is as follows: 1. Ministry of Health (MOH) personnel collect the raw data which are uploaded onto the cloud-based links server. Data are always available for review and download by the Data Manager and MOH Focal Person(s) (or designate). 2. At the conclusion of data collection for a particular cluster or catchment area, a designated Data Manager will ensure consistency of data management across sites and guarantee quality-marking of the output by: a. removing any noise generated by the data transmission process (e.g. duplicate records); A log of all corrections undertaken during the cleaning process will be maintained. b. checking for errors, internal inconsistencies or missing data; and c. querying (with the field team) any errors, internal consistencies or missing data. 3. At the conclusion of data collection for each Evaluation Unit, the Data Manager notifies the MOH Focal Person(s) by email that the cleaned dataset and correction log are available to be evaluated. A copy of the dataset can be shared at this time. 4. The MOH Focal Person evaluates the data, and then either approves the dataset ('approval C') or queries it with other Technical Advisors. 5. Any queries are resolved by the Data Manager, Technical Advisors and MOH Focal Person(s), with reference to MOH personnel who have been involved in data collection, as required. The product is the approved dataset. 6. The Data Manager notifies the MOH Focal Person(s) (or designate) by email that the approved dataset is available. 7. Analyses shown on the dashboard are run automatically, using algorithms that have been pre-agreed between the technical advisors and the MOH Focal Person(s). 8. Any queries are resolved by the MOH Focal Person(s) and Technical Advisors working together. 9. The MOH Focal Person(s) (or designate) then signs off on the summary data ('approval P'). At this point the approved dataset can be uploaded to the country’s national repository (if desired). 10. Depending on additional approvals granted by the MOH summary data can be pushed to other cloud-based databases for display. Troubleshooting: If you experience any of the following problems with the Android, try the following: GPS not functioning Ensure that you are standing well away from any houses or trees and that you have a clear view of the sky. The Android needs to locate three satellites, so needs a large area of sky. If it still does not work within a few minutes, check that use of GPS is enabled in the settings menu, as described above. Once the “Record Location” button is pressed, a “Loading Location” box will appear. If the accuracy is <10m, the recorder should press the small “Record Location” button below the “Loading Location” box. Scanner not functioning The ZXing Barcode scanner app allows a user to scan 1-D or 2-D "graphical barcodes" with the camera on their Android device. There are many different types of barcodes supported by this application which allows users to quickly link a unique identifier with individual samples. Both traditional 1-D barcodes and 2-D barcodes (QR code and Data Matrix) require users to have a steady hand to make sure the scanner captures the entire barcode sequence. Patience is sometimes needed, but also ensure that the camera lens is clean. No network Check that the airplane mode is turned off. If you are accessing the internet through a cellular server then you will need to check with them to see if you have the settings setup properly and if you have minutes or data remaining for your account. There are a variety of ways to check this and they will vary by provider. If you are accessing the internet through wi-‐fi then you will need to make sure the network is currently online. If it is online, you can try to disable the wi-‐fi service on the phone (menu >> setting >> Wireless & networks >> uncheck the wi-‐fi box) once it has been disabled, re-‐enable it and try again. If this also does not work, reboot the phone and try again. If this does not work, call your supervisor for further suggestions. Problems with the equipment Most equipment problems are related to the battery and the camera. If the battery is no longer holding a charge then see if a replacement battery is available. If no battery is available attempt to switch the battery with another phone (preferably spare equipment) and see if the problem persists. My username and password does not give me access to the website If you are not able to access the website or your account does not give you access to the proper features or projects, please contact the RTI technical advisor. Frequently asked questions: 1. How often to charge the device You should charge the devices nightly. If you are using the device on airplane mode or only a few hours each day it might appear that the battery still has nearly a full charge. It is still advisable to charge often to avoid running out of power. 2. Editing data in the field You will not be able to edit data in the field. Once data are entered into the phone you will only be able to edit it through the web interface If you realize that data needs to be edited, write down as much as you can about the record and the edits and give this information to your team data manager. Before a record is saved the summary page of the data you entered is provided as a final check, but once you click save, the data can only be edited online (or through ODBC connection). This was done by design of the app and can not be changed for a single project. 3. Determine if data was received If your data are no longer listed in the Send Finalized Data button then your data was successfully sent and processed. Your project data will appear online as soon as the record count on the button Send Finalized Form goes to zero. 4. Should I backup my data If you are able to transmit your data to the central server then your data are already backed up (it remains on the phone even after transmission to the central server). If you are not able to transmit your data please contact Administrator