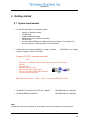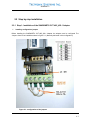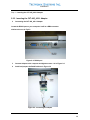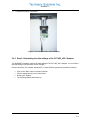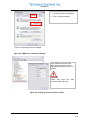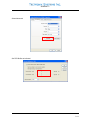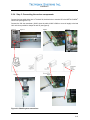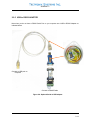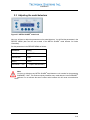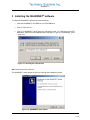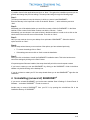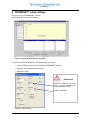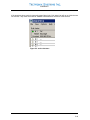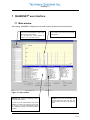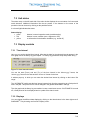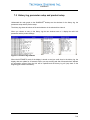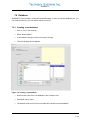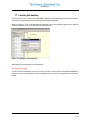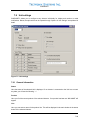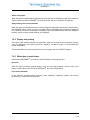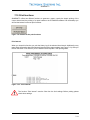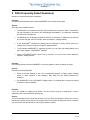
1
Shark Net Operator’s Manual Software Version 3.0.19 CommFront® CVT-485_422-1 adapter SHARKNET SOFTWARE SHARKNET® v3.0.19 User manual (English) Project name: Order /JOB NO: REG KEY: 1-2 SHARKNET Copyright The information and data given in this document can be amended without notice. Without explicit written permission by TECTRONIX SYSTEMS INC it is prohibited to copy or to transfer any part of this document. It does not matter how and through which electronic or written media it occurs. 2008 TECTRONIX SYSTEMS INC All rights reserved. Windows® and Access® are registered trademarks of Microsoft® Pentium® is a registered trademark of Intel® 1-3 SHARKNET Index 1 INTRODUCTION ...................................................................................................................... 1-5 2 GETTING STARTED................................................................................................................ 2-6 2.1 SYSTEM REQUIREMENTS....................................................................................................... 2-6 2.2 STEP BY STEP INSTALLATION ................................................................................................. 2-7 2.2.1 Step 1: Installation of the SHARKNET® CVT-485_422-1 Adapter...................................2-7 2.2.2 Inserting the CVT-485_422-1 Adapter ................................................................................2-8 2.2.3 Step 2: Determining the data settings of the CVT-485_422-1 Adapter ............................2-9 2.2.4 Step 3: Connecting the various components....................................................................2-12 2.2.5 USB to RS232 ADAPTER..................................................................................................2-13 2.3 ADJUSTING THE METAL DETECTORS ..................................................................................... 2-14 3 INSTALLING THE SHARKNET ® SOFTWARE ....................................................................... 3-15 4 UNINSTALLING (REMOVAL OF) SHARKNET ® .................................................................... 4-16 5 SHARKNET ® INITIAL SETTINGS .......................................................................................... 5-17 6 SHARKNET ® OPTIONS IN DETAIL ....................................................................................... 6-19 6.1 6.2 7 SHARKNET® SETTINGS .................................................................................................... 6-19 PORT SETTINGS ................................................................................................................. 6-20 ® SHARKNET USER INTERFACE .......................................................................................... 7-21 7.1 MAIN WINDOW ................................................................................................................... 7-21 7.2 UNIT STATUS ..................................................................................................................... 7-22 7.3 DISPLAY CONTROLS ........................................................................................................... 7-22 7.3.1 Time interval........................................................................................................................7-22 7.3.2 Displays ...............................................................................................................................7-22 7.4 MAIN GRAPH ..................................................................................................................... 7-23 7.4.1 Metal mV .............................................................................................................................7-23 7.4.2 Phase...................................................................................................................................7-23 7.4.3 Tendency.............................................................................................................................7-23 7.5 HISTORY LOG, PARAMETER SETUP AND PRODUCT SETUP ........................................................ 7-24 7.6 DATABASE ........................................................................................................................ 7-25 7.6.1 Creating a new database ...................................................................................................7-25 7.6.2 Opening an existing database ...........................................................................................7-26 7.7 LOCKING THE DESKTOP ...................................................................................................... 7-27 7.8 UNIT SETTINGS .................................................................................................................. 7-28 7.8.1 General information ............................................................................................................7-28 7.8.2 Display and printing ............................................................................................................7-29 7.8.3 When there is metal alarm .................................................................................................7-29 7.9 THE “VIEWER MODE” .......................................................................................................... 7-30 7.10 PRINT FUNCTIONS .......................................................................................................... 7-31 8 FAQ (FREQUENTLY ASKED QUESTIONS).......................................................................... 8-33 9 WARRANTY .......................................................................................................................... 9-36 1-4 SHARKNET 1 Introduction SHARKNET® is software which enables you to display and save all data from your METAL SHARK® metal detectors on a Microsoft Windows personal computer. SHARKNET® receives all relevant data of the connected METAL SHARK® metal detector, displays them on your PC and saves them in a Microsoft Access compatible database. SHARKNET® offers the following advantages: • • Quick and secure data transmission with the RS485-Standard, • • Management of up to 32 METAL SHARK® detectors at the same time, • • Real time supervision for all connected METAL SHARK® detectors, • • Three different graphic modes to display the metal notifications, • • Various time intervals can be displayed, • • Automatic saving of all parameter settings for every metal notification, • • Microsoft Access ´97 (and newer) compatible database, • • Print-out of automatically compiled reports (IFS/HACCP-reports). 1-5 SHARKNET 2 Getting started 2.1 System requirements • PC with Windows 2000 or XP operating system o o o o o o o • Pentium II, 200 MHz or better, 128 MB RAM, 100MB available disk space , SVGA monitor (min. resolution 1024x768), CD-ROM drive, free Serial RS232 DB9 port or USB port (requires an adapter - see chapter2.2.5) For best operation, a dedicated system is recommended. RS485 cable with required length(Stock Lengths available : (Custom Lengths a maximum 1500 feet) 100/200/300 foot lengths) Category 5 (CAT5) screened data cable OR - Minimum of 1 twisted pair (may have more pairs but they will not be used) AWG 22 Stranded 7x30 Conductor diameter .030 in Conductor material, Tinned Copper Over all Foil and Braid Shield with drain wire 120 ohm nominal impedance Belden Equivalent number: 3105A, Paired - EIA Industrial RS-485 PLTC/CM • SHARKNET CommFront CVT-485_422-1 Adapter TECTRONIX part no. 10250019 • SHARK USB/RS232 ADAPTER TECTRONIX part no. 10250020 ® Note: Please refer to the contact address on the last page to order the accessories mentioned above. 2-6 SHARKNET 2.2 Step by step installation 2.2.1 Step 1: Installation of the SHARKNET® CVT-485_422-1 Adapter 1 Installing configuration jumpers Before installing the SHARKNET® CVT-485_422-1 Adapter the adapter must be configured The Jumpers have to be installed as shown in figure 2-1: (Normally delivered in this configuration) Figure 2-1: configuration of the jumpers 2-7 SHARKNET Step 1: I Inserting the CVT-485_422-1 Adapter 2.2.2 Inserting the CVT-485_422-1 Adapter 2 Connecting the CVT-485_422-1 Adapter Locate the RS232 port on your computer. It will be a DB9 connector similar to the one in Fig 2-2 Figure 2-2: RS232 port 3 Connect Adapter to the computer and tighten screws. As in Figure 2-3 4 Install and prepare the Rs485 cable as in Figure 2-3 Figure 2-3: connecting the adapter 2-8 SHARKNET 5 Completed computer connections Figure 2-4: Final connection at the computer 2.2.3 Step 2: Determining the data settings of the CVT-485_422-1 Adapter The SHARKNET® software requires the data settings of the CVT-485_422-1 Adapter. You can find the required settings in the Windows “device manager”. Proceed as follows (For example: Windows XP, in other Windows systems the procedure is similar): • Click on the “Start” button in the menu task-bar • • • Point to settings and click on “Control Panel” Double-click “System” The following window should open up 2-9 SHARKNET • Choose the index-tab “Hardware“ • Click on “Device-manager“ Figure 2-5: choosing the device-manager Figure 2-6: COM-Ports in the device-manager Verify that there are Com Ports active and find the Com. Port # that matches the port used for the adapter.. Important: Please write down the number for later reference! COM Figure 2-6: Finding the correct Com Port number 2-10 SHARKNET Select Advanced Set FIFO Buffer as indicated 2-11 SHARKNET 2.2.4 Step 3: Connecting the various components. Connect the bus cable white wire to Terminal 24, the black wire to terminal 25 in the METAL SHARK control unit (see figure 4 & 5). Connect the 120 ohm terminator ( ONLY when the cable is 660 ft /200m or more in length) to the last Unit on the bus parallel to clamps 24 and 25 (see figure 8). Figure 2 Figure 3 Figure 6 Figure 4 Figure 5 Figure 7 Figure 2-5: RS485 system connections 2-12 SHARKNET 2.2.5 USB to RS232 ADAPTER Note when you do not have a RS232 Serial Port on you computer use a USB to RS232 Adapter as indicated below. Connect to USB port on Computer Connect to RS485 Cable Figure 2-6: Optional Serial to USB adapter 2-13 SHARKNET 2.3 Adjusting the metal detectors Figure 2-7: METAL SHARK® control unit Next you will have to adjust the parameters on the metal detectors. You will find the parameters in the REPORT MENU (also see the user manual of the METAL SHARK metal detector for further information). Set the parameters in the REPORT MENU as follows: Parameter Setting PRINT SHARKNET INTERFACE RS485 BAUD 115200 SHARKNET / UNIT 1 – 32 (also see the note! ) Note: You have to allocate every METAL SHARK® metal detector a unit number for the parameter SHARKNET / UNIT. This number uniquely identifies every metal detector in the SHARKNET® software. Do not allocate the same number twice because this will cause communication errors. 2-14 SHARKNET 3 Installing the SHARKNET® software To install the SHARKNET® software, proceed as follows: • Insert the SHARKNET CD-ROM into your CD-ROM-drive • Click on “Start Run…” • Type in “D:/SHARKNET_3019_Setup.exe” and click on “OK”. “D” is the letter of your CDROM-drive. Should your CD-ROM-drive have the letter “E“ type in “E:/SHARKNET_3019 _Setup.exe”. Figure 3-1: Running the setup wizard OR: Double-click on the setup file. The SHARKNET setup wizard will guide you through the installation process. Figure 3-2: SHARKNET setup wizard 3-15 SHARKNET If possible close all other applications and click on “Next”. Throughout the installation process you can go back and change the previous settings. The setup wizard will go through the following steps: Step 1: The setup wizard wants to know the directory in which you want to install SHARKNET. Enter the directory in the input field or click on the button “Browse…”, select a directory and click ‘Next’. Step 2: Afterwards you will be asked whether you would like to create a folder for SHARKNET in the Menu task-bar. Enter a name for this folder or select one with the “Browse…” button. Alternatively you can choose to not create a folder in the Menu task-bar. In order to do so click on the check mark in the lower left corner of the window. Then click on “Next”. Step 3: Here you can create an icon on your desktop for a quick start of SHARKNET. Select the desired option and click on “Next”. Step 4: Now the setup wizard shows you an overview of the options you have selected previously. • To correct the settings click on ‘Back’. • If the settings are correct click on ‘Next’ to start the installation. Step 5: When you click on the button “Install” the SHARKNET® installation starts. This is the last chance to correct the settings by clicking on the “Back” button. If important system files were installed, the setup wizard will point this out and request a restart. If you have to restart you can start SHARKNET by clicking on the SHARKNET folder in the Menu taskbar or by double-clicking on the desktop icon. If you do not have to restart your PC the setup wizard allows you to start SHARKNET right after the installation. 4 Uninstalling (removal of) SHARKNET® If you want to uninstall SHARKNET go into the menu task-bar ‘Start Settings Control Panel Software…’ and select SHARKNET in order to remove it. Another way to remove SHARKNET from your PC is by opening the unins000.exe file in the installation directory of SHARKNET. 4-16 SHARKNET 5 SHARKNET® initial settings Now you can run the SHARKNET software. After starting, the main window will open: Figure 5-1: main window after the first start In order to work with SHARKNET a few settings have to be made: • click on “Options” in the menu bar and select “SHARKNET settings” • see figure 5-2 for the parameter settings: • then click on “OK”. IMPORTANT! Select the COM-Port you have seen in device manager and noted (see chapter 2.2.3). Speed: 115200 bit/s Figure 5-2: initial settings 5-17 SHARKNET If all steps have been carried out correctly green lights in the “Unit status“ bar will go on within the next few minutes. They show which METAL SHARK® metal detectors are active at the moment. Figure 5-3: active detectors 5-18 SHARKNET 6 SHARKNET® Options in detail Figure 6-1: SHARKNET settings 6.1 SHARKNET® settings Language: This option changes the SHARKNET user language. In version v3.0.19 you can choose English and German. Number of detectors: This option indicates how many metal detectors SHARKNET will manage. The fewer detectors there are the faster the speed. Therefore it is useful to adjust this option to the actual number of detectors. AUTOMATIC time interval: This option indicates how far back you want to go in the AUTOMATIC display mode. If you enter “10 days” the AUTOMATIC mode always displays the data of the last 10 days. Standard display: This option indicates what is displayed when SHARKNET starts. “Metal mV” is the default setting when you install SHARKNET for the first time. Unit-timeout: This option controls how long it takes for the status of a metal detector which has not sent any data to switch to “UNKNOWN”. Then it makes a note in the history. The setting depends on the number of detectors and on the incoming data quantity. Debug-window: When this option is selected a text window opens which displays the received data of the metal detectors. This is useful should a communication problem occur. 6-19 SHARKNET 6.2 Port settings COM and Ethernet options: Describe the type of connection between PC and metal detector(s). The option “Ethernet” has not yet been implemented in SHARKNET v.3.0.x. COM port: Indicates the serial port to which the metal detectors are connected. If no data is received check this option first. Default: COM 5 Port speed: Indicates the speed of the serial transfer. For correct data transmission all detectors have to run at the same transmission rate. If there are data transmission problems check this option after the COM-port option. Default: 115200 XON/XOFF (Software) active: With RS485 Adapter: ON. With RS232 connection (null modem): OFF. Default: OFF 6-20 SHARKNET 7 SHARKNET® user interface 7.1 Main window After starting, SHARKNET displays the main window which contains all relevant information: Device Status Buttons: Display the status of all connected metal detectors as well as their name and the current product. You can select the current detector by clicking on one of the device buttons. Main-graph: Shows the metal notifications in the chosen time interval of the selected metal detector. Figure 7-1: main window HISTORY LOG: A listing of all detector events in the chosen time interval. In order to see the valid parameters and product settings at a certain point in time you have to click on an entry. In the logs “PARAMETER SETUP” and “PRODUCT SETUP” the related information appears. PARAMETER SETUP and PRODUCT SETUP: Here you see the parameter and product settings that were valid when the chosen events in the history log (left) took place. 7-21 SHARKNET 7.2 Unit status The status array on the left hand side of the main window displays the current status of all connected metal detectors. Additional information like the set product in the detector or the name of the production line can be seen by clicking on the particular switch. A coloured light indicates the status: Status display: • • • green red yellow detector in normal operation mode (metal-detection) detector in error condition (error, alignment or CIP) no information for the detector available (e. g. turned off) 7.3 Display controls 7.3.1 Time interval Here you can set the desired time interval. After that the data for the selected interval appears in the main graph and in the history log (see chapter 7.5 “History log, parameter setup and product setup“). Figure 7-2: time interval control You see the start (From:) and end (To:) of the time interval in the “dd.mm.yyyy” format, the “dd.mm.yyyy” format for the date and the “hh:mm:ss” format for the time. A window pops up, in which you can enter the desired time interval by clicking on the button “Set range“. The “AUTOMATIC” switch sets the time interval consecutively from the current time to a fixed period of ® time in the past. This period of time can be changed in the general SHARKNET settings. Thus the graph and the history log are rewritten in case a metal event occurs. If AUTOMATIC is turned off, a fixed period of time is displayed and no update of the data is made. 7.3.2 Displays You can change the different data displays by clicking on the three buttons in the lower right area of SHARKNET® or by choosing one from the “Display“ menu. 7-22 SHARKNET 7.4 Main graph The main graph is the biggest area of the SHARKNET® desktop. It shows the metal notifications received from the detectors in the selected time interval. Please refer to chapter 7.3.1 to change the time interval. You have three options to display the metal notifications: 7.4.1 Metal mV Displaying the number of the metal notifications at a certain time: • Every metal notification is displayed by a vertical bar. • The length of the bar indicates the number of notifications. • The horizontal position indicates the point in time of the notification in the current time interval. The timeline runs from past to present (from left to right). • When you leave the mouse on a particular point you see the corresponding time. 7.4.2 Phase Every metal notification is displayed with its phase angle and its amplitude: • Phase is displayed by a line from the lower left-hand corner of the screen. • The length of the line indicates the amplitude of the notification. • The angle to the horizontal axis describes the phase angle of the notification, indicating the type of metal that has been detected. • When you leave the mouse on a particular point you see the corresponding phase angle. 7.4.3 Tendency Number of metal notifications in the current time interval: • The curve indicates the total number of metal notifications. • The curve is parallel to the horizontal above the time period in which no metal was detected. • The curve rises when metal was detected. • Many metal notifications in a short period of time results in a steep incline. • When you leave the mouse on a particular point you see the corresponding time. 7-23 SHARKNET 7.5 History log, parameter setup and product setup Underneath the main graph on the SHARKNET® desktop are the windows for the history log, the parameter setup and the product setup. The history log shows all actions of the active detector in the selected time interval. When you choose an entry in the history log the two windows next to it display the valid Unit parameter and the product settings. Figure 7-3: the three log windows When the AUTOMATIC mode of the display is turned on and you scroll down in the history log, the display does not update for 30 seconds. When you stop scrolling and after 30 seconds have elapsed all information received from the Unit will be updated and the history log will jump back to the beginning (the newest information). 7-24 SHARKNET 7.6 Database SHARKNET® saves all data in a Microsoft Access-Database. In order to minimize database size, you can create a new one or you can add the data to an old one. 7.6.1 Creating a new database • Click on “File” in the menu bar. • Select “New database”. • In the window that pops up click on the button “Change“. • Then the following window appears: Figure 7-4: creating a new database • Now enter the name of the new database in the “Filename” field. • Afterwards click on “Save”. • The windows close and from now on all data will be saved in the new database. 7-25 SHARKNET 7.6.2 Opening an existing database • Click on “File”. • Choose “Open database” • The following window pops up: Figure 7-5: opening a database • Now you can select a database. • You can open it by clicking on “Open”. (Please see the note below!) Attention: Please keep in mind that all data received will be written in the database right after you open it. 7-26 SHARKNET 7.7 Locking the desktop The menu entry “Lock” protects the SHARKNET® desktop by deactivating some menus and buttons. This way only authorized persons can change the settings and displays. When you click on “Lock“ a window pops up asking the user for the password with which he wants to protect the desktop. It has to be entered twice (see figure 7-6). Figure 7-6: dialogue to lock desktop Afterwards this menu appears in the main graph: User interface is locked In order to unlock the desktop you have to click on “Unlock” in the menu bar. Afterwards SHARKNET® asks you to enter the password to unlock the desktop. If you enter the wrong password it will remain locked. 7-27 SHARKNET 7.8 Unit settings SHARKNET® allows you to configure every detector individually for display and reaction to metal notifications. Below, the options that can be opened through “Options Unit settings” are explained in detail. Figure 7-7: Unit settings 7.8.1 General information Status Here the status of the selected Unit is displayed. If no detector is connected or the Unit has not sent any data, you will see the following “---“. Product Here you find the current product of the selected detector. If no product has been set “NO NAME” will appear. Line Here you can enter a name for the product line. This will be displayed in the main window in the status button of the selected detector. 7-28 SHARKNET Status is displayed When this option is deactivated the status button of the Unit will not be displayed and hence cannot be selected. When you start SHARKNET® for the first time this option is activated for all detectors. Always display the current parameter When this option is activated, always the newest settings are displayed in the windows “product setup” and “parameter setup”. When you click on an older entry the associated (older) settings are displayed for 10 seconds. Then the new settings are displayed. When you deactivate this option the settings of the entry, which you have looked at before, are displayed. 7.8.2 Display and printing This option table indicates whether the information types on the right should be printed (Column: “Print”) or displayed in the history log (Column: “Display”). The table in Figure 7-7 would display and print all notifications. The indicated filter rules refer to the print function “Print range” and the ‘IFS/HACCP-Report’. 7.8.3 When there is metal alarm Indicates how SHARKNET® is to react to a metal notification of the particular Unit. No action When this option is chosen nothing happens. Only the main graph displays it and an entry in the history is made. When you first start up SHARKNET® this is the default setting. Print metal notification In this case the selected printer prints the metal notification. Optionally detector and product parameters (if it exists) can also be printed. 7-29 SHARKNET 7.9 The “Viewer mode” The viewer mode allows you to look at databases without being interrupted by data transmissions. SHARKNET® does not record any data at that time. To switch into the viewer mode you have to do the following: • Click on “Options viewer mode“ in the menu bar: Figure 7-8: options menu • You will be told that SHARKNET® is not recording any data at the moment. In the main graph that you are in “viewer mode” mode now appears. • Now you can open the databases you want to examine. • When you do not want to examine any more databases, click one more time on the option mentioned above. SHARKNET® then asks you to choose a database for data recording. 7-30 SHARKNET 7.10 Print functions SHARKNET® offers two different functions to generate a report, namely the simple printing of the current interval and the printing of a report based on the IFS/HACCP-standard. On the desktop you will find the buttons for the two print functions: Figure 7-9: buttons for the print functions Print interval When you chose this function you print the history log of the selected time interval. Additionally every page shows information about the selected interval and the page numbers (see Figure 7-10). After you click on the button “Print interval” you are asked to select a printer. Then printing starts. Figure 7-10: “Print interval” The function “Print interval” uses the filter from the Unit settings. Before printing please check these settings. 7-31 SHARKNET IFS/HACCP Report This function prints the history log, too, but it also prints out statistics about the PVS-tests that have taken place in the selected time interval (IFS/HACCP-compliant). An IFS/HACCP-report has the format: Figure 7-11: IFS/HACCP-report The function “IFS/HACCP-report“’ uses the filter from the Unit settings. Before printing please check the settings there. When the PVS-reports are hidden the number of tests appears on the report anyway. 7-32 SHARKNET 8 FAQ (Frequently Asked Questions) Answers to some frequently asked questions: Question: I connected all the detectors and I started SHARKNET® but I cannot see any data. Answer: There are many possible reasons: • The detectors are connected incorrectly. Check whether the connection cable is connected to the right terminals in the control unit (interchanged white/black?). An improperly connected Unit can block the whole bus. • The RS485-bus is not properly terminated. Check if the terminator is attached to the last Unit and if it has the right value of 120 ohm. (also see chapter 2 “Getting started”) • In the SHARKNET® software the settings for the COM-port is wrong. Please check your settings one more time referring to chapter 2 “Getting started”. • To see whether SHARKNET® is receiving any data, you can open the debug-window in the menu item “Options SHARKNET®-settings”. • Check if all SHARK®-control units are set up correctly. You can find the correct settings in chapter 2 “Getting started”. Question: In the debug-window I see that SHARKNET® is receiving data but it does not display any data. Answer: Here there are two possibilities: • Check in the filter settings to see if the corresponding detector is hidden (option “Display status“ in menu “Options Unit settings“). Only data from non hidden detectors are displayed. • Put SHARKNET in the “AUTOMATIC” display mode. It is possible that an interval is defined for which no data is available. ® Question: I am in the “Metal mV” display mode. When I use the mouse to point to a metal alarm, a time is displayed which is not entered in the history log. Answer: You have probably chosen a time interval which is too big. Since the calculation of the point in time is based on the mouse pointer position, the program does not recognize the right point in time. Therefore you must reduce the time interval in order to get a greater accuracy. 8-33 SHARKNET Question: When printing a report my printer only prints the page headers and not the metal notifications. Answer: There are two reasons for this problem: • In the selected time interval there are no notifications. Check in the history log of the selected detector for any data. • In the table for the filter options in the menu “Options Unit settings” you have deactivated the relevant data. Activate the notifications you want to have in your report in the column “Print“. Question: When I want to print the current settings of a detector by clicking on the button “Parameter sheet” for product and parameter data, “No data available” appears. Answer: You chose an Unit which has not sent any data to SHARKNET® yet or which is not active. Please make sure that the communication is working (also see chapter "Getting started”) and wait until the Unit has sent data. Also make sure that you have selected the correct detector. 8-34 SHARKNET Figures Figure 2-1: configuration of the jumpers...........................................................................................2-7 Figure 2-2: RS232 port ....................................................................................................................2-8 Figure 2-3: connecting the adapter ..................................................................................................2-8 Figure 2-4: Final connection at the computer ...................................................................................2-9 Figure 2-5: RS485 system connections..........................................................................................2-12 Figure 2-6: Optional Serial to USB adapter ....................................................................................2-13 Figure 2-7: METAL SHARK® control unit........................................................................................2-14 Figure 3-1: Running the setup wizard.............................................................................................3-15 Figure 3-2: SHARKNET setup wizard ............................................................................................3-15 Figure 5-1: main window after the first start....................................................................................5-17 Figure 5-2: initial settings...............................................................................................................5-17 Figure 5-3: active detectors ...........................................................................................................5-18 Figure 6-1: SHARKNET settings...................................................................................................6-19 Figure 7-1: main window................................................................................................................7-21 Figure 7-2: time interval control......................................................................................................7-22 Figure 7-3: the three log windows ..................................................................................................7-24 Figure 7-4: creating a new database ..............................................................................................7-25 Figure 7-5: opening a database .....................................................................................................7-26 Figure 7-6: dialogue to lock desktop...............................................................................................7-27 Figure 7-7: Unit settings.................................................................................................................7-28 Figure 7-8: options menu...............................................................................................................7-30 Figure 7-9: buttons for the print functions .......................................................................................7-31 Figure 7-10: “Print interval” ............................................................................................................7-31 Figure 7-11: IFS/HACCP-report .....................................................................................................7-32 8-35 SHARKNET 9 Warranty Tectronix Systems Inc. extends to the original purchaser of its SHARKNET® management system a limited one year warranty from the date of purchase against defects in material or workmanship provided the equipment and software is installed and operated in accordance with the recommendations and instructions written in this operator’s manual. Tectronix Systems Inc. will repair or replace, at its option, defective parts or software without charge. Shipping is the responsibility of the owner. 9-36 SHARKNET TECTONIX SYSTEMS INC. Unit 9 – 18812 96th Ave. Surrey, BC Canada Tel.: (604) 607-6028 Fax.: (604) 607-6026 Internet: www.metal-shark.com User manual SHARKNET® Software Status: October 2007 9-37