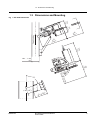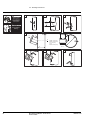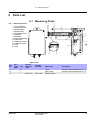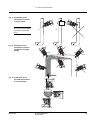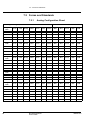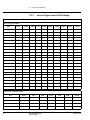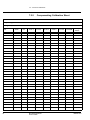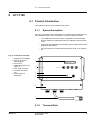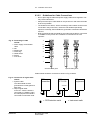
1
USER MANUAL
Pulptec™
BT-5400
Brightness Transmitter
© BTG Instruments AB
M2067/1en
Disclaimer
The contents of this document are subject to revision without notice due to continued progress in methodology,
design, and manufacturing. BTG shall have no liability for any error or damages of any kind resulting from the use of
this document. © BTG 2007.
BTG Instruments AB
P.O. Box 602
SE-661 29 Säffle
Sweden
Phone: +46 533 426 00
www.btg.com
© BTG Instruments AB
Table of Contents
1
Product Introduction . . . . . . . . . . . . . . . . . . . . . . . . . . . . . . 1
1.1
1.2
1.3
1.4
2
Safety Instructions . . . . . . . . . . . . . . . . . . . . . . . . . . . . . . . 7
2.1
2.2
2.3
2.4
3
Unpacking . . . . . . . . . . . . . . . . . . . . . . . . . . . . . . . . . . . . . . . . . . . . . . . . 11
Welding Instructions . . . . . . . . . . . . . . . . . . . . . . . . . . . . . . . . . . . . . . . . 11
Mounting Instructions . . . . . . . . . . . . . . . . . . . . . . . . . . . . . . . . . . . . . . . 15
Connection Instructions . . . . . . . . . . . . . . . . . . . . . . . . . . . . . . . . . . . . . . 16
Operation Instructions . . . . . . . . . . . . . . . . . . . . . . . . . . . 17
4.1
4.2
4.3
4.4
4.5
4.6
4.7
4.8
5
General . . . . . . . . . . . . . . . . . . . . . . . . . . . . . . . . . . . . . . . . . . . . . . . . . . . 7
Conventions . . . . . . . . . . . . . . . . . . . . . . . . . . . . . . . . . . . . . . . . . . . . . . . 8
Safety Regulations . . . . . . . . . . . . . . . . . . . . . . . . . . . . . . . . . . . . . . . . . . 9
CE declaration . . . . . . . . . . . . . . . . . . . . . . . . . . . . . . . . . . . . . . . . . . . . . 10
Installation Instructions . . . . . . . . . . . . . . . . . . . . . . . . . . 11
3.1
3.2
3.3
3.4
4
General . . . . . . . . . . . . . . . . . . . . . . . . . . . . . . . . . . . . . . . . . . . . . . . . . . . 1
Technical Data . . . . . . . . . . . . . . . . . . . . . . . . . . . . . . . . . . . . . . . . . . . . . 3
Dimensions and Mounting . . . . . . . . . . . . . . . . . . . . . . . . . . . . . . . . . . . . . 5
Type Sign Explanations . . . . . . . . . . . . . . . . . . . . . . . . . . . . . . . . . . . . . . 6
Hand-held Terminal SPC-1000 . . . . . . . . . . . . . . . . . . . . . . . . . . . . . . . . 17
Commissioning . . . . . . . . . . . . . . . . . . . . . . . . . . . . . . . . . . . . . . . . . . . . 18
Precalibration . . . . . . . . . . . . . . . . . . . . . . . . . . . . . . . . . . . . . . . . . . . . . 21
Configure . . . . . . . . . . . . . . . . . . . . . . . . . . . . . . . . . . . . . . . . . . . . . . . . . 24
Operation . . . . . . . . . . . . . . . . . . . . . . . . . . . . . . . . . . . . . . . . . . . . . . . . 30
Calibration by Sampling . . . . . . . . . . . . . . . . . . . . . . . . . . . . . . . . . . . . . 34
Damping and Measuring Span . . . . . . . . . . . . . . . . . . . . . . . . . . . . . . . . 37
Compensation . . . . . . . . . . . . . . . . . . . . . . . . . . . . . . . . . . . . . . . . . . . . . 38
Service Instructions . . . . . . . . . . . . . . . . . . . . . . . . . . . . . 41
5.1
5.2
5.3
5.4
M2067/1en
Continuous Maintenance . . . . . . . . . . . . . . . . . . . . . . . . . . . . . . . . . . . . 41
Alarm and Events . . . . . . . . . . . . . . . . . . . . . . . . . . . . . . . . . . . . . . . . . . 43
Sampling, Sheet Determination . . . . . . . . . . . . . . . . . . . . . . . . . . . . . . . 46
Mechanical Maintenance . . . . . . . . . . . . . . . . . . . . . . . . . . . . . . . . . . . . 48
BT-5400 Table of Contents
© BTG 2007
I
5.5
5.6
5.7
6
Parts List . . . . . . . . . . . . . . . . . . . . . . . . . . . . . . . . . . . . . . 61
6.1
6.2
6.3
7
Planning the Installation . . . . . . . . . . . . . . . . . . . . . . . . . . . . . . . . . . . . . 65
Forms and Standards . . . . . . . . . . . . . . . . . . . . . . . . . . . . . . . . . . . . . . . 68
Software . . . . . . . . . . . . . . . . . . . . . . . . . . . . . . . . . . . . . . . . . . . . . . . . . 73
SPC-1000 – Menu handling . . . . . . . . . . . . . . . . . . . . . . . . . . . . . . . . . . 73
Using Hart® Communication . . . . . . . . . . . . . . . . . . . . . . . . . . . . . . . . . . 73
RS-485 Connection . . . . . . . . . . . . . . . . . . . . . . . . . . . . . . . . . . . . . . . . . 74
JCT-1100 . . . . . . . . . . . . . . . . . . . . . . . . . . . . . . . . . . . . . . 75
8.1
8.2
8.3
8.4
8.5
8.6
II
Measuring Probe . . . . . . . . . . . . . . . . . . . . . . . . . . . . . . . . . . . . . . . . . . . 61
Ball Valve . . . . . . . . . . . . . . . . . . . . . . . . . . . . . . . . . . . . . . . . . . . . . . . . 62
Accessories . . . . . . . . . . . . . . . . . . . . . . . . . . . . . . . . . . . . . . . . . . . . . . . 63
Appendix . . . . . . . . . . . . . . . . . . . . . . . . . . . . . . . . . . . . . . 65
7.1
7.2
7.3
7.4
7.5
7.6
8
Service Hardware, I/O part . . . . . . . . . . . . . . . . . . . . . . . . . . . . . . . . . . . 52
Testing of Optics . . . . . . . . . . . . . . . . . . . . . . . . . . . . . . . . . . . . . . . . . . . 56
Troubleshooting . . . . . . . . . . . . . . . . . . . . . . . . . . . . . . . . . . . . . . . . . . . 58
Product Introduction . . . . . . . . . . . . . . . . . . . . . . . . . . . . . . . . . . . . . . . . 75
Safety Recommendations . . . . . . . . . . . . . . . . . . . . . . . . . . . . . . . . . . . . 79
Installation Instructions . . . . . . . . . . . . . . . . . . . . . . . . . . . . . . . . . . . . . . 80
Operating Instructions . . . . . . . . . . . . . . . . . . . . . . . . . . . . . . . . . . . . . . . 87
Service Instructions . . . . . . . . . . . . . . . . . . . . . . . . . . . . . . . . . . . . . . . . . 93
Parts List . . . . . . . . . . . . . . . . . . . . . . . . . . . . . . . . . . . . . . . . . . . . . . . . 101
BT-5400 Table of Contents
© BTG 2007
M2067/1en
1.1 - General
1
Product Introduction
1.1 General
The BT-5400 is designed for monitoring pulp bleaching in distributed control,
supervisory or stand-alone applications. Due to a unique method of measuring
brightness and a user-programmable algorithm, the BT-5400 can calculate
compensated brightness signals that consider variables and inputs from a
variety of process measurements.
The BT-5400 is available in a UV (Ultra Violet) light source variant for
measurement of fluorescence.
There are five analog output signals specifically designed for brightness and
color measuring, including ERIC (Effective Residual Ink Count) and
flourescence (UV).
BT-5400 is a part of the BTG’s “smart transmitter” product line. It is an
intelligent, microprocessor-based transmitter that, in conjunction with the
hand-held terminal SPC-1000, can be connected at any point on the 4-20 mA
output signal loop.
Calibration is done using a PC software, called BT-Calibration.
The BT-5400 is mounted through a ball valve assembly (SS 2343 or titanium
grade 2) to a weld-in stud or FRP stud. The BT-5400 can be used to measure
brightness and color in all types of bleaching process. It is suitable for both
mechanical pulps (TMP, CTMP, groundwood), and chemical pulps (kraft), and
in recycled fiber deinking.
When brightness measurements are used to control chemical additions,
variations in reaction rate due to changes in temperature, pH and chemical
concentration become more important. Changes in reaction parameters must
be compensated. Time effects such as production rate and stock flow must
also be taken into account. The BT-5400’s built-in temperature transmitter can
be used for brightness signal compensation, temperature control or merely
observation purposes.
M2067/1en
BT-5400 Product Introduction
© BTG 2007
1
1.1 - General
1.1.1
Measuring Principle
Pulp properties is measured at four (five for UV) discrete wavelengths. This is
done by pulsing four (five for UV) groups of LEDs which are exemplary light
sources thanks to their longevity, predictable beam pattern and
monochromatic output, therefore no need for rotating color filters and motors.
Color, brightness, ERIC, and flourescence (UV) with their different requirement
on applied wavelength can be measured. In BT-5400 the four wavelengths can
be combined to find the optimum correlation to lab in a specific application.
Light from the LEDs is directed into the process stream via flexible transmitting
fiber optics. It passes through the probe window and is diffused by the pulp or
other medium. The scattered light is then gathered by receiving fiber optics
and conducted to a photo detector.
Optical feedback and software control routines, based on the tried and tested
BTG 4-BeamTM Principle that minimizes drift due to temperature or aging of
optical components, enable continuous compensation for changes in process
temperature and allow for inevitable degradation of signal sources and
detectors. These active equalization techniques give the signal stability
needed.
The UV-channel in the BT-5400 UV measures fluorescence, which may
appear from FWA (Fluorescent Whitening Agents) present in the pulp. An
optical filter is used in front of the detector transmitting only the part of the
emitted UV-light which is reflected in the visible wavelength region. Thus, the
part of the UV-light which is reflected as UV is removed. Subsequently, pulps
without FWA will have a measured signal at zero, or very close to zero, for the
UV channel.
Fig
1 BT-5400 probe
source/detector
arrangement
BT-5400 UV
Detectors
Blue sources
Red/Green sources
UV sources
IR sources
BT-5400 IR
2
BT-5400 Product Introduction
© BTG 2007
M2067/1en
1.2 - Technical Data
1.2 Technical Data
General
Manufacturer
BTG, Säffle, Sweden
Quality Assurance
ISO 9001
Product Safety
Fulfills all relevant CE, UL, and CSA standards.
Functional Specification
Measuring Data
Measuring Range
Approx. 5-96 ISO
Temperature Measurement
Process temp. accuracy ±0.8ºC/1.5°F
Internal temp. accuracy ±1ºC/1.8°F
Damping
Mean value of 0-40 measuring cycles.
Measuring Cycle
Maximum 6 s
Event Log
Maximum 40 events are stored.
Signalling Data
Alarm Signal
Output signal at measuring span limits.
Also accessible via the communications link.
Vibration Testing
Resonance Frequency
160-170Hz and 450-500Hz within 4-600Hz
Source Data
Light Source
Light emitting diode
Detector Data
Photo Detectors
Photodiode (semi-conductor)
M2067/1en
BT-5400 Product Introduction
© BTG 2007
3
1.2 - Technical Data
Process Specification
Process Limits
ANSI 150
PN 16
Process Temperature Limits
5-120°C (41-248°F)
Ambient Temperature Limits
0-50°C (32-122°F)
Performance Specification
Repeatability
± 0.3 ISO
Reproducibility
± 0.4 ISO
Temperature Effect
< -0.05 ISO per °C (°F=°Cx1.8)
Physical Specification
Probe
Degree of Protection
IP 65 / NEMA 4x
Material
Stainless steel SS2343 with EPDM O-rings
Titanium grade 2 with Kalrez O-rings
Window Material
Sapphire
Electronic Housing Material
FRP
Probe Weight
Stainless steel: 6.3 kg (14 lb)
Titanium: 5.0 kg (11 lb)
Valve Assembly Weight
Stainless steel: 5 kg (11 lb)
Titanium: 4.3 kg (9.5 lb)
Storage Temperature
Minimum: -20°C (-4°F)
Maximum: 70°C (158°F)
Junction Box
See section 8.1.2.
4
BT-5400 Product Introduction
© BTG 2007
M2067/1en
1.3 - Dimensions and Mounting
1.3 Dimensions and Mounting
Fig
2 BT-5400 Dimensions
100
(4")
80
")
(3,2
70
°
Flow direction
245
")
(9,7
370 ")
6
(14,
280
)
(11"
I
Min. O 100
(4")
I
I
D
C
90°
I
E
E-A
I
24mm
A-E
I
OUT
IN
B
I
165mm
A
I
I
I
250
)
(10"
70°
O 42 (1,6")
5")
(3,3
85
M2067/1en
BT-5400 Product Introduction
© BTG 2007
5
1.4 - Type Sign Explanations
1.4 Type Sign Explanations
Fig
3 Type sign
BTG Instruments AB
Industrigatan 1-3
661 29 Säffle
SWEDEN
9
7
8
N1619
NO
TYPE
1
6
1234567
BT-5400 UV / IR
4
WET PARTS MADE OF
2
DIN 1.4436/AISI316
SPECIFICATION
PRESSURE
3
PN16
SAPPHIRE/EPDM
5
1. Transmitter model
UV or IR type.
2. Wetted parts made of
Stainless steel SS2343 (AISI 316 SS, DIN 1.4436) or
Titanium grade 2.
3. Pressure
PN 16 = Pressure class rating.
4. Manufacturing number
BTG internal product identification number.
5. Glass and rubber quality in wetted parts
Probe window = Sapphire.
EPDM = O-rings for stainless steel, pH 8-14.
Kalrez = O-rings for Titanium
6. CE-marking
The BT-5400 is approved according to CE directives.
7. C-TIC marking
The BT-5400 is approved according to Australian
C-TIC N1619 directives.
8. Warning sign
The device is designed for industrial use. Installation, handling and service must only be carried out by trained and authorized personnel and according to relevant standards. Read the manual for detailed information
and pay special attention to the warning signs!
9. Manufacturer
6
BT-5400 Product Introduction
© BTG 2007
M2067/1en
2.1 - General
2
Safety Instructions
2.1 General
These safety regulations are based on a risk analysis carried out in accordance with the requirements of relevant CE directions in order to comply with
European standards for CE marking.
In practice, an operating brightness transmitter is only hazardous while covers
are removed during installation and service.
Read these safety regulations before installing the transmitter. Follow the regulations when installing the transmitter, starting up and when carrying out service. Use warning signs for safety information!
Mounting parts, such as the weld-in stud, are dealt with in accordance with the
pressure vessel standards of the countries in question.
Always take precautions when handling equipment in pressurized pipes.
All installation, operation, service, and other handling must be carried out by
trained and authorized personnel and according to valid standards.
NOTE!
Follow this manual for all installation, operation, and service.
NOTE!
For good personal and functional safety: Use only parts which have been
manufactured or approved by BTG.
M2067/1en
BT-5400 Safety Instructions
© BTG 2007
7
2.2 - Conventions
2.2 Conventions
The following conventions are used in this manual:
•
DANGER!
A DANGER! admonition is used when there is a hazard with a risk for injury or possible death to a person.
•
WARNING!
A WARNING! admonition is used when there is a risk for damage to program, device, machine, sampler and so on.
•
CAUTION!
A CAUTION! admonition is used when there is a risk for system failure,
service interruption, disturbances to plant operation, a measuring application and so on.
The admonitions above are hierarchic. A DANGER! admonition includes the
possibility of both a WARNING! and a CAUTION! admonition.
8
BT-5400 Safety Instructions
© BTG 2007
M2067/1en
2.3 - Safety Regulations
2.3 Safety Regulations
DANGER
CHECK PIPES!
Risk for corrosive,
toxic, or aggressive
liquids or gases
with high pressure or
high temperature.
DANGER
Hazardous voltage
in the equipment
DANGER
CHECK PIPES!
Risk for corrosive,
toxic, or aggressive
liquids or gases
with high pressure or
high temperature.
DANGER
Hazardous voltage
in the equipment
M2067/1en
2.3.1
Safety Regulations for Installation
All welding must take place in accordance with current standards and regulations.
All handling of electrical units must take place in accordance with current standards and regulations. The junction box should only be connected by a qualified electrician in accordance with instructions. The ground should be
connected safely and be checked. It should be possible to switch off the voltage in the distribution center. A clear warning, such as a sign, should let other
people know that work is in progress and that the switch must not be touched.
2.3.2
Safety Regulations for Service
All handling of electrical units must take place in accordance with current standards and regulations. The junction box should only be connected by a qualified electrician in accordance with instructions.
Before removing the probe from the valve assembly, verify that the valve is
closed. Hot or corrosive liquid that leaks out while under high pressure may
cause serious chemical burn injuries!
BT-5400 Safety Instructions
© BTG 2007
9
2.4 - CE declaration
2.4 CE declaration
When using the units in other combinations than tested for, BTG can not guarantee the CE directive conformity.
The units in combination with customer installed external devices may conform
with EMC and safety requirements when properly installed and using an adequate CE marked equipment.
The system operator is responsible for the CE directive conformity. The
conformity must be verified by inspection.
10
BT-5400 Safety Instructions
© BTG 2007
M2067/1en
3.1 - Unpacking
3
Installation Instructions
3.1 Unpacking
The following is included in a BT-5400 delivery:
1. 1 x Measuring probe
2. 1 x BT-5400 test report
3. 1 x Reference kit
4. 1 x Ball valve
5. 1 x Brace
6. 1 x Block wrench (17 mm)
7. 1 x Weld-in stud
8. 1 x Transmitter cable
9. 1 x JCT-1100 electronics box
10. 1 x Hand held terminal, SPC-1000
11. 1 x User manual
12. 1 x BT-Calibration installation CD
3.2 Welding Instructions
3.2.1
Stainless Steel Weld-in Stud Installation
NOTE!
Pipe thickness shall not be more than 15 mm.
M2067/1en
BT-5400 Installation Instructions
© BTG 2007
11
3.2 - Welding Instructions
DANGER
1
2
3
CHECK PIPES!
Risk for corrosive,
toxic, or aggressive
liquids or gases
with high pressure or
high temperature.
D=42 mm
(1.7”)
DANGER
Use protective
clothing
4
X
W
A
Z
A
X
12
W
Q=Min. 15 mm (0.6”)
W=Max. 15 mm (0.6”)
X=71 mm (2.8”)
Y=70°
Z=Min. 100 mm (3.9”)
Z
5
Q
Y
A-A
6
BT-5400 Installation Instructions
© BTG 2007
7
M2067/1en
3.2 - Welding Instructions
3.2.2
SMO 254 and Titanium Weld-in Stud
Installation
NOTE!
Pipe thickness shall not be more than 15 mm.
DANGER
1
2
3
CHECK PIPES!
Risk for corrosive,
toxic, or aggressive
liquids or gases
with high pressure or
high temperature.
D=42 mm
(1.7”)
DANGER
Use protective
clothing
4
5
6
Y
X
X=56 mm (2.2”)
Y=70°
7
M2067/1en
BT-5400 Installation Instructions
© BTG 2007
13
3.2 - Welding Instructions
3.2.3
FRP Stud Installation
NOTE!
Pipe thickness shall not be more than 15 mm.
DANGER
1
2
3
CHECK PIPES!
Risk for corrosive,
toxic, or aggressive
liquids or gases
with high pressure or
high temperature.
D=42 mm
(1.7”)
DANGER
Use protective
clothing
5
4
6
X
W
Q
Y
A
Z
A
X
Z
7
W
Q=Min. 15 mm (0.6”)
W=Max. 15 mm (0.6”)
X=71 mm (2.8”)
Y=70°
Z=Min. 100 mm (3.9”)
A-A
9
8
Y=4-5 x
X
Y
4-5 x
4-5 x
10
14
BT-5400 Installation Instructions
© BTG 2007
M2067/1en
3.3 - Mounting Instructions
3.3 Mounting Instructions
3.3.1
Mounting the Sluice Valve
Tools required:
Spanner
1
3.3.2
Mounting the Brace
Tools required:
Spanner
Weld equipment
1
M2067/1en
2
BT-5400 Installation Instructions
© BTG 2007
15
3.4 - Connection Instructions
3.3.3
Mounting the Probe
Tools required:
Spanner
Parts required:
1 x Sealing kit, Article no. 84514280
2
1
3
4
5
3.4 Connection Instructions
3.4.1
Electric Connection
See section 8.3.
16
BT-5400 Installation Instructions
© BTG 2007
M2067/1en
4.1 - Hand-held Terminal SPC-1000
4
Operation Instructions
4.1 Hand-held Terminal SPC-1000
For more information about the SPC-1000, see section 7.4.
M2067/1en
BT-5400 Operation Instructions
© BTG 2007
17
4.2 - Commissioning
4.2 Commissioning
4.2.1
Startup
When you are confident that your BT-5400 has been correctly installed and
you are ready to power up the system for calibration and/or testing, you should
run through this brief check list before powering up. Using this list can help
ensure trouble-free initialization of your system.
NOTE!
To ensure that the ball valve assembly and the probe are correctly installed and
free from leakage it is recommended that you pressure test the system with
water.
The pressure should be kept higher than the rating according to applicable
regulations.
1. Ensure that the system is turned OFF before attaching the system cable to
the transmitter.
NOTE!
Tighten the system cable contact securely!
2. Check all wiring.
3. Install the brightness transmitter BT-5400.
4. Remove the lower cover of the electronics box, power up the transmitter,
and reattach the cover.
Fig
4 Electronics box
1 Power button
2 SPC-1000 connection
1
F1
N
L PE
IN1
IN2
ALARM
MODE
PWR OK
DO1
DO2
Di1
2
+24 GND +AOUT1- +AOUT2- IN1 IN2 GND +AIN- +ALARM-
GND A B
GND A B
5. Connect the SPC-1000 hand-terminal to the front of the electronics box
and power up the SPC-1000.
6. Press BT-5400 (version 1.0 and higher) to enter the BT-5400 main menu.
7. Press Read data to make sure the transmitter and the SPC-1000 are
synchronized.Use analog output 1 for brightness (blue LED).
8. Press the Yes button.
9. Wait 3-5 minutes.
10. Check that Edit range button is 1 and that the square in the lower right
hand corner of the SPC-1000 shows A.out 1.
18
BT-5400 Operation Instructions
© BTG 2007
M2067/1en
4.2 - Commissioning
11. Find out the expected brightness in the process.
12. Look at the square in the lower right hand corner. Read the ISO value. Add
an offset so that the output signal agrees with the brightness expected in
the process.
13. Press the Offset button .
14. Enter the calculated offset value and press the Enter/Menu button.
15. Press the Send data button and then the Send change button.
16. Enter the code 42600 and press the Enter/Menu button (only needed if
send code is ON).
4.2.2
Set Time, Date and Supply Frequency
1. From the main menu, press Configure button.
2. Enter code 5400 and press Enter/Menu button.
3. Press Config.setup.
4. Press Set clock.
5. Enter the correct date and time and press the Enter/Menu button.
6. Check that the correct supply frequency is set (50 or 60 Hz), or edit by
toggle the Supply freq. button.
7. Press the Send page button and then the Send change button.
8. Enter the code 42600 and press the Enter/Menu button (only needed if
send code is ON).
M2067/1en
BT-5400 Operation Instructions
© BTG 2007
19
4.2 - Commissioning
4.2.3
Select Range or Alarm Function
It must be decided if external measuring range selection inputs or alarm output
is needed in the BT-5400 application. The two functions share the same
connection points in the JCT-1100 and one must be selected if to be used.
If range inputs are selected this means that the BT-5400 uses two external
range selector inputs to select measuring range (pulp quality). In this case, no
alarm output exists.
If alarm output is selected, this means that external measuring range selection
is not possible, but can be done manually from the SPC-1000 if needed.
1. From the SPC-1000 main menu, press Configure button.
2. Enter code 5400 and press Enter/Menu button
3. Press Config.setup.
4. Press Range button.
NOTE!
The Range button is only visible if Mode is set to ALARM.
In this case the BT-5400 is configured to handle an alarm output.
Depending on the chosen function, the white eight-pole connector on the
circuit board inside the BT-5400 has to be placed accordingly, in either Alarm
or Range position. Open the BT-5400 casing to get access to the connector.
1. From the SPC-1000 main menu, press Configure button.
2. Enter code 5400 and press Enter/Menu button
3. Press Config.setup.
4. Select the desired funtion with Mode.
5. Send changes to BT-5400 by pressing Send page button and then the
Send change button.
6. Enter the code 42600 and press the Enter/Menu button (only needed if
send code is ON).
NOTE!
Default setting at delivery is Range.
20
BT-5400 Operation Instructions
© BTG 2007
M2067/1en
4.3 - Precalibration
4.3 Precalibration
This section describes the procedure for precalibration and how to check the
reference calibration of the BT-5400.
Since the UV-channel measures only the fluorescence component of the
reflectance, it must be calibrated using a different reference than the other
channels; a fluorescent paper. For the 'high' reference, this paper is put on the
probe tip with the common reference cylinder then put on top of it, and for the
'low' reference the dark side of the reference is used, without the paper. The
value to be used for the 'high' reference thus is the fluorescence component of
the brightness of the standard fluorescent paper, typically approximately 10 %
ISO, and the value for the 'low' reference is zero, corresponding to no
fluorescence.
4.3.1
Calibrate using Reference
This section describes the procedure for precalibration of the BT-5400 using
reference cylinder with high and low brigthness. For the BT-5400 UV variant
the UV-channel uses a fluorescent paper to add on the reference for the high
level of brightness.
Prerequisites:
•
BT-5400 has been mounted and in contact with the process for at
least three hours and has the same temperature as the process.
1. Remove the BT-5400 from the process.
2. Wipe the probe window with a cotton cloth.
3. From the SPC-1000 main menu, press Calibr. button.
4. Enter code 5400 and press Enter/Menu button.
5. Press the Ref.Calib. button.
6. Put the reference with the highest ISO value on the probe tip.
NOTE!
The side with the white plastic inside the reference cylinder is the highest ISO
value.
7. Wait two minutes for the signal to stabilize.
8. Press Next Column button until the cursor is placed in the High probe
column.
9. Check that the signal is stable, then press Copy meas button to copy the
measured signal to the High probe column.
10. Press Next row button.
11. Check that the signal is stable, then press Copy meas button to copy the
measured signal to the High probe column.
NOTE!
For the UV -channel use a fluorescent paper from the black plastic box on the
probe tip and the reference cylinder on top of the paper.
12. Repeat step 8 and 9 until measured signals are registered for BLUE, RED,
GREEN, N.IR, and F.IR/UV in the High probe column.
M2067/1en
BT-5400 Operation Instructions
© BTG 2007
21
4.3 - Precalibration
13. Press Next Column button once so the cursor is placed in the Lab column.
14. Press the Edit button.
15. Enter the high ISO value noted in the test report (Reference measurement
Lab) for the reference. Press Enter/Menu button
(for the UV-channel the value with the fluorescent paper).
16. Press Next row button.
17. Enter the high ISO value noted for the reference. Press Enter/Menu
button.
18. Repeat step 14 and 15 until all Lab values are entered.
19. Press the Send button and then the Send change button .
20. Enter the code 42600 and press the Enter/Menu button (only needed if
send code is ON).
21. Turn the reference cylinder on the probe tip so the lower ISO value is used.
22. If used, put the fluorescent paper back into the black plastic box.
NOTE!
The side with the dark plastic inside the reference cylinder is the lower ISO
value.
For the UV -channel the fluorescent paper is not used for the lower value.
23. Wait two minutes for the signal to stabilize.
24. Press Next Column button until the cursor is placed in the Low probe
column.
25. Repeat step 7 to step 18. Note that when entering Lab values the Low
reference values must be used, from the test report (Reference
measurement Lab).
26. Mount the BT-5400 in the process.
22
BT-5400 Operation Instructions
© BTG 2007
M2067/1en
4.3 - Precalibration
4.3.2
Check Reference Calibration
Prerequisites:
•
BT-5400 has been mounted and in contact with the process for at
least three hours and has the same temperature as the process.
•
All Meas Probe values + M.temp have been noted.
1. Remove the BT-5400 from the process.
2. Wipe the probe window with a cotton cloth.
NOTE!
Warm probe and a cold reference can lead to condesation on the probe
window.
3. From the SPC-1000 main menu, press Ref.Check button.
4. Put the reference with the highest ISO value on the probe tip.
NOTE!
The side with the white plastic inside the reference cylinder is the highest ISO
value.
For the UV -channel use a fluorescent paper from the black plastic box on the
probe tip and the reference cylinder on top of the paper.
5. Wait two minutes for the signal to stabilize.
6. Compare the Meas.Probe value with the High Probe value.
Maximum difference should not exceed ±0.5 ISO.
7. If used, put the fluorescent paper back into the black plastic box.
NOTE!
The side with the dark plastic inside the reference cylinder is the lower ISO
value.
For the UV -channel the fluorescent paper is not used for the lower value.
8. Turn the reference on the probe so the lower ISO value is used.
9. Wait two minutes for the signal to stabilize.
10. Compare the Meas.Probe value with the Low Probe value.
Maximum difference should not exceed ±0.5 ISO.
NOTE!
If the values differ more than ±0.5 ISO, check the probe window for dirt or
condensation and repeat this check. If the values still differ, do a new reference
calibration.
M2067/1en
BT-5400 Operation Instructions
© BTG 2007
23
4.4 - Configure
4.4 Configure
This chapter describes how to configure the BT-5400 for brightness, ERIC,
lightness, redness, yellowness, and if applicable UV -measurement.
4.4.1
Configure Brightness Measurement
Prerequisites:
•
BT-5400 has been mounted and in contact with the process for at
least three hours and has the same temperature as the process.
•
Reference calibration and reference check have been performed.
NOTE!
To demonstrate the brightness configuration process, hypothetical lab samples
are used with a lab value of 80 ISO
1. Take a physical sample for lab analysis.
2. On the SPC-1000 view A.out1 (MIX, that means blue led) and read the
measured value.
Example: 40 ISO
3. Calculate the difference between the lab value and the measured value.
Example: 80-40= 40 ISO.
4. Press the Offset button.
5. Enter the calculated offset value. Example: 40.
6. Press the Enter/Menu button.
7. Press the Send data button and then the Send change button.
8. Enter the code 42600 and press the Enter/Menu button (only needed if
send code is ON).
24
BT-5400 Operation Instructions
© BTG 2007
M2067/1en
4.4 - Configure
4.4.2
Configure ERIC Measurement
Prerequisites:
•
BT-5400 has been mounted and in contact with the process for at least
three hours and has the same temperature as the process.
•
Reference calibration and reference check have been performed.
NOTE!
To demonstrate ERIC configuration, hypothetical lab samples are used with a
lab value of 300 ppm.
1. From the SPC-1000 main menu, press Configure button.
2. Enter code 5400 and press Enter/Menu button.
3. Press Config.setup button.
4. Choose an analog out signal. In this example A.out 2 is used.
5. Toggle the A.out 2 button until MIX is selected.
6. Toggle the Unit button until PPM is selected.
7. Enter the following values:
Mix BLUE
0
Mix RED
0
Mix GREEN
0
Mix N.IR
-20
Mix F.IR/UV
0
Offset
1000
8. Press the Send page button and then the Send change button.
9. Enter the code 42600 and press the Enter button (only needed if send
code is ON).
10. Press the Menu button three times to go back to the main menu.
11. Take a physical sample for lab analysis.
NOTE!
The same lab sample can be used to configure brightness, ERIC, lightness,
redness, and yellowness measurements.
12. View A.out 2 and read the measured value. Example: 1200 ppm
13. Calculate the difference between the lab value and the measured value.
In the example here the lab value was 300 ppm with an offset of 1000.
The offset is then calculated as 1300-1200=100 ppm.
14. Press the Offset button.
15. Enter the calculated offset value. Example: 100.
16. Press the Enter/Menu button.
17. Press the Send data button and then the Send change button.
18. Enter the code 42600 and press the Enter/Menu button (only needed if
send code is ON).
M2067/1en
BT-5400 Operation Instructions
© BTG 2007
25
4.4 - Configure
4.4.3
Configure Lightness Measurement (L*)
Prerequisites:
•
BT-5400 has been mounted and in contact with the process for at
least three hours and has the same temperature as the process.
•
Reference calibration and reference check have been performed.
NOTE!
To demonstrate lightness configuration, hypothetical lab samples are used with
a lab value of 70.
1. From the main menu, press Configure button.
2. Enter code 5400 and press Enter/Menu button.
3. Press Config.setup button.
4. Choose an analog out signal. In this example A.out 3 is used.
5. Toggle the A.out 3 button until MIX is selected.
6. Toggle the Unit button until no values are selected.
7. Enter the following values:
Mix BLUE
1
Mix RED
0
Mix GREEN
0
Mix N.IR
0
Mix F.IR/UV
0
8. Press the Send page button and then the Send change button .
9. Enter the code 42600 and press the Enter/Menu button (only needed if
send code is ON).
10. Press the Menu button three times to go back to the main menu.
11. Take a physical sample for lab analysis.
NOTE!
The same lab sample can be used to configure brightness, ERIC, lightness,
redness, and yellowness measurements.
12. View A.out 3 and read the measured value. Example: 10
13. Calculate the difference between the lab value and the measured value.
In the used example the lab value was 70.
Then the offset is calculated as 70-10=60.
14. Press the Offset button.
15. Enter the calculated offset value. In the used example 60.
16. Press the Enter/Menu button.
17. Press the Send data button and then the Send change button.
18. Enter the code 42600 and press the Enter/Menu button (only needed if
send code is ON).
26
BT-5400 Operation Instructions
© BTG 2007
M2067/1en
4.4 - Configure
4.4.4
Configure Redness Measurement (a*)
Prerequisites:
•
BT-5400 has been mounted and in contact with the process for at
least three hours and has the same temperature as the process.
•
Reference calibration and reference check have been performed.
NOTE!
To demonstrate redness configuration, hypothetical lab samples are used with
a lab value of -0.5.
1. From the main menu, press Configure button.
2. Enter code 5400 and press Enter/Menu button.
3. Press Config.setup button.
4. Choose an analog out signal. In this example A.out 4 is used.
5. Toggle the A.out 4 button until MIX is selected.
6. Toggle the Unit button until no values are selected.
7. Enter the following values:
Mix BLUE
1
Mix RED
-1
Mix GREEN
0
Mix N.IR
0
Mix F.IR/UV
0
8. Press the Send page button and then the Send change button.
9. Enter the code 42600 and press the Enter/Menu button (only needed if
send code is ON).
10. Press the Menu button three times to go back to the main menu.
11. Take a physical sample for lab analysis.
NOTE!
The same lab sample can be used to configure brightness, ERIC, lightness,
redness, and yellowness measurements.
12. View A.out 4 and read the measured value. Example: 0.0
13. Calculate the difference between the lab value and the measured value.
In the example here the lab value was -0.5.
The offset is thus calculated as -0.5-0=-0.5.
14. Press the Offset button.
15. Enter the calculated offset value. In the used example -0.5.
16. Press the Enter/Menu button.
17. Press the Send data button and then the Send change button.
18. Enter the code 42600 and press the Enter/Menu button (only needed if
send code is ON).
M2067/1en
BT-5400 Operation Instructions
© BTG 2007
27
4.4 - Configure
4.4.5
Configure Yellowness Measurement (b*)
Prerequisites:
•
BT-5400 has been mounted and in contact with the process for at
least three hours and has the same temperature as the process.
•
Reference calibration and reference check have been performed.
NOTE!
To demonstrate yellowness configuration, hypothetical lab samples are used
with a lab value of 7.0.
1. From the main menu, press Configure button.
2. Enter code 5400 and press Enter/Menu button.
3. Press Config.setup button.
4. Choose an analog out signal. In this example A.out 5 is used.
5. Toggle the A.out 5 button until MIX is selected.
6. Toggle the Unit button until no values are selected.
7. Enter the following values:
Mix BLUE
1
Mix RED
0
Mix GREEN
-1
Mix N.IR
0
Mix F.IR/UV
0
8. Press the Send page button and then the Send change button.
9. Enter the code 42600 and press the Enter/Menu button (only needed if
send code is ON).
10. Press the Menu button three times to go back to the main menu.
11. Take a physical sample for lab analysis.
NOTE!
The same lab sample can be used to configure brightness, Eric, lightness,
redness, and yellowness measurements.
12. View A.out 5 and read the measured value. Example: 0.0
13. Calculate the difference between the lab value and the measured value.
In the example here the lab value was -0.5.
The offset is thus calculated as 7.0-0=7.0.
14. Press the Offset button.
15. Enter the calculated offset value. Example: 7.0.
16. Press the Enter/Menu button.
17. Press the Send data button and then the Send change button.
18. Enter the code 42600 and press the Enter/Menu button (only needed if
send code is ON).
28
BT-5400 Operation Instructions
© BTG 2007
M2067/1en
4.4 - Configure
4.4.6
Configure UV Measurement
Prerequisites:
•
BT-5400 has been mounted and in contact with the process for at
least three hours and has the same temperature as the process.
•
Reference calibration and reference check have been performed.
NOTE!
To demonstrate UV measurement configuration, hypothetical lab samples are
used with a lab value of 8 % ISO.
1. Take a physical sample for lab analysis.
2. From the SPC-1000 main menu, press A.out until 5 is selected.
A value of 9.5 % ISO is presumed.
3. Calculate the difference between the lab value and the measured value.
In the example here the lab value was 8.
The offset is thus calculated as 8-9.5=-1.5.
4. Press the Offset button.
5. Enter the calculated offset value. Example: -1.5.
6. Press the Enter/Menu button.
7. Press the Send data button and then the Send change button.
8. Enter the code 42600 and press the Enter/Menu button (only needed if
send code is ON).
M2067/1en
BT-5400 Operation Instructions
© BTG 2007
29
4.5 - Operation
4.5 Operation
4.5.1
Enter Main Menu
1. Switch on SPC-1000.
2. Press BT-5400 (version 1.0 or higher).
It is recommended to turn off the communication between the JCT-1100 and
the BT-5400. Analog out 4 and 5 will be disabled to ensure trouble free
communication between SPC-1000 and the BT-5400.
4.5.2
Read Data from BT-5400 to SPC-1000
1. Read data flashes in the main menu to indicate that data in the SPC does
not correspond with data in the instrument.
2. Press Read data button.
3. Press Yes button.
4. Communication between the SPC-1000 and the instrument is now
established and can take approx. 3-4 min. to complete (shown by a
progress bar). If communication with the instrument doesn't work - see
SPC-1000 error message or troubleshooting.
4.5.3
Configure Tag
1. Press Configure button.
2. Enter code 5400 and press Enter/Menu button.
3. Press Tag.
4. Enter tag number, for example 35AI345.
Press 3, wait two seconds and the cursor will jump to the next position.
Press 5. Press 1ABC twice for letter A, this must be done within two sec.
Continue entering the tag number and press Enter/Menu once again when
completed.
5. Select Config. setup button. (Send page button flashes if the tag number
is altered.)
6. Press Send page button.
7. Press Send change button.
8. Enter code 42600 and press Enter/Menu button (only needed if send code
is ON). Communication between the hand terminal and the instrument is
established and the latest changes have been sent.
4.5.4
View Analog Output Signals
1. Press Menu button to enter the main menu.
2. In the large square to the right you see A.out 1.
By pressing the square you can scroll between analog output signals 1 to 5.
30
BT-5400 Operation Instructions
© BTG 2007
M2067/1en
4.5 - Operation
4.5.5
Take Samples
4.5.5.1
JCT-1100
Prerequisites:
•
BT-5400 has been mounted and in contact with the process for at
least three hours and has the same temperature as the process.
•
Reference calibration and reference check have been performed.
1. Press the Sample button on the JCT-1100.
The sampling process starts. Default value are five samples.
2. While the sampling process is ongoing, take a physical sample for lab
analysis.
3. When the sampling process is finished the display will show SAMPLE
SAVED.
4. Press Enter button to show the date. Note the date.
5. Press Enter button again to show the time. Note the time also
6. Press Enter or any other button at this stage will finish the sampling
procedure.
7. Save the sample (0-100). Press Enter.
8. To use the saved samples for calibration, the PC-software BT-Calibration
is available from BTG.
4.5.5.2
SPC-1000
Prerequisites:
•
BT-5400 has been mounted and in contact with the process for at
least three hours and has the same temperature as the process.
•
Reference calibration and reference check heve been performed.
•
On the JCT-1100 communication must be OFF.
1. From the BT-5400 main menu on the SPC-1000 press the Calibr. button.
2. Enter code 5400 and press Enter/Menu button.
3. Press Take sample button.
4. Select the number of samples by pressing Avrg. of repeatedly.
5. Press Take sample. Collect a pulp sample from the line for lab evaluation
at the same time.
6. If the sample is OK, press Accept. (If not OK, press Discard and take a
new sample). The value is now stored in the BT-5400.
7. Repeat steps above until the desired number of samples has been taken.
8. When finished, press Menu twice to return to the BT-5400 main menu.
M2067/1en
BT-5400 Operation Instructions
© BTG 2007
31
4.5 - Operation
4.5.6
Check Events Log
1. Press Misc. button.
2. Press Alarm & diagnostics button.
3. Enter code 5400 and press Enter/Menu button.
4. Press Show log button.
Here you will find the latest 40 alarms or events stored.
5. Press Prev to scroll backwards in the list.
4.5.7
Check Range Selection on the JCT-1100
NOTE!
Mode = Range
1. Check that the transmitter cable inside the JCT-1100 box is connected to
J1 (Range-inputs).
2. On the JCT-1100 communication must be ON.
3. Short-circuit the JCT-1100 between Gnd and Range A(C), the Range in the
main menu on SPC-1000 will change from ”1” to ”2”.
32
BT-5400 Operation Instructions
© BTG 2007
M2067/1en
4.5 - Operation
4.5.8
Check Range Selection on the SPC-1000
1. Check that the the white eight-pole connector on the circuit board inside the
BT-5400 is connected to Alarm.
2. Press Configure button in the main menu.
3. Enter code 5400 and press Enter/Menu button.
4. Press Config setup button.
5. The Mode button should show Alarm.
6. Press Range button and select 1.
7. Press Send page button.
8. Press Send change button.
9. Enter code 42600 and press Enter/Menu button (only needed if send code
is ON).
4.5.9
Measuring range and edit range
The BT-5400 (as most of BTG instruments) use the range concept to select
different calibration setups to distinguish between pulp types and qualities.
As described in section 4.2.3: Select Range or Alarm Function, the selection of
measuring range can be controlled from the process via external range
selector inputs or set manually by SPC-1000 setting.
This function should not be confused with the SPC-1000 Edit range, which is
simply a selection of which of the four available ranges to edit. This means,
Edit range does not select the measuring range of the BT-5400, it gives
access to settings and viewing of measurement results for the different ranges.
The selection of which range (calibration) to use for measurement is done by
external range selector inputs or via SPC-1000 Config setup selection (see
section 4.2.3: Select Range or Alarm Function).
M2067/1en
BT-5400 Operation Instructions
© BTG 2007
33
4.6 - Calibration by Sampling
4.6 Calibration by Sampling
For tuning of the calibration it is recommended that process samples are taken
covering the intended span of operation, with respect to the brightness
parameters of interest.
Depending on application this may be one or more of the following three:
1. Brightness according to laboratory standard with UV-filter, that is without
the fluorescence component.
2. Brightness according to laboratory standard without UV-filter, that is
including the fluorescence component.
3. The difference between 1 and 2, that is the fluorescence component only.
If more than one of them are to be used, then they should be varied
independently in order to achieve a robust calibration. It is recommended
that BT-Calibration is used since more than one channel normally is
required for calibration.
In BT-Calibration the channels to be included in the calibration procedure can
be set, provided that manual calibration mode is used. For all parameters
without influence of fluorescence, such as brightness according to the
laboratory method with UV-filter, L*a*b* and ERIC, the UV-channel should be
de-activated in order to avoid overfitting. Subsequently, for calibrating
parameters with influence of fluorescence, such as brightness according to the
laboratory method without UV-filter, or the fluorescence component itself, the
UV-channel naturally must be activated. Furthermore, for calibrating the
brightness according to the laboratory method without UV-filter, in addition to
the UV-channel also at least one of the RGB LED's must be activated,
presumably the blue one.
34
BT-5400 Operation Instructions
© BTG 2007
M2067/1en
4.6 - Calibration by Sampling
4.6.1
General Remarks on Sampling
NOTE!
The only way to calibrate the transmitter correctly is to take correct laboratory
samples and adjust the transmitter accordingly.
To ensure acceptable precision in laboratory samples, we recommend usage
of BTG sampling valves.
Sampling procedure:
1. Install the sampling valve close to the transmitter on the same side of the
pipe. The valve should be installed so there is no interference from pipe
bends, pumps, etc. Recommendations regarding turbulence damping
zones are the same as for the transmitter itself.
2. Take a number of samples that cover your entire brightness span.
Calculate the mean value and reject samples that deviate widely from the
mean. Take an adequate volume for sampling – at least 500 ml (1/2 US
quart) for a reliable sample.
3. Make sure that samples for calibration and subsequent checking are
always taken in the same manner regardless of who does the sampling.
Similarly, the laboratory procedure must always be exactly the same.
The design of, and compliance with, sampling routines is crucial in assuring
uniform treatment of samples. Calibration and future precision of measurement
by the transmitter depends on this.
During calibration, the pulp flow past the Transmitter must be representative
for the position in which it is installed.
4.6.2
•
Take Samples
On the JCT-1100 communication must be OFF.
1. From the BT-5400 main menu on the SPC-1000 press the Calibr. button.
2. Enter code 5400 and press Enter/Menu button.
3. Press Take sample button.
4. Select the number of samples by pressing Avrg. of repeatedly.
5. Press Take sample. Collect a pulp sample from the line for lab evaluation
at the same time.
6. If the sample is OK, press Accept. (If not OK, press Discard and take a
new sample). The value is now stored in the BT-5400.
7. Repeat steps above until the desired number of samples has been taken.
8. When finished, press Menu twice to return to the BT-5400 main menu.
4.6.3
View Reference Values
1. Enter the SPC-1000 main menu. See start-up.
2. Press Ref. Check button.
3. View all reference values.
M2067/1en
BT-5400 Operation Instructions
© BTG 2007
35
4.6 - Calibration by Sampling
4.6.4
Update Reference Values
This section describes the procedure to check whether internal reference
values are valid or not.
Over time, changes in the measurement accuracy can occur due to ageing etc.
Measured values must not differ more than 0.5 % ISO from the latest values
noted in the Reference measurement section of the test report.
For update of reference values see section 4.3.1: Calibrate using Reference.
NOTE!
It is important to note the new values in the Reference measurement section of
the test report for the BT-5400.
36
BT-5400 Operation Instructions
© BTG 2007
M2067/1en
4.7 - Damping and Measuring Span
4.7 Damping and Measuring Span
Caution!
A too long damping time
constant will reduce the
accuracy of the control
system .
The damping time constant is set after calibration has been completed. Set it
so that the signal is stable. Use a mean value of 0-40 measurements, allowing
6 seconds for each measurement.
If a very long time constant is needed due to an unsteady probe signal, the
transmitter is probably working in an unstable, poorly mixed pulp flow. In this
case you should consider:
•
Relocating the transmitter further from the pump.
•
Improving the remixing system or the supply of dilution water, etc.
Setting a too long time constant reduces the benefit of the transmitter's high
precision. Contact BTG for further advice.
4.7.1
Set Damping
1. From the BT-5400 main menu on the SPC-1000 press the Trend button.
Study the stability of the signal.
2. Press the Menu button and select A.out for the desired channel.
3. Press the Damp button and enter a suitable mean value, for example 5.
4. Press Send data followed by Send change.
5. Enter code 42600 and press Enter/Menu button.
6. Press Trend and study the result.
7. If necessary, adjust the damping.
4.7.2
Set Measuring Span
Try to keep the measuring span as narrow as possible.
1. Select A.out for the desired channel.
2. Set the brightness level for the lower limit of the measuring span.
Press 4 mA for the lower limit (4 mA).
3. Enter the new value and press Enter/Menu.
4. Press 20 mA for the upper limit (20 mA).
5. Enter the new value and press Enter/Menu.
6. Check that the settings are correct.
7. Press Send data followed by Send change to transfer the values to the
transmitter.
8. Enter code 42600 and press Enter/Menu button
(only needed if send code is ON).
M2067/1en
BT-5400 Operation Instructions
© BTG 2007
37
4.8 - Compensation
4.8 Compensation
To compensate for consistency the BT-5400:s analog input can be used by
connecting the signal from an external consistency transmitter.
To get a consistency span, it is best to perform a process dilution for approx.
10 minutes and during the process read the signal from both the brightness
transmitter and the consistency transmitter. Samples should be taken during
and after dilution.
4.8.1
Adjust mA Input Signal
1. Connect the mA-source ”+” to JCT-1100 terminal AUX In+ (F) via a DMM
(digital multimeter) set on current metering to 20 mA (smallest possible
range) and ”-” to terminal ground (GND).
2. From the SPC-1000 main menu, press Misc button.
3. Press Factory setting button.
4. Enter code 1632 and press Enter/Menu button.
5. Press A.in button.
6. Apply 4.0 mA input current. Read the value.
7. Press Set 4 mA button.
8. Enter the value and press Enter/Menu button.
9. Apply 20.0 mA input current. Read the value.
10. Press Set 20 mA button.
11. Enter the value and press Enter/Menu button.
12. Press Send button
13. Press Send change button to transfer the values to the transmitter.
14. Enter code 42600 and press Enter/Menu button (only needed if send code
is ON).
15. Press Menu three times to enter the main menu.
38
BT-5400 Operation Instructions
© BTG 2007
M2067/1en
4.8 - Compensation
4.8.2
Collect Compensation Values
This procedure is divided into two phases.
The first phase is to collect physical samples from the pulp line and at the
same time note the values A.out-process-eu for output signal value and the
A.inp-EU for the compensation signal.
The second phase is to use collected and noted values to activate
compensation.
For example:
PHASE 1:
1. Take physical lab samples from the pulp line.
2. On the SPC-1000 press Misc button.
3. Press Factory setting button.
4. Enter code 1632 and press Enter/Menu button.
5. Press All signals button.
6. Press A.out button to scroll between the output signals (OUT.1).
Select the output signal that to be compensated.
7. Note the A.out-process-eu for output signal value and the A.inp-EU for
the compensation signal.
PHASE 2:
1. Press Menu button three times to enter the main menu.
2. Press Configure button.
3. Enter code 5400 and press Enter/Menu button.
4. Press Comp A.out (1-5) button.
5. Select A.out (1-5).
6. Press Select comp. button to scroll to A.IN if that signal is to be used for
compensation.
7. Press Set comp. table button.
8. Press Edit sample button to scroll to line 1. Line 1 can, for example, be low
consistency (low analog input signal), line 2 can be the nominal value
(operating point) and line 3 high consistency (high analog input signal).
9. Press Load EU value button to enter the analog output signal value noted
from step 7 in phase 1 and press Enter/Menu button.
10. Press Load comp. fact button to enter the required compensation in
percent noted from step 7 in phase 1 and press Enter/Menu button.
11. Press ON/OFF button to activate the compensation factor ACT=ON.
12. Proceed in the same manner for all the rows.
13. Press Menu button.
14. Press Send page button.
15. Press Send change button to transfer the values to the transmitter.
16. Enter code 42600 and press Enter/Menu button (only needed if send code
is ON).
17. Press Menu twice to enter the main menu.
M2067/1en
BT-5400 Operation Instructions
© BTG 2007
39
4.8 - Compensation
40
BT-5400 Operation Instructions
© BTG 2007
M2067/1en
5.1 - Continuous Maintenance
5
Service Instructions
In section 5.1 you will find a summary of maintenance that must be carried out
and the maintenance intervals. In section 5.2 to section 5.7 you will find the instructions for performing the maintenance.
5.1 Continuous Maintenance
5.1.1
•
Check against reference once weekly.
5.1.2
•
Guarantee Period (approx. 6 months)
Check against reference once monthly.
5.1.3
Daily Checks
•
Check the output signal.
•
The output signal from the transmitter must not deviate from lab samples.
How often a lab sample should be taken depends on positioning and
requirement. Determine the tolerance level.
5.1.4
•
Weekly Checks
Ensure that the transmitter is in position. Check for leaks.
5.1.5
Monthly Checks
•
Trend follow up against lab samples. Determine the tolerance level.
•
Make a note of internal signals.
5.1.6
M2067/1en
Calibration Period (approx. 1 month)
Semi-annual Checks
•
Check the transmitter with the reference to ensure ISO-values are still
valid. If not, update reference values, see section 4.3.2: Check Reference
Calibration.
•
Check the ball valve and its O-rings for leakage.
•
Clean the window and lubricate the probe tube.
•
Check the box for moisture.
BT-5400 Service Instructions
© BTG 2007
41
5.1 - Continuous Maintenance
5.1.7
•
Check the ball valve
•
Check the mounting stud
•
Clean the exterior of the transmitter.
5.1.8
42
Annual Checks
Bi-annual Checks
•
Replace any leaking sealings
•
Check the reference against lab values. Update values.
BT-5400 Service Instructions
© BTG 2007
M2067/1en
5.2 - Alarm and Events
5.2 Alarm and Events
The system has an Eventlog, which is accessible from the SPC-1000. Alarms
and exceptions should be recorded in the log.
All alarms start with * in the Eventlog to avoid being confused with Exceptions.
5.2.1
Alarms
The following alarms can be set by the user:
Analog out 1, Analog out 2, Analog out 3, Analog out 4, Analog out 5, Analog
inp.
In SPC-1000 programming the following abbreviations are used:
“Aout1”, “Aout2”, “Aout3”, “Aout4”, “Aout5”, “Inp”
Four different alarm conditions are reported in the Eventlog:
“Hi”, “Lo”, “Ok”, “Off”
“Hi” and “Lo” refer to the limits, High and Low, which can be set for the alarms.
When these are passed, a text stating the alarm is shown in the Eventlog and
whether the upper or lower limit is exceeded (Hi or Lo). The actual value at the
time of the alarm is also shown.
Example:
Aout 1 has exceeded its upper alarm limit of 74.0:
Appearance in SPC
Date:
Event:
Value:
Range:
2007-03-16 11.12.02
*Aout1 Hi
75.2
1
When the value is back within the alarm limits, it is logged with the addition OK.
Example:
The Aout 1 value is below the alarm limit 74.0.
Appearance in SPC
Date:
Event:
Value:
Range:
2007-03-16 11.32.12
*Aout1 OK
70.4
1
An active alarm that is shut off is marked in the log by “Off”.
If the alarm output is activated by one or several alarms, all active alarms must
be deactivated before the alarm output is deactivated. Set the alarms to OFF
to do this.
This event will be logged with “Car alarm”.
M2067/1en
BT-5400 Service Instructions
© BTG 2007
43
5.2 - Alarm and Events
5.2.2
Exceptions
Exceptions are reported to be used for diagnosis or troubleshooting, mainly by
BTG personnel.
Why and when Exceptions are reported can not be influenced by the user.
The following things may cause an Exception:
Event
Description
Text
System start
“Started.
New program
version
”New progr.
“All settings are reset to basic settings when a new
program is downloaded to the transmitter (same or
new version).
Cleared Eventlog
“Clr.EvLog
“From the table Device column ClearEvents all
items in the Eventlog can be cleared.
Changed settings
“New config
“Changes made from SPC-1000 generate an
exception. At certain occasions additional information will occur (see below).
Overflow
“Pre.T err
“T-DETECTOR: Cannot increase amplification
further. Preamplification max= 32.
Underflow
“Pre.T err
“T-DETECTOR: Cannot reduce amplification
further. Preamplification min= 1.
OK
“Pre.T OK
“T-DETECTOR: Within the control range again.
Overflow
“Pre.M err
“M-DETECTOR: Cannot increase amplification
further. Preamplification max= 32.
Underflow
“Pre.M err
“M-DETECTOR: Cannot reduce amplification
further. Preamplification min= 1.
OK
“Pre.M OK
“M-DETECTOR: Within the control range again.
zero division
“K1=0
zero division
“K1 is OK
zero division
“K2=0
zero division
“K2 is OK
Description
“When the system is restarted after a power-fail.
(voltage drop)
“Calibration: The constant is zero.
“Calibration: Constant OK.
“Compensation: The constant is zero.
“Compensation: Constant OK.
Additional information may occur in the Value field for some events:
•
When a new program version (“New progr.”) is loaded, it is shown here.
•
Alarm
•
Preamp
Otherwise the value is 0.00.
44
BT-5400 Service Instructions
© BTG 2007
M2067/1en
5.2 - Alarm and Events
5.2.3
SPC-1000 Error Messages
The SPC communicates with the transmitter using HART® protocol. The SPC1000 and the transmitter has a Master-Slave relationship where the SPC-1000
is Master (secondary master) and the transmitter is Slave.
The error messages that occur on the SPC-1000 always starts with Cmd*,
where * represents the command which led to the error.
The following error messages can occur:
Error message
M2067/1en
Description
Action
Comm line busy
The line is busy by another Master. The The other Master does not follow the
SPC-1000 will try to find an opening in HART standard. Disconnect or turn the
the line 5 times.
other Master off.
Not from slave
The answer comes from another Master Disconnect the HART unit which is not the
and not from the transmitter.
one that you want to communicate with
since there are terminals that do not function properly.
Comm error
Communication error / parity error.
Wrong slave ID
The answer comes from another Slave Normally there is only one Slave and the
than the SPC-1000 sent the command error will not occur. Disconnect any Slave
to.
other than the one you want to communicate with.
Wrong reply cmd
Wrong answer to the command. The
Probably there are other units connected to
transmitter has given answer to a ques- the cable that disturb the communication.
tion the SPC-1000 did not send.
Disconnect them.
Cmd resp error
A protocol error between the SPC-1000 Update the software in the SPC-1000 or the
and the transmitter. The transmitter does transmitter so that they can communicate.
not understand the SPC-1000 properly.
Data length err
The command is too short.
Update the software in the SPC-1000 or the
transmitter so that they can communicate.
Invalid message
Error in the message part as for checksum (below).
Check the cables between the transmitter
and the SPC-1000.
Invalid chksum
Wrong checksum on package
(results normally in re sending).
Check the cables between the transmitter
and the SPC-1000.
Reply time out
The instrument do not respond to com- The SPC-1000 is not connected to the
mand (Waiting time 256 ms).
transmitter or the transmitter is not turned
on. Check the cables between the SPC1000 and the transmitter.
HART rev error
Wrong version of the HART protocol.
It should be version 5.
Not BT-5400 dev
Wrong transmitter to what is chosen in Choose the right transmitter when starting
the SPC.
the SPC-1000.
BT-5400 rev err
Right transmitter but incompatible ver- Update the software in the SPC-1000 or the
sion of the protocol.
transmitter so that they can communicate.
Dev change/repl
The SPC-1000 is connected to another Connect to the right transmitter and start
transmitter than where the data comes with READ DATA. If it is the right transfrom. It is identified by the serial num- mitter go to READ DATA.
ber.
BT-5400 Service Instructions
© BTG 2007
Can be due to disturbances in the environment or bad cables. Check all cables and
fittings.
Update the software in the SPC-1000 or the
transmitter so that they can communicate.
45
5.3 - Sampling, Sheet Determination, Brightness Determination and Instrument Follow-
5.3 Sampling, Sheet Determination, Brightness
Determination and Instrument Follow-up
Sampling to determine brightness and the subsequent laboratory analysis provides a reference for calibration and follow-up of the transmitter. It is therefore
most importance that both sampling and laboratory analysis prioritize accuracy
and repeatability. The tranmitter's accuracy and repeatability is based on these
criteria:
•
Sampling. The sampling equipment and its positioning determine
whether or not a representative sample can be extracted from the pipe.
The sampling technique is necessary to transfer the sample to a safe
vessel. A sample taken from a completely different position, such as a
wash filter, at an uncertain time, will provide a less reliable result than a
sample extracted close to the transmitter while measuring signals were
noted. Some important aspects to consider are: the variations in samplers
(ball valve vs mushroom valves), transmitter filtering time, sample
accuracy, process variations and process parameters for personal safety
(burns can occur at temperatures over 50°C / 122°F, dangerous or acid
chemicals, process pressure).
•
Sheet determination according to SCAN CM 11:95 (=ISO 3688).
•
Determination of brightness according to SCAN P 3:93 (=ISO 2470,
=T525 On-92).
•
Determination of fluoresence in Anex B (=ISO 2470, =T525 On-92).
•
Follow-up. It is advisable to follow up the transmitter using [Error =
Lab.sample - Transmitter] as a follow-up. It is also worth setting a suitable
tolerance level at which actions must be taken. See document SSG 5252.
Another important follow-up procedure is to check transmitter
measurements against references and to check the references.
NOTE!
BTG is not allowed to publish the SSG or SCAN standards but they are
available from SCAN (Scandinavian Pulp, paper and board) and SSG (Pulp
and paper industries engineering Co.).
•
Adjust offset and gain. Re-calibration or adjustment of offset (zero point
adjustment) and gain (amplification) may be required after some time.
Example: Before adjustment: offset = 0, gain = 1 and standard
deviation=2. After adjustment: offset = -41.2, gain = 1.5 and standard
deviation=1.
•
Mixing. When you have sufficient number of sample values you can make
a linear multiple regression. Use a specific program or MS Excel and the
following formula:
EXAMPLE:
MIX(ISO)= Offset+Gain*[mixfactor*Proc.Eu(Blue) + mixfactor*ProcEu(Green)]
46
BT-5400 Service Instructions
© BTG 2007
M2067/1en
5.3 - Sampling, Sheet Determination, Brightness Determination and Instrument Follow-
Before adjustment of offset and gain
Lab (ISO)
88
86
84
82
Lab
80
Linear
regression
78
y = 1.5025x - 41.2
76
74
74
76
78
80
82
84
86
88
Instrument (ISO)
After adjusting offset -41.2 and gain 1.5
Lab (ISO)
88
86
84
82
80
Lab
78
76
74
74
M2067/1en
76
78
80
82
BT-5400 Service Instructions
© BTG 2007
84
86
88
Instrument (ISO)
47
5.4 - Mechanical Maintenance
5.4 Mechanical Maintenance
Material:
Screw driver
Universal screw wrench
Flash light
Lubricant for sealings
5.4.1
Remove Moisture from Circuit Board
1. Loosen the cover.
2. Check the gasket to make sure that no liquid can penetrate.
3. Carefully lift the cover.
4. Use a lamp to check for any condensation on the circuit board.
5. Check that LED 3 is lit and that LED 4 flashes once every five seconds.
5.4.2
Retract Transmitter from Sluice Valve
1. Use protective goggles and chemical-resistant equipment. Inform the
operator what you are doing.
2. Turn off the transmitter at JCT-1100.
3. Disconnect the cable connections.
4. Loosen the two safety screws behind the box.
5. Screw out the transmitter.
6. Close the valve.
7. Loosen the locking nut on the trapezoid threaded screw.
8. Screw out the transmitter.
5.4.3
Check Window
1. The transmitter must be removed.
2. Wipe the window with a cotton cloth.
3. Illuminate with a lamp.
4. Check that the window is intact and also check it for scratches.
5. Check that there is no dirt on or underneath the window.
6. Check that there is no condensate under the window.
48
BT-5400 Service Instructions
© BTG 2007
M2067/1en
5.4 - Mechanical Maintenance
5.4.4
Clean Probe and Window, SPC-1000 and
References
1. The transmitter must be removed.
2. Wipe the window with a cotton cloth.
3. Use alcohol on the pipe and window. For a more stubborn coating of resin
you might need to use diluted 3M hydrochloric acid.
Dry off with a cotton cloth.
4. Grease the metal surface of the pipe.
5. Clean the SPC-1000 according to section 5.4.5.
6. Clean the references with a small amount of washing detergent and water.
Put them in a microwave oven to dry for one minute. Leave in a exicator for
10 minutes. Let rest at room temperature for 30 minutes before making a
measurement in the brightness transmitter.
5.4.5
Clean SPC-1000
The terminal can be cleaned using a cotton cloth dipped in water.
Avoid water getting into the edges of the covers.
NOTE!
Use only mild cleaners. Clean and dry with care!
M2067/1en
BT-5400 Service Instructions
© BTG 2007
49
5.4 - Mechanical Maintenance
5.4.6
Replace Sluice Valve Seals
1. The process must be shut down and the pipe must be empty.
2. Make the replacement according to the figure.
3. Grease the sealings after the replacement.
Fig
5 Ball valve with weld-in
stud in stainless steel
1
2
3
4
Fig
6 Ball valve with weld-in
stud in titanium
1
2
3
4
50
Weld-in stud
Sealings
Sealings
Trapezoid nut
Weld-in stud
Sealings
Sealings
Trapezoid nut
BT-5400 Service Instructions
© BTG 2007
M2067/1en
5.4 - Mechanical Maintenance
5.4.7
Insert Transmitter
1. Grease the sealings and the tip of the probe tube. Do not grease the optical
surface and the trapezoid threaded nut.
2. Do not forget the O-ring on the flange.
3. Insert with a continuous twisting motion until the probe touches the stop.
4. Fasten the nut on the trapezoid threaded screw.
5. Open the valve.
6. Crank the handle until the O-ring positions correctly. The flange on the
probe will meet the flange on the ball valve.
7. Lock the transmitter with two locking screws.
8. Connect the cables.
9. Switch on power to JCT-1100.
M2067/1en
BT-5400 Service Instructions
© BTG 2007
51
5.5 - Service Hardware, I/O part
5.5 Service Hardware, I/O part
Material:
Digital Multimeter (DMM)
4 to 20 mA meter.
(Oscilloscope)
Reference included with delivery
Screwdriver
5.5.1
Electric Test-points
Check that there is power to the instrument and that the fuses in the junction
box are intact. Also check that fuse S1 (250 V Slow 2 A) on the circuit board is
intact. Check that LED 3 is lit up, indicating that 24 V DC is present.
Measure the following voltages:
GND (TP0) and TP3 :
+24 VDC± 2V
GND (TP0) and TP1 :
+15 VDC± 0.75V
GND (TP0) and TP2 :
+5 VDC± 0.25V
GND (TP0) and TP4 :
-15 VDC± 0.75V
GND (TP0) and TP5 :
-5 VDC± 0.25V
GND (TP0) and TP7 :
+5 VDC± 0.05V
GND (TP0) and TP8 :
+10 VDC± 0.05V
GND (TP0) and TP9 :+1.235
VDC+ 15mV / -35mV
Check the following if something is wrong::
•
Is the application program running?
LED 4 indicates if the boot program or an application program is running
or not. If it is flashing once per second, the boot program is running and
waiting for the application program to be downloaded via an RS-485 cable
(for BTG personel only). If it flashes approximately once every 5 seconds,
the application program is running. If the LED is constantly on or off, the
program has not started.
•
Are all cables connected correctly?
Check that all cables are properly inserted.
52
BT-5400 Service Instructions
© BTG 2007
M2067/1en
5.5 - Service Hardware, I/O part
5.5.2
Checking Communication to and from
SPC-1000
Check that a resistor (250 - 300ohms) is fitted between terminals
Out1+(mA1+) and Out1-(mA1-) in JCT-1100.
Connect SPC-1000 to JCT-1100 and switch on the hand terminal. Choose BT5400 and the latest version.
5.5.2.1
Check Range-inputs
Check that the transmitter cable (to /from JCT-1100) is placed in contact J1
(Range-inputs).
1. Short-circuit JCT-1100 between terminals Gnd and Range A(C), then
check that LED 1 is lit up and that Range on the main menu of SPC-1000
changes from 1 to 2. Note that it can take up to 5-10 seconds before the
range changes.
2. Short-circuit between terminals Gnd and Range B(D), then check that LED
2 is lit up and that Range changes to 3. Note that it can take up to 5-10 seconds before the range changes.
5.5.2.2
Check Alarm-output
1. Turn off JCT-1100 and move the transmitter cable to the circuit board from
J1 to J4.
2. Put on the reference on the probe.
3. Switch on JCT-1100 again. Wait until the meter has stabilized (approx. 2
minutes) and make a note of the measured value shown in the lower right
hand box on Range1.
4. Press Configure button.
5. Enter code 5400, and press Enter button.
6. Press Config setup button.
7. Press Mode button until the text under Mode shows Alarm.
8. Press Menu button until the main menu comes back.
9. Press Misc button.
10. Press Alarm & diagnostic button.
11. Enter code 5400 and press Enter button.
12. Check that the button to the left shows Set alarm A.out1. The button second from the far left shall show Alarm ON, if not press this button.
13. Press Low button and enter the measured value +10 units.
14. Check that High is greater than Low.
15. To download new limit values to the transmitter, press the (flashing) button
Send page and then Send change.
16. Check (diode meas) between terminals 14 and 15 on JCT-1100 “+” on
Range A(C) and “-” on Range B(D). It should be less than 0.1V.
17. Check that LED 5 is lit up when the alarm is activated.
18. Press Alarm ON until it shows Alarm OFF.
19. Press Send page button and Send change button and check that LED 5
goes out and that the DMM measures “OL”.
M2067/1en
BT-5400 Service Instructions
© BTG 2007
53
5.5 - Service Hardware, I/O part
20. Switch off the JCT-1100 and move the transmitter cable back to contact J1
(Range-inputs) and change so that Mode shows Range.
5.5.2.3
Check the Temperature Sensor
Remove the transmitter from the process and allow it to cool for 3 hours.
1. From the SPC-1000 main menu select Misc.
2. Press Factory setting button.
3. Enter code 1632 and press Enter button.
4. Select All signals.
Wait for 5 seconds before the page is updated. Mraw temp (temperature
at the probe tip) should be approx. 25°C / 77°F (room temperature) and the
Internal temp (temperature of the circuit board) approx. 40°C / 104°F. If
the transmitter is installed the process, the internal temperature could be
up to 20ºC / 68°F higher than the ambient temperature. The temperature of
the medium should however be less than or equal to the process temperature. Temperature transmission to the temperature sensor can vary, depending on the mounting stud material.
5.5.2.4
Check or Calibrate mA Input Signal
1. Connect a mA-source “+” to JCT-1100 terminal AUX In+ (F) via the DMM
set on current metering to 20 mA (smallest possible range) and “-” to terminal Gnd.
2. From the SPC-1000 main menu, press Misc. button.
3. Press Factory setting button.
4. Enter code 1632 and press Enter button.
5. Press A.in button.
6. Adjust the mA-meter to exactly 20.00 mA. Read the value in
Input (0-1023):.
7. Press Set 20 mA.
8. Enter the value and press Enter button.
9. Adjust the mA-meter to obtain 4.00 mA. Read the value in
Input (0-1023):.
10. Press Set 4 mA.
11. Enter the value and press Enter button.
12. Press Send button.
13. Press Send change button to transfer the values to the transmitter.
54
BT-5400 Service Instructions
© BTG 2007
M2067/1en
5.5 - Service Hardware, I/O part
5.5.2.5
Check or Calibrate mA Output Signal
1. Connect the DMM set to mA (the smallest range for 20 mA) in series with
the resistor in JCT-1100 on mA-output #1 (terminals mA1- and mA1+).
2. From the SPC-1000 main menu, press Misc. button.
3. Press Factory setting button.
4. Enter code 1632 and press Enter button.
5. Press A.out until A.out OUT.1.
6. Press Test value button.
7. Enter 20 and press Enter button.
8. Press Send button.
9. Press Send change button.
10. Adjust using the buttons 20 up or 20 down and then press Send button.
11. Press Send change button to obtain the new signal.
Keep repeating these actions until exactly 20.00 mA is obtained. The test
signal Test value is active for approx. 15 sec. before the output signal is
reset.
12. To calibrate 4 mA, press Test value button.
13. Enter 4 and press Enter button.
14. Press Send button.
15. Press Send change button.
16. Adjust with the buttons 4 up or 4 down and then press Send button.
17. Press Send change button to obtain the new signal.
Keep repeating these actions until exactly 4.00 mA is obtained.
18. Then move the DMM to mA-output #2 (terminals mA2- and mA2+).
19. Press A.out until A.out OUT.2.
20. Repeat the above procedures and then test output #3, #4, #5 in the same
manner.
M2067/1en
BT-5400 Service Instructions
© BTG 2007
55
5.6 - Testing of Optics
5.6 Testing of Optics
5.6.1
Check LEDs and Measuring Cycle
1. Remove the transmitter and turn it so that the probe pipe is pointing upwards.
2. Check to make sure that the LEDs light up one at a time for one second
and then emit a flash. During the measuring sequence the LED will be lit
up for a second and during a test for 20 milliseconds. A measuring cycle
takes about 5 seconds.
The blue LED can light up when it should be switched off due to leaking current. The light however is so weak that it will not affect other LED measurements.
5.6.2
Perform Reference Check
1. Press Ref. Check.
Check if all values are valid.
5.6.3
Set Optical Part
1. It is important that the probe window and references are kept clean.
2. Put on the reference with the highest ISO value (included with the transmitter) on to the probe-tip. Check that the brightness reference is fixed in position. Put down the transmitter on the box part, with the probe pipe pointing
upwards.
3. Wait a while for the transmitter to adjust.
4. In the SPC-1000 main menu, press Configure button.
5. Enter code 5400 and press Enter button.
6. Press Config setup button.
7. Press LED button.
8. Select Config until Config T-LED is visible.
9. Set the TM.Meas to 2800 ± 100 and Preamp.M to 1 by pressing LED curr.
and entering a new value. Press Enter and then Send page.
NOTE!
The measuring range for XM.meas and XT.meas is from 0 to 4095.
10. Check that TM.Dark and TT.Dark are approx. 300 ± 10 units. This tolerance applies when PreAmp readings are lower than 4.
11. Check that (TM.Meas - TM.Dark)/ PreAmp.M is approx. the same as
TM.diff. and PreAmp.M.
The same applies to (TT.Meas - TT.Dark)/ Preamp.T, this should be approximately equal to TT.diff. The value indicated by Preamp.T is not an exact value but a more exact value has been entered in the transmitter's
software.
56
BT-5400 Service Instructions
© BTG 2007
M2067/1en
5.6 - Testing of Optics
12. Press Config. to get next color and set TM.Meas to a value close to 2800
and set Preamp.M to 1 for all colors (blue, green, red) by adjusting the LED
current if necessary.
TT.Meas and Preamp.T should be set for N.IR and F.IR.
Perform these steps for all colors, N.IR, and F.IR, and perform the checks
in step 10 and 11 for all colors, N.IR, and F.IR.
5.6.4
Check of Grounding
1. Start by checking the resistance in the DMM measuring cables.
2. Remove the external grounding cable from the probe.
3. Turn off the power on the JCT-1100.
4. Measure between the probe pipe and the JCT-1100 shielding lacquer. Deduct the resistance of the measuring cables. The resulting resistance shall
be less than 5 ohms and normally around 1-2 ohms.
M2067/1en
BT-5400 Service Instructions
© BTG 2007
57
5.7 - Troubleshooting
5.7 Troubleshooting
Error
Probable cause
Suitable measure
Can’t communicate with SPC-1000. Missing resistor 250 - 300Ω in JCT-1100 Measure in the JCT-1100 on terminals
terminals mA1+ and mA1-. The resistor mA1+ and mA-. The voltage must be
is not in series with DCS.
more than 1.0 V. Less than 1.0V: wrong
resistance. Higher than 18 V: Mount
only 249 Ω in terminals mA1+ and mA1. The voltage must be between 1 and 5
V.
Cable between the transmitter and the Check the grounding.
JCT-1100. The shield must be connected in the PG fitting or in the binder contact.
Contacts not tightened.
Tighten contacts.
Cables inside the JCT-1100 drawn in
small loops.
Straighten cables.
Cable too close to the high-voltage cable.
Move power cables.
Too much AC signal (more than 50
mVAC)
on the shield or the communication cable.
If the AC signal is too high on the shield,
mount a 100-220 microF, 16 Volt bipolar capacitor between the shield (on the
analog out cable) and terminal mA1+.
Too high AC signal (more than 120
Mount a 10,000 microF 40 Volt capacimVAC) on the external 24 VDC supply. tor between the + and the – on the incoming
24 VDC supply.
The SPC-1000 data is not as expect- The SPC-1000 and instrument are oper- Change edit range (SPC-1000).
ed.
ating in different ranges.
Exceptions includes underflows and LED current is too high or too low. The Maintain probe and LED.
overflows.
LED is faulty. The LED is too weak. The
window is broken. There is no pulp in the
pipe.
Can't communicate over the RS-485 Faulty electrical connections on A, B or Check connections and troubleshoot
cable.
the common contact. Wrong address.
RS-485 find address.
The blue signal drops when brightness increases.
Color changes (the liquid turns more yel- Calibrate mix.
low) in the process.
Both the blue and the green signal Consistency variations, compensation
increase and decrease but lab sam- needed.
ples are stable.
Compensate using analog IN and CS
transmitter.
The raw signal fluctuates a lot.
Low flow. High amplification (Preamp).
Poorly mixed pulp.
Move the probe to another position.
The dark signal fluctuates a lot.
Poor earthing, check all earthings,
Check grounding. Bad 24 VDC. Check
shields and contacts against shield lac- capacitor or resistor value from shield to
quer, etc.
ground.
The raw signal drops significantly 5- Moisture on the inside of the window. Fi- Clean the probe, make sure that it is dry
10 minutes after the instrument has ber optics are not properly fastened.
inside and make sure the fiber optics
been inserted in the process.
are fastened.
The raw signal drops in relation to
the reference.
Dirt on the window. Dirt or moisture on
the inside of the window.
Measurements made at different temperature.
Fiber optics have loosened.
O-ring leakage.
Clean the probe and make a reference
procedure.
Check the O-rings and the O-ring
groove.
The logging program stops or runs
slowly.
Too low uptime rate.
Increase the uptime rate from 7 to 10155.1
58
BT-5400 Service Instructions
© BTG 2007
M2067/1en
5.7 - Troubleshooting
Error
Probable cause
Leakage from a new ball valve.
The ball valve has been used for taking Use the ball valve only for inserting the
samples. Wrong sealings. The ball valve probe. Change sealings. Check the ball
is damaged.
valve.
M2067/1en
BT-5400 Service Instructions
© BTG 2007
Suitable measure
59
5.7 - Troubleshooting
60
BT-5400 Service Instructions
© BTG 2007
M2067/1en
6.1 - Measuring Probe
6
Parts List
6.1 Measuring Probe
Fig
7 Measuring Probe
1
2
3
4
5
6
7
8
10
13
14
15
16
3 4
5 6
8
7
Contact RS-485
Contact junction box
Window Saphire
Window socket
Temperature sensor
Fiber optics
Fiber optics
O-ring 79.5x3 EPDM
Optics board
Contact second seal
Screw M6S 10x25
O-ring
O-ring
9
10
14
11
12
13
16
1
15
2
Spare Parts
Item
No.
Rec.
spare
parts
9
11
12
M2067/1en
Qty
6
1
1
Part No.
Stainless
steel
B0011163
Part No.
Titanium
Spare part
Description
Included in Sensor board kit, item no. 12
Included in Sensor board kit, item no. 12
B0011163
Screw
Nylon washer
Sensor board kit
BT-5400 Parts List
© BTG 2007
61
6.2 - Ball Valve
6.2 Ball Valve
Fig
8 Ball Valve
1
1
1
1
2
2
4
Weld-in stud Stainless Steel
Weld-in stud Titanium grade2
Weld-in stud 254SMO
Weld-in stud FRP
Sealing EPDM
Sealing Zalak
Nut for trapeze bar
Item
No.
Rec.
spare
parts
Qty
3
3
*
*
1
1
62
Spare Parts
Part No.
Part No.
Stainless
Titanium
Steel
84514488
84514280
BT-5400 Parts List
© BTG 2007
Spare part
Description
Sealing kit
Sealing kit
EPDM
Zalak
M2067/1en
6.3 - Accessories
6.3 Accessories
JCT-1100
Rec.
spare
parts
Item
No.
Qty
Part No.
Spare part
Description
1
A0092155
Analog out extension kit Analog Out 4 & 5 extension kit for
BT-5400.
For more information regarding JCT-1100 parts, see section 8.6.
Accessories
Sensor card
SPC-100
1
3
English
Ver.1.02
A0006437
2
Copyright© 1995
BTG
All rights reserved
4
SPC-1000
Communication terminal
Item.
No.
1
2
3
4
Rec.
spare
parts
*
(*)
(*)
*
Qty
Part. No.
Spare Part
Description
Hand-held terminal, complete
Connection cable, complete
Sensor card
Adapter for terminal connection
Mains adapter (not shown)
SPC-1000
1
1
1
93253847
84396449
74399536
74417959
46021309
46021317
74417959
46019873
A0003632
1
A0003111
1
A0093252
1
1
1
1
1
Adapter for terminal connection
Alkaline battery (not shown)
Reference complete
(for UV with fluorescence paper)
RS-485 cable for PC software
BT-Calibration
BT-Calibration sofware
SPC-1000/A
220 VAC / 12 VDC
110 VAC / 12 VDC
9V 6LR61
Notes: Recommended spare parts marked * have a typical operating life of two
years. Recommended spare parts marked (*) are less likely to be needed but
are recommended where many transmitters are in operation.
M2067/1en
BT-5400 Parts List
© BTG 2007
63
6.3 - Accessories
64
BT-5400 Parts List
© BTG 2007
M2067/1en
7.1 - Planning the Installation
7
Appendix
7.1 Planning the Installation
7.1.1
Choosing a Site for the Transmitter
Careful location of the transmitter is essential for optimum performance and
ease of maintenance.
The transmitter can be installed in a vertical, horizontal or inclined pipe. If
installed in a horizontal or inclined pipe, care should be taken in locating it so
that it does not measure large air bubbles trapped in the pulp.
Fig 9 shows a typical installation, the BT, TCT, and MPS can be installed close
to a pump. Your BTG sales engineer will be pleased to assist in selecting the
location that will give results that are consistent with your specific control
strategy.
Fig
9 Typical sensor
installation
1 Brightness Transmitter
BT-5400
2 Total Consistency
Transmitter TCT-230X
3 BTG Sampling valve
type MPS-1000
1
3
2
Important recommendations:
The following points should be considered must seriously:
1. Proximity to bends or elbows in pipes is to be avoided due to turbulence
and dewatering. For optimum results when the transmitter is positioned
downstream of a pump or pipe elbow, it should be located at the outer turn
of the pulp stream. See Fig 10, Fig 11, Fig 12 and Fig 13.
M2067/1en
BT-5400 Appendix
© BTG 2007
65
7.1 - Planning the Installation
2. If the transmitter must be installed in a difficult-to-reach position, build a
platform that will make it more easily accessible for service and inspection.
3. Choose a location with sufficient room for insertion and removal of the
transmitter and for opening its covers. The overall length of the transmitter
is 363 mm (14 in.). Remember to leave sufficient room for insertion and removal.
4. Install the transmitter so that it is protected from direct mechanical damage.
Install under a roof overhang if there is any risk of frequent water or pulp
spray.
5. Protect the transmitter from heavy vibration such as cavitating or unbalanced pumps. One method is to install a rubber bellows in the line.
6. Install the transmitter where the flow is above 1 m/s (3.3 ft./s) with well
mixed pulp that is consistency controlled.
7. Avoid tower and stand pipes.
8. Avoid colored liquid, choose installation after washer
.
3xD
Fig 10 Recommended
minimum calming
length - distance
between pipe elbow/
shut-off valve and
transmitter
66
or 1.5m (5ft.)
3xD
or 1.5m (5ft.)
or 1.5m (5ft.)
3xD
The minimum distance
the transmitter should
be located from a bend
or elbow is:
The diameter of the
pipe multiplied by 3 or
1.5 m (5 ft.).
Always choose the
largest value of the
calculated measures.
or 1.5m (5ft.)
3xD
BT-5400 Appendix
© BTG 2007
M2067/1en
7.1 - Planning the Installation
Fig 11 Installation of the
transmitter in relation
to a pipe elbow
NOTE!
Alt. A is the most suitable
if possible, avoid using
alt. C.
A
B
C
Fig 12 Installation of the
transmitter in relation
to pulp flow and pipe
elbows.
Pulp flow
Fig 13 Installation of the
BT-5400 transmitter in
a horizontal pipe.
M2067/1en
BT-5400 Appendix
© BTG 2007
67
7.2 - Forms and Standards
7.2 Forms and Standards
7.2.1
Configure analog out, BT-5400
Analog Configuration Sheet
VO no.
Mix factor
Analog out 1
Name
Date
LED
Damp
Offset
Gain
4 mA
20 mA
Blue
Red
Green
NIR
FIR
Analog out 2
Date
Name
LED
Damp
Offset
Gain
4 mA
20 mA
Blue
Red
Green
NIR
FIR
Analog out 3
Date
Name
LED
Damp
Offset
Gain
4 mA
20 mA
Blue
Red
Green
NIR
FIR
Analog out 4
Date
Name
LED
Damp
Offset
Gain
4 mA
20 mA
Blue
Red
Green
NIR
FIR
Analog out 5
Date
Name
LED
Damp
Offset
Gain
4 mA
20 mA
Blue
Red
Green
NIR
FIR
68
BT-5400 Appendix
© BTG 2007
M2067/1en
Date
Name
M2067/1en
Referen
ce
Lab
Blue
Red
Green
Reference measurement BT-5400
NIR
FIR
Referen
ce
Lab
Blue
Red
Green
VO. no.
NIR
FIR
Itemp
New
calib
7.2 - Forms and Standards
7.2.2
Reference Follow-up
BT-5400 Appendix
© BTG 2007
69
7.2 - Forms and Standards
7.2.3
Internal Signal and LED Settings
BT-5400, VO no.
Internal signals (0-4095)
Date
Name
Tmdiff
Ttdiff
T-led
Btdiff
Rtdiff
Gtdiff
Ntdiff
Ftdiff
I-temp
LED current (0-40 mA), 0=Off
Date
70
Name
Blue
BT-5400 Appendix
© BTG 2007
Red
Green
NIR
FIR
TLED
M2067/1en
M2067/1en
Blue
(ISO)
VO. no.
ISO based on ref
Red
Green NIR
(ISO) (ISO) (ISO)
BT-5400 Appendix
© BTG 2007
Blue
(raw)
Red
(raw)
Raw
Green NIR
(raw) (raw)
NIR (ISO) = k4 + k5*NIR (raw)
FIR
(ISO)
FIR
(raw)
7.2.4
Green (ISO) =k2 + k3*Green (raw)
Blue (ISO) =kO + k1*Blue(raw)
MIX (ISO) = K6+K7 x Blue (ISO) + K8 Green (ISO) + K9 x NIR (ISO)
BT-5400
Result
Name Lab value
Instr.Mix Error
Lab no. Date
(no.) (yy-MM-DD-HH-MM) (Who) (ISO) (ISO)
(ISO)
Calibration sheet
7.2 - Forms and Standards
Calibration Follow Up-sheet
71
7.2 - Forms and Standards
7.2.5
BT-5400
Compensating Calibration Sheet
VO no.
Compensating
Analog out 1, 2, 3, 4, 5
Date
72
Name
No.
A.out 1
A.out 2
BT-5400 Appendix
© BTG 2007
A.out 3
A.out 4
A.out 5
A.in/NIR
Comp.
factor
M2067/1en
7.3 - Software
7.3 Software
The following versions of software are available for BT-5400:
Product
Version
BT-5400
v1.0 or higher
SPC-1000
v1.0 or higher
JCT-1100
v1.5 or higher
BT-Calibration
Features
•
Mixing color calibrations on all analog outputs (MIX default).
•
Compensation available on all 5 analog outputs.
•
The SPC-1000 front menu displays signal information such as showing
which LED is used for analog output.
•
I-temp (internal temperature) can be set for alarm indication.
7.4 SPC-1000 – Menu handling
The software is straightforward to program and is very flexible. Learning to use
the software in a simulated environment accelerates the learning process and
makes mistakes less likely in actual process operation. The software is designed to guide the user, but calls for a basic understanding of how the transmitter works.
HELP functions and other important guidelines are displayed at critical points
in the programming process.
Warning notices are included at points where incorrect programming might affect the output signal. A code query has been inserted at highly critical points
in the program where basic transmitter settings could be affected.
7.5 Using Hart® Communication
The unit uses the Hart® standard communication protocol; for more information refer to the appropriate user instructions from the Hart® association. BTG
is also able to provide advice on the relevant code instructions.
NOTE!
For reliable Hart® communication to the DCS, the polling mode should be
used.
Hart communication to the DCS may be inhibited during connection of the
SPC-1000.
M2067/1en
BT-5400 Appendix
© BTG 2007
73
7.6 - RS-485 Connection
7.6 RS-485 Connection
7.6.1
RS-232 Serial Port
A PC serial port usually has a male DB-25 or DB-9 connector. A female DB-9
to male DB-25 adapter or cable is necessary if the PC has a DB-9 and the converter has a DB-25 connector. The logging program sets DTR high for powering converters without an external power supply. Some PC serial ports can not
supply the power needed to drive a converter.
7.6.2
Fig 14 Connection to the
circuit board
RS485
Connection to the Units
Common, white
B, transparent
A, black
3
2
1
Black
Red
Blue
3
2 J2
1
Connector
7.6.3
Wiring
According to the RS-485 standard the wiring distance can be up to 1.2 km with
up to 32 units connected. Converters with an external power supply can drive a
longer line than one taking the power from the PC serial port.
74
BT-5400 Appendix
© BTG 2007
M2067/1en
8.1 - Product Introduction
8
JCT-1100
8.1 Product Introduction
This manual is valid for JCT-1100/A junction boxes.
8.1.1
System Description
The JCT-1100 junction box is delivered as a complete unit from BTG and is always delivered together with a transmitter. It has the following functions:
•
Local display and console for basic configuration of the transmitter
and the collection of measuring values for calibration using the SPC1000
•
Connection point between the transmitter, power supply and the DCS
(Digital Control System)
•
Local connection for a hand-held terminal SPC-1000, or for a laptop
PC.
Fig 15 Front panel overview
1 Single line LCD display
2 Keys for access to
basic settings
3 Front cover
4 LED indicating 24 V DC
power on
5 SPC-1000 connector
6 Terminal connection
box
7 System cable to
transmitter
1
X.XX % XX.XX mA
2
Enter
Sampl e
3
4
5
24V
Terminal
6
7
8.1.2
M2067/1en
Technical Data
BT-5400 JCT-1100
© BTG 2007
75
8.1 - Product Introduction
Type
JCT-1100 for BTG transmitters
Manufacturer
BTG, Säffle, Sweden
General
Electronic Enclosure
Made of poly carbonate thermoplastic with a
transparent cover. Nickel paint coated internally to
protect against EMC interference.
Protection rating
IP65, NEMA 4x
Weight
Electronics box 2.0 kg (4.4 lbs)
Signals
Output signal
4-20 mA. Current limited to 21 mA.
Superimposed digital signal according to standard
HART® protocol and BELL 202 modem . Follows
HART® universal commands.
Maximum loop resistance
With HART-filter: 750 Ω.
Without HART-filter: 1000 Ω.
Analog input
0/4–20 mA
Alarm function [Valid for
OCT]
Solid state relay (SSR) optocoupler output.
Measuring ranges
Four separate, individually programmable, externally
connectable, using a binary-coded switch. Also
accessible via the communications link.
Communication
Junction box
Display for viewing and buttons for adjusting span,
offset, damping and calibration constants.
Hand terminal
Using the BTG SPC-1000 hand-held terminal jack
plugs into the junction box. The communication is
superimposed over the 4–20 mA current loop.
DCS
Directly with the DCS. HART® universal commands
can easily be made available.
Fieldbus
Prepared for fieldbus communication, e.g., Profibus
PA or Fieldbus Foundation
Connections
76
BT-5400 JCT-1100
© BTG 2007
M2067/1en
8.1 - Product Introduction
Transmitter connection
LIYCY 5x2x0.5, twisted pair, shielded 10 m/33 ft.
cable with connector is included in the delivery. This
cable is connected to the terminal strip in the junction
box.
Other cable lengths are available on request, max.
100 m/328 ft.
Cable fittings
Brass, nickel coated.
Supply voltage
Supply voltage
Built-in multi voltage power supply 100–240 V AC,
50/60 Hz (85-264 V AC, 47-63 Hz)
Power consumption
Maximum 60 VA for AC supply
Standardization and approvals
Standardization
Quality-assured in accordance with ISO 9001.
Designed in accordance with relevant CE directives
and standards. See section 8.1.5: CE Declaration of
Conformity
Approvals
Equipment type
Permanently connected equipment. The product is
designed for industrial use.
Installation category
III
Shock protection
Class I
Pollution degree
2
M2067/1en
BT-5400 JCT-1100
© BTG 2007
77
8.1 - Product Introduction
8.1.3
Type Sign Explanations
NOTE!
Always refer to the type sign when ordering spare parts.
Fig 16 Type sign for junction
box
1
2
3
4
5
6
7
8
9
10
11
12
2
1
Manufacturer
CE-marking
C-Tick-marking
ETL-marking
Warning sign*
Product
Voltage
Apparent power
Manufacturing number
Frequency
Installation category
Factory identification
BTG Instruments AB
Industrigatan 1-3
661 29 Säffle
SWEDEN
3
4
5
N1619
Certified to CAN/CSA-C22.2 No.61010-1 2nd ed
6
7
8
TYPE
NO
VOLTAGE
FREQUENCY
JCT-1100/A
50-60 Hz
100-240 VAC
APPARENT POWER
50 W
9
INSTALLATION CATEGORY
III
11
10
FACTORY IDENTIFICATION
12
*) Warning sign
The device is designed for industrial use. Installation, handling and service must only be carried out by trained and authorized personnel and according to relevant standards and legislation. Read the manual for
detailed information and pay special attention to the warning signs!
8.1.4
Revision Information
The following changes have been made in the JCT-1100/A compared with the
JCT-1100:
78
•
The language setting for the JCT-1100 is stored in the transmitter memory
instead of the JCT-1100 memory.
•
In a standard delivery the isolation amplifier has been replaced with a
HART-filter in the 4-20 mA output signal. The extra 250 ohm resistor for
HART communication is not required as long as the HART-filter is
mounted.
•
The RS-485 terminal block has been made smaller.
BT-5400 JCT-1100
© BTG 2007
M2067/1en
8.2 - Safety Recommendations
8.1.5
CE Declaration of Conformity
BTG’s CE-Declaration of Conformity is only valid when the junction box is used
in combination with other BTG equipment.
8.2 Safety Recommendations
See section 2 for safety recommendations.
M2067/1en
BT-5400 JCT-1100
© BTG 2007
79
8.3 - Installation Instructions
8.3 Installation Instructions
8.3.1
Mounting
NOTE!
Locate the junction box close to the transmitter and sampling valve to achieve
a convenient connection of the SPC-1000 hand-held terminal for calibration
and monitoring.
For convenient working height and a good operating position the bottom of the
junction box should be approximately 1.4 m (4.6 ft.) above the floor. The SPC1000 can be placed in a holder if one has been mounted close to the junction
box.
Install the box in a position where it is protected from mechanical damage.
50
2"
Fig 17 Recommended
clearances
NOTE!
The front cover swings
open and is hinged on
the left side.
300
12"
Enter
Sample
50
2"
200
8"
Terminal
Consistency
Transmitter
Sample
Enter
XCT-2300
217
8.5"
Fig 18 Dimensions
142
5.6"
80
34
1.3"
BT-5400 JCT-1100
© BTG 2007
285
11.2"
20
0.8"
Terminal
M2067/1en
8.3 - Installation Instructions
The junction box has three attachment lugs which are bolted to a flat surface.
Fig 19 Attachment lugs
BTG recommends that a roof or overhang is mounted above the junction box
to protect it against spray and pulp. If the junction box is located outdoors, a
roof should be mounted that protects from direct sunlight which can cause excessive operating temperatures. If possible, the SPC-1000 should also be protected when placed in it’s holder.
Fig 20 Protecting roof
200
8"
300
12"
75°
M2067/1en
BT-5400 JCT-1100
© BTG 2007
81
8.3 - Installation Instructions
8.3.2
Cabling
8.3.2.1
Cable Types
BTG recommends properly dimensioned cables as described below for connections between the junction box and external equipment.
The power cable should be in accordance with the IEC 227/245 standard.
Power supply cable:
•
Shielded (≥80 %) 3 x 0.75 mm2 (3 x AWG18) with PE.
NOTE!
BTG recommends that the power supply cable has a 2 A slow blow fuse.
Signal cables (for Output, Range Select, Alarm, AUX-in, etc.):
•
Shielded (100%), twisted pair: Min 2 x 0.3 mm2 (2 x AWG24). Typical
size is 2 x 0.75 mm2 (2 x AWG18).
NOTE!
BTG recommends that separate cables be used for analog and digital signals.
Multiconductor cables can be used.
82
BT-5400 JCT-1100
© BTG 2007
M2067/1en
8.3 - Installation Instructions
8.3.2.2
Fig 21 Grounding of cable
shields
1 Power supply or transmitter
cable
2 Nut
3 Sealing ring
4 Insert ring
5 Cable shield
6 Socket
7 Free wires
Guidelines for Cable Connections
•
Do not place signal cables and power supply cables close together! This
may cause interference.
•
Always avoid loops of cable leads in the junction box and make the leads
as short as possible.
•
The shields for the Alarm, AUX-in and Range select cables should not be
connected in the junction box, unless the mill standard specifically
requires it. Normally, these shields are grounded to instrument earth at the
mill end.
•
BTG recommends that the shield for the output signal cable is connected
to CONN21 in the junction box. CONN21 is connected to PE via a
capacitor.
7
6
5
4
3
2
1
Standard cable gland
Optional cable glands
Cable shields should be connected as shown in Fig 22 below.
Fig 22 Connection of signal cable
shields
1 System cable:
The cable shield must be
grounded to the cable glands at
both ends.
2 Output signal cable:
In the JCT-1100 the shield is
connected to ”CONN21” and in
the mill equipment the shield is
connected to instrument earth.
BTG
transmitter
BTG
JCT-1100
CONN21
1
= PE/Protective earth
M2067/1en
Mill
equipment
BT-5400 JCT-1100
© BTG 2007
2
= Instrument earth
83
8.3 - Installation Instructions
It is important to tighten the cable connector firmly to the transmitter – use a
tool! If not tightened firmly, the shield will not be properly grounded.
Fig 23 Transmitter cable
connection
JCT-1100
Tx
Conn2
84
BT-5400 JCT-1100
© BTG 2007
M2067/1en
8.3 - Installation Instructions
8.3.3
Wiring Diagram
COM
Fig 24 Wiring
B
Out 5 Out 5 +
OUTPUT
put
B
Out 4 +
mA1– mA2– mA3–
CONN4
Out 4 -
mA1+ mA2+ mA3+
CONN5
A
COM
A
CONN6
NOTE!
Unshielded long, looped wires may cause
interference to the signal.
The terminal markings become visible
when the screw clamp connectors are
removed.
Out 3
Out 2
Out 1
Signal output cable shield should be connected here. See section 8.3.2.2.
SW3
Aux in +
Range select, input B. Alarm -.
Range select, input A. Alarm +.
Cable shield connected to cable gland. See section 8.3.2.2.
ON
OFF
A
B
C
D
E
CONN3
USER
+24V GND GND GND GND GND GND
F
G
CONN21
LOAD RES
Cable shield connected to cable gland. See section 8.3.2.2.
G
F
Green
E
Brown (transmitter supply)
White (transmitter supply)
SUPPLY
A
+24V GND
PE
CONN1
Protective earth
L
Transmitter
Red
Line
N
SENSOR
Black
Yellow
D
C
Grey
B
CONN2
Neutral
Blue
Pink
90-250 V AC
Power Supply
M2067/1en
BT-5400 JCT-1100
© BTG 2007
85
8.3 - Installation Instructions
8.3.3.1
HART-communication
The junction box is delivered with a HART filter that removes the superimposed HART signal on the analog output signal from the junction box to the
DCS, and so on. If the HART-protocol is used after the junction box, the HART
filter must be removed. See section 8.5.2.1.
BTG’s hand-held terminal (SPC-1000) and the display in the junction box use
the HART-protocol for communication between the transmitter and the junction
box. The HART communication requires a 250 ohm minimum loop resistance,
which is normally provided by the HART filter. If the HART filter is removed, it
must be verified that the output circuit (DCS, etc.) has at least 250 ohms resistance. If this is not the case, then an extra resistor must be connected in series
with the output signal cable. Always connect the resistor to the plus (mA+) terminal.
To ensure that there is a closed 4-20 mA loop between the transmitter and the
junction box, the output signal from the junction box is jumpered on delivery.
This jumper must always be removed when a signal cable is connected. See
figure below.
Fig 25 Removal of jumper
CONN21
mA1+ mA2+ mA3+
CONN4
8.3.3.2
NOTE!
Remove the resistor before the output signal
cable is connected.
Out 1–
Out 1+
mA1– mA2– mA3–
Range Select Input
Transmitter calibration ranges for different production circumstances can be
changed with binary inputs to the transmitter.
86
Range
Input A
Input B
1
2
3
4
0
1
0
1
0
0
1
1
BT-5400 JCT-1100
© BTG 2007
M2067/1en
8.4 - Operating Instructions
8.4 Operating Instructions
8.4.1
Starting the Junction Box
The junction box is started by switching on the power supply with the switch in
the terminal box. See Fig 26 below. See the start-up instructions in the
transmitter section of this manual for detailed start-up instructions.
Fig 26 Power supply switch
1 Power supply switch
1
8.4.2
Transmitter Configuration from the Junction
Box
8.4.2.1
General Information
The JCT-1100 junction box is equipped with a display and four push buttons.
The display has one row of sixteen characters. The operator can make some
basic adjustments using the push buttons and the display without using the
hand-held terminal SPC-1000.
To make a complete calibration or to configure some major settings the
SPC-1000 must be used. The transmitter settings made from the junction box
can be loaded into the SPC-1000. There they may be used for documentation,
print-out, or backup.
NOTE!
Do not configure the transmitter from the hand-held terminal and the junction
box at the same time. Valuable configuration data can be lost! Always close a
configuration session by updating the transmitter.
M2067/1en
BT-5400 JCT-1100
© BTG 2007
87
8.4 - Operating Instructions
Fig 27 Front panel with push
buttons and display
1
2
3
4
5
Display
Sample button
Arrow up button
Arrow down button
Enter button
X.XX % XX.XX mA
Enter
Sample
1
2
3
5
4
24V
Terminal
The push buttons have the following functions (depending upon position in
menu structure):
88
Push button
Function
Sample
Reads a measurement value from the
transmitter that corresponds to a calibration
sample value
Arrow up
Scrolls up in the menu structure
Change a value upwards
Discard a sample value
Arrow down
Scroll down in the menu structure
Change a value downwards
Discard a sample value
Enter
Select menu options
Moves the cursor to the right
Stores entered values and calibration samples
BT-5400 JCT-1100
© BTG 2007
M2067/1en
8.4 - Operating Instructions
8.4.2.2
Menu Structure
NOTE!
The display on the junction box always returns to the Result display after 15
seconds of inactivity, or after three minutes if a message has been shown. If
data was changed, it is automatically saved to the transmitter.
Start up display
BT-5400 UV/IR
The transmitter type is displayed when the JCT-1100 has
established contact with the transmitter.
While reading or writing data ”Wait...” is displayed.
Result display
1: 76.6%
ISO
Result display: shows the process value.
To access the main menu items, press the up or down on
the arrow buttons:
.
Result display
1: 13.5 mA
Result display: shows the output signal 4 - 20 mA.
Channel setting
CHANNEL 1
Channel 1-5.
Range setting
RANGE 1
The present measuring range. Can be changed to access
other ranges (ranges 1, 2, 3 or 4).
Span setting
50.0 - 95.0
Measuring span, % ISO.
Offset adjustment
OFFSET +0.00
Process value offset, if required.
Gain
GAIN 1.00
Process value gain.
Damping setting
DAMPING 0
Damping on output signal, if required.
JCT Communication
JCT COMM. ON
Communication ON or OFF between the JCT and the
transmitter.
M2067/1en
BT-5400 JCT-1100
© BTG 2007
89
8.4 - Operating Instructions
8.4.2.3
Collecting samples
1: 76.6%
Collecting Samples and Changing Settings
ISO
When the Result display is shown samples can be
collected to calibrate the transmitter.
Press the sample button
sample for lab calibration.
Sampling
X(5)
45.5 OK?
and collect a process
The “X” in “X(5)” will increment as each value is stored.
When all values have been stored, an average sample
value will be calculated and displayed.
Save the sample value by pressing enter
the sample value by pressing
or
, or discard
.
NOT SAVED
“NOT SAVED” is displayed if the sample value is
discarded. Press any button to finish sampling procedure.
SAMPLE SAVED
“SAMPLE SAVED” is displayed if the sample value is
saved.
Press enter
, to display sample date (note the date).
NOTE!
Always mark the lab sample with date and time. The lab sample value for the
corresponding calibration cannot be entered from the JCT-1100.
The BT-Calibration sofware must be used.
Date
Date 2007-03-08
Press enter
, to display sample time (note the time).
Time
Time
Press enter
procedure.
, to complete and finish sampling
90
11:17:00
BT-5400 JCT-1100
© BTG 2007
M2067/1en
8.4 - Operating Instructions
Channel setting
CHANNEL 1
Press enter
1
Press
to select another channel.
or
to choose a channel to view/edit.
Verify by pressing enter
Range setting
RANGE 1
Press enter
1
Press
enter
or
.
to select another range.
to choose a Range. Verify by pressing
.
Note! The transmitter will continue operating with the
range set by the Range select switch and the output
signal will not change.
All Range specific parameters (Span, Offset, Damping &
Calibration) can be changed for each Range. However,
the changes will not take affect until the transmitter’s
range is changed via the Range select switch.
Span setting
SPAN 0.50-2.00
Press enter
0.50-2.00
When the first number starts to blink press
to change the Span.
or
to change the number. Press enter
to accept. The
next number will blink. Repeat the procedure until done.
SPAN 1.00-2.50
M2067/1en
BT-5400 JCT-1100
© BTG 2007
After the last value has been entered, the new span is set.
91
8.4 - Operating Instructions
Offset adjustment
OFFSET +0.00
+0000.0000
Press enter
to change the offset.
The sign character starts to blink. Press
or
to
change the sign or number. Press the enter
to
accept. The next number will blink. Repeate the
procedure until done.
Gain
GAIN 1.00
1.00
Press enter
to change the gain.
The first number starts to blink. Press
or
to
change the value. Press enter
to accept. The next
number will blink. Repeat the procedure until done.
Damping setting
DAMPING 0
Press enter
00
The first number starts to blink. Press
to change the damping value.
or
to
change the number. Press enter
to accept. The next
number will blink. Repeat the procedure until done.
JCT Communication
JCT COMM. ON/OFF
Enter
toggles communication ON or OFF.
Auto returns to ON after 30 minutes. Should always be
set to OFF when the SPC-1000 is used.
92
BT-5400 JCT-1100
© BTG 2007
M2067/1en
8.5 - Service Instructions
8.5 Service Instructions
8.5.1
Maintenance Routines
No special maintenance routines are required. However, it is recommended
that the following preventive maintenance is carried out:
•
Check that the junction box is not damaged and complies with the
protection rating (IP65).
•
Check that the cables to and from the junction box are not damaged.
•
Keep the junction box clean and free from pulp, etc.
8.5.2
Service Hardware
The different hardware components are identified in Fig 28 below:
Fig 28 Hardware
components
1 Screws for
terminal cover (2x)
2 Screws for
front panel (4x)
3 24 V DC connector
4 AC power connector
5 AC power supply
6 Mounting plate for
power supply unit
7 24 V DC LED
8 Display connector
9 SPC-1000 connector
10 Screws for main circuit
board (15x)
11 HART-filter (farthest to
the left) or isolation
amplifiers
12 Screw for front panel
grounding strap
M2067/1en
Sample
Enter
24V
1
2
Terminal
12
3
5
4
11
7 8 9 10
6
BT-5400 JCT-1100
© BTG 2007
93
8.5 - Service Instructions
8.5.2.1
Handling of Circuit Boards for Output Signals
Upon delivery a HART-filter on a separate circuit board is mounted (see Fig 29
below). No isolation amplifiers are mounted.
The HART-filter circuit board can be replaced with an isolation amplifier, or removed as required. If the circuit board is removed and not replaced, then the
connector pins have to be strapped in order to get an output signal. See Fig 29
below.
It is possible to mount isolation amplifiers for up to three analog output signals
(depending upon the transmitter type) in the junction box.
DANGER!
High voltage within the
junction box.
The front panel has to be removed before the circuit boards can be replaced,
or removed. See section 8.5.2.3.
Fig 29 Mounting of circuit boards
for HART-filter, circuit boards
for isolation amplifiers, or
strapping of outputs.
Circuit board
connected
(Output signal)
Position of isolation amplifiers under
the front panel
or
94
BT-5400 JCT-1100
© BTG 2007
No circuit board
connected,
strapped pins
(Output signal)
No circuit
board
connected
(No output
signal)
or
M2067/1en
8.5 - Service Instructions
8.5.2.2
Replacing the Power Supply Unit
If the power supply is faulty, it needs to be replaced.
Tools required:
Star screwdriver (medium size)
DANGER!
High voltage within the
junction box. Connections
may only be carried out by
qualified personnel.
NOTE!
Break and secure the AC power supply voltage to the junction box before the
front panel is removed (it is not sufficient to turn it off with the power supply
switch in the terminal box.).
All numbers within () below refer to Fig 28.
1. Check that the 24 V DC LED (7) and the display are off.
2. Unscrew the front panel (2) and carefully lift the front panel plate aside.
3. Detach the display connector (8) by pushing the two levers aside and pulling the connector straight out from the main circuit board.
4. Detach the SPC-connector (9) by pulling it straight out from the main circuit
board. It might be necessary to loosen the locking flap using a flat screw
driver.
5. Unscrew the front panel grounding strap (12) from the main circuit board.
6. Detach connectors for 24 V DC (3) and AC power (4) from the main circuit
board.
7. Detach the power supply unit from it’s mounting plate by pushing the black
lever (located on the right upper corner) to the left.
8. Lift out the power supply unit (5).
9. Move the wiring for 24 V DC (3) and AC power (4) from the faulty power
supply unit to the new power supply unit.
To mount the new power supply unit, perform the steps above in reverse
order.
M2067/1en
BT-5400 JCT-1100
© BTG 2007
95
8.5 - Service Instructions
8.5.2.3
Replacing the Front Panel
If there is something wrong with the display or the push buttons, then the
whole front panel has to be replaced. However, the transmitter will still work
properly without the display or the buttons functioning in the junction box. This
allows the replacement to be made at a convenient time.
DANGER!
High voltage within the
junction box. Connections
may only be carried out by
qualified personnel.
Tools required:
Star screwdriver (medium size)
NOTE!
Break and secure the AC power supply voltage to the junction box before the
front panel is removed (it is not sufficient to turn it off with the power supply
switch in the terminal box.)
All numbers within () below refer to Fig 28.
1. Check that the 24 V DC LED (7) and the display are off.
2. Unscrew the front panel (2) and carefully lift the front panel plate aside.
3. Detach the display connector (8) by pushing the two levers aside and pulling the connector straight out from the main circuit board.
4. Detach the SPC-connector (9) by pulling it straight out from the main circuit
board. It might be necessary to loosen the locking flap using a flat screw
driver.
5. Unscrew the front panel grounding strap (12) from the main circuit board.
6. Move the display wiring (8) from the faulty display panel to the new display
panel.
To mount the new front panel, perform the steps above in reverse order.
If the front panel sticker is not mounted, it is easier to mount it after the
front panel has been replaced in the junction box.
96
BT-5400 JCT-1100
© BTG 2007
M2067/1en
8.5 - Service Instructions
8.5.2.4
Replacing the Main Circuit Board
If the main circuit board is faulty, it needs to be replaced.
Tools required:
Screwdriver (medium size)
Star screwdriver (medium size)
DANGER!
High voltage within the
junction box. Connections
may only be carried out by
qualified personnel.
NOTE!
Break and secure the AC power supply voltage to the junction box before the
front panel is removed (it is not sufficient to turn it off with the power supply
switch in the terminal box.).
All numbers within () below refer to Fig 28.
1. Check that the 24 V DC LED (7) and the display are off.
2. Unscrew the terminal box cover (1).
3. Detach all screw clamp connectors with cables connected to them. Note
that the terminal screws do not need to be fully removed, the contact can
be pulled out of the screw clamp connector on the main circuit board.
4. Unscrew the front panel (2) and carefully lift the front panel plate aside.
5. Detach the display connector (8) by pushing the two levers aside and pulling the connector straight out from the main circuit board.
6. Detach the SPC-connector (9) by pulling it straight out from the main circuit
board. It might be necessary to loosen the locking flap using a flat screw
driver.
7. Unscrew the front panel grounding strap (12) from the main circuit board.
8. Unscrew the fifteen screws (10) that attach the main circuit board to the
box.
9. The main circuit board can now be removed. Space is tight, so be careful.
Lift out the upper part first (where the display connector (8) is located).
To mount the new main circuit board, perform the steps above in reverse
order.
8.5.3
Service Software
Software can only be serviced by BTG’s technicians. Contact BTG regarding
any suspected software problems.
M2067/1en
BT-5400 JCT-1100
© BTG 2007
97
8.5 - Service Instructions
8.5.4
Troubleshooting
This section only covers troubleshooting with regards to possible faults that
can occur in the junction box. Please consult the transmitter part of this manual
for transmitter related problems.
In the trouble shooting table below the probable causes are listed in a logical
order. They should be checked in that order.
The fuses and the test points indicated in the troubleshooting table below
are shown in Fig 30. All numbers within () in the troubleshooting table below refer to Fig 28.
Symptom
Probable cause
Action
1. The junction box
does not power up.
1.1. No power to the junction
box
Check the external power
supply voltage.
1.2. Fuse on main circuit
board blown
Check fuses.
FS1 and FS2 for AC power
supply, FS3 for 24 V DC to
transmitter, and FS4 for
DC/DC converters.
1.3. Faulty or incorrectly
connected cabling to the
power supply unit
Check the AC power (4)
and 24 V DC (3) wiring.
1.4. Faulty 24 V DC supply
Check TP1. If out of limits,
replace the power supply
unit. Seesection 8.5.2.2.
1.5. Faulty DC/DC converters Check TP2 and TP3. If out
on main circuit board
of limits, replace the main
circuit board. Seesection
8.5.2.4.
2. There is no informa- 2.1. No power to the junction
tion on the display.
box
3. Nothing happens
when the push buttons are used.
4. There is no output
signal.
98
See point 1 above.
2.2. Faulty or incorrectly
connected display wiring
Check the display wiring (8)
and the groundling strap
(12).
2.3. Display is faulty
Replace the front panel.
Seesection 8.5.2.3.
3.1. Faulty or incorrectly
connected display wiring
Check the display wiring (8)
and the grounding strap
(12).
3.2. One, or more push
buttons are faulty
Replace the front panel.
Seesection 8.5.2.3.
4.1. No power to the junction
box
See point 1 above.
4.2. Transmitter not in
operation.
Check the display for output
signal
BT-5400 JCT-1100
© BTG 2007
M2067/1en
8.5 - Service Instructions
Symptom
5. The SPC does not
work.
Probable cause
Action
4.3. Improperly mounted
HART-filter or isolation
amplifier
Check if the HART-filter or
isolation amplifier is correctly mounted. Seesection
8.5.2.1.
4.4. Open loop for 4-20 mA
output
Check the complete 4-20
mA loop for breaks.
4.5. Incorrect transmitter
analog out configuration
See the transmitter part of
this manual for calibration
instructions.
4.6. Faulty HART-filter or
isolation amplifier
Replace, or remove the isolation amplifier circuit board.
Seesection 8.5.2.1
5.1. Incorrect program running Switch to correct sensor
in the SPC
card and program in the
SPC.
5.2. Not enough resistance
(minimum 250 Ω ) in the
4-20 mA output loop
If the output signal is connected to a DCS, check that
the total loop resistance is
between 250Ω and 750Ω
(with HART-filter) or between 250Ω and 1000Ω
(without HART-filter.
5.3. The analog output signal
is not between 4-20 mA
See point 4 above.
5.4. Faulty or incorrectly
connected SPC cable
Check the connectors and
cabling from the SPC to the
main circuit board (9).
5.5. Faulty Hart
communication with the
SPC
Check that the SPC functions correctly. If it does, it is
necessary to replace the
main circuit board. See section 8.5.2.4
6. The analog output
6.1. Faulty HART-filter or
signal from the juncisolation amplifier
tion box is lower than
what the display display shows.
6.2. Incorrect transmitter
analog out configuration
M2067/1en
BT-5400 JCT-1100
© BTG 2007
Replace, or remove the circuit board. Seesection
8.5.2.1
See the transmitter part of
this manual for calibration
instructions.
99
8.5 - Service Instructions
Fig 30 Fuses and test points
6
on the main circuit
board
4
1
Pos
TP
Label
8
7
9
3
2
Min.
5
Max
Unit
Comment
1
FS1
2
A
Fuse for AC power supply: 250V, 2AT
2
FS2
2
A
Fuse for AC power supply: 250V, 2AT
3
FS3
2
A
Fuse for 24 V DC power supply: 250V, 2AT
4
FS4
2
A
Fuse for DC/DC converters: 250V, 2AT
5
TPØ
GND
Ground reference for all voltages (test points)
6
TP1
+24V
23.5
24.5
V
Output voltage from 24 V DC power supply
7
TP2
+12V
11.5
12.5
V
SPC-1000 supply voltage from DC/DC converter
8
TP3
+5V
4.95
5.05
V
Regulated system supply voltage from DC/DC
converter
9
TP5
1.23V
1.20
1.25
V
Reference voltage for HART modem
Measure all TP’s between TPØ (GND) and the TP at hand using a high
impedance digital voltmeter
100
BT-5400 JCT-1100
© BTG 2007
M2067/1en
8.6 - Parts List
8.6 Parts List
8.6.1
Item
No.
Rec.
spare
parts
JCT-1100
Qty
Part No.
Spare Part
Description
1
11
12
13
1
1
1
Junction box, complete
Main circuit board, with power
supply unit
Shield gasket
Terminal connection
HART-filter (included)
Isolation amplifier (optional)
System cable
Fuse
Cable gland
Cable gland
Power supply unit
Front panel, complete - without
sticker
Front panel sticker
Sticker, inside terminal box
Junction box
100-240 V AC version
10
A0012070
A0012146
(*)
14
15
16
17
18
19
*
(*)
20
21
22
M2067/1en
1
4
2
1
1
1
27014281
A0006635
A0068726
A0014274
A0012229
46022638
46028221
46028130
46027330
A0012203
1
1
1
XXXXX
XXXXX
A0012112
BT-5400 JCT-1100
© BTG 2007
SPC
Transmitter
TR5 2AT 250V
M12
M20
Pulse
101
8.6 - Parts List
102
BT-5400 JCT-1100
© BTG 2007
M2067/1en