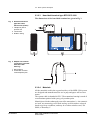
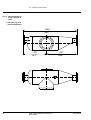
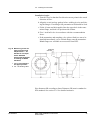
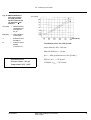
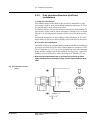
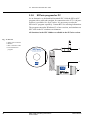
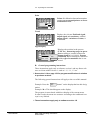
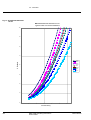
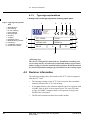
1
User manual
MEK-2300 with JCT-1100
Smart Rotating Consistency Transmitter
X.XX % XX.XX mA
Enter
Sample
24V
Terminal
M218.56/3en
© BTG 2004-06-09
Disclaimer
The contents of this document are subject to revision without notice due to continued progress
in methodology, design, and manufacturing. BTG shall have no liability for any error or
damages of any kind resulting from the use of this document. ©BTG 2004.
BTG Pulp & Paper Sensors AB
P.O. Box 602
SE-661 29 Säffle
Sweden
Phone: +46 533 426 00
www.btg-group.com
-
Table of contents
1
Safety recommendations . . . . . . . . . . . . . . . . . . . . . . . . . . 1
1.1
1.2
1.3
1.4
1.5
1.6
1.7
2
Safety recommendations for consistency transmitters
in the MEK-2300 Family . . . . . . . . . . . . . . . . . . . . . . . . . . . . . . . . . . . . . . 2
General . . . . . . . . . . . . . . . . . . . . . . . . . . . . . . . . . . . . . . . . . . . . . . . . . . . 2
Selecting a transmitter model and assembly parts . . . . . . . . . . . . . . . . . . 2
Installing mounting details . . . . . . . . . . . . . . . . . . . . . . . . . . . . . . . . . . . . . 2
Installing the transmitter . . . . . . . . . . . . . . . . . . . . . . . . . . . . . . . . . . . . . . 3
Installing the junction box . . . . . . . . . . . . . . . . . . . . . . . . . . . . . . . . . . . . . 4
Starting up and servicing the transmitter . . . . . . . . . . . . . . . . . . . . . . . . . . 4
Installation instructions . . . . . . . . . . . . . . . . . . . . . . . . . . . 5
2.1
2.2
2.2.1
2.2.2
2.3
2.3.1
2.3.1.1
2.3.2
2.3.2.1
2.3.2.2
2.3.2.3
2.3.2.4
2.4
2.4.1
2.4.2
2.4.3
2.4.4
2.5
2.5.1
2.5.1.1
2.5.2
2.5.2.1
2.5.2.2
2.5.2.3
2.5.3
2.5.3.1
M218.56/3en
Important information . . . . . . . . . . . . . . . . . . . . . . . . . . . . . . . . . . . . . . . . 5
Before you start . . . . . . . . . . . . . . . . . . . . . . . . . . . . . . . . . . . . . . . . . . . . . 6
Introduction . . . . . . . . . . . . . . . . . . . . . . . . . . . . . . . . . . . . . . . . . . . . . . . . 6
Visual inspection . . . . . . . . . . . . . . . . . . . . . . . . . . . . . . . . . . . . . . . . . . . . 7
Basic system description . . . . . . . . . . . . . . . . . . . . . . . . . . . . . . . . . . . . . . 8
The system . . . . . . . . . . . . . . . . . . . . . . . . . . . . . . . . . . . . . . . . . . . . . . . . 8
Conformity to CE directives and CSA approval . . . . . . . . . . . . . . . . . . . . 9
Working space and installation clearance requirements . . . . . . . . . . . . . . 9
Transmitter . . . . . . . . . . . . . . . . . . . . . . . . . . . . . . . . . . . . . . . . . . . . . . . 10
Junction box type JCT-1100 . . . . . . . . . . . . . . . . . . . . . . . . . . . . . . . . . . 10
Hand-held terminal type BTG SPC-1000 . . . . . . . . . . . . . . . . . . . . . . . . 11
Materials . . . . . . . . . . . . . . . . . . . . . . . . . . . . . . . . . . . . . . . . . . . . . . . . . 11
Planning the installation . . . . . . . . . . . . . . . . . . . . . . . . . . . . . . . . . . . . . 12
Advice and recommendations . . . . . . . . . . . . . . . . . . . . . . . . . . . . . . . . . 12
Choosing a site for the transmitter . . . . . . . . . . . . . . . . . . . . . . . . . . . . . 15
Motor Cable . . . . . . . . . . . . . . . . . . . . . . . . . . . . . . . . . . . . . . . . . . . . . . . 18
Choosing a site for the JCT-1100 junction box . . . . . . . . . . . . . . . . . . . . 18
Installing the transmitter . . . . . . . . . . . . . . . . . . . . . . . . . . . . . . . . . . . . . 19
Operating principle . . . . . . . . . . . . . . . . . . . . . . . . . . . . . . . . . . . . . . . . . 19
Positioning the transmitter . . . . . . . . . . . . . . . . . . . . . . . . . . . . . . . . . . . . 19
Low pressure pipe installations (PN10) . . . . . . . . . . . . . . . . . . . . . . . . . . 19
Installation with measuring vessel . . . . . . . . . . . . . . . . . . . . . . . . . . . . . . 20
Installation with weld-in stud . . . . . . . . . . . . . . . . . . . . . . . . . . . . . . . . . . 25
Installation with shut-off valve . . . . . . . . . . . . . . . . . . . . . . . . . . . . . . . . . 29
High pressure pipe installations (25bar/226°C) . . . . . . . . . . . . . . . . . . . . 30
Installation with measuring vessel . . . . . . . . . . . . . . . . . . . . . . . . . . . . . . 30
MEK -2300 Table of contents
©BTG 2004
I
-
2.5.3.2
2.5.4
2.5.4.1
2.5.4.2
2.5.4.3
2.5.5
2.5.6
2.5.6.1
2.5.7
2.5.7.1
2.5.7.2
2.5.7.3
2.5.8
2.5.8.1
2.5.8.2
2.5.8.3
2.5.9
2.6
2.7
2.8
2.8.1
2.8.2
2.8.3
2.9
2.9.1
2.9.1.1
2.9.1.2
2.9.2
2.9.3
2.9.3.1
2.9.3.2
2.9.4
II
Installation with weld-in stud (Fig 22) . . . . . . . . . . . . . . . . . . . . . . . . . . . 33
FRP pipe installations . . . . . . . . . . . . . . . . . . . . . . . . . . . . . . . . . . . . . . . 38
Transmitter material selection . . . . . . . . . . . . . . . . . . . . . . . . . . . . . . . . . 38
Installation in pipes < 250 mm/10 in diameter using a measuring vessel 38
Installation in pipes > 300 mm/12 in diameter using an
intermediate flange according to Fig 26 and Fig 27 . . . . . . . . . . . . . . . . 38
Pulp chest/overflow box (stuff box) installations . . . . . . . . . . . . . . . . . . . 41
Installation of the transmitter . . . . . . . . . . . . . . . . . . . . . . . . . . . . . . . . . . 43
Installing the transmitter. . . . . . . . . . . . . . . . . . . . . . . . . . . . . . . . . . . . . . 43
Connection of flushing water to mechanical seal . . . . . . . . . . . . . . . . . . 45
No water flushing . . . . . . . . . . . . . . . . . . . . . . . . . . . . . . . . . . . . . . . . . . 45
Low pressure flushing (Fig 32) . . . . . . . . . . . . . . . . . . . . . . . . . . . . . . . . 46
High pressure flushing - Model MEK-2320 . . . . . . . . . . . . . . . . . . . . . . . 47
Connection of electric motor . . . . . . . . . . . . . . . . . . . . . . . . . . . . . . . . . . 48
General . . . . . . . . . . . . . . . . . . . . . . . . . . . . . . . . . . . . . . . . . . . . . . . . . . 48
Connecting a 3-phase motor . . . . . . . . . . . . . . . . . . . . . . . . . . . . . . . . . . 48
Connecting a single-phase motor . . . . . . . . . . . . . . . . . . . . . . . . . . . . . . 50
Jumper on processor card . . . . . . . . . . . . . . . . . . . . . . . . . . . . . . . . . . . 50
Installing the junction box type JCT-1100 . . . . . . . . . . . . . . . . . . . . . . . . 51
Quick start checklist . . . . . . . . . . . . . . . . . . . . . . . . . . . . . . . . . . . . . . . . 51
Type sign explanation . . . . . . . . . . . . . . . . . . . . . . . . . . . . . . . . . . . . . . . 52
Transmitter type sign . . . . . . . . . . . . . . . . . . . . . . . . . . . . . . . . . . . . . . . . 52
Junction box type sign . . . . . . . . . . . . . . . . . . . . . . . . . . . . . . . . . . . . . . . 54
Measuring vessel/weld-in stud (low pressure models) type sign . . . . . . 54
Miscellaneous . . . . . . . . . . . . . . . . . . . . . . . . . . . . . . . . . . . . . . . . . . . . . 56
Dimensioning of the dilution water valve for consistency control . . . . . . 56
Calculation formula for dilution water flow: . . . . . . . . . . . . . . . . . . . . . . . 56
Dimensioning of the dilution water valve . . . . . . . . . . . . . . . . . . . . . . . . . 56
Pressure and temperature limits for piping, pipe flanges and fittings
of stainless steel — according to Swedish Standard SMS 1233 . . . . . . 61
Measuring vessel with weld-ends. Dimensions of the vessel’s weld-ends 62
Pipes according to ISO standard dimensions . . . . . . . . . . . . . . . . . . . . . 62
Pipes according to ID (metric Inner Diameter) standard dimensions . . . 62
General dimensional units — SI . . . . . . . . . . . . . . . . . . . . . . . . . . . . . . 63
MEK -2300 Table of contents
©BTG 2004
M218.56/3en
-
3
Operating instructions . . . . . . . . . . . . . . . . . . . . . . . . . . . 65
3.1
3.2
3.3
3.3.1
3.3.2
3.3.2.1
3.3.2.2
3.3.3
3.3.4
3.3.5
3.3.5.1
3.3.5.2
3.3.6
3.3.7
3.3.7.1
3.3.7.2
3.3.8
3.4
3.4.1
3.5
3.5.1
3.5.1.1
3.6
3.6.1
3.6.1.1
3.6.1.2
3.6.1.3
3.6.2
3.6.2.1
3.6.2.2
3.6.3
3.6.3.1
3.6.3.2
3.6.3.3
3.6.4
3.6.5
3.6.6
3.6.6.1
3.6.6.2
M218.56/3en
Important points to note . . . . . . . . . . . . . . . . . . . . . . . . . . . . . . . . . . . . . 65
Routine servicing, general remarks . . . . . . . . . . . . . . . . . . . . . . . . . . . . . 66
Hand-held Terminal SPC-1000 . . . . . . . . . . . . . . . . . . . . . . . . . . . . . . . . 67
General information . . . . . . . . . . . . . . . . . . . . . . . . . . . . . . . . . . . . . . . . . 67
Connecting the SPC-1000 . . . . . . . . . . . . . . . . . . . . . . . . . . . . . . . . . . . 68
Power supply . . . . . . . . . . . . . . . . . . . . . . . . . . . . . . . . . . . . . . . . . . . . . . 68
Communication . . . . . . . . . . . . . . . . . . . . . . . . . . . . . . . . . . . . . . . . . . . . 70
Connecting a printer . . . . . . . . . . . . . . . . . . . . . . . . . . . . . . . . . . . . . . . . 71
Connecting a PC . . . . . . . . . . . . . . . . . . . . . . . . . . . . . . . . . . . . . . . . . . . 72
Memory cards . . . . . . . . . . . . . . . . . . . . . . . . . . . . . . . . . . . . . . . . . . . . . 73
Function of the memory cards . . . . . . . . . . . . . . . . . . . . . . . . . . . . . . . . . 73
Inserting the memory card . . . . . . . . . . . . . . . . . . . . . . . . . . . . . . . . . . . 74
Setting/Display . . . . . . . . . . . . . . . . . . . . . . . . . . . . . . . . . . . . . . . . . . . . 74
Operating and cleaning the hand-held terminal . . . . . . . . . . . . . . . . . . . 74
Operating . . . . . . . . . . . . . . . . . . . . . . . . . . . . . . . . . . . . . . . . . . . . . . . . 75
Cleaning . . . . . . . . . . . . . . . . . . . . . . . . . . . . . . . . . . . . . . . . . . . . . . . . . 75
SPCwin program for PC . . . . . . . . . . . . . . . . . . . . . . . . . . . . . . . . . . . . . 76
Operating the transmitter . . . . . . . . . . . . . . . . . . . . . . . . . . . . . . . . . . . . 77
Programming the transmitter with hand-held terminal SPC-1000,
general instructions . . . . . . . . . . . . . . . . . . . . . . . . . . . . . . . . . . . . . . . . . 78
Starting the transmitter . . . . . . . . . . . . . . . . . . . . . . . . . . . . . . . . . . . . . . 86
Feedback adjustment in air . . . . . . . . . . . . . . . . . . . . . . . . . . . . . . . . . . . 88
Function . . . . . . . . . . . . . . . . . . . . . . . . . . . . . . . . . . . . . . . . . . . . . . . . . 88
Calibration . . . . . . . . . . . . . . . . . . . . . . . . . . . . . . . . . . . . . . . . . . . . . . . . 92
General remarks on calibration and sampling . . . . . . . . . . . . . . . . . . . . . 92
Calibration methods . . . . . . . . . . . . . . . . . . . . . . . . . . . . . . . . . . . . . . . . 93
Other functions that affect calibration . . . . . . . . . . . . . . . . . . . . . . . . . . . 96
General remarks on sampling . . . . . . . . . . . . . . . . . . . . . . . . . . . . . . . . . 99
Criteria for calibration . . . . . . . . . . . . . . . . . . . . . . . . . . . . . . . . . . . . . . 100
Adjusting Tag no. / Serial no. / Sensing element no. / Propeller no. . . . 100
Adjusting “feedback in water” . . . . . . . . . . . . . . . . . . . . . . . . . . . . . . . . 101
Calibration . . . . . . . . . . . . . . . . . . . . . . . . . . . . . . . . . . . . . . . . . . . . . . . 103
Predefined calibration curves . . . . . . . . . . . . . . . . . . . . . . . . . . . . . . . . 103
Single point calibration . . . . . . . . . . . . . . . . . . . . . . . . . . . . . . . . . . . . . 105
Multi-point calibration . . . . . . . . . . . . . . . . . . . . . . . . . . . . . . . . . . . . . . 108
Updated calibration . . . . . . . . . . . . . . . . . . . . . . . . . . . . . . . . . . . . . . . . 110
Calibration with given constants . . . . . . . . . . . . . . . . . . . . . . . . . . . . . . 111
Evaluation and documentation of calibration . . . . . . . . . . . . . . . . . . . . 112
Print-out documentation . . . . . . . . . . . . . . . . . . . . . . . . . . . . . . . . . . . . 112
Documenting calibrations (see Fig 58) with printer or manually . . . . . . 112
MEK -2300 Table of contents
©BTG 2004
III
-
3.6.6.3
3.6.6.4
3.6.6.5
3.6.6.6
3.6.7
3.6.8
3.7
3.7.1
3.7.2
3.7.3
3.7.4
3.7.5
3.7.6
3.7.7
3.8
3.9
3.10
3.11
3.11.1
3.11.2
3.12
3.13
3.14
3.15
3.15.1
3.16
3.16.1
3.16.2
3.16.3
3.17
3.17.1
3.17.2
3.17.3
3.17.4
3.17.5
3.17.6
IV
Documenting calibration using the “back-up card” . . . . . . . . . . . . . . . . 117
Documenting calibration using a personal computer (PC) . . . . . . . . . . 119
Evaluating calibrations . . . . . . . . . . . . . . . . . . . . . . . . . . . . . . . . . . . . . 120
Manual calculation of calibration constants K0, K1 and K2 . . . . . . . . . 124
Setting time constant (damping) . . . . . . . . . . . . . . . . . . . . . . . . . . . . . . 125
Setting measuring span and alarm limits . . . . . . . . . . . . . . . . . . . . . . . 126
Special calibration functions . . . . . . . . . . . . . . . . . . . . . . . . . . . . . . . . . 127
Offset adjustment . . . . . . . . . . . . . . . . . . . . . . . . . . . . . . . . . . . . . . . . . 127
Compensation for varying temperature . . . . . . . . . . . . . . . . . . . . . . . . . 129
Manual loading of feedback settings . . . . . . . . . . . . . . . . . . . . . . . . . . . 132
Altering Feedback resolution . . . . . . . . . . . . . . . . . . . . . . . . . . . . . . . . . 133
Calibration Curve . . . . . . . . . . . . . . . . . . . . . . . . . . . . . . . . . . . . . . . . . 136
Trend . . . . . . . . . . . . . . . . . . . . . . . . . . . . . . . . . . . . . . . . . . . . . . . . . . . 136
Simulation mode . . . . . . . . . . . . . . . . . . . . . . . . . . . . . . . . . . . . . . . . . . 137
Production calculation . . . . . . . . . . . . . . . . . . . . . . . . . . . . . . . . . . . . . . 138
Code protection . . . . . . . . . . . . . . . . . . . . . . . . . . . . . . . . . . . . . . . . . . . 140
Back-up memory . . . . . . . . . . . . . . . . . . . . . . . . . . . . . . . . . . . . . . . . . . 142
Trouble shooting functions . . . . . . . . . . . . . . . . . . . . . . . . . . . . . . . . . . 143
Checking measured/set values . . . . . . . . . . . . . . . . . . . . . . . . . . . . . . . 143
Service functions and signal calibration . . . . . . . . . . . . . . . . . . . . . . . . 144
Altering sensor/transmitter data . . . . . . . . . . . . . . . . . . . . . . . . . . . . . . 145
Training . . . . . . . . . . . . . . . . . . . . . . . . . . . . . . . . . . . . . . . . . . . . . . . . . 149
Trimming the controller . . . . . . . . . . . . . . . . . . . . . . . . . . . . . . . . . . . . . 150
Using the HART® communication . . . . . . . . . . . . . . . . . . . . . . . . . . . . 151
Digital communication according to the HART® protocol . . . . . . . . . . . 151
Software revisions . . . . . . . . . . . . . . . . . . . . . . . . . . . . . . . . . . . . . . . . . 152
SPC-1000 hand-held terminal . . . . . . . . . . . . . . . . . . . . . . . . . . . . . . . . 152
SPC-1000 PCMCIA sensor card . . . . . . . . . . . . . . . . . . . . . . . . . . . . . . 152
MEK-2300 sensor processor card (E-prom) . . . . . . . . . . . . . . . . . . . . . 152
Maintenance Planning and Quality Assurance . . . . . . . . . . . . . . . . . . . 153
Inspection of the accuracy/calibration of the consistency transmitter . . 153
Recommendation concerning transmitters used for simpler
measurements, e.g. for indicating purposes . . . . . . . . . . . . . . . . . . . . . 154
Recommendation concerning transmitters used for
measuring/control function of vital importance to the process . . . . . . . 154
Recommendation concerning transmitters used for measuring/control
function of vital importance to the process or used for debiting purposes 154
Maintenance of the transmitter . . . . . . . . . . . . . . . . . . . . . . . . . . . . . . . 154
Maintenance of the junction box . . . . . . . . . . . . . . . . . . . . . . . . . . . . . . 155
MEK -2300 Table of contents
©BTG 2004
M218.56/3en
-
4
JCT-1100 Junction box appendix . . . . . . . . . . . . . . . . . 157
4.1
4.1.1
4.1.2
4.1.3
4.2
4.3
4.4
4.5
4.5.1
4.5.2
4.5.3
4.5.3.1
4.5.3.2
4.6
4.6.1
4.6.1.1
4.7
4.7.1
4.7.2
4.7.2.1
4.7.2.2
4.7.3
4.8
4.8.1
4.8.2
4.8.3
4.8.3.1
4.8.3.2
4.8.3.3
4.8.4
4.8.5
4.9
4.10
M218.56/3en
Product introduction . . . . . . . . . . . . . . . . . . . . . . . . . . . . . . . . . . . . . . . 157
System description . . . . . . . . . . . . . . . . . . . . . . . . . . . . . . . . . . . . . . . . 157
Technical data . . . . . . . . . . . . . . . . . . . . . . . . . . . . . . . . . . . . . . . . . . . . 158
Type sign explanations . . . . . . . . . . . . . . . . . . . . . . . . . . . . . . . . . . . . . 160
Revision information . . . . . . . . . . . . . . . . . . . . . . . . . . . . . . . . . . . . . . . 160
CE-Declaration of conformity . . . . . . . . . . . . . . . . . . . . . . . . . . . . . . . . 161
Safety recommendations . . . . . . . . . . . . . . . . . . . . . . . . . . . . . . . . . . . 162
Installation instructions . . . . . . . . . . . . . . . . . . . . . . . . . . . . . . . . . . . . . 163
Mounting . . . . . . . . . . . . . . . . . . . . . . . . . . . . . . . . . . . . . . . . . . . . . . . . 163
Junction box with external 24 V DC power supply . . . . . . . . . . . . . . . . 165
Cabling . . . . . . . . . . . . . . . . . . . . . . . . . . . . . . . . . . . . . . . . . . . . . . . . . 166
Cable types . . . . . . . . . . . . . . . . . . . . . . . . . . . . . . . . . . . . . . . . . . . . . . 166
Guidelines for cable connections . . . . . . . . . . . . . . . . . . . . . . . . . . . . . 166
Wiring diagram . . . . . . . . . . . . . . . . . . . . . . . . . . . . . . . . . . . . . . . . . . . 168
HART-communication . . . . . . . . . . . . . . . . . . . . . . . . . . . . . . . . . . . . . . 169
Range select input . . . . . . . . . . . . . . . . . . . . . . . . . . . . . . . . . . . . . . . . 169
Operating instructions . . . . . . . . . . . . . . . . . . . . . . . . . . . . . . . . . . . . . . 170
Starting the junction box . . . . . . . . . . . . . . . . . . . . . . . . . . . . . . . . . . . . 170
Transmitter configuration from the junction box . . . . . . . . . . . . . . . . . . 170
General information . . . . . . . . . . . . . . . . . . . . . . . . . . . . . . . . . . . . . . . . 170
Menu structure . . . . . . . . . . . . . . . . . . . . . . . . . . . . . . . . . . . . . . . . . . . 172
Collecting samples and changing settings . . . . . . . . . . . . . . . . . . . . . . 173
Service instructions . . . . . . . . . . . . . . . . . . . . . . . . . . . . . . . . . . . . . . . . 177
Maintenance routines . . . . . . . . . . . . . . . . . . . . . . . . . . . . . . . . . . . . . . 177
Service hardware . . . . . . . . . . . . . . . . . . . . . . . . . . . . . . . . . . . . . . . . . 177
Handling of circuit boards for output signals . . . . . . . . . . . . . . . . . . . . . 178
Replacing the power supply unit . . . . . . . . . . . . . . . . . . . . . . . . . . . . . . 179
Replacing the front panel . . . . . . . . . . . . . . . . . . . . . . . . . . . . . . . . . . . 180
Replacing the main circuit board . . . . . . . . . . . . . . . . . . . . . . . . . . . . . . 181
Service software . . . . . . . . . . . . . . . . . . . . . . . . . . . . . . . . . . . . . . . . . . 182
Trouble shooting . . . . . . . . . . . . . . . . . . . . . . . . . . . . . . . . . . . . . . . . . . 182
Parts list . . . . . . . . . . . . . . . . . . . . . . . . . . . . . . . . . . . . . . . . . . . . . . . . 185
JCT-1100 with power supply unit
. . . . . . . . . . . . . . . . . . . . . . . . . . 185
MEK -2300 Table of contents
©BTG 2004
V
-
VI
MEK -2300 Table of contents
©BTG 2004
M218.56/3en
-
1
Safety recommendations
Installation, handling and service must only be carried out by trained and
authorized personnel and according to valid standard.
Read the manual for
detailed information.
•
The product is designed for industrial use.
•
Installation category: III
•
Pollution degree: 2
•
IP Code: IP65 / NEMA 4X
•
The product complies with the following EEC directives and
relevant
standards:
Machinery directive
Low-voltage directive
EMC directive
•
93/44/EEC, Generic standard
73/23/WWC, -EN61010-1
89/336/EEC, -EN 50081-2
89/336/EEC, -EN 50082-2
To meet the EMC directive the following precautions have to be
taken:
1. All wiring has to be shielded.
Power supply electronics:
shielded, coverage! 80%
Interface cable:
coverage 100% aluminium
2. All units are tested as a complete system to conform with relevant CE directives and their standards.
When using the units in other combinations, BTG cannot guarantee the CE directive conformity.
The units in combination with customer installed external devices
may conform with EMC and safety requirements when properly
installed and using an adequate CE marked equipment.
The system operator is responsible for the CE directive conformity. The conformity has to be checked by inspection.
•
SR218.56/3en
Take precautions when handling equipment in pressurized/hot lines
in vessels.
MEK -2300 Safety recommendations
©BTG 2004-06-09
1
1.1 - Safety recommendations for consistency transmitters in the MEK-2300 Family
1.1 Safety recommendations for consistency
transmitters in the MEK-2300 Family
These safety recommendations are based on a risk analysis carried out in
accordance with the requirements of the machinery and low voltage directive in order to comply with European standards for CE marking.
1.2 General
In practice, a consistency transmitter in operation means a risk only when
covers have been removed during installation and servicing, due to rotating machine parts or a hazardous electrical voltage.
Read these safety recommendations before installing the transmitter.
Follow the recommendations when installing the transmitter, starting up
and when carrying out service. Use warning signs for safety information!
These safety recommendations apply to the transmitter fitted with an AC
powered junction box. Mounting parts, such as measuring vessels and
weld-in studs, are dealt with in accordance with the pressure vessel standards of the respective countries.
" For good personal and functional safety: Use only parts which
have been manufactured or approved by BTG.
Mounting parts, such as measuring vessels and weld-in studs, have been
manufactured by BTG in accordance with Swedish industrial safety and
pressure vessel standards. Do not accept parts which have not been
manufactured by BTG, and follow the current instructions and standards during installation.
1.3 Selecting a transmitter model and assembly
parts
Pressurized parts must be suited to the current maximum pipe pressure in
relation to the temperature - see the data sheet. Select a material for the
parts which come into contact with the medium so that corrosion does not
occur - see data sheet.
CAUTION: The shut-off valves (see II 218.56, section 4.2.3.) should be
used only in low-pressure installations and with non-corrosive media as
we cannot guarantee complete tightness over the valve.
1.4 Installing mounting details
Welding or bolting and subsequent inspection should take place in accordance with current standards and regulations. Use approved lifting gear
2
MEK -2300 Safety recommendations
©BTG 2004-06-09
SR218.56/3en
1.5 - Installing the transmitter
during installation to prevent injury.
Assure yourself that the
pipe is empty before
opening it up!
Anchor the parts well during installation. A measuring vessel weighs approximately 40 kg / 88 lb. Brace this vessel if it has a shut-off valve
(weight with shut-off valve = 120 kg / 265 lb).
1.5 Installing the transmitter
•
Use approved lifting gear during installation. Ensure that the
transmitter is anchored solidly during installation. (A transmitter
weighs approximately 40 kg / 88 lb).
•
Construct a platform if the transmitter is located high up. This
platform will make it easier to fit and start-up the transmitter and
carry out service in the future.
•
The rubber quality of the transmitter flange seal (O-ring) should be
selected to suit the current medium. The O-ring supplied is suited to
the current criteria.
•
Fit the transmitter using the 15 screws, nuts and washers supplied.
Lubricate and tighten the screws alternately using a torque wrench.
Tightening torque for 8 mm screws/nuts:
24 Nm (2.4 kpm / 17.7 lbf.ft)
Tightening torque for 10 mm screws/nuts:
47 Nm (4.7 kpm / 34.7 lbf.ft)
Original screws are secured against vibration by means of nylon locking
devices.
DANGER!
High voltage operation
motor! Connection must
be carried out by
authorized personnel.
SR218.56/3en
•
When the transmitter has been installed, test-pressurisation should
be carried out using water in the pipeline. The test pressure is adapted
to standards and regulations in each country. In some lines for which
inspection is required, pressure test must be carried out before the
product can be commissioned.
•
A hazardous voltage is used to drive the electric motor. The motor
may only be connected by a qualified electrician in accordance with
instructions. The motor earth should be connected correctly and
checked.
•
A safety switch should be located in the immediate vicinity of the
transmitter in order to facilitate work on the motor and transmitter
during operation. A clear warning, such as a sign, should let other
people know that work is in progress and that switch must not be
touched.
MEK -2300 Safety recommendations
©BTG 2004-06-09
3
1.6 - Installing the junction box
1.6 Installing the junction box
A hazardous voltage is used to drive the junction box (AC version). The
junction box may only be connected by a qualified electrician in accordance with instructions. The earth should be connected correctly and
checked.
DANGER!
High voltage within the
junction box. Connections
may only be carried out by
qualified personnel
(applies to version with
built-in power supply).
It should be possible to switch off the voltage in the distribution centre,
for example. A clear warning, such as a sign, should let other people
know that work is in progress and the switch must not be touched.
•
Use only metallic cable fittings with shield connection for the
junction box. For the motor a plastic cable fitting should be used.
1.7 Starting up and servicing the transmitter
Read through the following points before starting up and servicing the
transmitter. Bear also in mind that the points mentioned above contain
important information for these operations.
To prevent electrical shock
— connect the protective
earth
PE properly.
If the motor is switched on so that the transmitter rotates, there is risk of
injury by crushing or cutting if the covers have been removed. This applies to the cover over the motor’s drive belt wheel, the cover over the
measuring part and the inspection cover. Also take care when working
close to the propeller and the sensor if these are exposed.
Take all professional precautions before servicing. Do not wear
gloves or rings which may get caught!
•
Before removing the transmitter from the measuring chamber or
opening the inspection cover, check carefully that the line is empty.
Hot or corrosive liquid flowing out under pressure may cause
serious chemical burn injuries!
•
Take care when opening the cover of the junction box with built-in
power supply unit. There are live parts here which may cause
electric shocks. Live parts are protected against normal contact
provided that the connections are made correctly.
•
When the transmitter is exposed to dangerous basic or acidic
corrosive media, it should be removed from the pipeline regularly for
inspection. Replace any damaged seals. If the transmitter’s or
measuring chamber’s pressurized parts have corroded, check that the
material is correct for the application. Leakages may cause
personal injury or damage to equipment due to corrosion or
burning!
There is risk of injury by
crushing or cutting if the
covers have been
removed.
4
MEK -2300 Safety recommendations
©BTG 2004-06-09
SR218.56/3en
2.1 - Important information
2
Installation instructions
2.1 Important information
The Consistency Transmitter is a precision tool and must be properly installed to ensure reliable service. So please, read the following instructions and user information before installing the transmitter.
This instruction manual contains installation instructions for the entire
range of BTG in-line rotating consistency transmitters.
Installation and operating conditions
The transmitter is designed and manufactured to provide accurate and reliable measurements over a long period of time.
" Correct installation and regular maintenance according to the Service
Manual will ensure maximum utility of the transmitter’s capacity.
For Safety precautions
please refer to SR218.56.
II218.56/3en
•
Install the transmitter so that it is protected from direct mechanical
damage. If there is any risk of it frequently being sprayed by water
or pulp ensure it is adequately protected by an enclosure.
•
To protect the junction box from water or pulp spray install under a
roof above the box. If installed outdoors the roof will also protect the
unit from direct sunlight and rain.
•
Protect the transmitter from heavy vibration sources such as
cavitation or unbalanced pumps.
•
Install the transmitter at the correct distance from a pump, pipe
elbow or valve.
•
The measuring vessel, weld-in stud, sensing element, propeller, etc.
must be of the correct type and in accordance to the PED for the
specific application. Contact your BTG representative for
information and advice.
•
Use sealing water of a good quality standard for the flushing water for
the mechanical seal. Make sure the flushing / sealing water pressure
is maintained at all times. This is especially important for the MEK2320 variant.
•
The main power voltage / frequency must be within acceptable limits
and be protected against transient sources such as electrical storms or
other electrical equipment.
•
Make sure the signal cables are located far away from the power
cables.
MEK-2300 Installation instructions
© BTG 2004
5
2.2 - Before you start
•
If the transmitter must be installed high up or in some other position
where it will be difficult to reach, a platform should be built to
provide easy unit access for service and inspection. A platform is
also a good solution for positioning the sampling valve.
•
Install the sampling valve — a BTG valve is recommended — close
to the transmitter. This way the lab. sample will be identical to the
sample measured by the consistency transmitter.
2.2 Before you start
2.2.1
Introduction
This manual contains instructions for planning and implementing the installation of the BTG MEK-2300 in-line consistency transmitter.
The MEK-2300 is the basic model in a series of highly specialized transmitters optimized for their individual application ranges.
If you are in doubt about whether the model you plan to install is the
same in all respects as the model described in this manual, or you
have any questions about installation, please get in touch with your
BTG sales engineer.
When you are satisfied that your MEK-2300 has been correctly installed
and you are ready to power up the system for calibration, please turn to:
section 2.7: Quick start checklist.
Double check items in the list before powering up. This list can help ensure a trouble-free initialization of your system.
6
MEK-2300 Installation instructions
© BTG 2004
II218.56/3en
2.2 - Before you start
Following this introductory section (Section 1) are the following:
1. Basic system description:
This section introduces the essential components of the system. It
also includes important information about the dimensions of the
components, including working space and installation clearance
requirements.
2. Planning an installation:
This section is vital to the correct layout of the system components
for the end-user, engineer and/or consultant. It contains advice on
locating the transmitter in your process, and positioning the junction box relative to the transmitter.
3. Installing the transmitter:
This section contains detailed instructions for installing the transmitter and measuring vessel.
4. Installing the junction box:
This section describes how to connect main power supply, inputs
and outputs.
5. Quick start checklist
6. Type sign explanation
7. Miscellaneous
2.2.2
Visual inspection
This product was inspected and tested prior to shipment. However, even the
best products can sustain transport damage that will only be seen if the
product is inspected. Before proceeding, check the transmitter, the handheld terminal and the junction box for transport damage. Look for loose
screws, wires or electronic components.
II218.56/3en
MEK-2300 Installation instructions
© BTG 2004
7
2.3 - Basic system description
2.3 Basic system description
2.3.1
The system
The system consists of a transmitter connected by a system cable to a
junction box type JCT-1100. To set up the transmitter a hand-held terminal type SPC-1000 must first be connected (see Fig 1). As an alternative
a PC with BTG’s SPCwin program installed can be connected to JCT1100 with BTG’s modem cable and be used to set up the transmitter.
Fig
1 MEK-2300
1 Transmitter
2 Junction box type JCT1100
3 hand-held terminal type
SPC-1000)
2
1
3
The transmitter contains measurement devices and electronic circuitry
for signal conversion. It is mounted in a measuring vessel or weld-in
stud, depending on pipe dimensions, that is welded or flange-fitted to the
pipe system.
The hand-held terminal allows the operator to set up and monitor the system, and includes a liquid crystal display (LCD) with a touch screen keypad.
8
MEK-2300 Installation instructions
© BTG 2004
II218.56/3en
2.3 - Basic system description
2.3.1.1
Conformity to CE directives and CSA approval
The entire system, consisting of the junction box including the BTG original power supply, the transmitter and the hand-held terminal and the
specified connecting cables (see the Installation instructions section of
the JCT-1100 manual included in this manual) is designed to meet the
following CE directives and their associated standards:
•
Machine Directive 93/44EEC
•
PED Directive 97/23/EEC
•
EMC Directive 89/336/EEC
•
Low voltage directive 73/23/EEC
The junction box JCT-1100 is CSA approved and the transmitter motor
can be order CSA approved.
2.3.2
Working space and installation clearance
requirements
Always ensure that there is sufficient room for the full depth of the system before installing the junction box, transmitter and necessary components. Make allowance for the need to open the junction box and
connecting the hand-held terminal, removing the transmitter from its
mounting assembly, as well as allowing sufficient working space to
do this. It is the responsibility of the end-user to ensure that adequate
working space is available.
" For unit conversions please refer to section 2.9.4 on page 63.
II218.56/3en
MEK-2300 Installation instructions
© BTG 2004
9
2.3 - Basic system description
2.3.2.1
Transmitter
The dimensions of the transmitter are given in Fig 2.
Fig
2 Transmitter
dimensions (mm/in)
The transmitter, including sensor and propeller, is approximately 490
mm (19.5 in) long. In addition to the installed length of the transmitter,
which will be 375 mm (15 in), you will need a minimum of an additional
115 mm (4.5 in) for extracting the transmitter from the pulp line. Leave
sufficient room around the transmitter to perform this task.
The transmitter weighs approximately 36 kg (80 lbs).
Remember to provide
access room for an operator,
as well as the full depth of
the transmitter and
junction box.
2.3.2.2
Junction box type JCT-1100
For information regarding the System description for JCT-1100, see the
Product introduction section of the JCT-1100 manual included in this
manual.
For information regarding the dimensions, installation clearances, etc.
for JCT-1100, see the Installation instructions section of the JCT-1100
manual included in this manual.
10
MEK-2300 Installation instructions
© BTG 2004
II218.56/3en
2.3 - Basic system description
2.3.2.3
Hand-held terminal type BTG SPC-1000
The dimensions of the hand-held terminal are given in Fig 3.
Fig
3 Hand-held terminal
type SPC-1000,
dimensions (mm/in)
1 Telephone jack to
junction box
2 Touchstone
3 Rubber casing
Fig
4 Adapter for terminal
connection (included
with SPC-1000
delivery)
1 Mini grippers
2 Connection for SPC1000 telephone jack
2.3.2.4
Materials
All the materials used in the exposed surfaces of the MEK-2300 system
are designed and manufactured for use in pulp and paper mill environments.
The system cable is sheathed in PVC. The transmitter housing is made of
cast aluminum painted with epoxy-poly urethan paint.
Materials used in the submerged parts of the transmitter, i.e. the transmitter itself, any measuring vessel used and any weld-in stud are selected
based on process conditions, and may be of either stainless steel, 254
SMO, or Hastelloy C.
II218.56/3en
MEK-2300 Installation instructions
© BTG 2004
11
2.4 - Planning the installation
2.4 Planning the installation
2.4.1
Advice and recommendations
The MEK-2300 is a precision instrument designed to provide accurate
and reliable measurements over a long period of time. To make sure of
obtaining the best possible results, please note the following recommendations and advice when planning your installation.
Dilution
Calculate the dilution water
control valve correctly and
use a high quality precision
actuator. Make sure that the
dilution water pressure is
stable and that the water is
injected at high velocity into
the pump suction.
Correct dilution is
essential to ensure reliable
transmitter operation!
Dilution water should be pressure controlled or otherwise protected from
major pressure variations.
To ensure good control, dilute no more than approximately 20% in each
dilution stage, though a higher percentage may be acceptable early in the
process.
If considerable, dilution is required it should be carried out in two stages,
70% to 80% of the water being added in the bottom part of the pulp chest
and the remainder in the form of a fine dilution upstream of the pump.
Thorough mixing at the bottom of the pulp chest upstream of the transmitter is vital, to avoid consistency variations.
The dilution water pipe should be inserted in such a way that it extends a
minimum of 15-50 mm (0.6-2 in depending upon pipe size) into the main
pipe on the suction side of the pump. See Fig 5. The pipe must be inserted
perpendicular to the suction stud. The pipe should be located at 1/3 of the
distance between the pump and the chest, counted from the pump to
avoid back flow into the chest.
At the point of injection the dilution water pipe should be dimensioned
to produce a rate of flow 3-4 times larger than the flow in the main pipe.
Typically this means a dilution water flow 3-5 m/s (10-16.5 fps) at max
flow in the suction pipe. The dilution water pipe should have the same or
larger dimension as the valve bore to prevent the valve from being
plugged by pulp at water pressure loss.
Choose a dilution water valve with linear characteristics. The pressure
drop over the valve should be at least 0.5 bar (7 psi) and should exceed
25% of the total pressure drop in the dilution water line. The valve and
its actuator must operate with the least possible backlash and smallest
possible dead zone. The valve must be tight when in its closed position.
See Fig 5.
" See section 2.9.1; How to calculate the dilution water valve.
12
MEK-2300 Installation instructions
© BTG 2004
II218.56/3en
2.4 - Planning the installation
Fig
5 Dilution water supply
at consistency control
∆ p = Dilution water pressure difference, upstream / downstream of the dilution water valve
1 = Velocity: 3 - 5 m/s, (10 - 16.5 fps)
V2 = See ”Dimensioning the pulp line”
G = Min 15-50 mm / 0.6 - 2 inches
depending upon suction pipe size
∆ p = min 0.5 bar / 7 psi
L = See Fig 7
A = Recommended design
B/C = Not recommended
A
90° G
B
C
Location of the dilution water valve:
Do not use saddles in
dilution water piping, see
Fig 5 (B).
II218.56/3en
The conventional method is to install the valve above the highest pulp
level in the chest, to prevent pulp from entering the valve during a shutdown. With modern large chests it is not always possible to meet this requirement.
Valve location as close as possible to the suction pipe wall is
recommended.
MEK-2300 Installation instructions
© BTG 2004
13
2.4 - Planning the installation
Dimensioning the pulp line - See Fig 5 - V
2
The transmitter is designed for installation in a pulp line
dimensioned for a rate of flow of 0.5-5 m/s (1.6-16.5 fps) where
consistency is 0.1% to 10%; and for a rate of flow of 0.3-3 m/s (1-9
fps) where consistency is 8% to 16%.
" See Fig 37 and Fig 39 for a nomogram how to estimate the flow
velocity. Note the recommended flow velocity.
In specific cases, where consistency is 8% to 16%, rates of flow of 0.2-5
m/s (0.65-16.5 fps) are acceptable (somewhat increased flow dependence).
Typically the main line is dimensioned for a normal rate of flow of 2-3
m/s (6.5-9.8 fps) for normal consistency installations, and 0.5-1 m/s (1.63.3 fps) for medium consistency installations - see accepted values
above.
" Do not mount the transmitter in the fluidized zone after an MCpump. It is recommended to mount it in the increased pipe section
following.
Sampling valve
The sampling valve should be installed as close to the transmitter as possible and it is recommended that it be installed on the same side of the
pipe. This will help ensure that the laboratory sample is identical to the
sample measured by the transmitter.
Installing a BTG sampling valve will ensure reliable results.
Measuring vessels for low pressure installations can be supplied with the
sampling valve mounted directly in the vessel.
Main power supply
Main power supply voltage and frequency must be within acceptable
limits, and must be protected against transients such as electrical storms,
or other equipment installed.
Flushing water for mechanical seal
Where applicable, the supply of flushing water for the transmitter’s mechanical seal must be of good quality, and pressure must be maintained
at all times. See section 2.5.7 for detailed recommendations as to the design of the water supply system.
14
MEK-2300 Installation instructions
© BTG 2004
II218.56/3en
2.4 - Planning the installation
Transmitters with mechanical seals that are not water flushed must have
their motors interlocked with pump motors, to ensure that the transmitter
stops, when the pump stops.
However, it must still be possible to run the transmitter’s motor under
manual control by jogging it, and to lock it in this position.
MEK-2320: With this model it is vital that the flushing water pressure is
maintained at all times. If pressure is lost, fibers may clog below the sensing element and affect measurements.
2.4.2
Choosing a site for the transmitter
Careful siting of the transmitter is essential for optimum performance
and ease of maintenance.
The transmitter can be installed in a vertical, horizontal or inclined pipe.
If installed in a horizontal or inclined pipe, care should be taken in locating it so that it does not measure large bubbles trapped in the pulp.
Measuring vessels for use in low pressure installations may be of lefthand or right-hand design.
Fig 6 shows a typical installation. Your BTG sales engineer will be
pleased to assist in selecting the location that will give the best results
consistent with your specific control strategy.
Fig
6 MEK-2300 system,
typical control circuit
for consistency
control
1 Consistency transmitter
MEK-2300
2 Junction box type JCT1100
3 Hand-held terminal
SPC-1000
4 3 System cable to
transmitter
5 Controller and recorder/
DCS
6 Dilution water valve
7 Pulp chest with sufficient
mixing
8 Stock pump
9 BTG Sampling valve
type MPS-1000
II218.56/3en
2
3
9
1
4
7
6
5
8
MEK-2300 Installation instructions
© BTG 2004
15
2.4 - Planning the installation
Important recommendations:
There are a number of considerations to take into account:
1. The transmitter should be installed as close as possible to the point
where the dilution water is injected, to ensure minimum time lag.
2. Recommended minimum distances: See Fig 7.
3. See Fig 7 and Fig 8. Proximity to bends or elbows in pipes is to be
avoided due to turbulence and dewatering. For optimum results
when the transmitter is positioned downstream of a pump or pipe elbow, it should be located at the theoretical outer turn of the pulp
stream.
4. If the transmitter is to be installed at a height where it will be difficult
to reach, build a platform that will make it more easily accessible for
service and inspection.
5. It is important to choose a location with sufficient room for insertion
and removal of the transmitter and opening its covers. The overall
length of the transmitter is 490 mm (19.5 in). Remember to leave sufficient room for insertion and removal.
6. Install the transmitter so that it is protected from direct mechanical
damage. Install under a roof if there is any risk of frequent water or
pulp spray.
7. Protect the transmitter from heavy vibration such as cavitation or unbalanced pumps. One method is to install a rubber bellows in the
line.
16
MEK-2300 Installation instructions
© BTG 2004
II218.56/3en
2.4 - Planning the installation
Fig
7 Recommended
minimum calming
length - distance
between pump/pipe
elbow/shut-off valve
and consistency
transmitter
The minimum distance the
transmitter should be located
downstream of a pump, bend or
elbow is the greater of two
numbers:
Lu
Lu
Upstream the transmitter LU:
1 m (3 ft.), or the diameter of the
pipe multiplied by 3 where
consistency is <8%; and 0.5 m
(1.5 ft.), or the diameter of the
pipe multiplied by 1.5 where
consistency is >8%.
Ld
Downstream the transmitter
Ld:
For all consistencies, the
minimum distance between the
transmitter and a pump, bend or
elbow located downstream is
similarly the greater of two
numbers:
0.5 m (1.5 ft.), or the diameter of
the pipe multiplied by 1.5
Lu
Lp
Lu
x 1,5
" Always choose the
largest of the values
calculated above.
" In order to obtain the best measuring results, it is
strongly recommended that the transmitter is
mounted in relation to the piping and other equipment
as shown in the figures above.
II218.56/3en
MEK-2300 Installation instructions
© BTG 2004
17
2.4 - Planning the installation
Fig
8 Installation of the
transmitter in relation
to a pipe elbow
" Alt. A is the most
suitable — if
possible, avoid
using alt. C.
2.4.3
Motor Cable
Motor supply cable:
Min. 4 x 1.5 mm2 (4 x AWG14)
(Shield is not required).
For further information: See section 2.5.8.
2.4.4
Choosing a site for the JCT-1100 junction
box
For information regarding choosing a site for the JCT-1100 junction box,
see the Installation instruction section of the JCT-1100 manual included
in this manual.
18
MEK-2300 Installation instructions
© BTG 2004
II218.56/3en
2.5 - Installing the transmitter
2.5 Installing the transmitter
2.5.1
Warning: To avoid
personal injuries, burning
injuries, aggressive
chemical injuries etc., it is
of outmost importance that
the pipe is depressurized
and empty before opening
it for installation or removal
of the equipment.
Operating principle
The MEK-2300 is based on a shaft system, belt driven from an electric
motor. The shaft system consists of an inner shaft (the measuring shaft)
that can move within a few degrees of arc, independently of the outer
shaft; and an outer shaft (the drive shaft), with a propeller that draws a
continuous pulp sample past a sensor connected to the measuring shaft.
The rotation of the sensor in the pulp sample results in torque. This
torque retards the measuring shaft in relation to the drive shaft. The degree of retardation is detected by the transmitter, which in its turn produces a feedback force to counterbalance the torque.
The torque/angle between the shafts is fed back and balanced to give a
constant value via an electromagnetic feedback system. The signal is
then converted into a 4 - 20 mA output signal with a superimposed digital
signal according to the Hart® protocol.
2.5.1.1
Positioning the transmitter
The transmitter is usually installed in a vertical pipe, and located downstream of a pump that mixes dilution water into the pulp. It should always
be installed as close as possible to the point where the dilution water is
injected, to ensure minimum time lag. See Fig 5.
" To ensure minimum time lag, locate the transmitter close to the
dilution point.
2.5.2
Low pressure pipe installations (PN10)
Where pressure is < 10 bar at 20°C (150 psi at 68°F), defined as PN10,
and pipe diameter is < 250 mm (10 in), the transmitter should be connected to the pulp line via a measuring vessel. See Fig 9 and see section 2.9.2.
" The measuring vessel is delivered as standard with weld ends for
weld connection to the main pipe. On request it can be delivered
with flanges.
Where pressure is < 10 bar at 20°C (150 psi at 68°F) and pipe diameter
is ≥ 300 mm (12 in), the transmitter should be connected to the pulp line
via a weld-in stud. See Fig 15 and section 2.9.2.
A slide-gate shut-off valve may also be fitted in a low pressure installation of this type. The valve makes it possible to remove the transmitter
while the pipe is filled with pulp.
II218.56/3en
MEK-2300 Installation instructions
© BTG 2004
19
2.5 - Installing the transmitter
Note that shut-off valves should only be used in low pressure installations and with non-hazardous media, as a complete seal over the valve
cannot be guaranteed.
Shut-off valves should only be used with the standard model of the
MEK-2300 and where consistency does not exceed approximately 4%.
2.5.2.1
Installation with measuring vessel
Standard measuring vessels are designed for welded connection. See Fig
9 - Fig 12.
" The dimensions for the welded-in measuring vessel weld-ends are
given in section 2.9.3.
Measuring vessels designed for flange connection conforming to DIN
2642, ANSI 150 lbs or other standards are available to order. See Fig 13.
" The measuring vessel’s pressure class rating determines the
choice of flange, despite the fact that some flanges will accept
higher pressures.
Standard measuring vessels for vertical pipe installations are left-hand
(see Fig 10). Measuring vessels for horizontal or inclined pipes may be
either left-hand or right-hand.
Measuring chamber length
”M” is determined by BTG.
Correct length is vital for
the transmitter’s function.
The length of the measuring chamber (M in Fig 9) is determined by BTG,
and may be either 70, 100 or 150 mm (2.75, 4 or 6 in). It may only be
longer than this if a shut-off valve is also to be installed. Always check
that this dimension agrees with the dimension stated for the position
number and in the order copy.
Installation in pipe
a. Turn the vessel so that the flow direction arrow points in the actual
direction of flow (see Fig 10 - Fig 13).
b. Align the vessel and any gaskets before welding it to its stud joining the flanges. If welding use a full penetration weld.
Do not turn the vessel
upside down. Air may
accumulate in its upper
part and disturb
measurement.
c. Fit the 8 mm stud bolt supplied into the upper hole in the transmitter flange, and lock it in position with thread sealant.
d. Check the inspection cover to ensure that it is correctly positioned
and tightened.
e. If the transmitter and any sampling valve are not to be installed immediately, screw a blank flange onto the transmitter. Blank flanges are available as accessories from BTG.
20
MEK-2300 Installation instructions
© BTG 2004
II218.56/3en
2.5 - Installing the transmitter
Fig
9 Measuring vessel with
weld-ends — for low
pressures and vertical
mounting — left-hand
design
Min.
500
M
Ø 308
Ø12.2"
20"
1 Measuring vessel
2 Measuring chamber in
the measuring vessel
3 Inspection cover
4 Stud bolt. Note! Fit bolt
in the upper hole
5 Flow direction arrow
6 Inspection area
1
4
2
1150
45.3"
3
6
5
Offset: measure x
Conn.
ØD
[mm]
x
[mm]
100
106
71
4"
114,3
67
125
131
58
5"
139,7
53
150
156
45
ØD
6"
168,3
39
Ø D = Outer diameter of pipe
200
206
20
8"
219,1
13,5
250
256
0
10"
273
0
II218.56/3en
x
MEK-2300 Installation instructions
© BTG 2004
21
2.5 - Installing the transmitter
Fig 10 Measuring vessel with
weld-ends for low
pressures and
horizontal mounting
— left-hand design —
(standard)
Flow direction
1150
45.3"
675
26.6"
475
18.7"
Fig 11 Measuring vessel with
weld-ends for low
pressures and
horizontal mounting
— right-hand design
(on request)
22
Flow direction
MEK-2300 Installation instructions
© BTG 2004
II218.56/3en
2.5 - Installing the transmitter
Fig 12 Measuring vessel with
stud for sampling valve
— available to order
1 Vertical mounting
2 Horizontal mounting —
left-hand design
a)
For more information see
drawing 5329015 included in
reference - A.
1
" State in order to BTG if
sampling valve type
FVS-1100 or MPS-1000
is going to be
installed.
3 Weld-in stud for sampling
valve type FVS-1100 or
alternatively MPS-1000.
1
b)
II218.56/3en
MEK-2300 Installation instructions
© BTG 2004
23
2.5 - Installing the transmitter
Fig 13 Flanged measuring
vessel available to
order
" See also Fig 9 for
other dimensions.
1150
45.3"
475
18.7"
24
MEK-2300 Installation instructions
© BTG 2004
675
26.6"
II218.56/3en
2.5 - Installing the transmitter
2.5.2.2
Installation with weld-in stud
Before starting installation, check that the thickness of the pipe wall is
sufficient for the pressure rating required. See Fig 14.
The length of the measuring chamber (M) is determined by BTG, and
may be either 70, 100 or 150 mm (2.75, 4 or 6 in). It may only be longer
than this if a shut-off valve is also to be installed.
Always check that this dimension agrees with the dimension stated for the
position number and in the order copy. The dimension is also stated on
the weld-in stud.
See Fig 15/Fig 16 for weld-in stud for PN10.
Warning: Assure yourself
that the pipe is empty
before opening it up!
Measuring chamber length
“M” is determined by BTG.
Correct length is vital.
Proper “M” dimension is
shown on the label
attached on the weld-in
stud.
No part of the weld-in stud
may extend into the pulp
line. Align it to the vertical
line!
II218.56/3en
Installation in pipe
a. Cut a hole with a 308 mm (12.13 in) diameter in the pipe, and grind
and bevel the edge to receive the weld.
b. In installations where the length of the measuring chamber is 70
mm (2.75 in), and there is a possibility of the presence of solids in
the pulp stream, the three deflector rails supplied should be welded
upstream of the stud, with their sharp ends facing upstream (see
Fig 16). This will have the effect of protecting the sensing element,
which will be in the main stream. Should the guide rails become
lost, new ones can easily be made. See Fig 16.
If it is impossible to weld the rails from inside the pipe, grind three
slots in the pipe, fit the rails in the slots and weld them from the
outside.
c. Profile the weld-in stud to the pipe dimensions by reference to the
length of the measuring chamber dimension “M”, Fig 15/Fig 16,
so that no part of the stud extends into the pulp line.
Note! The attached label fitted on the stud shows the “M”-dimension. Be sure that the proper stud is taken to be used at the
Tag no. in question.
d. Profile the stud by inserting it into the hole in the pipe and marking
it with a marking pen. Observe that the holes for the transmitter retaining screw should be aligned to the vertical line. See Fig 16 pos.
3.
e. After profiling it, weld the stud into the hole. A full penetration
weld must be used.
MEK-2300 Installation instructions
© BTG 2004
25
2.5 - Installing the transmitter
f. The use of an inspection cover is recommended. Cut a hole with a
diameter of 156 mm (6.14 in) in the pipe opposite the transmitter,
and grind and bevel the edge to receive a weld. Insert the inspection cover pipe into the hole, ensuring that at least 10 mm (0.4 in)
of the pipe extends into the main pipe where the cover is at its narrowest (see Fig 17). Then weld the pipe into the hole, taking care
not to deform the inspection cover pipe in doing so. Check that the
inspection cover pipe fits properly in the groove of the cover. Then
tighten the inspection cover against the pulp line with the clamp
and nut.
Fig 14 Material thickness in
main pipe to PN10. For
low pressure weld-in
studs
tmin [mm] =
tmin [mm]
A
Minimum material thickness in
main pipe for PN
10
ØD [mm]
=
Outer diameter
of main pipe
A
=
Stainless steel to
SS2343 ( ≈ AISI
316) / 254 SMO
B
=
Hastelloy
C-276
B
ØD [mm]
Example using Fig 14
What is the min. material thickness required for a main pipe, size 400 of
ISO standard when dimensioned for PN 10?
Material: Stainless steel to SS2343 standard.
ØD = 406.4 mm (according to standard). Select line A (SS2343).
According to the diagram tmin = 3.75 mm.
Select standard pipe 406.4 x 4.5 mm. (Due to the standard thickness tolerance of ±10% it will not be sufficient with t = 4.0 mm.).
" Use valid standard for exact calculation.
26
MEK-2300 Installation instructions
© BTG 2004
II218.56/3en
2.5 - Installing the transmitter
Use a valid calculation standard for an exact calculation. (The deviation from Swedish Standard is, as a rule, of minor importance.) However,
when tmin in the diagram approaches the thickness of the selected pipe we
recommend an exact calculation. Please also note that the manufacturing tolerance of the selected pipe must be included in your calculation!
If the calculation (the diagram) shows that the existing main pipe is of
insufficient thickness and therefore needs to be strengthened, i.e., have a
thicker wall, you must observe that the strengthened pipe must extend to
a minimum of 300 mm/12 in on each side of the weld-in stud, measured from its center.
Calculation values:
Weld-in stud: Outer diameter, OD = 308 mm
Material thickness t = 4 mm
Sizing temperature = 20°C/68°F
σ max = Max permitted stress value [N/mm²]
SS2343: σ max = 147 N/mm²
254 SMO: σ max = 185 N/mm²
Hastelloy C-276: σ max = 155 N/mm²
Fig 15 Weld-in stud to PN 10, “M” =
150 (100) mm/
6 (4) in
M=150
6"
1
2
3
4
Measuring chamber
Main pipe
Inspection cover
Position of sensing element,
“M” = 150 mm/6 in
5 Position of sensing element,
“M” = 100 mm/4 in
(100)
4"
Do308
12"
270
10,6"
373
14,7"
>300
12"
II218.56/3en
MEK-2300 Installation instructions
© BTG 2004
27
2.5 - Installing the transmitter
Fig 16 Weld-in stud with deflectors,
PN 10 - “M” = 70 mm/2.75 in
1 Deflectors x 3
2 Position of sensing element,
“M” = 70 mm/2.75 in
3 Aligned to the vertical line
70
M=70
2,75"
2
2,75"
3
A
30
1,2"
OD308
12"
270
10,6"
A --- A
A
373
14,7"
20v
92
3,6"
>300
12"
4
0,15"
1
Fig 17 Installation of
inspection cover
1 Yoke
2 Nut, vibration proofed
3 Inspection cover,
chained to the
measuring vessel
" Min 10 mm/0.4 in
distance to the pipe
wall at the narrowest
point.
28
MEK-2300 Installation instructions
© BTG 2004
II218.56/3en
2.5 - Installing the transmitter
2.5.2.3
Installation with shut-off valve
" Shut-off valves should only be used with the standard model of the
MEK-2300 and where consistency does not exceed approximately
4%.
Warning: Assure yourself
that the pipe is empty
before opening it up!
Weld-in studs can be ordered ready-fitted with slide-gate shut-off valves.
This makes it possible to remove the transmitter while the pipe is filled
with pulp (see Fig 18).
Note that shut-off valves should only be used in low pressure installations and with non-hazardous media, as a reliable seal over the valve cannot be guaranteed.
Each shut-off valve is supplied welded to the weld-in stud.
Incorrect use of shut-off
valves is a potential
hazard.
A water valve for flushing the measuring chamber and a drain valve for
emptying the measuring chamber will also be required. These are not included in the delivery.
Installation in pipe
a. Turn the valve so that its hand wheel is uppermost.
b. The stud should be profiled and welded in the manner described in
section 2.5.2.2 above. The length of the measuring chamber
should be kept as short as possible, approximately 180 mm (7 in).
c. Brace the valve if the pipe is subject to vibration and/or is of small
diameter.
Fig 18 Installation with shut-off
valve
1 Weld-in stud or measuring
vessel
2 Measuring chamber
3 Slide-gate valve
4 Water valve, size R ¼ in,
for clean flushing of the
joining thread in the
nipple: coned according
to ISO 7/1 -¼ BSP male.
5 Drain valve, size R 1 in / 1
in BSP, for emptying of
the measuring chamber.
Nipple joining thread:
coned according to ISO 7/
1 - 1 in BSP male. Tube to
outlet.
" Note! Items 4 and 5 are
not part of the
delivery.
II218.56/3en
MEK-2300 Installation instructions
© BTG 2004
29
2.5 - Installing the transmitter
2.5.3
High pressure pipe installations (25bar/
226°C)
Where pressure is >10 bar at 20°C (150 psi at 68°F) and pipe diameter is
< 250 mm (10 in), the transmitter should be connected to the pulp line via
a measuring vessel. See Fig 19 and Fig 20. See section 2.9.2.
Where pressure is >10 bar at 20°C (150 psi at 68°F) and pipe diameter is
> 300 mm (12 in), the transmitter should be connected to the pulp line via
a weld-in stud. See Fig 22. See section 2.9.2.
2.5.3.1
Installation with measuring vessel
Standard measuring vessels for high pressure applications are designed
for weld connection. See Fig 19. Measuring vessels equipped for flange
connection in conformity with DIN 2655, ANSI 300 lbs or other standards are available to order, see Fig 20.
" The dimensions for the weld-connected measuring vessels weldends are given in section 2.9.3.
" The highest operating pressure/temperature to which the
measuring vessel is to be exposed determines the choice of flange,
despite the fact that some flanges will themselves accept higher
pressures than these.
All measuring vessels are supplied with deflector rails as previously described. Because of the high pressure there is no inspection cover.
Measuring vessels can also be supplied flanged on two sides, to enable
the transmitter to be fitted on one side and a BTG HDS sampling valve
on the other, for use with a BTG KNA kappa number analyzer. See Fig
21.
Warning: Assure yourself
that the pipe is empty
before opening it up!
30
Cleaning and emptying of the measuring vessel can be simplified by installing a 1 inch ball valve, either welded or threaded, for water flushing.
Where a threaded valve is used, tap the welded length of pipe on the vessel to the desired thread standard.
MEK-2300 Installation instructions
© BTG 2004
II218.56/3en
2.5 - Installing the transmitter
Installation in pipe
a. Turn the vessel so that the flow direction arrow points in the actual
direction of flow.
b. Align the vessel and any gaskets before welding it to its stud/joining the flanges. If welding a full penetration weld should be used.
c. Fit the 10 mm stud bolt supplied into the upper hole in the transmitter flange, and lock it in position with sealant.
d. Fit a 1 inch ball valve in accordance with the recommendation
above.
e. If the transmitter and sampling valve (where fitted) are not to be
installed immediately, screw a blank flange onto the transmitter.
Blank flanges are available as accessories from BTG.
Fig 19 Measuring vessel for
high pressures and
temperatures — 25
bar/226°C or 375 psi/
439°F. Standard
design with weld ends
according to ID/ISO
standard.
1
2
1 Always mount bolt in
the upper position.
2 For 1 in flushing valve.
Pipe diameter ØD according to Inner Diameter (ID) metric standard or
ISO standard. See section 2.9.3 for detailed measures.
II218.56/3en
MEK-2300 Installation instructions
© BTG 2004
31
2.5 - Installing the transmitter
Dimensions
Fig 20 Measuring vessel for
high pressures and
temperatures —25 bar/
226°C or 375 psi/439°F.
Design with flanges
according to DIN 2655
or ANSI 300 lbs —
available to order.
A
B
C
D *(ID)
D *(ISO)
mm/ inch
mm/ inch
mm/ inch
mm
inch
165 / 6.5
285 / 11.2
410 / 16.1
150
6
165 / 6.5
285 / 11.2
410 / 16.1
200
8
200 / 8
310 / 12.2
460 / 18.1
250
10
1
2
1 Always mount bolt in
the upper position.
2 For 1 in flushing valve.
Fig 21 Measuring vessel
flanged on two sides
for consistency
transmitter and
sampling valve type
HDS.
1 Joined by weld
(standard) or flange
(available to order).
32
MEK-2300 Installation instructions
© BTG 2004
II218.56/3en
2.5 - Installing the transmitter
2.5.3.2
Installation with weld-in stud (Fig 22)
The weld-in stud is available in two sizes:
1. To be fitted in pipes > 200 - 250 mm/8 in - 10 in - see Fig 23.
2. To be fitted in pipes > 300 mm/12 in - see Fig 22.
" The small 200 - 250 mm/8 in - 10 in stud should not be used at
consistencies higher than 8-10% in a long fiber pulp and 10-12% in
a short fiber pulp. Pulp may plug inside the cavity and in the long
run damage the mechanical seal. If any doubt, use the measuring
vessel.
Before commencing the work of installation, check that the thickness of
the pipe wall is sufficient for the pressure rating required. See Fig 24 and
Fig 25.
The length of the measuring chamber “M” is 60 mm/2.4 in for installation in
consistencies > 4%.
For installations with consistency < 4%, “M” should be 150 mm (6 in).
Contact BTG for further advice. Always check that this dimension agrees
with the dimension stated for the position number and in the order copy.
" Note the length of measuring chamber - “M”!
Installation in the pipe
Warning: Assure yourself
that the pipe is empty
before opening it up!
a. Cut a hole with a diameter of 220 mm (8.6 in) in the pipe, and
grind and bevel the edge to receive the weld.
b. Weld the three deflector rails supplied upstream of the stud, with
their sharp ends facing upstream. This will have the effect of protecting the sensing element, which will be in the main stream.
c. If it is impossible to weld the rails from inside the pipe, grind three
slots in the pipe, fit the rails in the slots and weld them from the
outside.
d. Profile the weld-in stud to the pipe dimensions by reference to the
length of the measuring chamber, so that no part of the stud extends into the pulp line. Do this by inserting the stud into the hole
in the pipe and marking it with a marking pen.
Note! No part of the weld-in stud may extend into the pulp line.
Align it to the vertical line. See Fig 22.
e. Observe that the holes for the transmitter retaining screw should
be aligned to the vertical line Fig 22.
f. After profiling weld the stud into the hole. A full penetration weld
must be used.
II218.56/3en
MEK-2300 Installation instructions
© BTG 2004
33
2.5 - Installing the transmitter
Fig 22 Installation of high
pressure weld-in stud,
300 mm/12 in pipe or
larger, 25bar/225°C or
375 psi/439°F
“M”
1 Weld-in stud. Must be
profiled to suit the pipe
dimension.
Material SS2343-28, 254 SMO
or Hastelloy C-276, according
to order.
2 Main pipe 300 mm/12 in. Not
included in delivery from BTG.
Calculate min. t1 according to
current standard.
Selected pipe thickness
depends on present calculation
pressure/temperature.
Maintain t1 over a pipe length
of minimum 505mm/19.9 in
according to the figure.
3 Align the transmitter fastening
screws to the vertical line sloping pipes as well!
Always mount the guiding bolt
for the transmitter in the upper
hole.
" Always mount the guiding
bolt for the transmitter in
the upper position
≥ 300
12"
34
MEK-2300 Installation instructions
© BTG 2004
II218.56/3en
2.5 - Installing the transmitter
Fig 23 Installation of high
pressure weld-in stud,
200 - 250 mm/8 in - 10
in pipe
" Additional information according to Fig 22.
" Be aware of the restrictions using this weld-in stud. See section
2.5.3.2.
Calculating material thickness in main pipe Fig 24 and Fig 25.
Example for PN 25 and PN16.
" The data given in Fig 24 and Fig 25 are only valid for the weld-in
stud used in pipes > 250 mm/10 in.
" Use valid standard for exact calculation!
" The same weld-in stud is used for 25 bar and 16 bar installations.
The main pipe dimension is different.
Use a valid calculation standard for an exact calculation. (The deviation from Swedish Standard is, as a rule, of minor importance.) However,
when tmin in the diagram approaches the thickness of the selected pipe we
recommend an exact calculation. Do also note that the manufacturing
tolerance of the selected pipe must be included in your calculation! If
the calculation (the diagram) shows that the existing main pipe is of insufficient thickness and therefore needs to be strengthened, i.e., have a thicker
wall, ensure that the strengthened pipe extends to a minimum of 250 mm
(SS2343/ØD 800 mm/PN16), respectively 320 mm (SS2343/ØD 800
mm/PN25) on each side of the weld-in stud, counted from its center.
II218.56/3en
MEK-2300 Installation instructions
© BTG 2004
35
2.5 - Installing the transmitter
Fig 24 Material thickness in
main pipe to 25 bar
pressure. For high
pressure weld-in
studs pipe size > 300
mm/12 in
tmin [mm]
tmin [mm] =
Minimum material thickness in
main pipe for PN
25
ØD [mm]
=
Outer diameter
of main pipe
A
=
Stainless steel to
SS2343
( ≈ AISI 316)
B
=
Stainless steel to
254 SMO
Calculation values for weld-in stud:
C
=
Hastelloy
C-276
Outer diameter, ØD = 240 mm
ØD [mm]
Material thickness t = 10 mm
σ max = Max permitted stress value [N/mm²]
Installation data:
Pressure 25 bar / 360 psi
SS2343: σ max = 95 N/mm²
Temperature 226°C / 440°F
254 SMO: σ max = 122 N/mm²
Hastelloy C-276: σ max = 127 N/mm²
36
MEK-2300 Installation instructions
© BTG 2004
II218.56/3en
2.5 - Installing the transmitter
Fig 25 Material thickness in
main pipe to PN16.
For high pressure
weld-in studs for PN
16. Pipe size > 250
mm/10 in
tmin [mm]
=
Minimum material thickness in
main pipe for
PN 16
ØD [mm]
=
Outer diameter
of main pipe
A
=
Stainless steel to
254 SMO ≈
B
=
Stainless steel to
SS2562
( ≈ AISI 317 L)
tmin [mm]
ØD [mm]
Calculation values for weld-in stud:
Outer diameter, ØD = 240 mm
Material thickness t = 10 mm
σ max = Max permitted stress value [N/mm²]
Installation data:
SS2343: σ max = 147 N/mm²
Pressure 16 bar / 232 psi
254 SMO: σ max = 185 N/mm²
Temperature 20°C / 68°F
II218.56/3en
MEK-2300 Installation instructions
© BTG 2004
37
2.5 - Installing the transmitter
2.5.4
FRP pipe installations
Pipes made of fiber reinforced plastic (FRP) are now becoming quite common in chlorine bleach plants, as they are less expensive than metal pipes
and offer greater resistance to corrosion.
2.5.4.1
Transmitter material selection
" Select wetted material according to the actual process conditions!
Where the transmitter is to be installed in an FRP pipe, its wetted parts
are made of either Hastelloy C (for highly corrosive applications) or 254
SMO stainless steel (for less corrosive applications). Where exposure to
corrosion is not significantly higher than usual, however, standard materials will be used.
2.5.4.2
Installation in pipes < 250 mm/10 in diameter using a
measuring vessel
Where pressure is < 10 bar at 20°C (150 psi at 68°F), defined as PN10,
and pipe diameter is < 250 mm (10 in), the transmitter should be connected to the pulp line via a measuring vessel as described in section 2.5.2.1.
The measuring vessel is of standard dimensions, but is always flanged.
The main pipe should be equipped with flanges to match those of the vessel. The material available and selection of it is described as above.
" Do not turn the vessel upside down. Air may accumulate in its
upper part and disturb measurement.
2.5.4.3
Installation in pipes > 300 mm/12 in diameter using
an intermediate flange according to Fig 26 and Fig
27
Where pressure is < 10 bar at 20°C (150psi at 68°F) defined as PN10 and
pipe diameter is ≥ 300 mm (12 inch), the transmitter should be connected
to the pulp line using an intermediate flange connected to an FRP stud
located on the main pipe. The FRP stud is made to obtain the correct ”M”
measurement. Contact BTG for correct ”M” measurement.
38
MEK-2300 Installation instructions
© BTG 2004
II218.56/3en
2.5 - Installing the transmitter
Installation in pipe
a. For a solution according to Fig 6 — use an FRP stud, Fig 26, and
fix it to the main pipe, flange size 300 mm, PN 10 to DIN 2642.
Remember that the total length ”M” of the stud can be either 80
mm / 3.1 in or 150 mm / 5.9 in depending on the consistency of the
pulp.
Warning: Assure yourself
that the pipe is empty
before opening it up!
• When ”M” is 150 mm / 5.9 in Fig 27, Alt 1 — lower
consistencies — the stud length must be 126 mm / 4.96 in.
Fasten, with plastics, six (6) symmetrically positioned antirotation rails (7) inside the stud (5). The anti-rotation rails
should have a length of 110 mm/4.33 in, a height of 15 mm/0.6
in and a thickness of 4 mm/0.16 in.
• When ”M” is 80 mm / 3.1 in Fig 27, Alt 2— fasten three (3)
deflector rails upstream from the stud. Position them
symmetrically and 30 mm / 1.18 in apart - see also (11) fig 26
and fig 27.
There is no need to install the deflector rails if there are no
solid particles in the pulp that can damage the transmitter.
b. BTG can also deliver an intermediate flange (2) manufactured of
either Hastelloy C, 254 SMO, or SS2343 /AISI 316 including a
clamping flange (3) size 300 mm, PN 10 according to DIN 2642
made of stainless material to SS 2343 / AISI 316.
c. Prepare a gasket (4). Tighten the intermediate flange and the gasket with the clamping flange, use screws, nuts and washers (8-10).
Make sure to direct one of the transmitter’s fastening holes upwards.
d. Insert the stud screw, which was included with the delivery, in the
upper screw hole.
Fig 26 Flanged FRP stud
connection (300 mm,
PN 10, DIN 2642)
1 To be profiled and fixed
to the main pipe.
II218.56/3en
MEK-2300 Installation instructions
© BTG 2004
39
2.5 - Installing the transmitter
Fig 27 Installation of Consistency
Transmitter in FRP piping
> 300 mm (12 in) — low
pressure
1 BTG Consistency Transmitter
MEK-2300
* 2 Intermediate flange
3 Clamping flange, size 300 mm
to PN 10 according to DIN
2642, di =324 mm / 12.75 in
stainless steel to SS 2343 /
AISI 316. Other flange
standards available to order.
4 Rubber gasket, diameter 350 /
300 x t, where t = 2 - 3 mm /
0.08 - 0.12 in, Shore A
hardness = 40 - 70, viton.
5 Flanged FRP stud, size 300
mm, PN 10
6 FRP reinforcement
7 Six (6) 4 mm / 0.16 in thick
guide rails of plastic (only for
M = 150 mm / 5.9 in). 60°
apart.
8 12 screws to M6S 20 x 90,
stainless steel
9 12 nuts to M6M 20, stainless
steel
10 12 flat washers, SR-BRB AY
21 x 36 x 3
11 Three (3) 10 mm / 0.4 in thick
FRP deflectors (only for “M” =
80 mm / 3.1 in) positioned to
have a 30 mm / 1.18 in c-c
distance.
*Included in delivery from
FRP pipe in accordance to
existing pipe dimension.
Wetted parts are made of
Hastelloy C, 254 SMO, or
SS 2343 = AISI 316
according to order.
" “M”-dimension (M = 150
or M = 80 mm) according
to recommendations from
BTG.
40
MEK-2300 Installation instructions
© BTG 2004
II218.56/3en
2.5 - Installing the transmitter
2.5.5
Pulp chest/overflow box (stuff box)
installations
A: Pulp chest installation
The standard model of the MEK-2300 can also be installed in a pulp
chest using a weld-in stud, provided that maximum consistency is 3% to
4% and the pulp is well mixed in the chest.
Formation of layers will result in incorrect consistency measurement. To
prevent this, cut the weld-in stud to a length of 150 mm (6 in), of which
50 mm (2 in) should protrude from the inside wall of the chest (see Fig
28).
Position the transmitter on the periphery of the pulp chest, at 30° to 90°
angle relative to the mixer and preferably at the same level as the mixer.
B: Overflow box installation
The MEK-2340 has an elongated shaft, making it suitable for installation
in an open overflow box or level box. Shaft lengths for distances of 500,
700 or 1 000 mm (19.7, 27.5 or 39.5 in) between the end of the fastening
flange and the sensing element are available. See Fig 29 for a typical installation in an overflow box, where the distance is 700 mm (27.5 in).
" Note that this transmitter has no mechanical seal and an open
space between the transmitter flange and the liquid surface must
exist.
Fig 28 Installation in pulp
chest
II218.56/3en
MEK-2300 Installation instructions
© BTG 2004
41
2.5 - Installing the transmitter
Fig 29 Example of level box
for MEK-2340 — shaft
length 700 mm / 27.5
in
1 Mounting plate for
42
MEK-2300 Installation instructions
© BTG 2004
II218.56/3en
2.5 - Installing the transmitter
2.5.6
Installation of the transmitter
2.5.6.1
Installing the transmitter.
a. Leave the protective cover on the transmitter until it is to be installed.
Warning: Assure yourself
that the pipe is empty
before opening it up!
b. Check that the stud bolt supplied is fitted in the upper hole on the
flange of the measuring vessel/weld-in stud.
c. Check that the O-ring on the flange is in position.
d. Carefully lift the transmitter to a point from which it can be slipped
onto the stud bolt.
" Do not allow the sensing element to abut or become damaged by
the edge of the flange see Fig 30.
" Do not rest the mechanical seal on the edge of the flange. Slip the
transmitter directly onto the stud bolt see Fig 30.
" Do not lift or turn the transmitter round using the sensing element
see Fig 31.
e. Fasten the transmitter in position with the 15 nuts, bolts and washers supplied, oiling and tightening the bolts alternately, preferably
with the help of a torque wrench.
" Use recommended torque settings for transmitter fastening screw!
• Tightening torque for 8 mm bolts: 24 Nm (2.4 kpm)/17.7 ft.lbs.
• Tightening torque for 10 mm bolts: 47 Nm (4.7 kpm)/34.7
ft.lbs.
II218.56/3en
MEK-2300 Installation instructions
© BTG 2004
43
2.5 - Installing the transmitter
Fig 30 Warning sign —
installation
" Slip the transmitter
onto the stud screw.
The edge of the
measuring vessel
must not touch the
mechanical seal and
the sensing element.
Fig 31 Warning sign —
installation
44
MEK-2300 Installation instructions
© BTG 2004
II218.56/3en
2.5 - Installing the transmitter
2.5.7
Connection of flushing water to mechanical
seal
All MEK-2300 transmitters (except the MEK-2340) are equipped with a
mechanical seal for the drive shaft. The seal can be flushed with water to
produce a cleaning, lubricating and cooling effect.
" In most cases the water flushing can be avoided provided certain
precaution are taken - see section 2.5.7.1. Water flushing can be
avoided for most units to be installed.
Flushing operation can be achieved in one of two ways:
•
In low pressure flushing, the flushing water goes to a drain.
•
In high pressure flushing, the flushing water is pressed into the
media.
Models No. MEK-2320 have high pressure flushing. All other models
(except the MEK-2340) are designed for low pressure flushing.The
flushing water must be of standard quality, with no impurities larger than
200 µm.
2.5.7.1
No water flushing
Code in type designation: SSO/ESO
As mentioned above the flushing water provides a cleaning, lubricating
and cooling effect and normally gives the seal a longer life. However, the
cost of installation and operation of the water flushing in relation to a
somewhat shorter life for the sealing are factors that should be considered. In general, a satisfactory operational life of the seal can be obtained
without water flushing, provided the restrictions as outlined are borne in
mind.
Where the water quality is extremely poor it is advantageous not to use
water flushing. However, see the following restrictions.
General restrictions when not using water flushing of the mechanical
seal
II218.56/3en
•
The transmitter motor must be interlocked with the pump motor so
that transmitter and pump stop at the same time (to prevent dry run).
•
The consistency must not exceed ~10%.
•
Fillers, type China clay or similar that contain small abrasive
particles may not be present in large quantities larger than 5% filler
content.
•
The media must not be crystallizing, e.g., unwashed pulp containing
large quantities of black liquor > approximately 4% TS.
•
The pulp temperature must not exceed approximately 90ºC/ 195ºF.
MEK-2300 Installation instructions
© BTG 2004
45
2.5 - Installing the transmitter
•
Running the mechanical seal without water flushing is only
applicable to models MEK-2300 and MEK-2314. All other models
must have water flushing (except model MEK-2340 which doesn’t
have any mechanical seal).
2.5.7.2
Low pressure flushing (Fig 32)
Code in type designation: SSW, ESW, HSW, or FSW
" Only model No. MEK-2320 requires high pressure water. The other
models use low pressure water or no flushing water at all.
The rate of flow is controlled by a built-in flow controller. External purge
meters should therefore not be installed, as they have a definite tendency
to clog. Rate of flow is 0.5 l/min (0.13 US gal/min) to 0.95 l/min (0.25 US
gal/min), depending on transmitter model. Pressure can vary from nearly
zero to approximately 10 bar (150 psi). If pressure is higher than this, the
flow rate will increase, but this is not a critical factor.
A flow indicator need not necessarily be installed, but arrangements
should be made for observing the water leaving the floor outlet.
Connect the supply of incoming flushing water directly to the water inlet
pipe’s G 1/4 in (1/4 in BSP) male connection at the built-in flow controller. Pipes should preferably be at least 8 mm (0.31 in) in external diameter with a wall thickness of 1 mm (0.04 in).
Install a shut-off valve close to the transmitter.
Install the water overflow supplied on the outgoing water pipe. Overflow
and outlet pipe are in a separate plastic bag in the packing case. Connect
a 3/8 in reinforced plastic tube to the outlet, draw it to the floor outlet and
fasten it just above the floor outlet so that the flow can be observed. The
tube should not be bent to the extent that flow-through is restricted.
46
MEK-2300 Installation instructions
© BTG 2004
II218.56/3en
2.5 - Installing the transmitter
Fig 32 Warning sign for the
flushing water
connection
It also indicates the
direction of rotation
for the motor.
The sign is fastened
to the transmitter at
delivery.
Take care of instruction manual, test protocol, fastening screws and water
overflow (1) in package.
2.5.7.3
Make sure that water pressure
always remains higher
than media pressure.
High pressure flushing - Model MEK-2320
Code type designation: SSW/ESW
If the flushing water pressure is lost, even momentarily, particles from
the media may enter the area around the seal, and this will result in wear.
Any particles sticking between the hub of the water guide bushing and
the hub of the sensing element will disturb measurement.
The rate of flow for MEK-2300 is 0.95 l/min (0.25 US gal/min).
The flow is controlled by a built-in flow controller. For this model the
water penetrates into the pulp protecting strings or other objects spinning
around the sensor/sensor hub. It is very important that there is no pressure
loss. We recommend the installation of a check valve at the water supply.
There must not be any loss of water pressure which must always be min.
0.5 bar above media pressure. Avoid taps at the water supply! To check
the flow we recommend a flow indicator. Install a filter that must be kept
clean, if clogging particles are present. Arrange the filter cleaning to prevent pressure loss during the cleaning period.
II218.56/3en
MEK-2300 Installation instructions
© BTG 2004
47
2.5 - Installing the transmitter
2.5.8
Connection of electric motor
2.5.8.1
General
The motor can either be 3-phase or single-phase.
Instructions for the connection of the transmitter’s electric motor are to
be found in the cover of the junction box. See Fig 34/Fig 35. The motor
should preferably be connected using a plug to ensure easy service accessibility.
2.5.8.2
Connecting a 3-phase motor
a. The pulp line must be empty while this work is being carried out.
DANGER!
High voltage operation
motor! Connection must
be carried out by
authorized personnel
b. Check that the motor voltage connected at delivery is correct. If it
is not, adjust the jumpers in the junction box for the correct voltage
according to the data on motor type designation plate (See Fig 34/
Fig 35).
" Always check that the motor voltage connected at delivery is
correct. If not, switch over to the correct voltage.
c. The direction of rotation is indicated by an arrow on the motor
housing. As soon as the motor has been connected, check that the
direction of rotation is correct by starting and stopping the motor
momentarily. See Fig 35.
d. Set the overload protection to the same value as the rated current
for the motor, indicated by the rating plate. If the overload protection shows a tendency to trip it may be raised by a maximum of
20%, but in no case must the external motor temperature exceed
80°C (176°F). It can be measured between two cooling flanges on
the outside of the motor.
Where the transmitter’s
mechanical seal is not
water flushed, the motor
must be interlocked with
the pump motor.
48
e. Position the START and STOP switches centrally, and the safety
switch, overload protection and contacts close to the motor. This
will facilitate calibration and maintenance, when the motor must
be started and stopped several times. fig 35 shows a typical arrangement.
Where the transmitter’s mechanical seal is not water flushed, the
motor must be interlocked with the pump motor, to ensure that the
transmitter stops when the pump stops. However, it must also be
possible to jog the motor manually, and to lock it in manual control.
MEK-2300 Installation instructions
© BTG 2004
II218.56/3en
2.5 - Installing the transmitter
Dry running of the
mechanical seal will
rapidly cause irreparable
damage to the seal.
f. Run the motor for sufficient time for basic adjustment of the transmitter’s signal in air. This should be done as fast as possible, to
limit dry running and prevent breakdown of the seal. Max 5 - 10
min.! (If the mechanical seal is water flushed there is no time limit.)
g. Motor cable see section 2.4.3.
Fig 33 Motor wiring diagram
Y
Connection for, e.g., 380 V
AC/50 Hz or 440 V AC/60
Hz
∆
Connection for, e.g., 220V
AC/50 Hz or 255V AC/60
Hz — see manufacturer’s
label on the motor
Fig 34 Motor junction box
Information about
connected voltage at delivery.
" See this label in the
motor junction box. It
shows how the
motor is connected
at delivery.
Example:
Connected for 220 V
50 Hz.
II218.56/3en
MEK-2300 Installation instructions
© BTG 2004
49
2.5 - Installing the transmitter
Fig 35 Suggested
connection of the
transmitter motor
1 Transmitter
2 From the pump control
circuit.
Note! Same phase as
for the circuit for manual
operation
3 Contact for motor protection and control
device for manual run in
junction box
4 AUTO/MANUAL switch
5 Safety switch
2.5.8.3
Connecting a single-phase motor
Instructions for the connection of the transmitter’s electric motor are to
be found in the cover of the junction box.
Note that the single-phase motor has a smaller voltage tolerance than the
3-phase motor. It is therefore very important that the actual voltage at
the mill really is within the tolerance.
For 110 V AC motor max.voltage = 121 V AC and min. = 99 V AC.
For 220 V AC motor max. voltage = 242 V AC and min. = 198 V AC.
2.5.9
Jumper on processor card
The processor card (located on the side of the transmitter) can be configured for RS-485 communication or for HART communication with the
J4 jumper as follows:
1
2
3
1
2
3
50
RS485 communication on J3
activated (Optional)
HART communication on AnaOut1
4–20 mA (Standard)
MEK-2300 Installation instructions
© BTG 2004
II218.56/3en
2.6 - Installing the junction box type JCT-1100
2.6 Installing the junction box type JCT-1100
For information regarding Installation instructions for the JCT-1100
junction box, see the Installation instruction section of the JCT-1100
manual included in this manual.
2.7 Quick start checklist
When you are confident your MEK-2300 has been correctly installed and
you are ready to power up the system for calibration and/or testing, you
should run through this brief check list before powering up. Using this
list can help ensure trouble-free initialization of your system.
" To ensure that the measuring vessel/weld-in bulb and the transmitter
is correctly installed and free from leakage it is recommended to
pressure test the system with water.
The pressure should be kept higher than the rating according to
applicable regulations.
1. Check that the inspection cover, if any, is properly tightened.
2. Where applicable, check that there is a supply of flushing water
to the mechanical seal, and that the water is draining as it
should.
3. Ensure that the system is turned OFF before attaching the system cable to the transmitter.
Note! Tighten the system cable contact hard!
4. Check all wiring.
5. Switch on the main power supply.
6. Connect the hand-held terminal to the junction box. Switch it on
and check that the display lights up.
7. Switch on the electric motor briefly and check the rotational direction.
" The motor should not be allowed to run for more than 5-10 minutes
without a supply of flushing water.
Proceed to the MEK-2300 Operation instructions.
II218.56/3en
MEK-2300 Installation instructions
© BTG 2004
51
2.8 - Type sign explanation
2.8 Type sign explanation
2.8.1
Transmitter type sign
1
2
3
13
4
5
6
11
7
12
8
9
10
" The third letter at section designation below refers to the no’s in the
figure, I.e., 7.1.3. Where 3 describes the mechanical seal code.
1. Manufacturer
2. Transmitter version
Always refer to the type
sign when ordering spare
parts.
MEK-2300, -2308, -2310, -2311, -2312, -2314, -2315, and -2320. See
data sheets.
3. Mechanical seal code
SSW, SSO, HSW, ESW, ESO, FSW
First letter: Mechanical type S=Crane/Sealol 680 or 670, H=HF4,668,
E=Eagle, F=Flexibox.
Second letter: Material in seal faces: S=silicon carbide.
Third letter: Water flushing of seal: W=with water flushing.
O=open version, without water flushing.
See section 2.5.7 and Service manual SM218.56, section 2.3.
4. CE-marking (CSA)
The device complies with the amendments and requirements of the CE
directives: 89/392/EEC, 73/23/EEC, 89/336/EEC, and 97/23/EEC.
Note! The transmitter itself needs not to be CSA approved, only the junction box and motor.
52
MEK-2300 Installation instructions
© BTG 2004
II218.56/3en
2.8 - Type sign explanation
5. Manufacturing number
BTG internal manufacturing number.
6. Warning sign
The device is designed for industrial use. Installation, handling and service must only be carried out by trained and authorized personnel and according to valid standard. Read the manual for detailed information and
pay special attention to the warning signs!
7. Sensing element
Sensing element part number (see Parts List SP218.56).
8. Rubber quality in wetted parts
FPM (Standard) = Flour carbon rubber. For general purpose up to pH 12.
EPDM= Ethylene Propylene rubber. For high pH applications, pH 8 - 14.
See Service Manual SM218.56 chapter 2.2.
9. Splined fastening of sensing element
No marking = Alt. 2 Traditional fixed center screw fastening.
SP= Alt. 1 New splines / standard screw fastening.
See Service manual SM218.56 chapter 2.1.1.
10.Mechanical seal of Hastelloy
No marking = Original mechanical seal part no. 27006121 mounted.
See Parts List SP218.56, position 215.
S2 = New model of mechanical seal part no. 27010487 mounted.
See Parts List SP218.56, pos. 215.
11.Wetted parts made of
SS 2343, SMO, HC.
SS 2343 = Standard material, stainless steel SS2343 (AISI 316 SS,
DIN 1.4436).
SMO = Stainless steel 254 SMO.
HC = Nickel alloy Hastelloy C-276.
See data sheets D218.56 and D750.01.
12.Pressure
PN 10, 25 bar/226°C
PN 10 = Pressure class rating
25 bar/226°C = Pressure/temperature rating
See data sheets D218.56 and D750.01
13.C-Tick mark for Australia
II218.56/3en
MEK-2300 Installation instructions
© BTG 2004
53
2.8 - Type sign explanation
The device complies with the amendments and requirements of
EN 61010-1
2.8.2
Junction box type sign
For information regarding the type sign for the JCT-1100 junction box,
see the System description section of the JCT-1100 manual included in
this manual.
2.8.3
Measuring vessel/weld-in stud (low pressure
models) type sign
BTG Källe Inventing AB
SÄFFLE - SWEDEN
1
3
Design
PN10
150 psig / 68°F
Max. media temp.
120°C
248°F (116 psig)
Material
VO
DN / Connection
5
2
4
NOTE: WHEN USING WELD-IN STUD
CHECK THICKNESS OF MAIN PIPE
AGAINST OPERATING CONDI-
6
See explanation for transmitter type sign and data sheet D750.01.
The parts are designed and manufactured according to the Swedish pressure vessel codes: AFS 1988: 11/RN-78/TKN-97.
The parts are calculated according to American National Standard:
ASME section VIII-Div.1 and comply with PED regulations.
1. Design
PN 10 = Max 10 bar pressure at 20° C equal to 150 psig at 68° F.
2. Max. medium temperature
120° C (248° F)= Max. medium temperature for stated material specifications and valid standards.
In case of the medium temperatures are higher than stipulated, please
contact BTG before manufacture.
Note that the max. operational pressure depends on the temperature.
Max. medium temperature is 120° C at max. approved operational pressure 8 bar (248° F at 116 psig).
3. Material
54
MEK-2300 Installation instructions
© BTG 2004
II218.56/3en
2.8 - Type sign explanation
AISI 316*, SMO 254, Hastelloy C-276.
* Actual material qualities:
AISI 316 = SS 2343
See also data sheet D750.01.
4. VO
VO is the BTG internal manufacturing number.
5. DN/Connection
Pipe size connection and flange standard for measuring vessel:
DN: 100/4 in, 125/5 in, 150/6 in, 200/6 in, 250/10 in.
Flange standard: DIN 2642, AISI 150 lbs and other standards.
6. Text
When using the weld-in stud, make strength calculations. Guidance is
given in section 2.5.2.2.
II218.56/3en
MEK-2300 Installation instructions
© BTG 2004
55
2.9 - Miscellaneous
2.9 Miscellaneous
2.9.1
Dimensioning of the dilution water valve for
consistency control
Calculation of dilution water quantity — Q
Required data:
Production [t/h] = P
Uncontrolled consistency [%] = C1
Desired controlled consistency [%] = C2
2.9.1.1
Calculation formula for dilution water flow:
P × 100 ( C1 – C2 )
--------------------------------------------- = Q
C1 × C2
m3/h
Example:
Production = 8 t/h
Uncontrolled consistency = 3%
Desired controlled consistency = 2.5%
800 × 0,5
8 × 100 ( 3 – 2,5 )
Q = ---------------------------------------- = ---------------------- = 53,3 m3/h
7,5
3 × 2,5
2.9.1.2
Dimensioning of the dilution water valve
Calculation formula for the capacity factor Kv.
ρ
K v = Q ------------------------1000 × ∆ p
" NOTE! Cv = Kv x 1.155
Kv =
Capacity factor (m³/h)
Q =
Quantity of liquid (m³/h)
ρ
Density of liquid (kg/m³)
=
∆p =
Pressure drop across the control valve (bar)
When the dilution water density normally is 1000 kg/m3 the formula can
be simplified to:
Q
K v = ---------∆p
The pressure of the dilution water should not vary more than 15%. In
56
MEK-2300 Installation instructions
© BTG 2004
II218.56/3en
2.9 - Miscellaneous
case of large pressure variations we recommend a pressure control of the
dilution water — see directions in section 2.4.1.
Fig 36 Example of traditional
dilution before pulp
pump
Example:
When the installation is traditionally made according to Fig 36, where the
dilution water is injected before the pulp pump, the pressure drop across
the control valve is equal to the difference between the dilution water
pressure and the height of the pulp chest. This pressure difference should
be min. 0.4 - 0.5 bar / 6 - 7.5 psi.
In this case the pressure difference is 0.8-0.3 bar = 0.5 bar / 12 - 4.5 psi
= 7.5 psi. With all other data in accordance with the examples above, the
required Kv will be:
Q
53,3
K v = ----------- = ----------- = 75,4
∆p
0,5
The BTG ball sector valve type VBG-30, according to data sheet
D521.60-65 is a suitable control valve. Choose a valve size 40 or 50 mm
/ 1½ or 2 in depending on the pipe dimension.
The velocity of the dilution water at the point of injection should be 3-5
m/s (10-16.5 fps) — see also section 2.4.1. According to the nomogram
in Fig 37 a pipe size of 60-80 mm (2.5-3.2 in) will be a suitable dimension.
II218.56/3en
MEK-2300 Installation instructions
© BTG 2004
57
2.9 - Miscellaneous
Fig 37 Nomogram for
estimation of flow
velocities of liquids
" A correction factor must be applied when the valve is smaller than
the supply pipe.
When dimensioning the valve a correction factor must be included to correct when a reduction from a larger supply pipe to the smaller valve is
made. See Fig 38. The calculated capacity factor Kv (Cv) is multiplied by
the correction factor. The correction factor is determined by the amount
of reduction made.
Fig 38 Correction factor for
reduced bores
58
MEK-2300 Installation instructions
© BTG 2004
II218.56/3en
2.9 - Miscellaneous
" Use the curve for 85º valve opening when calculating the correction
factor.
Example:
Calculated Kv-value = 75.4
Pipe line dimension = 60 mm. (D)
Selected valve, e.g., BTG VBG-40 size 50 (d)
which has a Kv-value of 155 at 85º opening.
Check that selected valve Kv is sufficient. See Fig 40.
D = 1.2 which gives a correction factor of 0.78
---d
The valve Kv will be 0.78 x 155 = 116.25 and the valve size 50 is
sufficient.
Example to Fig 39:
Q = 6000 m³/24 h
Pipe diameter = 300 mm
What is the velocity in the pipe line?
6000
Q
---- = ------------------ = 4,17
24 × 60
t
m³/min
In the nomogram Fig 39 we can see that the flow velocity is ≈ 0.98 m/s
( ≈ 3.2 fps).
II218.56/3en
MEK-2300 Installation instructions
© BTG 2004
59
2.9 - Miscellaneous
Fig 39 Nomogram for flow
velocities in pipes
60
MEK-2300 Installation instructions
© BTG 2004
II218.56/3en
2.9 - Miscellaneous
2.9.2
Pressure and temperature limits for piping,
pipe flanges and fittings of stainless steel —
according to Swedish Standard SMS 1233
For conversion to SI-units: 1 at ≈ 9.8 N/cm²
Max. operating pressure:
Max. operating pressures under normal conditions are given in the table
below. The values stated must not be exceeded by more than 5%. However, the operating pressure must never exceed the nominal pressure
(PN).
The diagram in fig 40 shows max. operating pressure for different pressure classes at different operating temperatures.
Stainless steel 2343 according to SS 142343 (SS 316).
Example: What is max. operating pressure at 100°C operating temperature and pressure class PN 10?
Answer: 8 ato ≈ 8 bar.
Fig 40 Max operating pressure at
different operating
temperatures
Max operating pressure ato
PN
Operating temperature ºC
0-20
30
40
50
60
70
80
90
100
120
140
160
180
200
250
6
6
5.5
5.5
5.5
5
5
5
5
4.5
4.5
4.5
4.5
4.5
4
4
10
10
9.5
9.5
9
9
8.5
8.5
8.5
8
8
7.5
7.5
7.5
7
7
16
16
15.5
15.0
14.5
14
14
13.5
13.5
13
12.5
12.5
12
12
11.5
11
25
25
24
23.5
23
22
22
21.5
21
20.5
19.5
19
18.5
18.5
18
17.5
(ato = atmosphere (atm) overpressure)
II218.56/3en
MEK-2300 Installation instructions
© BTG 2004
61
2.9 - Miscellaneous
2.9.3
Measuring vessel with weld-ends.
Dimensions of the vessel’s weld-ends
2.9.3.1
Pipes according to ISO standard dimensions
Pipe connection
Pipe dimension
Pipe dimension
Low pressure
High pressure
(PN 10/150 psi)
(25 bar/360 psi)
mm
inch
mm
inch
mm
inch
100
4
114.3x3
4.50x0.12
—
—
125
5
139.7x3
5.50x0.12
—
—
150
6
168.3x3
6.63x0.12
168.3x6.3
6.63x0.25
200
8
219.1x3
8.63x0.12
219.1x8
8.63x0.31
250
10
273x3
10.75x0.12
273x10
10.75x0.39
The pipe dimensions refer to the pipe (weld-end):
Outer diameter x pipe thickness (OD x t).
2.9.3.2
Pipes according to ID (metric Inner Diameter)
standard dimensions
Pipe connection
Pipe dimension
Pipe dimension
Low pressure
High pressure
(PN 10/150 psi)
(25 bar/360 psi)
mm
inch
mm
inch
mm
inch
100
4
100x3
3.94x0.12
—
—
125
5
125x3
4.92x0.12
—
—
150
6
150x3
5.91x0.12
150x6.3
5.91x0.25
200
8
200x3
7.87x0.12
200x8
7.87x0.31
250
10
250x3
9.84x0.12
250x10
9.84x0.39
The pipe dimensions refer to the pipe (weld-end):
Inner diameter x pipe thickness (ID x t).
62
MEK-2300 Installation instructions
© BTG 2004
II218.56/3en
2.9 - Miscellaneous
2.9.4
Basic Units
Length
Mass
Time
Electric current
Temperature
Luminance
Material length
Recalculation
Torque
Nm
1
9.8066
0.11299
1.3558
General dimensional units — SI
m
kg
s
A
K
cd
mol
K = n ºC + 273.15
ºC = n K - 273.15
kpm
0.10197
1
11.521
0.13826
lbf · in
8.8508
86.796
1
12
Decimals and multiples of units
Multiples
Sign
Abbreviation
18
10
exa
E
15
10
peta
P
12
10
tera
T
9
10
giga
G
6
10
mega
M
3
10
kilo
k
2
10
hekto
h
10
deka
da
Derived and additional units
Area
m²
Volume
m³
Angles
°
Time
min
Frequency
Hz
Velocity
m/s
Acceleration
m/s²
Density
kg/m³
Force
N
Pressure, mech.
Tension
Pa
Pressure
bar
Dynamic viscosity
Pa · s
Kinetic viscosity
m²/s
Energy, heat quantity
J
Effect, energy current
W
Electric voltage
V
Electric resistance
Electric quantity, charge
1C
meter
kilogram
second
ampere
kelvin
candela
mol
lbf · ft
0.73756
7.2330
83.333·10-3
1
Parts
-1
10
-2
10
-3
10
-6
10
-9
10
-12
10
-15
10
-18
10
Sign
deci
centi
milli
mikro
nano
piko
femto
atto
square meter
cubic meter
degree ’minute “second
minute, h hour, d day
-1
hertz = s
newton = kg ·m/s²
Pascal = N/m²
bar = 100, 000 Pa = 0.1 Mpa
Pascal second
joule = Nm = Ws
Watt = J/s = Nm/s
Volt = Nm/As
Ohm =Nm/A²s
Coulomb = As
Abbrev.
d
c
m
n
p
f
a
Length
Inch
1
39.370
25.4
1
0.3048
12
0.9144
36
3
3
1.6093·10
63.36·10
3
3
1.852·10
72.913·10
-10
1 Å (1 Ångström) = 10 m
Meter
Area
m²
in²
3
1
1.5500·10
-3
0.64516·10
1
-3
92.903·10
144
3
0.83613
1.296·10
3
6
4.0469·10
6.2726·10
-6
9
2.5900·10
4.0145·10
1 ha (1 hektar) = 10,000 m²
Volume
m³
1
-6
16.387·10
-3
28.317·10
0.76456
-3
4.5461·10
-3
3.785·10
in³
61.024
1
3
1.728·10
3
46.656·10
277.42
231
Velocity
m/s
km/h
1
3.6
0.27778
1
0.3048
1.0973
0.44704
1.6093
0.51444
1.852
1 kn = 1 nautic mile/h
II218.56/3en
Foot
3.2808
-3
83.333·10
1
3
3
5.28·10
3
6.0761·10
Yard
1.0936
27.7778
0.33333
1
3
1.76·10
3
2.254·10
Mile
-3
0.62137·10
-6
15.783·10
-3
0.18939·10
-3
0.56818·10
1
1.1508
Natic mile
-3
0.53996·10
-6
13.715·10
-3
0.16458·10
-3
0.49374·10
0.86898
1
ft²
10.764
-3
6.9444·10
1
9
3
43.56·10
6
27.878·10
yd²
1.1960
-3
0.77161·10
0.11111
1
3
48.4·10
6
3.0976·10
acre
-3
0.24710·10
-6
0.15942·10
-6
22.957·10
-3
0.20661·10
1
640
mile²
-6
0.38610·10
-9
0.24910·10
-9
35.870·10
-6
0.32283·10
-3
1.5625·10
1
ft³
35.315
-3
0.57870·10
1
27
0.16054
0.13368
yd³
1.3080
-6
21.434·10
-3
37.037·10
1
-3
5.94621·10
-3
4.9511·10
UK gallon
219.97
-3
3.6046·10
6.2288
168.18
1
0.83268
US gallon
264.17
-3
4.3290·10
7.4805
201.97
1.2010
1
fps
3.2808
0.91134
1
1.4667
1.6878
mile/h
2.2369
0.62137
0.68182
1
1.1508
knot
1.9438
0.53996
0.59248
0.86898
1
Force
N dyn
1
6
10·10
9.8066
4.4482
MEK-2300 Installation instructions
© BTG 2004
kilopond
kp, kg
6
0.1·10
1
6
0.98066·10
6
0.44482·10
lbf
poundforce
0.10197
-6
1.0197·10
1
0.45359
0.22481
-6
2.2481·10
2.2046
1
63
2.9 - Miscellaneous
Pressure, mechanical tension
Pa
bar
kp/cm²at
-6
kp/mm²
-6
-6
dry
(mm Hg)
-3
7.5006·10
atm
lbf/in²
(psi)
-6
1
10·10
10.197·10
0.10197·10
9.8692·10
-3
14504·10
3
-3
100·10
1
1.0197
10.197·10
750.06
0.98692
14.504
3
-3
98.066·10 0.98066
1
10·13
735.56
0.96784
14.223
6
3
9.8066·10
98.066
100
1
73.556·10
96.784
3
1.4223·10
-3
-3
-6
-3
133.32
1.3332·10
13.595·10
13.595·10
1
1.3158·10
-3
19.337·10
3
-3
101.32·10 1.0132
1.0132
10.332·10
760
1
14.696
3
-3
-3
-3
6.8948·10 68.948·10
70.307·10-3 0.70307·10
51.715
68.046·10
1
1 mm water column » 9.81 Pa 1 inch water column »249.09 Pa 1 inch Hg » 3386.4 Pa
Density
3
kg/m
1
3
10
3
27.680·10
16.109
3
g/cm
-3
10
1
27.680
-3
6.019·10
lb/in
-6
36.127·10
-3
36.127·10
1
-3
0.57970·10
lb/ft
-3
62.428·10
62.428
3
1.728·10
1
Temperature
Related
Temperature
values
Related
Temperature
difference
Mass
Kg
Kelvine
scale
0K
255.372 K
273.15 K
Celcius
scale
-273.15°C
-17.778°C
0°C
Rankine
scale
0°R
459.67°R
491.67°R
Fahrenheit
scale
-459.67°F
0°F
32°F
Physical conditions
scale
Absolute zero
Melting point *
for ice
273.16 K
373.15 K
1K
0.55556 K
0.01°C
100°C
1°C
0.55556°C
491.688°R
671.67°R
1.8°R
1°R
32.018°F
212°F
1.8°F
1°F
Water triple point
Water boiling point *
Short
Short ton
hundred
sh ton
weight
(pound)
(ounce)
cwt
sh cwt
sh ton
-3
-3
-3
-3
-3
1
2.2046
68.552·10
35.274
19.684·10
0.98421·10
22.046·10
1.1023·10
-3
-3
-3
-3
-3
0.45359
1
31.081·10
16
8.9286·10
0.44643·10
10·10
0.5·10
-3
-3
14.594
32.174
1
514.79
0.28727
14.363·10
0.32174
16.087·10
-3
-3
-3
-3
-6
-3
-6
28.350·10
62.5·10
1.9426·10
1
0.55804·10
27.902·10
0.625·10
31.25·10
3
-3
-3
50.802
112
3.4811
1.792·10
1
50·10
1.12
56·10
3
3
3
1.0161·10
2.24·10
69.621
35.84·10
20
1
22.4
1.12
3
-3
-3
45.359
100
3.1081
1.6·10
0.89286
44.643·10
1
50·10
3
3
907.19
2·10
62.162
32.10
17.857
0.89286
20
1
ton (UK) is in the USA called long ton, slug=lbfs²/ft (lbf=pound-force, ft=fot) oz=ounce, also called ounce avoirdupois
(1 ounce troy=31.1035·103 kg) cwt=hundredweight (UK), in USA long hundredweight
Energy
J
lb
Slug
Oz.
kpm
Kilopondjoule
Kilowatthour meter
-6
1
0.27778·10
0.10197
6
3.6·106
1
0.37610·10
-6
9.8066
2.7241·10
1
-3
4.1868·103 1.163·10
426.94
6
2.6478·106 0.73550
0.27·10
-6
1.3558
0.37662·10
0.13826
-3
1.0551·103 0.29307·10
107.59
1 erg=0.1·10-6J
64
KWh
Effect
W
kpm/s
kcal/s
1
9.8066
3
4.1868·10
1.163
735.50
745.70
1.3558
0.29307
0.10197
1
426.94
0.11859
75
76.040
0.13826
-3
29.885·10
0.23885·10
-3
2.3423·10
1
-3
0.27778·10
0.17567
0.17811
-3
0.32383·10
-6
69.999.10
-3
Hundredweight
kcal
Kilo calory
-3
0.23885·10
859.85
-3
2.3423·10
1
632.42
-3
0.32383·10
0.25200
Ton
(UK)
hpm
Horse powerhour
-6
0.37767·10
1.3596
-6
3.7037·10
-3
1.5812·10
1
-6
0.51206·10
-3
0.39847·10
kcal/h
hp metr
0.85985
8.4322
3.6·103
1
632.42
641.19
1.1658
0.25200
1.3596·10
-3
13.333·10
5.6925
-3
1.5812·10
1
1.0139
-3
1.834·10
-3
0.39302·10
-3
hp
Horsepower
-3
1.3410·10
-3
13.151·10
5.6146
-3
1.5596·10
0.98632
1
-3
1.8182·10
-3
0.39302·10
ft-lbf
Foot pond
force
0.73756
6
2.6552·10
7.2330
-3
3.0880·10
6
1.9529·10
1
778.17
ft·lbf/s
Horsepower
0.73756
7.2330
3
3.0880·10
0.85779
542.48
550
1
0.21616
MEK-2300 Installation instructions
© BTG 2004
BTU British
Thermal
unit
-3
0.94782·10
3
3.4121·10
-3
9.2949·10
3.9683
3
2.5096·10
-3
1.25851·10
1
BTU/h
3.4121
33.462
3
14.286·10
3.9683
3
2.5096·10
3
2.5444·10
4.6262
1
II218.56/3en
3.1 - Important points to note
3
Operating instructions
3.1 Important points to note
The transmitter is a sensitive piece of precision equipment. Handle it
with care.
Safety Recommendations
see relevant section in
manual.
OI218.56/3en
•
When installing the transmitter in the line or removing it from the
line, use the handle to lift it and take special care to avoid any
damage to the unit.
Do not rotate the sensing element by hand as this can overload the
measuring system.
•
Before starting the motor, make sure that the flushing water
supply to the mechanical seal is working (applies to this model).
•
Familiarize yourself with the operation of the transmitter program
before starting the transmitter.
•
Make sure the direction of the motor is checked before admitting
pulp to the line.
•
Check that the actual “Set point” and “Max feedback” values agrees
with corresponding values stated in the attached test protocol.
•
Is a suitable sampling valve for pulp located close to the transmitter?
This is very important for calibration and check-up of the transmitter.
We recommend BTG sampling valves.
•
When calibrating the transmitter make sure that representative
samples are taken from the line. They should always be taken in the
same way which also applies for the laboratory routines.
•
When operating the hand-held terminal make sure that all data are
correct before sending them to the transmitter.
•
Check transmitter performance regularly. See section 3.17 on page
153.
•
Check the flushing water supply once a week. Take remedial action
immediately if necessary.
•
Check the condition of the drive belt every six months.
•
Check that the transmitter/junction box/hand-held terminal are not
exposed to abnormal vibration or splashing, which can lead to
poorer performance and make repairs and servicing more difficult.
" Type sign information, see installation instructions in manual.
MEK-2300 Operating instructions
© BTG 2004
65
3.2 - Routine servicing, general remarks
3.2 Routine servicing, general remarks
Check the following items (see Service Manual for detailed instructions):
Once a week:
Every six months:
Once a year:
Is the mechanical seal tight?
Is the flushing water system
working?
Is the gear belt in good condition?
Total torque wheel clearance.
For information regarding routine service for JCT-1100, see the Service
instruction section of the JCT-1100 manual included in this manual.
Also check as necessary:
•
Rubber seals in contact with media containing high concentrations of
chemicals (black liquor, chlorine, etc.).
•
Calibration of transmitter against laboratory samples.
•
Tuning of controller (control loop should respond quickly but should
not oscillate spontaneously).
Check total free play of torque wheels (see above):
Stop the transmitter. Turn it until one of the end position stops is visible.
Turn the brake ring to each end stop and check that the torque wheel
springs back to a central position.
" This check may be difficult to make if pulp is flowing past the
sensor.
Measure the total play between end position stops with a feeler gauge;
nominal value is 0.30 mm (0.012"). If the play is more than 0.50 mm
(0.020"), it should be adjusted. See service manual section: “Checking
torque wheel positions”.
66
MEK-2300 Operating instructions
© BTG 2004
OI218.56/3en
3.3 - Hand-held Terminal SPC-1000
3.3 Hand-held Terminal SPC-1000
3.3.1
General information
All of BTG’s smart transmitters are programmed using the BTG special
hand-held terminal type SPC-1000. (SPC = Smart Portable Communicator).
This terminal communicates with the sensor via a special protocol. Other
makes of hand-held terminals cannot be used to program BTG transmitters even though they may operate using the HART® protocol.
Fig 41 Hand-held terminal
SPC-1000
1 Telephone jack to
junction box JCT-1100
2 Touchscreen
3 Rubber casing
The hand-held terminal is designed in accordance with CE’s personal
safety and interference requirements. This means that it is harmless to the
user and, does not cause interference to other equipment and is not affected by interference from other equipment. It is protected by a thick rubber
casing and can therefore withstand reasonable mechanical shocks and a
small amount of splashing with water. Since the terminal is an electrical
instrument, it should be treated with care and not subjected to abnormally
rough treatment.
" Treat the terminal with care. Do not abuse it physically, submerge
it or spray it with water. Avoid storing it in a humid environment for
long periods.
OI218.56/3en
MEK-2300 Operating instructions
© BTG 2004
67
3.3 - Hand-held Terminal SPC-1000
3.3.2
Connecting the SPC-1000
3.3.2.1
Power supply
The hand-held terminal can be powered in three different ways - A: 24 V
DC supply from a junction box, B: 12 V DC supply from an AC adapter,
C: 9 V DC from an internal battery.
A: 24 V DC supply from a junction box.
This is the normal way of providing power for transmitter calibrating and
process monitoring. The terminal’s telephone jack is connected to the
junction box socket as shown in Fig 42.
This also provides a communications link with the transmitter. When this
supply option is chosen, the display lighting comes on for best
visibility.
Fig 42 MEK-2300 system,
typical control circuit
for consistency
control
1 Consistency transmitter
MEK-2300
2 Junction box type JCT1100
3 Hand-held terminal
SPC-1000
4 3 System cable to
transmitter
5 Controller and recorder/
DCS
6 Dilution water valve
7 Pulp chest with sufficient
mixing
8 Stock pump
9 BTG Sampling valve
type MPS-1000
68
2
3
9
1
4
7
6
5
8
MEK-2300 Operating instructions
© BTG 2004
OI218.56/3en
3.3 - Hand-held Terminal SPC-1000
Fig 43 Hand-held terminal
SPC-1000
Connections
Sensor card
4-20mA MODEM PRINTER
PWR ON/OFF
EJECT
MEMORY CARD
SPC-1000
Communication Terminal
B: 12 V DC supply from an AC adapter.
This method of supplying power is suitable during simulation and documentation, for instance, when the terminal is used at a desk.
A portable AC adapter is supplied with the hand-held terminal. The AC
adapter is available for 110 V AC or 220 V AC. The output supply is
12 V DC.
Check that the AC adapter
is suited to power supply
voltage (110 or 220 V AC).
Check before connecting to the main power supply that the AC adapter
is made for the correct supply voltage.
The AC adapter is supplied with a cord for plugging in to the mains power supply. In some cases, the molded plug may not fit your outlet. Replace the plug with a suitable standard plug if this is the case.
The AC adapter’s 12 V connection is connected to the socket on top of
the terminal. This is marked “PWR”. (12 V DC/0.4 A AC adapter, DC
jack with 2 mm connection pins. The + connection goes to the casing and
the - connection goes to the center pin.
The display lighting also comes on when the 12 V power supply is used.
OI218.56/3en
MEK-2300 Operating instructions
© BTG 2004
69
3.3 - Hand-held Terminal SPC-1000
C: 9 V DC supply from an integral battery.
The battery power supply is used, for example, when the terminal is connected to the 4-20 mA signal loop at a location other than at the junction
box.
An internal standard 9 V DC battery is located behind a cover on the back
of the terminal. To provide maximum operating time, a type 6F22 highpower alkaline 9 V DC battery should be used. A battery of this type will
operate for approximately 3 hours.
" Switch off the terminal immediately after use to obtain the
maximum operating time.
Rechargeable batteries or manganese batteries provide much shorter operating times. The display lighting does not come on in battery mode in
order to maximize battery life and provide maximal operating time. Despite this, display readability is quite sufficient in normal room lighting.
3.3.2.2
Communication
As mentioned earlier, the hand-held terminal communicates with the
transmitter via a special protocol (some functions are identical to
HART® protocol). For communication to take place, the circuit resistance must be at least 250 Ω (at 4-20 mA). For more information, see the
Installation instruction section of the JCT-1100 manual included in this
manual.
Minimum circuit resistance 250 Ω !
Normally the terminal’s telephone jack is connected to the junction box
socket. This connection provides power and is also the communications
link between the terminal and the transmitter.
Communication with the transmitter can also be achieved at a greater distance. In theory, the maximum distance from the transmitter is approximately 600 m which also applies for the output signal, but this distance
is often limited in practice to a couple of hundred meters because of voltage drop over the cable. (Compare section 3.5, II218.56)
An adapter set fitted with snap-on test pins and mini grippers - Fig 44 is supplied with the terminal and plugs in to the terminal’s telephone
jack. The test pins can then be connected to a terminal block, e.g. in the
rack room. The connection is made in parallel across the 4-20 mA connection which can be kept intact. The connection is not polarity-dependent.
When used in this manner, the terminal is usually powered from the in-
70
MEK-2300 Operating instructions
© BTG 2004
OI218.56/3en
3.3 - Hand-held Terminal SPC-1000
ternal battery.
Fig 44 Adapter for terminal
connection
(included with SPC1000 delivery)
3.3.3
Connecting a printer
A standard printer can be connected to the hand-held terminal socket
Do not use the hand-held
terminal’s 12 V DC AC
adapter for the EPSON
printer (6 V DC).
The printer may be
damaged if connected
incorrectly!
marked PRINTER. The printer must be EPSON-compatible (recommended models: EPSON P-40S, SEIKO DPU-411, or SEIKO DPU414). It must have a serial input and be set for 2400 baud. The connection
cable between the hand-held terminal and the printer is supplied by BTG
- refer to the parts list: Accessories for hand-held terminal.
The printers have a rechargeable battery and are provided with a 6 V DC
AC-adapter.
The printer is used to document all important calibration and adjustment
data, and is a very useful tool when trouble shooting (Fig 58).
OI218.56/3en
MEK-2300 Operating instructions
© BTG 2004
71
3.3 - Hand-held Terminal SPC-1000
3.3.4
Connecting a PC
Also a PC can be connected to the hand-held terminal socket marked
“Printer”. The hand-held terminal is connected according to RS-232
standard with either a 25-pin (Fig 58 - pos 2) or a 9-pin (Fig 45 - pos 1)
serial connector depending on the PC you have. A suitable connecting
cable is available from BTG and fits both 9 and 25 pin connector. See
parts list: Accessories for hand-held terminal.
If you use Windows 3.1, or later versions, you can use the SPC-1000
Documentation program. This program is available at disk “Documentation program for Windows” from BTG. (See section on page 119). You
will receive all data for the range you send to the PC, so if you want all
four ranges you just repeat the procedure for each range. If you have several BTG smart transmitters this is a very useful way of storing all transmitter data within the same file.
Pressing the print-button will transfer the data to your text file for
one range at the time (Fig 58).
Fig 45 PC contact alt./disk.
SPC-1000 Documentation
1.
2.
program for Windows
Version 1.0
Copyright© 1995
BTG
All rights reserved
72
" The PC can only be used for storing the transmitter calibrations.
They cannot be transferred back from the PC to the SPC-1000/
transmitter!
MEK-2300 Operating instructions
© BTG 2004
OI218.56/3en
3.3 - Hand-held Terminal SPC-1000
3.3.5
Memory cards
3.3.5.1
Function of the memory cards
The hand-held terminal is fitted with a PCMCIA slot for a memory card.
This card is the size of a credit card (85 x 54 x 3 mm). Two types of memory card are available. A: Sensor card and B: Back-up card.
The type of memory card to be used is task dependent.
A: Sensor card.
Sensor card
SPC-100
English
Ver.C
14457675
Copyright© 1995
BTG
All rights reserved
This memory card has a flash memory and is available with different
memory capacities. The memory card contains the operating programs
for different BTG transmitters in the smart transmitter series, and is
available only from BTG. The first version contains an operating program for consistency transmitters MBT-2300 and MEK-2300. A maximum of eight different sensor module programs can be stored on the card
(512 kB card). Each language version (English, German, French etc.) has
its own version of the sensor card.
The card is marked with the language, software version and part number.
For future updates of the operating program, BTG is able to supply the
latest version, and updates can easily be used on the different transmitters.
•
Some of the basic functions are however stored on the transmitter’s
processor card (in its EPROM) and can be changed only by replacing
the EPROM (carried out by BTG).
Since the memory card has good ESD protection the old card can be returned to BTG for reprogramming and can be used again as long as it is
not damaged.
" The life time of the memory card is given as 10 years. There is a risk
after this time that the software may deteriorate or disappear partly
or completely. Make sure a new sensor card is ordered in good
time.
OI218.56/3en
MEK-2300 Operating instructions
© BTG 2004
73
3.3 - Hand-held Terminal SPC-1000
B: Back-up card.
Backup card
SPC-1000
74414152
Copyright© 1995
BTG
All rights reserved
The storage card is a SRAM card and is used to store the transmitters’
different settings, i.e. calibration data and other settings (also shown by
the printer output - see section 3.3.3 on page 71).
A maximum of 125 different transmitter settings (Tag no.) can be stored
on one card using a 64 kB card configuration.
Since each transmitter has the option of four different measuring span
settings a total of 500 different settings can be stored on one card.
" Change the back-up card battery regularly. The battery life of the
back-up card is given as four years. There is a risk that the data
could disappear after this time. The battery should therefore be
replaced in good time.
If battery voltage level is low, it is shown on the display when the card is
inserted.
" To protect from overwriting the card can be set in “write protect”
mode with a switch.
3.3.5.2
The terminal must be
switched off when
changing cards! It can
otherwise be damaged!
Inserting the memory card
The protective cover must be opened first to remove the memory card.
Then make sure that the terminal is switched off. Press the button marked
“EJECT” and remove the card. Position the new card with the front facing the front of the terminal and insert the card fully into the slot.
The two types of cards are used as required.
The memory card must be handled with care and protected from moisture, extreme temperatures and direct sunlight. Do not bend or twist the
card.
" Handle the memory card with care! Store it in its plastic wallet if it
is not fitted in the terminal.
3.3.6
Setting/Display
All normal settings are made via the hand-held terminal’s touch screen.
All displays are provided on the touch screen.
The touch screen’s (LCD) read angle can be adjusted when necessary via
a covered hole at the back of the terminal marked “DISPLAY CONTRAST”. The read angle is set by the factory for normal room temperature but may need to be changed, particularly at very high ambient
temperatures.
" The read angle need not be adjusted for normal use.
3.3.7
74
Operating and cleaning the hand-held
MEK-2300 Operating instructions
© BTG 2004
OI218.56/3en
3.3 - Hand-held Terminal SPC-1000
terminal
3.3.7.1
Operating
As mentioned earlier, the terminal should be handled with care and not
subjected to mechanical damage, immersed in or sprayed with water.
When communicating with the sensor, the hand-held terminal is normally placed in the special terminal holder installed on a wall close to the
junction box.
" To prevent the terminal being sprayed with water when in the wall
holder a protective cover should be installed (For more information,
see the Installation instruction section of the JCT-1100 manual
included in this manual.
Fig 46 Handling the SPC-1000
terminal
RD
RY CA
MEMO
EJECT
F
ON/OF
PWR
ER
PRINT
DEM
A MO
Edit
4-20m
e
Rang
1
Read
data
Misc
p
Dam
2s
A
20 m
4.0%
4 mA
2.0%
.
Cali-e
brat
iConf
gure
t
Offse
0%
Calibn
ratio
curve
Send
data
e2
Rang
Tag
Print
d
Tren
61.7%
%
0%
. 3.35
Cons
100%
0
-230
MEK
Note
0l
00
-1
rmina
PC
tion Te
Smm
unica
Co
When the terminal is not in the wall terminal holder, place it on your left
forearm (for right-handed users) and hold it securely using the hole in the
handle. This is the best and safest way of using it, you can work properly
without damaging the terminal.
The telephone jack on the spiral cable can be parked in the hole in the
rubber casing for transport.
3.3.7.2
Cleaning
The terminal can be cleaned using a cloth dipped in water. Use only mild
cleaners - not strong solvents! Avoid getting water in the edges of the
covers.
" Use only washing-up liquid. Clean and dry with care!
OI218.56/3en
MEK-2300 Operating instructions
© BTG 2004
75
3.3 - Hand-held Terminal SPC-1000
3.3.8
SPCwin program for PC
As an alternative to the hand-held terminal SPC-1000 the SPCwin PC
program with a cable and a modem for connection to the JCT-1100 junction box is available. See fig 47 below. It is necessary to order the
SPCwin PC program separately. Contact BTG for ordering information.
The program runs under Windows95, or later versions, and simulates an
SPC-1000 in the PC-windows environment.
All functions in the SPC-1000 are available in the SPCwin version.
Fig 47 SPCwin
1 DB-9 serial connector
2 Modem
3 SPC connection cable
4 CD with SPCwin
program
SPCwin
PC version of SPC-1000 hand terminal
Simulation of SPC-1000
4
3
2
BTG© 2000
All rights reserved
A0014159
1
76
MEK-2300 Operating instructions
© BTG 2004
OI218.56/3en
3.4 - Operating the transmitter
3.4 Operating the transmitter
The transmitter can be programmed from the hand-held terminal SPC1000, from the SPCwin PC program, or from the JCT-1100 junction box
(limited functions).
Programming of the transmitter from SPCwin is the same as from the
SPC-1000 hand-held terminal. This section describes programming of
the transmitter from either.
For further information about SPCwin see section 3.3.8 on page 76.
For instructions regarding how the transmitter is programmed from the
JCT-1100, see the Operation instruction section of the JCT-1100 manual
included in this manual.
OI218.56/3en
MEK-2300 Operating instructions
© BTG 2004
77
3.4 - Operating the transmitter
3.4.1
Programming the transmitter with hand-held
terminal SPC-1000, general instructions
The software is designed for simple, user-friendly programming combined with a high degree of flexibility. A certain amount of training using simulation in a comfortable workplace, accelerates the learning
process and reduces the risk of mistakes in actual process operation. The
software is designed for self-instruction, but calls for a basic understanding of how the transmitter works.
HELP functions and other important guidelines are displayed at critical
points in the programming process.
Warning notices are included at points where faulty programming
might affect the output signal. A code query has been inserted at highly
critical points in the program where the basic setting of the transmitter
could be affected.
Optionally, a personal code can also be inserted to prevent any unauthorized access to the program. An overriding default code is available
from BTG.
The first touch screen is shown in Fig 48, select by touching the area
(“button”) with the text: Sensor card. The “buttons” function is explained in section Button” functions for opening and main menus.
Fig 48 Using the touchscreen
78
MEK-2300 Operating instructions
© BTG 2004
OI218.56/3en
3.4 - Operating the transmitter
A: “Button” functions for opening and main menu.
Fig 49 Selection of program
for the normal
operation of the
transmitter
4-20mA MODEMPRINTER
SENSOR
CARD
PWR ON/OFF
EJECT
MEMORY CARD
BACKUP
CARD
SPC-1000
Communication Terminal
SENSOR
CARD
Used when the standard program card is installed for the normal
sensor setting.
BACKUP
CARD
Used when the back-up card is installed for storing sensor settings.
The first two “button” functions are common for all BTG smart transmitters and independent of the type of sensor. These buttons are always in
English, not translated to other languages.
The “buttons” are within the framed area where the menu choice text is
located.
Pressing the display area actuates the “button” displayed there.
Touch the “MEK-2300 ver 1.2" button as in Fig 50.
Fig 50 Selection of MEK2300 program
4-20mA MODEM PRINTER
MBT
2300
ver1.2
PWR ON/OFF
MEK
2300
ver1.2
EJECT
MEMORY CARD
OCT
2300
ver1.2
SPC-1000
Communication Terminal
OI218.56/3en
MEK-2300 Operating instructions
© BTG 2004
79
3.4 - Operating the transmitter
MEK-2300 Ver. 1.2
4-20mA MODEMPRINTER
MBT
2300
ver1.2
X
PWR ON/OFF
MEK
2300
ver1.2
X
OCT
2300
ver1.0
X
EJECT
MEMORY CARD
X
X
X
X
SPC-1000
Communication Terminal
Selection of type
of sensor (MEK2300 = this manual). Program version 1.2.
Sensor type MBT2300 (not in this
manual).
Sensor type OCT2300 (not in this
manual).
X - X Future transmitter programs.
" See section 3.16 on page 152 for details regarding software
revisions.
The MEK-2300 main menu is displayed, see Fig 51. What follows is an
explanation of the selections you have available on the “buttons” in the
main menu. This menu is identical for all BTG Smart transmitters.
Fig 51 Selection ”buttons” in
the main menu of
MEK-2300 program.
4-20mA MODEMPRINTER
Read
data
4 mA
1.00%
Edit
Range
1
20 mA
4.00%
Misc.
Print
Note !
Trend
PWR ON/OFF
Configure
EJECT
MEMORY CARD
Calibrate
Calibration
curve
Damp
Offset Send
1s
0.00%
data
Tag.no.
Range 2
25.234
--------------0%
61.7% 100%
Cons. 3.35%MEK-2300
SPC-1000
Communication Terminal
80
MEK-2300 Operating instructions
© BTG 2004
OI218.56/3en
3.4 - Operating the transmitter
Read data
4-20mA MODEMPRINTER
PWR ON/OFF
EJECT
MEMORY CARD
Read
Read
data
data
Edit
Range
1
Configure
Calibrate
Calibration
curve
4 mA
1.00%
20 mA
4.00%
Damp
1s
Offset
0.00%
Send
data
Misc.
Print
Note !
Trend
Tag.no.
Range 2
25.234
--------------0%
61.7%
100%
Cons. 3.35% MEK-2300
SPC-1000
Communication Terminal
Reads the sensor’s setting to both
memories in the hand-held terminal,
and deletes all previous programming
in the terminal.
The function flashes, normally when
reading should be carried out but it may
also flash under other circumstances).
Edit Range 1
4-20mA MODEMPRINTER
PWR ON/OFF
Edit
ConfiEdit
Range
gure
1
Range
4 mA
20
1mA Damp
1.00%
4.00%
1s
Read
data
Misc.
Print
Note !
Trend
EJECT
Choice of measuring range (No.1 of 4)
for editing. Note that the present actual
output signal is controlled by the external measuring range setting. This output
signal is the one displayed in the main
menu (61.7%, 3.35% cons in example).
MEMORY CARD
Calibrate
Calibration
curve
Offset
0.00%
Send
data
Tag.no.
Range 2
25.234
--------------0%
61.7%
100%
Cons. 3.35% MEK-2300
SPC-1000
Communication Terminal
Configure
4-20mA MODEMPRINTER
Read
data
Edit
Range
1
4 mA
1.00%
20 mA
4.00%
Misc.
Print
Note !
Trend
PWR ON/OFF
EJECT
Confi- CaliConfigure
brate
gure
Damp
1s
Offset
0.00%
Setting and control of the transmitter’s
basic functions, locations in the process
(TAG no), temperature compensation
and calculation of the production (optional functions).
MEMORY CARD
Calibration
curve
Send
data
Tag.no.
Range 2
25.234
--------------0%
61.7%
100%
Cons. 3.35% MEK-2300
SPC-1000
Communication Terminal
Calibrate
4-20mA MODEMPRINTER
PWR ON/OFF
EJECT
CaliCalibrate
brate
Read
data
Edit
Range
1
Configure
4 mA
1.00%
20 mA
4.00%
Damp
1s
Misc.
Print
Note !
Trend
Offset
0.00%
MEMORY CARD
Calibration
curve
Send
data
Tag.no.
Range 2
25.234
--------------0%
61.7%
100%
Cons. 3.35% MEK-2300
For calibrating the transmitter against
the consistency in the process.
Can also be used as a training and simulation function.
SPC-1000
Communication Terminal
Calibration curve
4-20mA MODEMPRINTER
PWR ON/OFF
Read
data
Edit
Range
1
Configure
4 mA
1.00%
20 mA
4.00%
Damp
1s
Misc.
Print
Note !
Trend
EJECT
MEMORY CARD
CalibCalibration
curve
ration
Offsetcurve
Send
0.00%
data
Calibrate
Tag.no.
Range 2
25.234
--------------0%
61.7%
100%
Cons. 3.35% MEK-2300
Shows the differences between the
stored calibration points and the calibration curve, as well as the calibration
constants and the correlation factor.
SPC-1000
Communication Terminal
4 mA...%
4-20mA MODEMPRINTER
Read
data
PWR ON/OFF
EJECT
MEMORY CARD
Edit
Range
1
Configure
Calibrate
Calibration
curve
4 mA
4 mA
0.00%
1.00%
20 mA
4.00%
Damp
1s
Offset
0.00%
Send
data
Misc.
Print
Note !
Trend
Setting the minimum consistency of the
measuring span.
Tag.no.
Range 2
25.234
--------------0%
61.7%
100%
Cons. 3.35% MEK-2300
SPC-1000
Communication Terminal
OI218.56/3en
MEK-2300 Operating instructions
© BTG 2004
81
3.4 - Operating the transmitter
20 mA...%
4-20mA MODEMPRINTER
Read
data
4 mA
1.00%
Misc.
PWR ON/OFF
Edit
Range
1
Configure
mA
Damp
2020
mA
4.00%
1s
4.00%
Tag.no.
Note !
EJECT
Setting the maximum consistency of the
measuring span.
MEMORY CARD
Calibrate
Calibration
curve
Offset
0.00%
Send
data
Range 2
25.234
--------------0%
61.7%
100%
Cons. 3.35% MEK-2300
Print
Trend
SPC-1000
Communication Terminal
Damp
PWR ON/OFF
4-20mA MODEMPRINTER
Read
data
Edit
Range
1
4 mA
1.00%
20 mA
4.00%
Misc.
Print
Note !
Trend
Configure
Damp
Damp
1s1s
Tag.no.
EJECT
Setting the time constant (damping),
1-99 seconds.
MEMORY CARD
Calibrate
Calibration
curve
Offset
0.00%
Send
data
Range 2
25.234
--------------0%
61.7%
100%
Cons. 3.35% MEK-2300
SPC-1000
Communication Terminal
Offset
4-20mA MODEMPRINTER
PWR ON/OFF
Read
data
Edit
Range
1
Configure
4 mA
1.00%
20 mA
4.00%
Damp
1s
Misc.
Print
Note !
Trend
EJECT
MEMORY CARD
Calibrate
Calibration
curve
Offset Send
Offset
0.00%
data
0.00%
Tag.no.
Range 2
25.234
--------------0%
61.7%
100%
Cons. 3.35% MEK-2300
Used for zero point offset of the calibration curve directly or against a laboratory
sample.
SPC-1000
Communication Terminal
Send data
4-20mA MODEMPRINTER
PWR ON/OFF
EJECT
MEMORY CARD
Read
data
Edit
Range
1
Configure
Calibrate
4 mA
1.00%
20 mA
4.00%
Damp
1s
Offset
0.00%
Misc.
Print
Note !
Trend
Calibration
curve
Send
Send
data
data
Tag.no.
Range 2
25.234
--------------0%
61.7%
100%
Cons. 3.35% MEK-2300
Sends the terminal settings to the
transmitter. The transfer can be protected against unauthorized action by using a
code lock.
SPC-1000
Communication Terminal
Miscellaneous
4-20mA MODEMPRINTER
EJECT
MEMORY CARD
Edit
Range
1
Configure
Calibrate
Calibration
curve
4 mA
1.00%
20 mA
4.00%
Damp
1s
Offset
0.00%
Send
data
Misc.
Misc.
Print
Note !
Trend
SPC-1000
Communication Terminal
82
PWR ON/OFF
Read
data
Tag.no.
Range 2
25.234
--------------0%
61.7%
100%
Cons. 3.35% MEK-2300
Other functions: Factory settings (codeprotected). Back-up data from the terminal’s second memory if the editing memory data is lost, or when using the back-up
card.
Simulation function for manipulation of
the settings without disrupting the output
signal.
MEK-2300 Operating instructions
© BTG 2004
OI218.56/3en
3.4 - Operating the transmitter
Print
4-20mA MODEMPRINTER
PWR ON/OFF
EJECT
Edit
Range
1
Configure
Calibrate
Calibration
curve
4 mA
1.00%
20 mA
4.00%
Damp
1s
Offset
0.00%
Send
data
Print
Print
Misc.
Note !
Trend
Prints all calibration data and transmitter
settings on an external printer or downloads them to a PC.
MEMORY CARD
Read
data
Tag.no.
Range 2
25.234
--------------0%
61.7%
100%
Cons. 3.35% MEK-2300
SPC-1000
Communication Terminal
Trend
4-20mA MODEMPRINTER
PWR ON/OFF
EJECT
MEMORY CARD
Read
data
Edit
Range
1
Configure
Calibrate
Calibration
curve
4 mA
1.00%
20 mA
4.00%
Damp
1s
Offset
0.00%
Send
data
Misc.
Print
Trend
Trend
Note !
Tag.no.
Range 2
25.234
--------------0%
61.7%
100%
Cons. 3.35% MEK-2300
Displays the relevant Feedback signal,
output signal and consistency, and the
output signal’s variation over time, 055 minutes.
SPC-1000
Communication Terminal
Signal display
4-20mA MODEMPRINTER
Read
data
Edit
Range
1
4 mA
1.00%
20 mA
4.00%
Misc.
Print
PWR ON/OFF
Configure
EJECT
Calibrate
Displays the position in the process
(TAG No.), measuring range in operation according to external connection
Output signal in% (0-100%), Present
consistency in% according to calibration
and the type of transmitter that is connected.
MEMORY CARD
Calibration
curve
Damp
Offset Send
1s
0.00%
data Range 2
Tag.no.
Tag.no.
Range 2
25.234
25.234
--------------0%
61.7%
100%
--------------Note ! Trend
MEK-2300
0% Cons. 3.35%
61.7%
100%
Cons. 3.35% MEK-2300
SPC-1000
Communication Terminal
B: General programming instructions
These instructions apply only to software version 1 and any future software revisions within version 1, such as 1.1, 1.1.1, 1.2 etc.
" See section 3.16 on page 152 for program modifications in relation
to previous versions.
The following general instructions will apply to the rest of this manual.
Example: Press the
Read
data
"button” on the display that has this desig-
nation.
Example: 20 s. This should appear on the display.
The program is menu based with direct display of the current menu.
In other words, the menu tree structure according to the traditional concept is very limited.
" These instructions apply only to software version 1.X
OI218.56/3en
MEK-2300 Operating instructions
© BTG 2004
83
3.4 - Operating the transmitter
The program is structured in the following manner.
1.
The common basic functions for the opening menu (Fig 50) for all
types of transmitters are programmed into the terminals internal
memory and is shown when using the sensor card or when the backup card is inserted. Refer to item A: “Button” functions for the opening and main menus, “Buttons”:
SENSOR
CARD
BACKUP
CARD
,
MBT
2300
ver1.2
,
,
MEK
2300
ver1.2
and other future transmitter
models.
• These basic functions are specified only in English since they
are stored in the terminals memory.
4-20mA MODEMPRINTER
PWR ON/OFF
EJECT
MEMORY CARD
Read
data
Edit
Range
1
Configure
Calibrate
Calibration
curve
4 mA
1.00%
20 mA
4.00%
Damp
1s
Offset
0.00%
Send
data
Misc.
Print
Note !
Trend
2.
The main menu (Fig 51) is exactly the same for all types of transmitters that are programmed into the relevant sensor card. It comprises 14 “buttons” with direct selection of the relevant sub-menu
- refer to item A: “Button” functions for the opening and main
menus, “buttons”. There is also a signal display.
3.
The sub-menus are also much the same for all types of transmitters
except for the Configure, Misc. and Note functions. These are adapted to the individual type of transmitter.
4.
A “keyboard” for entering the numerical values is displayed when
required (See Fig 52). When numerical values are entered, the “New
values” are displayed while the previously-entered values are displayed as “Old values”. When the “Enter/Menu” button is pressed,
the “Old values” are replaced by the “New values” and the program
goes to the menu. CE (Clear Entry) can be used to clear the input if
incorrect data is entered.
Tag.no.
Range 2
25.234
--------------0%
61.7%
100%
Cons. 3.35% MEK-2300
SPC-1000
Communication Terminal
Fig 52 Numerical keyboard
of SPC-1000
4-20mA MODEMPRINTER
Old value:
0.00
New value:
0.00
CE
Enter
Menu
PWR ON/OFF
EJECT
MEMORY CARD
7
8
9
4
5
6
1
2
3
0
.
±
SPC-1000
Communication Terminal
5.
84
Alarm indication is actuated by decreasing the output signal to 4.0
mA (the value goes below the measuring span set) or to 21 mA (the
span is exceeded) (analogue output signal 4-20 mA). Indication is
also transmitted via the digital communication.
MEK-2300 Operating instructions
© BTG 2004
OI218.56/3en
3.4 - Operating the transmitter
6.
Code protection can be activated to prevent unauthorized persons
sending incorrect terminal programming to the transmitter. The
code can be selected individually but can be overridden by using a
general code.
7.
Other code protections are applied to configure and factory settings, and to certain optional functions that can be ordered from
BTG.
8.
Switch off the terminal for a few seconds if the program locks up
(can be caused by incorrect programming or communication problems). You have to restart again after this but it is not normally necessary to enter the transmitter’s setting
Note! If pressing
Read
data
Read
data
.
any previous setting in SPC 1000 not sent
to the transmitter is erased!
9.
Adjusting the measuring range. Refer to section A
Edit
Range
1
.
There are four discrete measuring ranges that can be individually
calibrated. This option is used to improve the accuracy of the transmitter, for example when different pulp qualities are present.
" The different measuring ranges can be selected and programmed
via the hand-held terminal but the relevant measuring range for the
actual output signal can be set only via the external connection.
This is accessible on the junction box terminal block. The
terminal’s pre-set measuring range, e.g. “Range 3" agrees only
with the terminal’s output signal and consistency display when this
measuring range (3) is also connected via the terminal block. In the
case of the other three measuring ranges (1, 2 and 4), all settings
in the terminal agree for the respective measuring range, except for
the output signal and the consistency display.
By pressing Edit Range 1, Edit Range 2, etc., you can step to the
relevant measuring range for setting.
The measuring range is also set for copying the relevant measuring
range’s back-up data to the editing memory. See A:
Misc.
.
The following provides detailed step-by-step instructions with
explanations for beginners.
The terminal’s display is usually quite sufficient for experienced
users.
OI218.56/3en
MEK-2300 Operating instructions
© BTG 2004
85
3.5 - Starting the transmitter
3.5 Starting the transmitter
Familiarize yourself with the operation of the hand-held terminal and
transmitter (see section 3.3 on page 67 and section 3.4 on page 77).
Before being started, the transmitter must be installed in the pulp line and
wired electrically according to the Installation instructions (II218.56).
Before admitting water or pulp to the line, check the following points
(where applicable to the model installed).
1. Is the inspection cover properly tightened?
The motor must not be
allowed to run for more
than 4-5 minutes without
flushing water to the
mechanical seal.
2. Has flushing water been supplied to the mechanical seal, and is the
water running off to drain as it should? (where applicable).
3. Switch on the motor briefly. Is it rotating in the direction shown by
the arrow?
Reverse rotation can cause the sensor to unscrew from the shaft (Certain types only).
4. Switch on the power supply to the transmitter’s electronics. Connect
the hand-held terminal to the junction box. Switch on. The display
should now light up. If not, check in the Trouble shooting section of
the JCT-1100 manual that is included in this manual.
Press
4-20mA MODEMPRINTER
PWR ON/OFF
Read data from sensor?
EJECT
SENSOR
CARD
,
MEK
2300
ver1.2
. Then transfer the relevant transmitter’s
MEMORY CARD
No
YesYes
SPC-1000
Communication Terminal
The transmitter data must
always first be transferred
to the terminal for the
setting to work!
data to the hand-held terminal by pressing
Read
data
,
Yes
. “Wait”
should now be displayed. (The transmitter data will not have been
transferred if “Transmission failed” is displayed. Check to ensure
that the terminal’s telephone jack is fully inserted and makes good
contact. The transmission could also fail if the signal circuit resistance is less than 250 Ω . To continue, press the display anywhere.)
5. Is the relevant transmitter’s position number in the process - Tag No.
- entered? This can be seen from the main menu’s signal display window. If not, press
Configure
followed by
Tag.no
12.1234
and enter the rele-
vant number. A maximum of six characters can be entered, e.g. 25
NT 1237 is entered as 25
Enter
Menu
1237
Enter
Menu
.
" Enter the TAG number to identify the relevant transmitter.
86
MEK-2300 Operating instructions
© BTG 2004
OI218.56/3en
3.5 - Starting the transmitter
6. Start the motor (after switching on the electronics unit).
7. Press
Configure
,
Feedback
adjust
. Enter code 2, 3, 0, 0. Press
the arrow points to “check”. Press
Send
data
Auto
Preset
->Check
until
. Check that the display
Set point value corresponds to the original adjusted value stated in
the attached test protocol. If not, enter the Set point value at
Preset
setpoint
0
. End with
Send
data
. To enter the “Max Feedback” value -
see section 3.7.4 on page 133, point C: Direct input for required feedback resolution.
8. Check the feedback signal for rotation in air if necessary. Go to
Trend
, “Feedback xx%”. It is a good idea to remove the cover of
the transmitter’s measuring part and brake the rotating brake ring for
a few seconds by hand. This helps the feedback circuit to start up
faster. The feedback value when the transmitter rotates in air should
at normal operation be between 4 and 8% when the transmitter is
warmed up and settled.
" If the FB value is wrong (< 1% /> 12%), a new basic setting must be
made. Proceed to section 3.5.1 on page 88.
" The transmitter is now ready for calibration against pulp samples.
Proceed to section 3.6.3 on page 103.
OI218.56/3en
MEK-2300 Operating instructions
© BTG 2004
87
3.5 - Starting the transmitter
3.5.1
Feedback adjustment in air
3.5.1.1
Function
" Incorrect adjustment of feedback in air can cause the signal to
become unstable and drift!
The purpose of this adjustment is to set the outer torque wheel so that it
centers between the end position stops while the transmitter rotates in air
(refer also to section 3.1 of the Service manual).
When the transmitter rotates in air and is stabilized, the feedback signal
should be reset if it is less than 4% or greater than 8%.
Warning - rotating parts!
Do not allow the transmitter
to rotate for more than 5
minutes in air if the
mechanical seal is not
flushed. It is better to
retard it manually.
When the transmitter’s motor is started, there may be a delay of a few
minutes before the feedback system comes into operation and attains
equilibrium. This delay is the result of the very small torques obtained
when rotation takes place in air.
To speed up the sequence, the cover over the transducer part can be removed and the transmitter retarded by hand by pressing on the brake ring.
If the transmitter is delivered from factory before november 1995
- wait min. 1 hour leaving the power to the electronics switched on
before making any adjustment!
If the transmitter’s mechanical seal is not water flushed, the transmitter
must not be run for more than a few minutes (maximum 5) since there is
a risk that the mechanical seal could overheat and become damaged. We
recommend that the transmitter be retarded by hand immediately after
the motor is started to prevent overheating. For Feedback adjustment select
Configure
.
The following menu appears; see Fig 53.
Then press
88
Feedback
adjust
.
MEK-2300 Operating instructions
© BTG 2004
OI218.56/3en
3.5 - Starting the transmitter
Fig 53 Feedback adjust
menu
4-20mA MODEMPRINTER
PWR ON/OFF
EJECT
Feedback Tag.no Tx.Spec Comp./
adjust
Prod.
12.1234
MEMORY CARD
Menu
Feedback adjust: FB adj.
in air/basic sensitivity setting.
Tag. no.: Transmitter id.
Tx.Spec : Transmitter spec.
Comp./Prod. : Optional features
SPC-1000
Communication Terminal
You will be asked to enter your code as in Fig 54. Enter your code 2300
and press Enter.
Fig 54 Load code
menu
4-20mA MODEMPRINTER
Your code is 2300
Load code
****
CE
Enter
Menu
PWR ON/OFF
EJECT
MEMORY CARD
7
8
9
4
5
6
1
2
3
0
.
±
SPC-1000
Communication Terminal
See Fig 54 for the following menu with the Auto, Preset and Check
choices.
Fig 54 Feedback adjust submenu. With Auto,
Preset and Check
choice
4-20mA MODEMPRINTER
PWR ON/OFF
Auto Preset Send
Preset setpoin data
->Check 0
EJECT
Sensor
sens.
calib.
MEMORY CARD
Menu
SPC-1000
Communication Terminal
OI218.56/3en
MEK-2300 Operating instructions
© BTG 2004
89
3.5 - Starting the transmitter
Adjustment can be done in one of two ways:
1. Automatic feedback adjustment (Auto)
2. Pre-set set point (Preset)
Auto
>Preset
->Auto
Preset
Check
or
. It can be checked at: Check Set
point/Angle/ Feedback (Check).
1. Automatic feedback adjustment (Auto)
The function operates so that the arrow is stepped to
the button, then press
Send
data
->Auto
Preset
Check
->Auto
Preset
Check
by pressing
.
" Note that the transmitter’s basic setting will be changed!
The terminal and the transmitter will now exchange data with each other
and adapt the adjustment to the correct value.
The Set point, Angle and Feedback values will be displayed after about
half a minute. (Set point is the set point value of the feedback system controller, Angle its actual value and Feedback its output signal). AUX is an
input for special functions. The value should be 0 if these functions are
not used. If the adjustment is correct, the Set point and Angle values
should agree. A typical nominal Set point value is 1600 and Angle can
be permitted to vary by +10 units (max. +20) from the Set point value.
The Set point value can be adjusted between approximately 1440-1680
units. The nominal value depends on the torque wheel’s toothed wheel
and optical sensors adjustment. Refer to section 3.2 of the service manual.
A change to the feedback
adjustment changes the
setting of the transmitter!
This must be done only
when the transmitter
rotates in air - not in pulp.
" The feedback value when rotating in air should be 4-8%. The
Feedback signal in this part of the menu is first shown as a raw
signal and the actual one (6 + 2%). Note that to obtain the actual one
“Sensor sensitivity adjustment” must be performed first - see
section 3.7.4 on page 133.
If the feedback value at rotation in air is outside its limit, fine tuning can
be performed at
Auto
>Preset
.
" Automatic feedback adjustment can be regarded as a rough
adjustment and the setting often needs fine tuning.
90
MEK-2300 Operating instructions
© BTG 2004
OI218.56/3en
3.5 - Starting the transmitter
2. Pre-set set point (Preset)
Auto
>Preset
It is possible to reach the control point quickly by directly adjusting the
feedback controller´s set point. On the MEK-2300 this function is generally used for fine tuning of the feedback adjustment.
This is done by pressing
Preset
setpoint
0
.
Then enter the required set point value on the keyboard which now appears. The previous value will be displayed as “Old value”.
A higher set point value means higher feedback value and vice versa.
(Typical values may differ somewhat between individual transmitters.)
Then press
Send
data
. If you do reset, the Set point, Angle and Feedback
raw signal values will be displayed after a while. Repeat the procedures
if the feedback in air is not 4-8%.
3.Checking the Set point/Angle/Feedback (Check).
This function is used to check the predetermined Set point/Angle/Feedback values. This is an important fault tracing function. No adjustment
can be carried out at this stage. Step the arrow to
nicate with the transmitter, press
OI218.56/3en
MEK-2300 Operating instructions
© BTG 2004
Send
data
Auto
Preset
->Check
and commu-
.
91
3.6 - Calibration
3.6 Calibration
3.6.1
General remarks on calibration and
sampling
The transmitter can be calibrated for the specific application after it has
been installed in the line and all connections have been made.
This section assumes you have completed section 3.5 on page 86, and
studied the operation of the hand-held terminal as described in section
3.3 on page 67.
The calibration system is flexibly designed to ensure maximum precision
under a wide range of operating conditions.
Fig 55 Typical
calibration
curve consistency/
feedback output signal
[%]
Feedback
100908070-
[%]
60-
Output
100-
505040[%]
30-
2
3
4
Linear output signal
20Example shows a sulfate kraft
pulp. Sensing element type B is
used
Consistency
10[%]
1
2
3
4
5
6
7
Consistency
Measuring span
92
MEK-2300 Operating instructions
© BTG 2004
OI218.56/3en
3.6 - Calibration
3.6.1.1
Calibration methods
The transmitter produces a raw signal (feedback) that is used to calculate
the consistency signal via a second degree algorithm. The accuracy of the
calibration constants used in the algorithm are very important for the final measuring result.
Different calibration methods can be used. Which one to choose depends
on how accurate the transmitter needs to be over a wide range of consistency. The following calibration methods are available:
A. Predefined calibration curves
B. Single-point calibration
C. Multi-point calibration
D. Updated calibration
E. Calibration constants
A. Predefined calibration curves (see section 3.6.3.1 on page 103)
Compared to a single-point calibration (Item B below), this calibration
method results in a more accurate measurement during initial start-up.
The reason for this is that the predefined calibration constants have been
calculated from BTG’s wide experience from actual field installations.
We recommend that multi-point calibration (Item C below) is used to
fine tune the transmitter.
In this method predefined calibration constants in the transmitter are used
and are adopted to process characteristics with an offset calibration.
This is a fast method with which only one laboratory sample is necessary.
The resulting calibration is good within a wide range, about ±1% consistency, from the calibration point.
This method can be used only with sensor B.
OI218.56/3en
MEK-2300 Operating instructions
© BTG 2004
93
3.6 - Calibration
B. Single point calibration (see section 3.6.3.2 on page 105)
This method is used to get started quickly and obtain a output signal, and
in cases where the consistency is not allowed to vary for purposes of calibration. This method is used to get started quickly and obtain an output
signal, and in cases where consistency must be stable due to calibration.
A single-point calibration is based on one single calibration value. A calibration point is achieved, by entering the topical raw signal (feedback)
and simultaneously extracting a lab sample. The calibration will now be
correct at that point, but may deviate to a greater or lesser degree at
other consistencies, depending on the type of pulp and the sensor fitted.
" Since single point calibration is based on a single sample, the
output signal cannot be linearized and will therefore not be so
exact.
Multi-point calibration is preferred to get an exact calibration with
a linearized output signal.
The measuring span is adjusted to the desired interval later via the
“4 mA” and “20 mA” buttons in the main menu.
4-20mA MODEMPRINTER
PWR ON/OFF
EJECT
CaliCalibrate
brate
Read
data
Edit
Range
1
Configure
4 mA
1.00%
20 mA
4.00%
Damp
1s
Misc.
Print
Note !
Trend
Offset
0.00%
MEMORY CARD
Calibration
curve
Send
data
Tag.no.
Range 2
25.234
--------------0%
61.7%
100%
Cons. 3.35% MEK-2300
SPC-1000
Communication Terminal
" Single point and Multi-point calibration are combined in the
program, where they are simply called CALIBRATE, but are treated
separately in the instructions.
" When you select Calibrate in the main menu, the display gives you
calibration functions.
Fig 56 Calibration functions
menu
4-20mA MODEMPRINTER
Take
sample
Load
lab.
cons.
PWR ON/OFF
Calc.
new
const.
EJECT
Special
func.
MEMORY CARD
Menu
Action:
1 Push <Take sample> and collect sample
2 After lab. evaluation push <Load lab.
cons.> and enter the value.
3 Push <Calc. new const.> to
calculate the new calibration.
<Special func> are used to manually
load raw signals or cal. constants.
SPC-1000
Communication Terminal
94
MEK-2300 Operating instructions
© BTG 2004
OI218.56/3en
3.6 - Calibration
C. Multi-point calibration (see section 3.6.3.3 on page 108)
4-20mA MODEMPRINTER
Take
sample
PWR ON/OFF
Load
lab.
cons.
EJECT
Calc.
new
const.
Multi-point calibration is used to obtain high precision; it takes full advantage of the potential of the software.
MEMORY CARD
Special
func.
Menu
Action:
1 Push <Take sample> and collect sample
2 After lab. evaluation push <Load lab.
cons.> and enter the value.
3 Push <Calc. new const.> to
calculate the new calibration.
<Special func> are used to manually
load raw signals or cal. constants.
SPC-1000
Communication Terminal
4-20mA MODEMPRINTER
PWR ON/OFF
EJECT
MEMORY CARD
Sample
FeedLab.- Active
No.
back
cons.
-->020.00%waterOn
122.40%1.05%On
225.50%1.52%On
328.70%1.86%On
433.60%2.41%On
537.50%2.82%On
642.40%3.06%On
745.50%3.37%On
846.80%3.68%Off
952.40%3.92%On
On=Included Off=Excluded in cal
Menu
Multi-point calibration is based on the proposition that the consistency
may be changed; signals for different consistencies are stored in the system memory. When laboratory consistency data are later entered, the microprocessor can use the input data and a mathematical formula. See
below to compute the linearized output signal.
Formula: Feedback = K0 + K1 x cons. + K2 x cons.2.
Edit
sample
0
Active
On
Off
The calibration curve is now determined by three CALIBRATION
CONSTANTS K0, K1 and K2 (see section 3.6.5 on page 111).
Load
lab.
cons.
SPC-1000
Communication Terminal
4-20mA MODEMPRINTER
PWR ON/OFF
100|%
F
|
e
|
e
|
d
|
b|Constants
a 50|k0 = 19.57
c|k1 = 1.38
k|k2 = 1.83
|
|
|
0|_________________
1.00%
4.00%
<----- Span ---->
SPC-1000
Communication Terminal
EJECT
MEMORY CARD
Menu
Correlation
r2 = 0.98
%scale
span
The more points you have, and the wider they are spread within the
measuring span, the more accurate the calibration will be (provided
that the laboratory consistency is accurate - see section 3.6.1.3 on page
99 and section 3.6.6.5 on page 120.)
Each type of sensing element produces a characteristic signal level
(FEEDBACK) when it rotates in water, but when the mains power frequency affects the motor, the speed of the sensing element will vary and
the signal will change somewhat; a 60 Hz power supply gives a higher
signal than a 50 Hz supply.
The FEEDBACK IN WATER value is pre programmed; it is used in
calibration to improve the accuracy when one point is defined (subject
to the condition that FEEDBACK IN AIR is between 4% and 8% and that
FEEDBACK IN WATER has been programmed for the correct type of
sensing element and mains frequency (see sensor table in Fig 64).
" Multi-point calibration results can be improved by plotting in
additional points under updated calibration.
The consistency/feedback curve is normally parabolic (see Fig 55); the
signal increases with increasing consistency. If something goes wrong,
for example if laboratory testing gives erroneous results for a high consistency sample, the calibration curve may be inverted, i.e. the signal level falls with increasing consistency. This makes calibration constant
K2 negative, which is not admissible. If this happens, the calibration
curve for the output signal is automatically redrawn, calculated to a
straight line with K2 = 0. The output signal in this case is not linearized.
By checking the calibration curve or running a printout you can check
which calibration point is distorting the result, and correct the calibration
by deactivating that point.
OI218.56/3en
MEK-2300 Operating instructions
© BTG 2004
95
3.6 - Calibration
D. Updated calibration (see section 3.6.4 on page 110)
4-20mA MODEMPRINTER
PWR ON/OFF
Load
lab.
cons.
Take
sample
EJECT
Calc.
new
const.
Updated calibration works just like the normal multi-point calibration, with
one exception: when you make a multi-point calibration, the previous
calibration is erased from the memory, whereas an updated calibration adds new points to the curve without erasing the existing points.
MEMORY CARD
Special
func.
Menu
Action:
1 Push <Take sample> and collect sample
2 After lab. evaluation push <Load lab.
cons.> and enter the value.
3 Push <Calc. new const.> to
calculate the new calibration.
<Special func> are used to manually
load raw signals or cal. constants.
SPC-1000
Communication Terminal
4-20mA MODEMPRINTER
PWR ON/OFF
EJECT
MEMORY CARD
Sample
FeedLab.- Active
No.
back
cons.
-->020.00%waterOn
122.40%1.05%On
225.50%1.52%On
328.70%1.86%On
433.60%2.41%On
537.50%2.82%On
642.40%3.06%On
745.50%3.37%On
846.80%3.68%Off
952.40%3.92%On
On=Included Off=Excluded in cal
Menu
As previously mentioned, the calibration curve is defined by three calibration constants K0, K1 and K2. It is also possible to make a calibration
by loading manually calculated values for these constants.
Edit
sample
0
Active
On
Off
Load
lab.
cons.
SPC-1000
Communication Terminal
4-20mA MODEMPRINTER
PWR ON/OFF
EJECT
100|%
F
|
e
|
e
|
d
|
b|Constants
a 50|k0 = 19.57
c|k1 = 1.38
k|k2 = 1.83
|
|
|
0|_________________
1.00%
4.00%
<----- Span ---->
E. Calibration constants (see section 3.6.5 on page 111)
MEMORY CARD
Menu
Correlation
r2 = 0.98
%scale
span
K0 is the value of the calibration line where it intersects the Y axis.
K1 is the inclination coefficient of the calibration line.
K2 is the exponential rate of increase of the inclination line.
" K2 must not be negative (see section 3.6.5 on page 111 and section
3.6.6 on page 112).
SPC-1000
Communication Terminal
3.6.1.2
Other functions that affect calibration
These functions are: Damping, measuring span, offset adjustment, temperature compensation, load feedback, calibration curve, trend and simulation mode.
" The basic settings of the transmitter also affect the calibration.
A. Damping (see section 3.6.7 on page 125)
4-20mA MODEMPRINTER
PWR ON/OFF
Read
data
Edit
Range
1
4 mA
1.00%
20 mA
4.00%
Misc.
Print
Note !
Trend
EJECT
Configure
Damp
Damp
1s
1s
Tag.no.
MEMORY CARD
Calibrate
Calibration
curve
Offset
0.00%
Send
data
Range 2
25.234
--------------0%
61.7%
100%
Cons. 3.35% MEK-2300
SPC-1000
A time constant (damping factor) usually needs to be inserted to stabilize
the output signal. Its value can range from 1 to 99 seconds. Damping is accomplished by filtering the signal through a software-controlled low-pass
filter.
When making the setting you should try to make the time constant as
short as possible in order to avoid the risk of filtering out actual
changes in consistency. By doing so you also take maximum advantage
of the transmitter’s precision.
Communication Terminal
B. Measuring span limits (see section 3.6.8 on page 126)
4-20mA MODEMPRINTER
Read
data
PWR ON/OFF
Edit
Range
1
4 mA
4 mA
0.00%
1.00%
20 mA
4.00%
Misc.
Print
Note !
Trend
20 Damp
mA
1s
4.00%
Tag.no.
SPC-1000
Communication Terminal
96
Configure
EJECT
MEMORY CARD
Calibrate
Calibration
curve
Offset
0.00%
Send
data
Range 2
25.234
--------------0%
61.7%
100%
Cons. 3.35% MEK-2300
This setting can be accessed directly in the main menu.
Measuring Span can be set as desired, but is limited by the measuring
span of the sensing element. If the calibration is of single point type, or
if the output signal is not linearized (K2 = 0), the span setting should be
as small as possible, since in these cases the calibration is correct at one
point only but may be more or less off at other points.
MEK-2300 Operating instructions
© BTG 2004
OI218.56/3en
3.6 - Calibration
C. Offset adjustment (see section 3.7.1 on page 127)
4-20mA MODEMPRINTER
PWR ON/OFF
EJECT
MEMORY CARD
Read
data
Edit
Range
1
Configure
4 mA
1.00%
20 mA
4.00%
Damp
1s
Calibrate
Misc.
Print
Note !
Trend
25.234
--------------0%
61.7%
100%
Cons. 3.35% MEK-2300
This function is accessed in the main menu — Offset.
Calibration
curve
Offset
Offset Send
0.00%
data
0.00%
Tag.no.
Range 2
SPC-1000
Communication Terminal
PWR ON/OFF
4-20mA MODEMPRINTER
Load
lab.
cons.
3.2%
Take
sample
EJECT
Calc.
MEMORY CARD
Offset
0.00%
If you have made a fine calibration and subsequent checking reveals that it
is not correct, you can use the Offset function. Note that the setting should
not be altered until the erroneous reading has been confirmed by several laboratory samples.
The function operates by displacing the whole calibration curve and locating it with a laboratory sample. You store the cons. value in the memory, at the same time taking a laboratory sample and then load the resulting
data in the normal way.
Menu
Sensor cons.= 3%
acc.to original cal.
Action:
1 Push <Take sample> and collect sample
2 After lab. evaluation push <Load lab.
cons.> and enter the value.
3 Push <Calc.> Alt. enter the actual
cons. offset at <Offset>.
SPC-1000
Communication Terminal
If the offset adjustment needed is already known the value can be directly
entered.
Any compensation currently applied can be read directly from the Offset
display, and erased or altered at the next check.
A valuable way to use this function is to compensate for coating of the
sensing element, as, for example happens in certain types of bleach
plants.
Coating on the sensor causes the signal to rise. It is possible to tell from
experience when the sensing element has become so thickly coated as to
interfere with the functioning of the transmitter.
D. Temperature compensation (see section 3.7.2 on page 129)
" This function is an option which can only be reached by entering
4-20mA MODEMPRINTER
PWR ON/OFF
Read
data
Edit
Range
1
4 mA
1.00%
20 mA
4.00%
Misc.
Print
Note !
Trend
EJECT
MEMORY CARD
Confi- Caligure
brate
Configure
Damp
Offset
1s
an access code obtained from BTG. If the code is not entered the
function does not appear in the display. The transmitter sensor
processor card must be equipped with components for this
function.
0.00%
Calibration
curve
Send
data
Tag.no.
Range 2
25.234
--------------0%
61.7%
100%
Cons. 3.35% MEK-2300
SPC-1000
Communication Terminal
4-20mA MODEMPRINTER
PWR ON/OFF
EJECT
MEMORY CARD
Feedback Tag.no Tx.Spec Comp./
adjust
Prod.
12.1234
A
Comp/
Prod
Menu
Configure
Feedback adjust: FB adjustment
in aire/basic sensitivity setting.
Tag. no.: Transmitter id.
Tx.Spec : Transmitter spec.
Comp./Prod. : Optional features
Communication Terminal
PWR ON/OFF
->Temp. 4 mA
Prod. Temp
Off
25.0
START
20 mA
Temp
75.0
EJECT
Working
Point
Temp
40.0
4 mA
20 mA
Rawsig. Rawsig.
859
204
1023
Setpoint= 390
Angle= 392
Feedback= 256.5%
AUX= 1023
SPC-1000
Communication Terminal
OI218.56/3en
. To access this function, an external temperature transmitter
must be connected.
SPC-1000
4-20mA MODEMPRINTER
Certain external factors affect the transmitter’s shear force, and thus the
signal. This effect is normally negligible. The function can be used in
cases where, for example, the temperature regularly undergoes wide
fluctuations (> 10°C/ 50°F). It will be found in the main menu under
MEMORY CARD
Menu
Take
sample
Here again, it is necessary to perform a fine calibration first. The function operates by applying a correction factor to the calculated cons. value,
and with it the output signal, is compensated for variations in temperature.
To get the exact amount of compensation first make a fine calibration
at a known temperature; (the “working point”) the compensation is calibrated later at a different temperature at which the fine calibration is
compared with a new measured value. This gives the absolute consistency error, i.e. the compensation factor.
MEK-2300 Operating instructions
© BTG 2004
97
3.6 - Calibration
PWR ON/OFF
4-20mA MODEMPRINTER
Load
lab.
cons.
Take
sample
EJECT
Calc.
new
const.
E. Load feedback (see section 3.7.3 on page 132)
MEMORY CARD
Special
func.
Menu
Action:
1 Push <Take sample> and collect sample
2 After lab. evaluation push <Load lab.
cons.> and enter the value.
3 Push <Calc. new const.> to
calculate the new calibration.
This function will be found under
Calibrate
,
Special
func.
.
<Special func> are used to manually
load raw signals or cal. constants.
SPC-1000
Communication Terminal
4-20mA MODEMPRINTER
PWR ON/OFF
EJECT
Sample
Feedback
-->020.00% water
122.40%
225.50%
328.70%
433.60%
537.50%
642.40%
745.50%
846.80%
952.40%
k0 = 19.57
k1 = 1.38
k2 = 1.83
MEMORY CARD
Menu
Edit
row
1
Load
new
value
Calibration
curve
SPC-1000
The function is used for manual loading of various feedback values for
calibration, for example, when replacing a card, or if you have lost or
want to alter a feedback value.
" For training in the operation of the transmitter this function
together with entering lab. values is a very useful aid. See section
3.13: Training.
Communication Terminal
4-20mA MODEMPRINTER
PWR ON/OFF
Read
data
Edit
Range
1
Configure
4 mA
1.00%
20 mA
4.00%
Damp
1s
Misc.
Print
Note !
Trend
EJECT
F. Calibration curve (see section 3.7.5 on page 136)
MEMORY CARD
CalibCalibration
curve
ration
Offset
Send
curve
0.00%
data
Calibrate
Tag.no.
Range 2
25.234
--------------0%
61.7%
100%
Cons. 3.35% MEK-2300
The function is found in the main menu under
SPC-1000
Communication Terminal
4-20mA MODEMPRINTER
PWR ON/OFF
EJECT
100|%
F
|
e
|
e
|
d
|
b|Constants
a 50|k0 = 19.57
c|k1 = 1.38
k|k2 = 1.83
|
|
|
0|_________________
1.00%
MEMORY CARD
Menu
Correlation
r2 = 0.98
%scale
span
4.00%
<----- Span ---->
SPC-1000
Communication Terminal
Calibration
curve
.
To assess the calibration, it is possible to see directly how well the calibration points entered agree with the calculated calibration curve.
The three calibration constants K0, K1 and K2 and the correlation factor
r2 can also be seen.
The resolution of the display can be adjusted to zoom in an area for better
readability.
G. Trend (see section 3.7.6 on page 136)
4-20mA MODEMPRINTER
PWR ON/OFF
EJECT
This function is found in the main menu under
MEMORY CARD
Read
data
Edit
Range
1
Configure
Calibrate
Calibration
curve
4 mA
1.00%
20 mA
4.00%
Damp
1s
Offset
0.00%
Send
data
Misc.
Print
Note !
Trend
Trend
SPC-1000
Communication Terminal
PWR ON/OFF
EJECT
100|
|
%
|
|
O
|
u
|
t 50|
p
|50,0%
u
|
t
|
|3.05%
|
0|________________________5
Feedback 50.3%
SPC-1000
.
Here you can see directly the output signal’s trend and stability. This is
important when setting the right time constant (damping).
Tag.no.
Range 2
25.234
--------------0%
61.7%
100%
Cons. 3.35% MEK-2300
4-20mA MODEMPRINTER
Trend
Range 1
MEMORY CARD
Menu
Output
12.0 mA
Cons.
Minutes
trend
The resolution of the display can be adjusted by varying the trend display
from 0-5 minutes to 0-55 minutes. This function is also a useful tool
when trimming the control loop.
The direct output signal in mA (4-20), the calibrated momentary consistency in% and the momentary feedback value in% (0-100) are shown in
addition to the output signal over time in% (0-100).
Communication Terminal
98
MEK-2300 Operating instructions
© BTG 2004
OI218.56/3en
3.6 - Calibration
H. Simulation mode (see section 3.7.7 on page 137)
The
Simulation
mode
Off
function is found in the main menu under
Misc.
. It can
be enabled (ON) or disabled (OFF-normal status).
4-20mA MODEMPRINTER
PWR ON/OFF
Factory Backup
setting data
Simulation
mode
Off
EJECT
MEMORY CARD
Menu
Factory setting : Not available
Backup data : To obtain lost data
Simulation mode : Simulation of all
settings without disturbing the actual
output signal - shown at main menu.
Result see Trend.
SPC-1000
Communication Terminal
" This function is used to simulate different settings on the terminal
without affecting the actual output signal.
All functions, with the exception of Feedback adjust and Damp, can be
reset in different ways to achieve optimum adjustment. The result is then
viewed in the Trend display. This can be sent to the transmitter once you
are satisfied with the adjustment. The simulation function is then automatically disabled.
3.6.1.3
General remarks on sampling
The only way to calibrate the transmitter correctly is to take correct
laboratory samples of various consistencies and adjust the transmitter
accordingly.
Sampling procedure:
1.
Install the sampling valve close to the transmitter. Where a measuring
vessel is used, it is best to install the valve in the vessel itself.
The measuring vessel can be ordered complete with weld-in stud
for sampling valve. Otherwise the valve should be installed in such
a way as to avoid interference from pipe bends, pumps, etc. Recommendations regarding turbulence damping zones are the same as for
the transmitter itself.
If the transmitter and sampling valve are far from each other,
we recommend installation of a separate junction box where the
hand-held terminal could be connected to be able to perform the calibration procedure in a convenient and safe way.
" To ensure acceptable precision in taking laboratory samples, we
recommend use of the BTG sampling valves.
OI218.56/3en
2.
Take at least two and preferably three laboratory samples at each
consistency level. Calculate the mean value; reject samples that deviate widely from the mean.
Take an adequate volume for sampling - at least 500 ml (1/2 US
quart) for a reliable sample.
3.
Make sure that samples for calibration and subsequent checking are
always taken in the same manner regardless of who does the sampling. Similarly the laboratory procedure must always be exactly
the same.
MEK-2300 Operating instructions
© BTG 2004
99
3.6 - Calibration
" The design of and compliance with sampling routines are of crucial
importance in assuring uniform treatment of samples and thus the
calibration and future precision of measurement of the transmitter.
" During calibration, the pulp flow past the Transmitter must be
representative for the position in which it is installed.
" To simplify and improve the regularly follow-up routines the BTG
Smart lab sampler - SLS-1000 is an useful aid.
3.6.2
Criteria for calibration
1. The transmitter rotates and has been started up as per section 3.5 on
page 86.
2. The hand-held terminal must be connected to the junction box and
switched on, and the transmitter data read into the terminal as per
section 3.5 on page 86.
3. The pulp flow must be turned on and must pass the transmitter in the
pipe. The pulp must have representative consistency and flow values.
3.6.2.1
Adjusting Tag no. / Serial no. / Sensing element no.
/ Propeller no.
Tag no.: The Tag no. is the transmitter identification no. in the process.
It can have different shapes in practice. In the terminal max 6 identification numbers can be entered. Example Tag no. is 12 NT 1234. Enter it
the following way: Press 12 Enter, 1234 Enter. “NT” will be displayed
as a point l.e. the total Tag no. will be 12.1234.
Serial no.: The serial number is entered at the factory. It can also be read
at the transmitter. type sign. and reentered if being lost. Example: Serial
no. is 123456/01/01.
Sensing element no. / Propeller no.: The part numbers for the sensing
element and propeller supplied are entered at the factory.
" When replacing sensing element/propeller with another type, the
relevant new part number must be entered so the transmitter is
correctly documented.
" When changing the sensing element to another type the
corresponding “feedback in water value” must be entered — see
section 3.6.2.2 on page 101. If not the calibration might be wrong.
100
MEK-2300 Operating instructions
© BTG 2004
OI218.56/3en
3.6 - Calibration
Procedure:
1. Press
Configure
2. Then press
4-20mA MODEMPRINTER
Read
data
Edit
Range
1
4 mA
1.00%
20 mA
4.00%
Misc.
Print
Note !
Trend
PWR ON/OFF
EJECT
Confi- CaliConfigure
brate
gure
Damp
1s
Offset
0.00%
in the main menu.
Tx.Spec
to obtain the relevant Serial no; Sensing ele-
MEMORY CARD
Calibration
curve
ment part no. and propeller part no.
Send
data
Tag.no.
Range 2
25.234
--------------0%
61.7%
100%
Cons. 3.35% MEK-2300
3. Press
Sensor
and enter the correct part no. - see order or Fig 64.
4. Press
Propelle
r
and enter the correct part no. - see order or Fig 64.
5. Press
Send
data
to transfer to the transmitter.
SPC-1000
Communication Terminal
3.6.2.2
Adjusting “feedback in water”
When the transmitter rotates in water, the feedback signal is dependent
primarily on the type of sensing element selected (it’s size) the transmitter’s speed of rotation - determined by the mains power frequency and the
transmitter’s pre-set strength - the torque in relation to the feedback signal.
These values can be determined in advance and, as a consequence, the
transmitter need not be run in water. The water value of the feedback signal is important for calibration accuracy since one calibration point, that
is usually quite different from the normal operating range, can be predetermined. (Applies only for Multi-point calibration)
" If the transmitter is to operate at very low consistencies - lower
than approximately 1-1.5%, it is recommended that, where
possible, the transmitter should actually be run in water in the
relevant installation.
In this case, the true feedback value can be read manually at
entered at
Calibrate
,
Special
func.
Trend
and
as sample No.0. See procedure below.
Feedback in water and the relevant sensing element and propeller numbers are entered when supplied by the factory. The new data must be set
when the sensing element is replaced. See section 3.6.2.1 on page 100.
OI218.56/3en
MEK-2300 Operating instructions
© BTG 2004
101
3.6 - Calibration
Factors influencing “feedback in water” value.
The “feedback in water” value for the sensing element in question is given in Fig 63.
A. First determine the mains power frequency - 50 or 60 Hz at location.
B. Then determine for which strength the transmitter is adjusted torque in relation to the feedback signal.
The standard settings are:
100% Feedback signal corresponds to 100 kpmm torque.
(NC=Normal Consistency models)
Transmitter models: MEK-2300, -2314, -2320, -2340.
100% Feedback signal corresponds to 150 kpmm torque.
(MC=Medium Consistency models)
Transmitter models: MEK-2310, -2311, -2312, -2315.
" Other settings can also be made, for example to increase
sensitivity - see section 3.7.4 on page 133.
If the transmitter strength is adjusted differently to the above the predetermined “feedback water value” is not relevant. In that case, do
not use sample 0 (feedback in water) value or let the transmitter run
in water, measure the actual “feedback in water” value and enter it
at
Special
func.
as sample 0.
C. Then determine which actual sensing element is used - see type label on the transmitter/ order/ Fig 64 whichever is relevant.
D. Finally determine and set the sensing element’s feedback in water
value according to Fig 64.
Procedure:
4-20mA MODEMPRINTER
PWR ON/OFF
ConfiConfi- Caligure
brate
gure
Read
data
Edit
Range
1
4 mA
1.00%
20 mA
4.00%
Misc.
Print
Note !
Trend
SPC-1000
Communication Terminal
EJECT
Damp
1s
Offset
0.00%
MEMORY CARD
Calibration
curve
Send
data
1. Press
Calibrate
in the main menu.
Tag.no.
Range 2
25.234
--------------0%
61.7%
100%
Cons. 3.35% MEK-2300
2. Then press
Special
func.
. Press
Load
new
value
and enter the correct “feed-
back” in water value at sample 0. Exit by pressing
102
MEK-2300 Operating instructions
© BTG 2004
Menu
.
OI218.56/3en
3.6 - Calibration
3.6.3
Calibration
3.6.3.1
Predefined calibration curves
(See section 3.6.1.1 on page 93, item A.)
In the table below calibration constants K0, K1 & K2 are listed for different pulps. These constants are only valid for the sensing element type
B and it’s consistency range (1-5% for long fibers and 1-6.5% for short
fibers). The constant K0 is dependent upon network frequency, 50 or 60
Hz, for the motor (rpm).
Predefined calibration constants.
Pulp
HWB
Hardwood bleached.
Short-fiber chemical pulp bleached.
K0/60 K0/50
K1
Hz
Hz
K2
24
20
-0.7
2.3
24
20
-1.5
2.7
24
20
-1.1
3.1
Hardwood unbleached.
HWU
SWB
Short-fiber chemical pulp
unbleached.
Soft wood bleached.
Long-fiber chemical pulp bleached.
Software unbleached.
SWU
Long-fiber chemical pulp
unbleached.
24
20
1.0
3.0
TMP
Thermo-mechanical pulp
24
20
-2.1
2.9
GW
Ground wood
24
20
-2.6
2.8
ONP
Old newspaper recycled.
24
20
-0.8
2.0
OCC
Old corrugated container
recycled.
24
20
-1.0
1.6
For a mixed pulp, or a pulp not included in the table, calibration constants
can be approximated according to the pulp type with the closest shear
force aspects.
The transmitter has to be adjusted for 100% feedback at 100 kpmm before this calibration can be made.
To enter the calibration constants follow the instructions in section 3.6.5
on page 111.
OI218.56/3en
MEK-2300 Operating instructions
© BTG 2004
103
3.6 - Calibration
Fig 57 Predefined calibration
curves
MEK-2300 Predefined calibration curves.
Typical results from actual installations
100
90
80
70
% Feedback
SWU
SWB
TM P
HWU
60
GW
HWB
ONP
OCC
50
40
30
20
0
1
2
3
4
5
6
% Consistency
104
MEK-2300 Operating instructions
© BTG 2004
OI218.56/3en
3.6 - Calibration
3.6.3.2
Single point calibration
(See section 3.6.1.1 on page 93, item B.)
Single point calibration is often used for quick start-ups and refined later by a multi-point calibration (see section 3.6.3.3 on page 108).
" To improve the calibration: Make an updated calibration and an
multi point calibration is obtained.
Criteria:
1. Transmitter started up as per section 3.5 on page 86.
2. “Feedback in water” should be set, see section 3.6.2.2 on page 101.
3. The transmitter’s data must be entered in the hand-held terminal as
per section 3.5 on page 86, items 4-5
Read
data
.
Procedure:
PWR ON/OFF
4-20mA MODEMPRINTER
Edit
Edit
Range
1
Range
4 mA
20
1mA
1.00%
4.00%
Read
data
Misc.
Print
Note !
Trend
EJECT
1.
Set the controller to MAN and adjust the dilution water valve
until the consistency is judged to be normal, i.e. as close to the
intended SETPOINT as possible. Let it stabilize.
2.
Select the relevant measuring range
3.
Start by setting the desired measuring span under main menu
MEMORY CARD
Configure
Calibrate
Calibration
curve
Damp
1s
Offset
0.00%
Send
data
Edit
Range
1
No. 1-4.
Tag.no.
Range 2
25.234
--------------0%
61.7%
100%
Cons. 3.35% MEK-2300
SPC-1000
Communication Terminal
4-20mA MODEMPRINTER
Read
data
PWR ON/OFF
Edit
Range
1
4 mA
4 mA
0.00%
1.00%
20 mA
4.00%
Misc.
Print
Note !
Trend
Configure
20 Damp
mA
1s
4.00%
Tag.no.
EJECT
MEMORY CARD
Calibrate
Calibration
curve
Offset
0.00%
Send
data
option
Range 2
25.234
--------------0%
61.7%
100%
Cons. 3.35% MEK-2300
4 mA
1.00%
and
20 mA
4.00%
, see also 3.6.8.
SPC-1000
Communication Terminal
4-20mA MODEMPRINTER
PWR ON/OFF
EJECT
Read
data
Edit
Range
1
ConfiCaligure
brate
Calibrate
Calibration
curve
MEMORY CARD
4 mA
1.00%
20 mA
4.00%
Damp
1s
Offset
0.00%
Send
data
Misc.
Print
Note !
Trend
4.
Press
Calibrate
followed by
Take
sample
.
Tag.no.
Range 2
25.234
--------------0%
61.7%
100%
Cons. 3.35% MEK-2300
SPC-1000
Communication Terminal
4-20mA MODEMPRINTER
PWR ON/OFF
Load
Calc.
lab.
new
Take
cons.
const.
sample
Take
sample
EJECT
Special
func.
MEMORY CARD
Menu
Action:
1 Push <Take sample> and collect sample
2 After lab. evaluation push <Load lab.
cons.> and enter the value.
3 Push <Calc. new const.> to
calculate the new calibration.
<Special func> are used to manually
load raw signals or cal. constants.
SPC-1000
Communication Terminal
OI218.56/3en
MEK-2300 Operating instructions
© BTG 2004
105
3.6 - Calibration
4-20mA MODEMPRINTER
Sample
-->1
2
3
4
5
6
7
8
9
PWR ON/OFF
Feedback
41.2%
0.00%
0.00%
0.00%
0.00%
0.00%
0.00%
0.00%
0.00%
Feedback
EJECT
MEMORY CARD
5.
New Menu
calibrationNew
calib
All previous calibration values should be deleted during single-point calibration.
ration
Take
sample
%
Edit
Sample
Press
New
calibration
and accept deletion by pressing
Yes
Press
Take
sample
and take representative laboratory samples.
.
SPC-1000
Communication Terminal
4-20mA MODEMPRINTER
Sample
-->1
2
3
4
5
6
7
8
9
PWR ON/OFF
Feedback
41.2%
0.00%
0.00%
0.00%
0.00%
0.00%
0.00%
0.00%
0.00%
Feedback
EJECT
MEMORY CARD
Menu
6.
Take New
calib
sample
ration
The feedback signal will then be stored in the memory for
sample 1 (mean value over 40 seconds). (Sample 0 is the
feedback in water value entered at the factory, see section
3.6.2.2 on page 101).
Single point calibration will be based on a single feedback
value and the corresponding laboratory sample and calculated
to a special adapted formula to give a good correspondence to
Take
sample
%
Edit
Sample
SPC-1000
Communication Terminal
the actual curve. Press
4-20mA MODEMPRINTER
PWR ON/OFF
EJECT
Sample
FeedLab.- Active
No.
back
cons.
-->020.00%waterOn
155.00%2.20%On
2 0.00%0.00%Off
3 0.00%0.00%Off
4 0.00%0.00%Off
5 0.00%0.00%Off
6 0.00%0.00%Off
7 0.00%0.00%Off
8 0.00%0.00%Off
9 0.00%0.00%Off
On=Included Off=Excluded in cal
MEMORY CARD
Menu
Menu
.
7.
Evaluate the laboratory samples. Calculate the mean value.
8.
Press
Load
lab.
cons.
. Sample 0, the feedback value during rotation
in water, and sample No. 1 should be activated during single
Edit
sample
0
Active
On
Off
Load
lab.
cons.
point calibration. Press
SPC-1000
Active
On
Off
. On for sample no 00. Press
Communication Terminal
Edit
sample
0
Active
On
Off
until the arrow reaches sample No. 1. Press
- On. Press
(mean value). Press
" Calibration can be
improved by entering
additional calibration
points, i.e. by making a
multi-point calibration
according to section
3.6.4 on page 110.
106
9.
Press
Calc.
new
const.
Load
lab.
cons.
Enter
Menu
and enter the laboratory value
,
Menu
.
to allow calibration to be performed. The rel-
evant calibration curve and the calibration constants will now
appear.
MEK-2300 Operating instructions
© BTG 2004
OI218.56/3en
3.6 - Calibration
10. Evaluate the calibration as per section 3.6.6.5 on page 120
4-20mA MODEMPRINTER
PWR ON/OFF
100|%
F
|
e
|
e
|
d
|
b|Constants
a 50|k0 = -2.18
c|k1 = 14.56
k|k2 = 0.00
|
|
|
0|_________________
1.00%
4.00%
<----- Span ---->
SPC-1000
Communication Terminal
EJECT
MEMORY CARD
Menu
11. Transfer the calibration to the transmitter. Press
Correlation
r2 = 0.98
%scale
span
Send
data
.
Check that all data that is displayed is correct. If a code has
been entered (see section 3.9 on page 140), key this in correctly and press
Yes
to transfer all the data to the transmitter.
If the message “Transmission fail” appear there is a communication problem. Refer to the Service manual and section 4,
item 5.
12. Press
Trend
in the main menu. Check the stability of the
signal over time. If necessary, go back to the main menu and
set a suitable time constant. Press
Damp
1s
(see section 3.6.7
on page 125). Then transfer the new data to the transmitter
again.
13. Trim the controller. See section 3.14 on page 150.
14. Document the calibration either manually or by making a
printout - refer to section 3.6.6.2 on page 112. Refer also to
" Calibration is now complete but can generally be improved by
entering additional calibration points, i.e. multi-point calibration.
OI218.56/3en
MEK-2300 Operating instructions
© BTG 2004
107
3.6 - Calibration
3.6.3.3
Multi-point calibration
(See section 3.6.1.1 on page 93, item C.)
Multi-point calibration is based on several measured values and is used
to obtain exact calibration. It can be further refined by an updated calibration (see section 3.6.4 on page 110). Note that if you have previously
made a single point calibration, it will now be erased. If you want to
save the value (sample #1), select UPDATED CALIBRATION.
Does the temperature normally fluctuate widely (by more than approximately 10°C)? If so, and you want to achieve greater precision in measurement, connect compensating equipment (see section 3.7.2 on page
129).
Criteria:
a. Transmitter started up as per section 3.5 on page 86. “Feedback in
water” should be set, see section 3.6.2.2 on page 101 for a multipoint calibration.
b. The transmitter’s data must be entered in the hand-held terminal as
per section 3.5 on page 86, items 4-5
Read
data
.
Procedure:
Go to MAIN MENU.
(Compare with section 3.6.3.2 on page 105, which describes similar steps
in somewhat more detail.)
Select actual range with
2.
Start by setting the desired measuring span under MAIN MENU
4 mA
1.00%
108
Edit
Range
1
1.
option and
20 mA
4.00%
“button”, range 1-4.
. See also section 3.6.8 on page 126.
3.
Set the controller to MAN. Close the dilution water so that the consistency rises to the maximum permissible limit. Let it stabilize. If
feedback now approaches or exceeds 100%, the sensing element
should be replaced by a smaller one. If feedback is very low, close
to the value for water, the sensing element should be replaced by a
larger one.
4.
Press
Calibrate
.
MEK-2300 Operating instructions
© BTG 2004
OI218.56/3en
3.6 - Calibration
5.
Take
sample
Select
or
No
, then
New
calibration
. Press
Yes
for a new calibration
for an UPDATED CALIBRATION.
UPDATED CALIBRATION is used if you want to preserve the value of sample #1 from single point calibration.
6.
Take
sample
Select
and take laboratory samples (normally three at each
level) immediately, while at the same time storing the feedback
signal in the memory. Mark the laboratory sample with the sample
number shown on the display.
7.
Decrease the consistency and repeat the procedure. For next sample,
press
Edit
sample
. You should take at least three samples at high, me-
dium and low level within the measuring span. The wider the spread
within the measuring span, the better results will be.
Exit by pressing the
Menu
key after collecting suitable amount of
samples at various levels.
8.
4-20mA MODEMPRINTER
PWR ON/OFF
EJECT
Sample
FeedLab.- Active
No.
back
cons.
-->020.00%waterOn
122.40%1.05%On
225.50%1.52%On
328.70%1.86%On
433.60%2.41%On
537.50%2.82%On
642.40%3.06%On
745.50%3.37%On
846.80%3.68%Off
952.40%3.92%On
On=Included Off=Excluded in cal
Load the laboratory consistency (mean value of samples) under
MEMORY CARD
Menu
Load
lab.
cons.
Edit
sample
0
Active
On
Off
for all numbered samples.
The FEEDBACK IN WATER signal should normally be included,
i.e. activated. If any sample is faulty it should not be activated, i.e.
not included in the calibration.
Load
lab.
cons.
SPC-1000
Communication Terminal
9.
Press the
Menu
key, then
Calc.
new
const.
. Let the microprocessor com-
pute the calibration. The transmitter is then in operation.
4-20mA MODEMPRINTER
PWR ON/OFF
100|%
F
|
e
|
e
|
d
|
b|Constants
a50|k0 = 19.57
c|k1 = 1.38
k|k2 = 1.83
|
|
|
0|_________________
1.00%
4.00%
<----- Span ---->
SPC-1000
Communication Terminal
EJECT
MEMORY CARD
Menu
Correlation
r2 = 0.98
%scale
span
10. Evaluate the results, from the displayed calibrating curve. If the
curve shows that any sample deviates widely from the calibration
line, thereby skewing the line as a whole in relation to the other samples, go back to LOAD LAB CONS, step to the offending sample
number, and deactivate that number. A faulty calibration constant,
K2 = 0, can likewise be corrected, i.e the signal can be linearized if
bad samples are not activated (see section 3.6.6 on page 112). Note
that you must always press
Calc.
new
const.
in order to recalculate the cali-
bration.
OI218.56/3en
MEK-2300 Operating instructions
© BTG 2004
109
3.6 - Calibration
11. Transfer the calibration to the transmitter. Press
Send
data
. Check
that all data that is displayed is correct. If a code has been entered
(see section 3.9 on page 140), key this in correctly and press
Yes
to transfer all the data to the transmitter.
If the message “Transmission fail” appear there is a communication
problem. Refer to the Service Manual and section 3.5 on page 86,
item 5.
12. Press
Trend
in the main menu. Check the stability of the signal
over time. If necessary, go back to the main menu and set a suitable
time constant. Press
with
Send
data
Damp
Xs
(see section 3.6.7 on page 125). End
.
13. Trim the controller. See section 3.14 on page 150.
14. Document the calibration either manually or by making a printout refer to section 3.6.6.2 on page 112. Refer also to section 3.6.6.3 on
page 117, or section 3.6.6.4 on page 119.
" Calibration is now complete but can generally be improved by
entering additional calibration points, i.e. an updated calibration
according to section 3.6.4 on page 110.
3.6.4
Updated calibration
(See section 3.6.1.1 on page 93, item D.)
Updated calibration can be used at any time to improve an existing
single or multi-point calibration. A total of ten sample points (including FEEDBACK IN WATER) can be entered in each measuring range.
This calibration option works in exactly the same way as the multipoint calibration described above.
The only difference is that you select option
No
No
at
New
calibration
the
mode which means that the existing calibration is not erased.
Any sample taken can be updated with a new sample at any time.
110
MEK-2300 Operating instructions
© BTG 2004
OI218.56/3en
3.6 - Calibration
3.6.5
Calibration with given constants
(See section 3.6.1.1 on page 93, item E.)
The three calibration constants K0, K1 and K2 define the calibration
curve.
1.
Calibrate
It is a simple matter to enter new constants under
Special
func.
. Step down to accurate constant with
Edit
row
1
,
and give ac-
tual input.
2.
Transfer the calibration to the transmitter. Press
Send
data
. Check
that all data that is displayed is correct. If a code has been entered
(see section 3.9 on page 140), key this in correctly and press
Yes
to transfer all the data to the transmitter.
If the message “Transmission fail” appear there is a communication
problem. Refer to the Service Manual and section 3.5 on page 86,
item 5.
3.
Press
Trend
in the main menu. Check the stability of the signal
over time. If necessary, go back to the main menu and set a suitable
time constant. Press
with
Send
data
Damp
Xs
(see section 3.6.7 on page 125). End
.
4.
Trim the controller. See section 3.14 on page 150.
5.
Document the calibration either manually or by making a printout refer to section 3.6.6.2 on page 112. Refer also to section 3.6.6.3 on
page 117, or section 3.6.6.4 on page 119.
" Calibration is now complete but can generally be improved by
entering additional calibration points, i.e. by making a multi-point
calibration according to section 3.6.4 on page 110.
OI218.56/3en
MEK-2300 Operating instructions
© BTG 2004
111
3.6 - Calibration
3.6.6
Evaluation and documentation of calibration
When you have made a calibration it should be evaluated and documented.
Programmed data essential to subsequent fault tracing or replacement of
a card are then available on file.
3.6.6.1
Print-out documentation
A standard printer is an invaluable aid that simplifies evaluation and documentation of transmitter settings.
The printer must be EPSON-compatible with an RS-232 serial input. The
recommended models are: EPSON P-40S, SEIKO DPU-411, or SEIKO
DPU-414), which can be ordered locally or from BTG. A special connecting cable supplied by BTG is needed. Set the printer to a baud rate
of 2400.
Documentation can also be done manually. Make a written record of all
the data listed on the printout shown in fig 58, and draw a calibration
graph.
" Actual data are also available at
3.6.6.2
Send
data
and
Calibrate
,
Load
lab.
cons.
.
Documenting calibrations (see Fig 58) with printer or
manually
1. Plug the printer into the hand-held terminal. Switch on the printer.
2. Select printout from the measuring range you want to print, press
4-20mA MODEMPRINTER
PWR ON/OFF
EJECT
Read
data
Edit
Range
1
Configure
Calibrate
4 mA
1.00%
20 mA
4.00%
Damp
1s
Offset
0.00%
Misc.
Tag.no.
Print
25.234
Print
Note !
Trend
SPC-1000
MEMORY CARD
Calibration
curve
Send
data
Range 2
--------------0%
61.7%
100%
Cons. 3.35% MEK-2300
Edit
range
X
Printer
. Press MAIN MENU option
Print
. Then select
and a printout is made.
Communication Terminal
If the display reads “No comm. with printer”, check that the printer is
correctly plugged in, that the battery is charged or the printer is connected
to a AC adapter and that the baud rate (2400) is correctly set.
Fig 58 shows a specimen printout.
If you do not have a printer, access the relevant parts of the menu and
make a manual note of the readings corresponding to those shown in
Fig 58. Items 1-7, 10-12 and 16-19 should always be recorded. In addition, you should draw a consistency/feedback calibration curve.
112
MEK-2300 Operating instructions
© BTG 2004
OI218.56/3en
3.6 - Calibration
Comments on specimen printout (Fig 58).
Corresponding data can be accessed in the program under the options
shown in parentheses.
1.
SENSOR
CARD
CONSISTENCY TRANSMITTER model, press
and
read “buttons” for MEK-2300.
2.
PROGRAM VERSION (software release and data) and language
version in use (Switch on the hand-held terminal, press
SENSOR
CARD
and
read “buttons” for MEK-2300).
3.
Particulars to be filled in by hand.
4.
Pre programmed transmitter data (
5.
Trouble shooting data. During operation, ANGLE should match
SETPOINT; tolerance: ±20 units. Nominal reading should be 1600;
adjustable range: 1440-1680 units.
Configure
,
Tx.spec.
).
Note! These values has been changed. In the first version the
nominal set point was ca 360 and the adjustable range 320-380
units. See section 3.16: Software revisions.
FEEDBACK IN AIR, most recent setting. Normal values: 4-8%. If
the reading is high, e.g. 35%, this indicates that the feedback was set
with the transmitter rotating in pulp (
2300,
->Auto
Preset
Check
,
Send to
sensor
Configure
,
Feedback
adjust
code =
).
Torque value is the basic sensitivity set (100 kpmm for standard.
models - NC and 150 kpmm for MC models. See section 3.7.4)
max. FB (Feedback) is the feedback raw signal at set Torque value.
To obtain the actual Feedback value in%:
Feedback in air (
Configure
,
Feedback
adjust
code = 2300,
Sensor
sens.
calib.
:
Torque/max FB).
OI218.56/3en
6.
Externally set measuring RANGE (choice of four).
7.
Set DAMPING TIME in seconds (
MEK-2300 Operating instructions
© BTG 2004
Send
data
).
113
3.6 - Calibration
Send
data
8.
Set measuring SPAN (
9.
OFFSET. Set zero point displacement in% consistency
(
Send
data
).
).
10. Calibration constants: K0, K1, K2. See section 3.6.6.3 on page
117
(
Calibration
curve
).
11. Present calibration values. ACTIVE. shows whether or not a sample is included in the calibration made
(
Calibration
curve
,
Load
lab.
cons.
).
12. Calibration curve based on data in item 11 above. The output signal is linearized from this curve as indicated by the horizontal scales,
i.e. the consistency can be read direct from the signal
(
Calibration
curve
).
" The consistency scale of the calibration curve is limited to the set
measuring span, but activated points outside the span also
influence the way the line is drawn.
114
MEK-2300 Operating instructions
© BTG 2004
OI218.56/3en
3.6 - Calibration
2
Fig 58 Specimen of
calibration documentation printout/PC
PROGRAM VER. 1.2e
Date
Sign.
Tag no. . . 12 1234
Serial no. 1234 0 1 2
Sensor no. 7319 8814
Prop no. . 7319 8772
Setpoint . 1595
Angle. . . 1593
Torque kpmm 100
max. F.B . 1694
F.B. in air 6.4
---- RANGE No. 1
Damping sec. . 1
4mA = % cons. 1.00
20mA = % cons. 4.00
Cons. offset % 0.00
Calibration constants
k0 = 19.57
k1 = 1.38
k2 = 1.83
Samp. Active
Cons.
0
on
0.00
1
on
1.05
2
on
1.52
3
on
1.86
4
on
2.41
5
on
2.82
6
on
3.06
7
on
3.37
8
off
3.68
9
on
3.92
3
4
5
6
7
8
9
10
11
100,00
Feedback
20.00
22.40
25.50
28.70
33.60
37.50
42.40
45.50
46.80
52.40
90,00
80,00
12
70,00
Feedback %
60,00
50,00
46,80
42,40
40,00
37,50
33,60
30,00
25,50
* Note! These FB values in
diagram are not printed at a
normal printout.
52,40 *
45,50
20,00
28,70
22,40
10,00
0,00
1,00
1,50
2,00
2,50
3,00
3,50
4,00
4,50
5,00
5,50
Cons.
OI218.56/3en
MEK-2300 Operating instructions
© BTG 2004
115
3.6 - Calibration
Fig 59 Calibration diagram for MEK
[%] Feedback
100
90
80
70
60
50
40
30
20
10
0
0
116
1
2
3
4
MEK-2300 Operating instructions
© BTG 2004
5
6
7
8
[%] Consistency
OI218.56/3en
3.6 - Calibration
3.6.6.3
Documenting calibration using the “back-up card”
For more information see section 3.3.5 on page 73.
Always switch off the
hand-held terminal when
changing a memory card.
The terminal could be
damaged in some cases if
this is not done!
Protect memory cards
against moisture and dirt,
handle them with care, do
not bend them.
All transmitter settings, calibration data and transmitter data can be
stored on a special SRAM memory card. This is the “back-up card”. The
card replaces the standard “sensor card” which holds the transmitter program. The back-up card can store up to 125 complete different transmitter settings for all four measuring ranges. For practical reasons, it is
preferable to store only one mill section´s transmitters (Tag No.) on one
card.
A: Storing the transmitter’s data on the back-up card (Store data).
1.
Make a standard complete calibration and adjustment of the relevant
transmitter.
2.
Switch off the hand-held terminal and replace the sensor card with
the back-up card.
3.
Switch on the hand-held terminal. Press
BACKUP
CARD
.
The message for this function is displayed only in English.
4.
Select the relevant storage position. For example, in the case of storage position No. 34 (of 125) press
+1
(= 30) and
+10
three times
four times (= 4). (30 + 4 = 34).
Fig 60 Store data menu
PWR ON/OFF
4-20mA MODEMPRINTER
EJECT
MEMORY CARD
Backup card
SPC-1000
+ 10/+ 1
74414152
STORE DATA: SPC 1000 ----> BACKUP CARD
READ DATA : BACKUP CARD --> SPC 1000
CECE
(1-125): 0
Copyright© 1995
BTG
All rights reserved
STORE
DATA
+10
+1
READ
DATA
SPC-1000
Communication Terminal
5.
Then press
STORE
DATA
to store the terminal’s transmitter adjustment
for the relevant transmitter (TAG No.) on the back-up card. Then
press
OI218.56/3en
Verify
for storage to be executed.
MEK-2300 Operating instructions
© BTG 2004
117
3.6 - Calibration
" Note the relevant TAG No. and the number of the storage position
on a separate identification list.
" All four measuring ranges will be stored so each one must be
clearly identified in the identification list.
6.
Switch off the terminal and replace the back-up card with the sensor
card.
" Store the back-up card in a safe place protected from moisture. The
card is an object of considerable value.
" The back-up card can be protected against accidental or unwanted
data input by using its write protect. Set the write protect button to
the activated position to prevent input. When the write protect is
activated, the text “Card write protected or Low card battery”
appears on the display.
B: Retrieving transmitter data stored on the back-up card.
(
Read
data
).
1.
Repeat Items 1-4 in A described earlier.
2.
Press
Read
data
to access the relevant transmitter setting from the
back-up card and transfer this to the terminal’s memory. The relevant Tag number is shown in the identification list as per Item 5
above. Press
Verify
.
3.
Switch off the hand-held terminal and replace the back-up card with
the sensor card.
4.
Switch on the hand-held terminal. Press
SENSOR
CARD
,
MEK
2300
ver1.0
.
" Do not “Read data”. If so the values obtained from the backup card
will be erased.
4-20mA MODEMPRINTER
Backup
range
1
PWR ON/OFF
Backup
range
2
Backup
range
3
EJECT
Backup
range
4
MEMORY CARD
5.
Press
Misc.
in the main menu.
6.
Press
Backup
data
and then
Menu
Communication Terminal
for the relevant measuring range
to transfer the data from the backup memory to the editing memory
in the terminal.
Copies the backup data (=data read from
the sensor) into editing memory.
All settins in the editing memory will
be replaced with the backup data
SPC-1000
Backup
range
X
7.
Press
Menu
. The data for the respective measuring range is now
available in the terminal for further processing.
118
MEK-2300 Operating instructions
© BTG 2004
OI218.56/3en
3.6 - Calibration
3.6.6.4
Documenting calibration using a personal computer
(PC)
Installation — Document PC:
SPC-1000 Documentation
program for Windows
The SPC-1000 terminal program comes with an automated installation
program called setup.
Installing the terminal communication program:
a. Start Windows Insert the installation diskette (marked “SPC-1000
Documentation program for Windows”) into drive A:.
Version 1.0
Copyright© 1995
BTG
All rights reserved
b. Choose File from the Program Manager main menu.
c. Choose Run.
d. In the Command Line text box, type: a:\setup, then choose OK.
e. Follow the instructions and the program will be installed on your
hard drive.
Connection and starting your program:
" Arrange a suitable library in the File manager to help you to keep
track of downloaded files (Tag no’s).
1.
Plug the serial cable into a free comm port on your computer and
into the hand-held terminal (marked Printer).
2.
Double click on the BTG icon.
3.
Double click on the SPC-1000 icon.
4.
Click on “CommPort”, “Settings” and select the connected comm
port.
5.
Click on “CommPort”, “Port open” to open your selected comm
port. If you click once more on “port open” you will close the comm
port.
6.
For more help click on the menu choice “Help”.
7.
Switch on the hand-held terminal.
8.
Send data to PC: Main menu option
9.
Press option
PC
Print
.
and the values as well as the calibration curve
are copied to the PC.
10. Save (and print if necessary).
OI218.56/3en
MEK-2300 Operating instructions
© BTG 2004
119
3.6 - Calibration
3.6.6.5
Evaluating calibrations
By studying the calibration curve, calibration constants and correlation
factor you can pinpoint and correct most calibration errors.
Typical errors in single point calibration:
Symptom 1:
4-20mA MODEMPRINTER
PWR ON/OFF
100|%
F
|
e
|
e
|
d
|
b|Constants
a 50|k0 = -2.18
c|k1 = 14.56
k|k2 = 0.00
|
|
|
0|_________________
1.00%
4.00%
<----- Span ---->
SPC-1000
EJECT
MEMORY CARD
Menu
Correlation
r2 = 0.98
%scale
span
Calibration lacks precision
The further away from the calibration point, the greater the error.
Sample #0 (FEEDBACK in water) is not activated. The curve is
drawn between 0% FB value and the loaded point.
Action:
Communication Terminal
Go to
Load
lab.
cons.
and activate sample #0. Calculate the new conCalc.
stants in calibration, press new
. Alternatively you can proconst.
ceed to a multi-point calibration to get better precision, see section
3.6.4 on page 110.
Symptom 2:
The measurement correlates badly against lab samples
At a one point calibration, the consistency should not deviate too
much from the nominal value as the accuracy becomes lower.
The calibration is however always correct at the consistency point
where the calibration was made.
If the consistency can be varied, for example at other changes of
the operating conditions, we recommend you to make a multipoint calibration.
Special conditions apply in single point calibration. K0 may be either positive or negative. K1 is normally positive. K2 and the correlation factor are always zero in single point calibration.
120
MEK-2300 Operating instructions
© BTG 2004
OI218.56/3en
3.6 - Calibration
Typical errors in multi-point and updated calibration:
Symptom 3:
4-20mA MODEMPRINTER
PWR ON/OFF
100|%
F
|
e
|
e
|
d
|
b|Constants
a 50|k0 = 19.57
c|k1 = 1.38
k|k2 = 1.83
|
|
|
0|_________________
1.00%
4.00%
<----- Span ---->
SPC-1000
Communication Terminal
EJECT
MEMORY CARD
Menu
Correlation
r2 = 0.98
%scale
span
Poor match between calibration points and calibration line
(low correlation factor)
The reason may be that the feedback value for rotation in air is
wrongly adjusted (should be between 4% and 8%).
The set value can normally be read from the FEEDBACK IN AIR
line of the printout. If the value is normal according to the printout,
the setting of the transmitter may have been disturbed. Another reason may be that the sensor has been replaced or moved to another
location without the FEEDBACK IN WATER value being reprogrammed.
Action:
Empty the line and adjust FEEDBACK IN AIR to the correct value.
Enter the relevant value for FEEDBACK IN WATER in the program.
" In case of very low consistencies it may be advantageous to
measure the actual FEEDBACK IN WATER at actual operating
temperature and enter the result as sample #0.
Special
This is then made at func.
check that the value is activated and
calculate the new calibration.
Symptom 4:
Wide scatter of calibration points round calibration line (low
correlation factor)
Action:
Check the sampling equipment and quality of sampling methods.
This is the commonest cause of lack of precision in calibration.
You can also try deactivating the most deviant samples. Does the
feedback signal fluctuate wildly? If so, the probable reason is that
the transmitter is measuring in non-homogenous, badly mixed
pulp. Check transmitter location, it may not be located correctly;
refer to the Installation instructions for advice on relocation.
OI218.56/3en
MEK-2300 Operating instructions
© BTG 2004
121
3.6 - Calibration
Symptom 5:
Insensitive signal. The calibration line has a low gradient
Action:
Replace the sensor with a larger one. The size of the sensor is the
primary factor with regard to sensitivity, so replacing it is always
the first thing to do. If this is not possible, an alternative is to readjust the Feedback resolution. An MC transmitter which brakes
100% feedback at a torque of 150 kpmm can be adjusted to brake
100 kpmm at the same feedback, i.e. made 33% more sensitive or
equal in sensitivity to the standard model.The setting should preferably be made with the aid of a torque brake. See section 3.7.4 on
page 133.
" Bear in mind that the increase in sensitivity is illusory; the
difference in feedback is greater, but signal resolution and
accuracy of measurement are not enhanced.
Your first corrective action should always be to replace the sensor.
Symptom 6:
Feedback signal too high (>100%)
Action:
Replace the sensor with a smaller one. Alternatively, set the feedback resolution to a higher torque, up to 150 kpmm (see Symptom
6 and section 3.7.4 on page 133).
Symptom 7:
Poor precision outside normal working range. Calibration
points are too few or too closely grouped
Action:
Enter more calibration points, making sure that they cover as
much as possible of the measuring span. FEEDBACK IN WATER (sample #0) should be included, as it stabilizes the whole calibration curve.
122
MEK-2300 Operating instructions
© BTG 2004
OI218.56/3en
3.6 - Calibration
Symptom 8:
Abnormal calibration constants
K0 should normally be the same as FEEDBACK IN WATER
(sample #0). This value shows where the calibration line intersects the Y axis at 0% consistency. Some deviation is normal.
K1 shows the slope of the calibration line, which is normally positive.
K2 shows the exponential deflection of the calibration line; it
must always be positive.
Action:
K0 Check the type of sensor fitted and whether its FEEDBACK
IN WATER value matches sample #0 see Fig 62. The value of
K0 should not deviate by more than a percentage point or so.
K1 If K1 is negative, the FEEDBACK IN WATER value may be
too high for the sensor fitted, or the signal level may be too
low for the sensor, because the FEEDBACK IN AIR adjustment is wrong.
If the symptom is caused by an erroneous value of sample #0,
it can be deactivated as a temporary measure.
K2 The calibration constants are calculated according to a second-order equation which can have both positive and negative
solutions. If K2 is negative, this means that the calibration
curve first rises normally but then turns and falls again because one or more points are located too low. As this is not
permissible, the program automatically performs a linear regression. K2 is now zero.
Study the calibration graph and deactivate those points (usually at high consistencies) that are pulling the curve down (see
the example in Fig 61, where points 5 and 6 are doing this;
point 5 ought to be higher than point 4, and point 6 higher still.
This figure also shows how to calculate the calibration constants manually, i.e. the same operation as in the linear regression).
OI218.56/3en
MEK-2300 Operating instructions
© BTG 2004
123
3.6 - Calibration
3.6.6.6
Manual calculation of calibration constants K0, K1
and K2 (see Fig 61)
In special cases it may be useful to calculate the calibration points by
hand.
Fig 61 shows how to calculate points K0 and K1. This is done in the same
way as for the Older models MEK-2000, MBT-100, Opticon, etc.
In this case, points 5 and 6 would have made K2 negative if the program
had not manipulated the calibration.
K0 may be positive, or can assume a negative value as shown in the figure. K0 is the feedback value where the calibration line intersects the Y
axis.
4-20mA MODEMPRINTER
PWR ON/OFF
Sample
Feedback
-->020.00% water
122.40%
225.50%
328.70%
433.60%
537.50%
642.40%
745.50%
846.80%
952.40%
k0 = 19.57
k1 = 1.38
k2 = 1.83
EJECT
MEMORY CARD
Menu
See Fig 61 for calculation of K1.
Edit
row
1
Load
new
value
Calibration
curve
SPC-1000
Communication Terminal
First press
Edit
Range
1
to access the appropriate measuring range. Then load
the calibration constants under MAIN MENU option
Special
func.
. Press
Edit
row
1
Always end with
Fig 61 Specimen of manual
calculation of
calibration constants
Calibrate
,
to appropriate constant No and enter the value.
Send
data
.
% FEEDBACK
100
y
K1 = --x
K2 = 0
4
5
Calibration
line
3
0
K0
1
2
2
y
1
6
3
4
5
CONSISTENCY%
x
124
MEK-2300 Operating instructions
© BTG 2004
OI218.56/3en
3.6 - Calibration
3.6.7
Setting time constant (damping)
(See section 3.6.1.2 on page 96, item A.)
Do not set too long a time
constant. You loose the
advantage of the control
system accuracy.
The time constant is set after calibration has been completed. Set it so
that the signal is stable, normally at 2-5 to 10 seconds.
If you find you have to set a very long time constant because the feedback
signal is unsteady, the transmitter is probably working in an unstable,
poorly mixed pulp flow (see section 3.6.6.5 on page 120, Symptom 5). In
such a case you should consider:
•
relocating the Transmitter farther from the pump.
•
improving the remixing system or the supply of dilution water, etc.
If the time constant is too long, you loose the advantage of the transmitter’s high precision. Contact BTG for further advice.
Procedure:
1.
Study the stability of the signal under MAIN MENU option
Trend
4-20mA MODEMPRINTER
Read
data
Edit
Range
1
4 mA
1.00%
20 mA
4.00%
Misc.
Print
Note !
Trend
PWR ON/OFF
Configure
Damp
Damp
1s
1sTag.no.
EJECT
Calibrate
Calibration
curve
Offset
0.00%
Send
data
Range 2
25.234
--------------0%
61.7%
100%
Cons. 3.35% MEK-2300
2.
Go to MAIN MENU option
e.g. 5 seconds. Press
SPC-1000
Communication Terminal
OI218.56/3en
.
MEMORY CARD
Trend
Send
data
Damp
Xs
. Enter a suitable time constant,
.
3.
Return to
and study the result.
4.
If necessary, adjust the time constant.
MEK-2300 Operating instructions
© BTG 2004
125
3.6 - Calibration
3.6.8
Setting measuring span and alarm limits
(See section 3.6.1.2 on page 96, item B.)
Normal measuring span settings are:
•
Normal consistency range 1-8% Nominal span ± 1%.
•
High consistency range 8-16% Nominal span ± 2%.
Try to keep the measuring span as narrow as possible, remembering that
it must never extend below the sensing element´s minimum consistency
limit.
Procedure:
1.
Press the key
Edit
Range
X
for the measurement range you want.
" Range indication in the main menu signal reading display refers to
the externally connected measuring range.
2.
4-20mA MODEMPRINTER
Read
data
4 mA
4 mA
0.00%
x.xx%
PWR ON/OFF
Edit
Range
1
Configure
20 mA
Damp
1s
x.xx%
Tag.no.
20 mA
4.00%
Misc.
Print
Note !
Trend
EJECT
MEMORY CARD
Calibrate
Calibration
curve
Offset
0.00%
Send
data
Range 2
25.234
--------------0%
61.7%
100%
Cons. 3.35% MEK-2300
Set the consistency level for the lower limit of the measuring span.
Press
4 mA
1.00%
for the lower limit (4 mA).
3.
Press
20 mA
4.00%
and set the upper limit (20 mA).
4.
Check that the settings are correct first. Send the new settings to the
SPC-1000
Communication Terminal
transmitter. Press
126
Send
data
MEK-2300 Operating instructions
© BTG 2004
.
OI218.56/3en
3.7 - Special calibration functions
3.7 Special calibration functions
3.7.1
Offset adjustment
(See section 3.6.1.2 on page 96, item C)
" Offset adjustment can be done in two ways:
A: Based on a laboratory sample,
B: Based on a deviation detected from laboratory samples.
" The entire calibration curve is shifted bodily on the basis of a single
point, so it is most important that the laboratory sample value for
that point is correct.
The offset adjustment, which is a zero point displacement, can be made
to all types of calibrations, but should normally be used only when a
multi-point calibration has been made.
A: Offset adjustment based on a laboratory sample
Procedure:
4-20mA MODEMPRINTER
Take
sample
Load
lab.
cons.
3.2%
PWR ON/OFF
Calc.
EJECT
Offset
0.00%
1.
Go to MAIN MENU option
2.
Press
Offset
x.xx%
.
MEMORY CARD
Menu
Sensor cons.= 3%
acc.to original cal.
Action:
1 Push <Take sample> and collect sample
2 After lab. evaluation push <Load lab.
cons.> and enter the value.
3 Push <Calc.> Alt. enter the actual
cons. offset at <Offset>.
Take
sample
and save the consistency value in the memory in the
normal manner, taking correct laboratory samples at the same time.
SPC-1000
Communication Terminal
3.
Then load the corresponding laboratory sample value,
Load
lab.
cons.
x,x%
xx%. The consistency according to the original curve appears in
the display, and after pressing
pears in the
Send
data
Offset
x.xx%
Calc.
the offset consistency ap-
key in the main menu.
4.
Press
to transfer the offset adjustment to the transmitter.
5.
The offset adjustment can be cancelled at
Offset
0.00%
if you give the
input the value Ø (zero).
OI218.56/3en
MEK-2300 Operating instructions
© BTG 2004
127
3.7 - Special calibration functions
B: Offset adjustment based on a deviation that is detected
A deviation can be entered directly if a deviation from the laboratory values is detected during regular monitoring of a transmitter’s display, for
example. Note however that the deviation should be verified by several
laboratory samples before carrying out zero point adjustment.
Procedure:
1.
Go to the main menu function
2.
Press
Offset
x.xx%
Offset
x.xx%
.
in the sub menu and enter the deviation that is detect-
ed.
3.
Transfer the value to the transmitter using
Send
data
. (Clear the value
by going back to the function and entering 0.)
128
MEK-2300 Operating instructions
© BTG 2004
OI218.56/3en
3.7 - Special calibration functions
3.7.2
Compensation for varying temperature
(See section 3.6.1.2 on page 96, item D.)
This function will be found in main menu sub menu
signed
Comp./
Prod.
Configure
button as-
.
Various types of compensation transmitters can be connected. A PT-100
transmitter with mA output is normally used for temperature compensation.
Since the compensation input is a universal input for 4-20 mA, it can also
be used for other types of compensation equipment.
The function should be used only with multi-point calibration, which
should preferably be performed before compensation is calibrated.
" Record the temperature during multi-point calibration.
The temperature transmitter is connected to the AUX-in terminals in the
JCT-1100 junction box. (See the wiring diagram in the Installation instructions section of the JCT-1100 manual included in this manual.)
Setting:
1.
Calibrate the transmitter against the consistency transmitter.
A. Press
4-20mA MODEMPRINTER
PWR ON/OFF
->Temp. 4 mA
Prod. Temp
Off
25.0
START
20 mA
Temp
75.0
EJECT
Working
Point
Temp
40.0
4 mA
20 mA
Rawsig. Rawsig.
859
204
1023
Setpoint= 390
Angle= 392
Feedback= 256.5%
AUX= 1023
SPC-1000
Communication Terminal
Configure
in the main menu.
MEMORY CARD
Menu
Take
sample
B. Enter the code: 1945.
C. Step down to “temp” by pressing the
->Temp.
Prod.
Off
button.
Temperatures in °C, °F or any other temperature system.
D. Determine the temperature span within which the process
may vary (e.g. 25-55°C). Calibrate the transmitter for a
somewhat wider measuring span (e.g. 20-60°C).
Calibrate the temperature transmitter in workshop to required measuring span (e.g. 20°C = 4 mA and 60°C = 20 mA
output signal).
Note! It is not necessary to make a complete and precise calibration, but you must verify that the transmitter’s output signal actually covers the measuring span, and make a note of
the signal strength at the minimum and maximum readings.
These readings can be entered as step F below.
OI218.56/3en
MEK-2300 Operating instructions
© BTG 2004
129
3.7 - Special calibration functions
4 mA
Temp
x.x
E. Enter the minimum limit of the temperature span at
Enter the maximum limit of the temperature span at
.
20 mA
Temp
x.x
(e.g. 20°C).
F. Calibrate the temperature transmitter against the consistency
transmitter. Connect a simulator capable of supplying the appropriate mA signal to the AUX-in terminals in the JCT1100 junction box. (See the wiring diagram in the Installation
instructions section of the JCT-1100 manual included in this
manual.).
G. First set the minimum signal for the measuring span (e.g. 4
mA at 20 °C) and press
START
.
H. The raw signal - AUX input - should now be displayed.
When the signal is stable press
4 mA
Rawsign.
xxx
.
I. Set the maximum signal for the measuring span (e.g. 20 mA
at 60 oC) and when the raw signal is stable press
20 mA
Rawsign.
.
2.
Connect the temperature transmitter to the AUX-in terminals in the
JCT-1100 junction box. (See the wiring diagram in the Installation
instructions section of the JCT-1100 manual included in this manual.)
3.
Perform a normal multi-point calibration according to section
3.6.3.3 on page 108. Measure and record the typical temperature
during calibration. If the temperature transmitter is connected and
calibrated as described above, the temperature can be read in main
menu at output signal.
4.
Return to
5.
Enter the typical temperature measured during the multi-point cali-
Comp./
Prod.
according to item 1. A-C.
bration according to point 4 above, at
Working
Point
Temp
x.x
. There is no compen-
sation at this point.
6.
130
Calibrate the compensation factor (% consistency/°C). Be sure to
make the calibration at a temperature (e.g. 45°C) which differs substantially from the one used in the multi-point calibration (e.g.
35°C). Consistency should be normal.
MEK-2300 Operating instructions
© BTG 2004
OI218.56/3en
3.7 - Special calibration functions
Start by storing the consistency from the transmitter at
Then enter the lab consistency at
Load
lab.
cons.
Take
sample
.
xx%. Note that, because
the calibration is made at one point only, the value must be as accurate as possible. Calculate by pressing
factor is shown in the display button
Calc.
Comp.=
x.xx%
/unit
. The compensation
and can also be input
directly here.
7.
Check the compensation factor at
Take
sample
move the compensation by pressing
Comp.=
x.xx%
/unit
,
Comp.=
x.xx%
/unit
. You can re-
0 (zero). The compen-
sation factor will normally be negative in temperature
compensation, because the feedback signal decreases with increasing temperature. The factor varies because it depends on pulp quality, sensor, etc. It increases directly in relation to the size of the
sensor used, and inversely with the length of the fibers in the pulp.
The factor, i.e the absolute error, is normally
(-) 0.010-0.015% consistency/°C.
The compensation factor can be directly entered at
Comp.=
x.xx%
/unit
Take
sample
,
if known.
Off-function:
The function can be turned off by pressing the
->Temp.
Prod.
Off
“button”
(see item 1.C). Press the button and observe the arrows move
- it should point to Off.
8.
OI218.56/3en
Don’t forget to
Send
data
.
MEK-2300 Operating instructions
© BTG 2004
131
3.7 - Special calibration functions
3.7.3
Manual loading of feedback settings
(See section 3.6.1.2 on page 96, item E.)
Calibrate
This function will be found in
4-20mA MODEMPRINTER
Take
sample
Load
lab.
cons.
PWR ON/OFF
Calc.
new
const.
EJECT
Special
func.
,
Special
func.
.
MEMORY CARD
Menu
Action:
1 Push <Take sample> and collect sample
2 After lab. evaluation push <Load lab.
cons.> and enter the value.
3 Push <Calc. new const.> to
calculate the new calibration.
It is a special function which can be of assistance in some cases.
Procedure:
<Special func> are used to manually
load raw signals or cal. constants.
SPC-1000
Communication Terminal
4-20mA MODEMPRINTER
PWR ON/OFF
Sample
Feedback
-->0
20.00% water
1
55.00%
2
61.00%
3
25.00%
4
0.00%
5
0.00%
6
0.00%
7
0.00%
8
0.00%
9
0.00%
k0 = 18.76
k1 = 14.79
k2 = 0.00
EJECT
1.
Go to MAIN MENU option
2.
Step with the arrow at
MEMORY CARD
Edit
row
1
Calibrate
,
Special
func.
.
and load the desired feedback set-
Menu
ting by pressing
Edit
row
0
Load
new
value
Load
new
value
. Sample #0 should normally have the
FEEDBACK IN WATER value for the sensor fitted. Exit by press-
Calibration
curve
SPC-1000
Menu
ing the
Communication Terminal
3.
key.
Do you also want to load the corresponding laboratory sample values? If so, go to
4.
Press
Calc.
new
const.
Load
lab.
cons.
.
to make a new calibration.
" The word “New calibration” must appear to make a new
calculation.
5.
132
Press
Send
data
to enter the calibration to the transmitter.
MEK-2300 Operating instructions
© BTG 2004
OI218.56/3en
3.7 - Special calibration functions
3.7.4
Altering Feedback resolution
(See section 3.6.6.5 on page 120, symptom 6 and 7 - compare with section 3.6.2.2 on page 101.)
All transmitter models for normal or low consistency (MEK-2300, 2308, -2314, -2320, -2340) have a standard setting for feedback in relation to the torque.
Standard setting (NC): 100% feedback at a torque of 100 kpm.
The medium consistency models (MEK-2310, -2311, -2312, -2315)
have a stronger setting: MC setting: 100% feedback at a torque of 150
kpm.
These settings are incorporated before delivery using a special torque
brake. This is a form of calibration to make the transmitters identical with
each other. As a result, it should be possible to exchange transmitters and
transfer calibration data without the need for extensive calibration
against pulp samples.
Where necessary it is also possible to adjust the feedback signal to show
100% at an adjustable torque of between 50-150 kpm.
" This function is particularly useful if the difference in feedback
within the predetermined measuring range is very small. This can
occur at low consistencies and, in particular, with pulp grades that
have a low shear force, e.g. recycled fibres. Note however that
when the size of the sensing element determines the basic
sensitivity, this is always changed first. As the feedback resolution
increases, the sensitivity is increased as well as the signal noise.
A: Standard adjustment of Feedback resolution
(100% feedback = NC: 100 and
MC: 150 kpmm torque respectively).
Criteria:
The transmitter must be started up and rotating in air.
Press
2.
The adjustment is protected by a code: 2300. Enter this code. Press
Sensor
sens.
calib.
OI218.56/3en
Configure
1.
in the main menu, followed by
Feedback
adjust
.
.
MEK-2300 Operating instructions
© BTG 2004
133
3.7 - Special calibration functions
3.
4.
Fit the torque brake as shown in data sheet D/M750.10 (appendix to
the Service Manual SM218.56). Adjust the dynamometer torque to
100 and 150 kpmm respectively according to the transmitter model
- see above.
Press
FB=100%
at
torque
xx kpmm
. Enter 100 or 150 kpmm as required.
Press
Send
data
to transfer the calibration to the transmitter. The raw
signal for SETPOINT, ANGLE, FEEDBACK and AUX-in will
then be displayed.
The feedback signal is now calibrated against the torque adjusted.
5.
Exit by pressing
Menu
.
B: Increased sensitivity of feedback resolution
(100% feedback = 50-100 kpmm torque (max 150))
" The transmitters are not interchangeable. The standard “Feedback
in water” setting is not valid.
Procedure:
Refer to Item A. The difference is that a different torque required for
100% feedback is set during Item 3, e.g. 50 kpmm. This means double
the resolution as at a torque of 100 kpmm.
Enter this value as per Item 4.
C: Direct input for required feedback resolution
" This adjustment is not as accurate as the previous adjustments but
works quickly and simply. The transmitters cannot be
interchanged. The standard “Feedback in water” setting may not
be valid.
1.
134
Refer to item A: 1 and 2.
MEK-2300 Operating instructions
© BTG 2004
OI218.56/3en
3.7 - Special calibration functions
2.
Press
FB=100%
at
rawsig.
xx
. Enter the raw signal as per the following table.:
Fig 62 Feedback - torque
curve
MEK-2300
Torque
50
60
70
80
90
100
110
120
130
140
150
3400
3200
3000
2800
Feedback raw signal
Feedback
Raw signal
1085
1200
1320
1423
1565
1694
1880
2110
2350
2725
3180
2600
2400
Torque
2200
2000
1800
1600
1400
1200
1000
40
60
80
100
120
140
160
Torque (kpmm)
" This feedback - torque curve is only valid for the latest versions
of MEK-2300. See section 3.16: Software revisions.
3.
As a reminder, also enter the torque value at
4.
Press
5.
Exit by pressing
*
FB=100%
at
torque
xx %
.
to transfer the values to the transmitter.
Menu
.
" To obtain the actual feedback value in%:
Feedback in air
------------------------------------- x
max. FB
100
Feedback in air = Feedback value raw signal when sensor rotates in air
max. FB = max feedback raw signal.
Both the Feedback raw signal as well the Feedback% value can be displayed after pressing
OI218.56/3en
*
MEK-2300 Operating instructions
© BTG 2004
according to point 4 above.
135
3.7 - Special calibration functions
3.7.5
Calibration Curve
(See section 3.6.1.2 on page 96, item F.)
This function is in the main menu under
Calibration
curve
.
The feedback signal (0-100%) is displayed as a function of the set measuring span xx-xx%. The calibration points within the predetermined
measuring span are displayed but note that activated calibration points
outside the measuring span affect the shape of the calibration curve.
A valuable application for the function is showing, in a simple and clear
manner, how well the calibration points agree with the calculated curve.
The three calibration constants K0, K1 and K2, and the special correlation factor r2, also provide a guide. Refer also to section 3.6.6.5 on page
120.
4-20mA MODEMPRINTER
PWR ON/OFF
EJECT
100|%
F
|
e
|
e
|
d
|
b
|
a 50|
c
|
k
|
|
|
|
0|_________________
0.00%
4.00%
<----- Span ---->
MEMORY CARD
Menu
Constants
k0 = 18.76
k1 = 14.79
k2 = 0.00
Correlation
r2 = 0.98
% scale
span
SPC-1000
Communication Terminal
Note that the feedback signal is displayed for the entire span - 0-100%.
This means that the slope of the curve and thus the resolution can be
small. This is particularly the case if a small measuring span is selected,
or at low consistencies and pulp grades with low shear force such as recycled fibres. If other measuring criteria are good, i.e. the transmitter is
correctly installed, the 4-20 mA signal can be modulated for very small
changes in feedback. In practice, the lower limit usually lies at around 5%
feedback units. (Transmitter set to 0-100% feedback for a torque of 0100 kpmm.)
To improve the display resolution the feedback resolution can be increased in steps. The changed setting only affects the calibration curve
display.
3.7.6
Trend
(See section 3.6.1.2 on page 96, item G.)
This function is in the main menu under
4-20mA MODEMPRINTER
PWR ON/OFF
EJECT
100|
|
%
|
|
O
|
u
|
t 50|
p
|50,0%
u
|
t
|
|3.05%
|
0|________________________5
Feedback 50.3%
SPC-1000
Communication Terminal
Range 1
Trend
.
MEMORY CARD
Menu
Output
12.0 mA
The time scale of the display is changed by pressing
Cons.
Minutes
trend
Minutes
trend
. Registra-
tion does not occur until the function in the menu is accessed and starts
from beginning again when
Minutes
trend
is pressed.
The 4-20 mA output signal is displayed as 0-100%. This means that the
resolution is relatively low - approximately 1% (0.16 mA) - but the display is still a useful tool when setting the time constant
Damp
1s
for ex-
ample.
136
MEK-2300 Operating instructions
© BTG 2004
OI218.56/3en
3.7 - Special calibration functions
When simulating different output signal settings, the
Simulation
mode
On
function
can be used to view the result without the actual output signal being affected. Refer also to section 3.7.7 on page 137.
3.7.7
Simulation mode
(See section 3.6.1.2 on page 96, Item H.)
Misc.
This function is in the main menu under
and in the
Simulation
mode
On
menu.
4-20mA MODEMPRINTER
PWR ON/OFF
Factory Backup
setting data
EJECT
Simulation
mode
Off
MEMORY CARD
Menu
Factory setting : Not available
Backup data : To obtain lost data
Simulation mode : Simulation of all
settings without disturbing the actual
output signal - shown at main menu.
Result see Trend.
SPC-1000
The function is used to change the adjustment of the calibration setting,
for example, without the actual output signal being affected.
When the function is enabled,
Simulation
mode
On
displays the simulated output
signal under the main menu’s
Trend
button where, in this case, the
Communication Terminal
Trend
Simulation on
button displays
.
Note that the transmitter’s actual output signal is displayed in the main
menu’s standard window for the output signal display.
Transfer the change to the transmitter by pressing
Send
data
. The simula-
tion function will then be disabled automatically. If you wish to go back
to the original setting you can do this directly on the terminal since this
has two separate memories, see section 3.10 on page 142.
4-20mA MODEMPRINTER
Backup
range
1
PWR ON/OFF
Backup
range
2
Backup
range
3
EJECT
Backup
range
4
MEMORY CARD
Menu
Copies the backup data (=data read from
the sensor) into editing memory.
All settins in the editing memory will
be replaced with the backup data
SPC-1000
Communication Terminal
OI218.56/3en
Go to
Backup
data
and transfer the relevant measuring range data back to the
editing memory
Backup
range
X
. Another option is to re-read the transmitter
data to the terminal by pressing
MEK-2300 Operating instructions
© BTG 2004
Read
data
.
137
3.8 - Production calculation
3.8 Production calculation
This function is available as an option from BTG and cannot be accessed
until a special code is entered.
The program is prepared for the function which can be accessed when a
special code is entered.
" To obtain this function the transmitter must be equipped with a
special version of the Sensor processor card. Order no. 74457607.
Setting:
1. Calibrate the flow transmitter against the consistency transmitter.
The flow transmitter should produce an output signal of 4-20 mA.
A. Go to
4-20mA MODEMPRINTER
PWR ON/OFF
->Temp. 4 mA
Prod. m 31h
Off
100.0
START
20 mA
m 31h
500.0
EJECT
Working
Point
0.0
4 mA
20 mA
Rawsig. Rawsig.
204
1023
0
Setpoint= 390
Angle= 392
Feedback= 256.5%
AUX= 1023
SPC-1000
Configure
,
Comp./
Prod.
.
MEMORY CARD
Menu
Take
sample
B. Enter the code: 1945.
C. Step down to “Prod” by pressing the
Temp.
->Prod.
Off
button.
Communication Terminal
D. Determine the measuring span over which the flow may vary
(e.g. 120-450 m3/h). Adjust the flow meter for a slight wider
span (e.g. 100-500 m3/h, i.e. 4 mA output signal = 100 m3/h
and 20 mA output signal = 500 m3/h).
E. Enter the minimum limit of the flow span at 4 mA, m3/h, xx
(e.g. 100). Enter the maximum limit at 20 mA, m3/h, xx (e.g.
500).
F. Calibrate the flow transmitter against the consistency transmitter. Connect a simulator capable of supplying the appropriate mA signal to the AUX-in terminals in the JCT-1100
junction box. (See the wiring diagram in the Installation instructions section of the JCT-1100 manual included in this
manual.).
G. First adjust the minimum signal for the measuring span (e.g.
4 mA at 100 m3/h) and press
START
.
H. The raw signal AUX input should now be displayed. Press
4 mA
Rawsign.
xxx
138
when the raw signal is stable.
MEK-2300 Operating instructions
© BTG 2004
OI218.56/3en
3.8 - Production calculation
I. Then adjust the maximum signal for the measuring span (e.g.
20 mA at 500 m3/h) and press
20 mA
Rawsign.
xxx
when the raw signal
is stable.
2.
The flow transmitter is now calibrated against the consistency transmitter.
3.
Connect the temperature transmitter to the AUX-in terminals in the
JCT-1100 junction box. (See the wiring diagram in the Installation
instructions section of the JCT-1100 manual included in this manual.)
The flow rate value is obtained at
Trend
.
The function can be disabled by using the button
Temp.
->Prod.
Off
. Continue
pressing the button until the arrow points to Off.
Remember to
OI218.56/3en
Send
data
.
MEK-2300 Operating instructions
© BTG 2004
139
3.9 - Code protection
3.9 Code protection
A security code can be entered to prevent unauthorized adjustment of the
transmitter settings. All the functions in the hand-held terminal can still
be accessed. By using the simulation function (see section 3.7.7 on page
137) you can also see how the transmitter reacts to changes. The code
protection prevents the settings on the hand-held terminal reaching the
transmitter if the security code is not entered. A personal code can be entered and, if this is lost, a general code is available from BTG.
" A general code is available from BTG if your personal code
becomes lost. General code: 42 600.
A. Initial activation of the security code / input of a personal code
1.
This should be done at the first opportunity during installation.
Send
data
Go to
Change
code
in the main menu. Press
Turn
code
on/off
followed by
. “Load old code” will be displayed.
Enter 42 600 (applies only on this occasion). Press
2.
.
Enter your personal code. “Load new code” will appear. Enter your
personal code, e.g. 123 (max 8 digits) and press
3.
Enter
Menu
Press
Code
OFF
with
Enter
Menu
Menu
to get
Code
ON
Enter
Menu
.
and enter your code, e.g. 123 follow
. Your new code is now activated finish by pressing
.
Data can now be transferred to the transmitter. If you wish to check
that the code has been entered, press
Send
data
and
Yes
. The
signal transfer will not take place without the input instruction for
the code being displayed.
B. Changing your personal code
Go to
Send
data
,
Turn
code
on/off
. Press
Change
code
“Load old code” will be dis-
played. Enter your old personal code (or the general BTG code). “Load
new code” will then be displayed. Enter your new code. Press Enter.
140
MEK-2300 Operating instructions
© BTG 2004
OI218.56/3en
3.9 - Code protection
C. Deactivating the code you have entered
Press
Send
data
,
Turn
code
on/off
. Press the
Code
on/off
“button” so that it displays
“code off”. Enter your personal code.
D. Activating the code you have entered
Press
Send
data
,
Turn
code
on/off
. Press the
Code
on/off
“button” so that it displays
“code on”. Enter your personal code.
OI218.56/3en
MEK-2300 Operating instructions
© BTG 2004
141
3.10 - Back-up memory
3.10 Back-up memory
The transmitter is equipped with a memory in which all data is stored for
this specific transmitter (according to the Tag No.).
There are two separate memories in the hand-held terminal: one editing
memory where all the programming is normally stored, and a back-up
memory. When data is transferred from the transmitter to the terminal
Read
data
, the transmitter data is stored in both the editing memory and
the back-up memory.
Fig 63 Storing menu
The back-up memory data is not affected by the different actions performed on the terminal except when data is entered: press
Read
data
.
" When pressing “Read data” all previous data both in editing and
the backup memory are erased and replaced by the new data
entered from the transmitter memory.
The back-up memory can be used to retrieve the original transmitter data,
even when changes were made via the terminal. The terminal does not
need to be connected to the transmitter.
Press
Misc.
,
Backup
data
.
When back-up range 1 is pressed, the back-up memory data is transferred
to the editing memory on measuring range 1. Implement the corresponding action for the remaining measuring ranges as well.
" All settings in the editing memory are now deleted and replaced by
the data in the back-up memory.
142
MEK-2300 Operating instructions
© BTG 2004
OI218.56/3en
3.11 - Trouble shooting functions
3.11 Trouble shooting functions
A number of functions are important in connection with trouble shooting
the transmitter. These functions will be found under MAIN MENU option
Configure, and on the printout.
3.11.1 Checking measured/set values
Go to MAIN MENU option
Configure
with sub menu
Feedback
adjust
code: 2300). Here you can check some very important values at
Press the button until the arrow points to
Send
data
Auto
Preset
->Check
(Enter
Check
.
and then push
and the SETPOINT, ANGLE and FEEDBACK values ap-
pear.
In this function the values can only be checked, not adjusted.
FEEDBACK:
When the transmitter is connected to the hand-held terminal, feedback
should vary from FEEDBACK IN AIR, i.e. approximately 4-8%, to
100% when the transmitter is braked by hand at the brake ring in the measuring part.
Both the Feedback raw value and the Feedback% values are shown. The
raw value varies between 0-4095. If the “Sensor sens. calib.” (see section
3.7.4 on page 133) is not adjusted, the Feedback% value is not relevant.
SETPOINT:
Nominal value is 1600. When FEEDBACK IN AIR is set at 4-8%, you
get a SETPOINT reading that can vary from approximately 1440 to 1680
units.
Note: See remarks section 3.6.6.2 on page 112.
ANGLE:
When the feedback function is working correctly, the ANGLE reading
should be equal to the SETPOINT reading, within a tolerance of ±5 units.
If feedback is more than 100%, the feedback system is overloaded and
ANGLE will be greater than SETPOINT.
Feedback resolution (Feedback raw signal):
The adjustment of the “Feedback resolution” setting will influence the
above settings.
OI218.56/3en
MEK-2300 Operating instructions
© BTG 2004
143
3.11 - Trouble shooting functions
The Feedback resolution setting is also observed at
Sensor
sens.
calib.
,
FB=100%
at
rawsig.
xx
Feedback
adjust
. Select
. This value is named “Feedback raw signal”. The
original setting can be read in the attached test protocol.
Refer to section 3.7.4 on page 133, for adjustments.
3.11.2 Service functions and signal calibration
A: Factory settings
There is a Factory settings sub-menu under the heading Misc. This is
where a certain signal calibration can be done. Since the calibration normally requires special equipment, this work can be done only at BTG.
The function is protected by a code and is therefore not accessible. (An
instruction is available from BTG on request at emergency cases.)
144
MEK-2300 Operating instructions
© BTG 2004
OI218.56/3en
3.12 - Altering sensor/transmitter data
3.12 Altering sensor/transmitter data
(See fig 58, fig 64, section 3.6.2.1 on page 100 and section 3.6.2.2 on
page 101 for detailed instructions)
The transmitter is delivered from the factory with ready-loaded program
data according to the manufacturing order. The data can be seen on the
print-out (fig 58) or at
Configure
,
Tx.Spec
.
Example:
SENSOR 73198814
Type of sensing element fitted*
PROP. 73198772
Type of propeller fitted
Serial no. 123456/01/03
Serial number
* See Parts list for part nos of sensors and propellers or fig 64 and fig 65.
Change the transmitter
specification data when
rebuilding the transmitter
to another type or
changing sensing element
or propeller.
OI218.56/3en
If the transmitter is modified to another type, or if the sensing element
and/or propeller is replaced, the new type designation should be entered
in the program.
See
Configure
,
Tx.Spec
.
When the sensor is replaced, it is most important for purposes of calibration that the correct type designation and FEEDBACK IN WATER value
are entered in the program.
MEK-2300 Operating instructions
© BTG 2004
145
146
MEK-2300 Operating instructions
© BTG 2004
**
E
**
D
C
B
-
-
73198822
73198897
A0004895
13194469
-
73198814
73198889
A0004887
13194451
-
73198806
73198871
A0004879
73194444
Ordering no.
Splines/sceew
fastening
74168527
74306309
73005266
73153884
73049991
73118721
73076606
73182123
13139449
13194501
73003667
73108987
73072654
73182099
13139407
13194493
73058604
73118697
73182131
13194477
13194485
Ordering no.
Fixed sceew
fastening
2.75”
70
100
4”
120
4.7”
m
5m
18 .3 ”
7
m
0m
21 .3 ”
8
Characteristic
SS 2343
Hastelloy
SS 2343
Hastelloy
SS 2343
SS 2343
Hastelloy
254 SMO
Rubber
Rubber
SS 2343
SS 2343
Hastelloy
254 SMO
Rubber
Rubber
SS 2343
SS 2343
Hastelloy
254 SMO
Rubber
Rubber
Material
-XX10, -XX12
-XX10, -XX12
-XX10, -XX12
-XX10, -XX12
-XX00, -XX08, -XX14, -XX40
-XX20
-XX00, -XX14
-XX00, -XX14
-XX00, -XX14, -XX40
-XX20
-XX00, -XX14, -XX40
-XX20
-XX00, -XX14
-XX00, -XX14
-XX00, -XX14, -XX40
-XX20
-XX00, -XX14, -XX40
-XX20
-XX00, -XX14
-XX00, -XX14
-XX00, -XX14, -XX40
-XX20
Transmitter type
2000/2200/2300
1,0%
Short
Long
Short
Long
6%
7%
4%
2,0%
Short
--
1,5%
Long
--
1,0%
Long
1,5-2%
0,8%
Short
Sludge
(-2200)
0,8%
16%
16%
12%
10,0%
8,5%
6,5%
5,0%
10-15%
2,5%
2,5%
Consistency range
lower limit upper limit
Long
Fiber
type
(5% - NC )
(6% - MC)
(9% - NC )
As above +3%
9% - NC
6% - MC
As above +4%
20% - NC
(*12% - MC)
As above +6%
31% - NC
(*17% - MC)
Feedback-Water
50Hz
(6% - NC )
(6% - MC)
(11% - NC)
As above +3%
11% - NC
7% - MC
As above +4%
24% - NC
(*14% - MC)
As above +6%
37% - NC
(*20% - MC)
Feedback-Water
60Hz
Fig 64 Choice of
MEK sensing el
ments
A
Basic
type
Sensing elements MEK-family
* Note! This feedback resolution adjustment is normally not used.
** Note! D, E and F are not recommended as first choice.
Note! 254 SMO has replaced AISI 317L.
3.12 - Altering sensor/transmitter data
OI218.56/3en
OI218.56/3en
MEK-2300 Operating instructions
© BTG 2004
L
K
J
I
H
G
**
F
Basic
type
--
73198830
74359795
74359878
A0006361
74359787
74359860
A0006353
74359779
74359852
A0006346
74359761
74359845
A0006338
-
Ordering no.
Splines/sceew
fastening
72117138
73159378
13139399
(73153777)
13170444
13120506
(73118358)
13139316
13139365
(73141285)
13139373
13120498
(73118374)
13134176
73001786
Ordering no.
Fixed sceew
fastening
215
8.5 ”
200
8”
3.5”
80
100
4”
125
5”
150
6”
190
7.5 ”
Characteristic
SS 2343
SS 2343
SS 2343
(SS 2343)
Hastelloy
254 SMO
SS 2343
(SS 2343)
Hastelloy
254 SMO
SS 2343
(SS 2343)
Hastelloy
254 SMO
SS 2343
(SS 2343)
Hastelloy
254 SMO
SS 2343
Material
-XX00
-XX50
-XX10, -XX11, -XX12, -XX15
-XX11, -XX15 Only!
-XX10, -XX12
-XX10, -XX12
-XX10, -XX11, -XX12, -XX15
-XX11, -XX15 Only!
-XX10, -XX12
-XX10, -XX12
-XX10, -XX11, -XX12, -XX15
-XX11, -XX15 Only!
-XX10, -XX12
-XX10, -XX12
-XX00, -XX11, -XX12, -XX15
-XX11, -XX15 Only!
-XX10, -XX12
-XX10, -XX12
-XX00 *
Transmitter type
2000/2200/2300
Long
Short
2,5%
3,5%
2,5%
0,1%
0,5%
0,7%
1,5%
2%
18%
18%
15%
14%
13%
12%
11%
10%
5%*
5%*
0,1%
0,1%
12%
Short
Long
Short
Very
Short
11%
10%
Short
Long
9%
8%
Long
Short
7%
6%
Short
Long
5%
3%*
Short
Long
2%*
Consistency range
lower limit upper limit
Long
Fiber
type
30% - NC
(*14% - MC)
25% - NC
5% - MC
(*6% - NC)
6% - MC
(*7% - NC)
8% - MC
(*13% - NC)
10% - MC
(*17% - NC)
-
-
Feedback-Water
50Hz
35% - NC
(*17% - MC)
29% - NC
6% - MC
(*7% - NC)
7% - MC
(*9% - NC)
(10% - MC
(*16% - NC)
12% - MC
(*20% - NC)
-
-
Feedback-Water
60Hz
3.12 - Altering sensor/transmitter data
147
3.12 - Altering sensor/transmitter data
Fig 64 - guidance
Sensing elements are made in a number of basic designs (A, B, C,
etc.), each of a certain size.
1. Sensing elements are available with a choice of fastening systems
(see Service Manual).
2. Different materials are also available. The standard material is SS
2343 (= AISI 316) stainless steel. Other options are Hastelloy C-276,
254 SMO, and rubber-clad types for abrasive media.
3. Different sensing elements fit different models of transmitter.
4. Each sensing element is adapted to a given range of consistencies,
but the type of fiber also influences the choice. The figures given for
maximum and minimum consistency are only approximate. Consult
BTG about the choice of sensor, because there are many variables to
be taken into account.
5. Sensing elements type D and E are not recommended as first
choice. If possible use type G-J. Test shows that the transmitter is
less influenced by flow velocity changes and other non consistency
related factors using type D and E.
Always consult BTG about the choice of sensing elements and
propellers
" The Tables in Fig 65/Fig 64 refers to the MEK family and is available
in MEK/MPK-2000 series, MEK/MPK-2200 series and in the MEK2300 series,. (Example sensing element G is valid both for MEK2210 and MEK-2310).
Ordering nos. - Propellers for the MEK family
Fig 65 Choice of MEK
propellers
Type
SS2343
254 SMO
Hastelloy
Cons. range
”M” measure
Large
73198772
A0004978
73198798
1,5-5%
150 mm
Small
74359886
A0004986
74359902
< 1,5%
150 mm
Hub
74360587
A0004994
74360603
> 5%
70 mm
" Avesta 254 SMO replaces AISI 317L stainless steel.
148
MEK-2300 Operating instructions
© BTG 2004
OI218.56/3en
3.13 - Training
3.13 Training
The SPC-1000 hand-held terminal can be used for training without any
other equipment being connected. It is preferable in this case if the handheld terminal is powered by the AC adapter. When no transmitter is connected, it is not possible to send or read data from the transmitter and thus
the program sometimes locks. If this occurs, switch the terminal off and
start it again.
Typical functions that can be simulated are single-point, multi-point and
updated calibration, calibration using given calibration constants, measuring span adjustment and offset adjustment. The result is seen on the
calibration curve or printout. The temperature compensation or production calculation can also be simulated but a transmitter needs to be connected in this case.
Refer to the relevant section in the instructions with respect to each item.
To enter the feedback values for calibration or the calibration constants
go to
OI218.56/3en
Calibrate
,
Special
func.
.
MEK-2300 Operating instructions
© BTG 2004
149
3.14 - Trimming the controller
3.14 Trimming the controller
Once a transmitter has been calibrated, the controller should be trimmed.
PI controllers are the type traditionally used in consistency transmitter
circuits; the following is a brief description of the standard trimming procedure.
1. Set the controller to MAN and adjust the set point value, which is
normally set at 50%.
Example: Consistency measuring span 2-4%, normal consistency
3%, present consistency signal 42% (which means that the present
consistency is 2,84%). To obtain a set point of 3%, the set point value
is set at 50% (see also step 9 below).
2. Set the controller to AUTO. Set I time to infinity.
3. Gradually reduce the P band until the controller begins to oscillate
spontaneously.
4. Increase the P band to twice the width.
5. Allow operation of the circuit to stabilize.
6. Keep the P band as it is, or increase it slightly.
7. Reduce the I time slowly until slow, sine-curve spontaneous oscillation is detected.
8. Increase the I time to give an adequate margin, e.g. twice the spontaneous oscillation value.
9. Study the regulating process in disturbed conditions. If changes in
operating conditions cause spontaneous oscillation adjustment is
necessary. If flow conditions change, e.g. if the flow velocity is reduced, the width of the P band must be increased.
Do not make the P band setting too wide, as this will adversely affect
the response time of the controller, making it sluggish.
10. If later checks on transmitter readings compared to laboratory sample values reveal a confirmed deviation, the lead value of the controller can be temporarily reset. With a MEK-2300 transmitter, where
the zero point is independent of the measuring span setting, we recommend that you make an offset adjustment in the transmitter
program at a suitable opportunity.
150
MEK-2300 Operating instructions
© BTG 2004
OI218.56/3en
3.15 - Using the HART® communication
3.15 Using the HART® communication
Refer to II218.56 for the functions available on the digital communication superimposed on the 4-20 mA signal loop.
Since this communication takes place using the HART® standard protocol, refer to the relevant user instructions from the HART® association.
BTG is also able to provide advice on the relevant code instructions.
" For reliable HART® communication to the DCS the polling mode
should be used.
When connecting the SPC-1000, the HART® communication to the
DCS may be inhibited during this occasion.
3.15.1 Digital communication according to the
HART® protocol
The transmitter complies to the HART protocol standard requirements.
To set and calibrate the transmitter the BTG hand-held terminal is required. Since additional functions are not covered by the HART protocol
a standard HART competitive terminal can only be used for certain functions.
Certain functions are available as a digital signal according to the HART
protocol and BELL 202 modem standard. The communication takes
place as a superimposed signal over the 4-20 mA output signal loop.
The following functions are available:
•
Output signal:
In percentage of output signal and in mA.
•
Identification
Instrument supplier (BTG) and instrument identification (TAG
no.).
•
Alarm information
Present signal above or below the set measuring span. (<4 mA,
>20 mA).
•
Damping
Adjustable setting.
•
Measuring span
Adjustable setting.
" For details, please contact the HART Communication Foundation
or BTG.
OI218.56/3en
MEK-2300 Operating instructions
© BTG 2004
151
3.16 - Software revisions
3.16 Software revisions
3.16.1 SPC-1000 hand-held terminal
There are two models available: the original model SPC-1000 and an upgraded model SPC-1000/A. Both models can be used with all types of
MEK-2300 transmitters and all versions of PCMCIA sensor cards.
3.16.2 SPC-1000 PCMCIA sensor card
Today’s MEK-2300 product requires PCMCIA sensor cards versions E
or F (depending on language version), or later. The MEK-2300 software
version in these PCMCIA sensor cards is 1.3, or later. These sensor cards
can also be used with all older sensor processor card software versions.
See section 3.16.3 below for further information.
Older PCMCIA sensor card software versions (A-D) have restricted usage in combination with sensor processor card software versions. See
section 3.16.3 below for further information.
3.16.3 MEK-2300 sensor processor card (E-prom)
Two different hardware types of sensor processor cards have been delivered with the MEK-2300.
The older version has traditional electronic components and is encapsulated in a metal cover. The software on this circuit board has versions 1.1,
1.2, ... 1.n. All versions, A-F and forward, of the PCMCIA sensor card
software can be used with this circuit board.
The new type, delivered today, has surface mounted electronics and is
not encapsulated in a metal cover. The software on this circuit board has
versions 2.1, 2.2, ... 2.n. This type of circuit board requires version E-F
(and forward) of the PCMCIA sensor card software.
152
MEK-2300 Operating instructions
© BTG 2004
OI218.56/3en
3.17 - Maintenance Planning and Quality Assurance
3.17 Maintenance Planning and Quality Assurance
In April 1993 BTG Källe Inventing AB attained ISO 9001 certification
concerning development, design and production among others for process control equipment for the pulp and paper industry. Repair at the factory is made in accordance with appropriate demands from new
production, every transmitter is, e.g., tested according to a specified program. The result is documented and included in the delivery.
3.17.1 Inspection of the accuracy/calibration of the
consistency transmitter
Inspection can be made in two ways:
1. By means of a special torque brake - with the transmitter removed
from the pipe - alternatively with the transmitter mounted in the pipe,
and no pulp in the pipe.
The torque brake is an accessory to the consistency transmitter, fitted
to the measuring part side of the transmitter. By varying the current
to the torque brake, different torques (corresponding to different pulp
consistencies) can be used. See special instructions for the torque
brake, D/M750.10.
The transmitter signal, in this case the feedback signal, can then be
adjusted to a certain level corresponding to the applied torque. (100
kpmm torque shall correspond to 100% feedback - MEK 2300).
2. Against laboratory samples. The transmitter is then mounted in the
pipe and running.
Comparison to lab. samples implies several sources of error. Originally the transmitter is, as a rule, calibrated against a great number of
lab. samples and adjusted accordingly. Thus comparison to one lab.
sample only implies a source of error.
The sample can be extracted from the pipe in a number of ways.
Different types of sampling valves, respectively common ball
valves, result in a various number off, more or less, serious sources
of error, which cannot be discussed here. The main points for a good
sampling are generally that the samples shall be extracted from the
pipe in a uniform, repeatable way in accordance with the original calibration. The sample volume must not be too small. At least
0.5 liter / 0.13 US gallon is necessary.
The treatment of the sample, after being extracted from the pipe,
must be made in a uniform, repeatable way. The lab. analysis shall
be in accordance with the established standards, e.g., SCAN-C 17:64
or valid TAPPI standard. A rapid analysis with drying on a heating
plate is not a reliable method.
A combination of verification against torque brake and lab. samples
might in practise be suitable. By this, calibration can first be checked
OI218.56/3en
MEK-2300 Operating instructions
© BTG 2004
153
3.17 - Maintenance Planning and Quality Assurance
against lab. samples during the normal follow-up. Should a deviation be
discovered, check and adjust the transmitter against the torque brake. If
comparison to torque brake corresponds to the previous result, but the
lab. value differs when compared with the transmitter value, you can suspect a change of some component in the pulp suspension, which has affected the measurement. If so, investigate the reason. A re calibration (or
possibly a zero-point offset) of the transmitter might then be necessary.
On the MEK-2300, it is possible to compensate for certain influencing
factors (temperature) or use several measuring ranges in case of changed
pulp composition.
A printout, or other automatic documentation, is an excellent complement to the ordinary protocol for documentary purposes.
3.17.2 Recommendation concerning transmitters
used for simpler measurements, e.g. for
indicating purposes
Comparison to lab. samples and previous calibration to be made twice a
year.
3.17.3 Recommendation concerning transmitters
used for measuring/control function of vital
importance to the process
Comparison to lab. samples and previous calibration to be made every
month.
3.17.4 Recommendation concerning transmitters
used for measuring/control function of vital
importance to the process or used for
debiting purposes
Comparison to lab. samples and previous calibration to be made once a
week or after a considerable change of the process variables.
" Gained experiences concerning necessary extent of comparison
affect the above recommendations, which should be considered
general.
3.17.5 Maintenance of the transmitter
The maintenance need will vary heavily, as the transmitter position and
thereby the influence from the media and ambient conditions vary from
case to case.
154
MEK-2300 Operating instructions
© BTG 2004
OI218.56/3en
3.17 - Maintenance Planning and Quality Assurance
Regular maintenance includes:
•
Inspection of flushing water and possible leakage once a week.
•
Inspection of transmission belt condition twice a year.
•
Inspection of wetted rubber details and metal parts for damages
twice a year, if exposed to aggressive chemicals.
•
Inspection of play between moment wheels twice a year, in case of
heavy pipe vibrations.
Long-time maintenance includes:
•
Replacement in transmission of pulley and belt recommended after
10 years of operation.
•
Replacement of motor ball bearings recommended after 8 years of
operation.
•
Cleaning/lubrication or replacement of rotating ball bearings of drive
unit and measuring unit (two for the drive shaft, one for the moment
shaft) after approximately 10 years of operation.
•
Replacement of mechanical seal after typically 5 years of operation,
depending on the operating condition.
•
Replacement of rubber seals after typically 10 years of operation.
For further information, see also the Service instruction for the respective
transmitter type.
3.17.6 Maintenance of the junction box
For information regarding routine service for JCT-1100, see the Service
instruction section of the JCT-1100 manual included in this manual.
OI218.56/3en
MEK-2300 Operating instructions
© BTG 2004
155
3.17 - Maintenance Planning and Quality Assurance
156
MEK-2300 Operating instructions
© BTG 2004
OI218.56/3en
4.1 - Product introduction
4
JCT-1100 Junction box appendix
4.1 Product introduction
This instruction manual is valid for JCT-1100/A junction boxes.
4.1.1
System description
The JCT-1100 junction box is delivered as a complete unit from BTG
and is always delivered together with a transmitter. It has the following
functions:
• Local display and console for basic configuration of the
transmitter and the collection of measuring values for
calibration with the SPC-1000
• Connection point between the transmitter, power supply and
the DCS (Digital Control System)
• Local connection for a hand-held terminal SPC-1000, or for a
lab top PC with BTG’s SPCwin program
Fig 66 Front panel overview
1 Single line LCD display
2 Keys for access to
basic settings
3 Front cover
4 LED indicating 24 V DC
power on
5 SPC-1000 connector
6 Terminal connection
box
7 System cable to
transmitter
1
X.XX % XX.XX mA
2
Enter
Sample
3
4
5
24V
Terminal
6
7
AX218.56/3e
MEK-2300: JCT-1100 Junction box appendix
© BTG 2004
157
4.1 - Product introduction
4.1.2
Technical data
Type
JCT-1100 for BTG transmitters
Manufacturer
BTG, Säffle, Sweden
General
Electronic Enclosure
Made of poly carbonate thermoplastic with a
transparent cover. Nickel paint coated internally to
protect against EMC interference.
Protection rating
IP65, NEMA 4x
Weight
Electronics box 2.0 kg (4.4 lbs)
Signals
Output signal - analog
4-20 mA. Galvanically isolated. Current limited to 21
mA.
Min load for communication with display terminal:
250 Ω.
Output signal - digital
Superimposed signal over 4-20 mA current loop
according to standard HART® protocol and BELL
202 modem . Follows HART® universal commands.
Analog input
0/4–20 mA
Measuring ranges
Four separate, individually programmable, externally
connectable, using a binary-coded switch. Also
accessible via the communications link.
Communication
158
Junction box
Display for viewing and buttons for adjusting span,
offset, damping and calibration constants.
Hand terminal
Using the BTG SPC-1000 hand-held terminal jack
plugs into the junction box. The communication is
superimposed over the 4–20 mA current loop.
DCS
Directly with the DCS. HART® universal commands.
OPC
RS-485 for connection to OPC-server. OPC program
provided by BTG. Note! Only for DCS/OCS system
with OPC capabilities.
Fieldbus
Prepared for fieldbus communication, e.g., Profibus
PA or Fieldbus Foundation
MEK-2300: JCT-1100 Junction box appendix
© BTG 2004
AX218.56/3e
4.1 - Product introduction
Connections
Transmitter connection
LIYCY 5x2x0,5, twisted pair, shielded 10 m/33 ft.
cable with connector is included in the delivery. This
cable is connected to the terminal strip in the junction
box.
Other cable lengths are available on request, max.
100 m/328 ft.
Cable fittings
Brass, nickel coated. For US and Canada, no fittings
are included.
Supply voltage
Supply voltage options
Built-in multi voltage power supply 100–240 V AC,
50/60 Hz (85-264 V AC, 47-63 Hz), max. 50 VA –
automatic setting.
Output voltage 24 V DC, regulated.
or
Customer provided 24 V DC regulated voltage.
24 V DC ± 10%, max ripple 240 mV peek-to-peek,
total regulation ± 2%.
Power consumption
Maximum 50 VA for AC supply
or
Maximum 600 mA including hand-held terminal
(200 mA) for 24 V DC supply.
Standardization and approvals
Standardization
Quality-assured in accordance with ISO 9001.
Designed in accordance with relevant CE standards.
Low-Voltage-Directive 73/23/CEE
EN61010–1 April 93.
EMC-Directive 89/336/CEE
EN 50081–2 Aug. 93
EN 50082–2 Mar. 95
Approvals
AX218.56/3e
Equipment type
Permanently connected equipment. The product is
designed for industrial use.
Installation category
III
Shock protection
Class I
Pollution degree
2
Insulation category
I
IP Code
IP65/NEMA 4X
Installation altitude
< 2000m (MSL)
MEK-2300: JCT-1100 Junction box appendix
© BTG 2004
159
4.2 - Revision information
4.1.3
Type sign explanations
" Always refer to the type sign when ordering spare parts.
Fig 67 Type sign for junction
box
1
2
3
4
5
6
7
8
9
10
11
12
Manufacturer
CE-marking
C-Tick-marking
CSA-marking
Warning sign*
Product
Voltage
Apparent power
Manufacturing number
Frequency
Installation category
Production Factory
2
1
BTG Pulp & Paper Sensors AB
Industrigatan 1-3
661 29 Säffle
SWEDEN
www.btgppt.com
TYPE
6
5
N1619
9
12345
VOLTAGE
FREQUENCY
10
50/60 Hz
100-240 VAC
8
4
NO
JCT-1100/A
7
3
APPARENT POWER
INSTALLATION CATEGORY
60 VA
III
FACTORY IDENTIFICATION
F1
12
11
*)Warning sign
The device is designed for industrial use. Installation, handling and
service must only be carried out by trained and authorized personnel
and according to relevant standards and legislation. Read the manual
for detailed information and pay special attention to the warning signs!
4.2 Revision information
The following changes have been made in the JCT-1100/A compared
with the JCT-1100:
160
•
The language setting for the JCT-1100 is stored in the transmitter
memory instead of the JCT-1100 memory.
•
In a standard delivery the isolation amplifier has been replaced with
a HART-filter in the 4-20 mA output signal. The extra 250 ohm
resistor for HART communication is not required as long as the
HART-filter is mounted.
•
The RS-485 terminal block has been made smaller.
MEK-2300: JCT-1100 Junction box appendix
© BTG 2004
AX218.56/3e
4.3 - CE-Declaration of conformity
4.3 CE-Declaration of conformity
BTG’s CE-Declaration of Conformity is only valid when the junction
box is used in combination with other BTG equipment.
CE-Declaration of Conformity
According to EN 45014
Manufacturer´s Name
Manufacturer´s Address
declares that the product:
Product Name
Model Number
conforms with the following
Product Standards:
LVD
BTG Pulp & Paper Technology AB
P.O. Box 602 S- 661 29 SÄFFLE, Sweden
EMC
EN 50081-2 Aug.93
EN 50082-2 Mar.95
and complies with the requirements of the
Low Voltage Directive: 73/23/EEC
EMC Directive: 89/336/EEC
Junction box
JCT-1100
EN 61010-1 April93
Säffle
Jan. 1999
Per Waernes, MD
AX218.56/3e
MEK-2300: JCT-1100 Junction box appendix
© BTG 2004
161
4.4 - Safety recommendations
4.4 Safety recommendations
See the corresponding section in the transmitter User Manual for Safety
recommendations.
162
MEK-2300: JCT-1100 Junction box appendix
© BTG 2004
AX218.56/3e
4.5 - Installation instructions
4.5 Installation instructions
4.5.1
Mounting
" Locate the junction box close to the transmitter and sampling valve
to achieve a convenient connection of the SPC-1000 hand-held
terminal for calibration and monitoring.
For convenient working height and a good operating position the bottom
of the junction box should be approximately 1.4 m (4.6 ft.) above the
floor. The SPC-1000 can be placed in a holder if one has been mounted
close to the junction box.
Install the box in a position where it is protected from mechanical damage.
50
2"
Fig 68 Recommended
clearances
" The front cover
swings open and is
hinged on the left
side.
300
12"
Sample
Enter
50
2"
200
8"
Terminal
Consistency
Transmitter
Sample
Enter
XCT-2300
217
8.5"
Fig 69 Dimensions
142
5.6"
AX218.56/3e
34
1.3"
285
11.2"
20
0.8"
Terminal
MEK-2300: JCT-1100 Junction box appendix
© BTG 2004
163
4.5 - Installation instructions
The junction box has three attachment lugs which are bolted to a flat surface.
Fig 70 Attachment lugs
BTG recommends that a roof or overhang is mounted above the junction
box to protect it against spray and pulp. If the junction box is located outdoors, a roof should be mounted that protects from direct sunlight which
can cause excessive operating temperatures. If possible, the SPC-1000
should also be protected when placed in it’s holder.
Fig 71 Protecting roof
200
8"
300
12"
75°
Fig 72 Holder for SPC-1000
164
MEK-2300: JCT-1100 Junction box appendix
© BTG 2004
AX218.56/3e
4.5 - Installation instructions
4.5.2
Junction box with external 24 V DC power
supply
This section describes the requirements on an external 24 V DC power
supply when the junction box is delivered without BTG’s built-in
24 V DC power supply unit.
" It is the mill’s responsibility to arrange the transmitter power
supply correctly. BTG will disclaim any liability for problems and
damage, caused by incorrect power supply.
Dimensioning the power supply unit is the mill’s responsibility. See section 4.1.2: Technical data on page 4 – 158 Supply voltage for requirements.
For safe operation the external 24 V DC supply must comply with
SELV/PELV (Separated Extra Low voltage).
To avoid power outs BTG recommends a UPS (Uninterruptible Power
Supply) power supply unit.
Cable connections must be made according to section 4.5.3: Cabling on
page 4 – 166.
The junction box is tested as a complete system to conform with the
relevant CE directives and their standards.
The junction box and transmitter may conform with EMC- and associated safety requirements when properly installed in combination with customer installed external devices and using an adequate power supply.
The mill operator is responsible for CE directive conformity.
Conformity has to be checked by inspection.
AX218.56/3e
MEK-2300: JCT-1100 Junction box appendix
© BTG 2004
165
4.5 - Installation instructions
4.5.3
Cabling
4.5.3.1
Cable types
BTG recommends properly dimensioned cables as described below for
connections between the junction box and external equipment.
The power cable should be in accordance with the IEC 227/245 standard.
Power supply cable:
• Shielded (≥80 %) 3 x 0.75 mm2 (3 x AWG18) with PE.
" BTG recommends that the power supply cable has a 2 A slow blow
fuse.
Signal cables (for Output, Range Select, Alarm, AUX-in, etc.):
• Shielded (100%), twisted pair: Min 2 x 0.3 mm2 (2 x AWG24).
Typical size is 2 x 0.75 mm2 (2 x AWG18).
" BTG recommends that separate cables be used for analog and
digital signals. Multiconductor cables can be used.
4.5.3.2
166
Guidelines for cable connections
•
Do not place signal cables and power supply cables close together!
This may cause interference.
•
Always avoid loops of cable leads in the junction box and make the
leads as short as possible.
•
The shields for the Alarm, AUX-in and Range select cables should
not be connected in the junction box, unless the mill standard
specifically requires it. Normally, these shields are grounded to
instrument earth at the mill end.
•
BTG recommends that the shield for the output signal cable is
connected to CONN21 in the junction box. CONN21 is connected to
PE via a capacitor.
MEK-2300: JCT-1100 Junction box appendix
© BTG 2004
AX218.56/3e
4.5 - Installation instructions
Fig 73 Grounding of cable
shields
1 Power supply or transmitter
cable
2 Nut
3 Sealing ring
4 Insert ring
5 Cable shield
6 Socket
7 Free wires
7
6
5
4
3
2
1
Cable shields should be connected as shown in fig 74 below.
Fig 74 Connection of signal cable
shields
1 System cable:
The cable shield must be
connected to PE at both ends.
2 Output signal cable:
In the JCT-1100 the shield is
connected to ”CONN21” and in
the mill equipment the shield is
connected to instrument earth.
BTG
transmitter
BTG
JCT-1100
Mill
equipment
CONN21
1
= PE/Protective earth
2
= Instrument earth
It is important to tighten the cable connector firmly to the transmitter –
use a tool! If not tightened firmly, the shield will not be properly grounded.
Fig 75 Transmitter cable
connection
JCT-1100
Tx
Conn2
AX218.56/3e
MEK-2300: JCT-1100 Junction box appendix
© BTG 2004
167
4.6 - Wiring diagram
4.6 Wiring diagram
" Unshielded long, looped wires may
Fig 76 Wiring diagram
RS-485
A
CONN6
B
COM
cause interference to the signal.
The terminal markings become visible when the screw clamp connectors are removed.
OUTPUT
Output signals
B
A
mA1– mA2– mA3–
CONN4
mA1+ mA2+ mA3+
FB
CONN5
Reserved for Field
Bus
COM
Reserved for serial
communication
+24V GND GND GND GND GND GND
G
F
AUX-in 0/4-20 mA
Range select, input B. See section 4.6.1.1.
Range select, input A. See section 4.6.1.1.
Cable shield not connected in junction box. See section 4.5.3.2.
ON
OFF
A
B
C
D
E
CONN3
SW3
Concentration output signal, 4-20 mA. See section 4.6.1
Signal output cable shield should be connected here. See section 4.5.3.2.
CONN21
USER
Production output signal, 4-20 mA (Optional)
LOAD RES
Cable shield connected to junction box PE via cable gland. See section 4.5.3.2.
Grey
C
SUPPLY
Power Supply
168
D
E
A
+24V GND
Brown (transmitter supply)
White (transmitter supply)
PE
CONN1
Red
Green
Protective earth
L
Transmitter cable
Black
Yellow
Line
N
SENSOR
F
B
G
CONN2
Neutral
Blue
Pink
100-240 V AC
MEK-2300: JCT-1100 Junction box appendix
© BTG 2004
AX218.56/3e
4.6 - Wiring diagram
4.6.1
HART-communication
The junction box is delivered with a HART filter that removes the superimposed HART signal on the analog output signal from the junction box
to the DCS, and so on. If the HART-protocol is used after the junction
box, the HART filter must be removed. See section 4.8.3: Handling of
circuit boards for output signals on page 4 – 178.
BTG’s hand-held terminal (SPC-1000) and the display in the junction
box use the HART-protocol for communication between the transmitter
and the junction box. The HART communication requires a 250 ohm
minimum loop resistance, which is normally provided by the HART filter. If the HART filter is removed, it must be verified that the output circuit (DCS, etc.) has at least 250 ohms resistance. If this is not the case,
then an extra resistor must be connected in series with the output signal
cable. Always connect the resistor to the plus (mA+) terminal.
To ensure that there is a closed 4-20 mA loop between the transmitter and
the junction box, the output signal from the junction box is jumpered on
delivery. This jumper must always be removed when a signal cable is
connected. See figure below.
Fig 77 Removal of jumper
CONN21
mA1+ mA2+ mA3+
CONN4
mA1– mA2– mA3–
" Remove the jumper before the output
4.6.1.1
Out 1–
Out 1+
signal cable is connected.
Range select input
Transmitter calibration ranges for different production circumstances
can be changed with binary inputs to the transmitter.
AX218.56/3e
Range
Input A
Input B
1
2
3
4
0
1
0
1
0
0
1
1
MEK-2300: JCT-1100 Junction box appendix
© BTG 2004
169
4.7 - Operating instructions
4.7 Operating instructions
4.7.1
Starting the junction box
The junction box is started by switching on the power supply with the
switch in the terminal box. See fig 78 below. See the start-up instructions
in the transmitter section of this manual for detailed start-up instructions.
Fig 78 Power supply switch
1 Power supply switch
1
4.7.2
Transmitter configuration from the junction
box
4.7.2.1
General information
The JCT-1100 junction box is equipped with a display and four push buttons. The display has one row of sixteen characters. The operator can
make some basic adjustments using the push buttons and the display
without using the hand-held terminal SPC-1000.
To make a complete calibration or to configure some major settings the
SPC-1000 must be used. The transmitter settings made from the junction
box can be loaded into the SPC-1000. There they may be used for documentation, print-out, or backup.
The SPCwin PC program with a cable and a modem for connection to the
JCT-1100 can be used as an alternative to the SPC-1000 hand-held terminal. See the transmitter section of this manual for more information
about SPCwin and the SPC-1000.
" Do not configure the transmitter from the hand-held terminal and
the junction box at the same time. Valuable configuration data can
be lost! Always close a configuration session by updating the
transmitter.
170
MEK-2300: JCT-1100 Junction box appendix
© BTG 2004
AX218.56/3e
4.7 - Operating instructions
Fig 79 Front panel with push
buttons and display
1
2
3
4
5
Display
Sample button
Arrow up button
Arrow down button
Enter button
X.XX % XX.XX mA
Enter
Sample
1
2
3
5
4
24V
Terminal
The push buttons have the following functions (depending upon position
in menu structure):
AX218.56/3e
Push button
Function
Sample
- Reads a measurement value from the
transmitter that corresponds to a calibration
sample value
Arrow up
- Scrolls up in the menu structure
- Change a value upwards
- Discard a sample value
Arrow down
- Scroll down in the menu structure
- Change a value downwards
- Discard a sample value
Enter
- Select menu options
- Verify entered values
- Moves the cursor to the right
- Stores a measurement value that corresponds
to a calibration sample value that is used for
calibration curve adjustment, or for offset
adjustment
MEK-2300: JCT-1100 Junction box appendix
© BTG 2004
171
4.7 - Operating instructions
4.7.2.2
Menu structure
" The display on the junction box always returns to the Result
display after 15 seconds of inactivity, or after 3 minutes if a
message has been shown. If data was changed, it is automatically
saved to the transmitter.
Start up display
The transmitter type is displayed when the JCT-1100 has
established contact with the transmitter.
XXX-2300
While reading or writing data ”Wait...” is displayed.
Result display
5.55%
12.53mA
Result display: shows the process value and the output
signal.
To access the main menu items, press the up or down
on the arrow buttons:
.
" Data can be saved to the transmitter by returning to the Result
display. “Wait...” followed by “DATA SAVED” is shown on the
display.
The reason for this is that the whole transmitter configuration file must
always be saved to the transmitter and it is more efficient to do this after
all configuration changes have been made.
Range setting
RANGE 1
The present measuring range. Can be changed to access
other ranges (ranges 1, 2, 3 or 4).
Span setting
SPAN 0.50-2.00%
Measuring span, low limit = 4mA high limit = 20mA.
Offset adjustment
OFFSET +0.00
Process value offset, if required.
Damping setting
DAMPING 0s
Damping on output signal, if required.
Calibration setting
CALIBRATION
Calibration constants for the transmitter’s calibration
curve.
172
%
MEK-2300: JCT-1100 Junction box appendix
© BTG 2004
AX218.56/3e
4.7 - Operating instructions
Language selection
LANGUAGE
JCT Communication
JCT COMM. ON
4.7.3
Collecting samples
4.71%
en
Language setting, in this case English.
Shutdown of communication between the junction box
and the transmitter.
Collecting samples and changing settings
12.53mA
When the Result display is shown samples can be
collected to calibrate the transmitter.
Press the sample button
sample for lab calibration.
NO:5
X(20)
and collect a process
“No 5” on the display indicates which position in the
calibration table the sample value will be stored. The first
empty position in the table is selected.
The “X” in “X(20)” will increment as each value is stored.
When all values have been stored, an average sample
value will be calculated and displayed.
" Always mark the lab sample with the table number for the sample
value. The lab sample value for the corresponding calibration
cannot be entered from the JCT-1100. The hand-held terminal SPC1000 must be used.
NO:5
20.21 OK?
Save the sample value by pressing enter
the sample value by pressing
NOT SAVED
SAMPLE TAB FULL
9
or
, or discard
.
“NOT SAVED” is displayed if the sample value is
discarded.
If all nine sample values in the calibration table are
already in use, select which sample value in the table to
replace with a new sample value.
Press enter
replace with the
and select which sample value to
or
buttons, verify with enter
. Press
or
to return to the Result display
without replacing any sample value.
AX218.56/3e
MEK-2300: JCT-1100 Junction box appendix
© BTG 2004
173
4.7 - Operating instructions
Range setting
RANGE 1
Press enter
1
Press
enter
or
to select another range.
to choose a Range. Verify by pressing
.
Note! The transmitter will continue operating with the
range set by the Range select switch and the output
signal will not change.
All Range specific parameters (Span, Offset, Damping &
Calibration) can be changed for each Range. However,
the changes will not take affect until the transmitter’s
range is changed via the Range select switch.
Span setting
SPAN 0.50-2.00%
Press enter
0.50-2.00
When the first number starts to blink press
%
to change the Span.
or
to change the number. Press enter
to accept. The
next number will blink. Repeat the procedure until done.
SPAN 1.00-2.50%
Offset adjustment
OFFSET +0.00%
SAMPLE
*
1.77%
OK?
After the last value has been entered, the new span is set.
Press the sample button
in this position and collect
a process sample for lab calibration.
“SAMPLE” is displayed while sample values are collected
and an average is calculated.
Save the sample value by pressing enter
the sample value by pressing
174
MEK-2300: JCT-1100 Junction box appendix
© BTG 2004
or
, or discard
.
AX218.56/3e
4.7 - Operating instructions
NOT SAVED
“NOT SAVED” is displayed if the sample value is
discarded.
When the results from the lab sample are ready, calculate
the offset: the value for the lab sample minus the sample
value. If the lab value is 1.69, the offset will then be 1.69
– 1.77 = –0.08%.
OFFSET +0.00%
Press enter
1.77%
When the plus sign starts to blink press
-0.08%
to change the offset.
or
to
change. Press enter
to accept. The next number will
blink. Repeat the procedure until done.
Damping setting
DAMPING 0s
Press enter
00 s
The first number starts to blink. Press
to change the damping value.
or
to
change the number. Press enter
to accept. The next
number will blink. Repeat the procedure until done.
Calibration setting
CALIBRATION
Press enter
Press
or
to access the calibration constants.
to step between calibration constants.
" Some transmitters have two calibration
constants, while others have three.
Repeat the steps below for each
calibration constant (K0, K1 or K2) that is
to be changed.
K0=0.2
Press enter
if the value is to be changed. When the
first number starts to blink press
or
to change
the number. Press enter
to accept. The next number
will blink. Repeat the procedure until done.
AX218.56/3e
MEK-2300: JCT-1100 Junction box appendix
© BTG 2004
175
4.7 - Operating instructions
Language selection
LANGUAGE
English
en
The selected language is indicated in small letters.
Press enter
Scroll with the
Svenska
Press enter
to change language.
or
keys to the desired language.
to accept.
Español
Italiano
Deutsch
Português
Suomi
Français
176
MEK-2300: JCT-1100 Junction box appendix
© BTG 2004
AX218.56/3e
4.8 - Service instructions
4.8 Service instructions
4.8.1
Maintenance routines
No special maintenance routines are required. However, it is recommended that the following preventive maintenance is carried out:
•
Check that the junction box is not damaged and complies with the
protection rating (IP65).
•
Check that the cables to and from the junction box are not damaged.
•
Keep the junction box clean and free from pulp, etc.
4.8.2
Service hardware
The different hardware components are identified in fig 80 below:
Fig 80 Hardware
components
1 Screws for
terminal cover (2x)
2 Screws for
front panel (4x)
3 24 V DC connector
4 AC power connector
5 AC power supply or
24 V DC power supply
board
6 Mounting plate for
power supply unit
7 24 V DC LED
8 Display connector
9 SPC-1000 connector
10 Screws for main circuit
board (15x)
11 Isolation amplifiers
12 Screw for front panel
grounding strap
AX218.56/3e
Sample
Enter
24V
1
2
Terminal
12 3
5
4
11
7 8 9 10
6
MEK-2300: JCT-1100 Junction box appendix
© BTG 2004
177
4.8 - Service instructions
4.8.3
Handling of circuit boards for output signals
Upon delivery a HART-filter on a separate circuit board is mounted (see
fig 81 below). No isolation amplifiers are mounted.
The HART-filter circuit board can be replaced with an isolation amplifier, or removed as required. If the circuit board is removed and not replaced, then the connector pins have to be strapped in order to get an
output signal. See fig 81 below.
It is possible to mount isolation amplifiers for up to three analog output
signals (depending upon the transmitter type) in the junction box.
DANGER!
High voltage within the
junction box.
Fig 81 Mounting of circuit boards
for HART-filter, circuit boards
for isolation amplifiers, or
strapping of outputs.
Position of isolation amplifiers under
the front panel
The front panel has to be removed before the circuit boards can be replaced, or removed. See section 4.8.3.2: Replacing the front panel on
page 4 – 180
Circuit board
connected
(Output signal)
or
178
No circuit board
connected,
strapped pins
(Output signal)
No circuit
board
connected
(No output
signal)
MEK-2300: JCT-1100 Junction box appendix
© BTG 2004
or
AX218.56/3e
4.8 - Service instructions
4.8.3.1
Replacing the power supply unit
If the power supply is faulty, it needs to be replaced.
Tools required:
Star screwdriver (medium size)
DANGER!
High voltage within the
junction box. Connections
may only be carried out by
qualified personnel
(applies to version with
100-240 V AC power
supply).
" Break and secure the AC power supply voltage to the junction box
before the front panel is removed (it is not sufficient to turn it off
with the power supply switch in the terminal box.).
All numbers within () below refer to fig 80 on page 4 – 177.
1. Check that the 24 V DC LED (7) and the display are off.
2. Unscrew the front panel (2) and carefully lift the front panel plate
aside.
3. Detach the display connector (8) by pushing the two levers aside and
pulling the connector straight out from the main circuit board.
4. Detach the SPC-connector (9) by pulling it straight out from the main
circuit board. It might be necessary to loosen the locking flap using
a flat screw driver.
5. Unscrew the front panel grounding strap (12) from the main circuit
board.
6. Detach connectors for 24 V DC (3) and AC power (4) from the main
circuit board.
7. Detach the power supply unit from it’s mounting plate by pushing
the black lever (located on the right upper corner) to the left.
8. Lift out the power supply unit (5).
9. Move the wiring for 24 V DC (3) and AC power (4) from the faulty
power supply unit to the new power supply unit.
To mount the new power supply unit, perform the steps above in
reverse order.
AX218.56/3e
MEK-2300: JCT-1100 Junction box appendix
© BTG 2004
179
4.8 - Service instructions
4.8.3.2
Replacing the front panel
If there is something wrong with the display or the push buttons, then the
whole front panel has to be replaced. However, the transmitter will still
work properly without the display or the buttons functioning in the junction box. This allows the replacement to be made at a convenient time.
DANGER!
High voltage within the
junction box. Connections
may only be carried out by
qualified personnel
(applies to version with
100-240 V AC power
supply).
Tools required:
Star screwdriver (medium size)
" Break and secure the AC power supply voltage to the junction box
before the front panel is removed (it is not sufficient to turn it off
with the power supply switch in the terminal box.)
All numbers within () below refer to fig 80 on page 4 – 177.
1. Check that the 24 V DC LED (7) and the display are off.
2. Unscrew the front panel (2) and carefully lift the front panel plate
aside.
3. Detach the display connector (8) by pushing the two levers aside and
pulling the connector straight out from the main circuit board.
4. Detach the SPC-connector (9) by pulling it straight out from the main
circuit board. It might be necessary to loosen the locking flap using
a flat screw driver.
5. Unscrew the front panel grounding strap (12) from the main circuit
board.
6. Move the display wiring (8) from the faulty display panel to the new
display panel.
To mount the new front panel, perform the steps above in reverse
order. If the front panel sticker is not mounted, it is easier to mount
it after the front panel has been replaced in the junction box.
180
MEK-2300: JCT-1100 Junction box appendix
© BTG 2004
AX218.56/3e
4.8 - Service instructions
4.8.3.3
Replacing the main circuit board
If the main circuit board is faulty, it needs to be replaced.
Tools required:
Screwdriver (medium size)
Star screwdriver (medium size)
DANGER!
High voltage within the
junction box. Connections
may only be carried out by
qualified personnel
(applies to version with
100-240 V AC power
supply).
" Break and secure the AC power supply voltage to the junction box
before the front panel is removed (it is not sufficient to turn it off
with the power supply switch in the terminal box.).
All numbers within () below refer to fig 80 on page 4 – 177.
1. Check that the 24 V DC LED (7) and the display are off.
2. Unscrew the terminal box cover (1).
3. Detach all screw clamp connectors with cables connected to them.
Note that the terminal screws do not need to be fully removed, the
contact can be pulled out of the screw clamp connector on the main
circuit board.
4. Unscrew the front panel (2) and carefully lift the front panel plate
aside.
5. Detach the display connector (8) by pushing the two levers aside and
pulling the connector straight out from the main circuit board.
6. Detach the SPC-connector (9) by pulling it straight out from the main
circuit board. It might be necessary to loosen the locking flap using
a flat screw driver.
7. Unscrew the front panel grounding strap (12) from the main circuit
board.
8. Unscrew the fifteen screws (10) that attach the main circuit board to
the box.
9. The main circuit board can now be removed. Space is tight, so be
careful. Lift out the upper part first (where the display connector (8)
is located).
To mount the new main circuit board, perform the steps above in
reverse order.
AX218.56/3e
MEK-2300: JCT-1100 Junction box appendix
© BTG 2004
181
4.8 - Service instructions
4.8.4
Service software
Software can only be serviced by BTG’s technicians. Contact BTG regarding any suspected software problems.
4.8.5
Trouble shooting
This section only covers troubleshooting with regards to possible faults
that can occur in the junction box. Please consult the transmitter part of
this manual for transmitter related problems.
In the trouble shooting table below the probable causes are listed in a logical order. They should be checked in that order.
The fuses and the test points indicated in the troubleshooting table below are shown in fig 82 on page 4 – 184. All numbers within () in the
troubleshooting table below refer to fig 80 on page 4 – 177.
Symptom
Probable cause
Action
1. The junction box
does not power up.
1.1. No power to the junction
box
Check the external power
supply voltage.
1.2. Fuse on main circuit
board blown
Check fuses.
FS1 and FS2 for AC power
supply, FS3 for 24 V DC to
transmitter, and FS4 for
DC/DC converters.
1.3. Faulty or incorrectly
connected cabling to the
power supply unit
Check the AC power (4)
and 24 V DC (3) wiring.
1.4. Faulty 24 V DC supply
Check TP1. If out of limits,
replace the power supply
unit. See section 4.8.3.1.
1.5. Faulty DC/DC converters Check TP2 and TP3. If out
on main circuit board
of limits, replace the main
circuit board. See section
4.8.3.3.
2. There is no informa- 2.1. No power to the junction
tion on the display.
box
3. Nothing happens
when the push buttons are used.
182
See point 1 above.
2.2. Faulty or incorrectly
connected display wiring
Check the display wiring (8)
and the groundling strap
(12).
2.3. Display is faulty
Replace the front panel.
See section 4.8.3.2.
3.1. Faulty or incorrectly
connected display wiring
Check the display wiring (8)
and the grounding strap
(12).
3.2. One, or more push
buttons are faulty
Replace the front panel.
See section 4.8.3.2.
MEK-2300: JCT-1100 Junction box appendix
© BTG 2004
AX218.56/3e
4.8 - Service instructions
Symptom
Probable cause
Action
4. There is no output
signal.
4.1. No power to the junction
box
See point 1 above.
4.2. Transmitter not in
operation.
Check the display for output
signal
4.3. Improperly mounted
HART-filter or isolation
amplifier
Check if the HART-filter or
isolation amplifier is correctly mounted. See section
4.8.3.
4.4. Open loop for 4-20 mA
output
Check the complete 4-20
mA loop for breaks.
4.5. Incorrect transmitter
analog out configuration
See the transmitter part of
this manual for calibration
instructions.
4.6. Faulty HART-filter or
isolation amplifier
Replace, or remove the isolation amplifier circuit board.
See section 4.8.3
5. The SPC does not
work.
5.1. Incorrect program running Switch to correct sensor
in the SPC
card and program in the
SPC.
5.2. Not enough resistance
(minimum 250 Ω ) in the
4-20 mA output loop
If the output signal is connected to a DCS, check that
the total loop resistance is
between 250Ω and 750Ω
(with HART-filter) or
between 250 and 1000Ω
(without HART-filter.
5.3. The analog output signal
is not between 4-20 mA
See point 4 above.
5.4. Faulty or incorrectly
connected SPC cable
Check the connectors and
cabling from the SPC to the
main circuit board (9).
5.5. Faulty Hart communication with the SPC
Check that the SPC functions correctly. If it does, it is
necessary to replace the
main circuit board. See
section 4.8.3.3
6.1. Faulty HART-filter or
6. The analog output
isolation amplifier
signal from the junction box is lower than
what the display display shows.
6.2. Incorrect transmitter
analog out configuration
7. Language changes 7.1. Old software version in
to English after powtransmitter
er down
AX218.56/3e
MEK-2300: JCT-1100 Junction box appendix
© BTG 2004
Replace, or remove the circuit board. See section
4.8.3
See the transmitter part of
this manual for calibration
instructions.
Check with your BTG office
if transmitter software can
be updated.
183
4.8 - Service instructions
Fig 82 Fuses and test points
6
(TP) on the main
circuit board
4
1
Pos
TP
Label
8
7
9
3
2
Min.
5
Max
Unit
Comment
1
FS1
2
A
Fuse for AC power supply: 250V, 2AT
2
FS2
2
A
Fuse for AC power supply: 250V, 2AT
3
FS3
2
A
Fuse for 24 V DC power supply: 250V, 2AT
4
FS4
2
A
Fuse for DC/DC converters: 250V, 2AT
5
TPØ
GND
Ground reference for all voltages (test points)
6
TP1
+24V
23.5
24.5
V
Output voltage from 24 V DC power supply
7
TP2
+12V
11.5
12.5
V
SPC-1000 supply voltage from DC/DC converter
8
TP3
+5V
4.95
5.05
V
Regulated system supply voltage from DC/DC
converter
9
TP5
1.23V
1.20
1.25
V
Reference voltage for HART modem
Measure all TP’s between TPØ (GND) and the TP at hand using a
high impedance digital voltmeter
184
MEK-2300: JCT-1100 Junction box appendix
© BTG 2004
AX218.56/3e
4.9 - Parts list
4.9 Parts list
4.10 JCT-1100 with power supply unit
6 1
13
20
28
6
Sample
Enter
24V
12
Item
No.
Rec.
spare
parts
11
10
Terminal
9
8 67
4 7
5
3
2
Qty
Part No.
Spare Part
Description
1
A0012070
A0012146
2
3
4
1
1
1
5
6
7
8
9
10
1
4
2
1
1
1
27014281
A0006635
A0068726
A0014274
A0012229
46022638
46028221
46028130
46027330
A0012203
1
1
1
A0012401
A0015958
A0012112
Junction box, complete
Main circuit board, with power
supply unit
Shield gasket
Terminal connection
HART-filter (included)
Isolation amplifier (optional)
System cable
Fuse
Cable gland
Cable gland
Power supply unit
Front panel, complete - without
sticker
Front panel sticker
Sticker, inside terminal box
Junction box
100-240 V AC version
1
(*)
*
(*)
11
12
13
AX218.56/3e
MEK-2300: JCT-1100 Junction box appendix
© BTG 2004
SPC
Transmitter
TR5 2AT 250V
M12
M20
Pulse
Connection MEK-2300
185