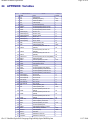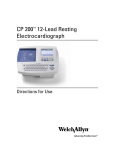
1
Medikro Windows Spirometer Page 1 of 81 Medikro Windows Spirometer User’s Manual for Spiro2000 software version 1.8 file://C:\Medikro\Spiro2000\Language\English\Help\Spiro2000Help.htm 11/17/2009 Medikro Windows Spirometer file://C:\Medikro\Spiro2000\Language\English\Help\Spiro2000Help.htm Page 2 of 81 11/17/2009 Medikro Windows Spirometer Page 3 of 81 Table of Contents 1 Introduction 1.1 Thank You 1.2 Getting the Most Out of This Manual 2 Installation 2.1 Installing More Languages 3 Starting and Exiting the Spiro2000 Software 3.1 Starting the Spiro2000 Software 3.2 Exiting the Spiro2000 Software 4 Setup 4.1 Database 4.1.1 4.1.2 4.2 General 4.2.1 4.2.2 4.2.3 4.2.4 4.2.5 4.2.6 4.3 Variables for display and print Incentive 4.6.1 4.6.2 4.6.3 4.6.4 4.6.5 4.6.6 4.6.7 5 Hospital Information System Interface HIS Input files HIS/manual Import Mode HIS/manual Import Recalculation Automatic Proceed into Measurement Identification of the Imported Person HIS Output files How and What to Export Variables 4.5.1 4.6 Calibration Volume, Max Variation and Logging Linearization File of the Flow Transducer The Spirometry Standard Recommendations Calculation Exceptions and Choices Heading of the Final Report HIS 4.4.1 4.4.2 4.4.3 4.4.4 4.4.5 4.4.6 4.4.7 4.4.8 4.5 Ambient factors Spirometer Detection Save Options Units Language User Identification Spirometry 4.3.1 4.3.2 4.3.3 4.3.4 4.3.5 4.4 Location of Data The Final Report Template Current Incentive Show incentive at this PC Java missing -warning Targeted FET Incentive size Data Communication Success Criteria Calibration 5.1 Flow Transducer and Calibration Calibration Procedure and Acceptance 5.2 file://C:\Medikro\Spiro2000\Language\English\Help\Spiro2000Help.htm 11/17/2009 Medikro Windows Spirometer Page 4 of 81 6 Personal Information and Session Database 6.1 Personal Information 6.2 Patient Data Entry 6.3 Retrieving Personal Information and Session Data from the Database 7 Measurement 7.1 Measurement Steps 7.2 Getting prepared for the Measurements 7.3 Starting the Measurement 7.4 Stopping the Measurement 7.5 Acceptance of the Measurement 7.6 The Flow and Duration Indicator 7.7 The Reproducibility Indicator 7.8 Session Status Summary 7.9 Deleting an Individual Measurement 7.10 Measurements with the Incentive 8 Analyzing Results 8.1 Curves 8.1.1 8.1.2 8.1.3 8.1.4 8.1.5 8.2 Numerical Results 8.2.1 8.2.2 8.3 8.4 9 VT, Volume/Time Curves VT6, 6 s Volume/Time Curves FV, Flow/Volume Curves Envel., Envelope Curves Magnification of the Curves Meas., Results of all Measurements Best, the Best Results as a Histogram Trend Printing a Current Window Interpretation 9.1 Ventilation Function 9.2 Bronchodilatation Test Result 9.3 Manual Interpretation Text 10 The Final Report 10.1 Viewing the Final Report 10.2 Printing the Final Report 10.3 Sending and Receiving the Final Report 10.3.1 10.3.2 Sending the Final Report Receiving the Final Report 11 Sending and Receiving the Session Data 11.1 Sending the Session Data 11.2 Receiving the Session Data 12 The Hospital Information Systems Data Interchange 12.1 Import 12.1.1 12.1.2 12.1.3 12.1.4 12.1.5 Receiving an input file Checking Import Person's Identity Selecting a session for the person imported to the system Handling errors Special Features of GDT Import file://C:\Medikro\Spiro2000\Language\English\Help\Spiro2000Help.htm 11/17/2009 Medikro Windows Spirometer 12.2 Page 5 of 81 Export 12.2.1 12.2.2 12.3 XML Export GDT Export Logging 13 Keyboard Shortcuts 14 Drop Down Menus 14.1 In the Opening View 14.1.1 14.1.2 14.1.3 14.2 Database Device Help In the Measurement View 14.2.1 14.2.2 14.2.3 14.2.4 14.2.5 Session Measure Device Show Help 15 Maintenance 16 Trouble Shooting 16.1 Leaks 16.2 Spirometer and Computer Connection 16.3 Operating Environment 16.4 Software 17 Certification 17.1 EC Declaration of Conformity 17.2 Certificate of Conformity 18 Accessories 19 Release Information 20 Additional Information 21 Disclaimer 22 Trademarks 23 References 24 APPENDIX: Variables 25 APPENDIX: Reproducibility Indicators 25.1 Introduction 25.2 VC, FVC and FEV1 25.3 FEF75, FEF50 and FEF25 (ERS 1993 only) 25.4 FEF25-75% (ERS 1993 only) 25.5 PEF (ATS/ERS 2005 only) 25.6 MVV (ATS/ERS 2005 only) Figures Figure 1-1. Spiro2000, Startup Screen. Figure 3-1. Starting of the Spiro2000 program. Figure 3-2. Spirometer not found - message. Figure 3-3. User Identification screen after starting the Spiro2000 program. Figure 3-4. The Opening View. file://C:\Medikro\Spiro2000\Language\English\Help\Spiro2000Help.htm 11/17/2009 Medikro Windows Spirometer Page 6 of 81 Figure 3-5. Exit Button. Figure 4-1. Device / Settings / Database. Figure 4-2. Device / Setting / General, Ambient factors. Figure 4-3. Device / Settings / General, Save options. Figure 4-4. Device / Setting / General, Units. Figure 4-5. Device / Settings / Spirometry, Calibration syringe volume ml. Figure 4-6. Device / Settings / Spirometry, Standard recommendations. Figure 4-7. Device / Settings / HIS. Figure 4-8. Device / Settings / Variables. Figure 4-9. Device / Settings / Incentive Figure 4-10. Java not found dialog Figure 4-11. Incentive applet Figure 5-1. Disposable Flow Transducer. Figure 5-2. Label for M9228-100, Disposable Flow Transducer. Figure 5-3. M9424 Calibration Syringe, 3000 ml. Figure 5-4. Outlet Port Adapter of Calibration Syringe. Figure 5-5. Calibr. button. Figure 5-6. Device / Calibration, Start. Figure 5-7. Device / Calibration, End. Figure 6-1. Per.Info button. Figure 6-2. Personal Information window, before data entry. Figure 6-3. Database / Choose a Person and a Session. Figure 6-4. Database / Choose a Person and a Session, Person search. Figure 6-5. Database / Choose a Session. Figure 6-6. Meas. button. Figure 6-7. "Show Curves" and "Show Results" button groups. Figure 7-1. The Measurement View. Figure 7-2. Choices of Manoeuvres Button Group Before Start of Measurement. Figure 7-3. Choices of Manoeuvres Button Group Before Start of Measurement. Figure 7-4. Choices of Manoeuvres Button Group After Start of Measurement. Figure 7-5. Volume Time Graph. Figure 7-6. Accept Measurement. Figure 7-7. Flow and Duration indicator. Figure 7-8. Reproducibility Indicator. Figure 7-9. Session Summary Status. Figure 7-10. Session / Delete signal(s). Figure 7-11. Incentive applet in an idle state. Figure 7-12. Incentive applet in a stand-by state. Figure 7-13. Incentive applet after a successful exhalation. Figure 7-14. Incentive applet after a failed exhalation. Figure 8-1. "Show Curves" and "Show Results" button groups. Figure 8-2. Show Curves in volume/time curve format. Figure 8-3. Floating VT6 window showing 6 s volume/time curves. Figure 8-4. Show Curves in flow/volume curve format. Figure 8-5. Show Curves in flow/volume envelope curve format. Figure 8-6. Draw a marquee around the interesting view area. Applies also to VT6 window. Figure 8-7. After drawing a marquee the curve is magnified for more detailed viewing. Figure 8-8. Numeric results in tabular format. Figure 8-9. Show Best Results. Figure 8-10. Trending in a graphical presentation form. Figure 8-11. Trending, interactive elements. Figure 8-12. Trending, in relation to reference values. Figure 8-13. A separate floating window shows trending in a numeric table presentation. Figure 9-1. Ventilation Function, Bronchodilatation Test Result and Manual Interpretation Text Figure 10-1. Report Button. Figure 10-2. Show the Final Report. Figure 10-3. Print Button. Figure 10-4. Standard final report. Figure 12-1. Log On Screen. Figure 12-2. Check Import Person's Identity Window. Figure 12-3. Choose a Session Window. Figure 14-1. Database / Delete Person(s) or Session(s). Figure 14-2. Help / About Figure 16-1. Calibration, Not Accepted message. Figure 17-1. EC Declaration of Conformity. Figure 17-2. Certificate of Conformity. file://C:\Medikro\Spiro2000\Language\English\Help\Spiro2000Help.htm 11/17/2009 Medikro Windows Spirometer 1 1.1 Page 7 of 81 Introduction Thank You We all at Medikro Oy wish to thank you for the purchase of the Medikro spirometer with Spiro2000 software. We trust it will serve you well. In order to understand better the spirometer system and get most out of it we encourage you to study this manual in detail. If you already have used a previous version of Spiro2000, you may want only to have a glance at the additions made in this document (since version 1.7.2). The additions are flagged with green color. Please note also that the whole text and structure of this document has been revised; these changes have not been flagged. Figure 1-1. Spiro2000, Startup Screen. 1.2 Getting the Most Out of This Manual Typically an operator will require information on new system installation and operation. The installation of the spirometer and related software as well as the system setup is described in the detailed Installation Guide provided with the software. We encourage you to study the Installation Guide before you put the spirometer into clinical work. This manual covers the use of Spiro2000 software. The next chapters will deal with the software setup, calibration, patient data, measurement, analyzing and interpreting the results, creating a final report, sending/receiving data and connecting to a Hospital Information System (HIS). There is also important supplementary information at the end of this manual. file://C:\Medikro\Spiro2000\Language\English\Help\Spiro2000Help.htm 11/17/2009 Medikro Windows Spirometer 2 Page 8 of 81 Installation The detailed Installation Guide is provided with the Spiro2000 software. It contains a description of all procedures to be done before starting the spirometry measurements. 2.1 Installing More Languages Additional languages may be installed with separate language packs. A language pack is a setup program that will install language files for the Spiro2000. One language pack may contain one or more languages from which the user may select the wanted language(s) during the installation. A standard Spiro2000 software package will supply a language pack with at least one language (normally English). At the first installation of Spiro2000, you can select which (one or more) of these languages you want to install. It is also possible to install more languages from this language pack afterwards. For supplementary languages, you can order language packs from Medikro Oy. To install additional languages from the Spiro2000 software package, follow the next steps: 1 2 Exit the spirometry software, if it is running. Run the Setup.exe that is located at the Spiro2000 installation CD under the X:\LanguagePack\ folder, where X is the letter of CD-ROM drive. 3 During the installation, you can select the language(s) to install. 4 After a successful installation, start the spirometry software. Default language selected during the language installation will be used when starting the software. The language can be changed to any installed one via software settings, see the chapter 4.2.5 Language. file://C:\Medikro\Spiro2000\Language\English\Help\Spiro2000Help.htm 11/17/2009 Medikro Windows Spirometer 3 3.1 Page 9 of 81 Starting and Exiting the Spiro2000 Software Starting the Spiro2000 Software In the Windows Start menu, point to Programs, and then click Medikro Spiro2000. Figure 3-1. Starting of the Spiro2000 program. After you have started the program you will see the name of the program as well as the version number on the screen while the program is being loaded. The program will search for the spirometer attached to your computer serial port and identify the COM port. (The search can be omitted, if you do not use the software for making measurements, see the chapter 4.2.2 Spirometer Detection.) In case the software scan cannot find the spirometer in any of the COM ports, the following message will be displayed: Figure 3-2. Spirometer not found - message. This message will appear only once. The software will try to detect the spirometer in the background until it is found. The personal information can be given and sessions can be studied even before the instrument has been found. The following Log On screen will appear. file://C:\Medikro\Spiro2000\Language\English\Help\Spiro2000Help.htm 11/17/2009 Medikro Windows Spirometer Page 10 of 81 Figure 3-3. User Identification screen after starting the Spiro2000 program. You have to type in at least 2 characters (initials of your name) in the "User name" field and then click Log On. For more information about the user identification options, see the chapter 4.2.6 User Identification. After the operator has entered the user name the program will activate the opening view. Figure 3-4. The Opening View. The operation of Spiro2000 is easy and fast. All the key commands are push buttons that can be selected by a mouse click. Alternatively, drop down menus are offered. At the opening view you can continue with buttons which appear active (highlighted). 3.2 Exiting the Spiro2000 Software file://C:\Medikro\Spiro2000\Language\English\Help\Spiro2000Help.htm 11/17/2009 Medikro Windows Spirometer Page 11 of 81 When you want to stop using the Spiro2000 software, select the Exit Button (Figure 3-5). Figure 3-5. Exit Button. The User Identification screen (Figure 3-3) appears. Now select the Exit button and the program exits to Windows. file://C:\Medikro\Spiro2000\Language\English\Help\Spiro2000Help.htm 11/17/2009 Medikro Windows Spirometer 4 4.1 4.1.1 Page 12 of 81 Setup Database Location of Data The operator can define the location of the data generated within a spirometry session. The location of following data can be established: Description of data Result Database (DSN) Reference Database (DSN) Default data transfer folder Calibration log file Default value Medikro_Spirometry_Result Medikro_Spirometry_Reference (only for information, the location can’t be changed) C:\Medikro\DataTransfer C:\Medikro\Calibration Log\SpirometryCalibration.xml To change the setting (Figure 4-1) select: Device Settings Database Figure 4-1. Device / Settings / Database. The program allows the operator to define databases also in the LAN environment. 4.1.2 The Final Report Template You may choose the default page of the Final Report. This page opens first when the final report is selected (see the chapter 10.1 Viewing the Final Report). To change the default page (Figure 4-1) select: Device Settings Database Final Report Template file://C:\Medikro\Spiro2000\Language\English\Help\Spiro2000Help.htm 11/17/2009 Medikro Windows Spirometer 4.2 4.2.1 Page 13 of 81 General Ambient factors The ambient conditions of the operating environment affect the results measured and calculated by the spirometer. Due to this fact room temperature, atmospheric pressure and relative humidity should be recorded and entered into the program daily and also if they change notably during the day. To enter these values (Figure 4-2) use the following command path: Device Settings General Ambient factors Figure 4-2. Device / Setting / General, Ambient factors. 4.2.2 Spirometer Detection The default setting of the Spiro2000 program includes an automatic serial port scan for spirometer detection. If you are using the software only for viewing database results and do not have a spirometer connected to your PC, you may wish the program to omit the automatic search. To omit the automatic search (Figure 4-2) use the following command path: Device Settings General Spirometer Detection file://C:\Medikro\Spiro2000\Language\English\Help\Spiro2000Help.htm 11/17/2009 Medikro Windows Spirometer Page 14 of 81 Inactivate/activate the automatic search by clicking the Spirometer Detection check box. 4.2.3 Save Options You have three choices to save the session data. The selection (Figure 4-3) is made using the following command path: Device Settings General Save options Figure 4-3. Device / Settings / General, Save options. Autosave. Will save all information of the session (personal information, measurement signals and results) to the database without reminding you at the end of the session. No Autosave. Will remind you at the end of the session to save all information of the session (personal information, measurement signals and results) to the database. No Save. No information of the session will be saved to the database. No reminder will be given. 4.2.4 Units You may select the units you wish to use from the following two alternatives: metric units (kg, cm, °C, l) or (kg, cm, °C, L) or imperial units (Lb, Ft, In, °F, l) or (Lb, Ft, In, °F, L). The software uses selected units for body weight and height and ambient temperature. Body height (and sometimes also body weight) affects reference values. Accordingly, ambient conditions affect the results measured and calculated by spirometry. To select the units (Figure 4-4) use the following command path: Device Settings General Units file://C:\Medikro\Spiro2000\Language\English\Help\Spiro2000Help.htm 11/17/2009 Medikro Windows Spirometer Page 15 of 81 Figure 4-4. Device / Setting / General, Units. 4.2.5 Language You have an option to select the language that your software is using. The amount of selectable languages depends on how many languages have been installed on the system. More languages can be installed via separate language packs (see the chapter 2.1 Installing More Languages). To select the language (Figure 4-4) use the following command path: Device Settings General Language and select the desired language from the list. 4.2.6 User Identification To identify the user, the software displays a user identification screen, where user gives his/her user name (see Figure 3-3). This is a default procedure and recommended for most operating environments. Optionally, the user identification can be automated (disabled) by unselecting the check box. Use the following command path (see Figure 4-4): Device Settings General Check identification at startup If the user identification is unchecked, a default user name will be automatically entered to the user identification screen that is displayed for a short time. Default user name can be selected from the “Default user name” drop down list and it has the following choices: Windows user (the user name that is used when logged into the operating system) Last user (the user name that has been used previously) If the user identification is enabled, the selections above are available with an additional choice: No name file://C:\Medikro\Spiro2000\Language\English\Help\Spiro2000Help.htm 11/17/2009 Medikro Windows Spirometer Page 16 of 81 If the user identification is enabled, the user has a possibility to modify the default name in the user identification screen. 4.3 4.3.1 Spirometry Calibration Volume, Max Variation and Logging Before you run the calibration, you should verify that the calibration volume specified in the program is the same as the volume of the calibration syringe. You may change also maximum variation of the calibration gains and choose if calibration is being logged. The settings (Figure 4-5) are found using the following command paths: Device Settings Spirometry Calibration syringe volume ml Device Settings Spirometry Max. calibration variation % Device Settings Spirometry Calibration logging Figure 4-5. Device / Settings / Spirometry, Calibration syringe volume ml. 4.3.2 Linearization File of the Flow Transducer You can check the linearization file of the flow transducer and change it when needed by using (Figure 4-5) the following command path: file://C:\Medikro\Spiro2000\Language\English\Help\Spiro2000Help.htm 11/17/2009 Medikro Windows Spirometer Page 17 of 81 Device Settings Spirometry Linearization file The file is identified by the product code of the Flow Transducer (for example M9228) and the manufacturing lot number (for example lot10.cfg). Please note that .cfg is the file extension (file type) of the linearization file. In case the lot number in the package of the Flow Transducers is not the same as the chosen linearization file, select the right linearization file from the list box. If the file is not listed, please select "New file" (at the top of the list) and follow the instructions given by the Spiro2000 software. The linearization file and its file name are provided in the Calibration File Diskette within the Flow Transducers Box. 4.3.3 The Spirometry Standard Recommendations You may choose which spirometry standard the Spro2000 software is complying. The choices are the ATS 1994, ERS 1993 and ATS/ERS 2005 recommendations (Figure 4-6). For the selection use the following command path: Device Settings Spirometry Standard recommendations Figure 4-6. Device / Settings / Spirometry, Standard recommendations. There are generally only minor differences between the American Thoracic Society (ATS) 1994 [1] and the European Respiratory Society (ERS) 1993 [2] recommendations. The views of both the ATS and ERS were joined in 2005 [3-5]. The standard selection affects primarily how representative values are chosen start of test criteria (extrapolated volume) end of test criteria (no change in volume, exhalation time) repeatability criteria of FVC, FEV1, VC, PEF and MVV bronchodilatation response criteria file://C:\Medikro\Spiro2000\Language\English\Help\Spiro2000Help.htm 11/17/2009 Medikro Windows Spirometer 4.3.4 Page 18 of 81 Calculation Exceptions and Choices After choosing the standard you may fine tune the spirometry calculations via exceptions and choices explained in this chapter. 4.3.4.1 Ventilation Function Interpretation You can select the how ventilation function is interpreted (Figure 4-6) by using the following command path: Device Settings Spirometry Ventilation function interpretation There are two choices: ATS/ERS 2005. With this choice the ventilation function is interpreted according to the ATS and ERS 2005 recommendations [5]. The interpretation classifies the spirometry based on the pre phase FEV1 compared to the reference value. Ventilation function Normal Mild decrease Moderate decrease Moderately severe decrease Severe decrease Very severe decrease FEV1 %ref x >= -2 SD 70 <= x < -2 SD 60 <= x < 70 50 <= x < 60 35 <= x < 50 x < 35 Sovijarvi 1994. With this choice the ventilation function is interpreted according to Sovijarvi 1994 [6]. The interpretation classifies the per phase spirometry results according to the variable that has the lowest value compared to the reference value. The exceptions are VC and FVC, of which the classification is accomplished according to the variable having a higher value compared to the reference value. Ventilation function Normal Mild decrease Moderate decrease Severe decrease Critical decrease Value compared to the reference x >= -2 SD -3.5 SD <= x < -2 SD -5.5 SD <= x < -3.5 SD -7.5 SD <= x < -5.5 SD x < -7.5 SD SD = standard deviation, +- SD = 95 % confidence limit. 4.3.4.2 Bronchodilatation Test Interpretation You can select the method to interpret the results of a bronchodilatation test (Figure 4-6) by using the following command path: Device Settings Spirometry Bronchodilatation test interpretation file://C:\Medikro\Spiro2000\Language\English\Help\Spiro2000Help.htm 11/17/2009 Medikro Windows Spirometer Page 19 of 81 There are three choices: ATS/ERS 2005. With this choice the bronchodilatation test is interpreted according to the ATS and ERS 2005 recommendations [5]. ERS 1993. With this choice the bronchodilatation test is interpreted according to the ERS 1993 recommendations [2]. Sovijarvi 1994. With this choice the bronchodilatation test is interpreted according to Sovijarvi 1994 [6]. 4.3.4.3 Bronchodilatation Test Comparison You can select the method to compare the results of a bronchodilatation test (Figure 4-6) by using the following command path: Device Settings Spirometry Bronchodilatation test comparison There are two choices: Reference values. With this choice the difference between post and pre results is calculated in relation to the reference value and shown as "%ref". To assess whether the change in the bronchodilatation test is significant, Spiro2000 compares the relative difference to the reference value. Pre phase representative results. With this choice the difference between post and pre results is calculated in relation to the pre phase representative value and shown as "%pre". To assess whether the change in the bronchodilatation test is significant, Spiro2000 compares the relative difference to the pre phase representative value. 4.3.4.4 Best PEF Criterion You can select how best PEF (Figure 4-6) is chosen by using the following command path: Device Settings Spirometry Best PEF Criterion There are two choices: PEF of max(FVC+FEV1). The best PEF is chosen from the manoeuvre with largest sum of FVC+FEV1. Largest PEF. The best PEF is the largest PEF of Pre- or Post- phase manoeuvres. 4.3.4.5 FEV% calculation criterion You can select how FEV- and FIV- percentages (Figure 4-6) are calculated by using the following command path: Device Settings Spirometry FEV% calculation criterion file://C:\Medikro\Spiro2000\Language\English\Help\Spiro2000Help.htm 11/17/2009 Medikro Windows Spirometer Page 20 of 81 There are two choices: max FVC of each phase. FEVn%(FVC) is calculated by dividing FEVn by the best FVC of Pre- or Post phase. n = 0.5 or 1. The best FEVn% is calculated by dividing the best FEVn by the best FVC. The same principle applies to FEVn%(FEV6), FIVn%(FIVC) and FIVn%(FIV6). FVC of each manoeuvre. FEVn%(FVC) is calculated by dividing FEVn by FVC of each manoeuvre. n = 0.5 or 1. The best FEVn% is chosen from the manoeuvre with largest sum of FVC+FEV1. The same principle applies to FEVn%(FEV6), FIVn%(FIVC) and FIVn%(FIV6). 4.3.4.6 FEF calculation criterion You can select how FEFn, FEF25-75%, FIFn and FIF25-75% (n = 25, 50 or 75) are calculated by using the following command path (Figure 4-6): Device Settings Spirometry FEF calculation criterion There are two choices: max FVC of each phase. FEFn and FEF25-75% are calculated using the best FVC of Pre- or Post phase as a reference volume. n = 25, 50 or 75. The same principle applies to FIFn and FIF25-75%. FVC of each manoeuvre. FEFn and FEF25-75% are calculated using FVC of each manoeuvre as a reference volume. n = 25, 50 or 75. The same principle applies to FIFn and FIF25-75%. 4.3.4.7 Reference Set The reference set represents the predicted pulmonary function values for the patient. To change the reference set selection (14 alternative reference sets in Spiro2000 v. 1.8), use the following command path (Figure 4-6): Device Settings Spirometry Reference Set Select the appropriate reference set to change the default value of the set. The set includes the predicted values for both genders and all age groups. There are several choices for the predicted values of different national or ethnic groups. The current reference sets in Spiro2000 are: Name of Ref. Set Bergl_Z Brazil China Cra_Knu ECSC_P ECSC_PZ Description (persons less than 18 years old are regarded as children) Berglund for adults, Zapletal for children Brazilian reference values Chinese reference values Crapo for adults, Knudson for children European Coal and Steel Community for adults, Polgar for children European Coal and Steel Community for adults, Polgar and partly Zapletal for children file://C:\Medikro\Spiro2000\Language\English\Help\Spiro2000Help.htm 11/17/2009 Medikro Windows Spirometer Page 21 of 81 ECSC_Z Forche2 Gulsvik_Z Hedenstrom_Z Japan Knudson NHANES III_W Vil_Koi European Coal and Steel Community for adults, Zapletal for children Austrian reference values: Forche for adults and children Norwegian reference values: Gulsvik for adults, Zapletal for children Swedish reference values: Hedenstrom for adults, Zapletal for children Japanese reference values Knudson for adults and children NHANES III (Hankinson) for 8-80 years old. Wang for children below 8 years. *) Finnish reference values: Viljanen for adults, Koillinen for children *) The only reference set that takes the ethnic group into account. The ethnic groups mentioned in the references are related to the ethnic groups used in Spiro2000 in a following way: Reference NHANES III Wang 4.3.5 Ethnic group in the reference African American Mexican American Caucasian Black White Ethnic group in Spiro2000 African American, African descent Mexican American All others African American, African descent All others Heading of the Final Report The header of the report can be modified to include the name of the establishment, clinic or institution as well as the necessary contact information. Use the following command path (Figure 4-5): Device Settings Spirometry Report Heading Enter the necessary information into the free text field, where 3 lines are provided. Individual report formats can be provided at request from Medikro Oy. 4.4 4.4.1 HIS Hospital Information System Interface Spiro2000 software can be connected to a variety of Hospital Information Systems (HIS). There are two different interfaces: GDT and XML. GDT (Geräte-Daten-Träger) is tailored for German standard interface for device data. XML is a general interface and can be applied to almost any HIS. You can select the Hospital Information System Interface using the following command path: Device Settings HIS HIS System file://C:\Medikro\Spiro2000\Language\English\Help\Spiro2000Help.htm 11/17/2009 Medikro Windows Spirometer Page 22 of 81 Figure 4-7. Device / Settings / HIS. The options are "None", "GDT" and "XML". Depending on your selection, some of the HIS related options (shown in the Figure 4-7 and explained below) are not in use. 4.4.2 HIS Input files The operator can define the location of the input file. If the XML interface has been chosen, the location of the input batch file can also be established. (The batch file is a small procedure intended to transform the input file to SpiroXML format, if necessary.) You can define the HIS input files using the following command paths (Figure 4-7): Device Settings HIS Input file Device Settings HIS Input batch file 4.4.3 HIS/manual Import Mode XML HIS and manual XML import (see the chapter 11.2 Receiving the Session Data) can have three modes, which affect how Spiro2000 handles incoming vs. database data (for GDT HIS interface the mode is always "Insert" regardless of this selection): Bypass. The content of the input is not connected to the database in any way. Spiro2000 does not write or read the database. Instead, incoming information is handled in a temporary, local database. The change back to the use of the “normal” database requires a new log on to the Spiro2000 software via User Identification window (Figure 12-1). Insert. The input is discarded in case of a conflict with the database. Incoming person information will be rejected if it conflicts with that which already exists for the person in the database. Similarly, incoming sessions' information will be rejected for those sessions in which conflicting information exists in the database. This is the only mode for GDT interface. Update. The input overrides database information. Incoming person information will replace personal information for the file://C:\Medikro\Spiro2000\Language\English\Help\Spiro2000Help.htm 11/17/2009 Medikro Windows Spirometer Page 23 of 81 persons already existing in the database. Similarly, incoming sessions' information will replace the sessions which exist in the database. (Sessions not found in the input document remain untouched in the database.) You can select the import mode using the following command path (Figure 4-7): Device Settings HIS Import Mode 4.4.4 HIS/manual Import Recalculation For XML HIS and manual XML import (see the chapter 11.2 Receiving the Session Data), the operator can choose which results to transfer into the local result database. There are two choices: the results found in the input file or the results recalculated based on signals found in the input file. The recalculation is recommended. However, input file results can also be used, if e.g. the input file does not have signals or if you are sure that the input file results have been calculated with the same Spiro2000 version and same calculation options you have used. You can choose the recalculation via menu (Figure 4-7): Device Settings HIS Calculate results of imported data 4.4.5 Automatic Proceed into Measurement After the input XML/GDT file is opened successfully, the software selects automatically the first session included in the import file or a new session if there is no session information coming from the import file. The program then automatically proceeds to a measurement-ready state. If the user finds the automatic proceed impractical, it can be disabled by unselecting the check box in the menu (Figure 4-7): Device Settings HIS Proceed into measurement automatically 4.4.6 Identification of the Imported Person For XML HIS and manual XML import (see the chapter 11.2 Receiving the Session Data), the operator can define whether the identification of an imported person is always checked, and what the default identification criteria is. Persons can be identified by Personal ID, PatientCode, Last Name, First Name and/or Date of Birth. You can configure the identification via menus (Figure 4-7): Device Settings HIS Check identification always in a dialog window file://C:\Medikro\Spiro2000\Language\English\Help\Spiro2000Help.htm 11/17/2009 Medikro Windows Spirometer Page 24 of 81 Device Settings HIS Identification Criteria 4.4.7 HIS Output files The operator can define the location of the output file. If XML interface has been chosen, the location of the output batch file can also be established. (The batch file is a small procedure intended to transform SpiroXML output file to a suitable format applicable to the used HIS, if necessary.) You can define the HIS output files via menus (Figure 4-7): Device Settings HIS Output file Device Settings HIS Output batch file 4.4.8 How and What to Export The operator can choose how an output file is created when a session is being closed. The choices are: Autoexport, No Autoexport and No Export. Autoexport: Will export the output file without reminding you at the end of the session. No Autoexport: Will remind you to export at the end of the session. No Export: Export will not happen at the end of the session. No reminder will be given. For XML HIS and manual XML export (see the chapter 11.1 Sending the Session Data) the operator can choose also whether the output file has the data of the current session only or all sessions of the current person. The latter option is intended especially for sending data for trending. You can select how and what to export via menus (Figure 4-7): Device Settings HIS Export options Device Settings file://C:\Medikro\Spiro2000\Language\English\Help\Spiro2000Help.htm 11/17/2009 Medikro Windows Spirometer Page 25 of 81 HIS Export Session Data 4.5 4.5.1 Variables Variables for display and print Variables can be individually selected for display or print (there are altogether 55 variables, see APPENDIX: Variables). To change the setting (Figure 4-8), use the following command path: Device Settings Variables Figure 4-8. Device / Settings / Variables. Note: By choosing variables for display you can also affect which manoeuvre buttons are active. For example, if none of TV manoeuvre variables (TV, FR or MV) is chosen, TV manoeuvre button is deactivated (grayed). The same principle is applied also to VC, FEVC, FIVC, FVC and MVV manoeuvres. 4.6 Incentive An incentive screen is a motivator for children (and if need be, for any test subject) to exhale with maximal effort for the spirometry examination. An interactive 3-dimensional animation is displayed during the test and it operates by responding to the performed exhale. The animation is a Java applet, which is run within the web browser and uses a TCP/IP protocol for communication. To work with the incentive, there has to be a TCP/IP protocol and a Java virtual machine installed and configured for use. We recommend that your system administrator install the communication setup. Setup of the incentive screen has been made into the dialogue sheet ‘Incentive’ (Figure 4-9). In most cases, it is enough to check the settings once and start using the incentive without further modifications. All the settings that are related to the incentive can be found at: Device Settings Incentive file://C:\Medikro\Spiro2000\Language\English\Help\Spiro2000Help.htm 11/17/2009 Medikro Windows Spirometer Page 26 of 81 Figure 4-9. Device / Settings / Incentive At the incentive dialogue sheet (Figure 4-9) the following settings can be adjusted: 4.6.1 Current Incentive This is a main selector from which the incentive is taken into use. The default value is none, which means that incentive is not in use. Currently there is one incentive, the “Frog”. Freddie the Frog is an animated frog that spends its time at its favorite pond and waits for strong exhalations that will make it leap to a lily pad on the opposite side of the pond. If the exhalation is not effective enough, Freddie splashes into the water instead. 4.6.2 Show incentive at this PC There are two ways the incentive can be viewed: in a local measurement workstation or in external computers that are connected to the network. If this check box is selected, a web browser of the measurement PC will be automatically opened and the incentive applet will be displayed. 4.6.3 Java missing -warning Enables a warning dialog if a Java virtual machine is not installed on the system. To run the incentive applet, a Java virtual machine must be installed and enabled from the browser settings. The spirometer software will search for Microsoft Java Virtual Machine and Sun Java Runtime Environment, and displays the following warning (Figure 4-10) if neither of them is found. This dialog can be disabled either by unchecking Warn if Java missing in the dialogue sheet or by selecting the check box Do not show this dialog again in the warning window. Figure 4-10. Java not found dialog 4.6.4 Targeted FET A target time of the exhalation (Forced Expiratory Time) in seconds. 4.6.5 Incentive size Size of the incentive screen in pixels. A default value of 416 x 320 is suitable for most computers since bigger size requires more performance for the computer. file://C:\Medikro\Spiro2000\Language\English\Help\Spiro2000Help.htm 11/17/2009 Medikro Windows Spirometer 4.6.6 Data Communication 4.6.6.1 HTTP Server Port Page 27 of 81 Port number of the web server. A web server is needed to display and run the incentive at a network. If the port number is reserved, the number is flagged red and an error message will be displayed when exiting Settings (by selecting OK). In that case, a new free HTTP server port can be found by clicking the Find a free port button. It is also possible to edit the port number manually. 4.6.6.2 Data Server Port Port number of the data server. A data server is needed for sending the data to the Java applet. If the port number is reserved, the number is flagged red and an error message will be displayed when exiting Settings (by selecting OK). In that case a new free data server port can be found by clicking the Find a free port button. It is also possible to edit the port number manually. 4.6.6.3 Automatic Host Name Spiro2000attempts to automatically determine the host name of the measurement workstation and uses it as the incentive page net address. Please, note that the automatic determination process is NOT absolutely correct in all network configurations. The automatically determined host name is only a suggestion, and may result into an invalid host name. In those cases we recommend unselecting this check box and typing the host name manually. 4.6.6.4 Host Name Host name of the measurement workstation. Can be edited, if Automatic Host Name is unchecked. This may also be the numeric IP Address of the measurement workstation (e.g. 192.168.64.142). If the incentive is displayed only in a local measurement workstation, also the values LocalHost or 127.0.0.1 can be used. Please consult your system administrator. 4.6.6.5 Incentive page net address The whole address to a net page, where the incentive applet is displayed. In order to view the incentive at external computers, their browsers have to make a connection to this address (you can copy this address via the clipboard). If the incentive is selected to open at the measurement computer, the browser will be opened automatically in this address. 4.6.6.6 Incentive buffer Length of the communication buffer in seconds. A default value of 0.3 s is recommended for most computers and networks. By increasing this value, it makes the communication more reliable but adds more delay between the exhalation and the animation. 4.6.7 Success Criteria 4.6.7.1 Preferred comparison and Success Flags You can choose the preferred comparison and the variables that are monitored within the incentive. The monitored variables are called success flags and they indicate how well the exhalation is performed (see the upper part of the incentive applet screen, Figure 4-11. For the color status of success flags, see the chapter 7.10 Measurements with the Incentive). For the preferred comparison, there are three choices to select: Reference values. When using this setting, selected variables of the exhalation are compared to the lower limit of 95 % normal range of their reference values. Current session best. When using this setting, selected variables of the exhalation are compared to their best values of the current session. If the current session does not contain any values to compare (e.g. the measurement is the first measurement of the session), the comparison will be done to the best values of the previous session. If the previous session does not contain any values for comparison, it will be done to the lower limit of 95 % normal range of their reference values. Prev session best. When using this setting, selected variables of the exhalation are compared to their best values of the previous session. If the previous session does not contain any values where to compare, the comparison will be done to the best values of the current session. If even they do not exist, the comparison will be done to the lower limit of 95 % normal range of their reference values. file://C:\Medikro\Spiro2000\Language\English\Help\Spiro2000Help.htm 11/17/2009 Medikro Windows Spirometer Page 28 of 81 Note that in Current session best and Prev session best, the comparison limit is determined as a percentage of the current session best or previous session best, respectively. Each selected variable can have an individual percentage. Also, note that the comparison is always phase related. It means that post phase measurements are always compared to the post phase measurements and pre phase measurements are always compared to the pre phase measurements. Figure 4-11. Incentive applet file://C:\Medikro\Spiro2000\Language\English\Help\Spiro2000Help.htm 11/17/2009 Medikro Windows Spirometer 5 Page 29 of 81 Calibration Calibration forms an essential part of good laboratory practice. Medikro spirometers should be calibrated daily as outlined in the ATS and ERS recommendations (see the chapter 23 References). Typically calibration is performed when the spirometer system is switched on. In addition, calibration should be repeated when starting to use a new lot of Flow Transducers and in case of there is a notable change during the day in environmental conditions (ambient temperature, pressure or humidity). Using a calibration log file is recommended and ensures the reliability of your results. You can select the location of this file as defined in the chapter 4.1.1 Location of Data. Other calibration settings are explained in the chapter 4.3.1 Calibration Volume, Max Variation and Logging . 5.1 Flow Transducer and Calibration Medikro spirometers use disposable Flow Transducers (Figure 5-1). Figure 5-1. Disposable Flow Transducer. Flow Transducers are manufactured to high precision and it is not necessary to calibrate the spirometer system with each Flow Transducer separately. It is recommended, however, that you perform a new calibration when starting to use a new lot of Flow Transducers. The lot number is identified at the label of the Flow Transducer package (Figure 5-2). Figure 5-2. Label for M9228-100, Disposable Flow Transducer. file://C:\Medikro\Spiro2000\Language\English\Help\Spiro2000Help.htm 11/17/2009 Medikro Windows Spirometer 5.2 Page 30 of 81 Calibration Procedure and Acceptance Please note the following: Before starting the actual measurements or calibration, it is recommended to allow the spirometer device to have a brief warm-up period of 5-10 minutes to reach a thermal equilibrium. A spirometer connected to a PC will start to warm up immediately after Windows is started. This is a normal and general procedure for most of the high-precision measurement devices. A 3000 ml Medikro Calibration Syringe (Figure 5-3, product code: M9424) is recommended. However, Spiro2000 software allows the user to enter the volume of the calibration syringe leaving you an option to use other volumes for calibration as well. Figure 5-3. M9424 Calibration Syringe, 3000 ml. Attach the spirometer with the Flow Transducer into the Outlet Port Adapter (Figure 5-4) of your Calibration Syringe. Figure 5-4. Outlet Port Adapter of Calibration Syringe. Empty the syringe. Click Calibr. button (Figure 5-5). Figure 5-5. Calibr. button. The program will instruct as follows (Figure 5-6): Press OK when pump is empty. file://C:\Medikro\Spiro2000\Language\English\Help\Spiro2000Help.htm 11/17/2009 Medikro Windows Spirometer Page 31 of 81 Figure 5-6. Device / Calibration, Start. After clicking OK the program will instruct: Fill the pump with one stroke. The program will continue: Empty the pump with one stroke. Perform at least 3 consecutive fill / empty cycles using a flow rate of about 6 L/s and after that click the Finish Calibration button (see Figure 5-7). The program will show the gain before and after the calibration as well as the change in gain from the previous calibration. It will then ask you to accept with OK the new calibration values. Typically the gain values during calibration are around 1.00. Should the spirometer system leak, the calibration be performed incorrectly or should the operator use incorrect calibration files, the absolute gain values after the calibration may lie outside the acceptable gain range. In this case the program will instruct: Gain after calibration is not in 20 % range. Calibration is not accepted. The default limit for calibration variation is 20 % and it determines the acceptable range of gain values (range is calculated as follows: 1.0 20% = 0.80 - 1.20). The limit can be changed as explained in the chapter 4.3.1 Calibration Volume, Max Variation and Logging. file://C:\Medikro\Spiro2000\Language\English\Help\Spiro2000Help.htm 11/17/2009 Medikro Windows Spirometer Page 32 of 81 Figure 5-7. Device / Calibration, End. file://C:\Medikro\Spiro2000\Language\English\Help\Spiro2000Help.htm 11/17/2009 Medikro Windows Spirometer 6 Page 33 of 81 Personal Information and Session Database When the Spiro2000 software was first time installed, it automatically also created a patient database (MS Access based). 6.1 Personal Information All spirometry measurements will start with the identification of the patient. Personal information of a new patient can be entered into a database via keyboard or previous session information can be retrieved from the database. Database contains the following information: 6.2 personal information entered by the operator measurement data from the spirometer unit session results calculated by the software Patient Data Entry Enter personal information via preformatted fields. Select Per.Info button (Figure 6-1) to open Personal Information window (Figure 6-2). Figure 6-1. Per.Info button. Figure 6-2. Personal Information window, before data entry. At least the following fields must be filled before the measurement can be performed: Date of Birth Personal ID or Patient Code Gender Reference set file://C:\Medikro\Spiro2000\Language\English\Help\Spiro2000Help.htm 11/17/2009 Medikro Windows Spirometer Page 34 of 81 Height Weight The fields include the following information: Last name / First name: Name of the person. If the person has a middle name, one can enter either an initial or the middle name into the same field with the first name. For example: First name: John F Last name: Smith Date of Birth: Enter the data as instructed - 2 digits for the day, 2 digits for the month and 4 digits for the year. The order of the data entry is taken from the regional settings of the PC to reflect the local date format. Age: The program will calculate the age of the patient automatically. Personal ID: Enter the ID of the patient. In some countries the social security code is used for this purpose. For example: 1234 Patient Code: Open field for any alphanumeric code used by the establishment / clinic / hospital to identify the patient. For example: A1B2C3D4 Gender: Select from the following options: Male / Female. ”No information” option is just for indicating, that the selection has not been done, yet. Ethnic Group: Indicates the ethnic origin of the person. Use the drop down menu for a proper selection. Ethnic group information does not change the calculation criteria for lung function, expect when NHANES III_W is chosen for the person’s reference set (see the chapter 4.3.4.7 Reference Set) Reference Set: Select the appropriate reference set. The set represents the predicted pulmonary function values for the patient. The selection is valid only during the current session. When the session is closed, the default reference set becomes valid again. The default value of the reference set can be changed as explained in the chapter 4.3.4.7 Reference Set. Height: Enter the height in centimeters, or in feet and inches. For example: 177 (centimeters) or 5 (feet) and 6 (inches). Weight: Enter the weight in kilograms (kg) or in pounds (lb). For example: 56 (kg) or 135 (lb.) BMI: The program will calculate automatically the Body Mass Index. The formula for BMI is as follows: BMI = weight (kg) / height2 (m2). Profession: Enter the profession of the patient. Smoking: Select from the following options: Yes / No / No information. Illness: The recording of relevant illnesses of the patient. Medication: The recording of relevant medication of the patient. Current problem: The recording of any current medical problem. Comment: Enter any additional observations. Co-operation: Select from the following options: Good / Satisfactory / Poor / No information. Operator: Indicates the operator identification entered at Log On phase of the program. file://C:\Medikro\Spiro2000\Language\English\Help\Spiro2000Help.htm 11/17/2009 Medikro Windows Spirometer Page 35 of 81 Ventilation function: Indicates the status of the ventilation function. The program will calculate this after the measurements have been completed. Result of Bronchodilatation Test: Shows the comparative result of the pre- and post phase tests. The program will calculate this, if post measurements have been accomplished. Interpretation Text: Interpretation of the session results by consulting doctor. Free text format (Note: only the five first rows can be printed in a report). 6.3 Retrieving Personal Information and Session Data from the Database Access the patient database (Figure 6-3) by pressing the DataBase button at the Personal Information screen (Figure 6-2). Figure 6-3. Database / Choose a Person and a Session. The selection of the person is made in the list box called "Persons in the database", which includes a list of the names of all patients in alphabetical order according to family name and then first name. The name of a patient can be searched by scrolling down the name list or by using an automatic name search function. The name search is straightforward. Enter one or more first letters of the last name into the Last name field. The list of names displays now the names starting with these specified letters. The name search is more accurate the more letters are used in the search (Figure 6-4). file://C:\Medikro\Spiro2000\Language\English\Help\Spiro2000Help.htm 11/17/2009 Medikro Windows Spirometer Page 36 of 81 Figure 6-4. Database / Choose a Person and a Session, Person search. You can also use person's Date of birth, Personal ID and/or Patient Code as search criteria. The search fields include Date of birth: Enter one or more first numbers of the date in an yyyymmdd format. For example: 19550228 Personal ID: Enter one or more first alphanumeric characters of the personal ID. For example: 1234 Patient code: Enter one or more first alphanumeric characters of the code. For example: A1B2C3D4 The search result is shown in the ”Persons in the database” field. After the person has been selected by highlighting the person's name, pressing Choose the Person's Session button will open a choose session window. This window will show all previous sessions in time sequence (Figure 6-5). file://C:\Medikro\Spiro2000\Language\English\Help\Spiro2000Help.htm 11/17/2009 Medikro Windows Spirometer Page 37 of 81 Figure 6-5. Database / Choose a Session. The operator can select either a new session or a possible previous session. If the operator selects a new session, all personal information from the latest session (if it exists) will be displayed in the Personal Information window. The operator can now update the information and start a new measurement by pressing the Meas. button (Figure 6-6) in the Personal Information window. If the operator selects a previous session, all personal data and measurement results of the session are displayed in the Personal Information window. The operator can now inspect the previous measurement results and curves by pressing first the Meas. button (Figure 6-6) in the Personal Information window Figure 6-6. Meas. button. and then by selecting the needed result or curve layout by pressing one of the buttons in "Show Curves" or "Show Results" button groups (Figure 6-7). Figure 6-7. "Show Curves" and "Show Results" button groups. For more detailed information, see the chapter 8 Analyzing Results. The Final Report of each session can also be investigated. file://C:\Medikro\Spiro2000\Language\English\Help\Spiro2000Help.htm 11/17/2009 Medikro Windows Spirometer 7 7.1 Measurement Measurement Steps 1 2 3 4 5 6 7.2 Page 38 of 81 Select patient data or enter new patient data Select measurement view Select measurement type: TV, VC, FEVC, FIVC, FVC, MVV Perform manoeuvres View the results and interpretation Print out the report Getting prepared for the Measurements Please note the following: Before starting the actual measurements or calibration, it is recommended to allow the spirometer device to have a brief warm-up period of 5-10 minutes to reach a thermal equilibrium. A spirometer connected to a PC will start to warm up immediately after Windows is started. This is a normal and general procedure for most of the high-precision measurement devices. When the personal information window is open, Meas. button will open the measurement view (Figure 7-1). Figure 7-1. The Measurement View. The patient data is now displayed on the top of the screen in the Title Bar. All functional buttons are in active state. The key features of the Measurement Window are: 1. 2. 3. 4. 5. 6. 7. 8. 9. 10. 11. 12. Title Bar with Patient Information Tool Bar with Functional Buttons Menu Bar with Drop Down Menus Session Status Summary Measurement Manoeuvre Buttons Environmental Conditions Timer / Time of Day / Date FV Graph VT Graph Result Table Flow and Duration Indicator Reproducibility Indicator (appears on display after the measurement has been stopped, see Figure 7-8, Figure 8-2, Figure 8-4 and Figure 8-5) file://C:\Medikro\Spiro2000\Language\English\Help\Spiro2000Help.htm 11/17/2009 Medikro Windows Spirometer Page 39 of 81 Explain the measurement and prepare the patient for the manoeuvre before the actual measurement. The measurement should also be demonstrated to the patient. Pay attention to correct posture with head elevated, complete inhalation, Flow Transducer position and complete exhalation. All manoeuvres should be started and finished with resting tidal breathing. The actual maximal exhalation effort of FEVC and FVC should last at least 6 seconds (3 s for children aged < 10 yrs, ATS/ERS 2005). MVV manoeuvre should be started only after the patient is breathing maximally and the manoeuvre should last 12 -15 seconds (ATS 1994 & ATS/ERS 2005) or 15 seconds (ERS 1993). It is recommended to allow the patient to perform 1-2 sample manoeuvres before the measurement. 7.3 Starting the Measurement Select the type of manoeuvre to start a measurement (Figure 7-2). Figure 7-2. Choices of Manoeuvres Button Group Before Start of Measurement. There are following choices displayed as buttons on the lower left side of the screen: Button TV VC FEVC FIVC FVC MVV Manoeuvre Tidal Volume Slow Vital Capacity Forced Expiratory Vital Capacity (only expiratory results will be calculated) Forced Inspiratory Vital Capacity (only inspiratory results will be calculated) Forced Vital Capacity (FEVC+FIVC = both expiratory and inspiratory results will be calculated) Maximum Voluntary Ventilation If you want to start by only monitoring the signal before any of the manoeuvres, you can accomplish it via a menu option (see the chapter 14.2.2.1 Start). Note: by choosing variables for display (see the chapter 4.5.1 Variables for display and print) you can also affect which manoeuvre buttons are active. E.g. if none of TV manoeuvre variables (TV, FR or MV) is chosen, the TV manoeuvre button is deactivated (grayed). The same principle is applied also to VC, FEVC, FIVC, FVC and MVV manoeuvres. The pressing of any manoeuvre buttons starts the measurement. Click the appropriate manoeuvre button when the patient is ready. The program allows the patient to complete the measurement in 60 seconds. (Well trained patients can complete several manoeuvre types during the 60 second measurement time. You can start a new manoeuvre immediately after another without stopping the measurement by clicking the respective button.) 7.4 Stopping the Measurement When you start the measurement, the Stop button (Figure 7-3) will change from a deactivated (grayed) state into an active state (Figure 7-4). Figure 7-3. Choices of Manoeuvres Button Group Before Start of Measurement. Figure 7-4. Choices of Manoeuvres Button Group After Start of Measurement. file://C:\Medikro\Spiro2000\Language\English\Help\Spiro2000Help.htm 11/17/2009 Medikro Windows Spirometer Page 40 of 81 The measurement can be stopped with the Stop button before the 60 seconds are finished. The time of the measurement can be monitored from the volume/time graph on the screen (Figure 7-5) or from the timer. The measurement will be stopped automatically after 60 s, if not stopped by the button. Figure 7-5. Volume Time Graph. After stopping the measurement, the program will show instantly the FEVC, FIVC or FVC envelope curve, slow VC or MVV curves as well as the measurement results in the measurement window. This numerical output includes Reference values (Ref), results of the current measurement (Curr), best results of the session (Best) and the difference between the Current and Best result (Curr - Best). 7.5 Acceptance of the Measurement After stopping the measurement the program will request an acceptance of the measurement (Figure 7-6). Figure 7-6. Accept Measurement. You can accept the measurement or reject it based on the manoeuvre start (extrapolated volume), duration (see Figure 7-7) and possible manoeuvre artefacts (submaximal effort, cough, glottis closure…). The Reproducibility Indicator (see the chapter 7.7 The Reproducibility Indicator) may help in evaluating the magnitude of the artefacts. For more details of accepting the manoeuvre see [4]. You can start a new measurement with the same or a new manoeuvre as soon as the patient is ready. 7.6 The Flow and Duration Indicator During measurement the expiratory and the inspiratory manoeuvres can be monitored from the Flow and Duration Indicator ( Figure 7-7). Figure 7-7. Flow and Duration indicator. It indicates the volume change in 1 second (ATS 1994 or ATS/ERS 2005 criteria selected) or in 0.5 seconds (ERS 1993 file://C:\Medikro\Spiro2000\Language\English\Help\Spiro2000Help.htm 11/17/2009 Medikro Windows Spirometer Page 41 of 81 criteria selected). When there is no horizontal bar to indicate a volume change in specified time, the “no change” criterion to end or reverse the expiratory / inspiratory manoeuvre is reached. The time of the last expiration is also shown during FEVC and FVC manoeuvres. The expiration should last at least 6 seconds (3 s for children aged < 10 yrs, ATS/ERS 2005). 7.7 The Reproducibility Indicator After the measurement the Reproducibility Indicator will tell you if the measurements will meet the reproducibility criteria for the spirometric test (Figure 7-8). Figure 7-8. Reproducibility Indicator. If the criteria are not fulfilled the program will flag the results in red. For more details of reproducibility, see APPENDIX: Reproducibility Indicators and [4]. 7.8 Session Status Summary The program monitors and reports the number of Pre- and Post- measurements performed within one session. The operator can review the session status from the status summary and activate or inactivate the viewing of curves of any measurement within a session from the respective check box, see Figure 7-9. Note: this does not affect the calculated results. If the user wants to remove a measured curve from the calculations, it can be done only by deleting it, see the chapter 7.9 Deleting an Individual Measurement. The program facilitates up to 8 pre- and 8 post- measurements as recommended by ATS and ERS. Pre indicates Basal Phase and Post indicates Bronchodilatation Phase None / all commands will activate or inactivate the viewing of all Pre- or Post- measurement curves respectively. Figure 7-9. Session Summary Status. 7.9 Deleting an Individual Measurement You can delete signals of the current or reviewed session by selecting the following command path: Session Delete Signal In order to delete a signal select it from the list and press OK. To make a multiple selection, press SHIFT while choosing signals with a mouse click from the database list (Figure 7-10). file://C:\Medikro\Spiro2000\Language\English\Help\Spiro2000Help.htm 11/17/2009 Medikro Windows Spirometer Page 42 of 81 Figure 7-10. Session / Delete signal(s). 7.10 Measurements with the Incentive The incentive screen is a motivator for children to perform an acceptable spirometry study. It can be viewed at the measurement computer monitor or at external computers that are connected to the same network. Before the first use of the incentive, it is recommended to read through the chapter 4.6 Incentive, which covers the configuration and setting up of the incentive in details. In this chapter we deal with the usage of incentive during the measurement. If the incentive settings have been configured properly and the incentive screen has been selected to display at the measurement computer, the spirometry software will launch the Internet Explorer web browser. Before the measurement is started the incentive applet will be rotating the scenery around the frog, see Figure 7-11. Figure 7-11. Incentive applet in an idle state. When the measurement is started, (see 7.3 Starting the Measurement) the incentive applet will set up to a stand-by state and the frog will be seen from a side view (Figure 7-12). Now it is time to start the study. file://C:\Medikro\Spiro2000\Language\English\Help\Spiro2000Help.htm 11/17/2009 Medikro Windows Spirometer Page 43 of 81 Figure 7-12. Incentive applet in a stand-by state. During the measurement, the frog will react to the ventilation performance by crouching down at the deep inhalation and making a leap at the consecutive exhalation. Note that in order to get the frog to crouch and leap the inhalation must be deep enough, at least 50 % of the current session’s pre phase best FVC (if the current session does not have FVC, the previous session’s pre phase best FVC is used instead. If even that does not exist, the reference value is used). The goal for the jump is the opposite lily pad, which corresponds a successful FVC (Figure 7-13). If the FVC fails, the frog will splash into the water (Figure 7-14). Small tabs at the upper part of the screen are called success flags and indicate by color if the criteria of the variables have been fulfilled. A tab with a dark yellow background means that the value has not been calculated yet. A tab with a bright yellow background means that the measured value fulfils the criterion. A tab with a bright red background means that the measured value does not fulfill the criterion. Note that the spirometry software makes a prediction for the FVC in the middle part of the exhalation. According to the prediction, the frog will land in the water on the opposite lily pad. However, it is possible that the frog will splash into the water even if the FVC succeeds. This can happen if the exhalation gets better at the latter half of exhalation. A clear indicator of a successful FVC is that the frog will jump up and down and raise its hands after the leap (Figure 7-13). file://C:\Medikro\Spiro2000\Language\English\Help\Spiro2000Help.htm 11/17/2009 Medikro Windows Spirometer Page 44 of 81 Figure 7-13. Incentive applet after a successful exhalation. Figure 7-14. Incentive applet after a failed exhalation. file://C:\Medikro\Spiro2000\Language\English\Help\Spiro2000Help.htm 11/17/2009 Medikro Windows Spirometer 8 Page 45 of 81 Analyzing Results You can analyze the results as graphs or as numeric results, or as a combination of both. According to your choice, select any of the buttons “VT”, “VT6”, “FV” or “Envel.” under “Show Curves”, or any of “Meas.”, “Best” or “Trend” under “Show Results” (Figure 8-1). Figure 8-1. "Show Curves" and "Show Results" button groups. Note the following details in the representation of figures: A ‘*’ mark in front of reference value (for example *60%) indicates that the value of the measured variable is outside of the 95 % normal range. A ‘*’ mark in front of the Post-Pre difference values indicates a significant change of values in bronchodilatation test. Red font color of the figure indicates that the reproducibility of the value fails (see APPENDIX: Reproducibility Indicators). 8.1 Curves VT will show the Volume/Time curve of the measurement(s) FV will show the Flow/Volume curve of the measurement(s) Envel. will show the envelope curve of the measurement(s) VT6 will open a separate floating window showing the 6 s Volume/Time curve of the measurement(s) The data of the session is displayed as curves and tables (Figure 8-2, Figure 8-4, Figure 8-5, Figure 8-3). 8.1.1 VT, Volume/Time Curves Figure 8-2. Show Curves in volume/time curve format. file://C:\Medikro\Spiro2000\Language\English\Help\Spiro2000Help.htm 11/17/2009 Medikro Windows Spirometer 8.1.2 Page 46 of 81 VT6, 6 s Volume/Time Curves Pressing the VT6 button opens a floating window (Figure 8-3), which shows envelopes of expiratory 6 s volume/time curves. Clicking the X-button at its upper right corner will close the VT6 window. The VT6 window can be kept open during the measurements to help monitor duration (at least 6 seconds or 3 s for children aged < 10 yrs recommended) and performance of the expiratory manoeuvres (FEVC, FVC). Figure 8-3. Floating VT6 window showing 6 s volume/time curves. 8.1.3 FV, Flow/Volume Curves Figure 8-4. Show Curves in flow/volume curve format. 8.1.4 Envel., Envelope Curves file://C:\Medikro\Spiro2000\Language\English\Help\Spiro2000Help.htm 11/17/2009 Medikro Windows Spirometer Page 47 of 81 Figure 8-5. Show Curves in flow/volume envelope curve format. 8.1.5 Magnification of the Curves The V/T, VT6, F/V and Envel curves can be magnified for more detailed inspection. Draw a marquee around the interesting view area of the curve by clicking and dragging from one corner of the area to the opposite corner (Figure 8-6). The selected part of the curve will be magnified. Note: the aspect ratio may not remain the same (Figure 8-7). Figure 8-6. Draw a marquee around the interesting view area. Applies also to VT6 window. file://C:\Medikro\Spiro2000\Language\English\Help\Spiro2000Help.htm 11/17/2009 Medikro Windows Spirometer Page 48 of 81 Figure 8-7. After drawing a marquee the curve is magnified for more detailed viewing. To return to the original graph size select Device / Normalize Graph command or click the VT, FV, Envel. or VT6 button (Show Curves group). 8.2 Numerical Results The following commands will represent the measurement results in numerical formats: 8.2.1 Meas. will show the results of all measurements Best will show the results of best measurements and a histogram Meas., Results of all Measurements This choice will show the results of all measurements in numerical format (Figure 8-8). The list of available variables used in Spiro2000 is described in APPENDIX: Variables. file://C:\Medikro\Spiro2000\Language\English\Help\Spiro2000Help.htm 11/17/2009 Medikro Windows Spirometer Page 49 of 81 Figure 8-8. Numeric results in tabular format. Up to eight Pre- and eight Post- measurements are shown. Measurement results include the result of each measured variable as well as percentage comparison to Reference Values. 8.2.2 Best, the Best Results as a Histogram This choice will show the results of best measurements both in numerical format and as a histogram (Figure 8-9). Figure 8-9. Show Best Results. Best results of the Pre- and the Post- measurements are compared to Reference Values. Also the Post - Pre difference is shown. file://C:\Medikro\Spiro2000\Language\English\Help\Spiro2000Help.htm 11/17/2009 Medikro Windows Spirometer Page 50 of 81 The best results are also displayed as a Histogram. It will show the 95 % normal range for each measured variable as a green bar. The best Pre- result is indicated with a blue circle and the best Post- result with a red square. The histogram results will give direct indication on the severity of a limited lung function. 8.3 Trend Trend allows the inspection of the trend of each individual variable in a graphical (Figure 8-10) and numeric table (Figure 8-13) form. Figure 8-10. Trending in a graphical presentation form. The operator can select one or several variables for the trending inspection from the Choose Variables field (Figure 8-11). The selected variables and their dimensions are shown on the top left hand side of the trend graph. Several variables can be selected by pressing SHIFT while making a mouse click. file://C:\Medikro\Spiro2000\Language\English\Help\Spiro2000Help.htm 11/17/2009 Medikro Windows Spirometer Page 51 of 81 Figure 8-11. Trending, interactive elements. The operator can also select the sessions to be excluded from the trending inspection. The exclusion of the sessions can be selected from the Exclude Sessions field (Figure 8-11). Several sessions can be selected by pressing SHIFT while making a mouse click. New results are calculated automatically for immediate trending inspection. X-axis variable can be selected from the appropriate field (Figure 8-11). There are three choices: Date indicates the date of the session Age indicates the age of the person at the time of the measurements Session indicates the sequence number of the sessions The "% ref" button (Figure 8-12) activates the inspection of results in relation to reference (predicted) values. The results are expressed as a percentage (%) of reference value, provided the selected variable has a reference value. file://C:\Medikro\Spiro2000\Language\English\Help\Spiro2000Help.htm 11/17/2009 Medikro Windows Spirometer Page 52 of 81 Figure 8-12. Trending, in relation to reference values. Figure 8-13. A separate floating window shows trending in a numeric table presentation. The “Table” button opens a floating window that contains a numeric table of trending data (Figure 8-13). A drop down selector “Variables” in the upper left corner of the window shows the list of variables that the operator has chosen from the previous window (Figure 8-11). By using this selection, the operator can choose the variable of which trend data is being studied at a time. 8.4 Printing a Current Window Whenever you choose the Print button, the software will print the content of the currently shown in a measurement window. This allows you to select (see the chapter 7.8 Session Status Summary) and print any measurement curve individually. file://C:\Medikro\Spiro2000\Language\English\Help\Spiro2000Help.htm 11/17/2009 Medikro Windows Spirometer 9 9.1 Page 53 of 81 Interpretation Ventilation Function Spiro2000 interprets the severity of lung function as described in the chapter 4.3.4.1 Ventilation Function Interpretation. The result is shown in the Personal Information window (Figure 9-1) and in the first page of Final Report (Figure 10-4). 9.2 Bronchodilatation Test Result Spiro2000 interprets the bronchodilatation test result as described in the chapters 4.3.4.2 Bronchodilatation Test Interpretation and 4.3.4.3 Bronchodilatation Test Comparison. The result is shown in the Personal Information window (Figure 9-1) and in the first page of Final Report (Figure 10-4). 9.3 Manual Interpretation Text Interpretation Text is given by a consulting doctor. The text is given in the Personal Information window (Figure 9-1) and shown in the first page of Final Report (Figure 10-4). Note: only the five first rows can be printed in a report. Figure 9-1. Ventilation Function, Bronchodilatation Test Result and Manual Interpretation Text file://C:\Medikro\Spiro2000\Language\English\Help\Spiro2000Help.htm 11/17/2009 Medikro Windows Spirometer Page 54 of 81 10 The Final Report The Final Report summarizes the results and interpretation of the current spirometry session. It can also present the summary of patient’s background in a form of graphical and numerical trend data. The standard final report contains at minimum four pages: The first page shows the best (representative) results. The results of individual Pre- and Post- measurements are shown in the second and third page. Pages from number four forward are dedicated to trending with an individual page for each selected trending variable. The number of trending pages depends on how many trending variables the user has selected, one at minimum (see the chapter 8.3 Trend). In more detailed, the report pages include the following information (Figure 10-2 and Figure 10-4): personal information, showing the patient name and ID is selectable (on every page) smoking history (page 1) clinical information (page 1) best results as tables and histogram (pages 1) reproducibility of the measurements (pages 1-3), selectable for the first page numerical values of the individual Pre- and Post- measurements, showing the curves is selectable (pages 2-3) numerical values of the selected trending variables (from page 4 forward) interpretation (page 1) envelope curves of the individual Pre- and Post- measurements (page 2) flow-volume curves of the individual Pre- and Post- measurements (page 3) On the first page, the user can select two graphs to display by selecting two of the following check boxes (at the upper left corner of the report page): best curves trending graph VT6 curves Note the following details in the representation of figures: A ‘*’ mark in front of reference value (for example *60%) indicates that the value of the measured variable is outside of the 95 % normal range. A ‘*’ mark in front of the Post-Pre difference values indicates a significant change of values in bronchodilatation test. Red font color of the figure indicates that the reproducibility of the value fails (see APPENDIX: Reproducibility Indicators). 10.1 Viewing the Final Report The final report can be viewed using the Report button (Figure 10-1). Figure 10-1. Report Button. file://C:\Medikro\Spiro2000\Language\English\Help\Spiro2000Help.htm 11/17/2009 Medikro Windows Spirometer Page 55 of 81 Figure 10-2. Show the Final Report. You may choose, which page opens first, when viewing the report, see the chapter 4.1.2 The Final Report Template Use <<Prev, 1, 2, 3, 4 and Next>> buttons in the upper part of the screen to change the page of the final report. The scroll bar is available on the right margin of the window to allow scrolling the final report page on the screen. 10.2 Printing the Final Report When the Final Report window (Figure 10-2) is shown, you can use the Print button (Figure 10-3) to print the Final Report. Figure 10-3. Print Button. file://C:\Medikro\Spiro2000\Language\English\Help\Spiro2000Help.htm 11/17/2009 Medikro Windows Spirometer Page 56 of 81 Figure 10-4. Standard final report. 10.3 10.3.1 Sending and Receiving the Final Report Sending the Final Report The report is created in HTML format and can be viewed by any browser such as Internet Explorer or Netscape Navigator. When you click the Report button, a Final Report is generated into the folder file://C:\Medikro\Spiro2000\Language\English\Help\Spiro2000Help.htm 11/17/2009 Medikro Windows Spirometer Page 57 of 81 C:\Program Files\Medikro\Temp\Report\. The Final Report contains a minimum of four pages and consists of the following files: M8124-3-multi.htm (page 1) Best Curves.png (page 1) Trend.png (page 1) VT6 Curves.png (page 1) M8124-5-multi.htm (page 2) PreEnvelopeCurves.png (page 2) PostEnvelopeCurves.png (page 2) M8124-6-multi.htm (page 3) PreFlowVolumes.png (page 3) PostFlowVolumes.png (page 3) M8124-7_1-multi.htm (page 4) … M8124-7_n-multi.htm (page n) TrendTVar1.png (page 4) … TrendTVarn.png (n refers to page number) Report Logo.gif (all pages) All of these files are needed to display the full final report, but you can also choose to select files for certain page(s) of the final report. Drag and drop the files to an e-mail message as an attachment and you can send the Final Report in an e-mail to the recipient. 10.3.2 Receiving the Final Report The report is created in HTML format and can be viewed by any browser such as Internet Explorer or Netscape Navigator. When you receive a Final Report via e-mail or diskette, you can simply double click the file M8124-3-multi.htm and the first page of the Final Report will be opened in the browser screen. You can also print the file with the browser if you want. file://C:\Medikro\Spiro2000\Language\English\Help\Spiro2000Help.htm 11/17/2009 Medikro Windows Spirometer Page 58 of 81 11 Sending and Receiving the Session Data 11.1 Sending the Session Data The data of a session (or sessions) can be stored in a file. This file is a SpiroXML document. The export session data option (see the chapter 4.4.8 How and What to Export) defines whether only the data of the current session or all sessions of the current person will be exported. Exporting all sessions is intended especially to sending data for trending. First you have to either perform a new session or retrieve data of an old session from the database. When you press the Export button in a personal database window, a new window is opened and you can give a name to the data file. The session data file has an extension ".xml". By default the session data will be saved into a folder "Datatransfer". A different default folder can be created as described in the chapter 4.1.1 Location of Data. If you want to send the session data as an e-mail attachment, drag and drop the file on an e-mail message. Now you are ready to send the e-mail to the recipient. You can also copy the file to a diskette and send the diskette by mail. 11.2 Receiving the Session Data The data of a session (or sessions) can be stored on a file. This file is a SpiroXML document. When you receive the SpiroXML document (extension "XML") you can copy it into the Datatransfer folder. When you press the Import Button in a personal database window, a new window is opened and you can select the XML file that you wish to open. The data of the session(s) found in the file is saved to your database according to the HIS import mode options (see the chapter 4.4.3 HIS/manual Import Mode) and the operation after this is similar to HIS Import (from step 2 on) explained in the chapter 12.1.2 Checking Import Person's Identity. Note that if the mode is "Bypass", incoming information is handled in a temporary, local database. The change back to the use of the normal database requires a new log in. By default the Session Data folder is C:\Medikro\Datatransfer. A different default folder can be created as described in the chapter 4.1.1 Location of Data. file://C:\Medikro\Spiro2000\Language\English\Help\Spiro2000Help.htm 11/17/2009 Medikro Windows Spirometer Page 59 of 81 12 The Hospital Information Systems Data Interchange Spiro2000 software can be connected to a variety of Hospital Information Systems (HIS). This means that data can be interchanged with Spiro2000 and HIS (imported/exported). The operations mentioned below require, that either "GDT" or "XML" has been chosen for Spiro2000 HIS System (see the chapter 4.4.1 Hospital Information System Interface). 12.1 Import The import consists of three steps: receiving an input file, checking imported person's identity and selecting a session for the imported person. 12.1.1 Receiving an input file Receiving an input file is semiautomatic. The existence of the input file is checked by the software after every log on (Figure 12-1). If it is found, import will start and will proceed via the person identity check up to the measurement view (Figure 7-1). The location and name of the input files are defined in the settings (see the chapter 4.4.2 HIS Input files). Figure 12-1. Log On Screen. 12.1.2 Checking Import Person's Identity This chapter applies only if the XML interface has been chosen. For GDT the import is always unchecked. The import person's identity will be always checked if this has been selected (see the chapter 4.4.6 Identification of the Imported Person) and the Import mode is not "Bypass" (see the chapter 4.4.3 HIS/manual Import Mode). However, if there is an error in the person's identity, the check will be executed despite the settings. The check is done in a "Check Import Person's Identity" dialog window (Figure 12-2). The window allows the user to check that the identity of the imported person matches the identity of the person found in the database. It is also possible to change identification criteria or edit incoming personal information in order to get the right match or to correct possible errors (see list below). Whether the edited information is transferred to a database depends on the Import mode. file://C:\Medikro\Spiro2000\Language\English\Help\Spiro2000Help.htm 11/17/2009 Medikro Windows Spirometer Page 60 of 81 Figure 12-2. Check Import Person's Identity Window. The following identification errors are possible (because the database must have unique PID and PatientCode values): Several persons found in the database (the match must be unique) Another person with the given PID exists in the database (this is possible if the criteria does not include PID) Another person with the given Patient Code exists in the database (this is possible if the criteria does not include Patient Code) The input file has neither Personal ID nor Patient Code for the imported person (every person must have either Personal ID or Patient Code in the database) The errors are recognized before saving data to the database and they are shown in the dialog window. If there is an identification error, the acceptance of the person is not possible without corrections. After accepted person identification, the input data is saved to a database. If the input file includes several persons, each of them is checked and the data saved separately. The XML input file is deleted if all persons were accepted and there were no other errors during import. If the identification of a person is not accepted, the importing is interrupted and will be started again in the next log on (as explained in the previous chapter). 12.1.3 Selecting a session for the person imported to the system After the person(s) identification, the software selects automatically the first session of the first person included in the import file or a new session, if there is no session information included for the first person. If automatic proceed into measurement has been chosen (see the chapter 4.4.5 Automatic Proceed into Measurement), the selected session is shown in a "Choose a Session" window only for a short time and the software proceeds automatically to the measurement view (Figure 7-1). Session reselection can be done manually afterwards as described in the chapter 6.3 Retrieving Personal Information and Session Data from the Database. If the automatic proceed into measurement has not been chosen, the software leaves the "Choose a Session" window (Figure 12-3) open and waits for the user response. file://C:\Medikro\Spiro2000\Language\English\Help\Spiro2000Help.htm 11/17/2009 Medikro Windows Spirometer Page 61 of 81 Figure 12-3. Choose a Session Window. 12.1.4 Handling errors For a successful import the input file must be formally correct (the XML file is a valid XML document, the GDT file has right check sums). Additionally XML input file must have proper values for the variables which determine the predicted values. The variables are shown below: Height Weight Gender Date of Birth If errors are found in a XML input file, they are reported and the file is moved to the "..\Medikro\HIS Log\Incorrect inputs"folder. Note: if there is a previous input file with the same name, it is overwritten without a warning. 12.1.5 Special Features of GDT Import The import person's identity is not checked. Only personal data is imported directly to the database and the Import mode is always "Insert" (see the chapter 4.4.3 HIS/manual Import Mode). Incoming session data will be imported only if "New session" is chosen for the imported person and the session is saved. The GDT input file is deleted only after a successful export (see the chapter 12.2.2 GDT Export). 12.2 12.2.1 Export XML Export The HIS export will be accomplished when closing a session (or it can also be omitted if the export option is "No Export"). The export settings (see the chapters 4.4.7 HIS Output files and 4.4.8 How and What to Export) define whether and how the output file is produced. 12.2.2 GDT Export GDT export is possible only for a new session of the person last imported (and Spiro2000 software has not been closed after that). Export is accomplished when displaying a report. The GDT input file is deleted after the successful export. 12.3 Logging This chapter applies only if the XML interface has been chosen; for GDT there is no logging. All import and export operations are logged to a file located in "..\Medikro\HIS Log" folder. Information older than one week will not be preserved. The log file is named "SpiroHISLog.xml" and it will include following information: Date and time file://C:\Medikro\Spiro2000\Language\English\Help\Spiro2000Help.htm 11/17/2009 Medikro Windows Spirometer Page 62 of 81 Operator Operation type (import or export) Input or output file name Success info Reason for error in unsuccessful operations file://C:\Medikro\Spiro2000\Language\English\Help\Spiro2000Help.htm 11/17/2009 Medikro Windows Spirometer Page 63 of 81 13 Keyboard Shortcuts Keyboard Shortcut Ctrl+Shift+C Ctrl+I F5 F6 F7 F8 F9 F10 Ctrl+M Ctrl+V Ctrl+6 Ctrl+F Ctrl+E Ctrl+A Ctrl+B Ctrl+T Ctrl+R Ctrl+P Ctrl+H Ctrl+X Enter Esc Function in Spiro2000 Start Calibration Open Personal Information Start/Finish TV manoeuvre Start/Finish VC manoeuvre Start/Finish FEVC manoeuvre Start/Finish FIVC manoeuvre Start/Finish FVC manoeuvre Start/Finish MVV manoeuvre Start Measurement Show Volume/time Curve(s) Show 6s Volume/time Curve(s) Show Flow/volume Curve(s) Show Envelope f/v Curve(s) Show Results of Measurements Show Representative Results Show Trend Show Final Report Print Current Window Show Help Exit Positive response - Log On, OK, Yes etc., if a dialog window is open 1) Negative response - Cancel, Close, Exit, No etc., if a dialog window is open 2) Stop Measurement, if a measurement is going on 3) Exit, otherwise file://C:\Medikro\Spiro2000\Language\English\Help\Spiro2000Help.htm 11/17/2009 Medikro Windows Spirometer Page 64 of 81 14 Drop Down Menus The drop down menus of the Spiro2000 offer you alternative ways to use the program package. 14.1 In the Opening View The following drop down menus will appear in the "Opening View" (Figure 3-4): Database Device Help 14.1.1 Database 14.1.1.1 Personal Information Opens the Personal Information window. 14.1.1.2 Delete Person(s) or Session(s) Allows you to delete persons and/or sessions from the database. The selection is similar to searching for a patient. To make a multiple selection press SHIFT while selecting person(s) with a mouse click from the database (Figure 14-1). Figure 14-1. Database / Delete Person(s) or Session(s). 14.1.1.3 Page Setup Opens the Page Setup window and gives the opportunity to adjust paper settings for printing. 14.1.1.4 Exit Opens the Log On window, which gives the choice to exit the program or to log on. 14.1.2 Device 14.1.2.1 Calibrate file://C:\Medikro\Spiro2000\Language\English\Help\Spiro2000Help.htm 11/17/2009 Medikro Windows Spirometer Page 65 of 81 Allows you to calibrate the spirometer as described in the chapter 5 Calibration. 14.1.2.2 Settings Allows you to define all Spiro2000 settings as described in the chapter 4 Setup. 14.1.3 Help 14.1.3.1 Show Help Displays this Spiro2000 User's Manual. 14.1.3.2 About Displays a system summary window (Figure 14-2). The table inside the window contains information about: Spirometer hardware and its driver Current status of the spirometer Calibration details System configuration, hardware details, memory usage Operating system, Internet Explorer and Java virtual machine details Communication details and status of the incentive Database details Information of the About window is useful if the user has a problem when using the software. Especially when the Spiro2000 software user needs to contact Medikro Technical Support to solve a problem, it is highly recommended that this information be sent to Technical Support. The whole content of the About window can be saved to a separate report file by selecting Save to file… from the upper right corner of the window. This generates an XML-formatted file containing the window information and also the INI-file content. The file produced can be then easily attached to e-mail and sent to Medikro Technical Support should assistance be needed. Figure 14-2. Help / About file://C:\Medikro\Spiro2000\Language\English\Help\Spiro2000Help.htm 11/17/2009 Medikro Windows Spirometer 14.2 Page 66 of 81 In the Measurement View The following drop down menus will appear in the "Measurement View" (Figure 7-1): Session Measure Device Show Help 14.2.1 Session 14.2.1.1 Personal Information Opens the Personal Information window. 14.2.1.2 Delete Signal Allows you to delete individual measurements as described earlier in the chapter 7.9 Deleting an Individual Measurement. 14.2.1.3 Page Setup Opens the Page Setup window and gives the opportunity to adjust paper settings for printing. 14.2.1.4 Print Current Window Prints the current window (see the chapter 8.4 Printing a Current Window) 14.2.1.5 Exit Opens the Log On window, which gives the choice to exit the program or to log on. 14.2.2 Measure 14.2.2.1 Start Starts the spirometric measurement. Note: With this selection the measurement begins and curves are drawn on the screen, but no results are calculated until you press some of the manoeuvre buttons. This is intended mainly for the MVV manoeuvre to monitor the signal before the start of the manoeuvre. 14.2.2.2 Stop Stops any spirometry measurement manoeuvre earlier than the maximum time of 60 seconds. 14.2.3 Device 14.2.3.1 Calibrate Allows you to calibrate the spirometer as described in the chapter 5 Calibration. 14.2.3.2 Settings Allows you to define all Spiro2000 settings as described in the chapter 4 Setup. 14.2.3.3 Normalize Graph Returns the magnified graph to its original size. 14.2.4 Show In this menu you will have the following choices: Volume/time Curve(s) file://C:\Medikro\Spiro2000\Language\English\Help\Spiro2000Help.htm 11/17/2009 Medikro Windows Spirometer Page 67 of 81 6 s Volume/time Curve(s) Flow/volume Curve(s) Envelope flow/volume Curve(s) Results of the Measurements Representative (Best) Results Trend Final Report The functions of these choices are the same as when using Show Curves and Show Results buttons (see the chapter 8 Analyzing Results). 14.2.5 Help 14.2.5.1 Show Help Displays this Spiro2000 User's Manual. 14.2.5.2 About Displays the system summary window, see the chapter 14.1.3.2 About. file://C:\Medikro\Spiro2000\Language\English\Help\Spiro2000Help.htm 11/17/2009 Medikro Windows Spirometer Page 68 of 81 15 Maintenance The Flow Transducer is for single use only. Change a clean Flow Transducer for every patient. Check the pressure tube and replace it if it is leaking or unclean. It is recommended to change the pressure tube after 300 patients or four times a year. Calibrate the spirometer carefully with a calibration syringe as described earlier in the chapter 5 Calibration. Perform a new calibration daily and always when starting to use a new lot of Flow Transducers. In addition, calibration should be repeated in case there is a notable change during the day in environmental conditions (ambient temperature, pressure or humidity). The spirometer unit does not normally need any maintenance. file://C:\Medikro\Spiro2000\Language\English\Help\Spiro2000Help.htm 11/17/2009 Medikro Windows Spirometer Page 69 of 81 16 Trouble Shooting Problems with spirometry measurements are related to instrument failures and erroneous manoeuvres. Instrument failures are typically either mechanical or software related. 16.1 Leaks The Spirometer can sometimes experience air leakage. Leaks may occur if pressure tubing is damaged or if any connection between the flow transducer, pressure tube and spirometer is not properly fastened. Leaks can be detected by daily calibration of the spirometer. If the gain value after calibration is not in the acceptable gain range, the software will inform the user with the following message (Fig. 16-1). Figure 16-1. Calibration, Not Accepted message. Make sure that the pressure tube is properly fastened into the transducer and into the spirometer unit. 16.2 Spirometer and Computer Connection The Spirometer connection to the computer may be loose. Make sure the connector is in place. 16.3 Operating Environment The minimum system requirements should be fulfilled to guarantee that the software functions properly. The minimum requirements can be found in the Installation Guide. 16.4 Software Software related problems are system dependent. Memory allocation, processor speed, operating system, other devices and applications play a significant role. The user is advised either to contact Medikro Oy Technical Support using e-mail (e-mail address: [email protected]) or to search the Medikro Oy homepage (www.medikro.com) which also provides useful information. file://C:\Medikro\Spiro2000\Language\English\Help\Spiro2000Help.htm 11/17/2009 Medikro Windows Spirometer Page 70 of 81 17 Certification 17.1 EC Declaration of Conformity Figure 17-1. EC Declaration of Conformity. 17.2 Certificate of Conformity file://C:\Medikro\Spiro2000\Language\English\Help\Spiro2000Help.htm 11/17/2009 Medikro Windows Spirometer Page 71 of 81 Figure 17-2. Certificate of Conformity. file://C:\Medikro\Spiro2000\Language\English\Help\Spiro2000Help.htm 11/17/2009 Medikro Windows Spirometer Page 72 of 81 18 Accessories Product Name Software Upgrade Product Code M9832 Flow Transducer, 100 pcs package M9228-100 Nose Clip, 10 pcs M9227-10 Pressure Tube for SpiroStar DX M9220 Pressure Tube for SpiroMaster MX M9230 Calibration Syringe, 3000 ml M9424 Outlet Port Adapter M91130 Description Use this product code to order an upgrade from your current Spiro2000 software version to the latest version file://C:\Medikro\Spiro2000\Language\English\Help\Spiro2000Help.htm 11/17/2009 Medikro Windows Spirometer Page 73 of 81 19 Release Information You most likely are interested to know what is new in your Spiro2000 software. Click the link below and you will see new features, enhancements and bug fixes for not only this version but for all versions released since the first one. ReleaseInformation Spiro2000.htm file://C:\Medikro\Spiro2000\Language\English\Help\Spiro2000Help.htm 11/17/2009 Medikro Windows Spirometer Page 74 of 81 20 Additional Information For additional information, please contact us via e-mail: [email protected] or visit our Homepage: www.medikro.com file://C:\Medikro\Spiro2000\Language\English\Help\Spiro2000Help.htm 11/17/2009 Medikro Windows Spirometer Page 75 of 81 21 Disclaimer Our policy of continuous product improvement makes all Medikro instruments, accessories, brand names, specifications, product documentation and model availability subject to change without notice. file://C:\Medikro\Spiro2000\Language\English\Help\Spiro2000Help.htm 11/17/2009 Medikro Windows Spirometer Page 76 of 81 22 Trademarks Windows is a trademark of Microsoft Corporation, Redmond, WA, USA Internet Explorer is a trademark of Microsoft Corporation, Redmond, WA, USA Netscape Navigator is a trademark of Netscape Communications Corporation, USA file://C:\Medikro\Spiro2000\Language\English\Help\Spiro2000Help.htm 11/17/2009 Medikro Windows Spirometer Page 77 of 81 23 References 1. 2. 3. 4. 5. 6. American Thoracic Society, Standardization of Spirometry, 1994 Update, Am J Respir Crit Care Med, 1995, Vol 152, pp 1107-1136. Quanjer PH, Tammeling GJ, Cotes JE, Pedersen OF, Peslin R, Yernault JC. Lung volumes and forced ventilatory flows. Official Statement of the European Respiratory Society, Eur Respir J, 1993, Vol 6, Suppl. 16, pp 5-40. Miller MR, Crapo R, Hankinson J, et al. General considerations for lung function testing. Eur Respir J, 2005, Vol 26 pp 153–161. No. 1 in SERIES ‘‘ATS/ERS TASK FORCE: STANDARDISATION OF LUNG FUNCTION TESTING’’. Miller MR, Hankinson J, Brusasco V, et al. Standardisation of spirometry. Eur Respir J, 2005, Vol 26, pp 319–338. No. 2 in SERIES ‘‘ATS/ERS TASK FORCE: STANDARDISATION OF LUNG FUNCTION TESTING’’. Pellegrino R, Viegi G, Brusasco V, et al. Interpretative strategies for lung function tests. Eur Respir J, 2005, Vol 26, pp 948-968. No. 5 in SERIES ‘‘ATS/ERS TASK FORCE: STANDARDISATION OF LUNG FUNCTION TESTING’’. Sovijarvi A, Uusitalo A, Lansimies E & Vuori I: Kliininen fysiologia. Duodecim. Helsinki 1994. file://C:\Medikro\Spiro2000\Language\English\Help\Spiro2000Help.htm 11/17/2009 Medikro Windows Spirometer Page 78 of 81 24 APPENDIX: Variables Abbreviation Name Unit 1 TIME Time hh:mm 2 3 4 5 6 7 8 9 TV FR MV VC FVC FEV0.5 FEV1 FEV6 Tidal volume Breathing frequency Minute ventilation Vital capacity Forced vital capacity Forced expiratory volume at 0.5s Forced expiratory volume at 1.0s Forced expiratory volume at 6.0s L 1/min L/min L L L L L 10 11 12 13 14 15 16 17 FEV0.5%(VC) FEV0.5%(FVC) FEV0.5%(FEV6) FEV1%(VC) FEV1%(FVC) FEV1%(FEV6) PEF PEF % % % % % % L/s L/min 18 FEF25 19 FEF50 20 21 22 23 24 25 26 27 FEF75 FEF25-75% METT AEFV FET VEXT LAGE FIVC FEV0.5 / VC FEV0.5 / FVC FEV0.5 / FEV6 FEV1 / VC FEV1 / FVC FEV1 / FEV6 Peak expiratory flow Peak expiratory flow Forced expiratory flow 25% VC [MEF75] Forced expiratory flow 50% VC [MEF50] Forced expiratory flow 75% VC [MEF25] Forced expiratory flow 25-75% [MMEF] Mean transit time Area of expiratory FV-curve Forced expiratory time Extrapolated volume Lung age Forced inspiratory vital capacity. 28 29 30 31 32 33 34 35 36 37 38 FIV0.5 FIV1 FIV6 FIV0.5%(VC) FIV0.5%(FIVC) FIV0.5%(FIV6) FIV1%(VC) FIV1%(FIVC) FIV1%(FIV6) PIF PIF L L L % % % % % % L/s L/min 39 FIF25 40 FIF50 41 42 43 44 45 46 FIF75 FIF25-75% MITT AIFV FIT VIEXT Forced inspiratory volume at 0.5s Forced inspiratory volume at 1.0s Forced inspiratory volume at 6.0s FIV0.5 / VC FIV0.5 / FIVC FIV0.5 / FIV6 FIV1 / VC FIV1 / FIVC FIV1 / FIV6 Peak inspiratory flow Peak inspiratory flow Forced inspiratory flow 25% VC [MIF75] Forced inspiratory flow 50% VC [MIF50] Forced inspiratory flow 75% VC [MIF25] Forced inspiratory flow 25-75% [MMIF] Mean inspiratory transit time Area of inspiratory FV-curve Forced inspiratory time Extrapolated inspiratory volume 47 48 49 MVV MVVFR MVVT Max voluntary ventilation MVV frequency MVV time L/min 1/min s 50 51 VCDIFF FVCDIFF Difference to best VC Difference to best FVC L L file://C:\Medikro\Spiro2000\Language\English\Help\Spiro2000Help.htm L/s L/s L/s L/s s L*L/s s L a L L/s L/s L/s L/s s L*L/s s L 11/17/2009 Medikro Windows Spirometer 52 53 54 55 FEV1DIFF PEFDIFF PEFDIFF MVVDIFF Page 79 of 81 Difference to best FEV1 Difference to best PEF Difference to best PEF Difference to best MVV file://C:\Medikro\Spiro2000\Language\English\Help\Spiro2000Help.htm L L/s L/min L/min 11/17/2009 Medikro Windows Spirometer Page 80 of 81 25 APPENDIX: Reproducibility Indicators 25.1 Introduction The Spiro2000 software highlights a value in red if its reproducibility criteria are not fulfilled. . Reproducibility is determined for both single measurements and session best values. Note that reproducibility is phase related, which means that pre- and post- measurements are not compared with each other. For detailed information see the ATS 1993 [1], ERS 1994 [2] and ATS/ERS 2005 [3-5] recommendations. 25.2 VC, FVC and FEV1 Indicating reproducibility for Session Best values: the best value is the largest value for each variable. The best value should not exceed the next highest one by more than the criterion. If the criterion is not fulfilled, the difference between the two largest values is flagged red. Indicating reproducibility for single measurements: if the VC, FVC or FEV1 differs from its largest value by more than its criterion, it is flagged red. The respective difference, VCDIFF, FVCDIFF or FEV1DIFF, is also flagged red. ERS 1993 %best ml VC 100 5 FVC 100 5 FEV1 100 5 *) 100 if FVC <= 1 L 25.3 ATS 1994 ml %best 200 200 200 - ATS/ERS 2005 ml %best 150 150 *) 150 *) FEF75, FEF50 and FEF25 (ERS 1993 only) Indicating reproducibility for Session Best values: the best value is the largest value for each variable. The chosen flowvolume curves for analyzing FEFs should have a PEF within a criterion of the maximal value. If the criterion is not fulfilled, the maximum difference of all PEF values is flagged red. Indicating reproducibility for single measurements: if the PEF differs from the maximal value more than a criterion, it is flagged red. The respective difference, PEFDIFF, is also flagged red. PEF ERS 1993 %best ml 10 ATS 1994 ml %best - ATS/ERS 2005 ml %best - (If the ATS 1994 or ATS/ERS 2005 recommendations are selected, the best FEFs are obtained from a forced vital capacity manoeuvre, which has the largest sum of FVC plus FEV1). 25.4 FEF25-75% (ERS 1993 only) Indicating reproducibility for Session Best values: the best value is the largest value. The reported value should be from a forced vital capacity manoeuvre, which differs less than a criterion from the largest FVC. If the criterion is not fulfilled, FEF25-75% value is flagged red. Indicating reproducibility for single measurements: if the best value is chosen from the curve which does not fulfill the criterion, the FEF25-75% of that curve is flagged red. FVC ERS 1993 %best ml 5 ATS 1994 ml %best - ATS/ERS 2005 ml %best - (If the ATS 1994 or ATS/ERS 2005 recommendations are selected, the best FEF25-75% is obtained from a forced vital capacity manoeuvre, which has the largest sum of FVC plus FEV1). 25.5 PEF (ATS/ERS 2005 only) file://C:\Medikro\Spiro2000\Language\English\Help\Spiro2000Help.htm 11/17/2009 Medikro Windows Spirometer Page 81 of 81 Indicating reproducibility for Session Best values: the best value is 1) the largest PEF or 2) PEF obtained from a forced vital capacity manoeuvre, which has the largest sum of FVC plus FEV1. Whichever the choice, the highest value should not differ next highest one by more than the criterion. If the criterion is not fulfilled, the difference between the two largest values is flagged red. Indicating reproducibility for single measurements: if PEF differs from its largest value by more than its criterion, it is flagged red. The respective difference PEFDIFF is also flagged red. PEF ERS 1993 %best L/s - ATS 1994 L/s %best - ATS/ERS 2005 L/s %best 0.67 - . 25.6 MVV (ATS/ERS 2005 only) Indicating reproducibility for Session Best values: the best value is the largest MVV. No MVV value should differ from the largest value by more than the criterion. If the criterion is not fulfilled, the MVV difference is flagged red. Indicating reproducibility for single measurements: if the MVV differs from its largest value by more than its criterion, it is flagged red. The respective difference MVVDIFF is also flagged red. MVV ERS 1993 %best L/min - ATS 1994 L/min %best - ATS/ERS 2005 L/min %best 20 file://C:\Medikro\Spiro2000\Language\English\Help\Spiro2000Help.htm 11/17/2009