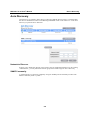
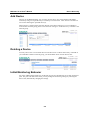
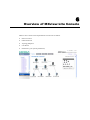
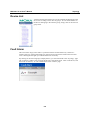
1
MXview Lite v2 User’s Manual First Edition, March 2009 www.moxa.com/product © 2009 Moxa Inc. All rights reserved. Reproduction without permission is prohibited. MXview Lite v2 User’s Manual The software described in this manual is furnished under a license agreement and may be used only in accordance with the terms of that agreement. Copyright Notice Copyright © 2009 Moxa Inc. All rights reserved. Reproduction without permission is prohibited. Trademarks MOXA is a registered trademark of Moxa Inc. All other trademarks or registered marks in this manual belong to their respective manufacturers. Disclaimer Information in this document is subject to change without notice and does not represent a commitment on the part of Moxa. Moxa provides this document “as is,” without warranty of any kind, either expressed or implied, including, but not limited to, its particular purpose. Moxa reserves the right to make improvements and/or changes to this manual, or to the products and/or the programs described in this manual, at any time. Information provided in this manual is intended to be accurate and reliable. However, Moxa assumes no responsibility for its use, or for any infringements on the rights of third parties that may result from its use. This product might include unintentional technical or typographical errors. Changes are periodically made to the information herein to correct such errors, and these changes are incorporated into new editions of the publication. Technical Support Contact Information www.moxa.com/support Moxa Americas: Toll-free: 1-888-669-2872 Tel: +1-714-528-6777 Fax: +1-714-528-6778 Moxa China (Shanghai office): Toll-free: 800-820-5036 Tel: +86-21-5258-9955 Fax: +86-10-6872-3958 Moxa Europe: Tel: +49-89-3 70 03 99-0 Fax: +49-89-3 70 03 99-99 Moxa Asia-Pacific: Tel: +886-2-8919-1230 Fax: +886-2-8919-1231 Table of Contents Chapter 1 Introduction..............................................................................................1-1 About this document .......................................................................................................... 1-2 Key Features....................................................................................................................... 1-2 Web-based Operation.............................................................................................. 1-2 Visualizing Devices and User Defined Topology................................................... 1-2 Alarm Management................................................................................................. 1-3 Traffic Monitoring .................................................................................................. 1-3 Configuration and Firmware Management of Moxa Ethernet Switches ................. 1-4 Chapter 2 Chapter 3 System Requirements and Supported Devices....................................2-1 Installation and Startup...........................................................................3-1 Installation Procedure......................................................................................................... 3-2 MXview Lite Startup.......................................................................................................... 3-2 Chapter 4 Getting Started.........................................................................................4-1 Login .................................................................................................................................. 4-2 Change Listening Port........................................................................................................ 4-3 First Time Launch .............................................................................................................. 4-3 Chapter 5 Device Discovery.....................................................................................5-1 Auto Discovery .................................................................................................................. 5-2 Add Device......................................................................................................................... 5-3 Deleting a Device ............................................................................................................... 5-3 Initial Monitoring Behavior................................................................................................ 5-3 Chapter 6 Overview of MXview Lite Console .........................................................6-1 Device List ......................................................................................................................... 6-2 Fault Alarm......................................................................................................................... 6-2 Topology Map .................................................................................................................... 6-3 User status .......................................................................................................................... 6-4 Preferences ......................................................................................................................... 6-4 Chapter 7 Alarms ......................................................................................................7-1 Check Alarms from Device List or Topology..................................................................... 7-1 Check All Alarms ............................................................................................................... 7-2 Alarm Severity Level ......................................................................................................... 7-3 Email notification............................................................................................................... 7-3 Chapter 8 Chapter 9 Traffic Report ...........................................................................................8-1 Managing Moxa’s Ethernet Switches ....................................................9-1 Devices Tab ........................................................................................................................ 9-1 Device Properties ............................................................................................................... 9-2 Device Configuration.............................................................................................. 9-3 Device Monitoring .................................................................................................. 9-4 Firmware Management ...................................................................................................... 9-5 Configuration File Management ........................................................................................ 9-5 Chapter 10 Preferences ............................................................................................10-1 User Account Management .............................................................................................. 10-2 Email Notification ............................................................................................................ 10-2 Auto-Refresh Timer.......................................................................................................... 10-3 Default Monitoring Settings............................................................................................. 10-3 1 Chapter 1 Introduction Moxa’s MXview Lite network management software is designed for configuring, monitoring, and troubleshooting Moxa Ethernet switches connected to industrial Ethernet networks. MXview Lite provides an integrated management platform that can detect Moxa Ethernet switches and SNMP-enabled devices installed on multiple subnets. All selected network components can be managed by web browser from both local and remote sites—anytime and anywhere. This chapter covers the following topics: About this document Key Features ¾ Web-based Operation ¾ Visualizing Devices and User Defined Topology ¾ Alarm Management ¾ Traffic Monitoring ¾ Configuration and Firmware Management of Moxa Ethernet Switches MXview Lite v2 User’s Manual Introduction About this document This document provides MXview Lite v2 installation and user interface instructions. Key Features Web-based Operation You need to install MXview Lite server software on a Windows computer connected to the same network the Moxa Ethernet switches to be managed are on. After proper installation, you will be able to manage your industrial Ethernet network on any Windows computer running Internet Explorer without having to install additional software. Up to four users are allowed to access the MXview Lite system simultaneously. Visualizing Devices and User Defined Topology MXview Lite provides intuitive device icons and a user editable topology. It is extremely helpful to be able to get a quick overview of your devices from the web browser. 1-2 MXview Lite v2 User’s Manual Introduction Alarm Management MXview will log the alarms based on preset conditions. The status warning of the “Fault Alarm” info box (at the bottom left corner) and topology map is very useful to track problems in detail. Key features of the alarm function are: y Notification based on preset conditions, such as device inaccessible via ICMP and SNMP, link down, bandwidth utilization rate, and packet error rate. y Notification via e-mail y Event thresholds as defined by the administrator y Alarm history y Alarm search by date, network range, and device y Two color-coded levels of alarm severity y Can export to CSV (Comma-Separated Values) format and is compatible with Microsoft Excel and Microsoft Access. Traffic Monitoring You may log the network traffic for a specific port or interface on the network device. 1-3 MXview Lite v2 User’s Manual Introduction Configuration and Firmware Management of Moxa Ethernet Switches MXview Lite provides unique support to fit your needs while managing mission-critical industrial Ethernet networks. The following features will help you manage Moxa Ethernet Switches easily: y Direct link to Moxa’s managed Ethernet switch’s web console y Import configuration files from Moxa’s managed Ethernet switches y Update configuration files to an Ethernet switches individually y Update firmware to Ethernet switches individually (or in a group). y Firmware update records. 1-4 2 Chapter 2 System Requirements and Supported Devices MXview Lite’s system requirement is as follows: Hardware Requirements CPU RAM Hard disk space Software Requirements Operating system Browser Intel Core 2 Duo CPU 2.4 GHz or above 1 G or above 1 G or above Windows XP Professional/2000/2003 IE 6.0 Service Pack 1 or higher version Language Support User interface User manual English Moxa’s managed Ethernet switches have the benefit of extensive functions such as network status, traffic log, and configuration /firmware file management. The following managed Ethernet switches support the previously mention functions: y EDS-400A series: EDS-405A, EDS-408A. y EDS-500A series: EDS-505A, EDS-508A, EDS-510A, EDS-516A, EDS-518A. y EDS-726 series modular industrial managed Ethernet switches. y EDS-728 series modular industrial managed Ethernet switches. y EDS-828 series modular industrial managed Ethernet switches. y PT-7710/7728/7828 IEC-61850 compliant modular managed Ethernet switches. For other SNMP-enabled devices, MXview Lite supports standard network management tools such as link up, link down, and network traffic monitoring, as defined by MIBII. 3 Chapter 3 Installation and Startup The installation procedure is simple. MXview Lite is packaged as one installation file named MXview_Lite.exe. Installation starts by executing this file. (Note: You may need administrator privileges for the installation of MXview Lite.) This chapter covers the following topics: Installation Procedure MXview Lite Startup MXview Lite v2 User’s Manual Installation and Startup Installation Procedure 1. If MXview Lite V1 was previously installed, we recommend un-installing MXview Lite V1 prior to installing MXview Lite v2. It is not a must to un-install V1, as the performance of v2 will not be affected. However, you will find two entries in Start Menu instead of one. 2. Start the MXview Lite setup program and follow the instructions to setup up your MXview Lite. 3. The next dialog will let you choose the directory in which to install MXview Lite. 4. MXview Lite will create a program group on the Start Menu. 5. The next step allows users to create a desktop icon. 6. The next step is a summary of the installation settings. To modify the settings that you had set earlier, click “Back” to do so. 7. Click on “Install” to start the setup process. 8. The installation process lasts a few minutes. Once the process is finished, the following dialog will appear. Click on “Finish” to complete the installation process. MXview Lite Startup MXview Lite can be started from the local computer by double-clicking on the desktop icon. Before using MXview Lite for the first time, you will need to enter the MXview Lite to set initial configurations, especially to define the network components you would like to monitor. After that, MXview will work in background mode to scan the specified network components. If you choose “No,” you may enter the web console page later by clicking on the “MXview” icon on the system status bar. 3-2 4 Chapter 4 Getting Started MXview Lite is implemented as a web-based service to realize local and remote management through a single portal. The following figure illustrates the operation model The MXview Lite system runs in the background on a Windows PC. MXview Lite communicates with network devices using SNMP plus a Moxa proprietary protocol that periodically polls specific MIB data and stores the data in a local database. MXview provides a uniform web interface to enable network operators to access and operate their network through the Internet or Intranet via a web browser. MXview Lite v2 User’s Manual Getting Started Login Once MXview Lite is properly installed, users can enter MXview Lite by web browser straight away. There are several ways to launch web interfaces. y From a local computer: Start by double clicking the “MXview Lite” icon on the system task bar. Press “Open MXview” and the web browser will activate automatically. You may also enter the IP address of the computer in the browser to access MXview. The next step is to enter the user name and password. The user name is predefined as “Admin.” For first time installations, a password is not required. y From a remote computer: You may enter the IP address or domain name of the computer running MXview Lite in the browser. The next step is to enter the user name and password. The user name is predefined as “Admin.” For first time installations, a password is not required. 4-2 MXview Lite v2 User’s Manual Getting Started Change Listening Port The default entry TCP port is 80. If this conflicts with other services in the same computer, you may change the TCP port number to any available port of your choice. The operation is as follows. 1. Double click the MXview Lite icon on the system task bar. 2. The screen below will appear, press the “Stop” button. 3. Enter the Listening port of your choice (please make sure the TCP port is available). 4. Press the “Open MXview” button to start the service again. First Time Launch When you enter MXview Lite for the first time, the “Auto Discovery” wizard will appear and you can specify the scan range of your network. The wizard will scan the installed network devices based on your settings. By default, MXview will select the network interface on the system as its default discovery domain. This process can last a few minutes depending on the range of the network. 4-3 5 Chapter 5 Device Discovery At this point, you will be able to see the installed devices on the device list. You may launch “Auto Discovery” again to update the installed network components. You may also manually add or delete network components on the device list. Please note that MXview Lite v2 can monitor up to 256 network nodes, including Moxa’s Ethernet switches and standard SNMP devices. MXview Lite v2 User’s Manual Device Discovery Auto Discovery Auto Discovery is applied to detect devices within pre-defined network ranges. To be detectable, the devices should be accessible via ICMP-Ping and SNMP. Click on the “Discover” in the Auto Discovery to perform device detection. Network to Discover It allows you to define the network group used to scan for installed network devices. By clicking “Add Network,” you may define the network group name and IP range for device discovery. SNMP Community A valid read-only or read-write community string for SNMP protocol should be provided. The default community name is “public.” 5-2 MXview Lite v2 User’s Manual Device Discovery Add Device Devices can be added manually, one at a time, into the device list. The IP address and SNMP community strings are required and you can add up to 64 characters. Click “Search” for MXview Lite to start detecting the specified device(s). When a device is found, please select the network group that it belongs to. If you would like to create another network group, please click “Discover” and go to “Auto Discovery” to define a new network group. Deleting a Device You may remove one or more listed devices in the device list to reduce unnecessary workload. If you would like to delete a network group, you should delete all its network devices first. Initial Monitoring Behavior For newly added or detected devices, all the link up ports are automatically set as fully monitored ports. For ports with link down status, you may change the monitoring settings by selecting the devices tab, and manually changing the settings. 5-3 6 Chapter 6 Overview of MXview Lite Console MXview Lite console can be separated into several areas as follows. y Device List area y Fault Alarm area y Topology Map area y User Status y Preferences (your system preferences) MXview Lite v2 User’s Manual Topology Device List All the monitored network devices will be arranged and displayed on the device list according to their network groups. To view the IP address of the devices belonging to the network group, simply click on the network group name. Fault Alarm This area will be empty unless there is a problem with the monitored device(s). If there is a situation with any of the monitored devices, that network group will be listed in this area and a color-coded signal will light up to indicated the level of severity. By clicking on the network group(s) displayed here, you will be directed to the “Topology” page. The “Topology” makes it easy to locate the device(s) with alarm issues. Click on the device, and then click on “Alarms,” to view related alarms in the “Alarms” page. 6-2 MXview Lite v2 User’s Manual Topology Topology Map This area displays the icons for monitored devices. If there are too many monitored devices to fit on a single web page, the mini map at the right will show all of the devices. By clicking on the pull down button of the “Display option,” you may choose to view the monitored switches by, IP Address, Model Name, MAC Address, or location. If you need to rearrange the device icons, you can do so by clicking the “Edit Mode” on the mini map. In addition, you may create virtual connections between devices to indicate logical connections between network devices. Remember to click on “Save” when you are finished, and then click on “Back to Monitor.” 6-3 MXview Lite v2 User’s Manual Topology Device icons can be displayed as small or large. For optimal performance, the maximum number of devices displayed on the topology map is 120 for small icons and 60 for large icons. Please refer to Chapter 10, “Default Monitoring Settings,” for more details. User status The user status indicates the name of the current user. If you are exiting the system, it is highly recommended that you click on “Logout” before exiting. Preferences You can make system level configurations such as password change, email notification for when an alarm goes off, auto-refresh timer for automatic web page refresh, and default monitoring settings by clicking on “Preferences.” Please refer to Chapter 10 for more information. 6-4 7 Chapter 7 Alarms When one of the following situations occurs, MXview Lite will log an alarm for the selected devices or ports/interfaces. y Inaccessible via ICMP (ping) y Inaccessible via SNMP y Port link down y Port utilization rate higher than the specified threshold y Port pack error rate higher than the specified threshold y Port collision rate high than the specified threshold There are two ways to checking alarm messages. One way is through the device list to check for the alarms of specific monitored devices. Another way is to click on “Alarms” tab and check all alarms. Check Alarms from Device List or Topology MXview Lite v2 User’s Manual Alarms Click on an IP address on the Device List to get the “Device Property” page. Click on “Alarm” and MXview Lite will display all the alarms related to the device. You can also click on the “Topology” tab and then on the device’s icon and a device property sub screen will appear. Click on the “Alarms” button on the bottom of the sub screen and MXview Lite will display all the alarms related to the device. Check All Alarms 7-2 MXview Lite v2 User’s Manual Alarms By clicking on the “Alarms” tab, you will enter the “Alarm History” page, which displays all the alarms within 24 hours. If you would like to see all the alarms that MXview Lite has stored, click on “Alarm History.” In “Alarms History” page, you can do following: y Search alarms by Network Group, Product Series, IP address, Interface, and Date range. y Export all the alarms to CSV (Comma-Separated Values) format, which is compatible with Microsoft Excel and most database software. y Clear all the alarms in the system Search Choose an option from the dropdown list; you may use single condition or multiple conditions to narrow the scope of the alarm search. This feature is useful for analyzing possible fault sources. Export Click on “Export,” and the system will prompt you to confirm the file name and location you would like to use. Delete Click on “Delete,” and the system will ask you to confirm the operation. If you click on “OK”, all of the stored alarm records will be deleted from MXview Lite system. Be sure you have exported all the logs, if necessary, before you decide to perform the clear function. Alarm Severity Level There are two levels of alarm severity. They are: y Fault: The issue is serious and immediate action(s) should be taken. y Warning: There is an issue, which requires attention. Email notification You may configure the system to notify up to five parties by e-mail when an alarm occurs (the level of severity for notification can be individually set for each party). Refer to page 10-2 for 7-3 MXview Lite v2 User’s Manual Alarms more details. 7-4 8 Chapter 8 Traffic Report MXview Lite logs traffic reports for specified ports. There are three charts that display: y Input/Output Traffic (Bits/Second) y Good Packets (Packets/Second) y Error Packets (Packets/Second) MXview Lite User’s Manual Devices Check Traffic Report for Selected Port Click on the “Traffic” tab, and then click on a listed device to open its traffic report chart. List Traffic Report for Two Selected Ports By clicking on “Group Reports,” a traffic report chart will be displayed; you may select up to two interfaces. Disk Size The traffic reports will be stored on the hard disk every 60 seconds. A maximum of 7 days of records will be kept in the system. Hard disk size usage depends on the number of ports logged. For example, an eight port Ethernet switch uses around 1.1 Mega bytes every 24 hours. 8-2 9 Chapter 9 Managing Moxa’s Ethernet Switches MXview Lite provides special management tools to help you manage mission-critical industrial Ethernet devices. There are three major components to managing Moxa’s Ethernet switches. y Device Properties Device Configuration: link the web consoles of the switches, change IP settings, and checking firmware version and configuration files. Device Monitoring: network traffic, alarms, and related settings. y Load firmware to Moxa Ethernet switches. y Configuration file upload and download for Moxa Ethernet switches. Devices Tab Click on “Device” tab to get the following: MXview Lite v2 User’s Manual Ethernet Switches Management Device Properties Click on “Device Properties,” and a list of monitored devices including Moxa switches and SNMP devices will be displayed. Please note that SNMP devices are supported, but with limited functions for web console, network traffic, alarm, and monitoring related settings. Moxa Ethernet switches have full access to all the functions in “Device Properties.” Select one of Moxa’s Ethernet switches and its basic information will be displayed. The two functions of “Device Properties” are: y Device Configuration y Device Monitoring 9-2 MXview Lite v2 User’s Manual Ethernet Switches Management Device Configuration There are four functions in Device Configuration. y Web Console: Click on “Web Console” and MXview Lite will open a new browser window and automatically link to the web console of the selected device. You may, for example, configure, troubleshoot, and instantaneously perform in-depth monitoring for Moxa Ethernet switches. y Firmware: Firmware version along with basic device information will be displayed in a sub window. If you would like to upgrade the firmware for your Moxa Ethernet switch, you may click on “Upgrade” to do so. y IP Setting You may change the IP settings using MXview Lite; this is very convenient for first time installation or maintenance. 9-3 MXview Lite v2 User’s Manual y Ethernet Switches Management Configuration File The configuration file can be retrieved from a Moxa Ethernet switch by clicking “Load From Device.” The configuration can be saved on the hard disk for quick replacement in the future. If you would like to restore the configuration file to a newly replaced device, you may click “Load to Device” to do so. Device Monitoring There are three functions in Device Monitoring y Traffic Click “Traffic” and a list of monitored ports will be displayed, then click on the port that you would like to check. For more information, please refer to chapter 8. y Alarm Click “Alarm,” to view the “Alarm History” page, which displays all the alarms within 24 hours. For more information, please refer to chapter 7. y Settings for Monitoring Click “Setting” and a list of monitored ports and the basic information of a selected device will appear. There is a checkbox by the port, you may check it to activate the monitoring and traffic logging status of that port or uncheck to deactivate. Following the selected port is a button; use it to change monitoring related parameters. Go to the end of this page to define the specific monitoring thresholds of the alarms or make further configurations. 9-4 MXview Lite v2 User’s Manual Ethernet Switches Management Firmware Management Click on “Firmware Management” to display the firmware version and upgrade history. To upgrade the firmware, check the checkbox of the Moxa Ethernet Switch you want to upgrade and then click “Upgrade.” Another screen will appear to show the location of the firmware. Note that Moxa’s Ethernet switches can be password protected. Click on “History” to check the firmware upgrade history of the selected device(s). Configuration File Management Click on “Configuration File Management” and a list of monitored devices will appear. Check the checkbox of the Moxa Ethernet switch(es) that requires configuration file import/export. When you are retrieving configuration file(s) from selected Ethernet switch(es), it is recommended that you store the configuration file(s) with fitting file names that can be easily organized into the directory. Replacing an Ethernet switch in the future will be quick and easy, simply find, and load the configuration file. 9-5 MXview Lite v2 User’s Manual Ethernet Switches Management If you would like to load a configuration file to a selected device, click on “Load to Device.” You will need to enter the file directory and password to launch the process. 9-6 10 Chapter 10 In “Preferences,” there are four useful functions available. y User Account Management y Email Notification y Auto-Refresh Timer y Default Monitoring Setting Preferences MXview Lite v2 User’s Manual Preferences User Account Management The user name in MXview Lite is “Admin,” and you may set/change the password here. Email Notification You may specify up to five parties to be notified by email when an alarm occurs. The “Notification Type,” which indicates the level of severity can be individually set for each party. 10-2 MXview Lite v2 User’s Manual Preferences Auto-Refresh Timer This function automatically refreshes web page content. The default is set to 30 seconds. The response time can be adjusted to as fast as 10 seconds. Default Monitoring Settings Each newly discovered device’s port with link up status is set to “monitor” by default. You may manually disable the function. In the “Topology Icon Size” selection box, you can select the size of the device icons. Note that the small icon option offers better performance, while the large icon option provides a more intuitive presentation. 10-3