1
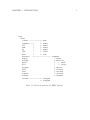
FEAP - - A Finite Element Analysis Program
Version 8.1 Installation Manual
Robert L. Taylor
Department of Civil and Environmental Engineering
University of California at Berkeley
Berkeley, California 94720-1710
E-Mail: [email protected]
January 2007
Contents
1 Introduction
1
2 UNIX/Linux Installations
2.1 Editing files makefile and makefile.in
2.1.1 Editing makefile.in . . . . . . .
2.1.2 Editing makefile . . . . . . . . .
2.2 Installing the program . . . . . . . . . .
2.2.1 Installation using RCS . . . . . .
2.2.2 Compiling and final installation .
2.3 Running FEAP . . . . . . . . . . . . . .
3 Windows Installation
3.1 Build of Libraries . . . . . . . . .
3.2 Build of Executable . . . . . . . .
3.3 Alternate Windows graphics form
3.4 Running FEAP . . . . . . . . . .
i
.
.
.
.
.
.
.
.
.
.
.
.
.
.
.
.
.
.
.
.
.
.
.
.
.
.
.
.
.
.
.
.
.
.
.
.
.
.
.
.
.
.
.
.
.
.
.
.
.
.
.
.
.
.
.
.
.
.
.
.
.
.
.
.
.
.
.
.
.
.
.
.
.
.
.
.
.
.
.
.
.
.
.
.
.
.
.
.
.
.
.
.
.
.
.
.
.
.
.
.
.
.
.
.
.
.
.
.
.
.
.
.
.
.
.
.
.
.
.
.
.
.
.
.
.
.
.
.
.
.
.
.
.
.
.
.
.
.
.
.
.
.
.
.
.
.
.
.
.
.
.
.
.
.
.
.
.
.
.
.
.
.
.
.
.
.
.
.
.
.
.
.
.
.
.
.
.
.
.
.
.
.
.
.
.
.
.
.
.
.
.
.
.
.
.
.
.
.
.
3
3
3
4
5
5
6
6
.
.
.
.
7
7
9
10
10
Chapter 1
Introduction
The source files for the FEAP system are delivered on one CD-ROM. In addition, the
disk contains printable files (using Acrobat Reader) for the manuals. The program is
furnished under license by the Department of Civil and Environmental Engineering at
the University of California, Berkeley. It is for use by the licensee only and may not
be redistributed to others in any form without prior authorization by the University
of California, Berkeley.
It is recommended that a directory with the name ‘feap’, or similar be created and all
information on the CD-ROM copied into this directory. The source files will reside in
a directory with the name ‘ver81’. When the files are copied to the ’feap’ directory the
program structure will have the directory structure shown in Table 1.1.
Within the licensed unit it is permitted to make public versions of the following: (1) An
executable version and/or an archive (library) file(s); (2) The files ’feap81.f’ (main program) and ’contact.f’ (dummy file to eliminate contact module); (3) include files; and
(4) User files in the directory ’user’ (e.g.,’elmt01.f’, ’umacr1.f’, ’umesh1.f’, ’usetm1.f’,
etc.). All other files are considered to be the property of the licensee and should not
be made available to others.
The routine ‘feap81.f’ may be modified to set parameters as necessary. The current
FEAP system uses dynamic memory allocation for all the main arrays during solution.
As such the maximum size of problems that can be solved by the program is limited
only by the available memory of the computer used.
Should the compiler used not have routines for malloc and free the system may be
installed using the routines in the directory ‘memory’. This form uses an unlabeled
common to store the arrays. The array mr in the routine subprogram pinitm.f can be
resized by setting the parameter mrmax to an appropriate value for the computer used.
Please report any installation problems by e-mail to: [email protected].
1
CHAPTER 1. INTRODUCTION
feap
ver81
contact ------------+- main
elements ---+
|- ntrnd
f77
|
|- nts2d
f90
|
|- nts3d
hp
|
|- ptpnd
ibm
|
|- tie2d
main
|
+- util
maintain
+------------------- elements
memory
|- frame
parfeap
|- material
patch
|
|- small
plot
|
+- finite
program
|- shells
unix
|- solid1d
user
|- solid2d
window2
|- solid3d
windows
+- thermal
include ------------+- integer4
+- integer8
Table 1.1: Directory structure for FEAP system
2
Chapter 2
UNIX/Linux Installations
The build in a UNIX/Linux environment is controlled by the data contained in files
makefile and makefile.in located in the directory ”ver81”.
If your system has a revision control system (RCS) or (CVS) it is highly recommended
that FEAP source files utilize this feature. This permits changes to the program
without losing any previous versions. This is a basic decision which must be made
before proceeding with additional installation steps.
2.1
Editing files makefile and makefile.in
Use a text editor to make changes to the files makefile and makefile.in located in the
directory ver81. The location of specific parts of the feap program is controlled by the
parameter $(FEAPHOME8 1). This parameter may be set using the system command:
setenv FEAPHOME8_1 /home/..../feap/ver81
where the last parameter is the path name where the individual subdirectories in ver81
are located. Alternatively, the command may be inserted within the .cshrc, .tcshrc
or whatever ’rc’ filename is located in the user root directory.
2.1.1
Editing makefile.in
It is necessary to edit the file makefile.in as indicated below. Note that comments
in this file are set by placing the character # in the first column.
Edit file makefile.in as follows:
3
CHAPTER 2. UNIX/LINUX INSTALLATIONS
4
1. Sellect the appropriate include files to use. For 32-bit machines use the line with
integer4; for 64-bit machines use the line with integer8.
2. In section Which compilers to use set the name of your Fortran compiler after
FF = (This is currently set to g77). Also set the name of your C compiler after
CC = (currently set to gcc).
3. Set optimization level to use. Currently this is set to O2 and the flag for all
warnings also is active.
4. In Section Source Types:
(a) If you will use RCS, set FSOURCE = RCS/ and CSOURCE = RCS/ (You may
set # FSOURCE = and # CSOURCE = as these are treated as comments).
(b) If you will not use RCS, set FSOURCE = and CSOURCE = (You may set #
FSOURCE = RCS/ and # CSOURCE = RCS/ as these are treated as comments).
5. In the section Source Extender :
(a) If you will use RCS, set FEXT = f,v and CEXT = c,v (You may set the
#FEXT = f and #CEXT = f lines as comments).
(b) If you will not use RCS, set FEXT = f and CEXT = c (You may set the #FEXT
= f,v and #CEXT = f,v lines as comments).
6. Generally, no options are needed for FOPTIONS = or COPTIONS =; however, if you
experience difficulties some may need to be inserted.
7. In section What options to be used by the loader select the correct X-library (i.e.,
either 32-bit (lib) or 64-bit (lib64). If a non-standard installation is made some
changes may be required.
8. In section What archiving to use standard options are given. Usually no change
is necessary.
2.1.2
Editing makefile
It is necessary to edit the file makefile to select appropriate subroutines for either
a Fortran 77 compiler (i.e., g77 in Linux) or a Fortran 90 (or 95) compiler. Routines
which are compiler dependent are been placed in the subdirectories f77 and f90. Make
changes in the two sections indicated below:
1. In section install: place a comment in the first column (i.e., using a #) for the
lines which contain the compiler which is not to be used. That is, if you will use
a Fortran 77 compiler place the comments before the lines which read
CHAPTER 2. UNIX/LINUX INSTALLATIONS
5
(cd f90; co makefile ; make checkout)
(cd f90; make install)
(cd f90; make clean)
whereas if you will use a Fortran 90 or 95 compiler place the comments on the
lines
(cd f77; co makefile ; make checkout)
(cd f77; make install)
(cd f77; make clean)
2. In section install norcs: place a comment in the first column for the line which
corresponds to the compiler not to be used: For use of a Fortran 77 compiler
place the comment on the line:
(cd f90; make install)
whereas for a Fortran 90 or 95 compiler place the comments on the line
(cd f77; make install)
2.2
Installing the program
Two options are available to set up the program: With RCS and without RCS. If you
are not using RCS proceed to Section 2.2.2.
2.2.1
Installation using RCS
Change directories until you are in ver81. After editing the files makefile.in and
makefile as described above, enter the command make rcs. All the files should be
deposited in subdirectories named RCS for each of the source subdirectories (e.g., plot,
program, etc.). Check that this has occurred.
If any part of the RCS step is unsuccessful it is necessary to correct errors and repeat
the make rcs installation.
CHAPTER 2. UNIX/LINUX INSTALLATIONS
2.2.2
6
Compiling and final installation
If necessary, change directories until you are in ver81. To complete installation enter
the command make install. Each subdirectory should be processed and the compiled
object files placed in the archive named in the makefile.in. A successful compilation
should deposit the executable (named feap) in the subdirectory main.
If errors occur it is necessary to correct them and then recompile the program using
the command make install.
For example, some Fortran 90/95 compilers do not include intrinsic functions for acosd,
asind, atand, cosd, sind, tand (i.e., trigonometric functions in degrees instead of
radians). If the compilation indicates these are missing, copy the files contained in
directory f77 to directory f90 and install in the RCS directory using the command:
ci acosd.f
It may be necessary to make the file ‘writeable’ by using the command:
chmod u+w acosd.f
prior to checking it in. Repeat for all the remaining files moved. After moving recompile
the program again using the command make install.
2.3
Running FEAP
After a successful installation step the FEAP program is ready for use. To permit
running the program from any directory it is convenient to define a path to the location
of the executable. This may be done by placing a file (e.g., one named feap81) in a
bin directory of the users root directory. The file should contain the two lines
#
/fullpath/feap/ver81/main/feap %1
and made executable by using the command chmod a+x feap81. The alias may not
be active until your next login.
The program may now be executed from any directory by first preparing an input file
(see User Manual for preparing this file) and issuing the instruction
feap81
from the command line.
Chapter 3
Windows Installation
An executable version of FEAP, including all graphics options, may be built using
Compaq Visual Fortran.
Generally, it is desirable to place parts of the program into separate libraries and
then finally build a main (executable) program. For example, a build with libraries
named program, plot, element, and contact keeps basic parts of the program in clearly
identifiable parts. A main program called feap may then be constructed which includes
these libraries. However, alternate names and combinations may be selected. Below,
a build is described for the names given above.
3.1
Build of Libraries
The following steps may be used to build the necessary libraries for the FEAP program:
1. Open the Developer Studio.
2. Under File select New. (N.B. Options to be selected are shown in italics).
(a) Under Projects tab select Fortran static library. Do not select a dynamic
link library (DLL).
(b) In location window set path to location for build files. The path must exist,
if not use standard Windows steps to create the folder before doing this
step.
(c) In Project name assign a library name (e.g., program). (N.B. Items to be
selected and named by the user are indicated by underlines).
(d) Press OK button to start (N.B. small upper window should now have the
notation Workspace program).
7
CHAPTER 3. WINDOWS INSTALLATION
8
3. Under Build :
(a) Select Set Active Configuration and choose between Release and Debug (generally I use Release for most builds).
4. Under Project select Project Settings:
(a) Choose Fortran tab and set Category window to Preprocessor.
(b) In INCLUDE and USE paths window insert the path to where the include
files are located. (The path will generally be set when you copy the program
- e.g., c:\feap7\ver75\include). (N.B. This step is essential in getting any
compile to work!)
(c) Press OK button to finish settings.
WARNING! STEPS 3 and 4 must be set in the sequence shown above. In particular if a change between Release and Debug is made it is necessary to set the
INCLUDE path again.
5. Under Project select Add to Project which causes a pop-up window to appear.
Select Files which will pop-up another window called Insert files into project. Use
the Look in window to select the folder where source programs are located and find
feap7 folder. The select ver75 (double click on folder button will change path),
followed by program. If Files type window is set to Fortran files(*.for,*.f90,...)
all the files to be compiled will appear in the large window. To select all files
place mouse cursor over last file in folder and while holding the ”Shift” key press
the left mouse button. All files should now be highlighted. Press OK button to
have highlighted files placed in project.
N.B. Instead of using the Look in window to find directories, it is possible to use
the Up one level button to traverse the folder structure to locate where source
files are located.
6. Repeat step 5 for the source folder names: F90 and user. DO NOT include files
from any other folder.
7. Under Build tab select Build program.lib (or name you selected for this project
or Rebuild all.
Compiler should process each file in the project and finish with a statement:
”program.lib - 0 error(s), 0 warning(s)”. If errors are present changes are necessary. First thing to ensure is that the path to the INCLUDE files is properly set
(see step 4. above).
8. Repeat Steps 2 to 7 for (you do not have to set the include path again):
(a) A library named plot which contains files in directory c:\feap7\ver75\plot
and c:\feap7\ver75\windows.
CHAPTER 3. WINDOWS INSTALLATION
9
(b) A library named element which contains files in all the subdirectories of
c:\feap7\ver75\elements [i.e., ”frame”, ”material” (and its ”small” and
”finite” subdirectories), ”shells”, ”solid2d”, ”solid3d”, ”thermal”].
(c) A library named contact which contains files in all the subdirectories of
c:\feap7\ver75\contact [i.e., ”main”, ”nts2d”, ”nts3d”, ”ptpnd”, and
”util”]. N.B. This library is optional if you do not intend to solve any
contact problems [see Step 4 below].
At this stage the libraries ”program.lib”, ”plot.lib”, ”elements.lib” and ”contact.lib”
for the FEAP program have been built. It is now necessary to build the final executable
program.
3.2
Build of Executable
The following steps may be used to build an executable for the FEAP program:
1. Under File select New.
(a) Under Projects tab select Fortran Standard Graphics or QuickWin Application.
(b) In location window path to location for build files should still be set for the
library builds. This is ok, but can be changed if you wish (recommend no
change for this). The path must exist, if not use standard Windows steps
to create the folder before doing this step.
(c) In Project name assign a program name (e.g., feap).
(d) Press OK button to start (N.B. small upper window should now have the
notation Workspace ’feap’ ).
(e) New pop-up window gives choice between a QuickWin and a Standard
Graphics mode. Select QuickWin and then press Finish.
2. Repeat steps 3 and 4 above which are now applicable to this project. (e.g., must
set Release or Debug mode and path for INCLUDE files).
3. Under Projects tab select Settings, followed by the Link tab. In Category window
select Input. In Ignore libraries window add ,libc.lib (with no blanks before the
”,”). N.B. Leave the existing entry (dfconsul.lib).
4. Use Project tab and select Add to Project. Then select Files and select the folder
Main (see step 5 above). Add the main program file ’feap75.f’ to the project. If
you did not build the contact library also include the file ’contact.f’.
CHAPTER 3. WINDOWS INSTALLATION
10
5. Use Project tab and select Add to Project. Select Files tab and go to folder
where library ”program.lib” is located. This is the path you set in the first build
followed by the name of the library (e.g., ”program”) and either release or debug
depending on which you built. Nothing will appear in the main window until a
selection is made in the Files of type window is set to: Library Files (lib). It may
be necessary to scroll to find this or just enter ”l” in the window and scrolling
will occur automatically.
Add the program.lib to the project by placing the mouse over the name in the
window and double clicking.
Repeat for all libraries built above (e.g., ”plot”, ”elements”, ”contact”).
6. Under Build tab select Build feap.exe (or name you selected for this project or
Rebuild all. Compiler should process each file in the project and finish with a
statement: ”feap.exe - 0 error(s), 0 warning(s)”. If errors are present changes
are necessary. First thing to ensure is that the path to the INCLUDE files is
properly set (see Step 4. in the instructions for building the libraries).
Program is ready to use. The executable will be placed in the release or debug directory
where the build of the executable was designated (see Step 3 and 4 in Section 3.2). It
is usually desirable to place an executable icon on the ‘Desktop’.
3.3
Alternate Windows graphics form
An alternate to the graphics structure may be built by using the source files in the
directory window2 instead of those in windows. Note that the remaining files in windows
must still be included. The alternate form uses the source files from window2 when
building the executable instead of the files with the same name that are in the windows
directory (the files to be included are: pfullscr.f, plopen.f plstrt.f plstdos.f,
pwopn.f).
3.4
Running FEAP
After a successful installation step the FEAP program is ready for use. The program
may be run in two modes:
1. From a command line in a ”Command prompt” window. In this case it is convenient to place a ”bat” file (e.g., feap75.bat) in a directory located on the system
PATH. This file has the structure:
CHAPTER 3. WINDOWS INSTALLATION
11
c:\fullpath\feap\ver75\build\release\feap
where it is assumed the executable resides in the directory build and is a release
version. The program may now be executed by giving the command
feap75
in any directory.
2. From an icon reached by traversing the directories to the location where the
executable resides after the build. For convenience the icon may be placed on
the ‘Desktop’ and executed there. A pop-up window will appear to locate the
desired input file (see User Manual for preparing this file).