1
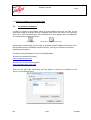
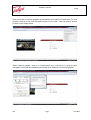
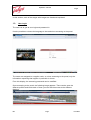
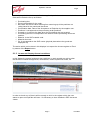
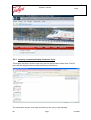
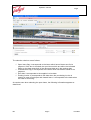
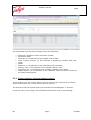
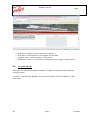
Supplier Portal Operation Manual Operation manual Logo INDDEX 1. 1.1. 1.2. 1.3. 2. 2.1. 2.1.1. 2.1.2. 2.1.3. 2.2. 2.3. 2.4. 2.4.1. 2.4.2. 2.5. 2.5.1. 2.5.2. 2.5.3. 2.6. Explorer setting for the portal access. ..................................................................... 3 Certificates installation. ............................................................................................ 3 Add the website to trusted sites. .............................................................................. 4 User Login ............................................................................................................... 6 Displays ................................................................................................................... 7 Commercial Display ................................................................................................. 7 Commercial Display Existing documents ................................................................ 7 Commercial Display Historical Records. ................................................................. 9 Commercial Display General conditions. ............................................................... 12 Quality Display Master data of the material ........................................................... 13 Supplier Mailbox Display ....................................................................................... 14 Planning / Inspection Display. ............................................................................... 15 Planning / Inspection Display: Deliveries check .................................................... 16 Planning / Inspection Display: Check of Shipping notifications ............................. 21 Finances Display. .................................................................................................. 25 Finances Display. Line item list. ............................................................................ 25 Finances Display. Quality pending items list. ........................................................ 28 Finances Display. Invoicing incidents register. ...................................................... 29 Contacts display. ................................................................................................... 30 Page 2 Operation manual Logo 1. Explorer setting for the portal access. 1.1. Certificates installation. In order to access to the supplier portal, the user-supplier will have two files, as the certificates copying assistant and the certificate itself, which will have to be executed. This way a safe communication and confidential on your details will be established. The shortcuts are shown as follows: C A_Talg o.p7b SAPTALMM -‐ P ortal P roveedores.pfx Depending on the browser used in order to access the portal, additional instructions for the certificate proper installation may be required. Check your browser instructions regarding this question. The web access will be given by the link detailed below: Access to the productive system. https://suppliers.talgo.com Access to the pre productive system. https://suppliers.talgo.com:1443 Once the link has been introduced, we'll be asked to choose the certificate as it's shown in the following figure. Ref. Page3 Print Date Operation manual Logo According to the browse we use, we can receive different error messages: Internet Explorer will give us a waring as "certificate error" and will block the exploration In order to get into the suppliers portal, select "Go to this website, (not recommended" The image with the error message is shown below: Once we're in, we'll be asked again to choose our certificate. We'll choose it and we'll be able to see the suppliers portal. This will happen every time we'll get into the portal again. If we're using Mozilla, the error window will be the following: We'll have to push "I understand the risks" and add the exception. 1.2. Ref. Add the website to trusted sites. Page4 Print Date Operation manual Logo Once we're able to see the suppliers portal website, we'll add it to trusted sites. For that purpose, we'll go to the menu bar and we'll get in into "tools"- "Internet options" as can be seen in the image below- Within "Internet options", we'll go to "trusted sites" and, once we're in, a pop up menu will appear, and it will let us adding the website as is detailed in the following figure. Ref. Page5 Print Date Operation manual Logo In this section, each of the stages with images are listed and explained. 1.3. User Login The user has to get its user login and password in. It's also possible to choose the language to be used when accessing to the portal The users are assigned to a supplier code, so, when accessing to the portal, only the information respecting that supplier in particular is shown. From this display, the accessing password can be modified. Once accessing to the portal, the following image appears. There can be seen the different profiles and inside each of them you can find the access to the different displays. Ref. Page6 Print Date Operation manual Logo The access to the different displays can be restricted according to the permissions granted to the user. 2. Displays 2.1. Commercial Display This display is made up by three sub displays. Current documents, Historical records and general terms. 2.1.1. Commercial Display Existing documents In the display, current documents will be see. The purchasing documents which validity date were later after today or which have any delivery to be received. Once in, the current purchasing documents appear. Ref. Page7 Print Date Operation manual Logo In the image 3, the following data can be seen: Purchasing document number Person responsible for the order. Total value on the purchasing order (sum of all the positions values) Confirmation date, Supplier Acceptance or Rejection of the purchasing document. ü Confirmation state, which corresponds to the status which is in the purchasing document. ü Purchasing document currency ü Additional note: It's a Text field where can be indicated those remarks the user may consider desiderable and related to the acceptance or rejectable of the purchasing document. ü ü ü ü Possible actions from the document header: ü Export all the records of the header which contain the mentioned document to Excel. This operation can be performed by pressing the Export button. ü By pressing the button Documents, the annexing documents to the purchasing doc can be seen. ü By using the Accept or Reject buttons, you accept or reject the purchasing document. With this option, the confirmation State from Pending to Accepted or Rejected is modified. In the image 4, the following data can be seen: ü ü ü ü ü ü ü Ref. Purchasing document number Purchasing document position. Material code Material short text Material unit price. Purchasing document position net price. Currency Page8 Print Date Operation manual Logo Possible actions from the "Details" option. ü Export all the records of the header which contain the mentioned document to Excel. This operation can be performed by pressing the Export button. ü It's possible to navigate in order to see the material data by pressing the link which contains the material code. 2.1.2. Commercial Display Historical Records. In the historical records display, those purchasing docs which, due to established reasons, aren't current anymore can be seen. By default, all documents not older than 1 year will be shown. Older documents can be consulted if wanted indicating in the proper selection fields the ranges of dates wished. Ref. Page9 Print Date Operation manual Logo In the image, the selection display to carry out the search can be seen. In can be performed depending on several factors such as: ü Purchasing document number ü Purchasing document type ü Document date. Indicate that all the three described fields have the multiple selection through the arrow placed at the right side. The system also allows to carry out the search without indication any data in the selection display screen. This way, all the registers not older than one year can be obtained Once the selection has been chosen, we'll be able to see a display like the following one: Ref. Page10 Print Date Operation manual Logo Ref. Page11 Print Date Operation manual Logo In this display, the historical records for the supplier in particular ar shown, and also the fields which make the list up as follows: ü Purchasing doc: ü Person responsible for the order. ü Net value: It's the net value resulting from summing up all the positions net value placed in the mentioned document ü Confirmation date, Date of the Acceptance or Rejection by the supplier user. ü Positions: it corresponds to the purchasing order positions. ü Created on: It refers to the date when the purchasing doc was created. ü Purchasing amount: Corresponds to the amount on the purchasing document position. ü Material: Is the SAP material code. ü Material short text ü Ce. It corresponds to the SAP center (physical place where the goods are displayed for) The action which can be done in this displays is to export the chosen register to Excel by means of the Export button. 2.1.3. Commercial Display General conditions. In this display the general and particular conditions on each supplier as well as other documents of interest as approvals, certifications, results of previous audits, etc. In order to check any of them it will be enough to click in the register which the user wants to open and a pdf doc will start. It's necessary to have installed a PDF document viewer. Ref. Page12 Print Date Operation manual Logo 2.2. Quality Display Master data of the material In this section, the material data as well as the following associated documents can be seen as follows: ü Quality assurance sheet. ü The draw or draws associated. It's also possible to access from the Commercial display- Current purchasing docs through the link which contains the material code. In the previous image, the selection display fields can be seen. ü Material: Is the SAP material code. If no material code is indicated, the system shows all materials existing in the current purchasing docs of the supplier in particular. ü Search: It allows you to perform the function according to the data entered. ü By using the ARROW, a multiple material code selection can be carried out. ü By selecting the DIAMOND icon which is in the Material field, different search criteria can be established. Ref. Page13 Print Date Operation manual Logo In the previous image, the display with the search results ar shown. ü ü ü ü ü ü ü ü ü ü ü ü The SAP material code. Description of the material. HAC: if having a quality ensuring sheet, a link would appear. Base measuring unit. Functional group Old classification. Material type. Item set: Draw code. Subject to quality control. Center. Supplier part number and supplier It's also possible to filter by using the enable button in the top left margin. 2.3. Supplier Mailbox Display In this section of the supplier portal, both the manual (performed by the TALGO users) and the automatics notifications (created by the system itself) can be seen. Ref. Page14 Print Date Operation manual Logo In the previous image, the following fields can be seen. ü Publication date, the date when the mentioned notification was published in the supplier portal. ü Subject: It indicates if the notification has been created in a manual or in an automatic way, The main difference is that the automatics are created by the system due to determined modifications on the purchasing docs. ü Icon, defined as an "envelope" used to determine if the mentioned notification has been read by the supplier. ü Details: Field where all considerations which the TALGO user considers appropriate for the manual and the automatic notifications. The reason which causes such notification must be indicated. In order to access to its display, the link "see" must be pushed. ü Erasing icon: In the top left margin of the screen, an icon has been enable to erase the notifications which the user may consider appropriate as an individual. 2.4. Planning / Inspection Display. This display is made up by two different sub sceneries: Check the deliveries and check the delivery notifications Ref. Page15 Print Date Operation manual Logo 2.4.1. Planning / Inspection Display: Deliveries check This display purpose is that the user may see the requirements needs which TALGO have with the supplier and to create the delivery notifications. The information may be seen when accessing to the query is the following: Ref. Page16 Print Date Operation manual Logo ü Last entrance, where appears the day and the time when the user accessed to the portal for the last time. ü Filtering fields; through these fields, different filters can be done in order to show in the calendar the information according to the filter performed. o o o Material: if a material or materials are indicated, in the calendar will appear all the dates which contain needs or delivery notifications regarding the selected material or materials. Date: As well as the material, when filtering the results by date, the needs or delivery notification for that date in particular would appear Center: When indicating the right center code, it shows you the dates when there's a requirement or a delivery notification for that center in particular. ü Delays: through this functionality, you can access to all the supply delays. It's a delay if the delivering date is older than the current date. In these cases, and in the delivery notifications creation, it's necessary to satisfy, first of all, the delays needs and later the current ones. ü Erased: It will be considered that for the positions not seen by the supplier, in the list won't appear as a modification. In case the supplier has seen the position and after it's erased, then it will appear when pushing the Erased button. ü Sum: Through all this functionality, all the supply needs including the deliveries appear. ü Accumulating Dates flag: when marking this Flag, the user can add to the detail tab the supplying needs of several dates. With this functionality it's possible to carry out a long term planning. ü The dates of the calendar which appear shaded have got several meanings: o If the color is red, it means that there exists a modification in the supplying requirement or that it's new. o If the color is green, it means that delivery notifications about the quantity total have happened. o If the color is yellow, it means that still there exists a pending amount to be delivered through delivery notification. o If the color is blue, it means that the supplying requirement is provisional ü When selecting the shaded date in the calendar, a detail display will appear where the position that has supplying requirement In this tab, the following fields can be seen. o Purchasing docs: o Date requirement o Settle or Provisional: o Purchasing document position. o Material o Material short text o Amount delivered o Detail: in this field will be indicated if this is a change or it's a new position. o Delivery note: (last delivery note associated to a material, purchasing document and position) Last delivery note received by Talgo. Ref. Page17 Print Date Operation manual Logo Ref. Page18 Print Date Operation manual Logo For example, it's been chosen the date January 28, 2011, and data at detail level appear. The red color of the line means that it's a change or a new position (as it's indicated in the field Detail) On the detail screen the following actions can be carried out: o o o o o o Export: By means of this function, all the registers which are in the detail with all the information may be exported. Filter: There exists a filter at detail level in order to look for any detail in each of the fields. Check all or uncheck all function: By performing this action, you can check or uncheck all registers at detail level. Accept: Through this function, the suppler accepts the supplying need, and then the shipping notification may be performed. Reject: By this function, the supplying need is rejected from the supplier. When a line is rejected, it will appear shaded. Notice: On the accepted positions, the user will be able to create the shipping notification on the selected positions. The following statements should be pointed out. § § Shipping notifications of positions with the same center can be created. Different needs with delivery dates lower to today's plus the days period indicated by the portal supplier master may be gathered. If determined changes in the supply needs occur, the system will automatically send an email to the supplier, and a notification in the supplier mailbox informing about that information will appear. ü Creation of the shipping notification. Ref. Page19 Print Date Operation manual Logo Shipping notifications on the selected needs may be created through the Notice option. Through this functionality, you can access to the shipping notification creation screen, where it's necessary to add the following information: o Delivery date, A reference to the delivery date is made, it appears as the delivery date proposal, the purchase order or the scheduling agreement delivery. o Delivery note: It's the supplier delivery note. By this note, the supplier will make the make the purchase arrive. o Creation date: It's always indicated the current date and it can't be modified. Ref. Page20 Print Date Operation manual Logo o Remarks: in this field the supplier may indicate any information which he considered appropriate. o In the lower part of the screen, the necessity on which will be created the shipping notification is located. The value of the fields are inherited from the delivery checks information, but the amount order, which is a compulsory detail to be informed by the user and won't exceed the total amount. o Create: by using this function, the user will create the shipping notification and the shipping notification number created will be shown in the bottom of the screen.This can be seen in the following image: 2.4.2. Planning / Inspection Display: Check of Shipping notifications The notifications checking provides the user the necessary information in order to analyze all the supplying needs which possess. You can access it from the menu as can be seen in the following image: Ref. Page21 Print Date Operation manual Logo The selection criteria for searching the information are as follows: ü ü ü ü ü ü ü Delivery notification number, which is the notification number created in SAP. Date of the shipping notification creation. Date of delivery Material Supplier delivery note number. Delivery center: it's the destination of the goods. Incidences, By checking this field, the system will show all the shipping notifications which for some reason or for other have been partly delivered. Through the Search function, the system tries to find out the information according to the checked criterion and through Clear, the indicated data in the selection criterion will be deleted. Through the Search function, the system tries to find out the information according to the checked criterion and through Clear, the indicated data in the selection criterion will be deleted. The information that will be shown, it's divided into header data and position data at different levels: Header, Details and Additional details. In the "Details" level the correspondent header line will be shown. In the "Additional Details" level the correspondent header line will be shown. Ref. Page22 Print Date Operation manual Logo Header data o o o o o o o o o o Shipping notification number Shipping creation date Shipping delivery date. Supplier delivery note. Goods movement status: By this status, it will be indicated whether the shipping notification has been received or not. Remarks: In this field the remarks indicated while creating the shipping notification appears. Export: By this function, the header registers data can be exported to Excel. Print: By this function, the shipping notification form is printed. Delete: By using this option, the shipping notification on which no goods receipt has been performed can be deleted. In case any goods entrance have been received on the notification in particular, the system doesn't allow its removal. Incidences: By this function, the incidences notifications form is printed. Position data (Details): Ref. Page23 Print Date Operation manual Logo o o o o o o o Shipping notification position. Material: Material short text Center which the shipping notification was carried out for. Amount which the shipping notification was carried out for. Amount with no incidences. Notification amount received in the first delivery. Notification Status Received or not received ü Data details extended: o o o o o o o Previous document, number of header document. Previous Pos , position number of the "Detail" line where it belongs. Doc. subs. : document number of the material which created this "Extended Details" line. Pos. subs. : position number of the material document which created this "Extended Details" line. Posting. date: Material document posting date. Delivery note: Number of the delivery note registered in the "Delivery note" field of the material doc. Amount: Amount registered in the material document. Stock type: Stock typology where the material amount which we perform the movement for was placed. o Free using. o Quality Control o Quality Status o Quality control not required. o Department decision pending. Quality o Accepted. o Rejected Ref. Page24 Print Date Operation manual Logo o o 2.5. Quality status description o Quality control not required. o Quality department decision pending o Accepted with fault, after Quality Control. o Accepted without certificate, after Quality Control. o Accepted with rejected units o Accepted after Quality control. (Including any other acceptance status which it's no mentioned in the previous states). o Provisional rejection o Rejection with causes analysis requested to the supplier.(RSAP) o Rejected after the Quality Control (Includes any rejection state which is no mentioned in any of the previous ones). Inspection lot: Number of inspection lot in those notifications whose materials have been undergone to a quality inspection. Finances Display. This display is made up by three subdisplays. Line item list, quality pending list and invoice incidents lits. 2.5.1. Finances Display. Line item list. In this display, the user will be able to see the open and cleared items which come from the logistic invoices verification. In order to access the list selection criterion, you have to go to the finance menu and choose Line item list. Ref. Page25 Print Date Operation manual Logo The selection criterion are as follows: ü Open items flag: It corresponds to the items which haven't been sent for its payment. If this box is checked, the open items which are within the indicated dates on the date range both in the document date as in the posting date. ü Cleared items flag: It corresponds to the items which have been issued for its payment. ü Doc date: it corresponds to the supplier invoice date. ü Posting invoice: it corresponds to the date when the purchasing invoice is posting in case of both open and cleared items. It corresponds to the date when it's send to confirming. As can be seen when selecting the open items, the following information appears at detail level. Ref. Page26 Print Date Operation manual Logo ü ü ü ü ü ü ü ü ü Ref. Reference: Supplier invoice document number. OI/CI: stands for Open Items (OI, red icon) and Cleared Items,(CI green item) Document date. Accounting date. Net payment: for open items (for confirmed invoices, type of OI document, this date is the Confirming date) House Bank: for open items, the value is always "white",for OI documents it's always informed about the bank details. Amount in the local currency. Payment block: it indicates if it's blocked for the payment, and the block type. If the block type is A, it will be accompanied by the literal sentence: "Contact the accounting department". In case the block is R "contact to sales" and in this last case, a more detail description about the block type will be indicated. Sent to confirming in case of cleared items, it corresponds to the document date of the mentioned item. Page27 Print Date Operation manual Logo 2.5.2. Finances Display. Quality pending items list. In this display, the supplier purchasing invoice which is blocked because the received goods mentioned in the invoice is in the quality control process can be sen. In order to access the list, you have to get the Finance menu bar and choose Quality control list. The selection criterion are as follows: ü Reference: It's the supplier invoice number. ü Posting date: it's about the date when the purchasing invoice with blocked status is posted. ü Delivery note: it corresponds to the supplier delivery note number which has been used for managing the goods reception. Ref. Page28 Print Date Operation manual Logo The information may be seen at detail level is the following: ü ü ü ü ü ü ü ü ü Reference: Supplier invoice document number. Accounting date. Doc date: it corresponds to the supplier invoice date. Local currency amount (in this example it appears by mistake with zerovalue) Order: Positions: it corresponds to the purchasing order positions. Delivery note: it corresponds to the supplier delivery note Inspection lot: it corresponds to the quality inspection lot number. Usage decision: it corresponds to the valuation which has been carried out by quality management. 2.5.3. Finances Display. Invoicing incidents register. In this display, the user will be able to see the invoices with some kind of incident, which is the reason for it to be blocked until its solving. The access to this list is performed by the Finances menuàRegister I. Invoices. As can be seen in the image, the information that can be seen is the following: Ref. Page29 Print Date Operation manual Logo ü ü ü ü 2.6. Reference: Supplier invoice document number. Doc date: it corresponds to the supplier invoice date. Supplier date: the last update in the system. Additional remark: in this section, it will appear the supplier remark detail. Contacts display. The user will see the existing contacts in Talgo according to the selection criterion used. In order to access this display, the Contacts option must be chosen in the menu bar. Ref. Page30 Print Date Operation manual Logo No selection criterion exist; the information will appear according to the indicated area in the filter section. Ref. Page31 Print Date