1
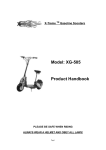
X-Treme TM Electric Scooters X-600 Electric Scooter Owner’s Manual Page1 PLEASE BE SAFE WHEN RIDING ALWAYS WEAR A HELMET AND OBEY ALL LAWS! IMPORTANT BATTERY MAINTENANCE and CHARGING INSTRUCTIONS 1. You MUST charge completely prior to initial use. (Follow charging instructions in your Product Handbook) 2. Charge immediately after each use. 3. Charge before storage. You must charge every 30 days if not in use. 4. Charge the unit for 6-8 hours or until the light on the charger turns red & green. 5. DO NOT allow this unit to deep discharge the battery. 6. For safety purposes, DO NOT charge for over 24 hours. 7. Turn the unit OFF when not in use. Failure to follow these INSTRUCTIONS will VOID YOUR WARRANTY! This PRODUCT IS NOT INTENDED FOR EXTREME or OFF-ROAD Use! Please take care of your X-600! DO NOT JUMP or ABUSE THIS PRODUCT! DO NOT RIDE IN WET/ICY CONDITIONS! Failure to follow these instructions will VOID YOUR WARRANTY! Page2 IMPORTANT PLEASE READ THIS BEFORE USING THIS PRODUCT READ THIS FIRST! WARNING This product does not conform to Federal Motor Vehicle Standards and is not intended for operation on public streets, roads or highways. Serious injury can result from the unsafe operations of this product. Operator can minimize these risks by using certain safety equipment such as: safety helmet, goggles, gloves, elbow and kneepads and appropriate footwear. DO NOT operate this product in traffic, on wet, frozen, oily or unpaved surfaces or under the influence of drugs and/or alcohol. Avoid uneven surfaces, potholes, surface cracks and obstacles. DO NOT use a water hose to clean this product. See Product Handbook for more information. This product is recommended for riders 14 YEARS OF AGE and older. SAFETY Persons without excellent vision, balance, coordination, reflex, muscle and bone strength and good decision-making capabilities should not use this product. Minors without adult supervision should not use this product. Persons unwilling or unable to take responsibility for their own actions should not use this product. The user of this product assumes ALL risks associated with its use. To minimize these RISKS, the user must wear safety helmet, goggles, gloves, elbow and kneepads and appropriate footwear. This product is ELECTRIC! puddles or rainy weather. DO NOT ride this product in wet conditions, Page3 QUICK REFERENCE SAFETY GUIDE SAFETY GUIDE The recommended minimum age for riding this scooter is 14 years old. To avoid damage to the motor and footplate, do not overload the scooter. Never ride with more than one person. Inspect your scooter thoroughly before each use for loose or missing parts. Avoid unintentional starts by turning the scooter off while not in use. To avoid the risk of a short circuit in the electrical parts, do not use your X-Treme Electric scooter in the rain and never spray or wash off your scooter with water. Do not place the battery near fire or heat. To avoid damage to the battery, do not use the charger if it has been damaged in any way. Keep hands, face, feet and hair away from all moving parts. Do not touch the motor or wheels while they are rotating. Brakes are designed to control speed as well as stop the scooter. Practice braking for proper slowing down and smooth stops. Maintain your X-Treme X-600 A-Blaze Signature Series Scooter as recommended in this Product Handbook. Use only quality replacement parts as recommended by the manufacturer. Inspect the entire scooter prior to each use. Replace any part that is cracked, chipped or damaged before use. *NEVER ALLOW CHILDREN TO OPERATE THE SCOOTER WITHOUT ADULT SUPERVISION. *NEVER ATTEMPT TO OPERATE THE SCOOTER WHILE UNDER THE INFLUENCE OF ALCOHOL. If a situation arises that is not covered in the manual, proceed with caution and use good judgment. Contact your dealer or X-Treme (www.x-tremescooters.com/support/) if you need further assistance Page4 TABLE OF CONTENTS IMPORTANT INFORMATION…………………………………….……………........................................... 2-3 QUICK REFERENCE…………………………………………………………………………………………. 4 TABLE OF CONTENTS……………………………….…………….………………………………………… 5-6 GETTING TO KNOW YOUR X-TREME X-600………………….………………………………………….. 8 PACKAGE CONTENTS & GETTING STARTED…………………………………………………………… 9 GETTING STARTED………………..……………………………..….……………………………………….. 9 ASSEMBLY, FUSE INSTALLATION……………………………….…………….........................................9-10 CHARGING, RIDING & BRAKING..………………………………………………...................................... 11 FOLDING AND STORAGE……….………………………..…………..………………………………………12 BRAKING SYSTEM………….…………………………………….…..………………………………………. 12 TIRE PRESSURE……………………………………………………...……………………………………… 13 MAINTENANCE……………………………………………………..…………………………………………. 14-15 TROUBLESHOOTING GUIDE……………………………………..………………………………………… 16 HOW TO GUIDE……………………………………………………………………………………………….. 17-23 How To Start Scooter……………………………………………………………………………………. 17 How To Adjust Chain……………………………………………………………………………………. 17 How To Adjust Disc Brakes………………………………..…………………………………………… 17-18 How To Understand Charger Light Sequence……………………………………………………….. 18 How To Check Charger Output………………………………………………………………………… 18 How To Install Bearings………………………………………………………………………………… 19 How To Remove & Insert Pin Connectors……………………………………………………………. 19 How To Determine Which Controller Version You Have…………………………………………….. 19 How To Replace/Install Controller…………………………………………………………………….. 19-20 How To Test Motor Direct To Battery…………………………………………………………………… 20 How To Check Battery Wires…………………………………………………………………………… 20-21 How To Change Charger Socket……………………………………………………………………….. 21 How To Check Fuse……………………………………………………………………………………... 21 How To Replace Fuse…………………………………………………………………………………… 22 Page5 How To Remove Rear Wheel…………………………………………………………………………… 22 How To Install Seat Extension………………………………………………………………………….. 22 How To Replace/Install Throttle………………………………………………………………………… 23 TROUBLESHOOTING GUIDE……………………………………………………………………………….. 24-29 Troubleshooting: No Power…………………………………………………………………………….. 24 Troubleshooting: After Fully Charging, Powers Only For Short Distance Use……………………. 24-25 Troubleshooting: Scooter Takes Off, Will Not Stop…………………………………………………… 25 Troubleshooting: Scooter On, Not Running…………………………………………………………… 26 Troubleshooting: Scooter Will Not Shut Off…………………………………………………………… 26 Troubleshooting: Scooter Won’t Run, Charger Stays Green……………………………………….. 26 Troubleshooting: Scooter Won’t Run, Charger Stays Red & Green……………………………….. 26 Troubleshooting: Scooter Going Slow………………………………………………………………… 27 Troubleshooting: Grinding Noise In Rear……………………………………………………………… 27 Troubleshooting: Scooter Seems Fine Until Sat On, Then Will Not Go Or Pops Fuse…………... 28 Troubleshooting: Tire Problems………………………………………………………………………… 28 Troubleshooting: Scooter Not Showing Full Charge After Charging 8 Hours……………………… 28 Troubleshooting: Removing & Checking Wire Terminals…………………………………………… 28-29 DIAGRAMS……………………………………………………………………………………………………... 30-31 Battery Wiring Diagram…………………………………………………………………………………. 30 Wiring Diagram……………………………………………………………………………………………31 OTHER QUESTIONS………………………………………………………………………………………….. 32 Page6 DO NOT RETURN TO STORE! Do not use this vehicle for the first time until you have inflated the tires to the correct PSI and completely charged the battery. Failure to follow these instructions may damage your vehicle and void your warranty. CALL OR GO ONLINE 1-253-777-0690 www.x-tremescooters.com/support/ For General Information or Parts Visit www.x-tremescooters.com Page7 GETTING TO KNOW YOUR X-TREME X-600 A-BLAZE SIGNATURE SERIES (Photo’s may vary) Page8 PACKAGE CONTENTS Your X-Treme X-600 A-Blaze Signature Series Scooter comes with the following items in the box. Please locate all of the following: 1. 2. 3. 4. 5. X-Treme X-600 Aiden Blaze Signature Series Scooter 36V Battery Charger Tool Kit User Manual and 20amp Fuses Seat Seat Post & Clamp GETTING STARTED Please read and understand these instructions and the OPERATING PROCEDURES section, prior to starting or riding your X-600 Assembly 1. Carefully remove the X-600 from the box. 2. To unfold the X-600, begin by pressing down on the FOLDING HANDLE with one hand while gently pulling up on the handlebars with the other. 3. Fully extend the handlebars to their upright position until you feel the mechanism lock into place. 4. Attach the handlebars by inserting the silver handlebar clamp onto the handlebar post stopping just below the top. Be sure to orient the bars in the correct riding position with the throttle on the rider’s right side. Secure the handlebars to the post by tightening the bolts on the clamp with the enclosed Allen wrench as shown. 5. Secure the hand brakes in place by using the provided Allen Wrench to first loosen the tension bolts. Adjust the levers to a comfortable position and tighten the bolts. *BE CAREFUL NOT TO PULL ON THE CABLES! Page9 Assembly – Cont: 6. Insert the 20amp fuse by opening the footplate cover as shown. Insert the fuse into the fuse holder then close the footplate cover. 7. Attach the seat post to the seat post receiver, then attach the clamp to the top of the seat post. Pull the upper seat post to the desired position and tighten the clamp securely. 8. Attach the seat to the upper seat post and tighten the seat bolts as shown. Page10 CHARGING Your scooter comes charged out of the carton. We still recommend charging the unit for 6-8 hours prior to it’s first use. We also recommend charging your scooter after each use and prior to storage. WARNING: Do not allow your scooter to go into deep discharge, as this will damage the batteries. 1. Make sure unit is turned off. 2. Open the charging socket cover located on the right side of the scooter frame, under the footplate. 3. Locate your Battery Charger. Find the charger socket end that has a three-prong socket and plug it into the scooter. 4. Next, plug the AC plug into a wall outlet. When first plugged in, the charger has one red light that will illuminate at the same time, indicating that the charging process has started. Once the light on the charger turns red & green, you may remove the charger and close the safety cap. RIDING 1. 2. 3. 4. Make sure that all of the exposed bolts and screws are tightened. Raise the kickstand to its upright position. Push the on/off switch (located on the left handlebar) to the ON position. Put one foot on the deck of the X-600 while pushing off with the other foot, gently rotate the THROTTLE GRIP, on the right side of the handlebars. The X-600 will begin to move on its own power. **Your scooter has a variable speed hand throttle. You can control the speed of your scooter by the amount of pressure you use when rotating the hand throttle. The more you rotate, the faster you will go. STOPPING & BRAKING 1. To brake, release the THROTTLE GRIP and depress the BRAKE LEVERS (on the Page11 left/right side of the handlebars. Depressing the brake will disengage power to the motor. When the unit feels like it is loosing power or not accelerating to full speed, the scooter is ready to be re-charged. NOTE: If the on/off switch is left in the ON position for more than 10-15 minutes without moving, Smart Power will shut itself OFF. To reset, turn the unit OFF, wait a few seconds and then switch it back ON again. FOLDING & STORAGE When you are done riding the X-600 you can fold it down for compact storage and transportation. First remove the seat post and seat, then using one hand, push down on the folding handle while gently pushing down on the handlebars. BE CAREFUL NOT TO HIT YOUR HEAD WITH THE HANDLEBAR. Push down until you feel the mechanism lock into the down position. BRAKING SYSTEM The X-600 uses a pinch braking system for the front, and a disc/caliper system for the rear They are both activated by a hand brake lever on the left and right side of the handlebar. Squeezing the hand brake lever with your left hand activates the rear brake. Squeezing the hand brake lever with your right hand activates the front brake. Make sure to release the HAND THROTTLE GRIP when engaging the brakes. Your X-600 is equipped with switches on each brake lever that will disengage power to the motor when the brake levers are depressed. Practice braking on a smooth, dry surface to get used to the feel of the braking system. Braking distance is affected by wet conditions and loose and uneven riding surfaces. Adjusting the Brakes The Brakes on the X-600 should come fully adjusted from the factory. However, it may be necessary to adjust the brakes from time to time. To adjust the rear brakes: For brakes that are adjusted too loose: 1. Adjust the tension screw on the right hand brake lever by rotating it counter-clockwise until the wheel spins freely. For brakes that are adjusted too tight: 2. Tighten the tension screw on the right hand brake lever by rotating it clockwise until the wheel has a slight drag. Page12 To adjust the front brakes: For brakes that are adjusted too loose: 3. Adjust the tension screw on the left hand brake lever by rotating it counter-clockwise until the wheel spins freely. For brakes that are adjusted too tight: 4. Tighten the tension screw on the left hand brake lever by rotating it clockwise until the wheel has a slight drag. For Further Front Brake Adjustment 4. Locate the adjustment screw on the front brake assembly (located above the front wheel). Tighten or loosen as necessary. For Further Rear Brake Adjustment 5. Locate the adjustment screw on the rear brake assembly (located on the left side of the back wheel. Tighten or loosen as necessary. SQUEAKY BRAKES The brakes may squeak before they are broken in. This is normal and will not affect the function or performance of the brakes. With continued use the squeak should go away. TIRE PRESSURE The tire must be inflated to a maximum of 50 P.S.I. It is also recommended to use a tube additive like Slime, available from any motorcycle shop, to avoid inconvenient punctures. Empty all air from the tire, prior to loosening the bolt to split the rim. MAINTENANCE RECOMMENDED TOOLS To adjust and service the X-Treme X-600 you will need the following tools: Allen Wrenches: 3/4/5/6 mm Page13 Wrenches: 10/13/13 mm Open end wrench Large Adjustable Crescent Wrench Philips Head Screwdrivers Oil, Grease or Lubricant ADJUSTING THE HEAD UNIT The head unit will come adjusted from the factory. However, riding on rough terrain and general use may cause the head unit to become loose over time. It may be necessary to adjust the head unit from time to time. To adjust the head unit: 1. Rotate the handle bar as far right as it will go to expose the HEAD UNIT. (see fig left) 2. Using a large adjustable wrench, gently turn the BEARING LOCK clockwise to tighten. *DO NOT OVER TIGHTEN OR IT WILL DAMAGE THE BEARINGS. ADJUSTING THE CHAIN The chain will come adjusted from the factory. However, it may be necessary to adjust the chain from time to time. The chain must be well aligned onto the sprockets in order to avoid uneven wear. This will result in shortened chain life. How tight should the chain be? If the chain is skipping or jumping on the sprockets, this is too loose and may be harmful. If the chain is making a humming sound when the wheel is turning, this is too tight and may cause the chain to snap. The correct tension is achieved by adjusting the chain from its loose position to when it becomes lightly tense. Page14 To tighten the chains: Slightly loosen the two axle bolts on both sides of the rear wheel. (Fig.14). Then slowly adjust the two adjusting screws on each side of the rear tire (Fig.15) until chain reaches the proper tension. Rotate the rear wheel to make sure the chain is aligned. Finally, lock and tighten the rear axle bolts prior to riding. MAINTENANCE SCHEDULE Proper care of your X-Treme X-600 will insure optimal performance and longer life span. The following are a few maintenance suggestions that will keep your X-Treme X-600 running in top condition: Daily Maintenance Perform each time you ride your X-600 Clean the exterior of the unit with a soft, damp rag. (DO NOT WASH WITH A HOSE) Check that all nuts and bolts are securely tightened. Lubricate the chain with any silicone spray, 3&1 oil or any good clean motor oil. Check battery charger for any frayed/cut wires. Page15 Basic Troubleshooting Guide SYMPTONS POTENTIAL CAUSE SOLUTION The charger light turns 1. This indicates the 1. Continue to green & red right away batteries are charge the adequately batteries for 6-8 charged. hours prior to initial use. 2. Bad Fuse or open connection 2. Check Fuse: between charger Look for loose or socket and disconnected batteries. wire Batteries do not hold a 1. Batteries have 1. Replace Batteries charge. Unit does not reached the end have specified travel of their useful life. range. 2. Charger is 2. Replace Charger malfunctioning. Unit. Unit moves intermittently 1. Batteries not fully 1. Charge or or very slow. charged. replace batteries. 2. Loose Wire. 2. Check for loose 3. Bad Throttle or wires controller. 3. Replace Unit will not move when 1. Batteries not fully 1. Replace batteries throttle lever is charged. or charger. activated. 2. Brake switches 2. Loosen brakes out of adjustment 3. Replace 3. Batteries have batteries. reached the end of their useful life. Unit stops abruptly 1. Fuse Blown 1. Replace Fuse during use. 2. Loose or broken 2. Check for loose wire. or broken wires and repair/replace. Page16 How To Start Scooter When starting the scooter, be sure the fuse in in scooter. Please make sure the battery is charged. When ready to start scooter squeeze left brake handle while starting scooter. There is a safety switch in the left brake handle to start scooter. How To Adjust Chain Tension 1) Loosen the axle nuts. 2) Then locate the chain tension bolts. These bolts go from the rear axle to the frame. Make sure each side is adjusted equally as this can make the scooter wheel and chain out of balance. 3) When you tighten the nuts on these bolts, they pull the whole axle and wheel back, tightening the chain. 4) Adjust the chain until when pushing down in middle you achieve 1/8" to 1/4" inch movement. 5) These bolts also controls wheel alignment, be sure to center the wheel in the center of frame. 6) After you have adjusted your chain and aligned your wheel tighten the axle nuts. ______________________________________________________ How To Adjust Disc Brakes 1) At the brake lever on the handle bar adjust the cable all the way in making the cable looser (not tighter). 2) At the Brake Caliper there is a small nut holding the cable to the caliper. Loosen this nut. 3) Spin wheel and back out brake pads as needed. 4) Pull the cable to the desired brake tension - move the arm that it is attached to . 5) When you have the desired tension tighten the nut back down on the cable. This will be the base setting for your brakes. 6) Use the small knob on the caliper to adjust the space between your brake pads. This is the knob with the grip pattern on the sides. 7) For further fine tuning adjust the small silver cone attached to the handbrake lever. This Page17 will slightly change the brake tension to get it where you are comfortable. How To Understand Charger Light Sequence - When you plug your charger into the wall the light should turn green. - Plug your charger into the scooter and it should turn to red for a good period of time. *** This indicates that the charger sees the batteries and charge cycle started. - If there is no red light then charger is not making a connection to the batteries to charge them. - Check for a loose wire on the back of the charge socket or bad fuse/fuse holder. - If the charger just turns red for a minute or two, this may indicates a defective cell in one of the batteries and batteries will need to be replaced. *** A defective cell reacts like a fully charged battery and will bring other batteries down to its level. - If a flashing red light appears on the charger, this may indicate the charger wires are crossed and/or touching each other. *** In most cases if the scooter runs a shorter distance the batteries may be beyond their life cycle. How To Check Charger Output Tools Needed – Multi-meter set to DC voltage. 1) Determine the total DC voltage output of your scooter and set the multi-meter Above that amount. 2) Plug the charger into a 110v outlet, but do not plug it into the scooter. 3) Place the multi-meter probes into the holes to the left and right of the indented key on the charger output side (connector that goes to the scooter). *** Attention: DO NOT allow the two probes to touch each other while in the charger socket as it may cause a short and/or spark. 4) This will give you the charger output reading to compare with what your scooter requires. Page18 How To Install Bearings 1) Remove the front/rear wheel. 2) Remove the old bearing. To do this, you will need to insert something, like a screw driver, from the opposite side and simply push it out. 3) Put the new bearings in. You will want to use something like a rubber mallet so you do not crack the bearings. Set the wheel on a flat, absorbent surface, like a work bench. Tap the bearing into the wheel evenly. 4) Re-install the tire and test ride. How To Remove & Insert Pins In Connectors 1) Look down inside the connector; you will see a metal pin. The pin is held in place by a small tab that bends outward. 2) Reach inside the front of the connector with a dental pick or jewelers screwdriver and bend the tab in then pull the metal pin out the back of the connector. 3) Reinsert the new wires into the white connectors. How To Determine Which Version Controller You Have Version 1 – All 8 white connectors Part #X600-220-1 Version 2 – 6 White & 2 Black Connectors Part #X600-220-2 How To Replace/Install A Controller 1) Remove Main Fuse. 2) Gain access to where the Controller is located. 3) Place the New Controller alongside the Original Controller. 4) Disconnect and re-connect One (1) Connector at a time. We recommend starting with the Page19 Largest Connector and working down to the Smallest Connector. This will avoid confusing the connectors. 5) With the Original Controller free of all wire connectors remove from frame. 6) Install the New Controller in its place with the original screws if equipped or with Double Sided Tape. 7) Install Main Fuse. 8) With Drive Wheel Not touching Any surface test run the motor and check accessories to confirm that they are functioning correctly. 9) Re-assemble and test ride. This is also a good time to perform a full check of the brakes, tire air pressure, etc. 10) Do this for all the white connectors. Remove the old controller from the scooter and install the new controller. How To Test Motor Direct To Battery ** ATTENTION: Prop the scooter up so that the rear wheel is NOT touching the ground. In this test the drive wheel will run Full Speed. 1) Access the Battery and Controller compartment. 2) Locate the Connector from the Battery to the Controller and label the male & female sides for reference. 2) Locate the Connector coming from the Motor to the Controller and label the male & female sides for reference. 3) Unplug the Batter and Motor connectors and plug them Directly into each other. **Caution** This will bypass the controller and put power directly to the motor. - If the Motor is good and the Batteries are charged the wheel will spin at full power in which case the Controller may need to be replaced. - If the Motor did Not run then the Batteries will need to be checked to confirm they are holding a charge. - If Batteries are holding a charge then the Motor will need to be checked or replaced. How To Check Battery Wires Please check the wires in your battery and controller area. Give each wire at the connection a firm but gentle tug pulling away from the connection. Look for any loose, bare, blackened, broken, or disconnected wires. 1) Check the wires at the rear of the charging socket Page20 2) Check the wires at the rear of the fuse holder 3) Check all fuses 4) Check the wires that connect the batteries together 5) Check the connections on the controller How To Change Charger Socket 1) In order to swap out the charging socket, first you must remove the 4 bolts that attach the seat post to deck and 2 bolts on deck up front. 2) Remove foot deck, if bolts get stripped you need to drill off the heads using 1/4" drill bit, or use vise-scrimps. 3) Locate the charging socket mounted into frame; follow the wires back to a silver box. You'll see a white connector to disconnect the wires to charger socket. Unscrew the nut on the inside holding the socket to frame. 4) Take something small like a paper clip and straighten and poke down inside the white connector to release gold pin lock and pull wire out from connector. Make note of which wire went into which connector holes. 5) Remove socket from scooter, and install new socket back thru hole. 6) Install nut to secure socket onto frame. 7) Then bend out locking tabs on gold pins and reinsert into connector. (Red on Red/Black on Black) and connect into silver box. 8) Plug in charger into wall and a green light should appear on charger. Next plug into scooter, charger should turn red when connections are correct. 9) Reattach foot deck. 10) Let unit charge for 8 hrs. How To Check Fuse Fuse Located on Side: - Look on the left side of the scooter below the floor plate to see if it has a round black fuse holder. If the fuse holder is located in this area, check to see if the fuse was installed. Fuse Located with Batteries: - If the fuse is not on the left side of the scooter remove the seat post and lift up the footplate. - On the top of your batteries should be a blue square box which is the fuse box. - This is where you will install the spade fuse. - When installing the fuse you may see a spark. This is normal. Charge Batteries: - Your scooter will now need to be charged. - After your batteries have fully charged your scooter is ready to ride. Page21 How To Replace Fuse 1) To replace the scooter fuse locate the spare 20amp glass fuse that came with the scooter. 2) Set scooter so that the rear wheel is not touching any surface. 3) Install the new fuse in the Fuse Holder which is located under the foot plate on the left side of the scooter frame near the charger socket. 4) Confirm that it is securely installed. 5) Perform a test run with the rear wheel off of the ground. 6) If it does not run check the wires on the back side of the fuse socket for secure connections. Check all other wire connections at this time. How To Remove Rear Wheel 1) Block your scooters so the rear wheel is off the ground. 2) Remove the two 5mm allen screws from your rear brake caliper. Remove the caliper and set aside. 3) Loosen the two 17mm axle nuts. Loosen the chain adjusters (they are attached to the axle and the back of the frame) until you can move the wheel forward enough to remove the chain. Slide the wheel out of the frame. 4) Reassemble in reverse order. 5) Tighten chain adjusters evenly keeping wheel straight with the frame. The chain should be fairly tight with only slight up and down movement. How To Install Seat Extension 1) To install your seat post extension you must remove the seat post from the extension. 2) Place some oil into the extension socket on your scooter. 3) Try to install the seat extension into the socket. If it still will not go into the socket, use a rubber mallet and drive the seat extension into the socket until the cross pin in the extension seats into the slot in the socket. 4) There is no pin or bolt for the seat extension. The cross hole in the seat socket is not drilled through the plastic insert. Page22 How To Replace/Install Throttle You can the remove and reinstall the throttle wire through the steering tube but it is much easier to cut and splice the wires at the handlebar. 1) Remove handlebar grip. 2) Cut throttle wires halfway between the throttle and the handlebar tube. 3) Loosen throttle bolts. 4) Remove old throttle. 5) Install the new throttle and tighten bolts. 6) Cut wires from new throttle leaving enough room to mate new wires with the old. 7) Splice wire together matching wire color. 8) You can solder the wires, use crimp connectors or just twist the wires together and tape. Page23 Troubleshooting: No Power In this situation we will assume that the battery has been charged or allowed to stand for several hours (a battery will normally self-charge up to a point and make the scooter power up for a fair distance). There are generally two main suspects: 1. First suspect a loose or broken connection. Take the top or deck off to see the wiring and inspect it for any loose or broken connections on the battery, switch, controller, etc. 2. Second suspect the controller box has failed. Since the controller is the heart of the system it can fail in many ways to prevent current from being supplied to the motor. 3. Other less likely suspects can be: A battery that is completely open, supplying no current and possible even testing as having no voltage. It can be very briefly shorted with a wire to see if an arc is produced, revealing current is present. It is also possible to have a bad brake lever or throttle since both have wiring and switches or variable controls. The brake lever has a power cut-off switch. The throttle variably controls the speed of the scooter. The scooter On/Off switch can be defective. Without a good switch the scooter has no power, but the test of this is the power light. Does the power light come on when the switch is activated to the on position? Troubleshooting: After Fully Charging, Powers Only For Short Distance Use 1. Suspect the battery charger or the battery as the primary cause of short distance riding after a lengthy or full charge. If your battery charger does not have charging indicator lights then you may not be charging the battery at all if the charger is defective. 2. The battery may be self-charging to only about 60% on its own. If the battery is getting old then it may not be able to hold a full charge and the battery will need replacement. When suspected you can very briefly arc across the battery terminals with a insulated wire to see if it produces a nice arc. . It is also possible to test some individual battery 12 volt cells using 12 volt motors or lights that will show you the available current capability. Is the 12 volt light dim on a charged battery? Does the 12 volt motor run slowly when connected to the cell? Similar type tests can be performed using a 24 volt battery cell, too. WARNING! Batteries contain acid that can explode, or the vapors ignite from an arc. Batteries produce Page24 current and voltage that can burn you when a shorted circuit occurs. Be absolutely sure you know what you are doing before trying any tests to eliminate a component from consideration of being defective!!! 3. You can take the battery to a shop capable of testing the battery under a loaded condition. Fully charge the battery and carefully remove it. Let a technician determine the condition of the battery for you. 4. We absolutely recommend a high quality Battery Charger as sold on our scooter parts page. Troubleshooting: Scooter Takes Off, Will Not Stop A) If the scooter is moving when you turn the key to the “on” position without turning the throttle you will need to replace the throttle or control box. B) If scooter takes off without turning the key to “on” – you need to replace the control box Scooter not moving and Lights do not work using battery, but lights do work when you plug the charger into the side of the scooter and also plug the charger into the wall-Scooter will not move at all and all lights do not work (lights do work when you plug the charger into wall): A) No fuse in fuse assembly= add one of the fuses includes with the scooters B) Bad Fuse= unscrew the cap only on the fuse holder. Remove the fuse and make sure that the fuse is not blown (a good fuse will have a solid wire from one end to the other, a bad fuse=the wire inside is broken) C) Bad fuse holder = fuse assembly may be cracked or have a bad connection within it. D) Bad control box E) Possibly bad battery, although this is rare. F) Wires behind fuse assembly have come off due to improper replacement of fuses or loose wire connections to the battery. This is always due to the customer rotating the whole fuse assembly (when changing fuses) and twisting the 2 wires that are in the back of the fuse holder. You must open up scooter and reattach these wires to back of fuse assembly or to battery and control box. If this is the problem the lights WILL work when you have the charger plugged in. Page25 Troubleshooting: Scooter On, Not Running Follow the wire from the left handbrake down under the foot plate. Unplug this wire. There is a safety in that brake that will not allow the motor to run when the brake is being applied. Make sure the rear wheel is off of the ground, then try turning the throttle with this unplugged. Troubleshooting: Scooter Will Not Shut Off Place the scooter off the ground so the rear wheel will not touch the ground. You do not want your scooter to take off. Take the footplate off. Disconnect the throttle clip under the footplate, then turn the scooter on and see if it still runs. If it does, you will need a new controller. Troubleshooting: Scooter Won’t Run, Charger Stays Green When you plug your charger into your scooter and the wall outlet the charger light stays green. This is telling me that somewhere between charger socket, controller, fuse holder and batteries you have an open circuit. Please remove the floor plate and check the wires in this area. You may find a wire that is not connected, a connector that is not pushed together properly or a fuse holder that is not letting the fuse connect properly. Troubleshooting: Scooter Won’t Run, Charger Stays Red & Green When you plug your charger into your scooter and the wall outlet the charger light stays green. This is telling me that somewhere between the batteries, fuse, and charger socket you have an open circuit. Please remove the floor plate and check the wires in this area. You may find a wire that is not connected, a connector that is not pushed together properly or a fuse holder that is not letting the fuse connect properly. Page26 Troubleshooting: Scooter Going Slow a) Motor is bad=THIS IS THE MOST COMMON REASON. Maybe the scooter goes fast if you lift the back wheel off the ground, but very slow when you sit on it. Sometimes you will smell the engine burning or you will hear it making a clicking noise. b) Battery needs to be recharged. c) Maybe one of the batteries needs to be replaced – check output of battery with an electrical meter. d) Scooter is braking so the brakes need to be adjusted – If you are simply pushing the scooter when the ignition switch is turned off and the scooter very hard to push then you know that the scooter is always braking. e) The rear chain sprocket and the sprocket on the end of the motor are not properly lined up. You have to loosen the two outer nuts on the back wheel axle and adjust the back tire so that the chain lines up straight f) The chain is too loose or the chain is too tight. Loosen up the nuts on the back axle and move the back wheel forwards to tighten the chain or backwards to loosen the chain. g) Make sure the tires have sufficient air but this usually is not the problem. h) Maybe bearings are worn out. Sometimes you can disconnect the chain and spin the back wheel and still hear the problem bearing. Troubleshooting: Grinding Noise In Rear a) MOST COMMON= motor is making noise – replace motor. If you take off the chain and run the scooter, does it still make a noise=if so, then it is definitely the motor. b) Bearings damaged in rear wheel – replace bearings. c) The chain is too loose or the chain is too tight. Loosen up the nuts on the back axle and move to back wheel to tighten or loosen the chain. d) The rear chain sprocket and the sprocket on the end of the motor are not properly lined up. You have to loosen the two outer nuts on the back wheel axle and adjust the back tire so that the chain lines up straight. Page27 Troubleshooting: Scooter Seems Fine Until Sat On, Then Will Not Go Or Pops Fuse Most common fix - front tire-fork is backwards. Loosen clamp on post and spin tire-fork around. Troubleshooting: Tire Problems Tire will not inflate – have broken inner tube. Replace. Troubleshooting: Scooter Not Showing Full Charge After Charging 8 Hours a) Charger may be bad. Replace charger. THIS IS MOST COMMON. b) Charger connection on scooter is bad- usually a wire on the back of this charger connection is not attached to the assembly. c) Maybe the connection problem from the charger wire to the controller. d) Maybe the controller is bad. e) Rarely, one of the 2 cells of batteries is bad. Troubleshooting: Removing & Checking Wire Terminals We've have found at times when the steps that have been taken do not resolve the issue, it's a wire to terminal issue. Possibly when a terminal was soldered to a wire end the connection was not good. Either the insulation was not stripped off enough to expose the bare wire for soldering or the soldering itself is not good. This type of condition can cause various symptoms at different times. The terminals can be removed from the connectors by using a small jewelers screwdriver or wire such as a straightened out large paperclip. There's a small metal tab on the terminal that is angle to catch on the connector housing to secure the terminal in the connector. By pushing or flattening the metal tab from the wire side of the connector you can pull the wire and terminal out of the connector. Carefully angle the tab back out slightly so it will catch when re-installed. Check the wire to terminal connection condition, solder, etc. and repair Page28 accordingly. It is suggested to do this one wire at a time to confirm the wires remain in the correct position or label or diagram in such a way you can reassemble in the correct positions. Page29 Page30 Wiring Diagram Page31 OTHER QUESTIONS For additional questions, service instructions, further information and important phone numbers, please go to the X-Treme website at www.x-tremescooters.com Thank you for purchasing an X-Treme X-600 and please tell your friends how much fun you’re having on the X-Treme X-600 DO NOT RETURN TO STORE! IF YOU NEED HELP CALL OR GO ONLINE 1-253-777-0690 www.x-tremescooters.com/support/ For General Information or Parts Visit www.x-tremescooters.com Page32 Revised 04/16/13