1
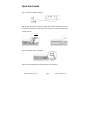
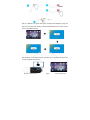
Touchjet Pond™ Projector User Manual © 2015 Touchjet Pte Ltd. Page0 www.touchjet.com Quick Start Guide Step 1: Connect the Power Adapter. Step 2: Slide and hold the Projector Power Slider Switch toward the front for 3 seconds. The fan should start spinning and the green power indicator light should come on. Step 3: Adjust the focus as needed. Step 4: Insert 2 AA batteries inside the Stylus then power on. © 2015 Touchjet Pte Ltd. Page1 www.touchjet.com Step 5: Calibrate your Stylus with your Touchjet Pond Projector using the Stylus or your Airmouse remote to access the calibration icon on the top left corner of the Home Screen. Step 6: Return to the Home Screen and select your first Android app to use on your projected touchscreen. © 2015 Touchjet Pte Ltd. Page2 www.touchjet.com Safety and Precautions! DO NOT expose the Projector, Stylus or Airmouse to water or wet surfaces. Electric shock may occur. DO NOT stare directly into, or directly expose others’ eyes to, the bright LED Projected Light Source of the Projector. DO NOT block or restrict airflow from the Projector’s ventilation holes, as this may cause the Projector to overheat. DROPPING the Projector, Stylus or Airmouse remote may cause damage and malfunctioning of the devices. © 2015 Touchjet Pte Ltd. Page3 www.touchjet.com Table of Contents A. Touchjet Pond Projector at a Glance B. What’s In the Box -‐ Accessories C. Getting Started D. Stylus Calibration E. Connecting to WiFi F. Signing in to Google G. Other Connections H. Specifications I. Troubleshooting Guide J. Terms and Conditions of Use K. One-‐Year Limited Warranty L. Contact Information Touchjet and Touchjet Pond are trademarks of Touchjet Pte Ltd. and its affiliates. Other trademarks are owned by their respective owners. © 2015 Touchjet Pte Ltd. Page4 www.touchjet.com A: Touchjet Pond Projector at a Glance The Touchjet Pond Projector (Projector) is a tiny handheld projector with an embedded Android system that turns any surface into a giant touchscreen. The Projector combines a high-‐performance projector with a full computer running the Android operating system and about 18 GB of built-‐in user memory. The image it projects acts as a touch screen when used with the Stylus or Airmouse remote (Airmouse). It can work with up to 4 styli simultaneously (2 are provided; others may be ordered separately). The front of the Projector contains the bright LED Projected Light Source (A) and a Stylus Tip Sensor that picks up the positions of one or more styli. On the right side (as you face the projection surface), there is a Power Slider Switch (B) and a Focus Wheel (C). On the left side, there is an Indicator Light (D) that glows green when the unit is on. It also has a small built-‐in speaker for sound. © 2015 Touchjet Pte Ltd. Page5 www.touchjet.com Front of Projector Stylus Tip Sensor (A) Projected Light Source Side of Projector (B) Power Slider Switch (C) Focus Wheel There are 4 connectors on the back of the unit: (E) A DC In Connector for the Power Supply (included in your Touchjet Pond kit); (F) A 3.5mm Audio Jack to connect to earphones or an external sound system; (G) A Mini HDMI Connector to repeat the display on another TV, © 2015 Touchjet Pte Ltd. Page6 www.touchjet.com recorder or video system; and (H) A Mini USB (OTG) Connector to connect to a PC or other accessories (cable included in your Touchjet Pond kit). Back of Projector (G) Mini HDMI Connector (E) Power Supply (H) USB(OTG)Connector (F) Audio Jack On the bottom of the Projector is a standard threaded camera mounting hole for use with a tripod. © 2015 Touchjet Pte Ltd. Page7 www.touchjet.com B: What’s In the Box -‐ Accessories Your Touchjet Pond kit contains the following: 1 Touchjet Pond Projector (Projector) with built-‐in computer, Android operating system and 18 GB of user-‐addressable memory. A number of useful Android apps come preloaded on the device. 1 Power supply (5vdc, 3A) to power the Projector and recharge its built-‐in battery 2 Styli 1 Airmouse 1 USB (OTG) cable for PC hookup or accessories 1 User Guide 6 AAA Batteries (for the two styli and Airmouse) 1 Carrying case © 2015 Touchjet Pte Ltd. Page8 www.touchjet.com Stylus Using infrared (IR) sensor technology in the device and included stylus, users can control and interact with Touchjet touchscreen projections. The stylus contains a tiny infrared emitter that is captured by a built-‐in infrared camera and translated into standard input for the Android system. Our IR sensor can even support two styli for multi-‐touch apps. The stylus is fully compatible with any existing Android application. Your Touchjet Pond kit comes with 2 Styli that can be used by two people simultaneously for applications and games. Two additional styli may be used simultaneously for up to four users (extra styli must be ordered separately). The Teflon point of the Stylus contains a small infrared (invisible) light source that can be detected and located by the Projector. This light source is activated when you touch the projection surface or press the small Pointer Button (A). The longer Power Switch (B) is a slide switch to turn on power to the device. Power is turned on when the slide switch is pushed toward the Stylus tip, covering the small indent mark. It is turned off when pushed in the opposite direction. To check that the power is on and the batteries are still good, push the Pointer Button and look at the tip in a darkened environment or your cupped hand – you should see a faint red glow. © 2015 Touchjet Pte Ltd. Page9 www.touchjet.com At the back of the Stylus is a small Battery Cap (C), which may be unscrewed from the body. The cylindrical body holds two AAA batteries, which should both be inserted with their positive ends (anode) pointing towards the tip. Although the Stylus uses minimal power, it is a good idea to turn it off while not in use to preserve battery life. Airmouse Remote B F D G E H I J F K A C The Airmouse allows you to control the Projector and Android apps without touching the display unit. It can connect to the Projector in two different ways: by an infrared beam pointing at the back of the Projector or by a Bluetooth (wireless radio) connection (see instructions below). Refer to the figure above: A. Battery Case – Below the button panel is a white area with the Touchjet logo. Hold the Airmouse upside down and push to slide this panel with your © 2015 Touchjet Pte Ltd. Page10 www.touchjet.com thumbs to reveal a compartment for two AAA batteries. Place two AAA batteries inside as indicated, then slide the panel closed. B. Power Button – Press once to switch the Projector to standby mode, and repeat to turn the power on. Alternatively, the Power Slider Switch on the Projector has the same function when briefly activated. C. Volume Control – Use the volume keys to adjust the speaker volume. Note: There is no volume control on the Projector itself. The volume of the speaker may only be adjusted using the Airmouse or software controls in the Settings Screen or in the chosen Android app. D. Home Key – Press to bring up the Home Screen on the projector. E. Arrow Keys – These keys can be used on the Home Screen and other screens to highlight icons in the direction of the arrow pressed. F. Return Button – Press to back to the previous screen. G. Airmouse Button – Press repeatedly to switch between airmouse and remote mode. H. Press to bring up the Source menu. I. Press to bring up the Setting menu when there has setting menu. J. Press to bring up the stylus calibration screen. k. OK Button – When the desired icon or function is highlighted with the arrow keys, press the OK Button to activate it. © 2015 Touchjet Pte Ltd. Page11 www.touchjet.com To establish a Bluetooth connection: Use the Airmouse Home Button or a Stylus to get to the Home Screen, then activate the “Gear” icon to bring up the Settings Screen. Look for the Bluetooth Switch on the screen and turn it on by tapping it with the Stylus. On the Airmouse, press the “mouse” button and hold it for up to 5 seconds until the red indicator light starts blinking (it does not have to be pointed at the Projector). It is now ready for “pairing”. On the upper right corner of the projected screen, select “Search for Devices.” A list of available devices will appear, and among them will be “TJAIR”. Select this device with the Stylus. The screen will indicate that the devices are “paired” (working together), and the red light on the Airmouse will become steady. You may now point the Airmouse at the projected image from a distance. The cursor on the screen will move as directed by the Airmouse. If you move the cursor onto a selectable icon, that icon may be activated by pushing the OK Button. The Airmouse will remain paired with the Projector thereafter but will go into “sleep” mode if not used for a few minutes and the red indicator turns off. Awaken it by pressing the Airmouse Power Button just once. © 2015 Touchjet Pte Ltd. Page12 www.touchjet.com C. Getting Started 1. Remove the Battery Cap of the Stylus and insert two AAA batteries, anodes (positive ends) toward the tip of the Stylus. Screw the cap back on and slide the Power Switch on the Stylus toward the tip. Press the small Pointer Button on the Stylus to make sure the tip faintly glows red. If so, the Stylus is active. 2. Connect the Power Supply to the Projector. 3. Connect the Power Supply to an outlet. 4. Power on the projector: Set the projector up on a tripod or flat surface and point it toward the projection screen or wall. A typical distance for clear viewing is 1 to 2 meters (3 to 6 feet). Slide forward and hold the Power Slider Switch on the right side of the projector for 3 seconds. • The Power Slider Switch’s green LED light (on the left side) will turn on when the projector is on. • In about 1 minute, a display will appear on the projection surface. To put the Projector in standby (power-‐saving) mode, press the Power Button on the Airmouse or slide the Power Slider Switch on the Projector forward briefly (holding the Power Slider Switch for 3 seconds will shut the power off completely). In standby mode, the optical engine should power off and the fan should stop spinning. The Projector can be turned on again from standby mode and return to the previously shown screen using the Airmouse Power Button or by sliding the Power Slider Switch on the Projector forward briefly. © 2015 Touchjet Pte Ltd. Page13 www.touchjet.com 5. Position the Projector at a distance from the projection surface that yields the desired projected image size and brightness. Adjust the Focus Wheel in front of the Power Slider Switch until the image is in sharp focus. The image should be similar to the figure below: 6. Touch the active Stylus to the center of the projected image (do not block the optical path between the Stylus tip and the Projector). In order to have accurate placement and interaction of the Stylus, perform a calibration (see next section). © 2015 Touchjet Pte Ltd. Page14 www.touchjet.com D. Stylus Calibration 1. Make sure your Projector is on and that you are projecting your screen onto on even surface of your choice. 2. When you touch the Stylus to the projected image, a white dot will appear. Move the stylus down and to the left of the screen until the white dot appears over the Target Mark (pictured below). Tap the Stylus there. © 2015 Touchjet Pte Ltd. Page15 www.touchjet.com 3. Follow the onscreen instructions to calibrate the Stylus position. Keep the tip of the Stylus depressed on each mark for about 3 seconds. Remember to hold the Stylus at an angle, as you DO NOT want to block the infrared light signal between the device and the Stylus. Also, make sure you press down lightly on the Stylus when performing this step to activate the signal. If you hold the Stylus on the surface so the tip is slightly depressed and then slide it around the surface, it is like sweeping your finger on a tablet or smartphone. You can draw with it or move things around, depending on the app. Note: If you do not use the Stylus for more than 3 minutes or so, the Projector puts its Stylus detection functions to sleep to save power. The first tap of the Stylus thereafter awakens the functions but may not register until the second tap or movement. © 2015 Touchjet Pte Ltd. Page16 www.touchjet.com E. Connecting to WiFi Before setting up or signing in to your Google account, you must first connect your Projector to a wireless connection (WiFi). The Settings Screen can be accessed by clicking on the “Gear” icon pictured below: Then turn on WiFi and select the correct WiFi device. After entering the password, you should automatically be connected to your WiFi router. Note: Troubleshooting for router and WiFi connection issues is beyond the scope of this User Guide. For problems connecting to a router, we suggest that you contact your router manufacturer or search the Internet (“Troubleshooting WiFi for Android”). After you are connected, you will see the WiFi indicator at the top right of the display. Tap anywhere on the screen to see the Android menu on the bottom of the screen. Tapping the envelope-‐shaped icon there will get you back to the Home Screen. © 2015 Touchjet Pte Ltd. Page17 www.touchjet.com F. Signing in to Google Once you have a connection to the Internet, you will be presented with the choice of logging on to an existing Google account or to create a new one. An email address and password that you use for any of the following applications will work for your Google account: • Gmail • YouTube • Google Apps • Any other Google product Assuming you already have a Google account, enter your username and your password to sign in. When you sign in, all emails, contacts, Calendar events and other data associated with that account are automatically synced with your device. If you have multiple Google accounts, you will be able to add your other accounts later. If you do not have a Google account, you can create one using your Projector (or a PC connected to the Internet) by choosing a username and password. It may take up to 5 minutes to connect to the Google servers. © 2015 Touchjet Pte Ltd. Page18 www.touchjet.com Once you have signed in and connect to the Google Play store, you may download any apps that you wish. Most Android apps work well with the Projector. Note: The Projector does not have the following sensors or devices common to most smartphones and tablets and thus is not guaranteed to properly run apps that use or require these sensors: • Cell phone transceiver • GPS receiver • Compass • Accelerometers and position sensors • Camera • Built-‐in microphone © 2015 Touchjet Pte Ltd. Page19 www.touchjet.com If you want to delete an application from system, please go to setting-‐>apps and click the app that you want to uninstall. © 2015 Touchjet Pte Ltd. Page20 www.touchjet.com G. Other Connections The 4 connectors on the rear panel of the Projector work as follows: DC In: For connecting to the Power Supply, which provides 5 VDC and 3 Amps when inserted into a wall socket providing between 100 and 240 VAC (cable included in your Touchjet Pond kit). Audio Out: When a 3.5mm Audio Jack is inserted, the built-‐in speakers are muted and the signal may be used for earphones or another external sound system (cable not provided). HDMI: This Mini HDMI Connector may be connected to another video source such as a PC, recorder or video camera to use the Projector as a projector only (cable not provided). USB: This Mini USB (OTC) Connector can be used for accessories, such as a USB memory stick, mouse or keyboard, or to hook the Projector up to a PC (cable provided in your Touchjet Pond kit). To transfer data between the Projector and the PC, file transfer apps may be needed (check iTunes or Google Play stores). © 2015 Touchjet Pte Ltd. Page21 www.touchjet.com H. Specifications Item Description Optical Technology Multi-‐Touch Light Source LED Lifetime Contrast Resolution Aspect Ratio Projection Distance WVGA 0.3” DLP Multi stylus based optical touch RGB LED 20,000 hours 1000:1 854 x 480 Pixels (WVGA) 16:9 (4:3 compatible) 50 cm ~ 300 cm (14 ” ~ 85 ”) AC Mode: Up to ANSI 80 Lumens Brightness Battery Mode: Up to ANSI 50 Lumens Focus Manual Lens Offset 100% Internal Memory 4 GB + 16 GB (Internal SD Card) Internal Speaker Mono USB Micro USB; USB AV source Mini HDMI Audio-‐out 3.5 mm mini jack Cooling Active Power Supply Input: 100 ~ 240V AC; Output: 5V, 3A DC Built-‐in 4000 mAh, 3.7 V , Li-‐polymer rechargeable Battery Type battery Battery Lifetime 120 min (ECO mode) Power Consumption 15W Dimensions (L x W x H) 108.5mmX97.6mmX33mm Weight 273g © 2015 Touchjet Pte Ltd. Page22 www.touchjet.com I. Troubleshooting Guide 1. Projector does not turn on. • Is the Power Supply plugged into a live wall outlet? Check the outlet with another device requiring power, such as a lamp. If so, • Is the 5v connector fully inserted into the DC In Connector on the Projector? If so, • Did you slide and hold the Projector Power Slider Switch toward the front for at least 5 seconds? If so, • Is the green indicator light illuminated on the right side of the Projector? If not, the unit may be defective. Please contact Touchjet Customer Support. • If the green indicator light is on and there is no light coming from the Projector, the unit may be defective. Please contact Touchjet Customer Support. 2. An image is projected but does not respond to the touches of the Stylus. • Is the Power Switch on the Stylus pushed fully toward the ON position (toward the tip)? If so, • Cradle the tip of the Stylus in your other hand and push the small Pointer Button. Do you see a faint red glow at the tip? If not, © 2015 Touchjet Pte Ltd. Page23 www.touchjet.com • Unscrew the Battery Cap and assure that there are 2 fresh AAA batteries inserted with the anodes (plus pole) toward the tip. Repeat the previous step. Do you see a faint red glow at the tip? If not, the Stylus may be defective. Please contact Touchjet Customer Support. • If you see the red glow when you push the button and the projected image still does not respond to touches of the Stylus, then o Is there anything (such as your arm or sleeve) blocking the path between the tip of the Stylus and the Projector? If not, o Try touching the projected image with the Stylus at other points. Make sure you touch with enough pressure to observe the faint red glow at the tip. If it still does not respond, try “re-booting” the Projector. Slide the Power Slider Switch toward the front of the unit for about 5 seconds until the green indicator light goes off and you feel no fan vibrations. Then slide and hold it again until the green indicator light comes back on. Make sure the Stylus is powered on and try touching the image once more. o If there is still no response, the unit may be defective. Please contact Touchjet Customer Support. 3. The Stylus calibration is not working. © 2015 Touchjet Pte Ltd. Page24 www.touchjet.com • When you touch the “Calibration Menu” icon, does the Calibration Menu Start Screen appear? If not, “reboot” the Projector: Slide the Power Slider Switch toward the front of the unit for about 5 seconds until the green indicator light goes off and you feel no fan vibrations. Then slide and hold it again until the green indicator light comes back on. Make sure the Stylus is powered on and try touching the “Calibration Menu” icon once more. If there is still no response, the projector may be defective. Please contact Touchjet Customer Support. • Does the Calibration Menu Start Screen appear, but there is no response after touching the first corner calibration point? If so: o Check that the Stylus is powered properly (see item #2 above). o Make sure there is nothing blocking the optical path between the Stylus tip and the Projector. o When you touch the projection screen or wall, you should see a white dot appear very near the Stylus tip. If it does not appear, the unit may be defective. Please contact Touchjet Customer Support. o Upon seeing the white dot, move it to the calibration point and hold it there for up to 3 seconds or until the calibration point disappears and another one appears in another corner. o Use the same procedure for the other calibration points. © 2015 Touchjet Pte Ltd. Page25 www.touchjet.com 4. The Airmouse does not work. • Assuming the Projector is on and projecting an image, before “pairing” the Airmouse with the Projector, does the “Home” icon bring up the Home Screen? If not: o Remember to point the Airmouse at the back of the Projector and try again. If it still does not work, o Remove the cover of the Battery Case and make sure that 2 AAA batteries were installed in the correct manner. o If the “Home” icon still does not work, the Airmouse may be defective. Please contact Touchjet Customer Support. • If the Airmouse keys (such as the Home Key) work, but the device will not “pair” with the Projector, then: o Press the “mouse” key and hold it for a few seconds until the red light next to it begins blinking. If it does not illuminate or begin blinking, then the Airmouse may be defective. Please contact Touchjet Customer Support. o If the red light is blinking, look on the Projector’s Settings Screen under Bluetooth and select “Search For Devices.” A list of available devices will appear, and among them should be “TJAIR” If it does not appear, then the Airmouse or Projector may be defective. Please contact Touchjet Customer Support. • If the Airmouse is paired with the Projector, but the cursor does not appear on the projected image when the mouse button is pressed, then the Airmouse or Projector may be defective. Please contact Touchjet Customer Support. © 2015 Touchjet Pte Ltd. Page26 www.touchjet.com J. Terms and Conditions of Use Thank you for purchasing the Touchjet Pond™ Projector and associated accessories (“Product”) from Touchjet Pte Ltd. and its affiliates including Touchjet, Inc., a Delaware corporation (“Company”)! By using the Product, you agree to the following Terms and Conditions of Use (“Terms”): License. Company hereby grants to “you,” the first user of the Product and any transferee of the Product (in whole but not in part) a limited, non-‐exclusive, non-‐transferable, non-‐sublicensable license to make personal and non-‐commercial use of the Product’s software (“Software”). Such license shall terminate without notice upon your non-‐compliance with these Terms. All rights not expressly granted to you are reserved and retained by Company. Company owns all right, title and interest in and to the Software and all intellectual property relating thereto. The Software is the property of Company and protected by United States and international copyright laws. Restrictions. The Product and Software or any component thereof may not be reproduced, duplicated, copied, sold, resold or otherwise exploited for any commercial purpose without the express written consent of Company. You may not incorporate any portion of the Software into your own programs or compile any portion of it in combination with your own programs, transfer it for use with another product or service or sell, rent, lease, lend, loan, distribute or sub-‐license the Software or otherwise assign any rights to it in whole or in part. You may not, and you will not encourage, assist or authorize any other person to, copy, modify, reverse © 2015 Touchjet Pte Ltd. Page27 www.touchjet.com engineer, decompile or disassemble or otherwise tamper with, the Software, whether in whole or in part, or create any derivative works from or of the Software. You may not misuse the Product or Software or use the Product or Software for any illegal purpose. You must comply with all export and re-‐export restrictions and regulations of the Department of Commerce and other United States and other governmental agencies and authorities that may apply to the Software. Use of Third-‐Party Services. When you use the Software, you may also be using the services of one or more third parties, such as a wireless carrier or a mobile platform provider. Your use of these third-‐party services is at your own risk and may be subject to the separate policies, terms of use and fees of these third parties. Feedback. If you provide suggestions, comments or other feedback (“Feedback”) to Company, Company shall be free to use, disclose, reproduce, license and otherwise distribute and exploit the Feedback as it sees fit, entirely without obligation or restriction of any kind on account of intellectual property rights or otherwise. Limitation of Liability. COMPANY SHALL NOT BE LIABLE FOR ANY INDIRECT, SPECIAL, INCIDENTAL, PUNITIVE OR CONSEQUENTIAL DAMAGES OF ANY KIND IN CONNECTION WITH THE PRODUCT OR SOFTWARE, EVEN IF COMPANY HAS BEEN INFORMED IN ADVANCE OF THE POSSIBILITY OF SUCH DAMAGES. If in any case Company does have a liability we do not accept any liability for (i) any loss of profits or use or for the restoring or recovering of any data corrupted or lost or (ii) any amount greater than the price paid by you for the Product. In jurisdictions which do not allow liability for certain © 2015 Touchjet Pte Ltd. Page28 www.touchjet.com kinds of damages to be limited or excluded, some or all of the above limitations or exclusions may not apply to you. Governing Law. Except where prohibited or provided otherwise by applicable law: (a) these Terms shall be governed by and construed in accordance with the laws of the State of California, USA without regard to the provisions thereof pertaining to conflicts of laws: (b) disputes and controversies arising out of or in connection with the Product or Software may be resolved by the state or federal courts located in San Francisco, California, USA, and each of you and Company agrees to submit to the jurisdiction of such courts. © 2015 Touchjet Pte Ltd. Page29 www.touchjet.com K. One-‐Year Limited Warranty Touchjet, Inc. (“Company”) offers the following commercial warranty to “you”, the first user of the Touchjet Pond™ Projector (“Product”). This warranty is in addition to any legal rights you have against Company or any other person. These rights vary by jurisdiction and are not affected in any way by this warranty. If you transfer the Product to another person they will also have the benefit of this warranty. Company warrants the Product against defects in materials and/or workmanship under normal use for a period of ONE (1) YEAR from the date of purchase by the original purchaser (“Warranty Period”). If a defect arises and a valid claim is received within the Warranty Period, Company will either, at its option: (a) repair the defect at no charge, using new or refurbished replacement parts; or (b) replace the Product with a new Product that is at least functionally equivalent to the original. A replacement Product or part, including a user-‐installable part installed in accordance with instructions provided by Company, assumes the remaining Warranty Period of the original Product. When a Product or part is exchanged, any replacement becomes your property and the replaced item becomes Company’s property. Obtaining Service. To make a claim to obtain warranty service, send an email to Company at [email protected] (a) describing the Product’s defect (b) with a copy of the Product’s purchase receipt. Service options, parts availability and response times will vary. If Company approves your claim, you will be responsible for the return (and associated shipping costs) of the Product or any defective parts to Company’s authorized service center. © 2015 Touchjet Pte Ltd. Page30 www.touchjet.com Limits and Exclusions. This Limited Warranty does not cover: (a) damage caused by failure to follow instructions relating to the Product’s use or the installation of components, including, without limitation, in this User Guide or the Terms and Conditions of Use; (b) damage caused by accident, abuse, misuse, fire, floods, earthquake or other external causes; (c) damage caused by service performed by anyone who is not a representative of Company; (d) accessories used in conjunction with the Product, whether or not provided with the Product; (e) a Product or part that has been modified to alter functionality or capability; (f) items intended to be periodically replaced by you during the normal life of the Product, including, without limitation, batteries and light bulbs; (g) any Product sold “as is,” including, without limitation, floor demonstration models and refurbished items; or (h) a Product that is used contrary to this User Guide or the Terms and Conditions of Use, including without limitation, commercially or for a commercial purpose. TO THE EXTENT PERMITTED BY APPLICABLE LAW, COMPANY DISCLAIMS ANY AND ALL STATUTORY OR IMPLIED WARRANTIES, INCLUDING, WITHOUT LIMITATION, WARRANTIES OF MERCHANTABILITY, FITNESS FOR A PARTICULAR PURPOSE, NON-‐INFRINGEMENT AND WARRANTIES AGAINST HIDDEN OR LATENT DEFECTS. IF COMPANY CANNOT LAWFULLY DISCLAIM STATUTORY OR IMPLIED WARRANTIES, THEN TO THE EXTENT PERMITTED BY LAW, ALL SUCH WARRANTIES SHALL BE LIMITED IN DURATION TO THE DURATION OF THIS EXPRESS LIMITED WARRANTY. Some jurisdictions disallow the exclusion or limitation of implied warranties, so the above exclusions or limitations may not apply to you. This warranty gives you specific legal rights and you may also have other rights, which vary from jurisdiction to jurisdiction. © 2015 Touchjet Pte Ltd. Page31 www.touchjet.com L. Contact Information Customer Service: [email protected] Address: 599, 2nd Street, San Francisco, CA 94107 USA © 2015 Touchjet Pte Ltd. Page32 www.touchjet.com © 2015 Touchjet Pte Ltd. Page33 www.touchjet.com