1
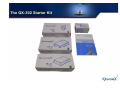
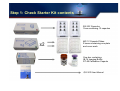
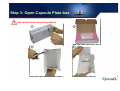
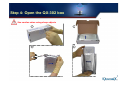
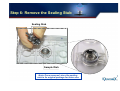
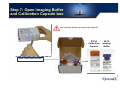
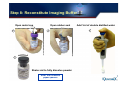
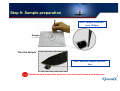
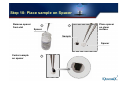
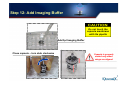
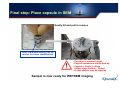
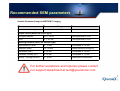
QX-302 CAPSULE
USER GUIDE
UQX013 Issue 1.0
August 2005
General precautions
Use powder-free gloves only
During preparation and storage, never place capsules on any surface
other than the Capsule Plate
Never touch the capsule membrane
KEEP STERILE
Should sterility be required, handle in a sterile environment
Refer to Qx-302 user manual for further information
Sample preparation protocols can be found at www.quantomix.com
The QX-302 Starter Kit
Step 1: Check Starter Kit contents
QX-302 Capsules:
1 box containing 12 capsules
x2
MP-12 Capsule Plates:
2 boxes containing one plate
and cover each
One box containing:
IB-74 Imaging Buffer
RT-58 Calibration Capsule
QX-302 User Manual
Step 2: Check expiry & record lot
Note: Expiry is 18 months
after production date
Month
Year
Record QX-302 lot number
Step 3: Open Capsule Plate box
Use caution when using sharp objects
a
b
c
d
Step 4: Open the QX-302 box
Use caution when using sharp objects
a
b
c
d
Step 5: Place capsules on plate
a
d
b
c
Fit capsule wings in slots
e
Turn counter-clockwise to open
Step 6: Remove the Sealing Stub
Sealing Stub
Sample Dish
Note: Once removed, store the sealing
stub in its original package for future use
Step 7: Open Imaging Buffer
and Calibration Capsule box
Use caution when using sharp objects
RT-56
Calibration
Capsule
Note: Read data sheets
IB-74
Imaging
Buffer
Step 8: Reconstitute Imaging Buffer
Open metal cap
Open rubber seal
b
a
d
Shake vial to fully dissolve powder
Note: Vial contains
paper spacers
Add 1ml of double distilled water
c
Step 9: Sample preparation
Note: Sample thickness:
up to 1000µm
Sample
Trim the sample
Note: Maximal sample diameter:
3mm
Detailed sample preparation protocols can be found at www.quantomix.com
Step 10: Place sample on Spacer
Remove spacer
from vial
a
b
Spacer
Place spacer
on clean
surface
Sample
Spacer
Center sample
on spacer
c
Step 11: Place sample and
spacer in the Sample Dish
Sample Dish
Locate the sample between the Sample Dish membrane and the spacer.
Procedure is best done if only the spacer is held.
Do not touch the
capsule membrane
with the tweezers
Step 12: Add Imaging Buffer
Do not touch the
capsule membrane
with the pipette
Add 5μl Imaging Buffer
Close capsule – turn stub clockwise
Capsule is properly
sealed only when
wings are aligned
Final step: Place capsule in SEM
Gently tilt and pull to remove
Note: Label here using a felt tip
marker for future identification
• Set stage at minimal height
• Capsule membrane should face up
• Capsule’s height is 28mm
(Above stage surface – 20mm)
• A stub adaptor may be required
Sample is now ready for WETSEM imaging
Recommended SEM parameters
Suitable Parameter Range for WETSEM™ Imaging
Parameter
Recommended Range
Comments
Acceleration Voltage
15 - 30 kV
Not lower than 10 kV
Probe Current (based on source type)
Tungsten filament
0.4 – 1.0 nA
Not higher than 1.0 nA
FEG
0.1 - 0.5 nA
Not higher than 0.5 nA
Working Distance (based on detector type)
Semiconductor (BSE)
6 - 10 mm
Acceptable 4 -15 mm
Robinson (BSE)
10 - 20 mm
Better efficiency at high kV
Scintillator (BSE)
6 -10 mm
Acceptable 6 -10 mm
Everhart-Thornley (SE)
8 -12 mm
Acceptable 6 -15 mm
In-lens / Through the lens
2 – 4 mm
Manufacturer dependent
For further assistance and inquiries please contact
our support department at [email protected]